Chapter 6. Rock That Camera!: Real-world problem solving

A proud alumnus of the international program Up With People (www.upwithpeople.org), I was eager to capture a great shot of the show when a cast came to town. Using my older-model point and shoot, I simply canceled the flash, set the ISO to high, braced my elbows against my ribs, and waited for the right moment.
Are ya feelin’ it? Now that you understand the basics of exposure, the different shooting modes, and all those great functions, there’s a whole new world of better photos waiting for you!
But how do you really pull it off? How do you work your way from an image that isn’t working to a better one that makes your heart happy?
When you take a photo and it’s not what you hoped for, the old you may have gotten frustrated and uttered a few choice words at your camera before shrugging your shoulders and surrendering to the false hopes of a newer model.
The new you knows better. When things don’t go your way, the solution is actually pretty simple: plain, old-fashioned problem solving. Instead of looking at the back of your LCD screen and declaring your utter disgust, take a moment to pause and name the problem—with actual words.
• Don’t say “This image is total garbage. My camera is a piece o’ junk!”
• Do say “Hmm, my moving subjects look blurred and the color is wacky.”
See the difference? The first option is an ambiguous declaration you can’t do much about, but the second statement clearly identifies the problem and, in doing so, practically leads you straight toward a solution.
Once you have a well-defined problem, solving it becomes infinitely easier. You simply follow your definitive statement with a definitive solution. In this case you might tell yourself, “I’ll try increasing my shutter speed and changing the white balance.” Bam! It’s that easy.
The process for any situation is roughly the same:
- Shoot some images.
- Evaluate them. Are they what you hoped for? If not, why not? Use words to specifically define the problem you’re having. If you had to explain the problem in a single sentence to a friend, what would you say?
- Take steps to correct it.
This chapter will take a look at four common scenarios and the challenges they present. Instead of offering only a single solution, we’ll explore several options for overcoming each challenge.
Why not just make it easy and offer a one-size-fits-all solution, you ask?
The truth is there isn’t one. If you really want to get good at bossing your camera around, you’ll have to learn to adapt. Every situation is different, and as in any grand adventure, there are no guarantees.
So instead of arming you with a solution that works only under very specific circumstances, this chapter will teach you to understand the challenge you’re facing, as well as the options for overcoming it, thereby empowering you to find success in most situations—not just the examples presented here.
To get started, you’ll have to accept the fact that there’s no such thing as a foolproof field guide, flow chart, or recipe for every scenario. Every choice you make will have advantages and disadvantages because, as far as I know, there’s not a single camera on the planet with a magical “make it all better” button.
Ultimately, experimentation and practice will be your best defense against whatever challenges come your way.
Challenge: Backlit situation
Any time the area behind your subjects is more brightly lit than they are, you’re in a backlit situation. When the camera calculates the exposure for such a situation, it doesn’t know if you’re trying to take a photo of the bright background or the people standing in front of it. The camera looks at the scene and thinks, “Wow, good thing there’s so much light—no need for me to fire the flash!”
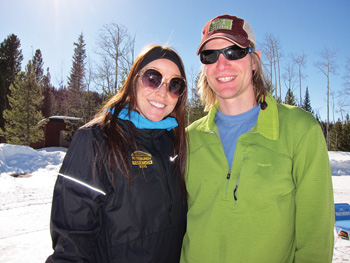
The result is often a photo like Figure 6.1, where the bright background looks good but the subject is too dark (underexposed).
Figure 6.1. The bright sun and snow behind Christina and Jason factored too heavily into the camera’s exposure calculation, resulting in settings that left the cute couple in the dark (underexposed).

Fix it With Fill-Flash
• Pros: Properly exposed subject and background.
• Cons: Might change the look/feel of the image.
Dig into your settings to turn on your fill-flash ![]() . This will force your flash to fire, better illuminating your subject, as seen in Figure 6.2.
. This will force your flash to fire, better illuminating your subject, as seen in Figure 6.2.
Figure 6.2. Fill-flash balances the exposure between the bright background and the darker subjects.
Reposition Yourself (Or the Subject)
• Pros: Properly exposed subject and background, all natural light.
• Cons: Possible shadows or squinting.
If you look closely at Figure 6.2, you’ll notice that although the flash fixed the exposure issue, it created a new problem by causing a distracting reflection off the material in Christina’s jacket (not to mention their sunglasses).
Preferring the look of natural light to that of direct flash, I simply turned around to put the sun over my shoulder (instead of in front of me as it was before) and asked Christina and Jason to move over a few feet and turn toward me. Because they were wearing sunglasses, I didn’t have to worry about the sun causing them to squint and was able to capture a more natural-looking image, seen in Figure 6.3.
Figure 6.3. Without flash, I was able to even the exposure between my subjects and the background by repositioning myself so the sun was over my shoulder instead of in front of me, resulting in a more natural-looking image.

Even though the new position caused Jason’s hat to cast a shadow on his face, the snow helped soften it by bouncing sunlight off the ground and back into his face, brightening what would’ve otherwise been a dark shadow.
By placing the sun over my shoulder (instead of in front of me), I was also able to capture the more dramatic blues of the sky. Pretty sweet trick, eh?
Reach for Exposure Compensation
• Pros: All natural light.
• Cons: Background will become overexposed.
If you generally prefer the look and feel of natural light, you’ll be happy to know that there are additional flash-free alternatives, even for those times when repositioning yourself (or your subject) isn’t an option.
As discussed in Chapter 3, “Function Junction: Flash, White Balance, and Exposure Compensation,” you can use exposure compensation ![]() to brighten your subject while letting the brighter background behind them blow out (become overexposed), as seen in Figure 6.4.
to brighten your subject while letting the brighter background behind them blow out (become overexposed), as seen in Figure 6.4.
Figure 6.4. If you prefer the look of natural light, you can use exposure compensation to deal with backlit situations as long as you don’t mind severely overexposing the background. In this example, choosing to expose the subject correctly meant letting the bright scene outside the window blow out (severe overexposure).

To pull it off, make sure you’re in a shooting mode that gives you the freedom and flexibility to tweak your exposure compensation settings (something like program mode), then experiment to find the best results. A setting of +1 might be a good place to start. Take test shots and continue to adjust as needed.
The goal is to increase the overall exposure so that your subject will be properly exposed even though your background will continue getting brighter and brighter, eventually blowing out completely and becoming pure white.
Many cameras will even preview the adjustments on your LCD screen as you make them, so you can get a feel for what’s happening before you take the photo.
Try Spot Metering Mode
• Pros: All natural light.
• Cons: Background will become overexposed.
If you max out your exposure compensation range (meaning that you’ve set exposure compensation to +2 and your subject is still too dark), you could try changing to “spot metering mode” ![]() .
.
As you may recall from Chapter 4, “Function Junction, Part Deux: Metering, Focus, and Drive,” spot metering mode calculates exposure based on a very specific portion of the scene (like your subject’s face) rather than by averaging the whole scene together as the default metering mode (evaluative) does. Because of this, spot metering mode makes it possible to nail the exposure for a certain part of the scene—even if it’s dramatically different from the exposure in the rest of the scene.
Once you’ve switched modes, place your subject in the center of the frame and press and hold the shutter button down halfway. Then, while continuing to hold the shutter button halfway down, recompose the scene the way you want and finish by pressing the button the rest of the way down to take the photo.
Using spot metering mode to achieve proper exposure on your subject while overexposing the background would give you the same results seen in Figure 6.4.
Make Friends with Manual Mode
• Pros: Full control to get the shot the way you want it.
• Cons: Not every camera offers manual mode.
As mentioned in Chapter 2, “Shooting Mode Bonanza: Getting Bossy, and Learning to Like It,” with practice, manual mode can actually be faster, easier, and more successful at helping you get what you want than any other mode. So if you think monkeying around with metering modes and exposure compensation sounds like a hassle, switch to manual mode, choose your settings, and take a few test shots. Adjust as needed.
Keep in mind that if you choose to keep your flash off, you’ll be purposefully overexposing the background, so don’t panic if your light meter is indicating overexposure. Base your exposure on how your subject looks in test shots rather than what the light meter says about the overall scene.
Challenge: Stage lighting
Even though it’s typically pretty dark at your child’s dance recital or theater performance, the flash is usually more problematic than it is helpful (see Figure 6.5). Though not capable of lighting up the whole stage, it does do a pretty great job of lighting the heads of the people seated in front of you!
Figure 6.5. Look familiar? Not only is the flash distracting to performers and other audience members, but it does nothing more than light up the heads of the people sitting in front of you. Get rid of it!

Rather than letting it continue to disappoint you, tell it to take a hike! The results, often much more rewarding, can be seen in Figure 6.6.
Figure 6.6. Canceling the flash not only got rid of the heads of the people in front of me, but also resulted in more accurate color.

Kill the Flash
• Pros: No more distracting flash!
• Cons: Um...you might have a hard time choosing between all the improved photos you get?
In a flexible shooting mode other than auto, cancel your flash ![]() and check your ISO menu settings to make sure the camera has free access to higher ISOs to compensate for such a dark shooting environment. If your camera lets you set a specific ISO, try something like ISO 1000. If your camera offers only a range of ISO, such as normal and high, set it to high.
and check your ISO menu settings to make sure the camera has free access to higher ISOs to compensate for such a dark shooting environment. If your camera lets you set a specific ISO, try something like ISO 1000. If your camera offers only a range of ISO, such as normal and high, set it to high.
Once you’ve canceled the flash, you won’t have to worry about illuminating the heads of the folks in front of you, and because you’ve jacked up the ISO, the camera can compensate for the low light without resorting to crazy slow shutter speeds (which could otherwise result in blurred photos).
But even with a high ISO, there may still be some scenes (depending on lighting conditions and the stage action) when it might be tricky to get a sharp shot without a tripod. To pull it off, practice stabilizing your arms by bracing your elbows on the arm rests of your seat or on your lap, or simply by tucking them in against your ribs. Hold your breath and fire away.
If things aren’t as sharp as you’d like, try bumping the ISO higher (if you can), and take some additional test shots. If still no luck, keep your camera ready and wait for a moment in the production where the stage is especially bright or the action is holding still (a finale of some sort, perhaps?) and focus your attention there for better odds.
Remember that dramatic lighting on the stage can create areas of extreme brightness next to areas of total darkness, so if you’re having exposure problems, play around with exposure compensation ![]() and consider using spot metering mode
and consider using spot metering mode ![]() instead of defaulting to evaluative.
instead of defaulting to evaluative.
Tip
Because the color temperature of your flash is quite different from that of the stage lights, turning it off might also result in more accurate color. Bonus!
Kill the Flash and Pick Your Own Shutter Speed
• Pros: No more distracting flash and better blurriness prevention.
• Cons: Not available on every camera.
After killing the flash, you may find that you get even better results by switching your shooting mode to shutter priority so you can prevent blur by choosing your own shutter speed.
In a dark shooting environment like the theater, you can help your camera out by choosing the slowest shutter speed that successfully prevents motion blur. It’s best to start with a shutter speed of around 1/60 and increase it as needed, rather than beginning with something like 1/4000. This way, you’ll avoid having to use extremely high ISO values to compensate for unnecessarily high shutter speeds.
If the action on stage is too fast for a slower shutter speed like 1/60, try successively faster shutter speeds until you find one that freezes the action. Just make sure your ISO setting is unrestricted so the camera can compensate as needed.
Don’t forget that you can tweak the overall exposure using exposure compensation ![]() or create a more targeted exposure using spot metering mode
or create a more targeted exposure using spot metering mode ![]() .
.
Kill the Flash and Get Totally Bossy
• Pros: No more distracting flash and full control over exposure settings.
• Cons: Not every camera offers manual mode.
Anytime you get frustrated with the results you’re getting in other modes, remember that manual mode isn’t as scary as you may think and, with practice, can actually be faster and more reliable than anything else for getting the shots you want.
In a dark environment like a theater, I’d recommend building your exposure equation around whatever shutter speed allows you to get a sharp shot. A setting of 1/60 might be a good place to start.
Once you’ve got your shutter speed nailed down, choose a large aperture (small number), and play around with your ISO until your test shots look good. If the scene is blurred, bump your ISO higher and choose a faster shutter speed.
Because of the dramatic lighting of the stage, your light meter might be jumping all over the place and may not accurately reflect a proper exposure. You can switch to spot metering mode ![]() if you like, but either way, make sure to take plenty of test shots to help you find the exposure settings you like best, rather than obsessing too much about what the meter says.
if you like, but either way, make sure to take plenty of test shots to help you find the exposure settings you like best, rather than obsessing too much about what the meter says.
Challenge: Night scene
Anytime you’re photographing a dimly lit subject in a dimly lit environment, the potential exists for your subject to appear surrounded by a black hole. The problem in these types of situations is the difference between what the exposure will be on your subjects (when the flash goes off) compared to the dark background, stretching beyond your flash’s range, as in Figure 6.7.
Figure 6.7. In auto mode, a shutter speed of 1/60 makes the background look dark and dull.

The solution is to force the camera to choose a slower shutter speed, giving the background a chance to be recorded. Figure 6.8 shows the difference a slower shutter speed can make, and as luck would have it, there are several ways to make it happen.
Figure 6.8. Forcing the camera to use a slower shutter speed of 1/10 allows the colorful background to be recorded.

Use Night Portrait Mode
• Pros: Easy way to improve your photos in a nighttime/dark environment.
• Cons: Unable to select a specific shutter speed; you have to let the camera choose.
This is the kind of thing night portrait mode ![]() was made for! The flash will be enough to light the subjects, and the reduced shutter speed will give the darker background a fighting chance. You may not achieve perfection, but odds are it’s an improvement.
was made for! The flash will be enough to light the subjects, and the reduced shutter speed will give the darker background a fighting chance. You may not achieve perfection, but odds are it’s an improvement.
Some cameras keep night portrait mode mixed in with the flash settings instead of alongside the shooting modes. In some cases, it may be referred to as slow-sync flash ![]() .
.
Drag Your Own Shutter
• Pros: Ability to select a specific shutter speed for greater control.
• Cons: Not all cameras feature shutter priority mode.
Did you know that anytime you add flash to your photos you can control how bright the background looks in comparison just by adjusting the shutter speed? It’s true, and the results can be pretty amazing. All you need to know is
• Slower shutter speeds = brighter backgrounds.
• Faster shutter speeds = darker backgrounds.
Tip
When using flash in dark situations like this, you may notice that you can hand-hold the camera at slower shutter speeds than usual. But eventually, if you slow the shutter speed far enough, you may want to stabilize the camera. Look for a ledge/wall/chair to balance the camera on and consider using the 2-second setting on your built-in self-timer ![]() to avoid camera shake from pressing the button.
to avoid camera shake from pressing the button.
Because night portrait mode doesn’t let you choose a specific shutter speed, the extent to which it can affect your photos is limited. Switching to shutter priority mode will give you additional flexibility by letting you slow the shutter down as much as you want, referred to as “dragging” your shutter.
To try dragging the shutter for yourself, confirm that your shooting mode is set to shutter priority, and make sure your flash is on and ready to fire. It should fire automatically in this type of situation, but if for some reason it doesn’t, you can force it to by turning on your fill-flash ![]() .
.
Experiment with slower shutter speeds like 1/15 or 1/10. Take some test shots and pay special attention to how the background is being recorded. If the background is still not as bright as you’d like it to be, slow the shutter speed down even more, then try again. If the background becomes too bright, choose a faster shutter speed.
Drag Your Own Shutter in Manual Mode
• Pros: Ability to select a specific shutter speed, ISO, and aperture for total control.
• Cons: Not all cameras feature manual mode.
Using manual mode, set your ISO somewhere in the range of 800 to 1600, choose a fairly large aperture such as f/4 or greater (remember that smaller numbers actually mean larger apertures), and try a shutter speed of 1/15.
Take a test shot and examine the background. Adjust your settings as needed, keeping in mind that slower shutter speeds make the background brighter and faster shutter speeds make it darker.
Challenge: Indoor sporting event
You know what I’m talking about—those dimly lit gymnasiums that seem to foil your every attempt at a decent photo. As seen in Figure 6.9, the problems are nearly the same every time: blurriness with a tinge of yellow.
Figure 6.9. Captured in auto mode with a shutter speed of only 1/40, this photo is typical of images from indoor sporting events: blurry with a tinge of yellow.
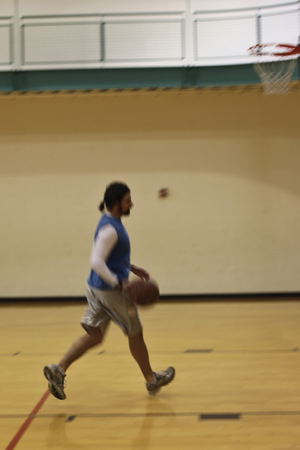
As you learned in Chapter 1, “Three’s Company: Understanding Shutter Speed, Aperture, and ISO,” time and movement are controlled by shutter speed. Thus, when you see blur like in Figure 6.9, it’s a sign that the subject is moving too fast for your current shutter speed.
Auto mode is a toss-up when it comes to sports photos, but luckily you have other options. That yucky yellowish color means auto white balance is missing the mark, and you’ll need to try something else.
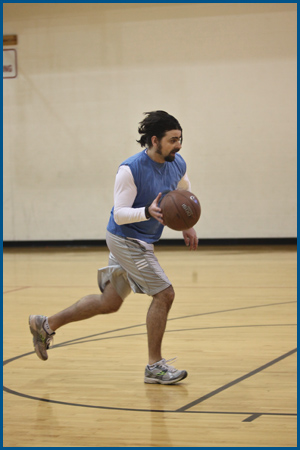
The following list of potential solutions will help you find your way to a sharper image with better color, as seen in Figure 6.10.
Figure 6.10. A faster shutter speed of 1/250 froze the subject while the fluorescent white balance option was a better match for the light in the gymnasium.
Switch to Sports Mode
• Pros: Little to no thinking required.
• Cons: You can’t set a specific shutter speed, and you may have limited access to white balance settings.
Switching to sports mode ![]() will not only help you get a faster shutter speed; it may also give you the ability to track moving subjects (using servo or continuous focus modes as discussed in Chapter 4) and shoot a burst of images in a row (with continuous drive mode, also covered in Chapter 4).
will not only help you get a faster shutter speed; it may also give you the ability to track moving subjects (using servo or continuous focus modes as discussed in Chapter 4) and shoot a burst of images in a row (with continuous drive mode, also covered in Chapter 4).
Keep in mind that in order to pull off a faster shutter speed, the camera will need to compensate for the reduced light in one way or another, and the options will be limited if the higher range of your ISO is restricted. So check your menu settings to make sure you haven’t restricted your camera from reaching higher ISOs. The higher you let the ISO climb, the faster the shutter speed you can get away with.
To fix the color problems, you’ll need to tinker with your white balance settings. Gymnasiums are typically lit with some form of fluorescent light, so one of the fluorescent settings would be a good place to start. Make the change, take some test shots, and you should be ready to roll. If the color in your images is a severe problem, and your camera’s version of sports mode doesn’t let you change your white balance, you’ll need a different solution.
Tip
As mentioned in Chapter 2, sports mode is sometimes referred to as “kids & pets” mode on some cameras.
Try Program Mode
• Pros: Little to no thinking required, access to white balance settings, available on almost all cameras.
• Cons: No way to directly influence the shutter speed, can be kind of a toss-up.
If your camera doesn’t offer sports mode (or any type of kids & pets mode), or if you’re unable to access your white balance settings while in sports mode, try a mode like program where the camera still does the heavy lifting but you can boss it around in some ways.
Unlike in sports mode, where the camera knows you’re shooting action and can respond with a faster shutter speed, in program mode the camera doesn’t know what type of shooting scenario you’re in, so you can’t count on it to be as helpful.
In this case, you can try to make the camera choose a faster shutter speed by shifting the exposure equation to include a more sensitive (higher) ISO, thereby forcing the camera to compensate with a faster shutter speed (though it might choose to compensate with a smaller aperture instead).
It’s something of a toss-up, but give it a shot by navigating to your ISO settings and choosing something quite high, such as 1200 or 1600. In the event that your camera has only two options (such as auto or high), set it to high. Once the blurriness is under control, attack the color issue by experimenting with other settings besides auto white balance (the fluorescent settings are a good place to start).
It might also be helpful to switch the focus mode to continuous (aka servo) to track moving subjects and the drive mode to burst (aka continuous) to shoot a series of images in rapid succession, increasing your odds of capturing all those critical moments.
Experiment with Shutter Priority Mode
• Pros: Offers total control over shutter speed; provides access to white balance, focus, and drive modes; allows the camera to handle the rest of the exposure.
• Cons: Not available on every camera.
Shutter priority mode lets you freeze the action by choosing your own shutter speed (unlike sports or program mode when you can do little more than boost your ISO and cross your fingers).
The exact shutter speed required will ultimately depend on the speed of your subjects, as trying to freeze the motion of a sports car zipping by at 225 mph calls for a significantly faster shutter speed than a high school basketball player dribbling across the court (even if they’re bound for the pros).
But where do you start?
• To get a high-quality image and avoid digital noise from unnecessarily high ISOs, you’ll want to use the slowest shutter speed you can get away with while still freezing the action. For this reason, it makes sense to start on the slower end of the spectrum with a shutter speed like 1/250 instead of working backward from faster shutter speeds like 1/4000.
• If you start with 1/250 and the action is still blurred, progressively increase the shutter speed until you’re able to freeze the action. The more you practice shooting the same scenes over and over, the better you’ll get at guessing which shutter speeds will work best, and this whole process will become increasingly easier.
• The camera will have to compensate for the lost light caused by faster shutter speeds, so check your menu settings to make sure you’re not preventing the camera from reaching upper-level ISO values.
• To keep the color in check, jump over to your white balance settings and dig around (likely starting with the fluorescent options) until you find the preset that gives you the best results.
• If you want to track your moving subjects or shoot a series of images in rapid succession, set your focus mode to continuous (aka servo) and the drive mode to burst (aka continuous).
Call All the Shots with Manual Mode
• Pros: Full control over all exposure settings, focus mode, and drive options
• Cons: Not available on all camera models
In the case of an indoor sporting event, I’d suggest starting with a base ISO of anywhere from 800 to 1200. Open your aperture as wide as possible (the smallest number), then look at your light meter and take some test shots to see what shutter speed makes for a good exposure. You’ll need something in the ballpark of 1/250 to start, so if your meter (or test shot) indicates under-exposure, bump up your ISO even higher (1200+) and try again.
If the motion is blurred, pick a faster shutter speed and compensate with an even higher ISO. Take more test shots. Still blurred? Use an even faster shutter speed and an even higher ISO, and take test shots to confirm.
Continue this process of tweaking your shutter speed and compensating with a higher ISO until you find a winning combination.
As with the other possible solutions, adjust your white balance to address any color issues, use continuous focusing (aka servo) to track moving subjects, and switch to continuous drive mode (aka burst) to shoot a series of images in rapid succession.
Chapter snapshot
![]()
While lots of folks would like to think there’s a single camera setting that will work in any situation, you already know that’s not how things work. The good news is that the more you play with your camera and get comfortable switching your settings around (problem solving on the fly), the better off you’ll be.
Keep these things in mind, and your photos will improve by leaps and bounds!
• Use words to define the challenges you face in images you’re not happy with. Then explore available solutions.
• In backlit situations, you can use fill-flash to balance the exposure between the bright background and an otherwise underexposed (too dark) subject.
• If you prefer the look of natural light, use exposure compensation ![]() , spot metering
, spot metering ![]() , or manual mode in a backlit situation to expose for the subject while allowing the background to become overexposed.
, or manual mode in a backlit situation to expose for the subject while allowing the background to become overexposed.
• When photographing in dark situations with stage lighting, cancel your flash. Use exposure compensation ![]() and spot metering
and spot metering ![]() to fine-tune exposure.
to fine-tune exposure.
• Use a slower shutter speed at night or in otherwise dark situations (wedding receptions, etc.) when your subject will be lit with flash to prevent the background from resembling a dark cave. Drag the shutter manually or use a preset like night portrait mode ![]() .
.
• When shooting action or sports, get clearer shots by using a preset like sports mode ![]() or choosing a fast shutter speed of your own. Compensate for the lost light with a higher ISO, and choose an appropriate white balance for better color. Track moving subjects with continuous focus mode (aka servo) and use continuous drive mode (aka burst) to capture a series of images quickly.
or choosing a fast shutter speed of your own. Compensate for the lost light with a higher ISO, and choose an appropriate white balance for better color. Track moving subjects with continuous focus mode (aka servo) and use continuous drive mode (aka burst) to capture a series of images quickly.
• Remember—experimentation is key!