Chapter 2. Shooting Mode Bonanza: Getting bossy, and learning to like it
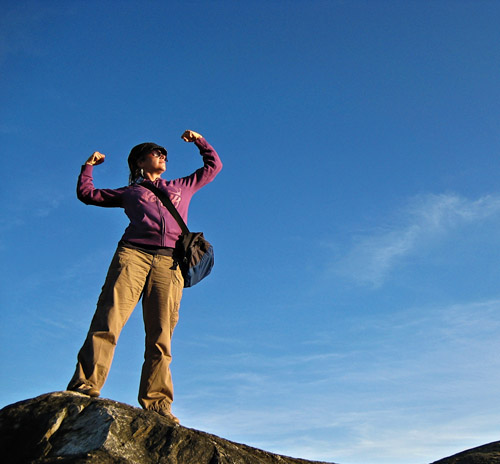
Captured with an older model point-and-shoot camera, this image depicts the triumphant feeling that comes with taking control over your camera and not being afraid to boss it around.
If the alphabet soup of shooting modes and dizzying collection of scenes (or presets) your camera offers has ever felt overwhelming, you are not alone. It’s largely the reason so many people’s cameras spend most of their lives in auto mode, never getting to live up to their full potential. How sad!
But—there’s a world of goodness (not to mention better photos!) awaiting you if you’re open to it. You may even let go of auto mode altogether once you try some of the other options (seriously!).
The shooting modes represent what I like to refer to as a “continuum of control” as seen in Figure 2.1. On one end of the spectrum is auto mode, in which the camera is the boss and you have pretty much zero control. The other end of the spectrum is home to manual mode, offering you full executive power and complete control over every image.
Figure 2.1. Modes on the left, such as auto, give you little to no control over camera settings, whereas modes on the right, such as Tv/S, Av/A, or M, give you greater amounts of control. Specialty modes or scenes generally fall somewhere in between.
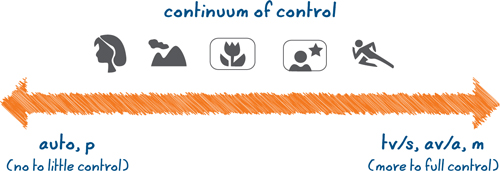
Specialty modes and scenes tend to fall somewhere in between.
In most dSLRs, shooting modes are commonly found on a round dial on top of the camera, as in Figure 2.2.
Figure 2.2. The available shooting modes on a dSLR camera are usually found on a dial like this, located on top of the camera.

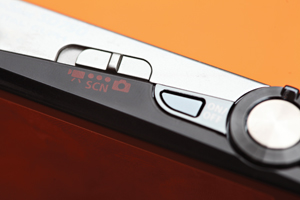
A point-and-shoot camera might have a similar dial (Figure 2.3) or a more limited slider bar (Figure 2.4) on the top with additional options within your menu system. It’s also possible that some point-and-shoot camera models don’t offer shooting modes, providing scene presets instead (explained later in this chapter).
Figure 2.3. Some point-and-shoot cameras that offer expanded controls (such as Canon’s Powershot G or S series) feature a dial that’s similar to what you |would find on a dSLR.
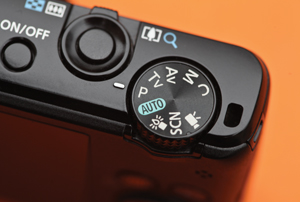
Figure 2.4. Though most point-and-shoot cameras offer a more limited range of shooting modes, you’ll typically find a selection of helpful presets to accommodate various shooting situations from within your camera’s scene menu.
I suggest taking a moment to locate each one as we go through them. As always, if you get lost, cozy up with your user guide.
Automated modes
The first two modes on the far left of the continuum (Figure 2.1) take the guesswork out of photography, making it quick and easy to get a shot—and get on with your life.
Auto Mode (A)
This is home base for most people—and not without reason. It’s comfortable, it doesn’t require any thinking, and although the results might often be unpredictable or disappointing, you can always just blame the camera, right?
Not anymore! You’ll learn how to take responsibility for your images as we move through this book.
In auto mode, the camera is in the driver’s seat and gets free reign regarding all decision making—and it is certainly not interested in any input from you. Need to change your white balance? Don’t even think about it. Did the camera misjudge the exposure? Too bad. Feel like you need to add some fill-flash? Think again. (Don’t have a clue what white balance or fill-flash is? Don’t worry—you’ll learn all about it in Chapter 3, “Function Junction: Flash, White Balance, and Exposure Compensation.” For now, just know that auto mode is pretty restrictive and doesn’t give you many, if any, options for tweaking settings.)
In fact, some functions may even appear to be entirely missing from your camera when set to auto mode. So if you’re trying to find your white balance settings and are nearly convinced your camera doesn’t have it, don’t give up. Those settings are likely there. Many cameras simply declare them off limits in auto mode.
Captured in auto mode on professional equipment (with an apparently very dirty lens!), this photo was horribly expensive considering the cost of the professional gear used to create it. All that gear (about $5,000 worth) and the photo still looks horrifically bad. That’s auto mode for ya!
Using the same professional gear in a different shooting mode that offers more control than auto, I was able to cancel the flash, choose a slower shutter speed, and get a much higher-quality shot.

This one is straight from my older model point-and-shoot camera. In a programmable mode, I simply canceled the flash and gave the camera permission to access the higher range ISO settings to compensate for not using the flash. Simple! (And much, much less expensive!)
Program Mode (P)
This setting is similar to auto mode, but without the handcuffs. The camera still makes the decisions regarding shutter speed, aperture, and ISO—but you’re free to chime in with suggestions on settings such as white balance, exposure compensation, and flash settings (explained in Chapter 3).
Tip
Some camera models also include a mode called Creative Auto (CA) that splits the difference between auto and program modes. If you’re super curious, your user guide can fill you in on the details.
It’s practically paradise for the auto mode converts out there (maybe that’s what the “P” should stand for—paradise!). If your camera supports this option, it’s definitely worth warming up to. Figure 2.5 and Figure 2.6 are great examples of how easy it can be to get wonderful images from program mode.
Figure 2.5. By selecting program mode on my point-and-shoot camera, I was able to cancel the flash that would’ve otherwise ruined the shots.

Figure 2.6. Another image made possible by selecting my point and shoot’s program mode and canceling the flash.

Specialty modes
This next cluster of modes is sometimes found on the dial next to auto and program modes, while other times the specialty modes are tucked in with your camera’s “scene” options. Every camera model is different, so keep yours (and your user guide) on hand to locate the modes (or scenes) as we go.
Portrait Mode
Traditional portraiture uses wide apertures to make the background appear slightly blurred, directing the viewer’s attention to the subject in the foreground. As you read in Chapter 1, “Three’s Company: Understanding Shutter Speed, Aperture, and ISO,” this is known as a shallow depth of field.
When you select “portrait” mode, you’re telling the camera that you’re about to take a close-up photo of a person (Figure 2.7) and that you’d like to separate them from the background with a shallow depth of field.
Figure 2.7. My husband Emir, making our point and shoot’s portrait mode look good!

The camera takes a stab at this by prioritizing the exposure for a wider aperture. Of course, exactly how blurred the background will be also depends on lighting conditions, your lens, and the distance between you and your subject. (Blurred backgrounds are even more dramatic when you’re close to your subject—so don’t be afraid to get closer!)
Additionally, since portraiture generally involves taking photos of people, it’s important that the color in such images be handled with care to produce what’s known as pleasing skin tones. Portrait mode facilitates this by optimizing saturation, brightness, and contrast with this goal in mind.
Landscape Mode
Contrary to what you may think when looking at the icon, you don’t have to live in a mountain state to make use of landscape mode! Essentially the opposite of portrait mode, this setting tells the camera that—unlike a portrait with a blurry background—you’d prefer more of your image in focus. The camera responds with a smaller aperture for greater depth of field. Just as portrait mode places an emphasis on great color for skin tones, landscape mode puts an emphasis on rendering color for great-looking foliage and skies (Figure 2.8).
Figure 2.8. The beautiful green coast of Wales captured with a point-and-shoot camera.

Sports Mode
Similar to what some cameras also call “kids & pets” mode, “sports” mode tells the camera you’re about to photograph a moving target. The camera responds by making a faster shutter speed the priority and employing a special focusing mode (usually called “servo” or “continuous” focusing) that allows you to track moving targets (Figure 2.9).
Figure 2.9. Emir used our point-and-shoot camera to capture this image of yours truly sand boarding in Morocco’s Sahara Desert.

Additionally, some cameras might include a drive shift into what’s known as “burst mode,” enabling you to shoot several frames in rapid succession (discussed further in Chapter 4, “Function Junction, Part Deux: Metering, Focus, and Drive”). All this, and you still don’t have to worry about setting your own exposure!
Macro Mode
Macro mode is a bit of a trickster, appearing in a number of different places on different cameras—sometimes on the dial along with everything else we’ve talked about so far, sometimes within a menu, and sometimes it gets its very own button on the back. If you can’t easily find yours, check your user guide.
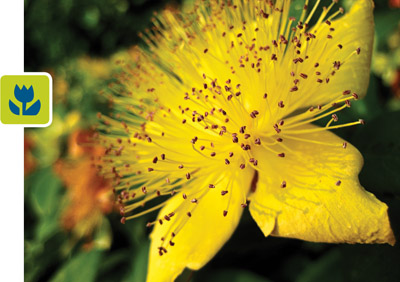
Macro mode enables your camera to focus on objects very close to your lens as in Figure 2.10, making it possible to capture close-up imagery in a way not possible in other modes.
Figure 2.10. This image was captured with the macro mode on my super ancient point-and-shoot camera—and it looks great!
Since you’re working at such a close distance, you may find that it works best to turn off your flash while shooting in this mode. Experiment to see what you like best.
Night Portrait Mode
This shooting mode is a bit of a wild card, because although nearly every camera offers it, it’s tricky to say where you’ll find it. Some cameras include it alongside all the other shooting modes we just talked about, others consider it a “scene” (explained later in this chapter), whereas some cameras tuck this feature in with the flash functions (explained in Chapter 3), referring to it as “slow sync” or “night” flash.
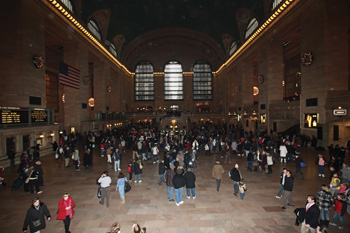
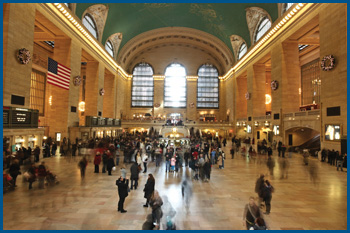
In a nutshell, this mode combines flash exposure with a slower shutter speed in an effort to balance your brightly lit subject (illuminated by your flash) with the background that might otherwise look like a dark cave in comparison, as seen in Figure 2.11 and Figure 2.12. It may not always be a miracle worker, but it is nice to have around.
Figure 2.11. While visiting New York City’s Grand Central Station, this adorable couple handed me their dSLR and asked if I would take their photo. (They were then kind enough to email it to me to include in this book—thanks, guys!) I shot this one in auto mode, and you’ll notice that although Lauren and Brandon look great, the background is a dark abyss. 1/60, f/4.5, 400, dSLR

Figure 2.12. I switched the flash to their dSLR’s version of night portrait mode, instructing the camera to use a much slower shutter speed. This gave the dark background (not lit by the flash) time to be recorded and actually show up in the finished photo. Much better! 1/5, f/4.5, 400, dSLR
Scene modes
Similar to the shooting modes we just discussed, “scenes” help you fine-tune some additional camera settings by providing a variety of presets for situations or scenes you might find yourself in. Whether you’re building a snowman, celebrating the Fourth of July, treasure hunting underwater, photographing kids on the run, relaxing at the beach, or throwing a birthday party, there’s probably a scene preset to help you out. In some cases, scenes are found on your camera’s mode dial, whereas other models store them within the camera’s menu system.
Tip
Scenes are most commonly found on point-and-shoot cameras, and may or may not be offered at all on your dSLR. Who says dSLRs get to have all the fun?
You can probably find a scene to match just about any condition you may find yourself shooting in. The key is to experiment—so take test shots ahead of time. Don’t wait until the exact moment little Suzy is about to blow out her birthday candles to discover that you get better results from “party scene” than “night portrait”!
You might also discover that your camera offers a wide selection of “special-effect scenes” that mimic fish-eye or tilt-shift lenses (Figure 2.13 and Figure 2.14), allow you to shoot in black and white, or help you capture photos to stitch into a panorama later on the computer.
Figure 2.13. Times Square rendered with the fish-eye effect from my point and shoot’s scene menu.

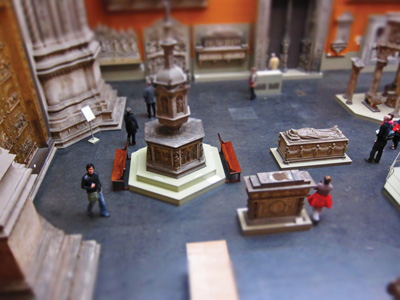
Figure 2.14. Captured using my point and shoot’s tilt-shift effect, this setting makes things appear as if they were very tiny and is therefore also referred to as the “miniature effect.”
Although most shooting modes (except for auto) let you adjust settings such as white balance and exposure compensation (explained in Chapter 3), the freedoms you have while shooting with a scene preset may be somewhat restricted and can vary from scene to scene and camera to camera. You may be giving up some control in exchange for a generalized preset recipe for a specific shooting condition. As in life, there’s some give and take.
Tip
Most point-and-shoot cameras don’t offer priority or manual shooting modes, but more and more compact models are starting to—so check your user guide to find out for sure. And even if you discover your current camera falls short when it comes to offering these options, don’t quit reading—study up to know what you want to look for when you’re ready to expand your options.
Priority modes
At some point, you may find yourself wanting more control over your exposure settings. While scenes and presets can be hugely advantageous, they’re still limiting in the sense that the camera is still in the driver’s seat, dictating the specifics of shutter speed, aperture, and ISO.
In certain situations, you’ll want to take over the controls and make your camera the copilot—ready to take orders from you for a change! If this sounds exciting, but the idea of jumping to full-blown manual mode is too much to chew on, these next two modes may really float your boat.
Put on your captain’s hat—it’s time to get bossy!
Shutter Priority (Tv) or (S)
This mode has nothing to do with hooking your camera up to the latest high-def big screen television (as the abbreviation on the dial may lead you to believe), and everything to do with you rolling up your sleeves and flexing your photo know-how!
Tip
Some cameras refer to shutter priority mode with an (S). Others refer to it as (Tv), which stands for “time variable” since the shutter speed (which controls time) is the priority when shooting in this mode. All other exposure decisions are built around what you select for the shutter speed.
Shutter priority mode allows you to set your own shutter speed while leaving the rest up to the camera. How awesome is that? Control without the headache! Plus, don’t forget you still have access to options such as white balance and exposure compensation (explained in Chapter 3), making this mode pretty darn attractive, wouldn’t you say? Additionally, while in this mode you may have the option of selecting auto for your ISO, or choosing a specific ISO in addition to choosing your shutter speed. Experiment or check your user guide to find out for sure.
On a dSLR, you usually set the shutter speed by turning a dial that looks something like what you see in Figure 2.15.
Figure 2.15. The front dial on a dSLR typically controls shutter speed.
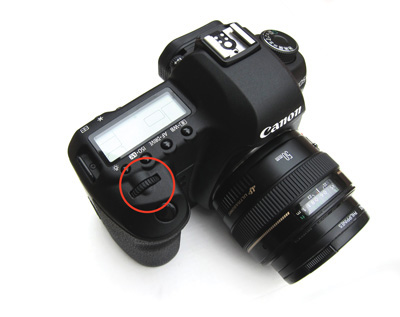
If you have a point-and-shoot camera that offers shutter priority mode, the control may be a dial on the back, a ring around the lens as pictured in Figure 2.16, or a setting within the file menu. As always, if you’re not sure where to find something, pause for a moment and look it up in your camera’s user guide.
Figure 2.16. This ring around the lens on my point and shoot controls the shutter speed when shooting in shutter priority mode.

Try it!
To get a feel for how this mode works and what your shutter is capable of, set your camera to shutter priority mode and pick a shutter speed like 1/125th, keeping in mind that your camera may simply display 125 instead of the fraction. How do you know which shutter speed you’ve selected? You’ll see your current shutter speed—along with various other exposure information—on the screen when you look either through your viewfinder or at the back of your LCD screen.
As you move the camera around and aim the lens at different scenes of varying brightness levels, you’ll notice that the shutter speed holds constant while the other settings fluctuate as the camera automatically adjusts the aperture (and possibly the ISO) in response to what’s in front of the lens. This is the beauty of shutter priority mode. Pretty cool, huh?
Play with your shutter speed and see how fast it’s capable of going—it might be able to reach speeds as fast as 1/4000th or even 1/8000th of a second! What about its slowest option? Depending on your camera model, your shutter might be capable of exposures as long as 15 or 30 seconds!
Tip
Some cameras even have a special mode called “bulb” that keeps the shutter open for as long as you hold the shutter button down!
Shutter speeds of a full second or slower are usually expressed with double quotation marks. So while a shutter speed of 1/30th might appear on your screen as 1/30 or simply 30—a shutter speed of 30 full seconds would be displayed as 30″.
How might you use shutter priority mode in real life?
Imagine that you’re on the adventure of a lifetime somewhere exciting in Africa. You’re perched in a rooftop cafe enjoying the view while the market square below you is abuzz with activity.
You soak up the sights and sounds of motorbikes racing by, vendors selling everything from fresh fruit to henna tattoos, and musicians filling the air with the sounds of their African drums (Figure 2.17). Definitely a scene to remember!
Figure 2.17. Jemaa al Fna Square in Marrakech, Morocco. 1/2 second, f/8, 80, point & shoot
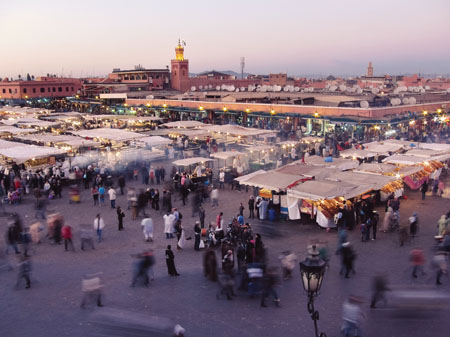
Naturally, you reach for your camera and decide that, in an effort to convey the life and energy of the scene, you’d like to capture the movement of the people with a touch of motion blur. If you’ve read Chapter 1, you know it’s the shutter speed that controls time and movement. And because you’re reading this chapter, you know that of all the modes we’ve discussed thus far, shutter priority is the only one that lets you pick a shutter speed without having to worry about anything else. So for this situation, it’s a great choice.
To blur the movement of the people, you’ll need a slow shutter speed. Exactly how slow will ultimately depend on the light, how fast or slow your subjects are moving, and how blurred you want their movement to appear. Anytime you plan to slow down your shutter to anything beyond 1/15th or even 1/30th, camera shake is a possibility. But don’t panic if you didn’t pack your tripod (who wants to drag that around on vacation?); just find a bench, ledge, or tabletop to set your camera on, and you’ll be fine.
Make sure your flash is turned off and try setting the shutter speed to 1/15th of a second to start with. You have to start somewhere and 1/15th is literally just a guess. (I’ll talk more about turning off the flash in Chapter 3; for now, just know that sometimes flash gets in the way, and we don’t want it to interfere with the scene here.)
Steady the camera and press the shutter button. Check out the resulting photo. If the people aren’t blurry enough for your liking, slow the shutter down even more (but not too slow or the people passing by might not show up at all). If you think the people are too blurry, pick a faster shutter speed. Go wild and experiment like crazy. Try a second, 8 seconds, or whatever your camera will allow. There’s no right or wrong answer here, just whatever you like best. Isn’t that reassuring?
Tip
Still shaky? If you’ve steadied the camera on a ledge, bench, or tabletop and you’re still getting a bit of camera shake in an image (which is quite common), try using your camera’s timer function set to 2 seconds (see Chapter 3 for more details). By the time you press the button and let go, the camera will have stabilized again before taking the picture.
Once you get the shot you were hoping for, switch the camera back to auto mode and take a photo. Isn’t the difference astounding? Aren’t you proud of yourself? Do something special with that image when you get back home. It’s a true accomplishment—frame worthy for sure!
But what if you wanted to freeze the action instead? You would follow the same process, but you’d start with a faster shutter speed, maybe 1/250 or 1/500, and go from there. The more you play with these modes, the better you’ll get at guessing, and the faster you’ll arrive at an exposure that you like.
Aperture Priority (Av)/(A)
As you might now imagine, aperture priority mode lets you set the aperture while the camera selects the shutter speed. Like shutter priority mode, aperture priority might also give you the option of either selecting auto for your ISO, or being able to choose your ISO in addition to choosing your aperture. Experiment or check your user guide to find out for sure.
Tip
Some cameras refer to aperture priority mode with an (A), while others refer to it as (Av)—which you might now guess stands for “aperture variable.”
On a dSLR, you typically adjust the aperture (in aperture priority mode) by turning the same dial you previously used to adjust shutter speed. The dial is often “mode dependent,” meaning that it controls the variable of whichever shooting mode you’re currently using. When you’re in shutter priority mode, the dial controls the shutter; when you’re in aperture priority mode, it controls the aperture. (This applies to the priority shooting modes only. If you’re shooting in manual mode, aperture might be controlled in a different way. Check your user guide for details.)
Try it!
To see the beauty of this mode in action, take a look at your info screen (either through your viewfinder or on your LCD screen) and set your aperture to something like f/5.6 (typically displayed on your screen as just 5.6). As you did before, aim your camera at scenes with varying levels of brightness. You’ll notice that while the aperture setting remains constant, the camera is continually adjusting the shutter speed (and possibly the ISO, depending on your camera model and the way you’ve configured your settings). Who says you can’t have your cake and eat it, too?
How wide is the aperture of your lens capable of opening? As you play with the controls, you may find that it stops at f/5.6, f/4.5, or f/3.5. If you zoom your lens all the way out, you may discover you’re able to open the aperture even wider. So while the aperture may have stopped at f/4.5 or f/5.6 when you were zoomed in closer, once you zoom all the way out, you may be able to open it as wide as f/3.5 or wider. (This phenomenon is explained further in Chapter 5, “Through the Looking Glass: The Lowdown on Lenses.”)
How small can your aperture setting go? Play with your settings and see for yourself. It may be as tiny as f/8, f/11, or even f/22!
How would you use aperture priority mode in real life?
If you’re in a situation in which you want to separate your subject from the background by using a shallow depth of field like in Figure 2.18, this mode is for you! Set your aperture to as wide open as your lens is capable of, come in as close to the subject as possible, and take the shot.
Figure 2.18. To make this cutie pop from the background, I created a shallow depth of field by selecting a wide aperture. 1/800, f/2.8, 640, dSLR

Conversely, if you’re taking a group shot and want to make sure that everyone is in focus from the front row to the back, be sure that you don’t use a wide aperture or you may only get the people in the first row or so in focus. Doh! In such a case, you might start with test shots set to an aperture of f/5.6 or f/8 and adjust as necessary.
Tip
The resulting blurriness of the background (referred to as “bokeh”) will be exaggerated the closer you are to your subject and the longer the focal length of your lens. Figure 2.18 was captured with a 200mm lens, resulting in an especially blurry background. (Don’t know what focal length is? See Chapter 5 for details.)
It really is that easy! Again, the more you play with these modes, the easier they become and the faster you’ll get.
Full control
At times, letting the camera have any input at all may prove to be more of a hassle than it’s worth. As the saying goes, when you want something done right, sometimes you just have to do it yourself!
Manual Mode (M)
When partial control just isn’t cutting it, manual mode is the way to go—giving you full decision-making power over the shutter speed, aperture, and ISO for each and every shot.
Tip
As mentioned earlier, if your point and shoot doesn’t offer manual mode but you don’t want to trade its compact size for the manual control options typically found only on a dSLR, check out Canon’s Powershot G or Powershot S series. It is possible to have full control in a tiny camera!
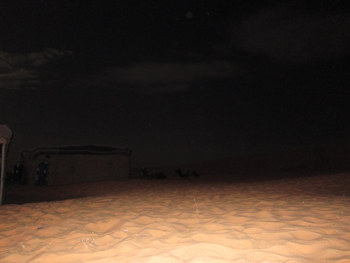
Even if you don’t foresee yourself shooting in manual mode on a regular basis, there are occasions when it may be literally the only way to get the image you want. Consider the following series of images captured on my point and shoot in the dark of night of Morocco’s Sahara Desert. Figure 2.19 was captured the way most people would’ve approached the scene—in auto mode (with auto flash). The result is a bright mound of sand, giving way to a black abyss. If I didn’t know any better, I’d think we were in a black hole!
Figure 2.19. Shot in auto mode, the camera choose all the settings, resulting in a brightly lit mound of sand surrounded by a huge black hole of—nothing. 1/15th, f/2.0, 400, Flash: fired (auto), point & shoot

After studying the previous image and acknowledging the dark cavernous abyss beyond the range of the flash, you might think that night portrait mode (or night portrait scene) would be a better choice here, since it generally allows more of the background (the area not lit by the flash) to be recorded.
The result of night portrait mode is shown in Figure 2.20, where you’ll notice that the camera made two exposure adjustments: the shutter speed slowed from 1/15th of a second to 1 second, and the ISO increased from 400 to 640. While night portrait mode was a nice attempt (if you look closely, you can see a bit more of the camels and clouds), it wasn’t enough to make much of a difference.
Figure 2.20. When auto mode fails in a situation like this, you might reach for night portrait mode next. While night portrait mode may be successful at a wedding reception or downtown somewhere with city lights behind you—here in the middle of the dark desert, it just wasn’t enough. 1 second, f/2.0, 640, Flash: fired (auto), point & shoot
If you’ve read ahead to Chapter 3, you may be thinking, “What about exposure compensation? Wouldn’t that fix it?” I like the way you think! But—even though exposure compensation is incredibly handy (as you’ll see later in Chapter 3)—in this example, we are so far off from a proper exposure that even something as great as exposure compensation can’t save us.
Nope. I had only one choice—switch to manual mode.
Then—I canceled the flash. Since it’s only capable of illuminating a limited distance (as opposed to lighting up the entire Sahara), it isn’t helpful here.
Next, opening the aperture as wide as I could, I slowed down the shutter speed for the longest exposure my point-and-shoot camera was capable of and selected the lowest ISO I thought I could get away with (as you may recall from Chapter 1, higher ISOs result in images with a lot of digital noise).
In this situation, it was actually so dark out that I could barely see well enough to compose the scene, let alone find something to focus on. Thus, if you look carefully, the focus is actually on the sand rather than on the structures or camels as I would’ve liked it to be—but as soon as I pressed the shutter button, waited 15 seconds for the exposure and eventually saw the result—I was in love!
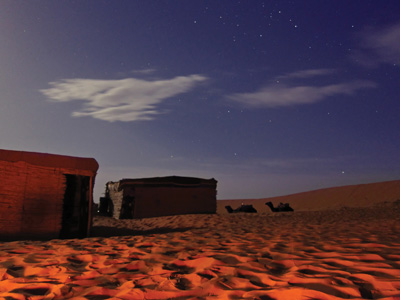
Thanks to the full control of manual mode, I was able to capture a gorgeous rendering of the Sahara Desert (Figure 2.21) complete with two camels, twinkling stars, and the warm glow of our campfire (which could not be seen whatsoever in the previous two frames because the flash overpowered it).
Figure 2.21. Our view of the Sahara Desert as made possible with manual shooting mode. 15 seconds, f/2.5, 400, Flash: canceled, point & shoot
But how do you know which settings to use? Keep reading to find out!
Get to Know Your Light Meter
It may seem like professional photographers routinely pull perfect exposure settings out of a magic hat—but it doesn’t work quite that way. Over time, practice, experience, and ultimately, trial and error will prove to be your best strategy (I literally guessed at the settings I used for the Sahara shot in Figure 2.21). But before you master the skills that come from practice, practice, and more practice, there is a tool made specifically for helping you choose the appropriate exposure settings. The good news? You already have it—it’s built right into your camera.
Ladies and gentlemen, I’d like to introduce you to—drum roll—your very own light meter (Figure 2.22)!
Figure 2.22. Displayed when looking through your viewfinder or at the back of your LCD screen, some light meters are horizontal like this one, whereas others are displayed vertically. Some include numbers and others just display dashes or tick marks. If you have a hard time finding it on your camera, your user guide should be able to show you exactly what it looks like.
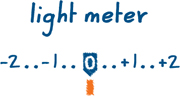
Light meters work by measuring the light in any given scene and predicting what the exposure will look like based on the camera’s current settings. You’ll find the light meter when looking through your viewfinder (or possibly at your LCD screen). They vary from camera to camera, so while the meter in Figure 2.22 is displayed horizontally, yours might run up and down instead. Some meters include numbers as shown with the meter in Figure 2.22, while others just show dashes or tick marks with no numbers whatsoever. If you have a hard time locating the meter on your camera, check your user guide for details.
The value of the light meter is that it dynamically adjusts based on the light it reads coming from the scene in front of the lens—and how your current camera settings relate. If you remember back to Chapter 1, you learned that light is measured in something called stops. If you look closely, you’ll notice that even if your meter doesn’t include numbers, it displays an exposure range stretching from two stops underexposed (−2) to two stops overexposed (+2), typically in increments of 1/3 of a stop.
The further away your current camera settings are from what the meter thinks they should be, the further to either side of center (0) the indicator will go. Thus, when the camera thinks the picture will be too dark (underexposed), the indicator will be displayed on the minus (−) side, as in Figure 2.23.
Figure 2.23. This is how the light meter looks when the camera thinks an image will be underexposed (too dark).
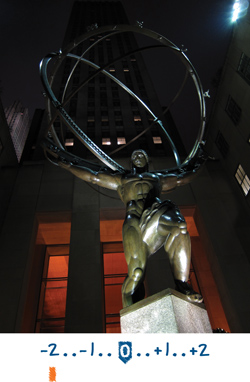
And as you would expect, if the camera thinks your photo will be too bright (overexposed), the indicator will be displayed on the plus (+) side, as in Figure 2.24. Again, the further toward the + side the indicator is, the brighter the camera believes the exposure will be.
Figure 2.24. This is how the light meter looks when the camera thinks an image will be overexposed (too bright).

Of course, it’s no surprise that when you’ve made the meter happy, the indicator will hover around the center (0), letting you know that the camera believes you’ve found the magical combination of settings that will make for a properly exposed image (Figure 2.25).
Figure 2.25. When the camera thinks you’ve found a good combination of shutter speed, aperture, and ISO, the indicator will hover right in the center at 0 (zero).

Take your meter for a test drive
To see the meter in action for yourself, switch your camera to manual mode. With the lens cap still on, look at your light meter. (You can also cover the lens with your hand or stand in a dark closet.) It should be indicating underexposure (−2).
Now, stick the front of your lens right up close to something really bright (like the bulb in the lamp on your nightstand). You should see a reading that indicates overexposure (+2). (Try not to blind yourself or start any fires while doing this, will ya?)
Try aiming the camera at other various scenes and you’ll see the light meter jumping all over the place.
The meter is not the boss of you!
While it’s very helpful, the meter isn’t perfect—so try not to get obsessed with the feeling that you can’t take a photo unless the meter indicator is perfectly centered (at zero), or the idea that a perfect meter reading will result in a perfect photo. The meter is merely a tool—definitely more of a guide than a commander in chief—so just think of it as an assistant to help you find a starting point for a decent exposure.
Remember that the camera doesn’t know the scene you’re facing, where the light is coming from, or the effect you’re trying to achieve. The camera is literally just measuring light and guessing whether or not it will be enough to record an image. Ultimately, the only thing that matters is what you think and feel about any test shots you take.
Would you be surprised to learn that your meter comes with its own set of options—called “metering modes”—that control the way it takes measurements? It’s true! And the option you select can have a pretty huge impact on how helpful (or not helpful) the meter is to you. When you’re shooting in one of the automated shooting modes, your metering mode can dramatically affect the exposure settings your camera chooses and the image that results. Curious? You’ll learn more about it in Chapter 4.
For now, accept the fact that sometimes the meter will tell you that the photo you’re about to take will be too bright or too dark, and occasionally you’ll just have to smile and shoot it anyway because test shots (and ultimately, experience) will train you to know better.
Give Manual Mode a Try
To put everything we’ve talked about up to this point into perspective, you really should roll up your sleeves and give manual mode a whirl for yourself. To get started, make sure your camera is set to manual (M) and find an interesting scene with a decent amount of light. Your living room, next to a large window (during the day), would be a great place to experiment.
If you’re reading this at night while curled up on the sofa or in your bed, you can still switch your camera to manual and play with the settings to get a feel of how everything comes together. We will not be using flash for this exercise, so make sure it is turned off or otherwise put away.
Position yourself so that your back (or side) is to the window (just be sure you’re not facing the window), and find something interesting on your coffee table to take a photo of. (Seriously, as Figure 2.26 shows, this could be anything. A tray of buttons from the craft room, Valentine’s Day cards from atop your desk, a spool of ribbon, a basket of odds-and-ends—heck, even your kid’s action hero figurines would work!)
Figure 2.26. You don’t need a fancy subject in front of your lens to try out manual mode—just grab whatever is handy or easily within reach and get to it!

Get down at eye level, come in close, and move the objects around if need be to put together an interesting scene.
Now that our scene is set and we’ve got our subjects, we’re ready to think about exposure. Since you’re in manual (M) mode, the shutter speed, aperture, and ISO are all up to you. But where do you start?
Set the ISO
It’s probably easiest to start by setting a baseline ISO. In Chapter 1, you learned that ISO relates to how sensitive your camera is to light. The higher the number, the more sensitive your camera becomes.
Accessing your ISO might require pressing a button, turning a dial, or digging into your camera menu. If you’ve never done it before and aren’t sure where to look, your camera’s user guide will certainly be able to help.
I like to think of ISO 200 as home base and generally a good place to begin. If you’re in a well-lit area (outside in broad daylight or inside with buckets of glorious light pouring through your windows), I recommend starting there.
If it’s considerably cloudy out, or if there’s just not much light coming through your window, try something more sensitive like 400 or 800. You can always return to this setting and make changes later, so remember that whatever you go with initially, it’s just a place to start. For now, don’t bother with the light meter—just pick an ISO as explained above, and move on.
One variable down, two more to go!
Select the aperture
Let’s lock down our aperture next. As you learned in Chapter 1, aperture is the opening inside the lens that controls the quantity of light that passes through.
If you’ve never done this before and aren’t sure how to go about adjusting your aperture while in manual mode, pat yourself on the back—you’re about to learn something new that will serve you well in the future. Look at you go!
Because all the manufacturers build their cameras so differently, and because no one wants to read (or write) a book that’s 10,000 pages long, I’m afraid I’ll have to refer you, once again, to your user guide. Just be forewarned—the way you adjusted the aperture earlier in this chapter (while shooting in aperture priority mode) might be different from the way you adjust your aperture setting while in manual shooting mode. So if you look it up in your user guide, be sure you’re referencing the right section.
Still ignoring your light meter, set the aperture to something like f/5.6. Remember that this is just a starting point—literally a guess. It’s not a rule or recommendation for any particular situation, but rather a loose suggestion based on what the lighting environment in your living room might be like and the capabilities of the lens you likely have attached (or built in) to your camera. Good guesses come with practice—and yours starts now. (Aren’t you excited?)
Decide on a shutter speed
The final exposure variable to lock down is the shutter speed. If you don’t already know how to change your camera’s shutter speed while in manual mode, now is a good time to look it up. (I’ll wait here.)
Since we already have the other two settings in place, we’re ready to finish completing the last corner of the exposure triangle—with some help from the light meter. Take a look at your light meter (either through your viewfinder or on your camera’s LCD screen) and adjust your shutter speed until the indicator arrives at or somewhere near the center of the meter—indicating what the camera believes to be a proper exposure.
What shutter speed is it that’s making your meter happy? Keep in mind that some cameras display shutter speeds as whole numbers rather than the fractions they are; thus a shutter speed of 1/15th of a second may display as 15. Whole seconds are usually displayed with double quotation marks, so a shutter speed of 15 seconds would display as 15″.
If the meter indicates that a shutter speed of 1/15 or slower is needed for a proper exposure, you may require a tripod. If that idea makes your nose wrinkle (who wants to mess with a tripod?), don’t panic—you have options!
• Find something like a ledge, table, or countertop to steady your camera on and continue with the shutter speed the meter indicates.
• Switch back to your aperture setting and check if you can open it wider (by picking a smaller number) to let more light into your lens. Depending on your lens, you may be able to open the aperture even wider if you zoom your lens all the way out. This would then enable you to make the meter happy with a slightly faster shutter speed, thereby eliminating the need for a tripod.
• If your lens doesn’t offer you a wider aperture (or if you don’t want to change your current aperture setting), go back to your ISO setting and try raising it higher. Then, return to your shutter speed to compensate. With a more sensitive ISO, you should now be able to get away with a faster shutter speed.
If you’ve tried all of the above—and have set your ISO set as high as it can go—and the shutter speed required to make the meter happy is still really slow, see if you can turn on more lights. It must be pretty dark in there!
Testing, testing—1, 2, 3!
Once you’ve got your settings selected and your meter looks happy, it’s time to see how it all comes together—so fire away and click that shutter button!
How does it look? If it’s too bright, you’ll need to shield out more light by using any combination of the following:
• A faster shutter speed
• A smaller aperture (with a higher number)
• A less sensitive ISO
If your image is too dark, you can brighten it up by doing one of the following:
• Opening your aperture wider (how much wider will depend on your lens and possibly your current zoom setting—aka, focal length—as discussed in Chapter 5)
• Slowing down the shutter speed even more
• Making your ISO more sensitive by bumping it higher
If you didn’t get the results you were hoping for on your first try, study the results, tweak your settings accordingly, and take another shot.
Rinse and repeat.
Manual mode is the real-life balancing (dare I say, juggling) act described in Chapter 1. Where your settings start and how far you’re willing (or able) to push any part of the equation depends on what kind of photo you’re trying to take and the lighting situation you’re in.
You did it!
Though it feels clumsy and awkward (not to mention painfully slow) at first, believe it or not, with practice, manual mode can actually become faster and more reliable than any other shooting mode! Seriously. It’s true.
Tip
As you learn, have some fun and share your progress by posting your photos at flickr.com/groups/yourcameralovesyou/.
But even if manual mode doesn’t become your No. 1 favorite, the important thing is that you were willing to give it a try. Bravo!
Manual mode cheat sheet
For those of you who are fans of step-by-step guides and charts, this one is for you!
- Assess lighting conditions to establish a baseline ISO setting.
- Decide what your priority is. A certain shutter speed? A particular aperture? Set the camera accordingly.
- With the ISO set and either the shutter speed or aperture established, adjust the remaining variable until the light meter looks happy (with the indicator hovering around the center). Remember that the light meter is just a guide.
- Take a test shot.
- Assess the resulting photo.
- If the shot is too dark, you could do the following:
• Slow down the shutter speed to give the light more time to leave an impression (keep in mind that shutter speeds of around 1/30th, 1/15th, or slower may require stabilization to prevent camera shake)
• Open up the aperture to let in more light
• Increase the ISO to make the sensor more sensitive to existing light
• Any combination of the above
- If the shot is too bright, you could do the following:
• Choose a faster shutter speed to reduce the amount of time the light is “burning” an image on the camera’s sensor
• Close down the aperture (make it smaller by choosing a bigger number) to reduce the amount of light coming in
• Decrease the ISO to make the sensor less sensitive to the light
• Any combination of the above
- Make adjustments as needed based on the assessment in step 5.
- Take additional test shots.
- Repeat steps 5–7 until satisfied.
Visual Feedback
As you are learning to notice the different effects that shutter speed, aperture, and ISO have on your images, it can be helpful to look back at photos you’ve taken to see what their settings were and how they impacted the resulting photo. On most cameras, it’s as easy as playing back an image. If you don’t see the exposure information, look for a button that says “Display” or “Info.”
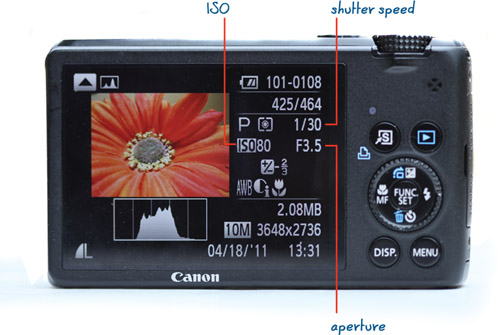
If you press this a few times while playing back an image, you should eventually see the exposure information displayed on the LCD screen alongside your image, as in Figure 2.27. You might even see the date/time and get a peek at the “histogram” (a bar graph representing the brightness values of the image).
Figure 2.27. The info screen is helpful for reviewing your shots to see how different settings impact your images. In addition to the shutter speed, aperture, and ISO, what else does your info screen tell you about your photo? It might describe the shooting mode, image size, and resolution—among other things.
Another place you can examine the way your exposure settings affect your photos is on the computer. Once you’ve downloaded your photos, you should also be able to pull up this information in whatever software you use to manage and edit your images. The information you’re looking for is called “metadata.” If you can’t easily locate it, check the software’s help menu, where you can do a search for “metadata.”
Familiarizing yourself with these settings and the impact they have on your images will help your photography skills grow by leaps and bounds. So instead of panicking the next time you bump into the info screen in Figure 2.27, take a second to explore it and make sense of the data it’s sharing with you.
Chapter snapshot
![]()
As you’ve seen, you have lots of options when it comes to shooting modes—from fully automatic to fully manual—and everything in between (not to mention scenes!). So resist the temptation to set your camera to a single mode and leave it there forever.
• Take advantage of all the control and flexibility your camera offers to get the best shots possible in every situation. All those different settings are begging to be put to good use!
• Keep in mind that some modes give you more freedom than others to boss the camera around. As convenient as auto (A) mode may appear to be, it’s definitely worth getting comfortable with less restrictive modes so you can take advantage of some of the other great features your camera offers (detailed in Chapter 3).
• Each camera is different—offering different options, placing them in different places, and even calling some of them by different names! Don’t be afraid to dig around and explore. Your user guide is always there for you if you get stuck!
• Now that you understand how all the different shooting modes work, you might realize you have a greater appreciation for all the thinking your camera is capable of doing for you when you choose to let it. Don’t you love it more already?