
In Chapter 2 I walked you through the new Google AdWords interface. I gave you a tour showing where everything is located, how everything is organized, and how to perform the basic operations necessary to use the interface. However, I purposely left some parts out and saved them for this chapter. If you're a newbie to cost-per-click advertising, you wouldn't appreciate being bombarded with things like placement targeting, remarketing, ad extensions, or display builder. It can be overwhelming to place everything about AdWords in one chapter, so I decided to divvy up the information between Chapter 2, this chapter, and Chapter 5.
The first — and possibly most obvious — omission from Chapter 2 is the launching pad for this chapter of the book. The Google Content Network has become a big part of AdWords over recent years, working a little bit differently from the Google Search Network. Let's start there.
As noted in earlier chapters, a Search Network is Google, AOL, or any "engine" where a user types in a search query. A Content Network is a network of web-sites that in this case serves ads from Google.
Google has designed and refined a technology in which your ads can appear on sites and on page placements throughout the Web based upon the page's content and keywords that you're bidding on. This technology, known as the Google Content Network, reaches more than 80 percent of global Internet users, with a 76 percent unique reach (that is, non-repeated visitors) in the United States alone (Source: comScore Networks machine-based panel). A visitor performing a search on Google can type in a search query and visit a site that comes up within a search engine result. That site may show relevant text, image, or video ads based upon that original search query. Your ad may be clicked on, and it may generate additional conversions and sales for you.
Within the Settings sub-tab under the main Campaigns tab, you can put any current Search Network campaign into the Google Content Network and begin to display your ads instantly. However, doing so may seriously deplete your budget and your available impression share from AdWords. Usually, the Google Content Network generates several thousand impressions daily, even for low-yield advertisers pushing niche products. What you'll want to do is create a new, separate campaign for your Content Network ads and keywords. When you do this, ensure that this new campaign isn't also added to the Search Network as your original campaign would be; otherwise, you could be duplicating bids on keywords and ads and competing against yourself. You can use the same keywords and ads that you use for your search campaign in your Content Network campaign, and in a lot of cases this is the most convenient and efficient way to manage it.
The Google Content Network allows you to create three different types of ads to display on Content Network sites: text ads, image ads, and video ads. It is up to the publisher (owner) of the website to determine what types of ads will be available to advertise with — I'll show you an image later to illustrate how you'll know which websites accept which ad formats. (With Google AdSense, site owners are paid by Google to place Content Network ads on their site's pages.) This means that you also have to follow best-practices guidelines and meet editorial review guidelines here.
Text ads on the Content Network are exactly like the ones you create for search campaigns in AdWords, but Content Network publishers have the right to change the shape, font size, and color of your text ads. Text ads do have to follow the same character-length restrictions as search text ads, and must also meet editorial guidelines. They can also appear within videos and feeds, but they don't always — again, it depends on what the website's publisher allows.
Figure 4-1 shows a good example of a publisher within the Google Content Network, and of how text ads may appear different on a website as opposed to a search engine results page. This page, on the Healthy Eating Recipes blog, has Content Network text ads within the top-left header image, as well as four ads going down the page on the right-hand side. You can't tell it from Figure 4-1, but the two ads on the top left have a dark yellow font color for links and a white font color for the description. The shape of the top-left ads is also different, as there are three lines, not two as in Search Network ads. The ads on the bottom right have long first lines and short second lines, because each is one long sentence (which can't be done in the Google Search Network). The display URLs in both sets of ads have very small font sizes and are different colors, which have also been customized.

These ads were created right within AdWords, just like any other Search Network ads that these particular advertisers may have within their campaigns. Let's hope they've separated their Content Network ads from their search ads by creating separate campaigns in AdWords for both.
Image ads are interesting because they allow for a lot more creativity than the standard 70-character-limit text ads. An estimated 95 percent of all Content Network websites accept image ads today in a variety of IAB-standard sizes.
IAB is the acronym for the Internet Advertising Bureau, which sets forth guidelines for things such as the size at which publishers should expect advertisers to create their image ads.
Image ads, just like text ads, are matched to a page's content. You must have good ad copy and a good message, and comply with all editorial guidelines from Google, or you will not be able to run image ads on its Content Network. With image ads you can upload your already-created image right into the AdWords interface by navigating to the Ads sub-tab within the Campaigns main tab, and then clicking on Create a New Ad from the farthest-left drop-down menu about two inches down from the Campaigns sub-tab. You can also create images for use in the Content Network by using the Display Builder tool, which we'll discuss in Chapter 6.
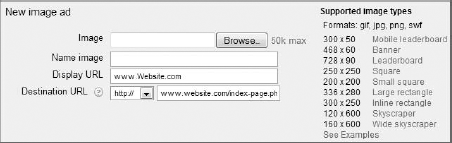
Figure 4-2 shows the portion of the page that appears when you want to upload your image ad into an ad group. You can browse for your image locally, give it a unique name, and enter in a display and a destination URL. Looking to the right of Figure 4-2 will inform you of the file formats and sizes that Google Content Network sites accept. A few things that this right-hand area won't tell you are that Google accepts animated .gif files and that Google cannot accept CMYK-format images. If you upload an image in CMYK, it may appear as a broken link or as an error message on the publisher's website. To be sure this doesn't happen to you, ensure that your image designer (or you, if you're creating the images) saves any Content Network image ads in the Web-standard RGB color format.

A couple of other details about image ads will be helpful for you to know. Google allows you to create as many image ads per campaign as you'd like to. At this time, there are no limits on the number of ads that you can create via the Display Builder tool or upload from within your campaign. Image ads are almost always more expensive (have a higher cost per click) than text ads, so be sure to set your campaign's daily budget higher to accommodate your image ads. Also, you'll want to give your images a descriptive name that doesn't exceed 50 characters. This helps the Google engineer who will eventually be looking at your image ad to approve it.
Here's some food for thought. As I mentioned a little bit ago, website owners who are Content Network partners can accept text, image, and video ads. Some accept all three ad formats, most accept image and text ads, and all Content Network partner websites accept text ads. Let's hypothetically assume that you have an ad group that contains both an image ad and a text ad, and the campaign is added to the Content Network. How does Google know which ad, the image ad or the text ad, to display on any given Content Network site?
What Google AdWords does is show the most relevant ad, either your image ad or your text ad. It will look at your selected keywords, your daily campaign budget, and the quality of the ads themselves in order to determine which ad it should show on any given Content Network partner website. If you want to show only your image ads (or video ads for that matter) for a particular campaign, your best bet is to create an ad group that contains only image ads — but be sure that you're not competing against yourself by having a second ad group containing only text ads for the same list of bidded keywords. About 5 percent of all Content Network websites do not accept image ads, so you'll be missing out on an impression and possible customer roughly one out of 20 times if you don't have at least one text ad with your image ads.
For maximum exposure you can create video ads that will display on select Content Network partner websites that accept video ad formats. Today there are far fewer Content Network partners that accept video ads, so the chances of your ads appearing on the Content Network are not as high as if you were using an image or a standard text ad. There are also a lot of differences between video ads and image or text ads, as well as much more robust specification requirements.
Google offers three different types of video ads to advertisers: click-to-play video ads, in-stream video ads, and InVideo ads. Click-to-play video ads allow the site visitor to control clicking the video ad in order to play it. In-stream video ads will play for either a minimum of 15 seconds or a maximum of 60 seconds as soon as the web page loads. InVideo ads appear within the bottom 20 percent of the video's stream-play space and are more prominent on YouTube and what Google considers "premium" partner network sites.
Click-to-play video ads can be stopped or skipped, while in-stream video ads or InVideo ads cannot. Click-to-play video ads and inVideo ads are eligible for both the cost-per-click pricing and the cost-per-impression pricing models, while in-stream video ads can be paid for only within the cost-per-impression pricing model. (We'll talk about pricing models in a few more pages.) All three types of video ads are required to have a working destination URL that, if clicked by a visitor, will take that visitor to the advertiser's website.
With click-to-play video ads, a static opening image (which you can also create) is first shown to a web browser. Click-to-play video ads on the AdWords Content Network are available in either a medium rectangle shape (300 × 250 pixels) or a large rectangle shape (336 × 280 pixels). In-stream video ads do not require a static opening image but have their own set of technical specifications. They do not have a set pixel size, but must be created with a standard 4:3 aspect ratio. InVideo ads can be either Flash overlays or videos, with each file format containing its own laundry list of tech specs. When you're uploading or ready to create a video ad in AdWords, your best bet is to visit the following three URLs, which outline all technical specifications that you need to be aware of:
Click-to-play video-ad technical specifications:
https://adwords.google.com/support/aw/bin/answer
.py?hl=en&answer=66788
In-stream video-ad technical specifications:
https://adwords.google.com/support/aw/bin/answer
.py?hl=en&answer=153708
InVideo ad technical specifications:
https://adwords.google.com/support/aw/bin/answer
.py?hl=en&answer=90377
Figure 4-3 shows an example of an inVideo ad on a YouTube video for a Mr. Bean episode. The episode is entitled Mr. Bean — Army Cadets," and while the video is playing, an ad for Quaker Oatmeal scrolls on the bottom 20 percent of the video, with a call to "vote now!" and participate in the ad's challenge.

InVideo ads can also appear as full-screen advertisements that begin 15 seconds before your video starts (like the ones on every video on www.hulu.com). The image ad on the right-hand side is also from Quaker and it matches the InVideo ad, but it's not a part of video advertising. In this situation, Quaker spent a good chunk of change to advertise in this fashion. You can also expect to spend a lot not only on video advertising, but on creating the video as well.
Regardless of the type of ads that you decide to run on the Content Network, you'll have the choice between running automatic placements and managed placements within AdWords. Automatic placements will select websites for your Content Network ads to appear on, based upon your ad group's keywords. To enable automatic placements you'll need to click on the Relevant Pages across the Entire Network radio button within the Settings sub-tab of the main Campaign tab. Managed placements are websites on which you specifically choose to advertise. You can enable your managed placements by selecting the Relevant Pages Only on the Placements I Manage radio button within that same Settings sub-tab.
You really want to think about which option you're selecting and why you're selecting it. Using automatic placements is a very "hands-off" approach to advertising on the Content Network. You're basically allowing Google to determine the websites suitable to display your ads, while using your ad group's maximum cost-per-click bid price to charge you per click or per thousand impressions. Managed placements are the sites where your ads are appearing that you'd like more control over. Any site that is a managed placement can have its bids changed, providing you with much greater flexibility with a more ROI-intelligent spend of your money.
If you're looking for as many eyeballs as possible as soon as possible, and you have a high or unlimited advertising budget, you can probably use the Content Network with automatic placements and not worry. For all other advertisers, spend your money wisely and choose the managed placements option to control the bid prices for each website. If you need to remove a website entirely, you can exclude it by using the Site and Category Exclusions tool, which will be discussed at the end of Chapter 5.
You'll notice a lot of similarities between the following list of tips for success and the tips for success I covered in Chapter 3. However, there are some differences, most notably the placements and the sites that your ads appear on or are excluded from appearing on.
Search for "tips for success on the Google Content Network" on Google, and you should find an article that will include these five tips:
Campaign structure: Tightly themed ad groups within a campaign are one of the key determinants of Quality Score on the Search Network as well as on the Content Network. Keep your Content Network ad groups as focused as possible for optimal results.
Keywords: As a general rule, you'll want to have anywhere from 5 to 20 keywords for ad groups that share the same topic. Don't combine keywords for different services or products, and don't overload your ad groups with an endless list of keywords. Take the 10 or 12 most important keywords for you and run with them. Delete keywords that don't perform and replace them with new ones (avoid adding keywords without deleting poor ones first).
Ads: Your ads are obviously the most important piece of data that will determine whether or not a user visits your website from a Google Content Network partner. First, keep the network that you're advertising in mind. In the Google Search Network, a user types in a search query, and ads that are relevant to that search query are displayed. The end user wants to find the information that he or she is searching for, and your ads are competing against other cost-per-click ads and organic search engine results for that user's click. In the Content Network, the user has already made at least that first click at some point in time, and needs to be strongly persuaded to click another ad from within a website. It's critical to be able to relate the product or service on the website to the ad in the Content Network, be it a text, image, or video ad. Users in this network may even think that your ad is spam (because it's not on
www.google.com), so you have to be ultra-persuasive here. Clear offers, strong calls to action, dedicated landing pages, and all the other smart ideas from the Search Network world also apply.Content bids: If you remember from just a few pages ago, selecting the Managed Placements option from within your campaign's Settings sub-tab allows you to control the bid for each Content Network site on which you're advertising. The Automatic Placements option takes the average of your keyword- and ad-group-level cost-per-click bids and uses that average as the bid price. As I've said before, if you're a "hands-off" type of marketer who's interested in reaching as many eyeballs as possible, automatic placements are probably the way to go. If return on investment and quality traffic are top priorities, you'll want to enable managed placements (and remove nonperforming sites by excluding them via the Site and Category Exclusion tool). Bid preferences should be checked against the goals that you're looking to meet with the Content Network.
Negative keywords: As explained in Chapter 3, negative keywords also can be applied to the Content Network. This really is a great way to exclude users performing irrelevant searches and what could be unqualified traffic. Even if you just want as many people as possible to see your message, adding negative keywords to your Content Network campaigns can ensure that you're spending your money wisely and that your message doesn't fall on deaf ears. For most advertisers, using negative keywords is yet another trick up their sleeve to further improve ROI and conversion rates.
Keep in mind that your ad will or won't be shown on a Content Network site based upon the Quality Score and the bid price. Content Network sites can show as few as one ad to as many as four or five ads on one page. Will your ad be one of them?
Images are expensive. Ask any design company for a quote to create the simplest .gif image, and you'll feel as if you quality for a government bailout. But you need images, because they're very attractive and can be used on the Google Content Network that I just covered. So how do you, the hard-working advertiser, afford to create the multiple image sizes and formats that you need in today's digital world? Enter Google's Display Ad Builder.
You'll be able to create image ads from a growing library of hundreds of image templates, sorted by category and popularity. Pick any image and edit its headline, font colors, and text, and within a few short minutes you will have saved yourself a lot of money and time, while simultaneously launching image advertisements on the Content Network. Did I mention that Display Ad Builder is free to use?
To get started, find your Ads sub-tab within the main Campaigns tab and click the New Ad drop-down menu, which is the farthest-left drop-down menu under the graph. The menu will provide you a link to the Display Ad Builder, which will expand the table and show you all the available ad templates.
Once you arrive at this screen, you should see a laundry list of categories down the left-hand side of the page. Everything from seasonal and educational to rich media and audio/video image templates is available, including interesting sortable options like "most popular" and "highest click-through." A good number of these templates are animated, but several are static, for your convenience if you prefer static ones. The image template that you choose will dictate what information you'll need to provide, so there's no standard display ad template. However, you should be prepared to write a headline, a few lines of descriptive text, the text that the clickable button (call to action) will have, a display URL, and a destination URL. You could be asked to insert logos, product images, or a link to your YouTube video. Figure 4-4 shows an example of the template selection screen.

Once you select your template you'll have plenty of editing options to customize your new image ad. Figure 4-5 shows an example of what you'll see by picking one of the ads in the Entertainment category. You can insert an ad name, a ticket stub text (this image starts by scrolling small ticket stub images for which you can edit the text and font type), a headline, description lines, and lower, on this page but not shown, a display URL and a destination URL. To the right of the editing options are the ad variation options. You can create your ad in any one of the listed sizes — there's no cost to do so. Depending on the scope of your Content Network campaign(s), you should create your image in enough size variations to cover all possible size requirements of a potential website that you'd like your ads to appear on.
Once you create your image and it starts displaying on a Content Network site, you'll be able to see statistics for it just as you would for a text or video ad. Optimize accordingly with the tips you've learned in this chapter and Chapter 3.

You don't necessarily have to use the Display Ad Builder. You may be good at graphic design, or you may already have images created. If this is the case, simply click Image Ad instead of Display Ad Builder in the drop-down menu mentioned earlier to bring up the dialog box shown in Figure 4-6 You'll need to name it and provide both a display URL and a destination URL. Your uploaded image cannot exceed 50K in size, but this feature supports more image types and sizes than are available in the Display Ad Builder. Your uploaded image will have to comply with all the standard terms, conditions, and trademark/ copyright laws, so be careful.
Up until now, we've talked about only one AdWords bidding model: the cost-per-click bidding system. It's as straightforward as it gets; you set a bid, a user clicks your ad, and you pay one cent more than the next-highest bid from your maximum cost-per-click bid. I haven't mentioned two other types of bidding, and I have yet to tell you how Google groups your advertising goals with your bidding options.
There are three types of AdWords bidding options: cost-per-click (CPC), cost-per-thousand-impressions (CPM), and cost-per-acquisition (CPA).
You're already familiar with the standard traditional bidding model used globally. In AdWords, you can set either manual bids (for ad groups, ads, or keywords) or automatic bids, an option that takes your daily budget and evenly disperses it throughout the day.
I encourage you to use manual bidding whenever possible. Manual bidding gives you complete control over each ad's or keyword's bid price, which is something you really need complete control over. Automatic bidding sounds like an easy "hands-off" approach to managing your bids, but there are drawbacks you need to be aware of. First, automatic bidding will disable ad scheduling, which is an important advanced feature to be introduced later. Second, you will not be able to control your maximum cost-per-click bids, leaving Google's automated system to decide how to bid for you and how to spend your daily budget. You're more than welcome to give automatic bidding a try, but you'll most likely want the control that comes with manual bidding. Even if you set one bid for your entire ad group, and every ad or keyword within that ad group is the same bid, at least you're in control of how your money is spent.
If you're thinking about the Content Network, and you're thinking about all the potential eyeballs staring at your ads, you may want to look into cost-perthousand-impressions bidding, also known as CPM bidding. Instead of paying for clicks (meaning the visitor has actually gone to your site), you'll pay just for each thousand impressions your ad receives. A thousand may not sound like many, but on the Content Network you may consistently receive several thousand or more impressions daily. Just as with cost-per-click bidding, you'll select a maximum CPM bid for the ads that you'll be displaying, but you'll want to consider a higher CPM bid (in comparison to a CPC bid). CPM-bidded ads always occupy the entire ad space available on a Content Network site with an image, video, or expanded text ad. There will be fewer advertisers competing against you, but the competition will be much tougher to win a placement on a site, especially when you use a lower bid.
In case you're wondering, there's no advantage on the Content Network in using CPM bidding over CPC bidding. They both compete in the same auction, and one bidding type doesn't trump the other. It's about what fits your goals, budget, and performance.
Cost-per-acquisition bidding is all about one acronym: ROI. Using the CPA option once again puts the AdWords system in the driver's seat, just as automatic CPC bidding does. Google will look at your account's historical performance, your daily budget, and the cost per acquisition that you set within AdWords. It will take this data and set cost-per-click bids on your ads and keywords in an attempt to stay below your CPA bid. Google can set high cost-per-click bids at times for ads it deems more valuable, and lower the bids when it deems the time and ads less valuable.
Using CPA bidding may actually lower your conversion rate a bit, and will affect other metrics, so you want to make sure that you know exactly what your cost-per-acquisition really is, or that you know how to calculate it. Furthermore, your campaign must have received 30 conversions within the last 30 days and must be receiving conversions at a consistent rate for a few days in order for you to use the CPA bidding model
Note
The cost-per-acquisition bidding model requires that you install the Google AdWords Conversion Tracking code on the key conversion pages of your website. You cannot use CPA bidding without this code, and you really won't know what your CPA bid might be unless you have a clear idea of where you'd like your site visitors to go and what you want them to do when they get there. I cover conversion tracking in Chapter 5.
Once you decide on a bidding option, all ad groups, ads, and keywords within that campaign will be instantaneously updated to reflect your new settings. If you feel you've made a mistake and the bidding option is not working out for you, you can always edit it by returning to the Settings sub-tab within the main Campaigns tab.
I've been purposely holding out on you so that you could get the basics of Google AdWords and cost-per-click advertising down. I've been hinting in the previous chapters that AdWords has some "advanced" settings, like Position Preference, Ad Scheduling, and Frequency Capping within the Settings sub-tab of the main Campaigns tab. Now that I've covered all the basics and some of the more in-depth AdWords topics, it's a perfect time to introduce you to the advanced features that can definitely help your campaign's overall performance.
Let's begin the second half of this chapter by digging into each individual feature.
I mentioned in Chapters 2 and 3 that AdWords won't translate your text, image, or video ads for you — this is something you'll have to do on your own if you're interested in targeting potential customers outside your native language. In AdWords you can select which languages to display your ads in; the selection is made within the Settings sub-tab of any AdWords campaign.
By looking at Figure 4-7, you'll see that you can choose among about three dozen language options simply by clicking on checkboxes in front of the languages. However, because AdWords doesn't translate your ads, any ads written in, say, English, will be shown to Spanish users. Needless to say, showing ads to customers speaking another language won't result in very high click-through or conversion rates.
To advertise in another language you actually need to write the ad in that language. If you don't have access to a translator, you can try using one of the many free translation tools online, but I'll warn you that they're not 100 percent accurate. I can vouch for that, since Portuguese is my second language. The user's browser language option is what determines the language in which the Google search engine will be displayed, and in what language users see your search and content ads. Languages are separate from locations, so a user in France could have an English-language setting and see your ads in English, not French. So if you have an international business model and live in the United States, you can advertise to the entire world without worrying whether your customers can read your ads — it's completely dependent upon their browsers' language settings. (Conversely, users in your native country could have different browser language settings, which could exclude them from seeing your ads.)
Available only on the Search Network for keyword-targeted campaigns, Position Preference allows you to select a preference for the actual numerical position in which you want your ads to be displayed. This is gold for advertisers who need a strong brand presence and need to have their ads displayed only in top positions. It's copper for advertisers who are looking for high volumes of impressions and clicks.

When you enable Position Preference within the Settings sub-tab of any campaign, a new column will appear in your Keywords tab, allowing you to manually edit the position preferences for each individual keyword. Suppose you want your ads to show only in the top position, which is Position 1. You'll select From 1 in the first drop-down menu and To 1 in the second drop-down menu, and hit Save. From that moment on, the keyword's ad (when matched to a Google search query) will potentially appear only in Position 1, which is the shaded box in the top middle of a search engine result. Suppose you want a range of positions, say Positions 1 through 5. You'll select From 1 in the first drop-down menu and To 5 in the second, and click Save. Your ads will potentially appear only in Positions 1 through 5. I just used an important word — "potentially." Google can't guarantee that your position preference will be awarded to you on any impression. It will try its best to ensure that your ads match your position preference, but your ad won't always be displayed in the position that you want it in. If you want an ad for a specific keyword to appear in Position 1 and in no other position, your ad still could appear in Position 2 or 3. Even if you want ads to display on the right-hand side of the page (usually Positions 4 through 10), your ad may pop up in Positions 1 through 3 from time to time. Position Preference is simply not an exact system, but in my experience it works well enough that your ads will be shown based on your preferences most of the time.
Another thing to consider is that with Position Preference enabled, your reach (volume) will take a serious hit, especially if you want to display ads in only one or two positions. A lot of impressions and clicks can accrue from all the other positions combined, so if traffic volume from AdWords is a priority for you, think twice before enabling Position Preference. If you want a high volume of both impressions and clicks, and never to be displayed in a low position, you'll have to find the right balance between the Position Preference range and the volume of impressions and clicks you receive from that preference. My best advice for you: Test out Position Preference and continue to tweak it until it's just right for you.
You can select a preference for an exact position, below a certain position, above a certain position, and within a range of positions. Position Preference is a campaign-level setting, but it must be edited individually at the keyword level. Remember, being number one isn't automatically the most successful position. Don't use Position Preference to fall into the trap of being number one just to be number one without any good reason.
You have two ad-delivery options for each campaign: standard delivery and accelerated delivery.
Standard delivery, the default option, will show your ads evenly over the course of a 24-hour day. The AdWords system will automatically divide your daily budget into equal parts and distribute your ads throughout the day as smoothly as possible without interruption. It can do this because AdWords isn't allowed to substantially exceed your daily budget, and it's able to forecast the impression and click volume that your campaigns will receive. This is a good solid option for most advertisers.
If you need to do some aggressive advertising, such as to promote a lastminute sale or a limited-time offer, accelerated delivery is your best bet. As soon as the clock strikes 12 midnight in your local area, the floodgates will open and the AdWords system will start to display your ads. Like diners at an all-you can-eat buffet, your campaigns devour as many impressions and clicks as your daily budget can allow for. However, once your daily budget has been reached, your campaigns stop showing ads until the next day, or until you raise your daily budget. I've seen many a campaign get burned with accelerated delivery (i.e., the campaign runs out of funds before 9 a.m. — not a pretty situation, especially if it's someone else's money, like a client's).
If you have enough funds, you could probably get away with accelerated delivery on a campaign that contains only your branding keywords or your top-performing keywords, because you can never have enough traffic from those two types of campaigns. But be careful using accelerated delivery on other campaigns — play it safe at first if you're not sure or if you have a limited budget to spend.
Ad Scheduling has got to be one of the most requested and used features in Google AdWords.
It's easy to see why it's so popular. You tell AdWords on which days and at what times of day to display your ads. By default, your ads get shown 24 hours a day, seven days a week. This is clearly suboptimal for a lot of businesses. Why would you run ads at 11 p.m. on a Saturday encouraging customers to call your office?
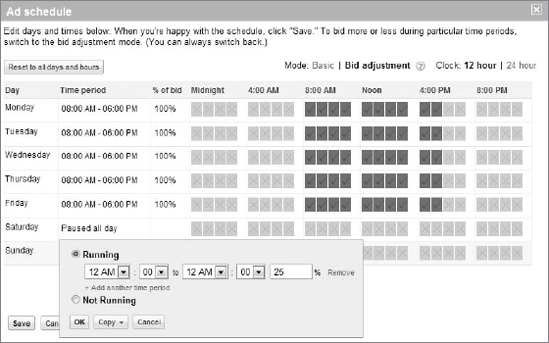
From within any Settings sub-tab, you'll find Ad Scheduling as a link toward the bottom of the screen. Click the link to bring up the window that is shown in Figure 4-8. The gray boxes are the time slots of each individual day your ads are not being shown. The other boxes represent the times that your ad is running. AdWords provides ad scheduling options for each 15-minute interval. Click a time under the Time Period column to bring up the pop-up box shown at the bottom of Figure 4-8; then you can edit that day's time schedule. You can pause the day entirely by clicking Not Running, and you can copy that day's settings to another day by clicking the Copy drop-down menu at the bottom of that pop-up.
You can also edit something very interesting. Notice the field on the far-right of the pop-up window, with a % symbol and the word Remove to the right of the field. You can use this field to edit the bids for a particular time of day. Let's say that the morning (8 a.m. to noon) is normally your business's slow time. You can, for example, bid at 50 percent of your maximum cost per click during that period, by entering in "50" and setting your time schedule to 8 a.m. to noon. You can then click the Add Another Time Period link and complete your desired time schedule with a bid setting of 100 percent. This is a great way to maximize your daily budget and refine your spends to an even greater, more intelligent degree.
Ad Scheduling is another campaign-level option, applied to all ads and keywords across your entire campaign.
Toward the very bottom of any Settings sub-tab for any campaign is a link titled Ad Delivery. When you click that link you'll see an option for Ad Rotation. AdWords provides you with two options for Ad Rotation: Optimize and Rotate.
Optimize is the default option, and the most widely used Ad Rotation option for most advertisers. Optimize starts by showing all your ads, and then works to show the ads that perform the best more frequently than the ads that don't perform as well. For example, let's say one of your ad groups has three ads. The first has a click-through rate of 1 percent, the second a rate of 2 percent, and the third a rate of 5 percent. With the Optimize option enabled, AdWords will show the ad with a 5 percent click-through rate far more often than the other two. In a lot of cases, AdWords will almost entirely give up on the other two ads and show the best-performing ad almost exclusively. In my opinion, this is one of the best "hands-off" options AdWords offers.
But my opinion isn't necessarily shared by everyone. As I am writing about this feature, I am thinking of a colleague of mine who makes a strong case for the Rotate option, and prefers to use that over the Optimize option. The Rotate option evenly rotates all the ads within an ad group, forcing you to manually pause or edit under-performing ads. If your ad group with three ads receives 900 impressions in one day, AdWords will show exactly 300 impressions for each of the three ads within the group.
I honestly feel that this even rotation is not a good idea for you. There are some benefits to allowing AdWords to do some of the work for you, and this is one of them. Why put some of your customers through ads that aren't as good as other ads they could be seeing? Why take the risk of a lower click-through rate and possibly a lower conversion rate? Still, my colleague swears by even rotation. As she points out, AdWords doesn't run a statistically significant number of impressions or clicks in order to determine which ads are performing the best. AdWords very quickly starts to identify an ad that is performing well and starts serving up that ad more often with the Optimize feature. Depending on when the ads are created and launched (time of day, day of the week, or season), and depending on the volume of impressions and clicks, one ad may look invincible in comparison to the others, but may not be when presented to a larger sample size. In other words, AdWords doesn't survey enough visitors before it starts showing an ad more often — what could prove to be the worst ad over the course of time could be the one that AdWords starts displaying more frequently right away, which means that the ads that are actually better will receive less volume and take longer to beat an opposing ad.
Which option you choose is entirely up to you. If you do select the Optimize option, your best-performing ad will (eventually) be shown more frequently. If you select the Rotate option, you will have to remember to go back into the ad group, analyze performance, and pause the other ads. Ad Scheduling is a campaign-wide setting.
The AdWords Content Network can take you by surprise. I'm not kidding when I say that your ads may receive several thousand impressions daily from a Content Network site. You may not even receive many clicks, which means you'll have comparatively low click-through rates. In some cases, a 0.05 percent (i.e., five hundredths of a percent) click-through rate can be considered great. Don't worry — your click-through rates for the Content Network are judged separately from your click-through rates for the Search Network, and thus don't affect your Quality Scores.
To place a cap or a "hard stop" on the number of impressions your Content Network campaigns receive on either a daily, weekly, or monthly basis, the Frequency Capping option is your friend. You can cap the number of impressions per unique user on a site, so that the same unique user sees your ad only a certain number of times per time period. This is very helpful, because the same unique user can visit the same website multiple times a day and hundreds of times in one month. This happens on sites with message boards or other interactive elements, like fantasy sports sites. If the users aren't interested in your ad, they may never click it, so you're wasting impressions on users who have no interest in you. Setting a cap of 50, for example, provides each unique user a fair chance at clicking your ad. If after 50 visits users still haven't clicked your ad, it's probably a safe bet that they are not interested.
Frequency Capping can be applied at the ad-group level or at the individual ad level, and is available only on the Content Network (not the Search Network — would be nice if it were).
Finally, Demographic Bidding allows you to set bid percentages based upon users' gender and age brackets. Certain websites on the Content Network are able to collect this information. Usually these are social-networking sites like Facebook, sites with message boards, or any sites that store personal user information. This information is very private: Personal names, addresses, ZIP codes, and other sensitive info are never shared. Instead, users are aggregated (for example, I'm male and between 25 and 34 years old).
The link for Demographic Bidding is the very last link at the very bottom of the Settings tab. When you click this link, the dialog box in Figure 4-9 opens up. You can exclude users based on gender or age bracket by clicking the checkbox corresponding to the option you desire. Even though my example doesn't show any statistics, your Content Network campaign will show clicks, impressions, click-through rate, average cost per click, and total cost segmented out. If I actually did want to start running this campaign in the Content Network, you can see from Figure 4-9 that my ads would be shown only to users that I'm not excluding, which are the users in the 18—24 bracket and the 25—34 bracket. Looking above that, you'll see that for males I'm willing to bid 75 percent more than my original bid, and for females I'm willing to bid a full 100 percent more than my original bid. You can bid more aggressively for specific age brackets as well.
The Demographic Bidding window doesn't show data on specific websites. You can use the Report Center that I displayed in Chapter 2 and select the Demographic Performance report to see a full list of all Content Network sites and statistics for each individual site. Also, when two demographic bid increases overlap each other, the percentages will be added together. The example that appears in the Demographic Bidding window is perfect. If your female increased bid is 10 percent, and your 18—24 age bracket increased bid is 15 percent, your bid will be increased by 25 percent for females between the ages of 18—24 (10 percent from the gender preference and 15 percent from the age-bracket preference).
Sites that don't collect demographic information will not be able to have your settings applied to delivery and distribution. Demographic Bidding settings apply to all ads and ad groups within a campaign.

In this final section of Chapter 4 I'll take you beyond the regular text, image, and video ads that I've been talking about up to this point. Ad Extensions are a relatively new feature within AdWords that allow you to augment your current ads to provide your customers with more information about your business. Ad Extensions "extends" your ad text to potentially include your location, address, or phone number, additional links, or product images. Certain extensions, like location and product extensions, can appear on Google Maps or Google Product Search.
Ad Extensions are edited within each Settings sub-tab in any campaign, just like all the advanced features mentioned earlier. You'll find Ad Extensions toward the bottom of the tab, where you may see up to five different options. Ad Extensions are a newer AdWords feature, which means that they may not be available in your country or in your account. (You may see a few but not all Ad Extensions possibilities.) You don't have to pay anything extra to use Ad Extensions on your ads — you simply pay each time any user clicks your ad or any ad extension link, like Sitelinks. Users can click your ads in Google Maps using the local business ad extensions, and you still won't be charged as long as the user doesn't click a link to visit your site directly. This could be beneficial, as you could advertise a lot for free.
If you're the owner of a local restaurant, ice cream shop, or veterinary business, you can link your Google Local Business Center account and have your address appear within cost-per-click ads on Google and Google Maps. A Local Business Center account allows your local business to have valuable information appear within Google Maps listings, such as your address, your phone number, directions, and more. This is a phenomenal feature for anyone using a mobile device and searching locally on Google, as well as anyone searching from a regular desktop or laptop computer. Creating a Local Business Center account is easy: simply go to www.google.com/maps and click the Put Your Business On Google Maps link on the left-hand side of the map page. Follow the simple instructions from that point forward to add your listing. You will need to be signed in with your Google account in order to proceed.
In fact, your business may already be listed, even if you've never gone through this process before. There will be a Claim Listing button if your address and business name are returned to you during the setup process. If your business isn't there, you will be able to click Add Listing to insert it. There's no shortage of details to enter: you can put in business hours, photos, videos, menu and payment options, and lots more. Be aware that Google will need to verify your business to make sure it's legit. You'll be given a few verification options at the end of the Local Business Center sign-up process.
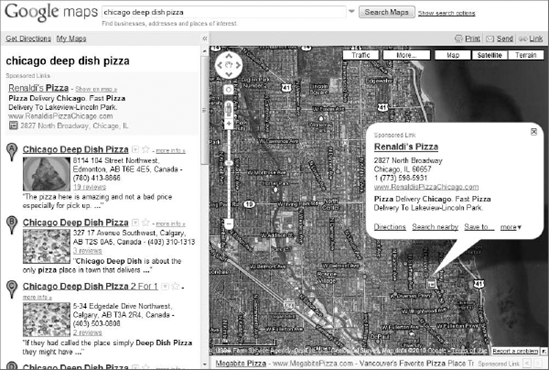
Look closely at Figure 4-10. I've performed a search on Google Maps for Chicago deep dish pizza, which is delicious beyond words. The first and clearly most prominent sponsored ad, on the top left, is from Renaldi's Pizza and takes full advantage of local business ad extensions. Both within the map itself and on the top left, the cost-per-click text ad appears, along with a map icon and address. The map's sponsored link within the dialog box includes the business's full mailing address, website URL, and phone number. Because it's on Google Maps, you are also provided with links for Directions, Search Nearby, and more, which are not being charged to Renaldi's Pizza.
The other listings below the sponsored listing on the left-hand side are what you would consider "organic" Google Maps listings. These other pizzerias have their addresses and phone numbers pulled in from the results that the Google Local Business Center has for them, which may or may not have been entered manually.
Franchise partners, shift managers, and even agency employees can enter up to nine separate business locations for their company or clients by selecting the non-business option from the Ad Extensions section of the Settings sub-tab. Here verification that you own a business is not required, and you can enter your information on the fly, without a Local Business Center account.
Figure 4-11 shows the small pop-up window that appears when you add an address as a non-business owner.

If phone extensions are enabled within your AdWords campaign, and any user on an iPhone or Nexus One is searching on Google, that user will be able to click your business phone number to call you directly. Your business phone number appears as a hyperlink, just as a link appears in your desktop browser, and will connect that person to you. Any click a user makes on your hyperlinked phone number from a mobile phone will be charged to you at the same rate as a standard cost-per-click ad, which is one cent above the next-highest bid from your maximum cost-per-click.
To be eligible for phone extensions you'll need to make sure that you're targeting ads to iPhones and other mobile devices with full Internet browsers in the Settings sub-tab, within the Devices section. From this section you'll be able to enter your business phone number and start displaying phone extensions to mobile customers. Figure 4-12 is a screenshot from my iPhone, showing what happens after I click the phone number in the ad for the Dial 7 New York Taxi Service.
For ads that meet the criteria for high quality, advertisers have the ability to add up to four additional links to their cost-per-click ads on Google and Search Partner sites by using Ad Sitelinks. If your campaign is a branding campaign, or another high-quality campaign, you'll see an Additional Links link in your Ad Extensions Settings section, where you'll be able to enter up to 10 names and URLs for important links on your site. Depending on the user's search query, AdWords will display up to four Sitelinks below your ad's original display URL.

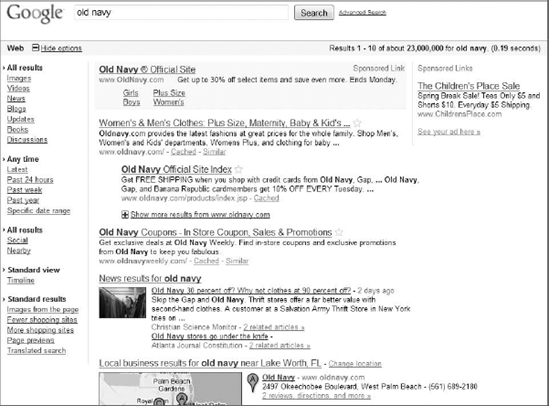
Each click on an ad Sitelink will incur a cost-per-click charge, just like a click on any other link on your ad or other site extension. Figure 4-13 shows an example of Sitelinks when a search is performed on the query old navy, which no doubt brings up an ad from Old Navy's high-quality branding campaign. As you can see, four Sitelinks appear within the ad in Position 1, where each Sitelink takes me to a specific department within the store.
Product extensions allow for image and product data from your Google Merchant Center account to be displayed within text ads on Google-sponsored search results. If you are an e-commerce merchant who uses Google Merchant Center to upload product data feeds for Google's Product Search, you can sync with your AdWords account for your ad's benefit.
At the time of writing, the Product Extensions feature is available only to U.S. advertisers. However, it shouldn't be long before this feature is rolled out in Europe and other markets as well. Also, product extensions aren't shown on Search Network sites, like AOL.
Your images, prices, titles, and other data from products that closely match a user's search query may appear on the right-hand side of the search engine results page, usually trumping other sponsored ads.
Figure 4-14 shows an example of product extensions in action, for a query for noise-canceling headphones. The top two results on the right-hand side are product extensions, pulled directly from these merchants' Google Merchant Center accounts. Also, notice what's in the middle portion of the search result. The second sponsored ad, from eBay, shows several noise-canceling headphones currently on eBay's auction system. I accessed them by clicking a plus-sign symbol to show products from eBay for my search term. Google is referring to this feature as a "plusbox," and has made it available to high-end advertisers like eBay so they can further expand their sponsored ads. Now that is an ad extension!

We've covered quite a bit of advanced material in this chapter, and I hope that I was able to show you several options to enhance, optimize, and increase your campaign's reach. The next chapter talks about specific AdWords tools that you can use to manage your account, and also about unique reporting features like the My Change History tool. I'll also cover conversion tracking and the Google Ad Planner tool, two essential pieces of the AdWords success puzzle.