
Google AdWords is the gold standard of online cost-per-click advertising. In fact, it's arguably the gold standard in any form of online marketing. Google AdWords and the cost-per-click advertising model is a multibillion-dollar-per-year industry. It's fast, cheap, easy to set up, and a lot of the other things that we talked about in the previous chapter.
This chapter is dedicated to opening up a Google AdWords account, learning its structure, and explaining how things work. Depending on how well you know Google AdWords, this chapter may seem basic, but it's important to lay the foundation for things to come later in this book. If you are familiar with Google AdWords but haven't logged in or worked in it for a while, you may want to review this chapter, since a lot has changed recently. There is now an entirely new and updated user interface with many more bells and whistles than the previous model.
This chapter also includes lots of pictures, which should be welcome to those of you who are more apt to learn through images.
Note
Google AdWords is constantly and rapidly evolving. Seemingly every week there are updates and new features added in. It's impossible to be 100 percent up to date with every feature in a printed book like this one. Your version of Google AdWords may have slightly different features or possibly a slightly different look and feel from what is presented in this book. But the heart of the AdWords user interface will most likely be the same.
Obviously, before you can start advertising in AdWords you'll need your own Google AdWords account. Before you can even get that, you'll need to make sure that the e-mail address you're planning on using to log in to Google AdWords is also a Google account. A few steps are required to create a Google account, but after you do it once you can use the same e-mail address for all other Google products, like Analytics and Website Optimizer. Let me first show you how to create a Google account, even though the chances are very high that you already have one (a Gmail account is a Google account, but you can also use a Yahoo!, Hotmail, or corporate e-mail account to create a Google account).
The first place you'll want to go is www.google.com, and you'll want to look on the upper right-hand corner of the page for the "Sign in" link — you may have to move your mouse to make the links visible. After clicking "Sign in" you'll see a login screen, and you should see a link below the login area on the right-hand side of the page that says Create an Account Now (or an equivalent directive). Click that link to reach the first page of the Google account-creation screen. Figure 2-1 shows the top half of that account-creation screen.

An interesting note: enabling web history will enhance your personalized search results from Google. You'll experience different search results when you're logged in to your Google Account from when you're not logged in.
After inserting your e-mail address and creating your password, scroll down to fill out the Location, Birthday, and Word Verification fields. Once you're done, click "I accept. Create my account." Figure 2-2 shows you what this bottom half looks like.

Once you have created your Google account you'll need to take a few additional steps. You'll first be taken to a screen that will ask you to provide your cell-phone number, so you can receive a six-digit SMS text message that you'll need for verification. After entering the six-digit code you'll be redirected to a confirmation page, informing you that you will be receiving an e-mail from Google with a verification link that will look something like this: https://www.google.com/accounts/VE?c=CKOM48yWp_nmZhD-ncL85JyPwc0B&hl=en
Click the URL to activate your Google account and have access to any Google product.
Now you'll want to visit www.google.com/adwords to start the process of creating your AdWords account. If you haven't closed your browser or logged out of your new Google account before visiting the preceding URL, you should see some kind of message notifying you that your e-mail address isn't a valid AdWords log-in. That's OK — simply look above it and click the Get Started button (it may say something different — AdWords typically runs Google Website Optimizer experiments including that call to action to improve sign-up rates).
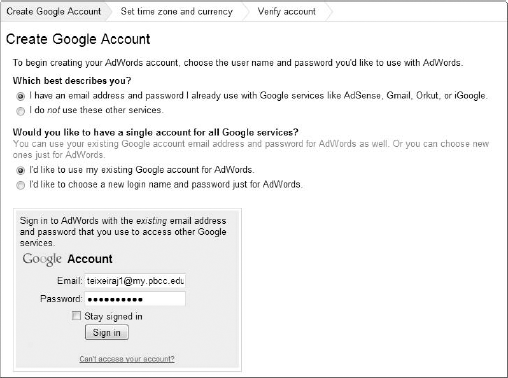
Figure 2-3 shows the first screen of the AdWords account-creation process. I recommend that you select the first radio button in each section. Selecting "I do not use these other services" will prompt you to create a new Google account (which would be redundant, as you already have a Google account), and selecting "I'd like to choose a new login name and password just for AdWords" will allow you to create a second Google account (which can be confusing, especially if you plan on using Google Analytics and Google Website Optimizer). Ultimately, it's your choice, and your choice doesn't influence anything.
Next you'll be required to select your permanent time zone, your country or territory, your actual time zone, and your account's currency. Please use caution when selecting these four options — they are permanent and cannot be modified after you click Continue. You are provided with a link to review the payment options for local currencies, and you'll also notice the two forms of payment that AdWords offers its customers: Postpay (automatic payments) and Prepay (manual payments). We'll talk more about these in just a little bit.
Now your AdWords account is officially created, and you should see a confirmation screen. Click the Sign In to Your AdWords Account link and you'll be taken to your Home tab within your AdWords account. You'll see a screen resembling the one in Figure 2-4 before creating your first campaign, which I highly recommend that you do right away. This way you can get used to the AdWords interface, and you can take care of entering your billing information, which needs to be verified before you can start running any ads with Google.
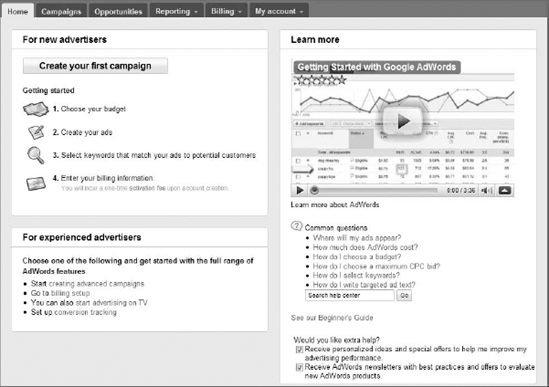
On your new account's homepage you will right away notice the big Create Your First Campaign button on the upper left-hand side of the screen. You can click that right away, or you can get familiar with the tabs and all the links that are now available to you throughout this interface. There is even a video on the Home tab, and a search function so you can search the Google Help Center for all AdWords-related topics. Figure 2-4 shows what's underneath the Home tab before you create your first campaign and before you enter your billing information. Once you perform those two tasks you'll find a different set of items under your Home tab, which you'll see an example of in a few pages.
After clicking the silver Create Your First Campaign button, you'll see the campaign settings screen that you'll become very familiar with over time. There are a number of options to choose from on this screen, which we will dive deeper into later in this chapter, but for right now you'll want to just make sure that the location, language, bidding, and daily budget options are to your liking. Set a low daily budget and a low bidding option just for now so that you can move on to the next step. Google AdWords allows you to set a manual cost-per-click bid for all keywords (or set each cost-per-click bid individually), and allows you to set automatic cost-per-click bids (Google will take your daily budget and create the cost-per-click bids for you). Click Save and then continue to creating your ads and keywords.
In the next step you'll create at least one ad and be asked to create at least one keyword for your ad group. You can create a text ad or image ad, use the display-ad builder, or create a mobile ad. If you're creating a text ad you'll be required to enter a headline for it (25 characters maximum), two description lines (35 characters maximum each), a display URL (35 characters maximum), and a destination URL. You can preview your ad on the right-hand side, or you can click the Help Me Write an Effective Text Ad link to learn more about writing an ad (or wait until Chapter 3, where I'll show you some ways to write effective ad copy). Below the ad creator you'll be able to enter keywords that you'd like your text ads to be triggered by when someone performs a query on Google. You can add as many keywords to your ad group as you wish on the left-hand side, and you should have noticed sample keywords that appeared after you entered your website's display URL in the preceding text ad. One best practice for keywords (also covered in Chapter 3) is to include only a few very relevant keywords per ad group. You can also estimate the search volume of your selected keywords to get an idea of how many clicks and impressions you expect to receive. Figure 2-5 shows an example of the Create Ad and Keywords screen.
Your first campaign, ad group, ad, and keywords have now been created, but they won't be displayed on Google unless you complete the next step, which is setting up your billing options and entering your payment information. Clicking Save and Continue to Billing will redirect you to the Billing tab.
First, select your billing country and hit Continue. Once you do, you'll see the two billing options, Postpay and Prepay, that I mentioned earlier. Take your time in deciding between these two options — you will probably have to create a brand-new AdWords account if you decide you want to change this setting in the future.
Postpay billing: This allows AdWords to charge your bank account or credit card after you receive clicks. If you have a lot of budget allocated to cost-per-click advertising and you know you're going to be very cautious about how you spend your money, postpay billing may be a good option for you. For U.S. advertisers only, you can enter bank-account information via direct debit, and AdWords will automatically withdraw funds from your account. For everyone else, you'll have to use the credit-card option (debit cards with the credit-card logos on them will also work).
Prepay billing: This allows AdWords to deduct funds from a prepaid balance as clicks accrue. If you have a set amount of money allocated to cost-per-click advertising each month, prepay billing may be your best bet. It's also a good idea if you are not sure about advertising with Google AdWords — you can prepay a balance and use it as a test to see whether or not you like AdWords. Prepay billing also requires a credit card, and debit cards with the credit-card logos on them will also work in prepay billing.

After selecting your desired billing method, you'll be asked to review Google's advertising program terms, which can be printed out or saved if desired. Check "Yes, I agree" to continue. On the next screen you'll finally be asked to select your credit card and provide your full billing information.
Please note that AdWords will charge you a small one-time activation fee to begin running your AdWords ads on Google. This small fee covers the costs of providing you with an AdWords account and entering ads and keywords before you are charged for any clicks. It's a negligible charge: five dollars in the United States or five euros in Europe, for example.
You're now finished with the initial setup of AdWords, and you can go back and make changes to your campaigns and interact with the AdWords interface. Let's learn about the different tabs, and what you can do within each one.
Google AdWords has a virtually limitless number of options to select from. Geo-targeting, keyword match types, position preferences, display-ad builder, opportunities, reporting, and various tools just scratch the surface of this great cost-per-click program.
AdWords organizes everything into six tabs lying horizontally toward the very top of the interface. The six tabs are designated Home, Campaigns, Opportunities, Reporting, Billing, and My Account.
The Home tab is the top-level overview of your AdWords account performance. Consider it your "homepage," where you can review the basic statistics, statuses, and campaign performance. On the left-hand side of this Account Snapshot you can set up custom alerts, view your account financial status, read recent announcements from the AdWords team, add up to 10 campaigns to your watch list, and view a summary of your top keywords' performance. On the right you'll receive a summary of all active online and television campaigns, a campaign performance report, and some help and tips from the AdWords Help Center. It's a great dashboard for obtaining high-level insights into your AdWords campaigns, and it's also customizable: you can move each box to a position of your liking, or minimize it if you don't wish to see it any longer.
It may be more convenient for you to start at the Campaigns tab instead of the Home tab when you log in to AdWords. If this is the case, you can click a link found toward the very bottom of the Home tab to switch the starting page to the Campaigns tab when you log in to AdWords.
Figure 2-6 shows an example of what you may find under your Home tab.

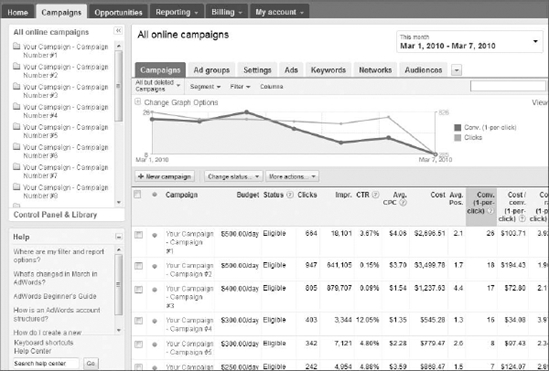
You'll spend most of your time within the AdWords interface in the Campaigns tab. This is where all campaign information, settings, and statistics are available, and where you'll do your day-to-day work. There's a mountain of options within the Campaigns tab. On the left-hand side of the screen you'll find an alphabetized list of all your online campaigns, which you can click to access individually. Below that list are links for the AdWords help section, answering common questions asked by advertisers.
The middle portion of the Campaigns tab starts with a date-range slider toward the very top, which is clickable and editable, allowing you to view campaign performance for any date range desired. Below the date range are several sub-tabs, where you can access Campaigns, Ad Groups, Settings, Ads, Keywords, Networks, and Audiences. Immediately below that are additional options to further drill down into your AdWords campaigns. These include the ability to display offline (paused or deleted) campaigns, segmenting options, a filtercreation tool, and a column-customization feature, allowing metrics to be added to or removed from the main data table. Toward the right-hand side of these options you'll find a search function, which helps if you have several campaigns at once, a show/hide trending chart toggle, and an export function, allowing you to download your campaign data in several different file formats.
The graph that's found below these ancillary options is editable — you can change what metrics appear here. Below this graph you'll find buttons to create a new campaign, change a campaign's status, and perform other actions. Finally, below all of this, you'll see each one of your campaigns listed, with corresponding metrics for each campaign. Clicking any campaign name will let you drill down into the campaign to the ad-group level, and clicking any ad group within your campaign displays its keywords. You'll notice as you drill down that the order of the sub-tabs above the trending graph and the available options around the trending graph will update and make sense with where you are in the interface. You'll always know where you are in AdWords by a breadcrumb trail that appears toward the very top of the screen, right underneath the main AdWords tabs. Figure 2-7 shows an example of the Campaigns tab and its many different options.
A relatively new feature in AdWords, the Opportunities tab analyzes your campaign performance and provides recommendations for you. It's like having your own account representative watching your campaigns and providing guidance along the way.
The two main types of opportunities that AdWords will suggest to advertisers are keyword bid ideas and keyword ideas, which will be stacked on top of one another within the Opportunities tab. You may also receive some campaign budget ideas if Google decides that your budget isn't being used to its fullest potential. The keyword bid ideas table will show you the impact you should expect to experience on each suggested keyword if you increase its cost per click. Google also provides you with a link to view the estimates for each keyword's performance if you were to decrease costs. Clicking a keyword suggested in the Opportunities tab pops open a window, shown in Figure 2-8.

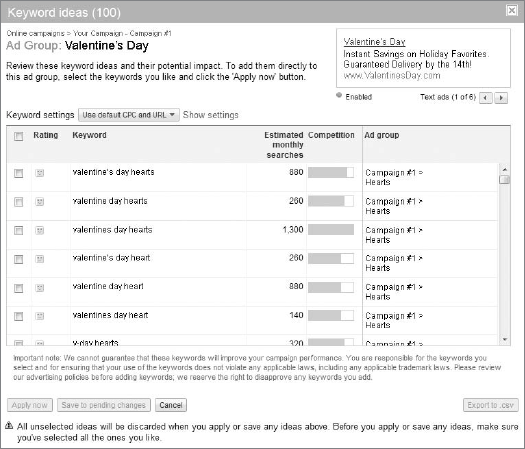
The keyword ideas table will analyze your current keyword list and identify growth opportunities that make sense based on your campaign and ad-group structure. The better your campaign structure, the more accurate Google can be in providing these keyword recommendations to you. Each suggested keyword will be shown alongside its estimated monthly search volume, and when any keyword is clicked, a pop-up window appears, showing you each suggested keyword, which ad group it should be placed in, the advertiser competition for each keyword, and a rating system that will help improve how AdWords returns suggestions to you in the future. You can even download this keyword suggestion list into a CSV file to analyze offline. Figure 2-9 shows you what keyword suggestions will look like:
The Reporting tab is the first to have its own drop-down menu with its own subsections. There are five subsections within the Reporting tab:
Reports: The report center is the place to create and view custom reports. The last 15 reports you created will be listed here, as well as any report templates created for future use. I'll show you how to create a report and what it looks like later in this chapter.
Change history: Everything you do in AdWords is recorded and stored in the My Change History section. This information can be retrieved as far back as January 1, 2006. Chapter 5 goes deep into the My Change History tool.
Conversions: AdWords advertisers can add a piece of JavaScript code to their most important (conversion) pages. This code is available from within the Conversion Tracking section. It's accessible via this sub-section, and I'll also cover it in depth in Chapter 6.
Google Analytics: As you'll learn in later chapters, you can access your Google Analytics account from within your Google AdWords account. This sub-section is the place to do that.
Website Optimizer: Ditto for Website Optimizer. Access your experiment data right from within the AdWords interface via this sub-section.
The Billing tab also has its own drop-down menu, with two subsections:
Billing summary: A complete summary of all of your billing activity will be reported on this page. You can view the details of your last payment, your primary payment method, and your current AdWords balance, all from within this easy-to-use report. You can also view a list of payments and billing activities toward the bottom of this page.
Billing preferences: An overview of the preferences that you selected when you first set up your AdWords account will be found here. You should see your credit-card type, billing, and other personal information.
Note
If you work for an agency or manage a "My Client Center" AdWords account, your billing options will most likely be different from the ones just described. You'll possibly see an "Invoice" section, showing you the details of your invoicing terms, and a "Budget" section, showing you the details of your monthly budget. However, chances are that you won't need to worry about the Billing tab if you work for an agency or work within an MCC AdWords Account.
The last of the six tabs in Google AdWords is reserved for information about your AdWords account. It is broken up into three subsections:
Account access: This shows all the e-mail addresses that have access to your Google AdWords account, and their roles. Normally only one e-mail address (yours) has access to your AdWords account, but you can invite anyone to your account from within this section.
Notification settings: AdWords can send you a variety of e-mail notifications, from serious ones like billing alerts to performance suggestions. I advise you to enable as many of these alerts as you possibly can, especially if you are very new to Google AdWords. Figure 2-10 shows the Notification Settings window.
Preferences: This page will review for you the preferences that you selected when you first created your AdWords account, such as time zone and language. This simple page will become extremely important in later chapters, as this will be the place to edit your destination-URL auto-tagging, which we'll cover later on in the book.

A high-level walk-through of Google AdWords is nice to get you familiar with the interface, but we really need to be more thorough in order to truly learn what AdWords can do. There still are many nuances to show and explain. The rest of this chapter will focus on digging deeper within each tab, and showing examples of how everything works.
As we reviewed earlier, the Home tab — also known as the Account Snapshot page — is the dashboard for your Google AdWords account. It's one of my personal favorite things in all of online marketing, and I am surprised at how underrated it is. (This is ironic, considering that I'm always suggesting that the user segment everything and "dive deep" into campaigns and data. This Account Snapshot page is a high-level overview.)
There are eight elements within the Account Snapshot page and, as mentioned before, these can be rearranged to your individual liking.
If you have any disapproved ads or keywords, budget shortfalls, payment issues, or any other issues that are very important and require your immediate attention, the Alerts element will tell you about them. Some alerts, like those having to do with disapproved ads, must be taken care of right away to ensure that your ads continue running on Google and its search partners. Alerts can be very valuable and force you to take important action when necessary.
On the other hand, alerts may become irritating and you may wish to stop certain ones from appearing. Go back and view Figure 2-10, where you'll see the Notification Settings page within the My Account tab. The status in the Online column will indicate which alerts appear on your Account Snapshot page and which don't.
Your total budget, the percentage of your budget spent, and a green checkmark are the three things you should always see on the Account Status element. This area just keeps you abreast of your budget situation, and the green checkmark notifies you that your account is active and ready to go. If you have a brand-new AdWords account you may see "You have no status messages," which is not necessarily a bad thing.
When Google AdWords launches a new feature, or when you have some important message from Google, your Announcements element will indicate it to you. It's great for keeping up with the latest development news on AdWords, but it can also become bothersome. You can once again visit the Notification Settings page to enable or disable any announcements as you see fit.
Now we get into some of the "meat" of the Account Snapshot page. Your Watch List can show you up to 10 selected campaigns that you've deemed critical. You won't have to go very far to analyze your most important campaigns' performance with the Watch List.
You should have a "No items here" message in the Watch List window. Click Manage Your Watch List, which is at the bottom of this window, to open up a new window that looks like the one in Figure 2-11. All your campaigns — including paused or deleted ones — will be listed here. Simply click Add to add them to the right-hand side, or Remove to clear them off your Watch List. Once added, your selected campaigns appear on your Account Snapshot page, which shows you impressions, clicks, click-through rates, and cost-per-click metrics for each. You can also change the date range of your Watch List: you should see a small calendar icon above the list of campaigns.

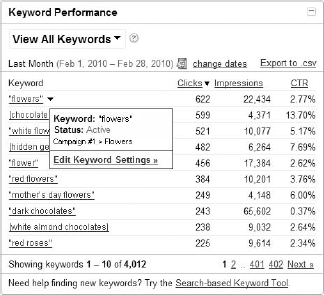
The Keyword Performance element of the Account Snapshot page is quite robust. By default, your top 10 "Best Performing Keywords" by click-through rate will be shown to you, with links for viewing keywords beyond the top 10. However, you can heavily customize this window. First, you're given six separate keyword performance choices:
View all keywords: Shows every keyword in your account.
Best-performing keywords: Shows the keywords with the highest click-through rates.
Worst-performing keywords: Shows the keywords with the lowest click-through rates.
Keywords with no clicks: Shows any keyword without a click in the specified date range.
Expensive keywords: Shows the keywords with the highest average cost per click.
Competitive keywords: Shows the keywords for which there is the most competition among advertisers on AdWords.
Each metric column that appears for each keyword is sortable, and each keyword is clickable: clicking a keyword will take you within that keyword's campaign, where you can edit it. Mousing over any keyword will pop open a small box showing that keyword's status and within which campaign it is nested. Like the Watch List element, the date range can be modified to your liking, but unlike the Watch List, the list of keywords can be exported into a CSV file.
This quick Keyword Performance report may very well become one of your favorite reports over time. Check out Figure 2-12 for an example of the Keyword Performance window.
This is a simple element of your Account Snapshot page. It simply lists the number of online campaigns in your account, and the number of television campaigns. You are provided with some quick links to create a keyword-targeted or placement-targeted campaign, as well as a new television campaign.
Here in the Campaign Performance window you can view multiple metrics against each other, or perform a date-range comparison between two separate time periods. You can view campaign performance for all online campaigns, or for individual campaigns by choosing them from the large drop-down menu toward the top of this element. Furthermore, the metrics that show in the trending graph can also be changed — the default metric is usually Conversions.
Below the graphs are a line-item summary of the selected campaigns' activity from your selected date range. When you have a date-range comparison applied you'll see each date range's metrics and a Difference column on the far right, showing you either the increase or the decrease over time for that particular metric. The focus of this element is performance, so a heavy emphasis is placed on conversions and success-oriented metrics. Figure 2-13 shows a good example of the Campaign Performance element with a date-range comparison applied.

Finally, you can search for articles within the AdWords Help Center and for answers to commonly asked questions in this final element, Help and Tips. There may be a question that you don't know the answer to, or a time when you're simply looking for a refresher in a particular area. This will be the place to go in such cases.
As I mentioned earlier, the bulk of your time in AdWords is going to be spent within the Campaigns tab. This is where all statistics about your campaigns, ad groups, ads, and keywords are located, and this is where you can make any changes to bid prices, geo-targeting, and ad copy, and do any kind of work. I'll first cover what you can do within the Campaigns tab, and after that I'll discuss what's found underneath each individual sub-tab.
Within this first sub-tab you'll notice some functions that will be available in all the other sub-tabs within the main Campaigns tab. They are:
Date-range slider: This will be available on the top right of all sub-tabs within the main Campaigns tab. You can view today's campaign data, yesterday's data, last month's, this month's, all-time, and even a custom date range. Your date-range option will be saved so that the next time you log in to AdWords you'll see data for the same date range as on your last login.
All enabled campaigns: This is a small drop-down directly underneath the Campaigns sub-tab. It allows you to toggle between viewing all enabled campaigns, all but deleted campaigns, and all campaigns regardless of status.
Segment: Segmenting your campaigns, ads, and keywords will become critical to the success of your AdWords account, so you should become very familiar with this button, located next to the All Enabled Campaigns button. You can segment anything in AdWords by net-work type, click type, device, or a number of different date ranges. Each campaign, ad group, ad, and keyword will contain additional rows of segmented information when a segment is applied, as shown in Figure 2-14. Here a campaign is segmented by week, so the performance of this campaign is broken down by each week in the month of February. Notice the vastly different conversion figures, while cost and average position remain virtually identical.
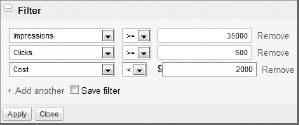
Filter: Filtering is another powerful segmentation option in AdWords. The Filter button is located right next to the Segment button, and allows you to view campaigns, ads, and keywords that meet certain criteria. For example, in Figure 2-15 I have created a filter that shows all the campaigns with 35,000 impressions or more, 500 or more clicks, and less than $2,000 in total cost. This filter can be saved for use the next time you log in to AdWords.
Columns: The Columns button offers yet another great customization function within the Campaigns section. When this button is clicked, a menu will appear of all available metrics to display in AdWords. You'll notice that almost half the metrics are not checked. Interesting bits of information, like impression share and many-per-click conversions, are unchecked by default. Figure 2-16 shows the full menu, and all the different metrics options that you should definitely explore within your own account.
Search function: Every sub-tab comes equipped with a search tool for your convenience. It's located on the far right-hand side of the screen.
Show/hide graph: The trending graph can be toggled off or on. Its button is located directly to the right of the search function.
Download report: You'll find this button next to the Show/Hide Graph toggle button. You can download reports in a variety of different file formats.
Change graph options: The two metrics that you see on the trending graph can be changed to any two metrics you feel like viewing. Figure 2-17 shows the menu you'll see when you want to change the graphing options for your own campaigns.


As you saw in earlier images, every campaign that you have ever created will be listed here and ready for you to analyze and work on. Clicking an individual campaign in this list will show you all the ad groups, ads, and keywords associated with it, and you'll be able to change bid prices and many other settings.
Within the Campaigns sub-tab you can edit each campaign's daily budget and status. If you wish to increase or decrease a daily budget, or to pause, enable, or delete a campaign, you can do so from within this tab. All the functions and features that we just covered are available in this sub-tab. Each column heading, including those of the columns that you add in with the Columns feature, is sortable, which will help your analysis efforts greatly. Finally, you can edit the name of any campaign here as well — mouse over any campaign name to see a small pencil image appear, and click on that to edit a campaign's name.
Note
The action of deleting a campaign doesn't really delete it as you'd expect. "Deleted" is simply a status for a campaign. You can un-delete it atany time.
Each ad group from every campaign you've ever created is listed here in this sub-tab. You can edit each ad group's name, and pause or delete any ad group, just as you can in the Campaigns sub-tab. (There is also a main Campaigns tab.) However, in this tab three editable items are available to you.
The default maximum cost per click, the managed placements maximum cost per click, and the Content Network maximum cost per click bid prices can all be edited here on the fly. These default bids that you can edit are safety nets in the event that you don't set a bid for any ad or keyword within an ad group. In Google AdWords, bids at the keyword level override any bids at the ad or ad-group level, and in campaigns without keywords, the ad bid overrides the ad-group bid. We'll also go deeper into placement targeting and the Content Network in Chapter 5.
Clicking any ad group that's listed will show you all the ads and keywords associated with that group.
Each campaign in Google AdWords has its own unique settings that apply to that campaign (and only that campaign). You can click any campaign name to view and edit that campaign's settings, and, as you'll quickly notice, there are a lot of settings to choose from!
We'll cover the basic ones in this chapter, and save some of the advanced settings for Chapters 4, 5, and 6. Starting from the top and working your way down the page, you'll see the following settings options:
Campaign name: You can edit your campaign name here, as you can from the Campaigns sub-tab.
Locations: This is one of the most important settings in AdWords and cost-per-click advertising, which I also talk about in Chapter 3. This shows the locations around the world where your ads will be displayed. Clicking the Edit link will pop open a window that allows you to choose your countries, regions, states, and cities, or to draw your own custom radius. Metro areas, predefined bundles, and radius targeting are also available for each campaign. Geo-targeting such as this in AdWords is available only at the campaign level — any ads and keywords within a campaign will have the campaign's settings applied to them. You'll also be able to show relevant addresses with your ads if you have a Google Places account.
Languages: It's important to note that AdWords won't automatically translate your cost-per-click ads. If you're targeting a country that does not speak your native language, your ads will be shown to visitors from that country in your language, untranslated. Ensure that the language settings match the audience you're targeting.
Demographic targeting: This is available only for Content Network campaigns, and we'll cover it later in the book. For now, just know that this is where you'll be able to edit demographic targeting settings.
Networks: Another important campaign setting is the Networks setting, where you define the places your ads will appear. By default your ads will be shown on every network available. However, most (if not all) of the time, this is suboptimal. Selecting the Let Me Choose radio button will allow you to select the
Google.comsite,Google.comSearch Partners, the Google Content Network, or managed placements. As a best practice, you'll want to create different campaigns for different networks, and set different bids for different networks (as we talked about earlier in the chapter).Devices: You can choose to show your ads to all types of devices, which is the AdWords default setting. If that doesn't work for you, you have the ability to show your ads only to desktop/laptop computers, or only to mobile devices. There are also some advanced options specifically for mobile devices, as shown in Figure 2-18.
Ad extensions: Google AdWords has recently introduced additional business information for your online ads. Product images from your Google merchant account, click-to-call phone numbers, and Sitelinks can extend your ad and make it more appealing to a potential customer. We'll cover these advanced options in greater detail in Chapter 4.
Bidding option: Your bidding option is also available to be edited for your campaigns. There are three focused bidding options available: Focus on Clicks, Focus on Conversions, and Focus on Impressions. We'll also cover this in greater detail in Chapter 4.
Budget: The daily budget is how AdWords knows how much money it has to allocate throughout the course of each day. You can enter a bud-get manually, or use the View Recommended Budget tool to view the AdWords recommendations.
Advanced settings: For brand-new Google AdWords advertisers, these advanced settings should be left alone, at least for the time being. For anyone with experience in cost-per-click advertising, this will be the place to manage advanced settings, such as Position Preference, Ad Scheduling, Ad Rotation, Frequency Capping, and more. Once again, Chapter 4 will cover all the advanced campaign settings available in AdWords.

In this sub-tab (Figure 2-19) every ad from every campaign will be listed. Ads that appear here will look as they would on a search engine results page, which is a nice feature. You can edit from within this sub-tab, as from within the other tabs covered so far, but you'll want to exercise caution when editing an ad here and within the AdWords interface in general.
AdWords allows you to create and delete ads at will, but editing an existing ad is a bit of a different story. Editing an ad actually deletes the existing ad and creates a new one. This is important because with a new ad come new statistics, which will be reset for the new ad that you edit. The deleted ad gets stored away in the Deleted Ads row, which is available if you click the All Ads button, which is the very first button on the left-hand side, directly underneath the Campaigns sub-tab.
The fifth sub-tab within the main Campaigns tab is the home for all keywords across all AdWords campaigns. As with its Ads sub-tab neighbor, editing key-words within this tab will delete the existing keyword and add a new keyword in its place. This also resets all statistics, and the old keyword will be stored in the Deleted Keywords column. The keyword's match type is considered a part of the keyword and cannot be edited.

You can edit the keyword's status (enabled or paused), bid price, and destination URL without deleting it and creating a new keyword in its place. Keep in mind when editing keywords that the bid price and destination URL that you use will override the ad bid price and destination URL, as well as the ad-group bid price and destination URL. The keyword's bids and URLs take priority over everything else.
Toward the very bottom of the keywords sub-tab (you may have to scroll very far down) you'll notice a link titled Negative Keywords. These are words that, if used in a person's search query, will disqualify your ads from being displayed. You'll be able to add, edit, or delete ad-group-level and campaign-level negative keywords by clicking on the link. With AdWords you can create negative key-words at the campaign level (so all ad groups have the same negative keywords applied to them) and at the ad-group level (so select ad groups have the same negative keywords applied to them).
Using negative keywords is an extremely helpful optimization technique to keep costs down and increase your return on investment. I cover negative keywords in Chapter 3.
Figure 2-20 shows the Networks sub-tab, where a statistical breakdown of your advertised networks is displayed. The Search Network is made up of the Google search engine's result pages and Search Partners, which are websites, like AOL. The Content Network is made up of managed placements and automatic placements. Remember that you can always edit the networks in which your ads appear within the Settings sub-tab inside the main Campaigns tab.

The final sub-tab within the main Campaigns tab is the Audiences tab. I'll spend some time talking about placement targeting and remarketing in later chapters, but for now just know that this final tab is where you'll be able to manage, edit, and create audience lists and remarketing campaigns. This type of advanced advertising can really expand your reach and target the appropriate segments for your business.
We've covered all the sub-tabs within the Campaigns tab, and now we'll take a better look at the next main tab in AdWords as we move from left to right on the screen: the Opportunities tab.
Google AdWords automatically analyzes your budget, your keywords, and your overall campaign performance and provides recommendations for you within this tab. As I mentioned earlier in this section, the Opportunities tab is like a personal consultant at your disposal. Every few weeks the AdWords system will review your account and provide recommendations (or "ideas") that are statistically significant, and that will improve your traffic and campaign performance.
You may log in to your account and find no ideas; this tends to happen with new AdWords accounts or those with very limited daily budgets. But normally you'll find one of three types of opportunity ideas from Google:
Keyword ideas: Google will scan your ad-group structure and generate some keywords for you that you're not currently bidding on. As I mentioned earlier in the chapter, if you have a tight, well-organized account structure, the keywords that Google will suggest for you are going to be very accurate. If you have a poorly organized account, Google may be very inaccurate with its keyword ideas. Clicking an idea will bring up all the keywords that Google recommends inserting in that keyword's ad group — but don't just take Google's word for it. Use your common sense and make sure that you can afford these keywords first before adding them to your ad groups.
Keyword-bid ideas: Similar to the keyword ideas, Google will provide specific bid ranges plotted on an (x/y) coordinate graph. As you increase your bids, the number of impressions increases, but so does your total cost; your costs will be lower as your impressions decrease. Applying keyword-bid ideas to your keywords should meet your goals. If you want more impressions and possibly more clicks, increase your bid prices (but keep in mind that your daily budget won't be changed; the more you raise your keyword bids, the more they will "hog" the available impressions against your daily budget, which means some of your other keywords will be left in the dark).
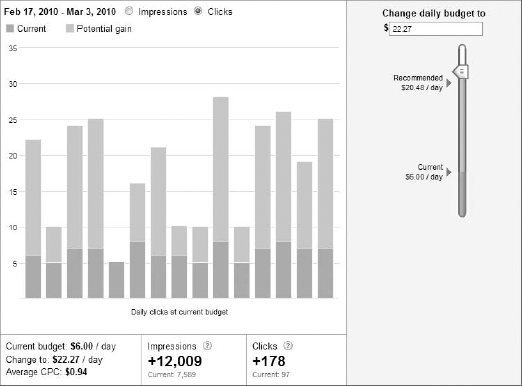
Campaign budget ideas: Google's Opportunities tab will also analyze your daily budget, and inform you if you've been hitting your daily budget frequently. If you have been, Google will suggest to you that you may be missing out on available impressions and clicks, and will show you some rather advanced forecasting. Google takes a look at the last 15 days of activity within your account, and calculates the best possible daily budget to reach as many customers as possible. Figure 2-21 shows a campaign budget idea in action. To the right there is a sliding bar/scale that will show you where your current daily budget is, where the Google recommended daily budget is, and any point in between. Sliding the bar up or down will change the forecasting intelligence displayed on the left-hand side of the pop-up. The number of impressions, clicks, and other items of statistical information are available for you to digest, and you can toggle between viewing these stacked bar graphs by either impressions or clicks. Obviously, these suggestions are truly valuable only if you can afford to raise your daily budget to the recommended amounts, but even if you can't afford it, you can always use this area to get an idea of what could be.
I highly recommend that you check your Opportunities tab every few weeks to view what Google's automated Opportunities tab system has in store for you.
The Reporting tab is home to the Report Center, where we'll focus our attention in this section. You can access Conversion Tracking, My Change History, Google Analytics, and Google Website Optimizer from this tab, but I want to walk through the steps of creating a report and accessing reports for future use. Creating a customizable report in AdWords enhances your analysis efforts, and can shed some light on a certain data set that may not have been readily visible up to this point. Reports are also easier to integrate with a CRM system or database that you may manage, versus manually entering information.
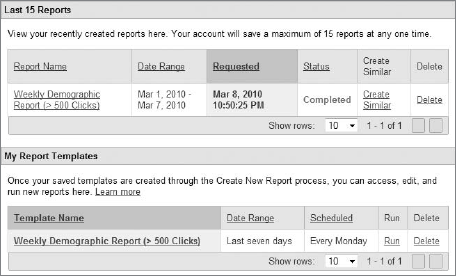
Once you're in the Report Center you should see a link reading Create a New Report on the upper middle portion of the page. Click that link to start the reportcreation process. You can save up to 15 reports at any one time in your AdWords account.
Your first decision in creating your report will be to select a report type. At the time of this writing, Google AdWords offers 10 different report types, depending on the type of information that you're looking to retrieve. These types are as follows:
Placement/keyword performance: This report type will show you performance data for keywords or placements that you're targeting.
Ad performance: Here you can view performance data for each of your ads.
URL performance: Here you'll see the performance for each destination URL (not to be confused with display URL).
Ad-group performance: This shows ad group reporting for one or more campaigns.
Campaign performance: This reports data at the campaign level.
Account performance: Your entire account's performance can be reported on.
Demographic performance: Here you view data for sites by demographic.
Geographic performance: This report is broken down by the location of your visitors.
Search-query performance: This shows performance for the actual search queries that triggered ad impressions (not the keywords that you're bidding for, but the actual search terms visitors use on Google).
Placement performance: This shows Content Network performance on the sites on which you're advertising.
You can select only one report type per report. If you need multiple reports, finish creating one report and create another new report.
Next you'll select some basic settings for your report. This naturally includes selecting your unit of time. Twelve separate units of time are available, and if those default units don't suit your needs, you can always create a custom date range. In Figure 2-22 you'll see that you can either select to have your report run for all campaigns and ad groups, or manually select them one by one.

While completely optional, advanced settings are critical to getting your report to look the way you want it to. There are two links in this section to click on: Add or Remove Columns, and Filter Your Results.
Clicking Add or Remove Columns will reveal a rather large layer of column options with a lot of metrics that are not available anywhere else in the AdWords interface. By default your report will contain 15 data columns, but you can select as many as 49! Check out Figure 2-23 for the full menu of available reporting columns.
The Filter Your Results link allows you to perform a set of operations similar to the Filter function from within the main Campaigns tab. You can select up to 12 different criteria, and enter restrictions for each criterion as you see fit. This filtering option can really help clean up the report that you eventually create, as it can either eliminate a lot of "junk" or it can be specifically targeted to your reporting needs. Figure 2-24 displays an example of some filter restrictions being applied to a report.


The final sections of the reportcreating process are naming your report and scheduling your report's delivery options. First you'll want to give your report a name that you'll be able to easily identify when you go back to look it up in the Report Center.
Next you can save the report as a template, which allows you to quickly reuse the settings for another new report in the future. After that, you can schedule the report to run every day (daily), every Monday (weekly), or every first day of the month (monthly). Finally, you can set up this report to be e-mailed at your scheduled delivery times to one or more e-mail addresses. You can send your report as a file attachment in a CSV, CSV for Excel, TSV, XML, or HTML file format.
Once you're finished with this section it is time to create your report by clicking the silver Create Report button at the bottom of the page. You'll be redirected to the Report Center, where you'll see your created report status eventually change to Completed. The report settings and the requested date will appear, and if you've saved the report as a template, it will be listed underneath the report, as in Figure 2-25.
Clicking the name of the report will pop open a new tab or window on your browser, and show you your data in an easy-to-read and -understand report format. If you've ever seen a report from Google Analytics or remember what some of the images from AdWords from within this chapter look like, you'll see similarities between the style of Google AdWords reports and that of Google Analytics.
Within this report you can view detailed statistics (generated date of report, date range, and such). You can export the report on the fly in many of the file formats just mentioned, and you can create a similar report to the one you just created. You can open this report as a Google Spreadsheet (helpful for non—Excel owners and for online collaboration). Any of the column headings are sortable, and you can view more rows by scrolling all the way down the report and clicking the arrows on the bottom right-hand side.
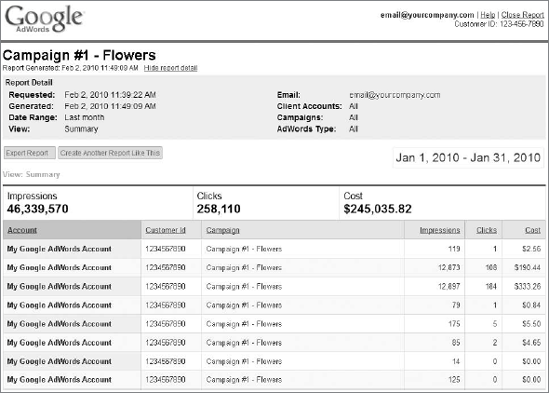
Figure 2-26 shows the final product: an example of a created report.
For most AdWords advertisers the second-to-last tab within the AdWords interface will include two reports: a Billing Summary and a Billing Preferences report. If you manage an MCC (a "My Client Center" containing multiple AdWords accounts), or have an agency account, you'll see an Invoice Summary report and a Budget report.
Just as with any other report in Google AdWords, you can view top-level data and apply a custom date range to it. Your last payment, with the amount paid, date, and payment method, is shown at the far left of the scorecard going across the top of the summary screen. Your primary payment method is also shown, along with the status of the payment method. A "valid" status means that your credit card was processed without errors. An "expired" or "declined" status message requires immediate action if you are to continue advertising with AdWords. You may also see a "pending" status, indicating that your payment may already have been made and is just processing. The item on the far right of the scorecard is your current balance, showing your total unpaid advertising costs and billing threshold. Naturally, as with all things AdWords, the Billing Summary page can be downloaded into a CSV file or opened as a Google document. Figure 2-27 shows the Billing Summary page.

The Billing Preferences page is a sensitive one, as it carries all your personal billing and payment information. Check this page before you start advertising with AdWords to ensure that all the information is up to date. Here you can edit your billing and payment information and edit your primary and secondary (backup) payment details.
The Invoice Summary and Budget tabs appear for those with MCC or Agency AdWords accounts. In the agency advertising world, credit is typically extended to the agency of record, and an unlimited amount of funds can be spent with AdWords at any one time. The agency of record is invoiced and required to pay a lump sum for all cost-per-click charges that it owes AdWords. This privilege is usually granted to agencies only after a successful trial period including a good history of payment and high spending.
In almost all situations you, the online marketer, won't need to worry about any Agency/MCC billing reports or settings, as these are set up by your finance/accounting department before you even start setting up your first campaigns.
The final tab and final part of Chapter 2 is the My Account tab. There are three reports in this drop-down menu, where you'll be able to edit the notifications that AdWords delivers to your inbox and also be able to invite other users to share your AdWords account.
Situations may arise where you'll need to allow someone else to have access to your AdWords account. This could be a friend, a colleague, or an agency helping you out with your campaigns. Regardless of the situation, you can invite anyone with an e-mail address to have access to your AdWords account. However, the type of access you grant is important, and you have a few options to choose from:
E-mail-Only Access: All that users can do with this type of access is receive e-mail notifications and messages in their inboxes from AdWords. These users cannot do anything at all within your account — they can't even sign in. Clearly, this is the most restrictive access available in AdWords.
Reports-Only Access: These users can view the Campaigns tab in a view-only mode, and they can view the Reports tab (and run reports within it). This is not as restrictive as E-mail-Only Access, but it still keeps a very tight rein on a user.
Standard Access: A Standard Access user can create campaigns, edit settings, run reports, and do almost everything that an account's owner can do. The only thing a Standard Access user cannot do is manage access levels or disable access to the account.
Administrative Access: Administrators can do everything that you can do within your account. This is the least restrictive type of access. Depending on the necessary task (API functions), the user may need to be an administrator and have the same controls as you.
Choose your user's access level carefully, and never give out your own login information to anyone for any reason. Trust me on that last statement.
As you saw way back in Figure 2-10, your notification settings, which are the e-mails that AdWords sends you and the announcements it sends to your Account Snapshot page, can be edited from this page. As I said before, you should probably enable as many of these settings as you can, especially if you are new to Google AdWords or to cost-per-click marketing. You can always go back and disable them later, but for now it's probably a good idea to keep as many notifications active as possible.
High-level account preferences are editable from this final report in Google AdWords. Your display language, number preference, and destination-URL auto-tagging are editable from this screen. Remember that your time zone coun-try/territory and your billing preference (prepay or postpay) cannot be edited at all. In Chapter 14 we'll come back to this page to ensure that destination-URL auto-tagging is enabled, which is a critical part of allowing Google AdWords data to appear in Google Analytics.
We covered a whole lot in this chapter, and I hope you've learned where everything is located in Google AdWords and how things are organized. We went from the very start of the Google account creation process to the very end, covering all the many points in between. You'll notice that I didn't talk too much strategy or philosophy about cost-per-click advertising here in Chapter 2. That's completely reserved for the next chapter in Your Google Game Plan for Success, the chapter titled "Cost-per-Click Advertising." This is where I explain how the industry as a whole functions and some of the essential strategies that you'll need to know (and that if you already know, it's a good idea to review while you're here).
I hope that you've enjoyed our book thus far! Don't go anywhere, because we have a lot more material to cover.