
A carpenter, a dentist, and an auto mechanic are all good with their hands. They've been tutored and mentored, and have mastered their skills to perfection. Most have the certifications to back it up. Some carpenters are just naturals and can do anything with their hands. A top auto mechanic knows about all there is to know about cars. All these folks use the tools of their trade to do their jobs. As an online marketer, you also need to use the tools of your trade to become the very best there is, and make yourself and your clients lots of money.
In this chapter I'll demo a number of tools available both within and outside AdWords. You'll learn about the critical Conversion Tracking tool, the My Change History tool, and Google Ad Planner. The first tool I'll cover is one you could very well use as often as the AdWords online interface; this is Google AdWords Editor.
AdWords Editor is a free downloadable program that enables you to manage your AdWords account offline and from your desktop. With it you can make bulk changes across multiple campaigns, including budget changes, keyword bid adjustments, and new ads. You can write notes, download bulk spreadsheets, and propose changes to other colleagues who may work together with you.
The best feature of AdWords Editor is that all the changes happen locally, on your computer. Only when you are good and ready will your changes be posted live to your account, and you don't have to worry about losing changes if your Internet connection is lost or your computer crashes — AdWords Editor saves your work as you go along.
AdWords Editor is available for both Windows (Windows 2000 and newer) and Mac OS X (10.4 and newer). It's available to be downloaded and installed from http://www.google.com/intl/en/adwordseditor/index.html. Click Download AdWords Editor on the top right-hand side of the page, which will take you to a Thank You page and begin the file download. Once the download is complete, find it on your computer and double-click the installation file. This process should take about a minute, and you'll be ready to download your first campaign from AdWords.
When you open AdWords Editor for the very first time, you'll need to accept the terms and conditions before proceeding. You'll need to scroll down to the bottom of the pop-up box in order to click I Accept to move forward. Next you'll be asked to set your default language and location targeting options for any new campaigns that you create from within AdWords Editor. You'll also be asked to enable or disable usage tracking. Google collects anony-mous usage information from your sessions if you enable usage tracking. The information is not personally identifiable, but the choice of whether to enable tracking is entirely up to you. Click OK to open up AdWords Editor for the very first time.
The next thing to appear should look like Figure 5-1. The AdWords Editor window should be open, along with an Open Account window in front of it. Click Add Account at the bottom of the Open Account window to bring up the third window you see in Figure 5-1, which asks you to sign in to your AdWords account. Enter your username and password and click Next to begin downloading your campaigns. A new dialog box should appear, asking you if you'd like to download all campaigns or only selected campaigns. Once you have made this choice a progress bar will appear in a new window, showing you statistics of campaigns, ad groups, and other campaign details downloaded. When the download is done you'll finally be able to start using AdWords Editor!
Your campaigns are now downloaded, and it's time to start getting familiar with the AdWords Editor interface. I'll run through the options much as I did in Chapter 2 with the online version of AdWords, but I won't be going as deep — we do have other very important programs to cover in this section. If you're still new to AdWords, it's my recommendation that you continue using the online version until you have a solid grasp of the interface. If you're already at that level, continue reading!
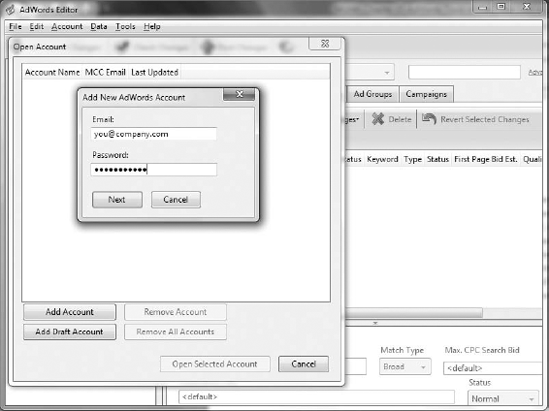
Figure 5-2 shows the standard view of AdWords Editor. At the very top left, options to download files in Excel and to open another account, as well as tools, data options, and a menu, are available. Immediately below that top row, you can download recent changes, check selected campaigns for accuracy, post selected campaigns live, and view AdWords-oriented statistics for your campaigns. Below that second row are the main panels you'll be working with, including a navigation menu on the left-hand side and the editing screen in the middle, with six tabs featuring commands below them. The bottom half of the middle portion of the screen shows you all the settings of your campaign (or selected items, according to the tab you're on).
If you start using AdWords Editor regularly, you'll want to make it a habit to click Get Recent Changes on the upper left-hand side. This will save you a lot of pain by downloading the most recent version of your account. This way, any updates you make to your AdWords campaigns online will be downloaded, so you won't wind up doubling your work or overwriting anything.

Clicking the File menu button will display options for downloading and backing up your AdWords account. You can export in a CSV file; a ZIP file that includes any uploaded images from image ads, backup, and sharing file formats if you use multiple accounts; and an HTML-friendly version to view your AdWords account in a local web browser. Each menu option enables you to download the entire account or only selected campaigns.
A second interesting menu option is the Tools button. The first one is a Duplicate Keywords tool, which is shown in Figure 5-3. You can find duplicate keywords between ad groups, between campaigns, or over your entire account. You can search by match type, through deleted keywords, and by word order. As your AdWords account grows, it will become increasingly important for you to keep tight control over everything within your account, and it's all too easy to create duplicate keywords unknowingly. The AdWords interface online will let you create and activate a duplicate keyword, which would result in your bidding (competing) against yourself, possibly within the same campaign. With AdWords Editor you can seek out duplicates.
There are two other important tools in this menu. Keyword Grouper scans your campaigns and provides suggestions about how to better organize your ad groups by grouping like-worded keywords together. Remember that a critical component of your keyword's Quality Score is your account structure, which makes this tool invaluable for you to use regularly, especially when you first start working in AdWords Editor.

There is also a beta version of the Opportunities tab from AdWords called Keyword Opportunities. Google can find related keywords based on your current account keywords or based on the content of your website. Another key component of a successful AdWords campaign is having a good fit between your ads, the keywords in your ad groups, and the content on the destination URL (landing page) of your ads. Keyword Opportunities can help by suggesting keywords that you may not have thought of to help increase your performance. Of course, neither Google nor I can guarantee that any suggested keyword will in itself automatically improve performance. You can check out the keyword opportunities report by clicking the Tools menu and selecting Keyword Opportunities from the drop-down menu.
Most of your time in AdWords Editor will be spent within the six tabs in the middle portion of the screen. Looking from right to left on your screen, each campaign, active or paused, will be listed here when you download recent changes. AdWords Editor won't download deleted campaigns — you'll have to go to the online interface and switch the status of deleted campaigns for AdWords Editor to be able to download them. Below the Campaigns tab you have options to add a campaign or to add or edit multiple campaigns. There's also a Revert Selected Changes button, which performs an undo for any highlighted element. The same holds true for the other five tabs. Within the Ads tab you are given four sub-tabs, one for each ad type (text, image, local business, and mobile). At this time AdWords Editor cannot support video ads. Ad previews become available when you select any type of ad in the bottom panel of the program.
The Keywords tab is what I'll use to show you a few more screenshots that demonstrate work within AdWords Editor. Figure 5-4 shows some of the keywords from a few of the campaigns in my AdWords account. If I want to see keywords from only one or two campaigns, I select them from the left-hand navigation menu. Usually, as a default, all your active and paused campaigns will appear together in the six main tabs. Toward the bottom of Figure 5-4 you can see individual keyword details, including the keyword itself, match type, maximum cost per click, destination URL, status (normal, paused, or deleted), and an area for entering comments. Comments are available only in AdWords Editor — they are not available online.
At the very bottom of the screenshot you'll see additional tools at your disposal, including an Advanced Bid Changes tool and an Advanced URL Changes tool. These are like the search and replace functions in Microsoft Office or the Ctrl+F function in your browser. These two tools — especially the Advanced URL Changes tool — can be a total lifesaver if you need to make a sweeping change, for instance because a page was updated or a landing page's URL was changed. It's not as easy to change your URLs like this in the online version of AdWords, and it's not possible to change bid prices at the keyword level across ad groups and campaigns in one shot, so you should become familiar with those two tools.
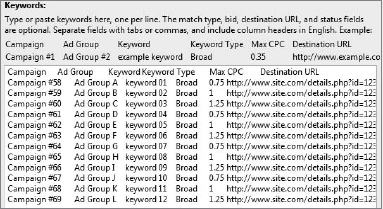
When you click the Make Multiple Changes button under the row of tabs, you'll be able to add or edit multiple keywords or ads across campaigns. This is a go-to feature in AdWords, especially when collaboration or client approval is required. Normally you either download a desired campaign or ad group in a CSV file format from the File menu, or you start creating a new list of keywords, match types, bids, and destination URLs in Microsoft Excel. You can do all your work in this spreadsheet, show it to your colleague for input or quality control, show it to your business partner or client for approval, and then use the Make Multiple Changes feature to upload your bulk spreadsheet into AdWords Editor. You can also enter the campaign and ad-group names into your bulk spreadsheet.
Figure 5-5 is an image of a fake bulk list of keywords uploaded into the pop-up window that you'll see after clicking the aforementioned button. If you follow the onscreen instructions and create the required column headings, when you paste your work from your spreadsheet program into AdWords Editor, the fields should be tab-delimited (you'll see blank spaces between fields as in Figure 5-5). When you click the Next button below the pane shown in the figure, AdWords Editor will check your new or edited keywords for errors or inconsistencies. If there are none, you'll be good to go by pressing OK. If not, you can cancel and make adjustments as necessary.
If you enter a keyword that is already within your specified campaigns and ad groups, you'll be updating (editing) the corresponding current keyword, not creating a new keyword.

Most of the other functions within AdWords Editor are extremely easy to use. They operate either as menu functions or as pop-up windows, or within the main AdWords Editor panel. As I mentioned in the beginning of the chapter, you'll want to be very familiar with the online interface before delving into the offline software tool. You'll find yourself picking up AdWords Editor in a matter of minutes if you know how the online AdWords interface works.
Once you've completed your work for the day (or for any period), it's time to make your changes live within AdWords. Until you press the large Post Changes button at the very top of the program, all your new, edited, or deleted campaigns, ad groups, negatives, and keywords will be offline. You'll get a chance to review high-level informational statistics about the number of edits or changes you've made, but the best way to make sure AdWords will accept everything is to pay attention to the navigation and the main editing area. You'll notice as you edit items that a purple triangle image will appear next to anything you edit. This lets you know that you've edited something within that campaign, ad group, or keyword. It won't appear when you enter in a new campaign; it will only appear when you make edits to an existing campaign. You should also watch out for red and yellow warning signs that may pop up as you're working within AdWords Editor. If you see a line item with a red or yellow warning symbol, click it to find out what the error is (it will be listed in the bottom half of the main editing panel). Make sure that all the red and yellow warning signs are taken care of before you upload.
Once you hit the Post button, all your work will be uploaded and simultane-ously made live in your actual account. It's never a bad idea to double-check that your work is indeed in the interface and set as you want it.
Note
Just as in the online version, aspects of the offline AdWords Editor program may look slightly different from the images you see in this chapter. Google is constantly pushing out new updates for both the online and offline versions of its programs, so there may be features so new that I wasn't able to cover them here.
Google Ad Planner, also known as DoubleClick Ad Planner by Google, allows any advertiser to create a robust media plan for sites on which he or she wishes to advertise. With Ad Planner you can define desired target audiences by demo-graphic, language, interests, or geography; you can search for relevant websites that fit your target audience; and you can view detailed website statistics for millions of sites that are not available anywhere else online.
Google also offers Ad Planner for Publishers. If you're a site administrator or owner, you can keep your site information current and up to date, so that would-be advertisers have a higher chance of selecting your site, which in turn increases the possibility that you'll make money.
This innovative tool is available at www.google.com/adplanner. You can also find it by doing a search within AdWords or within the AdWords Help Center. It's not attached directly to the AdWords interface, and you'll need to be logged in to your Google account in order to create a media plan. Your best bet is to open up a new tab and visit www.google.com/adplanner. Before you create a media plan, you can get a taste of what Ad Planner has in store for you right off its homepage.
As you reach the Ad Planner homepage you'll be able to view any site's listing right off the bat, in the upper portion of the screen. Enter a URL for any site and click the arrow button or press the Enter key to view that site's profile. You don't have to log in to your Google account or create a media plan to do this. This site listing enables you to obtain some baseline statistics on any site you wish, and will give you a taste of what the media plan has in store. You can also use it to check out your own site, and view its listing as others will view it.
Figure 5-6 shows you the site profile for www.thedailyplate.com. Starting from the top and working our way down, a thumbnail, a category, and descrip-tion text are available. If you look closely at Figure 5-6, you'll notice that this site does not have a description in Ad Planner — the site's owner will need to log in to his or her Google account, verify that this site is indeed the owner's, and add a description. A checkmark, indicating that the site is accepting advertising, is also shown.
Below the top part, site-level statistics are available, along with the estimated volume of daily unique visitors plotted on a chart. Statistics on the left-hand side are all estimates, and do not represent actual counts. They are displayed in millions or thousands, depending on the volume of traffic that the site receives. Counts of cookies, visitors, site reach, page views, total visits, average visits per visitor, and average time on site are all available.
If demographic data is available, it will be displayed below the Traffic Statistics area shown in the middle of Figure 5-6. (This particular website does not have demographic data, and this may be the case for most sites that you view in this site listing tool.) Toward the very bottom, you can begin to see the sites that visitors to The Daily Plate also visited, as well as the keywords that were searched for. The interesting metric to note in this area is affinity, which is an estimate of how likely a visitor is to visit a site and/or use a keyword that appears on this report. Let's use the example on the bottom of Figure 5-6 to elaborate. The second website (the last visible line on Figure 5-6) is Diet Facts (www.dietfacts.com), and it has an affinity score of 827.8x. This means that a user of the original site, The Daily Plate, is 827.8 times more likely to be found on Diet Facts. Clearly, Diet Facts is a site that The Daily Plate would want to advertise on, as its audience is incredibly likely to be on this site. Conversely, a Diet Facts visitor is also 827.8 times more likely to be found on The Daily Plate.
Keywords work similarly. The second keyword, applebees nutrition, has an affinity score of 1,419.8x. Google Ad Planner is suggesting that a user searching for applebees nutrition is 1,419.8 times more likely to visit The Daily Plate. It's a no-brainer — The Daily Plate should seriously consider using that keyword on a Content Network targeted campaign, because it provides a great chance to reach the target audience.

Start creating your media plan by signing in to your Google account from the Ad Planner homepage. You'll need to accept Ad Planner's program terms in order to continue. Check the appropriate checkboxes and hit Continue to begin creating your first media plan.
When you first arrive at the media-planning page, you'll instantly see two main tabs and two sub-tabs. The tabs at the very top of the page are labeled Research and Media Plan. On the Research tab you'll find a website to evaluate statistical data and demographic information; there you'll also be able to add a site to your media plan. The Media Plan tab will show you a full listing of all added sites, as well as some top-level information. Because you must create a media plan before you can add sites, let's go ahead and do that, starting from right to left.
Under the Media Plan tab you'll see a row of silver buttons at the end of the table, along with some command links. If this is your first time using Ad Planner, your tab should be completely blank. Click Create Media Plan to assign your new media plan a name, a country, and a brief description. Save it, and you'll see a screen matching the one in Figure 5-7. Two new sub-tabs will appear, labeled Details and Profile. Each placement and its category will appear within the Details sub-tab, and demographic data will appear under the Profile sub-tab.
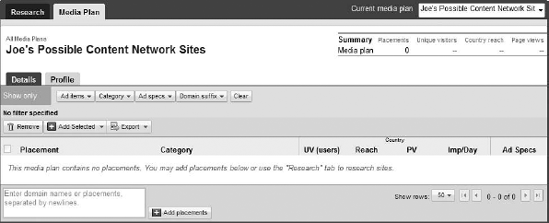
Now it's time to add sites to your media plan. You can do this in one of three ways. You can add sites directly by using the text area and clicking the Add Placements button at the very bottom of Figure 5-7. You can enter as many website URLs as you want, and view the sites' details. On this Details tab you'll see each site's placement (URL), vertical (Category), daily unique visitors (UV), reach, page views, impressions per day, and, most importantly, ad specifications.
Check out Figure 5-8. I've manually added to my media plan placements on which I might want to run a Content Network campaign. I remembered these website URLs and entered them one by one in that bottom-left text area. Each site is listed on the left, and when you click any site's name you'll see its site profile (we'll do this in just a little bit). You can also visit the site directly by clicking that "double window" icon to the left of the site URL. The Category column to the right of the site URLs reveals to me what category each item falls under. Notice that the first URL —cars.com— is listed under Vehicle Shopping. Because I wanted sites that are travel-oriented, I can remove the cars.com placement from my media plan. Now look to the far right of Figure 5-8 and notice the Ad Specs column. This tells me what ad types, if any, each website supports. Any site on the Google Content Network can support text, image, video, and Flash/rich-media ads, and you may see those logos appear from left to right, as you can see for www.priceline.com. Because I want to be able to advertise on sites, I can also remove sites that don't accept any ads, like www.southwest.com and the bottom three sites.
Roll your mouse over any logo in the Ad Specs column to view the ad-format sizes that particular website accepts.

The second way you can add sites to your media plan is by first doing some in-depth research by clicking the main Research tab at the very top left of Ad Planner. Here, by default, you should see www.wikipedia.org and a full page of analytical and demographic statistics. However, because www.wikipedia.org does not accept advertising on its website, it's no good to us at this time. We need to add sites to our media plan that we can possibly advertise on in the future. Therefore, I am going to change the site to www.priceline.com, because I already have it in my media plan and we already know from Figure 5-8 that it supports all ad-format types.
When you change your site to www.priceline.com, you'll be able to evaluate the site and make a more intelligent, more informed business decision, which should help you decide whether or not you'd like to advertise on the site. You can view graphs, demographic data, a unique-visitor (cookie) trending graph, and the ad-format types the site accepts, just as we talked about in the "Viewing a Site Listing" section a few pages ago.
In that section we didn't cover a few interesting pieces of data that can further help you in your decision-making process:
Sites also visited: The top 10 other sites visited by
www.priceline.comvisitors listed and ranked by affinity score. For example, at the time of this writing, forwww.priceline.com, a site namedwww.trip.comhas an affinity score of 38.0x. This means that visitors visitingwww.priceline.comare 38.0 times more likely to visitwww.trip.com. This information equals opportunity for you. If the demographic information fromwww.priceline.comsatisfies your target audience, you could also addwww.trip.comto your media plan.Keywords searched for: The top 10 keywords that lead people to the website in question also appear ranked by affinity score. You might want to bid for high-affinity keywords in your Content Network campaigns in Google AdWords.
Top sub-domains: The top sub-domains that the site owns will be listed, along with the number of monthly worldwide unique visitors (unduplicated visitors). You'll see each sub-domain's potential reach and possibly add them to your media plan as well.
The third possible way to search for sites with Ad Planner is by audience type. This is the second sub-tab within the Research main tab, where you'll find a great many options to choose from. Going across the top of the screen, right below the Search by Audience sub-tab you'll see an Audience row and a Filter row, where you can refine the listing of sites that appear. As you can see in Figure 5-9, in the Audience row you can filter the preselected sites by geography, language, demographics (gender, income, education, and age), online activity (which other sites visitors also visit), and something called load audience, whereby you load in sites based upon audience type (for example Auto Enthusiasts, Brides-to-be, or Affluent 100K +).
The Filter row allows you to further refine the contents of this Audience sub-tab by filtering according to ranking method, ad items (domains, sub-domains, placements), category (sports, entertainment, health), ad specifications, and domain suffix (.net, .edu, .org). The Ranking method button (when selected) provides you with three options: Comp (for Composition) Index, which displays smaller (lower-volume) sites geared toward your target audience; Best Match, which displays a balance between small and large websites; and Audience Reach, which displays larger but less-targeted sites for the widest possible reach. The default option is Audience Reach, and it takes into account your Filter and Audience row options to provide you with this list of sites and data.

As you are refining this list, you can add any site to your media plan by clicking the checkbox next to the site's URL and clicking the Add Selected button at the very top. You can also export your selected sites into a CSV file (important if you wish to drop these sites into your manual placement targeted campaign in Google AdWords).
If it is helpful, graph these sites by clicking the Graph button. This will open a new pop-up window and show you an interactive bubble chart, which uses the same front-end technology as motion charts in Google Analytics, which I'll demonstrate in later chapters. You can customize the x and y axes (determining which metric each axis represents), the color, and the shape of the bubbles. If you scroll over any bubble you'll see the site's name and date. Mouse over any bubble to see its x-, y-, and z-axis data. Figure 5-10 shows an example of the Ad Planner graphing option.
Finally, click the Media Plan main tab again and click the Profile sub-tab. This contains aggregated demographic data for all selected sites in your media plan. You can view the gender distribution, age brackets, education levels, and household income figures in four horizontal bar graphs. You also get to see a summary of the number of placements selected and the reach of the selected sites, toward the top right of the screen.
Figure 5-11 shows what my Profile sub-tab looks like.


Google Ad Planner is a must if you plan on advertising in the Content Network. This type of information is not available within the AdWords interface or within AdWords Editor, so you'll need to visit the Ad Planner site to create your media plan and perform your research.
On the very top right-hand side of the Ad Planner interface is a Publishers link. This is where you'll want to go to verify your site and edit the content that appears for your site in Ad Planner.
Before you can do any editing, you'll need to first verify that you own the site in question. You can do this in one of two ways: you can log in to your Google Webmaster Tools account and upload a verification file, or, if you're a DoubleClick MediaVisor client, you can sign in to that account and select the sites you'll want to include in Ad Planner. For Webmaster Tools you'll need to have FTP (file transfer protocol, which gives you the ability to upload/download files from your host server) access and the ability to perform basic HTML edits. From within Google Webmaster Tools, you'll be able to click on a link to download your verification file, which is a simple text file that you upload to the root directory of your website. Google often checks for this verification file for search engine spiders, local business listings (Google Places), and other programs, including Ad Planner for publishers.
Once your site is verified and appears listed in the Ad Planner publisher center, you'll be able to edit its category and the ad formats that your site accepts, and to share your Google Analytics data. If you're an administrator of your Google Analytics account, you'll be able to share unique visitors (cookies), page views, total visits, average visits per visitor, and average time on site. This could be advantageous, as the more information you share, the better other advertisers can place their ads on your site. Contact the administrator of your Google Analytics account if it's someone other than you, and ask to be made an administrator in order to share these statistics with Ad Planner.
I've been hitting you over the head with words like insights and outcomes and analysis for four and a half chapters now. It's about time I started talking about the AdWords Conversion Tracking tool. When you enable conversion tracking in your AdWords account, you'll activate performance-oriented metrics, which will enable you to make intelligent decisions about how to manage your AdWords campaigns, ad groups, ads, and keywords. You'll be able to assign numerical and financial values that will show you how wisely or frivolously your advertising dollars are being spent.
When a visitor clicks an AdWords ad from an account that has conversion tracking enabled, the visitor will reach the landing page of that particular ad. In the meantime a cookie will be placed on the visitor's computer, identifying the user as originating from an AdWords account with conversion tracking enabled. The campaign, ad group, ad, and keyword information, as well as a date/time stamp are also stored within this cookie. It has a shelf life of exactly 30 days (keep that in the back of your mind for now).
During that browser session, the visitor sees several pages and eventually reaches a key page of that website, such as a "thank you" page after filling out a form, or a "receipt" page after purchasing something from the online store. A snippet of JavaScript tracking code that's placed on this page will send data to Google AdWords, signaling a conversion. In no more than 24 hours this information will be credited back to the keyword that the user originally clicked, and you'll see a conversion appear for that keyword in the AdWords interface. AdWords will also calculate the conversion rate (the percentage of visitors who convert) and the cost per conversion (how much each individual conversion costs, on average), which are two critical metrics for any serious advertiser.
Now, let's say that, for example, a user enters the term new balance sneakers in AdWords, clicks an ad for the New Balance website, and does not reach the page on the site that has the AdWords conversion-tracking script. Then let's assume that the same visitor, 15 days later, comes back to Google and performs a search for new balance running shoes. She finds another paid search advertisement for New Balance's website, clicks it, and this time converts, purchasing running shoes from the New Balance website. Now, which keyword should receive the credit for the sale? In AdWords, which of the two keywords should receive the conversion statistic? If you said the keyword new balance sneakers, you'd be correct.
AdWords uses what is known as a first-click attribution model for measuring conversions. The first click's keyword, regardless of how many other clicks occur after it, will receive the conversion credit. Furthermore, Google will "backfill" this data when the conversion occurs. In the previous example there was a 15-day period between the first click and the second (last) click. This 15-day period may not necessarily happen within the same month; the first click could have happened March 25 and the second April 9. This is extremely important to remember if you run any type of monthly or weekly reporting out of AdWords.
One more quick quiz: A visitor searches for structured settlement and clicks a paid ad for a particular website. The same visitor comes back 45 days later and uses the same structured settlement search query, and clicks an organic listing in the regular search engine results. During this second visit, the visitor converts. Does the structured settlement keyword get credit for the conversion in AdWords? The answer this time is no.
The AdWords conversion cookie has a 30-day shelf life. After 30 days the cookie expires, which means AdWords cannot receive credit for that conver-sion. It would have received credit had that same visitor converted within 30 days, even though the user's second visit to the site was from an organic search engine result.
If a visitor has cookies disabled or is blocking JavaScript, Google cannot collect conversion data from that visitor.
Note
In Chapter 14 I cover AdWords search funnels. This report shows the keyword paths that visitors take to reach a point of conversion on your site. If a visitor clicks three different ads within a 30-day period, using three different search queries, the Search Funnels report will show you which keyword directly led to a conversion, as well as what other keywords get partial credit for the conversion — called an assist. Flip to Chapter 14 to learn how this first-click attribution model can be enhanced, providing you with more intelligent data.
Log in to your AdWords account and click the main Reporting tab. You should see a drop-down menu appear below the tab. Find the Conversions link and click it. Once there, you'll see an empty table with three sub-tabs. You'll see some links to Google help files on the left-hand side (if you want to learn even more about conversion tracking), and a place for a navigation menu.
Find and click New Conversion from within the Conversions sub-tab to create a conversion action for your account. You can create multiple conversion actions if you have multiple conversion points on your website, but for now I'll just create one to show you how it's done.
Once the New Conversion button is clicked, you'll be asked to enter a name for your conversion and to select a conversion type. This is simply for information purposes, but can be used to organize this section of AdWords if you plan on creating multiple conversion actions. Choose the type of conversion that most closely matches your conversion, and click Save and Continue below. You can choose to select a purchase/sale, a sign-up, a lead, or a view of a key page. There is also an "other" option, in case you're not sure which tracking purpose type to select from.
You should now be redirected to the Code sub-tab, where you'll see some options for your conversion tracking snippet. You can select the page security type (HTTP or HTTPS), an optional revenue figure (to attach a numerical value that will be used to calculate your cost per conversion), the page language that the script will be placed in, the text format for a small notification that will appear to users after a conversion (you can choose here not to show it), and, finally, the color background for the aforementioned notification.
Once you've gone through the list of options, it's time to grab your conversion tracking script. Click Save and Get Code to do just that. Once you do, the JavaScript tracking code will appear. You can either copy/paste it in yourself or send it your web developer, who can insert it. The conversion-tracking script should be placed on the page where you want a conversion to be counted, and it should be placed anywhere within the <body> tag of the document.
From here you can click All Conversion Types, which is a link at the very top left of the page. You'll then see your freshly created action listed in the table, with the word unverified below the Tracking Status column. You'll need to wait until the tracking code is installed on your site, and for at least one conversion to be credited to this conversion action in order to see a verified status for your conversion action.
Fast-forwarding some weeks into the future, let's return to your AdWords account and click the Campaigns tab. As you've probably noticed in your account, you'll see four new columns on the far right of the main table, where your campaigns will be listed. They appear in Figure 5-12.

From left to right, the first column shows the total number of recorded conversions per campaign (or ad group, ad, or keyword, depending on where you are within AdWords). The second column shows the cost per conversion, on average, for each campaign. The lower the cost, the better your return on investment will be. The third column is the conversion rate. A higher conversion rate indicates a higher likelihood that the campaign, ad group, ad, or keyword will convert and be successful for you. The fourth column shows the number of view-through conversions. A view-through conversion occurs when a visitor views your display ad, but doesn't click it, when on a Content Network site. View-through conversions are available only for campaigns in the Content Network, excluding text ads.
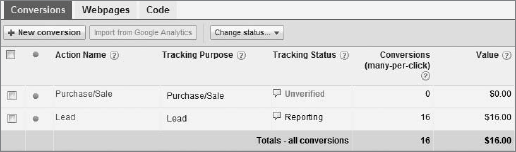
If you click your Reporting tab and click on the Conversions link, you should see conversion data here at the aggregate account level. If you have any unverified tracking scripts, they will appear without any conversions, but the scripts that are verified will have statistics enabled for them. Figure 5-13 shows the Conversions sub-tab for the two conversion types within my account for one day. The "lead" conversion action is reporting, and it shows 16 conversions for this day.
The 16 conversions that you see in Figure 5-13 include what Google considers many-per-click conversions. Many-per-click conversions count the number of conversions that occur in a single click. More than one conversion per click can occur if a user converts twice (or more) by only clicking once on an AdWords ad. For example, someone clicks on an ad and converts on one place on the site (one conversion), but then finds another form or another key page of the site where conversion tracking is also installed, and the person converts again. That's two conversions for only one click; hence the name "many-per-click" conversions. Any time a conversion is made within the 30-day cookie shelf-life period, AdWords will add a many-per-click conversion to the overall count.
In Figure 5-12, a screenshot from within the standard AdWords Reporting tab, you see 1-per-click conversions. In Figure 5-13, a screenshot from the Conversions sub-tab within the main Reporting tab, you see many-per-click conversions, which incorporate the total conversions per click. Google keeps these metrics separate by default in order to avoid confusion. However, you can click the Columns button within the main Campaigns tab, as demonstrated in Chapter 2, and add the many-per-click conversion metric to your standard report table.
You can also run reports out of the regular reporting center that focus on conversions. When you create a report, select any report type, and when you get to the Advanced Settings portion of the page, make sure to select Add or Remove Columns, find the appropriate conversion checkboxes, and run your report. I'll talk about how to evaluate and optimize your campaigns with a conversion-oriented focus in Chapter 6.
Almost always, advertisers will walk in the AdWords door with a list of key-words already in mind, on a piece of paper or in a Word document or Excel file. They feel that they have the pulse of their audience at their fingertips, and they believe that they know exactly which search terms their target audience is using to find what it's looking for. But how do they really know? If they haven't used tools like Ad Planner or the Search-Based Keyword tool from Google, they really don't know for sure.
The Search-Based Keyword tool from Google AdWords allows you to search for keywords by comparing them to your site's content. It specializes in highlighting keywords that are relevant to your campaigns, but that you are not currently bidding for. It will show you impression share, possible traffic volumes, and average bid prices for each keyword idea that it delivers to you.
The Search-Based Keyword tool is available at www.google.com/sktool. You can also search for it in the AdWords Help Center within your AdWords account.
Start by entering your website URL and words or phrases that are relevant to your marketing efforts. Your website URL should already appear within the Keyword Ideas tab, if you're signed in to your Google account. You can take a shortcut and see all top keywords across all categories by clicking a text link toward the bottom of the page; the Search-Based Keyword tool will find relevant unused keywords for your account.
You can also search for keywords on any site online. Take a look at what I've done in Figure 5-14. I've searched www.apple.com and entered a keyword of iphone, just to see what type of search results and data I can expect to see from the Search-Based Keyword tool. You can apply filters to your search by clicking More Filters at the top of the page. You can filter your search results by monthly search volume, competition, ad and search share, suggested bid price, and URL. You can also restrict your queries to seasonal periods (e.g., keywords like holiday iphone).
You can segment your search query by category type (on the right-hand side of the page) and by brand name, and you can edit your geo-location by clicking Edit in the upper-middle portion of the screen. A list of keyword ideas will be displayed in the middle of the page based on your search query and filter preferences. Monthly search volume, competition, suggested bid prices, and the page from which the keyword was extracted are all available. You can collect any keyword that makes sense for you by checking it off and adding it to your Draft Keywords tab, giving you an easy layout for all selected keywords.
You'll notice in Figure 5-14 that the column sizes seem squished when you are looking at either the Keyword column or the Extracted from Webpage column. At the time of this writing these columns are not expandable, so your best bet is to export your keywords. Clicking the Export button will allow you to download a CSV file, where you'll be able to read the content within the columns more clearly. You'll probably want to do this anyway if you want to import your keywords into your AdWords campaigns after you're done working in the Search-Based Keyword tool.

If you are logged in to your Google account, you'll be able to use the third tab, My Active Keywords. This will show you the active keywords you have within AdWords, so that you can compare and contrast the keywords you select from the Search-Based Keyword tool with your current AdWords keywords.
You're an intelligent advertiser, and you know how to build up your AdWords account for a higher return on investment, so there's no reason not to use the Search-Based Keyword, too.
AdWords offers its advertisers a handful of useful tools, scattered across the online interface. These tools can be of great value and help to you along the way as you manage, refine, and optimize your AdWords campaigns. Let's take a look at the tools, what they mean, and where they're located.
Google understands that advertisers make a lot of changes over the course of weeks, months, and even years. Even for the best in the game, it's very difficult to keep up with every change, edit, and optimization technique that has been developed. It's tough to go back in time and remember what worked, what didn't work, and what was tried in the past.
With the My Change History tool, you don't need to worry about making a record of everything that you do. Each and every action you take within AdWords, down to the smallest bid change, is recorded and accessible. When you access this tool you'll see filter options, a chart, and a detailed listing of all the changes within your AdWords account since January 1, 2006. Figure 5-15 shows you what the My Change History tool looks like. The My Change History tool is available as the second link within the Reporting tab's drop-down menu.

To summarize, here are some things you need to know about the My Change History tool:
Tool location: Immediately above the trending graph within the main Campaigns tab, and available within any sub-tab.
Restrictions: Data previous to January 1, 2006, is not available.
Options: Exportable into a CSV file.
Availability: All AdWords campaigns.
If you're concerned that ads are not appearing for certain keyword queries, or if you want to perform a diagnostic test on your AdWords ads, you can use the Ads Diagnostic tool to help you resolve any possible issues with your ads, or to put your worries to rest.
With this tool you can diagnose either a select keyword or all keywords within any selected campaigns in your account. You can select your domain, display language, and user location, based on either IP address or geo-location. If this doesn't satisfy you, you can copy the URL that appears in your browser's address bar after you perform a search on Google, and paste it directly into the Ads Diagnostic tool. Clicking Continue will show you what's wrong with your ads, and the tool will recommend a way to fix it. Check out Figure 5-16 for a screenshot of the Ads Diagnostic tool.

Nothing beats being able to preview your ads as they would appear online. However, doing so will cost you an impression each time you check Google to see how your ads look, which costs you money and pollutes your AdWords statistics.
With the Ad Preview tool at www.google.com/adpreview, you can view your AdWords ads as they would look on a Google search engine results page, without interfering with your impressions or budget. Enter a keyword that will bring up your AdWords ad, select the Google domain and language, and choose your geographical location. Click Preview Ads to show a Google search engine result in preview mode. Now you can see what your ad looks like — and see who else is coming up for that same search term! Look at Figure 5-17 for a screenshot of the Ad Preview tool.

You can (and should) use the Search-Based Keyword tool I talked about some pages ago, but if you want some quick and easy keywords to build your AdWords campaigns with, try the Keyword Discovery tool located within your AdWords account.
From within this tool, enter keywords or a website to base your search off of. You have advanced options, such as geo-location, language, and trafficestimation, as well as filters that will help narrow your search results to your possible future keywords. Toward the bottom of the tool you can sort your keyword search results by category, alphabetically, by volume, or by match type. If you find a keyword you like based on its statistics, you can click the checkbox next to that individual keyword to add it to your campaign directly. For each key-word a competitive analysis, monthly volume, and search trends are displayed. You can also sort the table by relevance and customize the columns, much as you can with AdWords.
Figure 5-18 shows an example of the Keyword Discovery tool being used for brown sock—type keywords.
Tool location: Within the Add Keyword button in the Keywords sub-tab of the main Campaigns tab, and from within the Tools section (search for keyword tool in the help section of AdWords)
Restrictions: Keyword-based data only (no image or video)
Options: Adding your keyword, domain, geo-location, and match type, directly to your AdWords campaign
Availability: Any keyword-targeted campaign
Keyword tools like the Search-Based Keyword tool and the Keyword Discovery tool are awesome resources to help you become an equally awesome advertiser. Augment this level of greatness by using the Traffic Estimator tool before activating any keywords in your AdWords account.

On the first Traffic Estimator page, enter keywords line by line. If you want traffic estimates on phrase or exact match too, use quotation marks or brackets to denote phrase or exact, respectively. Choose a currency and a maximum cost per click, enter a daily budget, and select your targeting options. When you hit Continue you'll be taken to the second page, which looks like Figure 5-19. You'll be able to judge each keyword's search volume, estimated average cost-per-click bid prices, estimated ad positions, and estimated daily clicks and costs. You can revise your estimates on the fly or download the key-word list as a CSV file (great for agencies with clients).
Tool location: Within the Tools section (search for traffic estimator in the help section of AdWords)
Restrictions: Keyword-based data only (no image or video). Figures raw estimates only
Options: Estimating keyword traffic volumes and exporting into a CSV file

Not everyone uses the Ad Preview tool that I discussed a little bit ago. Lots of people don't know of its existence, so they'll search for their own ads on Google and drive up the impression counts while lowering the click-through rates. This is especially troublesome for those working with people in different office locations or colleagues around the world.
With the IP Address Exclusion tool you can force AdWords to not show your ads to users from a certain IP address. If you know your IP address or the IP address(es) of your colleagues, find the IP Address Exclusion tool from the AdWords help section, and select your campaign. You're allowed to enter up to 20 IP addresses or IP ranges to block from each campaign. After you select your campaign, enter your IP addresses line by line, as shown in Figure 5-20, and click Exclude IP Addresses to apply the exclusions to your campaign.

As you know by now, when you're running automatic placements for your Content Network campaigns, it will show your ads to what it feels are the relevant websites. You can view what websites it runs your ads on, but you can't tell it what websites not to run your ads on (before you start your campaign). Until now, that is.
Find this tool from the help section within AdWords, and select the Content Network campaign for which you want site or category exclusions to be applied. Then choose to exclude individual sites, sites by topic or theme, media types (for video and Flash ads), and page types (error pages, parked domains, message boards). Save your changes at the bottom left of the screen, and don't forget to ensure that your date range is what you want it to be on the bottom right-hand side. Figure 5-21 shows an example.

Tool location: Within the Tools section (search for site exclusion in the help section of AdWords)
Restrictions: Maximum of 5,000 sites per campaign
Options: Site-, category-, and theme-based exclusions allowed
Availability: Any Content Network campaign
There you have it — tools that will allow you to take your regular AdWords campaign and turn it into a great AdWords campaign. In addition, another "tool" that will put you far ahead of your competitors and please your customers is your ability to extract insights and take appropriate action continually. This is what really separates the winners from the losers, and if you want to be on the winning side I hope you'll continue to Chapter 6, which is all about insights.