
This chapter takes an in-depth approach to the technical aspects of Google Analytics. If you're working in IT, are a webmaster, or are in charge of making sure your Google Analytics account is running smoothly and tracking properly, this chapter is tailor-made for you. However, if you're more of a marketer, an analyst (who doesn't manage profiles or tracking codes and just analyzes data and provides insights), or a director/vice-president of marketing, this is the only chapter in the book that you may want to skim. Fair warning: This chapter contains highly geeky material. Its pages should be handled with caution, as their contents may become volatile.
Let's start by talking about the data-collection process, which — obvi-ously — happens with the Google Analytics Tracking Code.
The Google Analytics Tracking Code (normally abbreviated GATC) is a piece of JavaScript code that is placed on every page of a website. When a visitor reaches a web page that has the GATC installed on it, the visitor will have a set of Google Analytics cookies added on his or her computer, or the visitor's existing Google Analytics cookies will be updated. As I mentioned in Chapter 8, visitor data is also sent to Google's servers for processing via an image named utm.gif that is one pixel square.
The interesting thing about the GATC is that there are three active generations being used online. There's the urchin tracking code, which is the first genera-tion of the GATC. About two years after the first-generation tracking code was released, Google developed the ga.js tracking code, which was more robust, faster, and better capable of handling the Web 2.0 Internet world. In the first half of 2010 Google released a third-generation tracking code called the async code, which is lighter, faster, and more accurate than the previous codes. The async code also loads into the browser before the web page loads, which is something that neither urchin nor ga.js can do.
Since all three tracking codes are prominent on the Web, and since all three tracking codes still allow you to collect data, let's take a look at each one sepa-rately, so you can see the progression and development of the GATC over time.
Note
For the "Common Customizations" section of this chapter I will beshowing only examples that use the async tracking code. If you are using urchin or ga.js, this would be a good opportunity to upgrade your site toasync.
Urchin is the first-ever tracking code released by Google Analytics to collect visitor data. It's currently not available within the Google Analytics interface; you can find it only within Google's help articles online or on a website that has not updated its tracking code for quite a few years. The name "urchin" is a derivative of the name of the company that Google acquired in 2005 that became Google Analytics.
There are some reasons that the urchin tracking code may still be on a website. A site's owner may have a contract with its web developer or content-management system whereby he or she is allotted a certain number of updates per month. Since the urchin tracking code still works, site owners don't see the value in upgrading. They are going to miss out on things like event tracking and custom variables, which cannot be used with urchin.
The base urchin tracking code looks like this:
<script src="http://www.google-analytics.com/urchin.js"
type="text/javascript"></script>
<script type="text/javascript">
_uacct = "UA-1234567-1";
urchinTracker();
</script>
The urchinTracker function that you see in the second-to-last line of code is the modern-day equivalent of the trackPageview function, which is what makes the data-collection process happen. Since urchin does not have auto-detection for secure and non-secure servers, site owners have to update the first line of the tracking code to call the urchin.js file from the secure Google server, as in this example:
<script src="https://ssl.google-analytics.com/urchin.js"
type="text/javascript">
</script>
<script type="text/javascript">
_uacct = "UA-1234567-1";
urchinTracker();
</script>
The urchin tracking code should be found toward the bottom of the source code, somewhere in the vicinity of the closing </body> tag. However, I have seen Google tracking codes in virtually every imaginable place.
Note
There is often a mix-up between urchin (the first-generation tracking code) and Urchin Software from Google (which is a server-based web analytics platform sold exclusively by Google Analytics Certified Partners). If someone claims to "use urchin," make sure you know which urchin that person is refer-ring to.
The ga.js tracking code was released a few years after Google's acquisition of Urchin in late 2005. This tracking code is a vast improvement over urchin, as it has automatic secure/non-secure detection, is more Web 2.0—ready, and uses an object-oriented JavaScript file, which is more dynamic and fluid than the static urchin.js JavaScript file. Basically, it's a big improvement.
At the time of this writing, ga.js is the most prominent GATC on the Internet, because async has been out for only a few months. Again, people often take their time upgrading. It costs time and resources, and ga.js still works fine.
Following is the base ga.js tracking code that you'll find in your Google Analytics account or on many websites using Google Analytics:
<script type="text/javascript">
var gaJsHost = (("https:" == document.location.protocol)
? "https://ssl." : "http://www.");
document.write(unescape("%3Cscript src='" + gaJsHost +
"google-analytics.com/ga.js' type='text/javascript'%3E%3C/script%3E"));
</script>
<script type="text/javascript">
try {
var pageTracker = _gat._getTracker("UA-1234567-1");
pageTracker._trackPageview();
} catch(err) {}</script>
Instead of using urchinTracker for collecting page view data, as the urchin tracking code does, ga.js uses the trackPageview function to do the same thing. The ga.js tracking code, like the urchin.js tracking code, should be placed somewhere near the bottom of the source code, preferably immediately before the closing </body> tag. This is recommended by Google so that if Google ever experiences downtime, your website won't be affected as it would be if you had placed the tracking code in the <head> of the document. However, it's safe to place the code in the <head> of the document — I've been working with Google Analytics virtually since its inception, and I can recall only one unscheduled period of downtime, which was repaired within the hour.
Released in early 2010, the async tracking code is the latest innovation by Google to track your website's data. The idea behind async is that it loads asynchronously with the web page — it does not wait for the web page to load in order to start executing. It's also faster, lighter, and more accurate in terms of data collection than previous Google tracking codes.
Google recommends (as do I) that you use this generation of the tracking code on all your site's pages. This chapter will show only examples using the async code, and over time this will become the default tracking code that you'll find in your profile's tracking wizard.
This is what the base async tracking code looks like:
<script type="text/javascript">
   var _gaq = _gaq || [];
   _gaq.push(['_setAccount', 'UA-1234567-1']);
   _gaq.push(['_trackPageview']);
   (function() {
var ga = document.createElement('script'),
ga.type = 'text/javascript'; ga.async = true;
ga.src = ('https:' == document.location.protocol ? 'https://ssl' :
'http://www') + '.google-analytics.com/ga.js';
var s = document.getElementsByTagName('script')[0];
s.parentNode.insertBefore(ga, s);
 })();
</script>
Unlike urchin and ga.js, the async code isn't split into two separate <script> tags — everything is nested within one <script> tag. It is also different in that you are asked to place the tracking code within the <head> of the document, not toward the closing <body> tag. This is so that async can load into the web browser as the web page is loading. However, as you may have seen in the middle of the async JavaScript snippet, the async code also calls the ga.js file from Google's servers.
It may be confusing to see me refer to the ga.js tracking code and a ga.js file that is called from Google's servers. These are two separate things: the ga.js tracking code refers to the second-generation GATC, while the ga.js file is a JavaScript file hosted on Google's servers that makes the data collection and cookie creation possible.
For some website owners and IT managers, it may be helpful to host this ga.js JavaScript file locally instead of having the tracking code call it each time a visitor visits your site. To do this you'll need to modify the track-ing code (in the async code, you'll modify the ga.src command line and update it with the domain and placement that you choose), and you'll need to download the ga.js JavaScript file and upload it to your own web server. You may download the latest version of the ga.js JavaScript file from http://www.google-analytics.com/ga.js, but be sure to re-download it about once each month, as Google is constantly tweaking it and making minor improve-ments. You always want to have the latest version of the JavaScript file if you are hosting it locally.
One of the biggest questions on site owners' and Google Analytics account owners' minds is always, "Where can I find the Google Analytics Tracking Code?" It's not immediately visible when you log in to Google Analytics.
If you are the administrator of the Google Analytics account, find the Edit link in the same row as your profile information. It will be located toward the far right of the screen. Click that link and then find the Check Status link, which will be directly above the Main Website Profile Information table in your profile's settings. Once you click that second link, you'll see your tracking code toward the bottom of the page, and the status of your tracking code on your site toward the top. Figure 10-1 illustrates. At the time of this writing, the default code shown in the tracking wizard is the ga.js tracking code — you can see a link to try the new asynchronous (async) tracking code.
This Tracking Code Wizard is quite neat if you're more of a hands-off person (which is kind of an oxymoron, to be a hands-off technical person). It's a good instructional tool that can show you what you'll need to do to your tracking code if you select any of the options within the three mini-tabs shown to the left in Figure 10-1. In the Tracking Code Wizard you'll see three steps. The first asks you what you are tracking, the second shows you your tracking code, and the third (not pictured, below the second step) will show any additional action items that need to be completed.
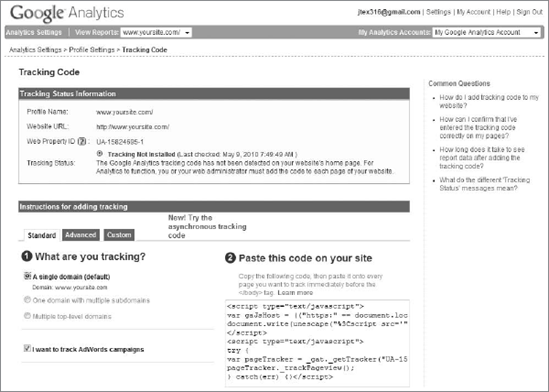
By default, Google Analytics is set up to track a single domain, for example www.yoursite.com. You can add to or configure the tracking code for other situ-ations, which I will cover toward the end of this chapter. The Tracking Code Wizard can help you configure your tracking code if you need to do any of the following:
Track one domain with multiple sub-domains (Standard tab)
Track multiple top-level domains (Standard tab)
Track AdWords campaigns (Standard tab)
Track online ad campaigns from other providers (Advanced tab)
Track online campaigns from other providers that use different marketing tags from the ones used by Google Analytics (Advanced tab)
Use Google Analytics and Urchin Software from Google together (Advanced tab)
Track dynamic content (Advanced tab)
Track PHP pages (Advanced tab)
Edit your tracking code in a custom editing area (Custom tab)
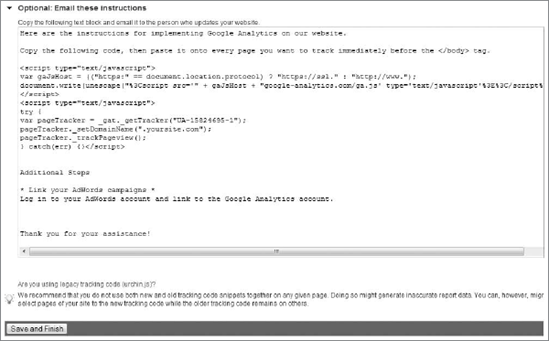
The wizard also gives you the option to e-mail instructions for adding the track-ing code to the person who will actually do the work of installing the tracking code on your site's pages. Click to copy the text shown at the very top of Figure 10-2, and then paste it into the body of an e-mail.
For now, use the Tracking Code Wizard simply to see what code would look like if you selected any of the options that are available. Later in this chapter I'm going to dive much deeper and explain how to customize your tracking code by hand.
You may have been able to reach the following conclusion by now, but if a user is blocking JavaScript, he or she cannot be tracked by Google Analytics.
Users who block JavaScript, cookies, and even images cannot be tracked by Google Analytics. This includes most search engine spiders that you'll see pop up in server log files and log-based web-analytics packages like WebTrends. Users using mobile phones without browsers that can execute JavaScript or load images also cannot be tracked, even though you may again see them in log files. Any user who intentionally blocks cookies, tracking scripts, or Google cannot be tracked. Those same users blocking cookies and JavaScript are also missing out on a lot of functionality on the Internet that requires cookies and JavaScript in order to function, like Flash players, video players, and many other web applications.
This almost always brings up two separate issues. The first is that you want to know how many people block cookies or JavaScript, or otherwise make them-selves untrackable. The answer you want to hear is "Eight percent," or some other figure put together by some research company. The real answer is that there is no way to know for sure. There really isn't a consensus in the industry. You should use web analytics to compare your data against historical trends and site average trends, and extract valuable insights.
The tail end of the first issue rolls right into that of comparing data sets — that is, comparing the statistics provided by Google Analytics. It shouldn't matter to you if there's a 5 or 10 or 20 percent difference between your log files and Google Analytics, or any two packages. Again, the purpose of web analytics is to compare trends, segment data, and extract insights — not to keep records or update accounting spreadsheets.
As tough as it sounds, don't fall into the trap of trying to make your web-analytics data perfect. It won't happen, and you'll waste a lot of energy. Trust me, I've been down that road myself, and I realized that web analytics is about much more than collecting exactly perfect data.
We talked about the fact that Google Analytics sets up to four, possibly five, first-party cookies on a user's computer when he or she visits a website for the first time. If a visitor has already been to your website and already has existing cookies, the JavaScript will work to update those cookies to reflect additional visits and page views. Just so that everyone is clear, a cookie is a small text file that contains data about a visitor's interaction with a website.
There are four first-party cookies that will be set automatically, assuming a user is accepting cookies. There could be a fifth first-party cookie, depending on whether or not a website is using custom segmentation. Let's look at the Google Analytics cookies, but first check out Figure 10-3, which shows a set of Google Analytics cookies on my Firefox browser for the Google Analytics blog site.
The __utma cookie (that's a double underscore and the letters "utma") is the visitor identification cookie. This cookie is persistent (meaning it remains on your computer after your browsing session ends), and it has a default lifespan of two years.
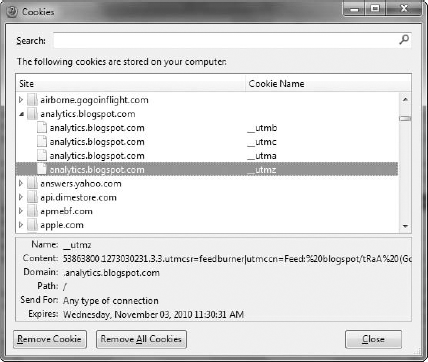
This cookie tells Google Analytics the domain and the time of the current and initial visit, and acts as the session counter to tell Google Analytics if you're a new visitor or a returning visitor (and, if you're a returning visitor, how many visits you have to your credit). When you open up the cookies in your browser, as I did in Figure 10-3, and click to view the __utma cookie, you should see something like this:
53863800.397018497.1272945173.1273030231.1273531162.4
Each set of numbers is separated by a dot, and each set of numbers means something. The first number that you see in my example — 53863800 — is called a domain hash. Google Analytics uses it to keep the domain information (the actual URL of the website you visited) confidential and encrypted so that no one else can read this sensitive data, except for the website that sets the cookie. First-party cookies work this way to safeguard a user's identity. The domain hash is present on all other Google Analytics cookies for security reasons. This domain hash number will be different for each set of cookies that you may have on your computer.
The second number — 397018497 — is a random unique ID that is associated with your __utma cookie. This unique ID, plus the third number, which in my example is 1272945173, is what Google Analytics uses to count unique visitors for any given date range. That third number, 1272945173, is the Unix time stamp of the initial visit to the site. Google Analytics keeps time using Unix time stamps, like most software applications today.
The fourth number — 1273030231 — is the time stamp of the beginning of the previous session, and the fifth number — 1273531162 — is the time stamp of the current session. This data is used to calculate the visitor loyalty and recency reports in the Visitors section.
The sixth and final number, at the very end of my example __utma cookie string — 4 — is the session counter. In this example I've visited the Google Analytics blog four times in my two-year cookie lifetime.
Both the __utmb and __utmc cookies are session identifiers. They serve the purpose of collecting page-view time stamps so that Google Analytics can record and calculate the average-time-on-site metric.
This brings up a new issue that is vital to understanding how Google Analytics works. The __utmb cookie is a persistent cookie, like the __utma cookie. The difference between the two is that the __utma cookie lasts by default for two years, while the __utmb cookie lasts only 30 minutes after the session expires. The __utmc cookie is a temporary cookie and expires as soon as you close your browser, thereby ending your browsing session.
What the __utmb and __utmc cookies do is take the time stamp of your first page view to the site in a given session. They then wait until you make a second page view to record the second time stamp, and subtract the value of the first time stamp from the value of the second time stamp. The remainder is the time you spent on the first page. Google Analytics will keep doing this for each sub-sequent page view, and at the end of your session all of your page view times will be added up, and the time you spent on the site (and on each individual page) will be recorded and sent to Google, along with your other cookie data.
Now, what if a person views only one page, and does not give an opportunity for the __utmb and __utmc cookies to record a second time stamp? How does Google Analytics know how much time you spent on the first page of the site? The answer is that it doesn't know, leaving you with a result of a single-page visit (a bounce) without an average-time-on-site metric. A visitor may spend 25 minutes on a site, but if he or she never makes a second page view, it won't be possible to record the actual time of the one he or she does make.
You could most likely write some code to modify the way that page views are detected by the __utmb and __utmc cookies so that you can record a second page view after a certain amount of time has elapsed.
The __utmz cookie is the referral cookie that stores all a visitor's referral information. It's also known as the campaign cookie, as campaign information is stored here.
Like the __utma and __utmb cookies, the __utmz cookie is a persistent one, with a default shelf life of six months. This can be edited, and I'll show you how to do that later in this chapter (the "Modifying Cookie Timeout Values" subsection). If you click an AdWords ad that is properly synced to a Google Analytics account, or for which campaign tracking URLs are being used (both of which will be discussed in later chapters), the __utmz cookie will store the source, medium, campaign, term, and content data, which Google Analytics will take and use in the Traffic Sources report section. For reasons that will become very clear toward the end of the chapter, maintaining the integrity of the __utmz cookie should be taken very seriously. The __utmz cookie can be compromised in a few precarious situations, like crossing between sub-domains or top-level domains.
The following is an example of the __utmz cookie for the Google Analytics blog site on my computer:
53863800.1273030231.3.3.utmcsr=feedburner|
utmccn=Feed:%20blogspot/tRaA%20(Google%20Analytics%20Bl
og)|utmcmd=feed|utmcct=Google%20Feedfetcher
There are two parts to the __utmz cookie: on the left are numbers, and on the right are words. The first number on the left — 53863800 — is the domain hash, which is present in all Google Analytics cookies. The second num-ber — 1273030231 — is the time stamp showing when the campaign data was collected. The next two numbers — 3 and 3 — are the session number and the campaign number, respectively. The session number increases by one for every session in which the campaign cookie is overwritten. The campaign number increases by one for every time you arrive at the site by means of a different campaign. Google needs these counts to know how to best attribute page view, conversion, and e-commerce data in reports.
The first wording after the campaign number — utmcsr=feedburner — shows the source of the referral. In this case I came from FeedBurner, which is an RSS feed-aggregating service used by virtually everyone who owns a blog. The second wording — utmccn=Feed:%20blogspot/tRaA%20(Google%20Analytics%20 Blog) — shows the name of the campaign, which is "Feed blogspot/tRaA (Google Analytics Blog). It's quite lengthy, but this is how Google wants it to look in its reports. Notice the "%20" occurrences in the campaign name — %20 is the encoded value for a space.
The third wording — utmcmd=feed — is the medium, which is the means by which I accessed the site. Here it's feed. Other common media include organic, cpc (for cost-per-click campaigns), and referral. The fourth and final wording in my example — utmcct=Google%20Feedfetcher — is the ad content, which usually identifies the ad or the link that a visitor clicked.
There is a fifth possible string that is not shown in my example, which would look like this:
utmctr=google%20analytics%20blog
This would be my string, if I had either used an organic search engine or clicked a cost-per-click ad. In this example I used the keyword "google analytics blog" in a search engine and clicked either an organic listing or a pay-per-click advertisement.
Even if you're not in marketing or online advertising, you can quickly see how valuable the data in this cookie is, and how important it is to keep it clean and not compromised.
The __utmv cookie is a special fifth cookie that can be dropped on a visitor's machine if you are using custom segmentation, which we will talk much more about later in this chapter. The __utmv cookie can hold up to five different labels for a unique visitor that can associate him or her with an important action or an important flag that allows advertisers to segment by these groups in Google Analytics reports.
The __utmv cookie has a shelf life of up to two years, making it a persistent cookie. It holds the domain hash like the other cookies, and holds up to five key/value pair combinations that identify certain unique visitors in a unique way. As we'll discuss later in the chapter, how you plan for custom variables is critical to their use.
Quite possibly the most-used code customization is the Google Analytics e-commerce tracking module. This information is displayed as transaction and product data in the e-commerce reports that were highlighted at the end of Chapter 7.
This tracking code is appended to the standard GATC on the shopping cart's receipt, order confirmation, or thank-you page displayed to a visitor after a purchase. It can also be used on any page that comes after a transaction without a shopping cart, like a donation form or one-time payment form. If you're creative enough, you can find useful ways to use the e-commerce tracking code on your non-e-commerce site.
Figure 10-4 shows the Edit Profile Information screen within your profile's Main Website Profile Information settings. Before you install the e-commerce tracking script, you'll need to ensure that your profile is set up to report on the e-commerce data that your site will begin to collect. Simply select Yes under E-Commerce Website, click Save, and your e-commerce reporting section will be displayed as shown in Chapter 7.

Let's take a look at the e-commerce code snippet, and its location relative to the critical trackPageview function in the GATC:
_gaq.push(['_setAccount', 'UA-1234567-1']);
_gaq.push(['_trackPageview']);
_gaq.push(['_addTrans',
  '1234',           // order ID - required
  'Mountain View',  // affiliation or store name
  '11.99',          // total - required
  '1.29',           // tax
  '5',              // shipping
  'San Jose',       // city
  'California',     // state or province
  'USA'             // country
]);
_gaq.push(['_addItem',
  '1234',           // order ID - required
  'DD44',           // SKU/code
  'T-Shirt',        // product name
  'Green Medium',   // category or variation
  '11.99',          // unit price - required
  '1'               // quantity - required
]);
_gaq.push(['_trackTrans']);
There are three main components of the e-commerce tracking snippet. The first is the addTrans function, which is in the third line of my example. The addTrans function collects the following transaction information:
Order ID: This is a required field, which means it must be filled out in order for e-commerce tracking to function. This is the order ID that your shopping cart or transaction system generates.
Affiliation: This is a store name, like Mountain View or San Francisco, or any other name you want to use.
Total: The transaction total, which is a required field.
Tax: The tax charged in the transaction.
Shipping: The shipping charged in the transaction.
City: The city in which the transaction originated.
State or Province: The state or province in which the transaction originated.
Country: The country in which the transaction originated.
You're required to fill in only the order ID and total fields in the addTrans function, but to get the most relevant data possible for your Google Analytics account, I recommend filling out all fields.
The second component of the e-commerce tracking code is the addItem func-tion, which will be in charge of collecting all product data. The fields collected by the addItem function are the following:
Order ID: Just like the
addTransfunction, theorder IDin the addItem field is required, and, additionally, it must match theorder IDin theaddItemfunction exactly.SKU/Code: This is reserved for a product number or SKU that you may find on the UPC label or on the back of an off-the-shelf product.
Product Name: The name of the product ordered.
Category or Variation: A category or a variation that the item ordered belongs to.
Unit Price: A required field, this is used to indicate the individual item price (not the combined price of multiple quantities of the same item).
Quantity: The quantity of each item purchased (a required field).
Again, while you're required only to fill in order ID, unit price, and quantity, it's a good idea to fill in as much product data as possible (preferably all fields).
For the addItem function, Google Analytics requires that for each additional unique item ordered, you create a second, third, or nth addItem entry in the e-commerce tracking module, so that Google Analytics can accurately collect transactions that contain multiple products. For example, let's say that not only did I purchase a T-shirt from the Google Store, I also purchased two large blue hats. The e-commerce coding would then appear as the following in the source code of the page:
_gaq.push(['_addTrans'
  '1234',           // order ID - required
  'Mountain View',  // affiliation or store name
  '11.99',          // total - required
  '1.29',           // tax
  '5',              // shipping
  'San Jose',       // city
  'California',     // state or province
  'USA'             // country
]);
_gaq.push(['_addItem',
  '1234',           // order ID - required
  'DD44',           // SKU/code
  'T-Shirt',        // product name
  'Green Medium',   // category or variation
  '11.99',          // unit price - required
  '1'               // quantity - required
]);
_gaq.push(['_addItem',
  '1234',           // order ID - required
  'HT12',           // SKU/code
  'XLS-Hat',        // product name
  'Blue Hat- LG',   // category or variation
  '11.95',          // unit price - required
  '2'               // quantity - required
]);
_gaq.push(['_trackTrans']);
Notice how the order ID field is the same for both products, but each individual product has its own SKU/code. Also notice that this particular transaction con-tains a quantityof 2, yet the unit price of 11.95 is the individual item price for each hat. Don't automatically multiply the quantity by the unit price — Google Analytics will do this for you on the report-processing end.
The third and final component of the e-commerce tracking code is the trackTrans method, which sends the addTrans and addItem data to Google Analytics servers for processing. Strangely, the trackTrans line is chopped off or simply forgotten about more often than seems logical. Without the trackTrans function, e-commerce data from Google Analytics will not be able to be collected.
You may be wondering how Google's e-commerce tracking script is able to collect this transaction data. This is where you, the developer/programmer, are going to come into the picture. With the e-commerce tracking snippet, you must write some application code or some piece of programming that will copy the values of the transaction and print them into the addTrans and addItem fields.
It's also your responsibility to ensure that each unique product is given its own addItem function. This can be done in PHP, .NET, ASP, ColdFusion, and any other non-HTML language that you can think of. It doesn't matter how your programming or application code is written — as long as it does the job of print-ing the transaction data for the e-commerce coding snippet, you're good to go.
Some off-the-shelf products like Miva Merchant and osCommerce offer Google Analytics plug-ins, where you'll only be required to provide the UA account number for your Google Analytics account. Check with your vendor to find out whether it offers a plug-in — you may be able to bypass having to hard-code everything.
Those of you who own Google Analytics, 3rd Edition (a book released in 2009 by Wiley Publishing that I had the pleasure of coauthoring) will recognize this subhead from that book's Chapter 8. There are several different types of mistakes you may make when programming your site for collecting e-commerce data, and these mistakes can affect the way your data ultimately appears in the reports. You need to be aware of all of the following common mistakes and pitfalls in order to collect the cleanest, most accurate data possible for your website. Your marketing department will thank you on bended knee for your diligent efforts.
Different Order IDs on
addTransand anyaddItem: The Order ID for each transaction must be exactly the same in both theaddTransfunction and everyaddItemfunction. If not, your data will be heavily distorted in Google Analytics.SKU/Code inconsistency: If a visitor's order contains multiple items, making it necessary for multiple
addItemfunctions to be called, each item must have a SKU/Code field filled out. This may sound like a no-brainer, but if for some reason you accidentally (or purposely) do not include a SKU/Code for anyaddItem, that item won't be recorded and you'll see wild inconsistencies in your e-commerce reports. Make sure that eachaddItemline contains a SKU/Code field.Special characters: Currency symbols, quotations marks, asterisks, commas (especially commas), and any other characters like that in any e-commerce field will cause data distortion. You will probably need to check the source code of an order as it appears online to ensure that special characters aren't appearing in any field. If they are, write some additional code to replace these characters with letters, numbers, or dashes.
The number zero: The standalone number zero has also been known to cause some issues with reporting data in the past. Some accounts do not have any problems using zeroes for either the Tax or Shipping fields, while others do. My best advice is to not use zeroes and simply to skip the field entirely (leave it blank — no white space, no zero, no nothing — just two consecutive quotation marks).
Commas: Commas are just dangerous, and cause problems when used as thousands-place separators. We've all been taught in math classes to use commas to separate places by the thousands for large numbers. For Google Analytics e-commerce transaction data collection, you'll want to forget all about that advice.
Pre-multiplying the Unit Price field: I mentioned this earlier, but it definitely bears repeating, as it's very common. Do not pre-multiply the Unit Price field by the quantity; Google Analytics will do this for you during report processing.
Leaving out the
trackTransfunction: This last line of Google Analytics e-commerce coding is surprisingly left off the final product quite often. Don't forget that the actual call to Google Analytics servers happens via thetrackTransfunction, so it's required in order for e-commerce tracking to function.Not using required fields: Just so that you're clear, the required fields in the
addTransfunction are Order ID and Total. The required fields in theaddItemfunction are Order ID, Unit Price, and Quantity. Youmustuse at least these five fields to record a successful transaction.Not running
addItemwhen necessary: Don't forget to runaddItemfor each unique item in a transaction. If your order contains one T-shirt, two hats, and three watches, there should be threeaddItemfunctions, as three unique items were ordered.
In the earlier Google Analytics chapters, I told you that you could track the "Web 2.0" interactions that users have when they are on your website. Event tracking is one of the fancier features and nicer customization possibilities provided by the Google Analytics Tracking Code, as you can track all non-page-view actions that a user may perform while on your website.
The important phrase to note is that event tracking with Google Analytics is designed for anything that is specifically not a standard page view. This could be anything that a user can do on a Flash piece, a web application that uses AJAX, or any other interactive application in any language on your site. You could use a virtual page view to track these interactions, as I'll show you later in the chapter, but it wouldn't be very appropriate to do so, as the user really isn't visiting a page or downloading a file that cannot be tracked with the GATC. Also, the event tracking schema allows for some organizational and numerical value associations to collect some fairly insightful data on the activities of your Web 2.0 elements.
Note
At the time of this writing, goals cannot be created as events. As you'll learn at the end of this chapter, a goal can be created as a page view, as time on site, or as a number of pages per visit. Keep this in mind as you're developing your event-tracking functions.
The event-tracking functionality is usually in the form of a standalone JavaScript event, like onClick or onLoad. However, you can use any standard JavaScript command function that will fire off an event tracking hit. As a standalone example, event tracking can be used as an onClick event on a video's play button, like this:
onClick="_gaq.push
(['_trackEvent', 'Videos', 'Play', 'Avatar Trailer', 150]);"
Event tracking can also be used in line with the GATC, like this:
<script type="text/javascript">
  var _gaq = _gaq || [];
  _gaq.push(['_setAccount', 'UA-1234567-1']);
  _gaq.push(['_trackEvent', 'Videos', 'Play', 'Avatar Trailer', 150]);
  _gaq.push(['_trackPageview']);
  (function() {
    var ga = document.createElement('script'),
ga.type = 'text/javascript'; ga.async = true;
    ga.src = ('https:' == document.location.protocol ?
'https://ssl' : 'http://www') + '.google-analytics.com/ga.js';
var s = document.getElementsByTagName('script')[0];
s.parentNode.insertBefore(ga, s);
  })();
</script>
You'll notice in the onClick event and in the fourth line from the top of the GATC example that there is a call to _trackEvent, followed by four pieces of data: Videos, Play, Avatar Trailer, and the number 150. These correspond to the four event tracking fields: Category, Action, Label, and Value.
The first one from the left, Category, is a required field, which means that if you don't have the first field filled out, you will not be able to record an event tracking hit. Category is designed to be the home of a top-level name from which actions occur. Videos, applets, MP3s, downloads, files, and brochures are all good examples of names for categories.
The second field from the left is the Action field, and it is also required by Google Analytics. The Action field is exactly what it sounds like: the action that a visitor performs. If the visitor clicks the play button, then "play" is the perfect name for that action. Other actions include click, fast-forward, rewind, volume up, mute, drag, drop, enlarge, full screen...you get the idea.
The third field from the left is an optional field for a label. A label is a piece of information that can further describe the category/action pair. Most people find it very helpful to use the page name as the Label field, so that when they're looking in Google Analytics in the Event Tracking section they can see which pages actions were performed on. You can also use the Label field for names of movies or applications that someone interacts with, like Avatar Trailer in my example.
The last field is another optional field that is reserved for a value. You can create any numerical value for an event, and numerical values help assign weight and meaning to category/action pairs in the Google Analytics reports. In my example I used a value of 150, but you can use any value that you'd like. Don't use commas to separate thousands places in your values (if you use figures that are that high). Also, notice in the event tracking example that the value did not have quotation marks encompassing it. Make sure that you leave it this way, as quotation marks around the value number may cause your event to not be recorded.
A limit of 500 GATC requests for each session can be tracked by Google Analytics. GATC requests include both page views and event tracking, as well as e-commerce transaction hits. I would advise caution, especially when configuring event tracking for Flash or web applications using AJAX that have lots of moving parts and lots of things that a visitor can do. Don't track things like mouse movements, and limit what mouse-click events you track. Five hundred may seem like a lot, but if you're tracking something like a "shoot 'em up" game in which each left mouse click counts as an event, 500 requests may be used up in a couple of minutes.
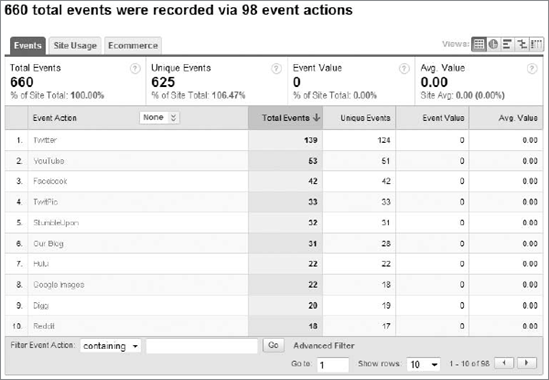
Once your data begins to collect, log in to Google Analytics and visit the Content section of your reports. You should see a large Event Tracking link in bold letters on the bottom of the Content sub-navigation menu. Clicking that will take you to the Event Tracking Overview report, where a summary of your event track-ing data will appear. You'll be able to see the total events, visits with event, and events-per-visit metrics, and below this a summary of your top event categories and the actions that took place from each. On the right-hand side of the Event Tracking Overview are a few links to drill down into the reports, and as always you'll find the standard trending graph above the data. Figure 10-5 shows an example of what all of this looks like.

As you can see in Figure 10-5, the navigation menu contains links to the overview, a report for three of the four event-tracking fields (Categories, Actions, and Labels), and a trending histogram report showing the daily event-tracking activity. Finally, there's a hostnames report showing the domains on which event tracking hits originated. This is useful if you're tracking multiple sites.
In Figure 10-6 I am showing an example of the Actions report. In the Event Tracking section, actual event data is collected in this first Events tab, which you see in Figure 10-6. You can also view site usage and e-commerce data for each event, but remember that at the time of this writing, goal data cannot be tied to an event. Original metrics for events like total events, unique events, event value, and average event value line the top scorecard and are displayed within the report rows themselves. Clicking any action name will show the categories and the optional labels that pertain to the action.
Figure 10-6 is actually a really good example of not using the Event Value field for your event category/action pairs. You will not be able to provide any weight or numerical measurement value to your actions, other than the total count of actions performed.
One of the newer features of Google Analytics, custom variables allow a website owner to tag a group of visitors that perform a certain action, sign up for a certain event, or register for something on your site. For example, let's say that your site has a members-only section. You can use a custom variable for any visitors who successfully enter the members-only area of your site, and label them so that you can group your members and segment their data separately from that of nonmembers. With custom variables you are given the room to create up to five different variables for any unique visitor.
Like event tracking, custom variables can be implemented on any page or link on your site either via an additional line of JavaScript code in your GATC, or as an onClick or similar JavaScript function. More often than not you'll be using custom variables in line within the GATC, but there are definitely some cases in which it is a good idea to use custom variables as onClick or other JavaScript events.
Google Analytics officially released custom variables toward the end of 2009, replacing the longstanding user-defined report section and its setVar JavaScript function. setVar has been officially deprecated and replaced with the setCustomVar function. Using setCustomVar will install on a user's machine the __utmv cookie that we discussed earlier in the chapter, which has a default life span of two years.
Custom variables work by labeling unique visitors with a name/value pair, much as events are tracked via a category/action pair. There are four parameters for the custom-variables schema, three of them being required. The format for custom variables looks like this:
_setCustomVar(index, name, value, opt_scope)
The index is the slot for the custom variable, whose value ranges from 1 to 5 (inclusive). The indexes are the "pockets" that unique visitors have available to carry custom variables around with them in their __utmv cookies. If a slot is reused or accidentally duplicated somewhere on your site, the new data will overwrite the existing data in that slot.
The name will be the piece of data that appears in the Custom Variables report in the Visitors section of Google Analytics. The names and the number of visitors who have been hit with a custom variable will be listed in this report, which can be further segmented (as most reports in Google Analytics can be).
The value parameter is the other piece of data that is paired up with the Name field in the custom-variables string. The maximum length that both the name and the value together can be is 64 bytes (characters).
The last parameter that you can use for custom variables is the scope, which is an optional field. There are three types of scope that you can use for your custom variable: 1, 2, and 3. Scope 1 will set the custom variable at the visitor level, scope 2 will set the custom variable at the session level, and scope 3 will set the custom variable at the page level. If you don't use this optional field, it will default the custom variable to the page level (3).
Generally speaking, you would use scope 1 (visitor level) to differentiate visitors across multiple browser sessions. The member/nonmember example from earlier is an example of a visitor-level custom variable. You could set the visitor-level scope on your membership registration's receipt or thank-you page, and then, for the "life" of that visitor, he or she will always be identified as a member with scope 1. Scope 2 (session-level) custom variables could be used on a site containing a message board to which a user would need to log in to view and comment on threads. The session-level custom variable could be set after the user logs in, and could track the user's statistics for the length of that session. Scope 3 (page-level) custom variables can be used to track interactions with important pages on your site. If you want to know if a visitor encounters a special section of your website or sees your price sheet page, you could set the page-level custom variable on the desired page and view data for it in Google Analytics.
You can also get creative and set multiple custom variables throughout your website, or on the same page. But be extremely careful not to overwrite yourself and use the five index slots with great caution. Using an Excel spreadsheet or making a table on your notepad before implementing these custom variables across your website may not be a bad idea.
Here's a working example of custom variables within the GATC:
<script type="text/javascript">
  var _gaq = _gaq || [];
  _gaq.push(['_setAccount', 'UA-1234567-1']);
  _gaq.push(['_setCustomVar', 1, 'Log-In', 'Success', 2]);
  _gaq.push(['_trackPageview']);
  (function() {
var ga = document.createElement('script'),
ga.type = 'text/javascript'; ga.async = true;
ga.src = ('https:' == document.location.protocol ?
'https://ssl' : 'http://www') + '.google-analytics.com/ga.js';
var s = document.getElementsByTagName('script')[0];
s.parentNode.insertBefore(ga, s);
  })();
</script>
Within this particular GATC I'm using a custom variable in the first (1) slot. It's a session-level custom variable (scope 2), and I'm tracking my log-in function (name). Depending on what happens when a user logs in during a browser session, that user is labeled as success (value) or failure. In this example I am attempting to determine the rate of successful versus failed log-ins in hopes of improving the secure area of my website, which I want only my clients to access.
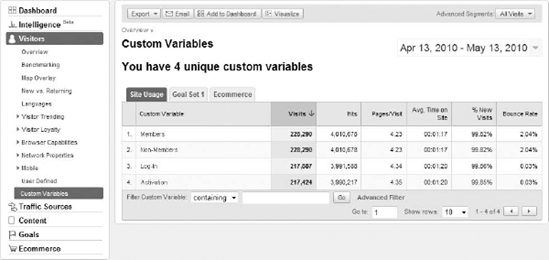
Once you've planned and implemented some custom variables for your website visitors, it's time to see what the site looks like in Google Analytics. Log in to your account and go to the Visitors report section. The very last link on the navigation menu should be Custom Variables. Click that to view the standard report table that you're used to seeing throughout all of Google Analytics. The Custom Variables report won't show you a trending graph, but it will list the unique custom-variable names and their statistics. Clicking each name will bring up the values for that name, which will allow you to segment those values by any of the standard dimensions available. The powerful part of the Custom Variables report is that you can attribute values to goal-conversion and e-commerce data by clicking the respective tabs within the report table. Figure 10-7 shows an example of the Custom Variables report.
There are a lot of different ways to customize the Google Analytics Tracking Code. Most of the ones that you see online in websites' source code are supported by Google. Some are not. Many, many others are simply bad implementations badly disguised as customizations. You could write an entire book about customizations and the technical aspects of Google Analytics — Jerri Ledford and I did so in 2009 with Google Analytics, 3rd Edition. However, for this book I must limit this subsection to the most common customizations that one would perform with Google Analytics. At the end of the book is an appendix that contains links to resources on the Web, including a few links to some technical customizations that are possible with Google Analytics.
Using virtual page views with Google Analytics Tracking Code is very simple and very convenient. Let's say you have a situation on your website in which the actual page changes when a user clicks Next or More Info, yet the URL in the browser's address bar doesn't change. You can use a virtual page view within the GATC to identify to Google Analytics that this is a unique page view, and to count it as such in the Content Report section.
What you'll want to do is populate the trackPageview field as shown in the following example:
<script type="text/javascript">
  var _gaq = _gaq || [];
_gaq.push(['_setAccount', 'UA-1234567-1']);
  _gaq.push(['_trackPageview', '/page-step-2.html']);
  (function() {
var ga = document.createElement('script'),
ga.type = 'text/javascript'; ga.async = true;
ga.src = ('https:' == document.location.protocol ?
'https://ssl' : 'http://www') + '.google-analytics.com/ga.js';
var s = document.getElementsByTagName('script')[0];
s.parentNode.insertBefore(ga, s);
  })();
</script>
Visiting this page will result in /page-step-2.html's registering as a page view in the Content report in Google Analytics.
Using the same trackPageview technology, you could use a JavaScript onClick event on any PDF, MP3, Windows Media file, or any other non–web page type of file and track it as a page view. Using the trackPageview function as a JavaScript onClick event will increase your page count, as files that cannot contain the GATC will be tracked and displayed in the Top Content report within the Content Report section. Using trackPageview on downloadable files or even on outgoing (external) links is the only way to then use them as goals, if desired.
An example of the trackPageview function as a JavaScript onClick event is shown here:
onClick="_gaq.push(['_trackPageview', '/pdf/name-of-file.pdf']);"
In some rare cases, placing this onClick event above the GATC in the source code can throw some scripting errors on the page. Even though your async GATC should be in the <head> of the document, if you install the onClick event and are receiving some type of script error, you may have to move the GATC higher up in the source code (above the onClick event).
It is very common nowadays to have a website "family" or network in which sites with multiple sub-domains or even sites with multiple top-level domains interact with and link to each other. Because of the standard GATC and the way first-party cookies use the domain.hash function, only the website that set the cookie can read and access it. So, by default, if www.yoursite.com sets a cookie, and a visitor clicks a link from your site to blog.yoursite.com, and both www.yoursite.com and blog.yoursite.com have the same tracking code, the visitor will have two fresh sets of cookies on his or her browser. You will see self-referrals appear in the Traffic Sources report section, and you will have other referral tracking issues. This is of course assuming that you want to track both sites simultaneously within one profile.
Read the rest of this section very carefully. You will need to see which situation applies to you, and ensure that your site is configured appropriately.
Just as in my previous example, if you have www.yoursite.com and blog.yoursite.com, and you wish to track both sites simultaneously, you will need to update your GATC to include the setDomainName function on both sites, while defining your domain name as shown here:
<script type="text/javascript">
  var _gaq = _gaq || [];
  _gaq.push(['_setAccount', 'UA-1234567-1']);
  _gaq.push(['_setDomainName', '.yoursite.com']);
  _gaq.push(['_trackPageview']);
  (function() {
var ga = document.createElement('script'),
ga.type = 'text/javascript'; ga.async = true;
ga.src = ('https:' == document.location.protocol ?
'https://ssl' : 'http://www') + '.google-analytics.com/ga.js';
var s = document.getElementsByTagName('script')[0];
s.parentNode.insertBefore(ga, s);
  })();
</script>
Now every sub-domain of .yoursite.com that has this GATC will be tracked cleanly without your losing the original referring information for any visitor. Remember to update both sites with the exact same GATC.
Cross-domain tracking involves two parts. First the GATC must be updated on both (or all) sites to include a call to both setDomainName and setAllowLinker, as shown here:
<script type="text/javascript">
  var _gaq = _gaq || [];
  _gaq.push(['_setAccount', 'UA-1234567-1']);
  _gaq.push(['_setDomainName', 'none']);
  _gaq.push(['_setAllowLinker', 'true']);
  _gaq.push(['_trackPageview']);
  (function() {
var ga = document.createElement('script'),
ga.type = 'text/javascript'; ga.async = true;
ga.src = ('https:' == document.location.protocol ?
'https://ssl' : 'http://www') + '.google-analytics.com/ga.js';
var s = document.getElementsByTagName('script')[0];
s.parentNode.insertBefore(ga, s);
})();
</script>Remember to update both sites with this updated GATC. After you do so, you will need to do at least one of the following. You will positively need to update each and every link to and from each domain, with a JavaScript onClick _link function in order for cross-domain tracking to work. A user needs to be able to have his or her cookie data sent via HTTP (in the browser's address bar) to the destination site in order for cross-domain tracking with Google Analytics to work. If you don't do this part, or you skip some links, it will not work.
The _link function should be used like so:
onClick="_gaq.push
(['_link', 'http://www.secondsite.com/page.html']); return false;"
It bears repeating that this _link function should be installed not only on every link on your first website, but also on any link back to that website from the second website. You will also need to make sure that you update the URL shown in the example with the actual URL of the destination page on the second website.
If you send data via a form from one website to another, instead of using the _link function you can use the _linkByPost function as a JavaScript onSubmit function, like this:
onSubmit="_gaq.push(['_linkByPost', this]);"
Once a user clicks a link using _link or submits a form using _linkByPost and successfully arrives at the second site (or back at the first site), he or she should see something like this in the browser's URL address bar:
http://www.secondsite.com/page.php?id=12345&__utma=1.312038497.127
3891238.1273891238.1273891238.1&__utmb=1.1.10.1273891238&__utmc=1&__
utmx=-&__utmz=1.1273891238.1.1.utmcsr=%28direct%29|utmccn=%28direct
%29|utmcmd=%28none%29&__utmv=-&__utmk=123238411
That really long string of characters is the cookie information making its way from one website to the next. When checking for accuracy and validation of implementation, perform some test clicks and see if you get something like this in your browser's address bar.
Possibly one of the most popular features of Google Analytics is the ability to edit cookie settings. While you can't do too much to the cookies themselves, you can make some modifications to when they expire.
The first thing you can do is modify the session timeout. By default Google Analytics uses a 30-minute session timeout. If no activity is detected after 30 minutes, Google will stop the session, and the user will create a new session and visit when he or she resumes activity on the site. Using the setSessionCookieTimeout function within the GATC can allow you to modify the __utmb cookie to delay or speed up the session timeout:
_gaq.push(['_setAccount', 'UA-1234567-1']);
_gaq.push(['_setSessionCookieTimeout', 3600000]);
_gaq.push(['_trackPageview']);
Next, you can modify the campaign duration timeout. By default Google Analytics will track campaign data (referral data) for a unique visitor for up to six months. To edit this value you can call the setCampaignCookieTimeout function within your GATC and edit the __utmz cookie:
_gaq.push(['_setAccount', 'UA-1234567-1']);
_gaq.push(['_setCampaignCookieTimeout', 31536000000]);
_gaq.push(['_trackPageview']);
A third cookie-modification option is to edit the visitor cookie timeout. By default this happens after two years, but you can modify it to be sooner or later by calling the setVisitorCookieTimeout function, which edits the __utma cookie:
_gaq.push(['_setAccount', 'UA-1234567-1']);
_gaq.push(['_setVisitorCookieTimeout', 63072000000]);
_gaq.push(['_trackPageview']);
In case you are wondering, the numerical values that you see for these cookie-modification functions are set in milliseconds. Multiply the number of seconds by a thousand to get the number of milliseconds to use for modifying these cookie values.
A neat and common customization to have in your back pocket is the ability to add an organic search engine directly to your GATC, without having to wait for Google to update the ga.js tracking file. You never know when someone will invent the next big thing, and you don't want to wait to track it as an organic engine in your reports. Be proactive here and use the addOrganic function on all pages on which you have the GATC installed, defining the domain of the search engine and its search query parameter:
_gaq.push(['_setAccount', 'UA-1234567-1']);
_gaq.push(['_addOrganic', 'joeteixeira.com', 'q']);
_gaq.push(['_trackPageview']);
Perform a test search on your search engine and view the URL, and pick out the variable or string that immediately precedes your search query. A lot of the time it's going to be the letter q, but it isn't always that simple.
Note
There's an entire level of "tech" that we didn't even get a chance to cover in this book, such as mobile tracking, SDKs, and the Google Analytics API, as well as some other not-so-common GATC customizations. I felt that these were a bit too technical for the general population, and, quite honestly, we didn't have the room for them in this jam-packed book. There are some links in the Appendix that will point you to the most up-to-date online versions of this information, which will probably be more current than any book.
Before I let you go to discover the wonderful world that is Google Website Optimizer, I need to cover some administration options that you will prob-ably be tasked with from time to time. These include options for creating new profiles, editing goals, and possibly writing your own filters. Any of this can be done after you create your Google Analytics account (as described in Chapter 7), or, once you've done that, after you install the Google Analytics Tracking Code on your website.
When you're logged in to your Google Analytics account (assuming that you are an administrator), you'll see your profiles listed in rows and you'll also see some links toward the bottom of the overview report table. Clicking Add Website Profile will do just that, but you can also click any of the blue Add New Profile links integrated within the report table rows. This does the same thing.
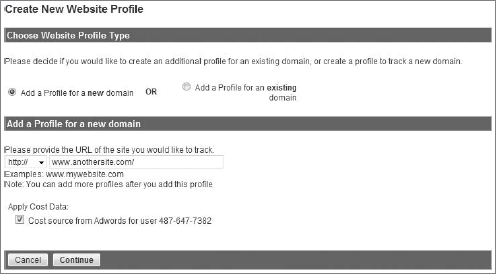
Next you'll be given the option of adding a profile for a new domain or adding a profile for an existing domain. If you add a profile for a new domain you'll enter your URL, as shown in Figure 10-8. You'll also be able to keep cost data imported from your AdWords account to this new profile, if both AdWords and Analytics are synced. A profile for a new domain will create a new UA number and group it separately from your existing profile(s). Creating a profile for an existing domain will allow you to select the domain for which you want to create your profile. Click Continue when you're finished, and you'll be taken to the Tracking Code Wizard to grab your GATC.
After completing profile creation you'll be redirected back to the overview screen, where you'll see a yellow triangle next to your new profile. This will go away and be replaced by a green checkmark once you install the GATC on your website's homepage.
When you click the Edit link directly underneath the Check Status link in any profile's row, you'll be taken to the main website profile information screen, where you'll be able to edit the profile's settings, create goals, add filters, and manage users. Figure 10-9 shows what this screen looks like. This is where you'll be able to assign a default page and enable e-commerce and Site Search reports. You can also exclude query parameters from appearing in your content reports, if your website generates cumbersome, difficult-to-read URL query parameters.
Below the profile settings you will see the Goals table, and if it's a new profile there should be four blank rows without any goals inside them. You can create up to 20 goals within four goal sets, each goal set having a maximum of five goals. Click Add Goal to create your first goal in any goal set (start with Goal Set 1 for simplicity's sake). Once you arrive at the goal-information page, enter a name for your goal and ensure that the goal is set to on (if you wish to turn a goal off in the future, this is the place to do it). Then define your goal position (which goal set you want your goal to be located in) and select your goal type. You may remember from earlier in this chapter that there are three goal types: URL destination, time on site, and pages per visit. Figure 10-10 shows an example of what your screen will look like when you select URL destination as the goal type.

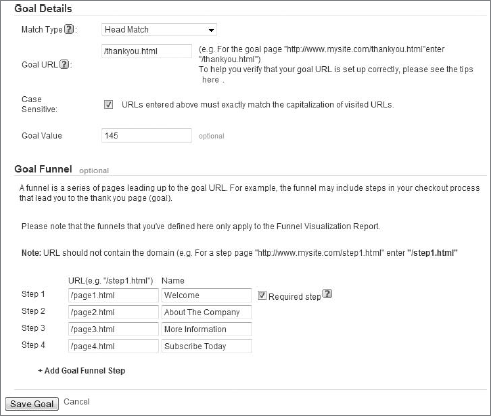
For the URL destination goal type, you will need to define the match type, enter a goal URL, and create a numerical value for your goal, as shown in Figure 10-10. You will also have the option to enter a funnel, which is the defined path from start to finish reviewed in Chapter 7.
Figure 10-11 shows an example of one of the two engagement goal types (time on site). Here you have a much simpler set of controls to work with — you basi-cally enter the desired time and a value for the goal.

Below your goals in your profile settings will be the location in which you'll find your filters for your profile. Filters define how you want your data to appear in Google Analytics, and before processing happens you can manipulate that data. You can create filters to exclude your own traffic or to include only traffic to a specific subdirectory, or you can create an advanced filter array to combine data from two different reports. Filters in Google Analytics must be written in POSIX Regular Expression format, and are extremely sensitive. I don't have the space to cover Regular Expressions here, but check the appendix for more details and links to learn more about it.
There are quite a few filter options available, and you may be asked to do anything in the following list. Once a filter is created, it will take about 24 hours for it to be activated on your profile. You can edit, add, or remove a filter at any time via the filter settings area within each profile or the Filter Manager link on the overview screen of your Google Analytics account.
Predefined Exclude or Include filter: This filter can either exclude or include traffic from a domain, from an IP address, or to a subdirectory. If this is your first time using filters, try creating one of these predefined filters first.
Custom Exclude filter: This filter excludes traffic by any of the 40+ filter fields available. You can exclude traffic by visitor type, e-commerce trans-action ID, or country. You're most likely going to be using this type of filter to exclude an IP address, a source, a medium, or a hostname (URL). Figure 10-12 shows an example of a Custom Exclude filter.
Custom Include filter: Including data excludes everything except what you enter in the Filter Pattern field. For example, if you include Google, and select Campaign Source from the Filter Field drop-down menu, you will be excluding everything except Google.
Lowercase and Uppercase filters: These are very self-explanatory. You may use them for lowercasing source, campaign, or medium names to clean up data in your reports.
Search and Replace filter: If you have a long, ugly-looking URL you can replace it and clean it up with a nicer-looking one, so that you can distinguish it better in your reports. You can also search for and replace campaign names, request URI names, and re-write any other items that you wish.
Advanced filter: An Advanced filter lets you take data from two different fields and combine them. A popular Advanced filter is one in which the hostname (URL) and request URI (page/file path name) are combined together so that you can see the URL of the website in reports. This filter is used in situations in which multiple websites are tracked simultaneously, because page file names may be the same on multiple sites.

Finally, you'll definitely be asked to add users so that they can have access to Google Analytics reports.
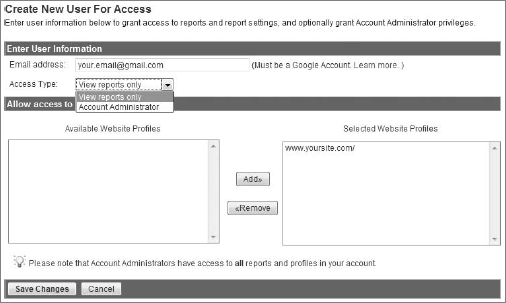
You can add a user from your overview screen (look for the User Manager link) or from within each individual profile. Scroll all the way down to the bottom of the profile settings to find a table listing the users who have access to the profile. Click Add User to enter the user's e-mail address and to specify whether he or she will be granted "view reports only" access or account administrator access. "View reports only"-access users cannot create profiles, edit settings, or manage users. Administrators can do everything within a Google Analytics account, including removing you from having access. Needless to say, use caution when determin-ing who gets administrative access. Figure 10-13 shows the user manager screen.
Remember, each e-mail address must also be a Google account in order for the user to be able to access Google Analytics (or any other Google product, for that matter). You may want to flip all the way back to Chapter 2, where I show step-by-step examples of making an e-mail address a Google account.