Naturally, one of the major features of PHP and the dynamic Web in the past few years has been the capability to keep websites up-to-date through database integration. PHP, of course, has this capability to connect to a database, or multiple data sources, and present up-to-date content either in its “raw” format or in a “massaged” presentation. To do this, though, PHP has to establish a connection to a data source and be able to extract required or requested information.
Naturally, Zend Studio for Eclipse has an entire perspective devoted to the management of the data source. Select the perspective titled Database Development to see this collection of views. You should see a layout similar to that shown in Figure 9.1.
As you can see just by opening this perspective, some views are open that you may not have seen previously. The Data Source Explorer view is the main view on the left side of the IDE, and you will find that you use this view the most during your work within this perspective.
Before you can use this perspective to its optimal value, you have to establish some connections to a database source. Zend Studio for Eclipse has some data sources predefined for you, and in this chapter, we use the MySQL data source. In the Data Source Explorer view, right-click on the SQL Databases item to bring up the pop-up menu. Only two items come up: New and Refresh. Click on the New item to open a connectivity dialog, entitled New JDBC Connection Profile, as shown in Figure 9.2.
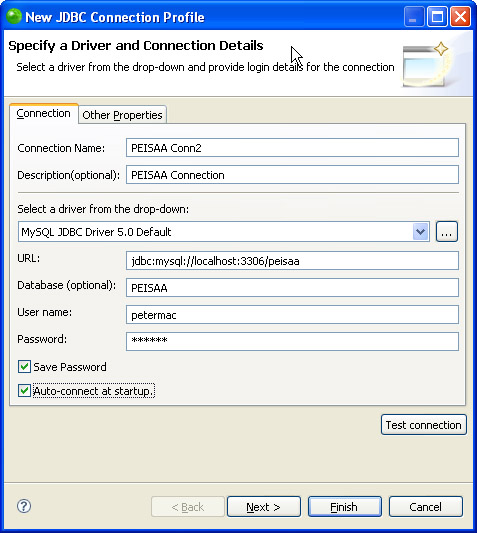
Give your database connection a useful name and description for it if you want. Then decide whether you want the connection to automatically connect each time you open the Data Source Explorer. Here you will also provide your connection authorization credentials and alternately the specific name of the database you are connecting to. Be sure to test your connection here before moving forward just to be sure you are communicating to the database correctly.
Click Next to move to the last dialog in this wizard process; here, you see a summary of the connection information that you have just established. Click Finish and you are ready to use your new database interface.
Note
On the URL line in the New JDBC Connection Profile dialog, you may see something like jdbc:mysql://localhost:3306/database. If you want to connect to one specific database, then be sure to remove database and replace it with the name of an existing database so that it can connect to the tables.
Caution
Also be aware that sometimes if you do not specify a specific database name in the New JDBC Connection Profile, the resulting connection definition may not have any database refernces to show. So it is always better to set up each connection to a specific database.
Still in the Database Development perspective, you should now be able to drill down to your named database and look at the tables and structures defined within it, as shown in Figure 9.3.
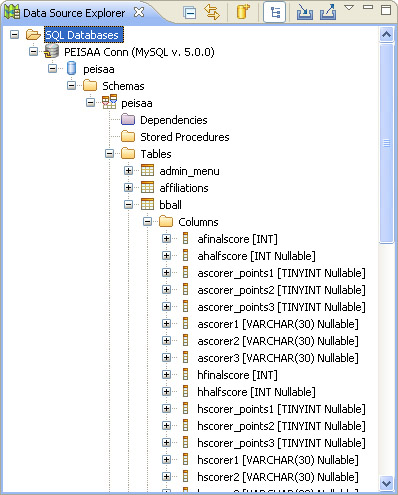
Because this is a sample database being used with this book, you will, naturally, see different tables and different column names and definitions than shown here, but the overall concept is the same.
Now that we have a valid and operational connection to the local database, let’s draw some data out of the tables to see what that looks like.
Using the tree view to the data source just established, expand the tree to the Tables level (refer to Figure 9.3 if you need to). Right-click on any table name and select Data from the resulting pop-up menu; then select Sample Contents from the next pop-up menu. You trigger a sample SQL Select statement to be run against the table that you have chosen.
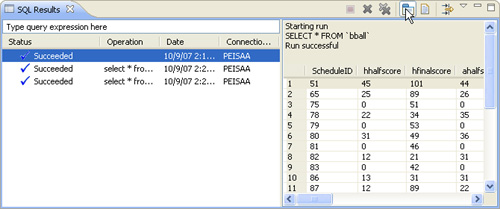
When this is done, you see an insertion into the SQL Results view (which is divided into two panes). On the left side, you see the status results of the run query, and on the right side is the SQL statement that was run and sample data that was retrieved. This window is shown in Figure 9.4. Note that you can combine the right display pane from two separate tabs into one by clicking on the toolbar item labeled Display Results in Single Tab in the toolbar at the top of the right pane. The mouse pointer is pointing to it in Figure 9.4.
Note
You can adjust the columns that are displayed to you in the SQL Results view by opening the preferences for it in the SQL Results View Options (History Options) under SQL Development in the Zend Studio for Eclipse preferences area.
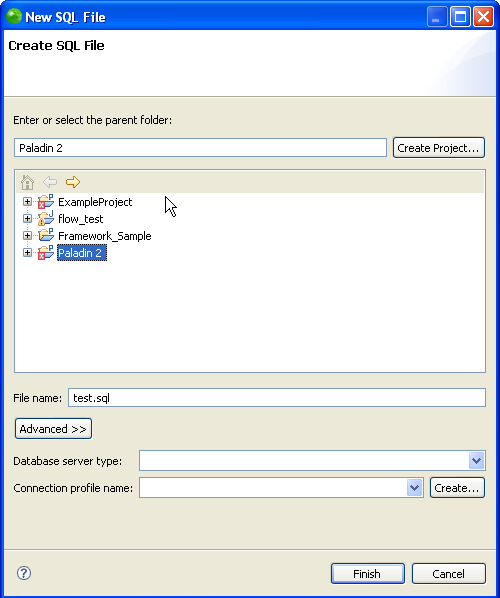
You can also write your own SQL queries to send to the database through your SQL connection within Zend Studio for Eclipse. This is a little different in its approach. To send SQL code to the database, you need to create a new SQL-type file so that Zend Studio for Eclipse knows that it should contain SQL code and therefore be able to handle it properly. Select File, New and then select SQL File from the next-level menu. This opens the New SQL File dialog, where you can name the file and assign it to a project (see Figure 9.5).
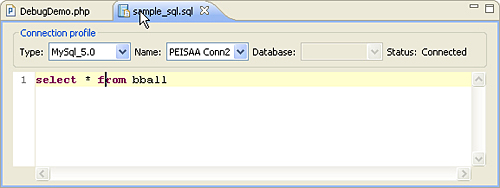
After you create the file, Zend Studio for Eclipse adds sql as a filename extension and opens the file in the code editing section of this perspective. As you can see in Figure 9.6, you can edit and create SQL statements that are more complex than the simple data inquiry shown in the previous section. In this figure, there is a series of drop-down lists across the top of this code editor that display the current assigned connections to this SQL file. If you have other connections that this SQL context can also interface with, flexibility is added here to change those connections on the fly and run other SQL if you so desire. After you write the SQL code that you want, you can execute it against the current connection by pressing Ctrl+Alt+X, or if you have selected SQL in a larger file to run, you can press the more simple Alt+X to run the code (these options also appear on the right-click pop-up menu for you to select).
Note
If you want to write and test some SQL against a table, you can use the SQL Scrapbook icon on the SQL Perspectives toolbar to quickly create an SQL editing file for you. You can make your connections from the drop-down lists that appear at the top of this file, and you are all set to run the SQL.
The data in your tables also can be edited from within this perspective. Under the Data submenu in the right-click pop-up menu, there are three other options we have not covered yet. The first is labeled Edit. When you select this option while pointing to a table, the data from that table is loaded into an Editor tab, and you are allowed to edit the contents. Keep in mind that after you edit the contents, you still have to save the changes back into the table. After you save your changes to the contents of a table, an SQL UPDATE statement is actually generated and executed against the database; this is then displayed in the SQL Results view for further scrutiny.
The other two items on the Data submenu are Load and Extract. They are basically import and export options available on a table-by-table basis.
The Database Development perspective is not limited to query execution alone. You can also delete tables and draw out the Data Definition Language (DDL) for all defined tables.
To delete an unwanted table, select that table in the Data Source Explorer, right-click, and choose Delete from the pop-up menu. This generates the drop table SQL code for you and opens it in a new code editor for you to inspect before you execute the code. Following is an example of the code generated for you:
ALTER TABLE admin_menu CHANGE COLUMN menuid menuid INT NOT NULL;
ALTER TABLE admin_menu DROP PRIMARY KEY;
DROP TABLE admin_menu;
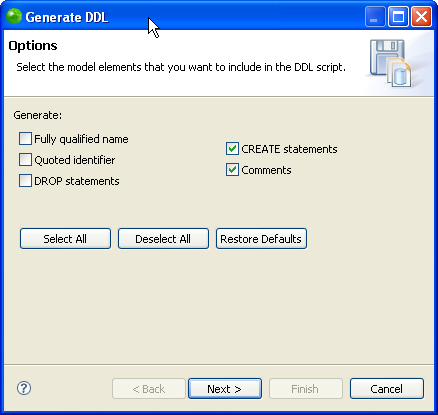
The process to generate the DDL code for your tables is similar. Select a table, right-click, and then select Generate DDL from the pop-up menu. A dialog appears with options, as shown in Figure 9.7. Here, you can choose the generation options such as adding a DROP TABLE directive, using fully qualified names, and including comments. After you choose these options, a second wizard page provides more options. When you complete the wizard, Zend Studio for Eclipse generates the appropriate code, as shown in the following example:
CREATE TABLE admin_menu (
    menuid INT NOT NULL AUTO_INCREMENT,
    menu_order INT DEFAULT 0 NOT NULL,
    menu_text VARCHAR(50) DEFAULT '' NOT NULL,
    belongs_to VARCHAR(50) DEFAULT '' NOT NULL,
    url VARCHAR(100) DEFAULT '' NOT NULL,
    active TINYINT DEFAULT 0 NOT NULL,
    target VARCHAR(15) DEFAULT '' NOT NULL,
    PRIMARY KEY (menuid)
) ENGINE=MyISAM;