All programmers do some kind of testing when they are writing code. You generally have an idea of what is going on in a particular script based on the output. For example, suppose you have a function named sum() that accepts two values and returns the sum of those values. If you pass in the values 3 and 2 and the returned value is 6, you know that something is wrong and probably assume that the values are being multiplied instead of being added.
The difference between simply running a script and running a unit test is that the unit test can be automated and calibrated. In general, unit tests are more reliable and standardized because they have more thought put into them and are usually designed to cover all, or at least a very large percentage, of the functions in a script. Another difference between testing by running and creating unit tests is that the unit test method generally starts with the test and builds code until the test runs. This development philosophy is called “Test First” development and can yield code with fewer bugs.
Zend Studio for Eclipse implements the unit-testing suite called PHPUnit. It is actually a third-party suite created by Sebastian Bergmann but is integrated directly into the IDE. Using a unit-testing package allows you to design and plan tests ahead of time, store them, run them, and analyze the results. The goal of all this is to help you turn out better scripts and software.
In this chapter we look at a simple calculator class, create some unit tests for it, and then create a test suite that manages all the unit tests and can run them as a group. We start the chapter with a brief overview of the non-PHPUnit tools available for debugging in Zend Studio for Eclipse.
With the introduction of good unit-testing products for PHP, using prints and echoes as the only means of testing is beginning to be looked upon with some skepticism. The argument against unit testing is that it does take more upfront work, which may not be justifiable for trivial solutions. Without getting any further into the methods of testing and debugging debate, let’s look at the benefits of printing output to the console or screen.
When you are writing your own code from scratch, you usually have a reasonable idea of what information, arrays, and objects are available to you at any given point in a script or function. When you are using third-party or open source libraries, such as the Zend Framework, a few extra bits of information are floating around. Being able to see what these data structures and variables are holding might make some of your debugging easier. Later in this book, we look at the Zend Framework in detail, and then we are going to use it to build a simple project. In Listing 10.1, we take the completed companiesController.php file from that project and add two print_r statements. When you run the project with these statements, you get a long printout of the contents of $db and $this, which hold data that is used in the controller and some that is passed to the companies view.
Example 10.1. Modified Excerpt from companiesController.php File for Exploratory Debugging
public function indexAction()
{

    // we want to execute the following query using ZF functions:
    //
    //    SELECT *
    //    FROM company, countries, provinces
    //    WHERE company.ProvID = provinces.ProvID
    //    AND company.CountryID = countries.CountryID

    global $db;

    // Create the Zend_Db_Select object
    $select = $db->select();

    // Add a FROM clause (with joins)
    $select->from(array('c' => 'company'))
            ->join(array('co' => 'countries'), 'c.CountryID = co.CountryID')
            ->join(array('p' => 'provinces'), 'c.ProvID = p.ProvID'),

    // execute the query
    $this->view->rowset = $db->fetchAll($select);

    // dump the database variable that was set up in the bootstrap file
    echo "<pre>";
        print_r($db);
        echo "</pre>";

    // dump $this to see what data is contained in it
    echo "<pre>";
       print_r($this);
        echo "</pre>";

}
Some of the information in these variables that we’re dumping is probably of no use to you. Listing 10.2 shows an excerpt from the output. You can see all the information that was performed in the database queries done in the init function for the controller as well as the one in that function.
Example 10.2. Excerpts of Useful Information Contained in Zend Framework Variables
...
[rowset] => Array
(
    [0] => Array
        (
            [CompanyID] => 1
            [Name] => Test Company
            [Address1] => 123 Morse Street
            [Address2] =>
            [City] => Charlottetown
            [ProvID] => 2
            [Postal] => C0A 1H0
            [CountryID] => 1
            [Country] => Canada
            [ProvName] => Prince Edward Island
        )

    [1] => Array
        (
            [CompanyID] => 3
            [Name] => Other Test Company
            [Address1] => 456 Main Street
            [Address2] =>
            [City] => Dallas
            [ProvID] => 37
            [Postal] => 75201
            [CountryID] => 2
            [Country] => United States
            [ProvName] => Texas
        )

)
...
Knowing the values of variables and arrays can be helpful when you are trying to get a certain piece of information to display. You can use the Console, Debug Output, and Browser Output views in Zend Studio for Eclipse to see what is going on behind the scenes of your projects. The rest of this chapter looks at PHPUnit integration with Zend Studio for Eclipse.
If you have never used unit testing, learning how to use it may be similar to the first time you tried your hand at object-oriented design. Unit testing can be a strange concept at first, but after you see it in action, the benefits should become clear, regardless of whether you decide to use it in your day-to-day routine. In this section, we look at writing unit tests for a trivial example.
Suppose you want to write an object-oriented calculator class. This class has four simple functions: add, subtract, multiply, and divide. You could probably write this class in a few minutes, and it would most probably be reasonably bug free. However, for the purpose of demonstrating unit testing, we need to spend some time discussing the details.
Unit testing forces programmers to do something that most of us would rather not do: plan the project in detail. This approach doesn’t allow you to start writing a single line of code until every function, argument, and return value has been defined. Let’s list the requirements and some basic tests for each function that we will be making in the calculator:
add—. Add two numbers and return the sum. If one of the numbers is zero, the returned value is simply the other number.subtract—. Subtract the second number from the first number. Subtracting nothing from the first number yields the first number. If both numbers are the same, the returned value should be zero.multiply—. Multiply two numbers and return the product. Multiplying a number by zero returns zero. Multiplying a number by one returns that number.divide—. Divide the second number into the first number. Dividing a number by one yields that number. Dividing a number by itself yields one. Dividing by zero is not allowed.
Now that we know what we’re building, let’s see what this class looks like. Listing 10.3 shows the completed class.
Example 10.3. Sample Calculator Class
<?php

class Calc {

    public function add($a, $b) {
        return $a + $b;
    }

    public function subtract($a, $b) {
        return $a - $b;
    }
    public function multiply($a, $b) {
        return $a * $b;
    }

    public function divide($a, $b) {
        if(!$b) {
            throw new Exception("second value must be greater than zero");
        }
        return $a / $b;
    }
}

?>
At this point, you can write a test script that creates an instance of the class and runs each of the functions in turn to verify that they work as expected. Unit testing basically does the same thing. However, the benefit comes when the system is more complicated than this example, or it grows and you can’t remember if you changed any functions in this class since the last time you tested it. Using Zend Studio for Eclipse and PHPUnit, you can write a suite of tests that test all the functionality in the project and run them whenever you want.
To create a unit test, right-click on the project for which you want to create the test and select New, PHPUnit Test Case. The resulting unit test wizard guides you through the process of creating a unit test and helps you set up access to the appropriate libraries needed to run PHPUnit. In Figure 10.1, you can see a few places for input in the wizard dialog. The Source Folder input is the project that the unit test is going to be run against. The SuperClass input is the location where the unit-testing library is located. You should leave this setting as the default unless you are an advanced user.
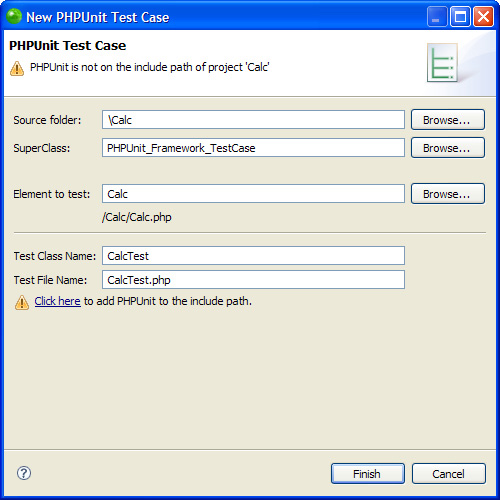
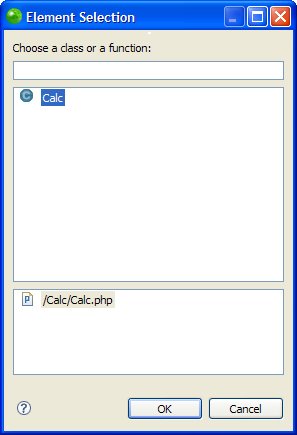
If you click on the Browse button next to the Element to Test, a pop-up window shows all the classes in your project. As you can see in Figure 10.2, there is only one class in the project right now. Click on the Calc class and then click OK. After you have selected the class that you want to test, the remaining input boxes fill themselves in with default names that reflect the class. If this is the first unit test that you are creating for a project, you will probably see a link at the bottom of the window that says Click here to add PHPUnit to the include path. You have to click on this link for the test to run. Then click Finish.
When the wizard finishes, you have a skeleton file that PHPUnit can run. All that is left is to put in the tests and run the file. The skeleton file includes constructor, setUp and tearDown functions, and a test function for each of the functions in the class that you are testing. There is also a private variable, named $Calc in this case, that has the same name as the class you are testing. You use this variable to run the tests. The setUp and tearDown functions are run before and after each of the other test functions. We go into more detail about these functions later in the chapter. For now, let’s run a simple test.
Listing 10.4 shows the completed test case. Notice how each test matches the requirements outlined earlier in this chapter. The test for division by zero in the divide function is purposely designed to fail so that we can have more interesting output from running the test.
Example 10.4. The Completed Test Case for the Calc Class
<?php

require_once('calc.php'),
require_once('PHPUnit/Framework/TestCase.php'),

/**
 * Calc test case.
 */
class CalcTest extends PHPUnit_Framework_TestCase
{

    /**
     * Constructs the test case.
     */
    public function __construct() {

    }

    /**
     * @var Calc
     */
    private $Calc;

    /**
     * Prepares the environment before running a test.
     */
    protected function setUp()
    {

    }

    /**
     * Cleans up the environment after running a test.
     */
    protected function tearDown()
    {

    }


    /**
     * Tests Calc->Add()
     */
    public function testAdd()
    {
        // test that two numbers are added properly
        $this->assertEquals($this->Calc->add(5,2), 7);
        // test that a number plus zero is equal to that number
        $this->assertEquals($this->Calc->add(3,0), 3);
    }

    /**
     * Tests Calc->Divide()
     */
    public function testDivide()
    {
        // test that two numbers are divided properly
        $this->assertEquals($this->Calc->divide(4,2), 2);
        // test that a number divided by one is equal to that number
        $this->assertEquals($this->Calc->divide(6,1), 6);
        // test that a number divided by itself yields one
        $this->assertEquals($this->Calc->divide(8,8), 1);
        // dividing by zero is not allowed
        $this->assertEquals($this->Calc->divide(9,0), 1); // this test should fail
    }

    /**
     * Tests Calc->Multiply()
     */
    public function testMultiply()
    {
        // test that two numbers are multiplied properly
        $this->assertEquals($this->Calc->multiply(3,5), 15);
        // test that a number multiplied by zero is equal to zero
        $this->assertEquals($this->Calc->multiply(3,0), 0);
        // test that a number multiplied by one is equal to one
        $this->assertEquals($this->Calc->multiply(7,1), 7);
    }

    /**
     * Tests Calc->Subtract()
     */
    public function testSubtract()
    {
        // test that two numbers are subtracted properly
        $this->assertEquals($this->Calc->subtract(5,2), 3);
        // test that a number minus zero is equal to that number
        $this->assertEquals($this->Calc->subtract(3,0), 3);
        // subtracting a number from that number yields zero
        $this->assertEquals($this->Calc->subtract(4,4), 0);
    }

}
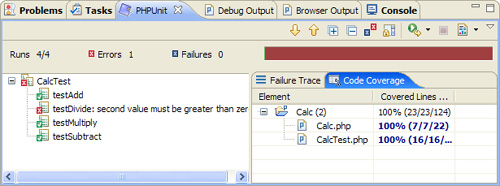
To run the unit test, right-click on the code editor of the unit test file and select Run As, PHPUnit Test. The test should take a few seconds to run, and then it displays the results. Figure 10.3 shows that all four of the tests ran, but there was an error in the tests set up for the divide function.
In a large-scale project, there may be a test case for every class or function. This could result in dozens or hundreds of unit tests. At this point, running the tests becomes tedious and time consuming. Lucky for you, PHPUnit also allows you to create test suites. Zend Studio for Eclipse implements these suites in a similar way to test cases themselves.
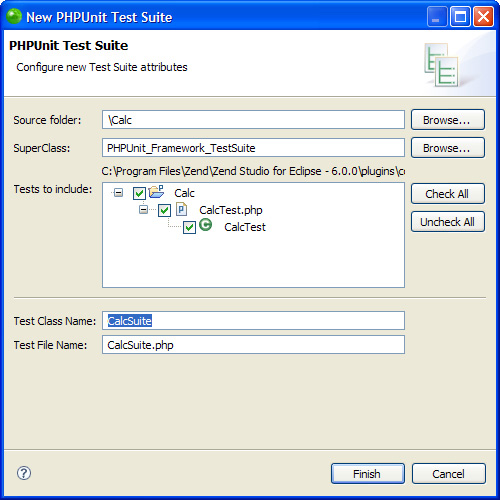
After creating your test cases, you can create a test suite by right-clicking on your project and selecting New, PHPUnit Test Suite. A test suite wizard guides you through the rest of the process. Figure 10.4 shows the test suite creation dialog. The test suite in this example is called CalcTestSuite. Click Finish and the test suite class is created for you. Now all you have to do is run the test suite as a PHPUnit test case by right-clicking on the file and selecting Run As, PHP Unit Test.