We have already talked about perspectives and how using different perspectives for different tasks can improve productivity. If you want to know more about perspectives, be sure to read Chapter 3, “Environmental Settings.” This chapter focuses specifically on the PHP perspective.
In this chapter we take a closer look at five important views: Outline, PHP Project Outline, PHP Functions, Problems, and Tasks views. They are some of the default views in the PHP perspective. If you have changed the locations of default views in your window, they may appear in different places on your screen.
To help us with the examination of views, we need some sample code. Functions, classes, variables, errors, and tasks will show up in the view windows. We are going to make a simple Number class later in this chapter to showcase several features. Before we do that, let’s get some basic information on each of the views; then we can see how they work together in the bigger scheme of things.
The Outline view breaks all elements in a selected file into an easy-to-read format. If you have a new project with a new PHP file in it, when you declare a function or class, it appears in the Outline view. As a file gets more complex, this view becomes more useful.
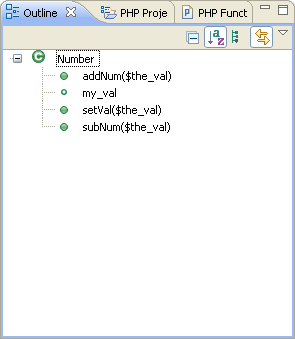
The Outline view uses icons to represent different elements in code. A class is represented by a large circle with a C in the middle of it. Public variables that belong to a class are represented by a hollow circle, whereas private variables are represented by a hollow square. Finally, functions, whether they belong to a class or are independent, are represented by a solid circle. Look at Figure 5.1 to see how the Outline view represents code elements from a file.
If you switch to the PHP Project Outline view, you see similar information to the Outline view. For some files and projects, this information is actually identical. As you build more complexity into a project, these views will start to hold different information. We go over exactly what the differences are when we start to write some code.
The PHP Project view is a good way to get a quick overview of a project. Some of the other views that we are going to discuss, such as the Problems and Tasks views, display information for all opened projects. The PHP Project Outline view shows information only for the selected project. This is a logical way to display information, but it is something that is important to keep in mind if you are working on several projects at once.
In Figure 5.2, notice that classes, variables, and functions are represented in the PHP Project view by the same symbols as are used in the Outline view.

The PHP Functions view is an extremely useful feature of Zend Studio for Eclipse. If you constantly find yourself on the php.net website, you will get a lot of use out of this view. It is basically an outline view of the PHP manual at your fingertips. You can pull up the website manual page directly in Zend Studio for Eclipse if you need to read more about a function by right-clicking on it and clicking Open Manual. Double-clicking on a function inserts it into your code at the position of the cursor.
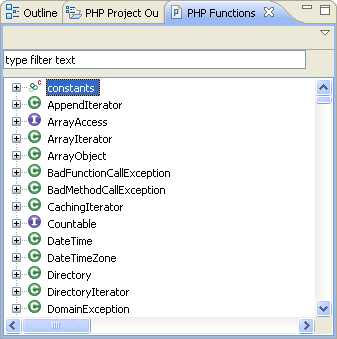
The list in the PHP Functions view is organized by PHP constants, PHP classes or modules that come with a standard install of PHP, and then the regular functions that are familiar to most programmers. The nice thing about the list in this view is that it is exhaustive. Virtually anything that you might want more information on is included in this window. The list is long, but it is organized in a logical way and finding things is not difficult. As you can see from Figure 5.3, there is a lot to look through in this view.
The Problems view appears by default at the bottom of the screen, under the code editor. This view delivers useful information about errors and warnings in your code but is updated only after files have been saved. As you might expect, double-clicking on an error or warning takes you to the line of code that is responsible.
The Problems view shows all problems (errors, warnings, or infos) for all files in all opened projects. For the simplest debugging, make sure that you have only one project open at a time. However, in certain cases, simultaneous debugging of multiple projects might come in handy.
Although the Problems view displays errors, warnings, and infos, it shows only information about the most serious until that category in a given file has been fixed. That means you could have a dozen warnings (for example, printing a variable before a value has been assigned to it) and only one error, and only the error would show up in the Problems view. The warnings are hidden until the error is fixed.
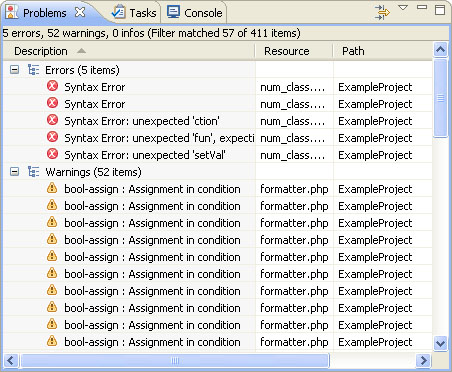
Figure 5.4 shows a project with errors and warnings in two different files. Notice that the filename where the error exists is shown in the Resource column of the Problems view, and that the files in the PHP Explorer view have error or warning icons next to them.
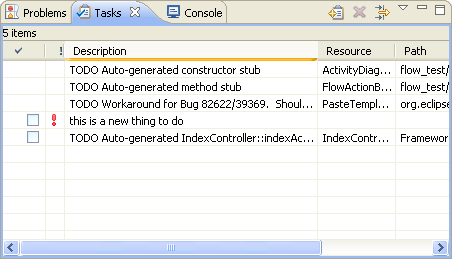
The Tasks view is an extremely useful feature. It makes use of certain types of comments left in code and turns them into a task or communication system that could be used by a single programmer or a group. Double-clicking on a task takes you to the file and the line where the comment was typed. The Tasks view also gives you a checkbox that can be used to mark completed tasks.
The default way to enter a task is to type //TODO anywhere in your code. Anything typed after TODO on the same line is added to the description of the task. This is fine, but what if you want to really make use of the task system and have different types of tasks with different priorities? You can set up your own task options by opening the Zend Studio for Eclipse Preferences window (Window, Preferences) and then select PHP, Editor, Task Tags. You could create a new task tag called HOTFIX and set the priority of this type of task to High. After you create the tag, typing //HOTFIX anywhere in your code creates a HOTFIX task and marks it as High priority.
Remember that the Tasks view shows tasks for all projects that are opened in the PHP Explorer. If you have several projects opened, each with several tasks outstanding, the log could get quite full. The Tasks view can be as complicated or as simple as you choose to make it. Figure 5.5 shows a simple example of how tasks may be used in a project.
We are done with our overview of views, but before we move on, let’s look at how to move views around, close them, and restore them. Not many things are more frustrating than finally getting comfortable with a piece of software and then accidentally closing or moving something and not being able to get it back the way it was.
You may have discovered that you can click and drag views around and even close them completely. This is a useful feature that allows you to work in a workspace that you have complete control over. On the chance that you close a view by clicking on the X or you move a view and then forget where you put it, you can select Window, Show View and then choose one of the views, or click on the Other menu item to get it back.
As we already pointed out, the Task and Problems views display all outstanding tasks or problems for all opened projects. One way to control what is displayed in these views is to close projects that you are not working on. If you find that you need to have more than one project open but still want to see only certain tasks or problems, you’re in luck. You can apply filters to both the Tasks view and the Problems view.
The filters available for tasks and problems are slightly different. We look at both of them here, but we start with task filters. Click on the filter icon at the top right of the Tasks view. This brings up the Filters window, as shown in Figure 5.6.
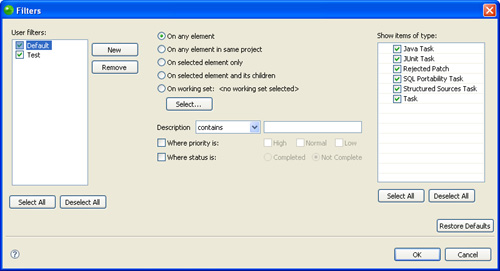
In this window, you can create custom filtering profiles. Each profile can be named and have specific filters in place associated with it. Start by clicking New in the Filters window. You can name your profile and then filter tasks by elements, projects, description, priority, status, and type. Filters have a Restore Defaults option, so don’t be afraid of ruining the settings.
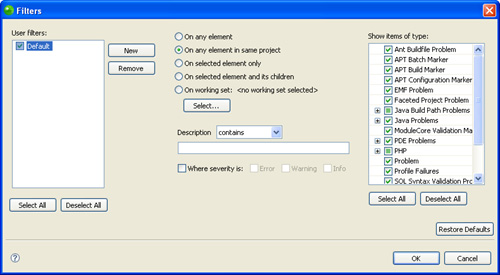
The filter icon for problems looks the same as the one for tasks, except that you must be in the Problems view. If you click on the icon, or look at Figure 5.7, you’ll notice that the Filters windows are almost identical. You can create custom filters profiles in the area on the left of the window and change the filtering preferences. The preferences available for problem filtering are specific to the Problems view and include options such as severity of the problem.
Now that you have an idea of what these views do, let’s take a closer look at them in a more realistic light. As you add functions and classes, include external files, define constants, and make notes to yourself or other developers, these views begin to become more interesting. Let’s take a closer look at the differences between the Outline view and PHP Project Outline view; then we will watch them change as we add some sample code to a project.
The main difference between the Outline and PHP Project Outline is that the Outline view shows the outline only for a single file. If your project has only one file and you have it open, these views look pretty much the same. Let’s put some code in a project to illustrate the differences.
If you want to follow along with this example, open Zend Studio for Eclipse now. Create a new project called Number. To avoid confusion, close any other projects that might be open.
Start by creating a file called num_class.php. This will be a simple class that will model a number. It will have a value and will be able to add or subtract other numbers with its own value. Listing 5.1 shows what the class is going to look like.
Example 5.1. num_class.php—A Simple Class to Illustrate How Views Represent Code Elements
<?php

/*
 * filename: num_class.php
 *
 * This is a very simple Number class
 * Numbers will know their value and be able to add or subtract
 *
 */

class Number {

    public $my_val;

    function setVal($the_val) {
        $this->my_val = $the_val;
    }

    function addNum($the_val) {
        return $this->my_val + $the_val;
    }
    function subNum($the_val) {
        return $this->my_val - $the_val;
    }

}

?>
After entering the code, take a look at the Outline view. The class that was just created has been turned into a tree structure with the class name at the top, then the variables, and then the functions. If you mouse over the functions, the tool tip shows you what arguments can be passed to the function and what is returned.
Click on the PHP Project Outline view to see a different presentation of information. At this point, the Outline and PHP Project Outline views look similar. The difference is the way the information is categorized. The only heading that has any information at this point is the classes heading. It should show you exactly the same information that was previously in the Outline view. There are no Soap clients or defined constants yet, so these headings have nothing under them. You might wonder why the functions heading is empty because we did define three functions. This heading displays only functions that are not attached to a class. The functions that we wrote appear under the Number class and are not repeated.
Let’s see what happens to these views with a few more files. We need a file that will make use of the class. We can call it driver.php. Listing 5.2 shows what it looks like.
If you look at the Outline view, you will notice that it is quite different from the Outline view for num_class.php. You should see an entry in the outline for the included file (num_class.php) and the defined constant (ONE). This view is a powerful tool for visualizing relationships among multiple files at a glance.
Take another look at the PHP Project Outline view with the new file. The only difference should be that there is something in the constants heading now. You might notice that the included file does not show up in this view. The reason is that included files do not make that much sense when you are thinking of the project as a whole. This is where the differences between these views start to become evident. We take a closer and more detailed look at these views in the second half of this book when we build a usable application.
After reading this chapter, you should have an idea of how to use the Outline, PHP Outline, PHP Functions, Problems, and Tasks views. You do not have to be an expert on these views to be able to create a project in Zend Studio for Eclipse. However, becoming comfortable with them will increase your productivity and help you identify relationships or problems in your code.