
The WYSIWYG designer has many parts and views to it. If you don’t know by now, the acronym WYSIWYG stands for What You See Is What You Get, and in real terms, this is what happens within this editor and collection of views.
To start, the WYSIWYG editor and PHP code editor are combined after a fashion. There is a predefined perspective that is available in Zend Studio for Eclipse, and you should switch to that perspective for the remainder of the discussion within this chapter. To do that switch in perspective, if you are currently in the PHP perspective, select Window, Open Perspective and then select the PHP/HTML WYSIWYG option. If you are in a different perspective, you should be able to locate this perspective by selecting Window, Open Perspective, Other Sequence and locating the WYSIWYG perspective from the subsequent list.
The PHP/HTML WYSIWYG perspective should look similar to that shown in Figure 14.1.
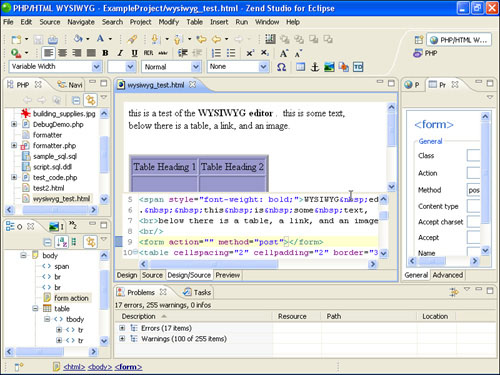
As you can see, there is a total rearrangement of the views around the code editor, and there are even a few new views added to this perspective. This arrangement, however, is simply the starting point to the PHP/ HTML WYSIWYG Editor. This editor is designed mostly for the HTML environment, so let’s create a new file with an .html extension. To do this, select File, New; then name the file wysiwyg_test.html and assign it to the demonstration project.
Note
Immediately after you create a new HTML file you should save and close it. Then you can re-open it with the PHP/ HTML WYSIWYG Editor by right-clicking on the file name itself and selecting open with..., then selecting the PHP/ HTML WYSIWYG Editor. This will re-open the file with WYSIWYG editor tabs at the bottom of the editor (Design, Source, Design/Source, and Preview).
Let’s examine the environment that we now find ourselves in. First, the toolbar that has just updated itself has many HTML-specific uses assigned to it: table design, anchor handling, image management, tag insertion, and property management, to name just a few.
As you may have noticed in figure 14.1, a series of tabs appears at the bottom of the PHP/ HTML WYSIWYG Editor. These tabs are Design, Source, Design/Source, and Preview. Each tab is explained further in the following sections.
The Design portion of the PHP/ HTML WYSIWYG Editor view is, as the name implies, the design portion of the interface. If you have used other basic HTML designer tools, you should be familiar with table generation, link insertion, and anchor management, for example. Here, you can use the toolbar items to design and lay out a basic web page and then have Zend Studio for Eclipse write the HTML for you at the same time. Notice that some rudimentary design work has been done in Figure 14.2, with some sample text, some bold attributes, a simple table, an inserted link, and an inserted image.
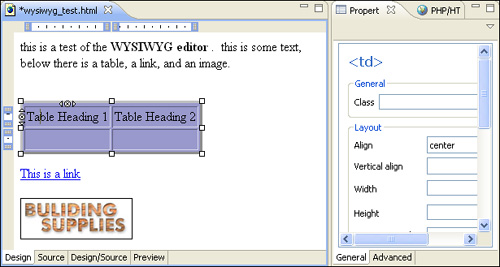
To design the text, enter what you want and highlight any portion of it that you may want to alter. With the selected text, if you want to make it bold as done here, just select Bold from the toolbar, and the selected text is set bold.
To add a table to the design area, simply click on the Table icon on the toolbar to the left of the Anchor icon, or select Insert, Table. After the table is shown in the display, there is an anchor link with the text This is a link. To design some text as an <A> link, all you have to do is click on the Anchor icon on the toolbar, and the Insert Anchor Wizard is displayed. Fill in the basic information, and the link is defined for you.
Under that link in the figure is an image. To the right of the Anchor icon on the toolbar is the Image icon (it looks like a painted landscape). Clicking on this icon launches the Image Insertion Wizard. Here, you can either enter a valid URL for the image in question or use an image that is already defined within the current project environment. To have images already associated with a project, select the File menu then select File System under the General tree and follow the process of importing from the file system.
There are a few other icons available on this toolbar that we don’t describe in great detail. A CSS selector is available if you want to assign certain CSS styles to the page in question. This icon is just to the right of the image icon. The next icon to the right is a toggle that shows you what HTML tags are already in use on the page. And the first icon on the immediate left of the toolbar is for mapping special characters like the copyright symbol to the web page under design.
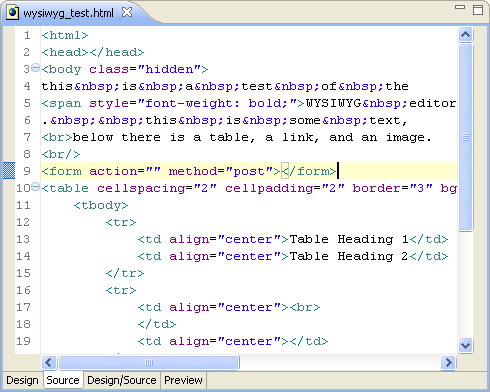
Now that we have a simple web page laid out, we can use this same editor to dig deeper into the code if we want. Selecting the Source tab on the bottom of the PHP/ HTML WYSIWYG Editor switches you into the code editing view of the web page that is under development. You see all the code that Zend Studio for Eclipse has generated for you and can begin to alter it. You can also be more precise in the attributes of the tags if you want, and of course, you can add tags here that are not available in the default Design view. As you can see in Figure 14.3, the PHP/ HTML WYSIWYG Editor has done a lot of coding for you already just in this basic web page.
If you want to see the HTML source code and design layout at the same time, the next tab on the PHP/ HTML WYSIWYG Editor, Design/Source, is the one you want. It splits the editor horizontally for you and shows the design layer at the top of the editor and related source code underneath that. Using this tab is a great way to watch the PHP/ HTML WYSIWYG Editor do its thing in generating the underlying code.
If you want to see what you and the PHP/ HTML WYSIWYG Editor have jointly created, you can switch to the Preview tab on the editor. This tab shows you in a browser view what you have designed. In Figure 14.4, notice that items like the defined anchor links are now active, underlined, and blue. In addition, you should see a Refresh button at the top of the editor to redisplay any changes that you may have made since the last time you previewed your work.

Now that you have a basic feel for the PHP/ HTML WYSIWYG Editor, we can take a little foray into the code assistant part of this editor and then look at the properties management of the HTML code, which is also part and parcel of this design environment.
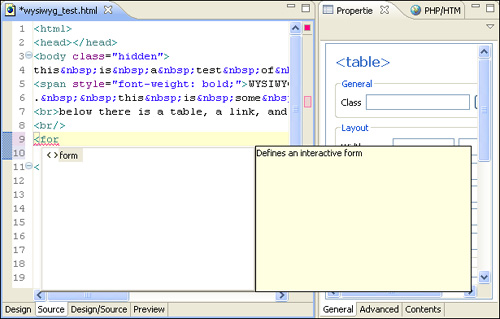
If you switch to the Source tab of the editor, you are presented with the code in its raw form. If you decide to write your code here, Zend Studio for Eclipse assists as much as it can with the attributes of any particular HTML tag that you might be working with. For example, as you can see in Figure 14.5, a <form> tag is under construction, and the options list of the different attributes to that tag are presented.
Caution
At the time of this writing, if you start a web page with the design editor, the code assistant does not launch properly until you place an <html> tag at the start of the source code. When you place that tag at the top of the file, the HTML code assistant works properly. You may also notice that you have to wait a second or so after you type the initial opening of the tag (<) until the code assistant kicks in.
After you select the code, as in the <form> tag, the code template that is defined for the tag is inserted into the code at the point of the cursor. The following code is inserted in this case:
<form action=""></form>
Notice that the closing tag is also supplied for you. This feature can be annoying sometimes, depending on the context of the tag combinations that are inserted, so it may take some getting used to.
Also notice that on the right side of the Zend Studio for Eclipse environment in this current perspective is a Properties view, as shown in Figure 14.6. If you haven’t played with this view yet in this chapter, you are very disciplined indeed. This Properties view has great value in that it is intelligent enough to know what kind of HTML tag is currently in focus, and it displays the known properties and options for editing purposes. The really neat feature about this Properties view is that if you alter a value or add a new value to an existing option, it inserts the correct HTML code for you. You can try this now with the METHOD option on the <form> tag. Select post for the method in the Properties view, and the following code should appear:
<form action="" method="post"></form>
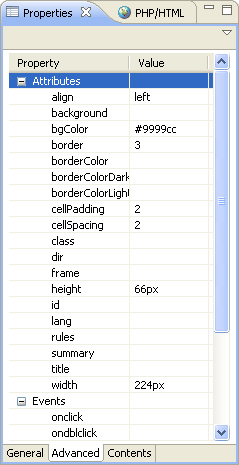
Another tab, named Advanced, appears at the bottom of the Properties view. The default tab, General, shows only the most often used properties of a particular tag. Selecting the Advanced tab shows a complete listing of all the possible property options available to you, including the events that are part of that tag, if any. As shown in Figure 14.6, all the events are shown—onclick, onkeydown, onmouseover, and so on. Again, you can enter values in the Properties view, and they appear in the code “auto-magically” for you. The reverse of this magical feature is also true in that if you alter the code in the source editor, the Properties view is updated for you on the fly.
Note
You can alter or maintain some of these features in the Preferences section under the Window menu. Select the Web and XML, HTML files tree path to see what is available to you there.
If you are planning to write some event code for onclick, for example, a dialog opens in which you can insert your inline script code. Zend Studio for Eclipse saves it into your tag and therefore into your project for you.
In this chapter you saw how Zend Studio for Eclipse embraces the HTML code environment. You saw how to design some simple web pages with the design tool and saw how the generated code looked by activating the Source tab. You also saw the power inherent in the Properties view that accompanies this editor. The WYSIWYG perspective is quite powerful and versatile, and getting to know as much of its ins and outs as possible is a great asset to you, as a Zend Studio for Eclipse developer.