
3. Twitter: 140 Characters to Success
We came across the word “twitter” and it was just perfect. The definition was “a short burst of inconsequential information,” and “chirps from birds.” And that’s exactly what the product was.
—Jack Dorsey, creator of Twitter

A Little History
Twitter started as a brainstorming session in 2006 when a group of board members at the podcasting company Odeo gathered with Mexican take-out in a children’s park. The team involved included Jack Dorsey, who, over his burrito, came up with the idea of developing a texting or Short Message Service (SMS)-like system for communication between small groups of people. The idea seemed exciting—short bursts of content that fit in with the maximum number of characters permitted by SMS (most commonly 160). The team agreed on 140 characters to leave room for a username and a colon in front of the message. Although it was difficult at that time to explain the value, the team knew that they were on to something huge. Figure 3-1 shows the very first Twitter message, sent by Jack Dorsey (@jack).
Figure 3-1. The first ever Twitter message, sent by Jack Dorsey in March 2006.
(Source: Twitter.com)

What’s been described as the boom moment for Twitter occurred during the South by Southwest (SXSW) festival in 2007. During the event, Twitter was showcased extensively via clever placement of two 60-inch plasma screens, which continually streamed Twitter messages (or tweets as they are now known). Suddenly, people got it! Hundreds of conference goers began keeping tabs on each other’s whereabouts via the tweets being broadcast. It was the beginning of an exciting and addictive new world of communication and was quickly lauded by visitors, speakers, and every kind of blogger in attendance. The event culminated in the Twitter developers accepting the festival’s award with the words, “We’d like to thank you in 140 characters or less. And we just did!”
Getting Started: Creating a Great Twitter Account
Getting started on Twitter is an incredibly simple process; making it great takes a little more gray matter. Here’s how to do it right:
1. You can either go to Twitter.com and click the large yellow Sign up button on the lower right or go directly to twitter.com/signup, as shown in Figure 3-2. Click the Sign up button to get started.
Figure 3-2. The Twitter sign up screen.
(Source: Twitter.com)

2. Fill in the first field with your full name (see Figure 3-3).
Figure 3-3. Twitter’s Join the Conversation screen.
(Source: Twitter.com)

3. Select and enter your Twitter username (or handle). This is where you need to get creative and think of a name that truly sums up your brand and business.
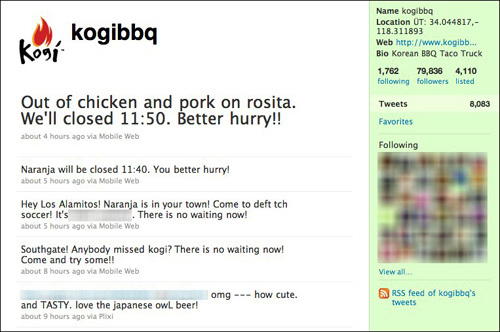
If you are an entrepreneur or a solo enterprise, you and your name may be the brand itself and ideal as your Twitter handle. Think about what your clients and customers will be looking for and then decide whether your chosen name will become easily recognizable to them. If you find your preferred name is already taken, start brainstorming and play around with key words and phrases that paint a verbal picture of your brand. And don’t forget your company tagline; it might just contain the perfect Twitter name for you. It’s also important to think about length of name because this can impact your tweets and the tweets of others dramatically by cutting back the number of characters available for messages. Company names such as the Korean BBQ Taco Truck don’t exactly roll off the tongue and are just too lengthy to be used as a Twitter name. So the staff got creative and came up with the simple but very effective Twitter handle @kogibbq, which successfully translated into an enormous number of followers, as shown in Figure 3-4. Thanks to the word-of-mouse marketing given to their brand by their loyal followers, Kogi is a thriving business that not only has the customers queuing for their tacos, but for their t-shirts and other logo merchandise too.
Figure 3-4. Korean BBQ Taco Truck adopted new names for their trucks and company t-shirts via their Twitter name.
(Source: Twitter.com)
4. Choose a strong yet memorable password. If multiple people regularly log in to the account, you may need to change the password often to ensure that ex-staff cannot gain access. Later in the book, we show you how Cross Platform Promotion (CPP) tools can be utilized to maintain control and security of your account, enabling you to have sole access to your password.
5. Enter your email address, making sure that you enter one that is in active use, because this will be used to verify and activate your account. At present, a single email address can be tied to only one Twitter account, so select with care.
Finding sources that interest you is key to getting the most out of Twitter.
6. Find sources that interest you. This is key to getting the most out of Twitter and will ensure that the information you seek about your brand arena is being tweeted directly to you. Select your areas of interest from the column on the left of the screen, and you’ll see a number of suggested accounts for you to follow (see Figure 3-5). Simply click the Follow button along each suggested account that you want to follow, and you’re on your way! A new list of suggested accounts will appear each time you select an interest. The green square above the list helps you to keep track of the number of accounts you are following. When you’re done, just click the blue Next: Friends button on the lower-right of your screen.
Figure 3-5. Finding sources that interest you is key to getting the most out of Twitter.
(Source: Twitter.com)

7. Find and follow your friends and contacts. Twitter can scan your email address book (if you wish) to find contacts who have Twitter accounts (see Figure 3-6). It’s a quick and simple way to start building your network and is so easy to implement.
Figure 3-6. Twitter can search your email address books to find contacts you already know.
(Source: Twitter.com)
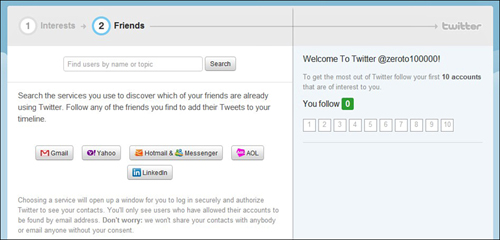
• Just type your email address and your email password into the boxes and then click Find friends. (Don’t worry about giving this information away; Twitter doesn’t store this login and won’t use your email address without your permission.)
• A list of friends and colleagues who have Twitter accounts will appear, and then all you have to do is to follow them.
• You can follow all of them by clicking the blue Follow All button on the right side of the list or individually by using the gray Send request button next to their information.
• Click the Next: others button at the bottom of the screen, and a box will pop-up showing those contacts who aren’t on Twitter and giving you the option to invite them by checking their individual boxes or by the clicking Select all button at the top of the screen.
8. To complete your sign up, use the Twitter search feature to search for anyone else you want to follow, like this:
• Type the name of the person you’re searching for into the search box; a list of matching accounts will be shown, as illustrated in Figure 3-7. Click the Follow button next to those you want to begin following, and a confirmation message will appear.
Figure 3-7. Use the Twitter search feature to find anyone else you would like to follow.
(Source: Twitter.com)
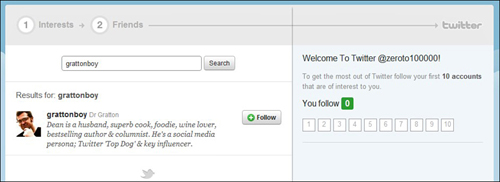
• When you’ve finished following, just click the blue Next set: you’re done! button to complete the process.
Voilà! You’ll now be taken to your brand new profile page (also known as your timeline). This is where you can share information and begin tweeting.
Customizing Your Twitter Profile
Customizing your profile is a great way to make your brand stand out. As well as allowing you to include your company logo, Twitter lets you upload any image as your background, giving you the opportunity to present your business in a unique and personal way that expresses its brand personality.
Adding Your Logo or Photo to Your Profile
1. Start by clicking Settings in the upper-right navigation bar.
2. Now click Profile, which is the fifth tab along the top.
3. Click Change Image, along with the profile picture.
4. You’ll see the Choose File button. Click this button to choose which file to load.
After you have selected your image file, click Save at the bottom of the page. Your thumbnail image will then appear, as shown in Figure 3-8.
Figure 3-8. This is how @grattongirl’s profile settings look.
(Source: Twitter.com)
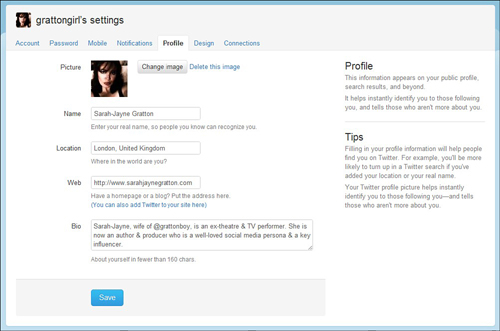
The Profile tab also gives you the option to change your name, location, web details, and to enter a bio. Again, be creative here and let your brand personality shine. When you’re happy with your profile, be sure to click the Save button at the bottom of the page.
Personalizing Your Background
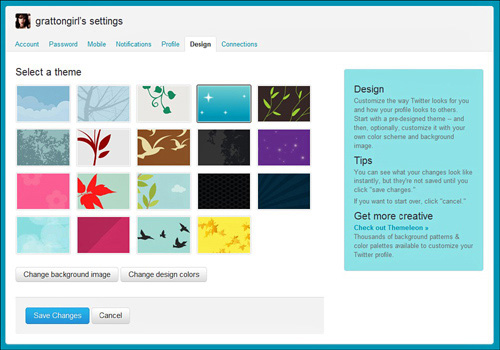
There are many ways to personalize your profile by adding a creative background that effectively represents your business brand. Twitter provides a number of free designs that are a breeze to incorporate, as shown in Figure 3-9.
Figure 3-9. Twitter’s background and color options are easy to incorporate into your profile.
(Source: Twitter.com)
1. Log in to Twitter.com.
2. Click Settings under your username in your top navigation bar or go to twitter.com/account/settings.
3. Click the rightmost tab, labeled Design.
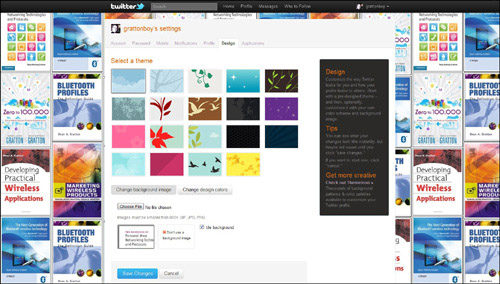
4. Select a template by clicking it or upload your own background image by clicking the Change background image button and selecting your preferred file; see @grattonboy’s example in Figure 3-10.
Figure 3-10. @grattonboy chose to personalize his background with an image montage of his publications. You could easily do the same with your product range.
(Source: Twitter.com)
Again, this can be your logo, image of your products or offices, or whatever makes the best statement for you.
Always remember to save your changes when done (that is, click Save Changes).
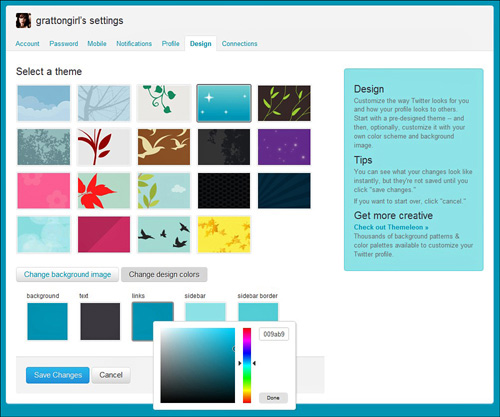
If you want to customize the sidebar and font colors of your page, click Change design colors. You can play around with the various options until you are happy by clicking any of the boxes to change your colors (see Figure 3-11).
Figure 3-11. You can easily customize your colors using the tools provided by Twitter.
(Source: Twitter.com)
5. Click Done after making your choices.
The previously mentioned options provided by Twitter are great for getting your feet wet, but if you want something with a little more oomph, you may want to flip forward to Chapter 15, “Step 6: Do You Need a Brand Makeover?” which recommends a number of other options that will help to make your Twitter profile truly unique.
So you’re now ready to take your place in the Twitterverse. Part III of the book tells you everything you need to know about getting it right first time, from understanding the behavior of the Twitter arena to tweeting like a pro. If you can’t wait to get started, you can skip to it right now. If however, you want to set up all your platforms before takeoff, then stay with us as we move on to the next big social media arena: Facebook.