
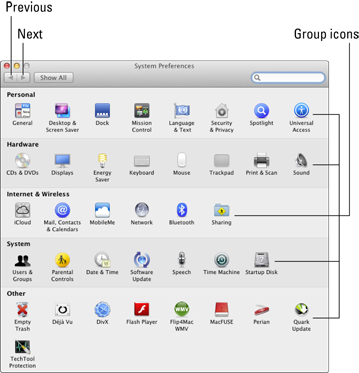
Figure 6-1: The power-house of settings and switches: System Preferences.
Chapter 6
A Nerd’s Guide to System Preferences
In This Chapter
![]() Navigating System Preferences
Navigating System Preferences
![]() Searching for specific controls
Searching for specific controls
![]() Customizing Lion from System Preferences
Customizing Lion from System Preferences
Remember the old TV series Voyage to the Bottom of the Sea? You always knew you were on the bridge of the submarine Seaview because it had an entire wall made up of randomly blinking lights, crewmen darting about with clipboards, and all sorts of strange and exotic-looking controls on every available surface. You could fix just about anything by looking into the camera with grim determination and barking out an order. After all, you were On The Bridge. That’s why virtually all the dialogue and action inside the sub took place on that one (expensive) set: It was the nerve center of the ship and a truly happenin’ place to be.
I devote this entire chapter to the System Preferences window and all the settings within it. After all, if you want to change how Lion works or customize the features within our favorite operating system, this one window is the nerve center of Mac OS X and a truly happenin’ place to be. (Sorry, no built-in wall of randomly blinking lights — but there are exotic controls just about everywhere.)
A Not-So-Confusing Introduction
The System Preferences window (as shown in Figure 6-1) is a self-contained beast, and you can reach it in a number of ways:
![]() Click the Apple menu () and choose the System Preferences menu item.
Click the Apple menu () and choose the System Preferences menu item.
![]() Click the System Preferences icon in the Dock.
Click the System Preferences icon in the Dock.
![]() Click most of the Finder menu status icons and then choose the Open Preferences menu item. (This trick works with the Bluetooth, Wi-Fi, Display, Input Source, Time Machine, Modem, and Clock icons.)
Click most of the Finder menu status icons and then choose the Open Preferences menu item. (This trick works with the Bluetooth, Wi-Fi, Display, Input Source, Time Machine, Modem, and Clock icons.)
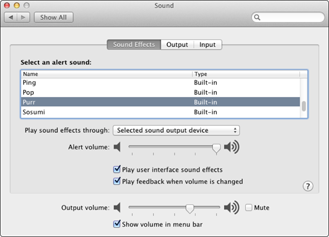
When the System Preferences window is open, you can click any of the group icons to switch to that group’s pane; the entire window morphs to display the settings for the selected pane. For example, Figure 6-2 illustrates the Sound pane, which allows you to set a system alert sound, configure your iMac’s built-in microphone, and choose from among several output options.
Many panes also include a number of tabbed buttons at the top — in this case, Sound Effects, Output, and Input. You can click these tabs to switch to another pane within the same pane. Many panes within System Preferences have multiple subpanes. This design allows our friends at Apple to group a large number of related settings in the same pane (without things getting too confusing).
To return to the top-level System Preferences window from any pane, just click the Show All button (top left) or press ![]() +L. You can also click the familiar Previous and Next buttons to move backward through the panes you’ve already visited and then move forward again, in sequence. (Yep, these buttons work just like the browser controls in Safari. Sometimes life is funny that way.)
+L. You can also click the familiar Previous and Next buttons to move backward through the panes you’ve already visited and then move forward again, in sequence. (Yep, these buttons work just like the browser controls in Safari. Sometimes life is funny that way.)
Figure 6-2: The Sound pane, proudly showing off the Sound Effects panel.
 If a System Preference pane is locked, you won’t be able to modify any of the settings on that pane unless you unlock the pane. Click the padlock icon (and, if prompted, type your dmin-level account password) to unlock the pane. After you’ve finished your tweaking, you can protect the settings from inadvertent changes by clicking the padlock icon again to close the pane.
Your changes to the settings in a pane are automatically saved when you click Show All or when you click the Close button on the System Preferences window. You can also press ![]() +Q to exit System Preferences and save all your changes automatically . . . a favorite shortcut of mine.
+Q to exit System Preferences and save all your changes automatically . . . a favorite shortcut of mine.
If you see an Apply button in a pane, you can click it to immediately apply any changes you make, without exiting the pane. This is perfect for some settings that you might want to try first before you accept them, like many of the controls on the Network pane. However, if you’re sure about what you changed and how those changes will affect your system, you don’t have to click Apply. Just exit the System Preferences window or click Show All as you normally would.
Searching for Settings
Hey, wouldn’t it be great if you could search through all the different panes in System Preferences — with all those countless radio buttons, check boxes, and slider controls — from one place? Even when you’re not quite sure exactly what it is you’re looking for?
Figure 6-3 illustrates exactly that kind of activity taking place. Just click in the System Preferences Spotlight Search box (upper right, with the magnifying glass icon) and type in just about anything. For example, if you know part of the name of a particular setting you need to change, type that. Lion highlights the System Preferences panes that might contain matching settings. And if you’re a Switcher from the Windows world, you can even type in what you might have called the same setting in Windows!
The System Preferences window dims and the group icons that might contain what you’re looking for stay highlighted. Slick.
If you need to reset the Search box to try again, click the X icon that appears at the right side of the box to clear it.
Figure 6-3: Searching for specific settings is a breeze with the Search box.

Popular Preference Panes Explained
Time to get down to brass tacks. Open the most-often-used panes in System Preferences to see what magic you can perform! I don’t discuss all the panes because I cover many of them in other chapters. (In fact, you might never need to open some System Preferences panes at all, like the Language & Text pane.) However, this chapter covers just about all the settings that you’re likely to use on a regular basis.
The Displays pane
If you’re a heavy-duty game player or you work with applications like video editing and 3-D modeling, you probably find yourself switching the characteristics of your monitor on a regular basis. To easily accomplish switching, visit the Displays pane (see Figure 6-4), which includes two panes:
![]() Display: Click a screen resolution to choose it from the Resolutions list on the left. (Typically, it’s a good idea to use the highest resolution.) If you have an external monitor connected to your iMac, click the Detect Displays button to scan for that monitor. Drag the Brightness slider to change the brightness level of your display.
Display: Click a screen resolution to choose it from the Resolutions list on the left. (Typically, it’s a good idea to use the highest resolution.) If you have an external monitor connected to your iMac, click the Detect Displays button to scan for that monitor. Drag the Brightness slider to change the brightness level of your display.
 When you select (mark) the Show Displays in Menu Bar check box, you can switch resolutions and color levels right from the Finder menu!
![]() Color: Your iMac can use a color profile file that controls the colors on your display. This setting comes in handy for graphic artists and illustrators who need color output from their printers that closely matches the colors displayed by the iMac. Click the Calibrate button to launch the Display Calibrator, which can create a custom ColorSync profile and calibrate the colors that you see on your monitor.
Color: Your iMac can use a color profile file that controls the colors on your display. This setting comes in handy for graphic artists and illustrators who need color output from their printers that closely matches the colors displayed by the iMac. Click the Calibrate button to launch the Display Calibrator, which can create a custom ColorSync profile and calibrate the colors that you see on your monitor.
Figure 6-4: The Displays pane also comes in a handy Finder menu- bar size!

The Desktop & Screen Saver pane
Hey, who doesn’t want to choose their own background? And what about that nifty screen saver you just downloaded from the Apple website? You can change both your background and screen saver by using these options on the Desktop & Screen Saver pane.
The settings on the Desktop panel (as shown in Figure 6-5) include
![]() Current Desktop picture: To change your Desktop background, click a thumbnail. You can also drag a picture from a Finder window or the desktop and drop it into the well (the fancy Apple word for the square box with the sunken look). Lion automatically updates your Desktop so that you can see the results. To open another collection of images from Apple, click the desired collection folder in the list on the left of the pane. If you want to open a different folder with your own images, click the Add button (which bears a plus sign) at the lower left of the pane and then navigate to that folder.
Current Desktop picture: To change your Desktop background, click a thumbnail. You can also drag a picture from a Finder window or the desktop and drop it into the well (the fancy Apple word for the square box with the sunken look). Lion automatically updates your Desktop so that you can see the results. To open another collection of images from Apple, click the desired collection folder in the list on the left of the pane. If you want to open a different folder with your own images, click the Add button (which bears a plus sign) at the lower left of the pane and then navigate to that folder.
Figure 6-5: Show The Man who’s boss and pick your own Desktop background.

![]() Arrangement: You can automatically fit an image to your screen, tile your background image (repeat it across the Desktop), center it, and stretch it to fill the screen. Because the images from Apple are all sized correctly already, the Arrangement pop-up menu appears only when you’re using your own pictures.
Arrangement: You can automatically fit an image to your screen, tile your background image (repeat it across the Desktop), center it, and stretch it to fill the screen. Because the images from Apple are all sized correctly already, the Arrangement pop-up menu appears only when you’re using your own pictures.
![]() Change Picture: If you like a bit of automatic variety on your Desktop, select the Change Picture check box. You can click the pop-up menu to set the delay period. The images in the current collection or folder are then displayed in the sequence in which they appear in the thumbnail list.
Change Picture: If you like a bit of automatic variety on your Desktop, select the Change Picture check box. You can click the pop-up menu to set the delay period. The images in the current collection or folder are then displayed in the sequence in which they appear in the thumbnail list.
![]() Translucent Menu Bar: When enabled, this feature turns your Finder and application menu bars semiopaque, allowing them to blend in somewhat with your Desktop background. If you’d rather have a solid-color menu bar, deselect this check box.
Translucent Menu Bar: When enabled, this feature turns your Finder and application menu bars semiopaque, allowing them to blend in somewhat with your Desktop background. If you’d rather have a solid-color menu bar, deselect this check box.
![]() Random Order: Select this check box to throw caution utterly to the wind and display random screens from the current collection or folder!
Random Order: Select this check box to throw caution utterly to the wind and display random screens from the current collection or folder!
The settings on the Screen Saver pane include
![]() Screen Savers: Click the screen saver that you want to display from the Screen Savers list. Lion displays an animated preview of the selected saver on the right. You can also click the Test button to try out the screen saver in full-screen mode. (Move your mouse a bit to end the test.)
Screen Savers: Click the screen saver that you want to display from the Screen Savers list. Lion displays an animated preview of the selected saver on the right. You can also click the Test button to try out the screen saver in full-screen mode. (Move your mouse a bit to end the test.)
If the selected screen saver has any settings you can change, the Options button displays them.
![]() Start Screen Saver: Drag this slider to choose the period of inactivity that triggers the screen saver. Choose Never if you want to disable the screen saver entirely.
Start Screen Saver: Drag this slider to choose the period of inactivity that triggers the screen saver. Choose Never if you want to disable the screen saver entirely.
![]() Use Random Screen Saver: Another chance to rebel against conformity! Select this check box, and Lion picks a different screen saver each time.
Use Random Screen Saver: Another chance to rebel against conformity! Select this check box, and Lion picks a different screen saver each time.
![]() Show With Clock: Select this check box, and Lion adds a smart clock display to your screen saver (a great help for those of us who spend many minutes on the phone).
Show With Clock: Select this check box, and Lion adds a smart clock display to your screen saver (a great help for those of us who spend many minutes on the phone).
![]() Hot Corners: Click this button to display a drop-down sheet and then click any of the four pop-up menus at the four corners of the screen to select that corner as an activating hot corner. (Moving your mouse pointer to a hot corner immediately activates the screen saver.) You can also specify a corner as a disabling hot corner; as long as the mouse pointer stays in that corner, the screen saver is disabled. Note that you can also set the Dashboard and Mission Control activation corners from here. (Read on for the entire lowdown.)
Hot Corners: Click this button to display a drop-down sheet and then click any of the four pop-up menus at the four corners of the screen to select that corner as an activating hot corner. (Moving your mouse pointer to a hot corner immediately activates the screen saver.) You can also specify a corner as a disabling hot corner; as long as the mouse pointer stays in that corner, the screen saver is disabled. Note that you can also set the Dashboard and Mission Control activation corners from here. (Read on for the entire lowdown.)
For additional security, check out the Security & Privacy pane in System Preferences — on the General pane, you’ll find the Require Password After Sleep or Screen Saver Begins check box. Select the check box.
The Mission Control pane
Figure 6-6 illustrates the Mission Control, Spaces, and Dashboard settings that you can configure in this group. You can use Mission Control to view all the application windows that you’re using at one time so that you can select a new active window. Or you can move all windows aside so that you can see your Desktop. Dashboard presents a number of mini-applications (or widgets), which you can summon and hide with a single key.
Figure 6-6: Tweak the operation of Mission Control from this pane.

Here’s what you can control about Mission Control (horrible pun not intended but accepted nonetheless):
![]() Hot Corners: Click this button to set Hot Corners within Lion. These four pop-up menus are the same as those in the Hot Corners configuration sheet in the Desktop & Screen Savers pane. Click one to specify that corner as one of the following: an All Windows corner (which displays all windows on your Desktop); an Application Windows corner (which displays only the windows from the active application); a Desktop corner (which moves all windows to the outside of the screen to uncover your Desktop); or a Dashboard corner (which displays your Dashboard widgets). Choose Launchpad to activate the Launchpad screen. Note that you can also set the Screen Saver Start and Disable corners from here, as well as put your display to sleep.
Hot Corners: Click this button to set Hot Corners within Lion. These four pop-up menus are the same as those in the Hot Corners configuration sheet in the Desktop & Screen Savers pane. Click one to specify that corner as one of the following: an All Windows corner (which displays all windows on your Desktop); an Application Windows corner (which displays only the windows from the active application); a Desktop corner (which moves all windows to the outside of the screen to uncover your Desktop); or a Dashboard corner (which displays your Dashboard widgets). Choose Launchpad to activate the Launchpad screen. Note that you can also set the Screen Saver Start and Disable corners from here, as well as put your display to sleep.
![]() Keyboard and Mouse Shortcuts: Click each pop-up menu to set the key sequences (and mouse button settings) for Mission Control, Application windows, Show Desktop, and the Dashboard.
Keyboard and Mouse Shortcuts: Click each pop-up menu to set the key sequences (and mouse button settings) for Mission Control, Application windows, Show Desktop, and the Dashboard.
You’re not limited to just the keyboard and mouse shortcuts on the pop-up menus. Press the Shift, Control, Option, and ![]() keys while a pop-up menu is open, and you see these modifiers appear as menu choices! (Heck, you can even combine modifiers, such as
keys while a pop-up menu is open, and you see these modifiers appear as menu choices! (Heck, you can even combine modifiers, such as ![]() +Shift+F9 instead of just F9.)
+Shift+F9 instead of just F9.)
By default, Lion displays your Dashboard as a Space within the Mission Control screen. If you prefer your Dashboard widgets to appear as an overlay (as they did in previous versions of Mac OS X), deselect the Show Dashboard As a Space check box.
![]() Automatically Rearrange Spaces Based on Most Recent Use: If this check box is selected, Mission Control presents your most recently used Spaces first within the thumbnails at the top of the screen.
Automatically Rearrange Spaces Based on Most Recent Use: If this check box is selected, Mission Control presents your most recently used Spaces first within the thumbnails at the top of the screen.
![]() When Switching to an Application: When selected, this check box allows you to switch applications between Spaces desktops using the
When Switching to an Application: When selected, this check box allows you to switch applications between Spaces desktops using the ![]() +Tab shortcut. Lion jumps to the desktop that has an open window for the application you choose, even if that desktop is not currently active.
+Tab shortcut. Lion jumps to the desktop that has an open window for the application you choose, even if that desktop is not currently active.
The General pane
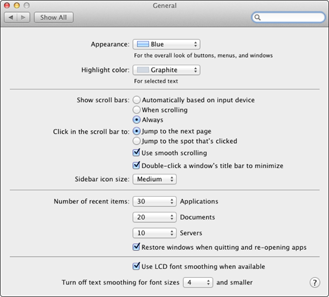
The talented General pane (shown in Figure 6-7) determines the look and operation of the controls that appear in application windows and Finder windows. It looks complex, but I cover each option here.
The settings include
![]() Appearance: Click this pop-up menu to specify the color Lion uses for buttons, menus, and windows.
Appearance: Click this pop-up menu to specify the color Lion uses for buttons, menus, and windows.
![]() Highlight Color: Click this pop-up menu to choose the color that highlights selected text in fields, pop-up menus, and drop-down list boxes.
Highlight Color: Click this pop-up menu to choose the color that highlights selected text in fields, pop-up menus, and drop-down list boxes.
![]() Show Scroll Bars: Use these radio buttons to specify when Lion should display scroll bars within a window. By default, they’re placed automatically when necessary, but you can choose to display scroll bars always, or only when you’re actually scrolling through a document. (If you’ve used Mac OS X before, note that the familiar scroll arrows from past versions of the operating system no longer appear within Lion.)
Show Scroll Bars: Use these radio buttons to specify when Lion should display scroll bars within a window. By default, they’re placed automatically when necessary, but you can choose to display scroll bars always, or only when you’re actually scrolling through a document. (If you’ve used Mac OS X before, note that the familiar scroll arrows from past versions of the operating system no longer appear within Lion.)
![]() Click in the Scroll Bar To: By default, Mac OS X jumps to the next or previous page when you click in an empty portion of the scroll bar. Select the Jump to the Spot That’s Clicked radio button to scroll the document to the approximate position in relation to where you click. (You can also choose smooth scrolling, which looks cool, but many folks think that it’s too slow compared with the default scrolling speed.) If you select the Double-Click a Window’s Title Bar to Minimize check box, you can minimize a Finder or application window by simply double-clicking the window’s title bar. You can also set the size for the icons in the Finder window toolbar.
Click in the Scroll Bar To: By default, Mac OS X jumps to the next or previous page when you click in an empty portion of the scroll bar. Select the Jump to the Spot That’s Clicked radio button to scroll the document to the approximate position in relation to where you click. (You can also choose smooth scrolling, which looks cool, but many folks think that it’s too slow compared with the default scrolling speed.) If you select the Double-Click a Window’s Title Bar to Minimize check box, you can minimize a Finder or application window by simply double-clicking the window’s title bar. You can also set the size for the icons in the Finder window toolbar.
![]() Number of Recent Items: By default, Lion displays ten recent applications, documents, and servers within Recent Items in the Apple menu. Need more? Just click the corresponding pop-up menu and specify up to 50 items.
Number of Recent Items: By default, Lion displays ten recent applications, documents, and servers within Recent Items in the Apple menu. Need more? Just click the corresponding pop-up menu and specify up to 50 items.
![]() Restore Windows When Quitting and Re-Opening Apps: If this check box is selected, Lion’s Resume feature automatically saves the state of an application when you quit. When you launch the application again, Lion restores all the application windows and opens the documents you were working on when you quit. In effect, you can continue using the application just as if you had never quit. If you deselect the check box, Lion will not restore your work, and you’ll have to load your document again; this is the same action taken by earlier versions of Mac OS X.
Restore Windows When Quitting and Re-Opening Apps: If this check box is selected, Lion’s Resume feature automatically saves the state of an application when you quit. When you launch the application again, Lion restores all the application windows and opens the documents you were working on when you quit. In effect, you can continue using the application just as if you had never quit. If you deselect the check box, Lion will not restore your work, and you’ll have to load your document again; this is the same action taken by earlier versions of Mac OS X.
![]() Use LCD Font Smoothing: By default, this check box is selected, making the text on your iMac’s LED display appear more like the printed page.
Use LCD Font Smoothing: By default, this check box is selected, making the text on your iMac’s LED display appear more like the printed page.
![]() Turn Off Text Smoothing for Font Sizes: Below a certain point size, text smoothing doesn’t help fonts look any smoother onscreen. By default, any font displayed at 8 point or smaller isn’t smoothed, which is a good choice for an iMac with a flat-panel LED screen.
Turn Off Text Smoothing for Font Sizes: Below a certain point size, text smoothing doesn’t help fonts look any smoother onscreen. By default, any font displayed at 8 point or smaller isn’t smoothed, which is a good choice for an iMac with a flat-panel LED screen.
Figure 6-7: Appearances might not be everything, but they’re easy to find on the General pane.
The Energy Saver pane
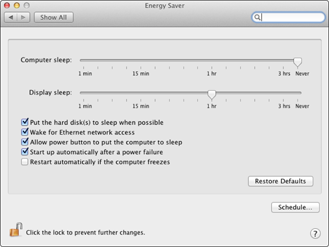
I’m an environmentalist (it’s surprising how many techno-types are colored green) so this pane (as shown in Figure 6-8) is pretty doggone important. When you use them correctly, you not only save electricity but also even invoke the Power of Lion to automatically start and shut down your iMac whenever you like!
To save electricity, drag the Computer Sleep slider to a delay period that triggers sleep mode when you’re away from the keyboard for a significant period of time. (I prefer 30 minutes.) If your iMac must always remain alert and you want to disable sleep mode entirely, choose Never. You can set the delay period for blanking your monitor separately from the sleep setting with the Display Sleep slider.
To conserve the maximum juice and cut down on wear, select the Put the Hard Disk(s) to Sleep When Possible check box to power-down your hard drives when they’re not needed. (This might cause a delay of a second or two while loading or saving files because the drives must spin back up — if you’re sharing files with others on your network, sleeping hard drives can also significantly slow file transfers.)
You can set Lion to start or shut down your iMac at a scheduled time. Click the Schedule button and then select the desired schedules (the Start Up or Wake check box and the Shut Down/Sleep pop-up menu) to enable them. Set the trigger time by clicking the up and down arrows next to the time display for each schedule. Click OK to return to the Energy Saver pane.
Select the Wake for Ethernet Network Access check box to wake your iMac from sleep mode whenever your computer is accessed remotely across your network. If you prefer to send your iMac to sleep by pressing the Power button, enable the Allow Power Button to Put the Computer to Sleep check box. Lion can restart your iMac automatically after a power failure — a good feature for those running the Apache web server, because your website will automatically come back online after power is restored. Lion can also restart automatically if your iMac freezes (that’s techno-talk for a computer that’s not responding to keyboard or mouse commands) if you select the Restart Automatically If the Computer Freezes check box.
Figure 6-8: Reduce your iMac’s power consumption from the Energy Saver pane.
The Dock pane
You can use the settings shown in Figure 6-9 to configure the Dock’s behavior until it fits your personality like a glove:
![]() Size: Pretty self-explanatory. Just drag the slider to change the scale of the Dock.
Size: Pretty self-explanatory. Just drag the slider to change the scale of the Dock.
![]() Magnification: When you select this check box, each icon in your Dock swells like a puffer fish when you move your mouse cursor over it. (Just how much it magnifies is determined by the Magnification slider.) I really like this feature because I resize my Dock smaller, and I have a large number of Dock icons.
Magnification: When you select this check box, each icon in your Dock swells like a puffer fish when you move your mouse cursor over it. (Just how much it magnifies is determined by the Magnification slider.) I really like this feature because I resize my Dock smaller, and I have a large number of Dock icons.
![]() Position on Screen: Select a radio button here to position the Dock on the left, bottom, or right edge of your iMac’s Desktop.
Position on Screen: Select a radio button here to position the Dock on the left, bottom, or right edge of your iMac’s Desktop.
![]() Minimize Using: Lion includes two cool animations that you can choose from when shrinking a window to the Dock (and expanding it back to the Desktop). Click the Minimize Using pop-up menu to specify the genie-in-a-bottle effect or a scale-up-or-down-incrementally effect.
Minimize Using: Lion includes two cool animations that you can choose from when shrinking a window to the Dock (and expanding it back to the Desktop). Click the Minimize Using pop-up menu to specify the genie-in-a-bottle effect or a scale-up-or-down-incrementally effect.
![]() Minimize Windows into Application Icon: If this check box is not selected, minimized application windows appear as thumbnail icons in the Dock. To minimize application windows into the application icon in the Dock — which can save space on your Dock — click this check box to select it.
Minimize Windows into Application Icon: If this check box is not selected, minimized application windows appear as thumbnail icons in the Dock. To minimize application windows into the application icon in the Dock — which can save space on your Dock — click this check box to select it.
![]() Animate Opening Applications: Are you into aerobics? How about punk rock and slam dancing? Active souls who like animation likely get a kick out of the bouncing application icons in the Dock. They indicate that you’ve launched an application and that it’s loading. You can turn off this bouncing behavior by deselecting this check box.
Animate Opening Applications: Are you into aerobics? How about punk rock and slam dancing? Active souls who like animation likely get a kick out of the bouncing application icons in the Dock. They indicate that you’ve launched an application and that it’s loading. You can turn off this bouncing behavior by deselecting this check box.
![]() Automatically Hide and Show the Dock: Select this check box, and the Dock disappears until you need it. (Depending on the size of your Dock, the Desktop real estate that you gain can be significant.) To display a hidden Dock, move your mouse pointer over the corresponding edge of the Desktop.
Automatically Hide and Show the Dock: Select this check box, and the Dock disappears until you need it. (Depending on the size of your Dock, the Desktop real estate that you gain can be significant.) To display a hidden Dock, move your mouse pointer over the corresponding edge of the Desktop.
![]() Show Indicator Lights for Open Applications: Mac OS X indicates which applications are running in the Dock with a small blue dot in front of the icon. To disable these indicators, deselect this check box.
Show Indicator Lights for Open Applications: Mac OS X indicates which applications are running in the Dock with a small blue dot in front of the icon. To disable these indicators, deselect this check box.
Figure 6-9: Customize your Dock by using these controls.

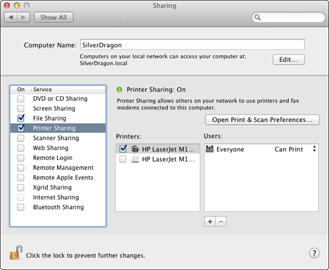
The Sharing pane
So you’re in a neighborly mood and want to share your toys with others on your local wired or wireless network. Perhaps you’d like to start your own website or protect yourself against the Bad Guys on the Internet. All these fun diversions are available from the Sharing pane in System Preferences, as shown in Figure 6-10.
Click the Edit button to change the default network name assigned to your iMac during the installation process. Your current network name is listed in the Computer Name text field.
Each entry in the services list controls a specific type of sharing. To turn on any of these services, select the On check box for that service. To turn off a service, click the corresponding On check box to deselect it.
From a security standpoint, I highly recommend that you enable only those services that you actually use, because each service that you enable automatically makes your Lion firewall open to allow that service. A Mark’s Maxim to remember:
 Poking too many holes in your firewall is not A Good Thing.
When you click one of the services in the list, the right side of the Sharing pane changes to display the settings you can specify for that particular service. To display all the details on these options, click the Help button at the lower-right corner of the System Preferences dialog.
Figure 6-10: Share your toys with others by using the controls on the Sharing pane.
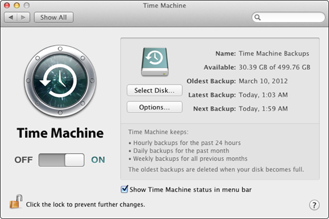
The Time Machine pane
Mac users are justifiably proud about Lion’s Time Machine automatic backup feature. You can easily configure how Time Machine handles your backups from the pane shown in Figure 6-11. Of course, you’ll need an external hard drive (or a Time Capsule wireless backup station) for the best backup security. Note that Time Machine won’t work with your iMac’s DVD drive . . . it’s got to be a hard drive. (Note, however, that if your Wi-Fi network uses an AirPort Extreme base station, you can connect an external hard drive to the base station’s USB port for use with Time Machine. Your iMac will back up wirelessly to the base station’s drive, just like Apple’s Time Capsule device!)
To enable Time Machine, click the On switch and then click the Select Disk button to choose a disk to hold your Time Machine backup data. Time Machine backs up all the hard drives on your system; however, to save time and hard drive space, Time Machine allows you to exclude specific drives and folders from the backup process. Click the Options button; then click the Add button (with the plus sign) to select the drives or folders you want to exclude, and they appear in the Exclude list.
Figure 6-11: Put Time Machine to work, and your data is always backed up.
To remove an item you would like to exclude, select it in the list and click the Delete button (with the minus sign). Note that the Estimated Size figure increases, and Time Machine adds the item you deleted from the list to the next backup.
By default, Lion warns you when deleting older backup files, but you can turn this warning off from the Options sheet as well.
After you make your changes, you can elect to back up your Mac immediately by clicking the Time Machine icon in the Finder menu and choosing the Back Up Now item.
..................Content has been hidden....................
You can't read the all page of ebook, please click here login for view all page.