
Figure 22-1: Force a recalcitrant application to take off.
Chapter 22
It Just . . . Sits . . . There
In This Chapter
![]() Avoiding the blame (righteously)
Avoiding the blame (righteously)
![]() Putting basic troubleshooting precepts to work
Putting basic troubleshooting precepts to work
![]() Using Mark’s Troubleshooting Tree
Using Mark’s Troubleshooting Tree
![]() Getting help
Getting help
I wish you weren’t reading this chapter.
Because you are, I can only surmise that you’re having trouble with your iMac, and that it needs fixing. (The other possibility — that you just like reading about solving computer problems — is more attractive, but much more problematic.)
Consider this chapter a crash course in the logical puzzle that is computer troubleshooting: namely, the art of finding out What Needs Fixing. You also see what you can do when you just plain can’t fix the problem by yourself.
Oh, and you’re going to encounter a lot of Tips and Mark’s Maxims in this chapter — all of them learned the hard way, so I recommend committing them to memory on the spot!
Can You Troubleshoot? Yes, You Can!
Anyone can troubleshoot. Put these common troubleshooting myths to rest:
![]() It takes a college degree in computers to troubleshoot. Tell that to my troubleshooting kids. They’ll think it’s a hoot because they have Apple computers of their own at home and at school. You can follow all the steps in this chapter without any special training.
It takes a college degree in computers to troubleshoot. Tell that to my troubleshooting kids. They’ll think it’s a hoot because they have Apple computers of their own at home and at school. You can follow all the steps in this chapter without any special training.
![]() I’m to blame. Ever heard of viruses? Failing hardware? Buggy software? Any of those things can be causing the problem. Heck, even if you do something by accident, I’m willing to bet it wasn’t on purpose. It’s Mark’s Maxim time:
I’m to blame. Ever heard of viruses? Failing hardware? Buggy software? Any of those things can be causing the problem. Heck, even if you do something by accident, I’m willing to bet it wasn’t on purpose. It’s Mark’s Maxim time:
 Don’t beat yourself up — your iMac can be fixed.
![]() I need to buy expensive utility software. Nope. You can certainly invest in a commercial testing and repair utility if you like. My favorite is TechTool Pro from Micromat (
I need to buy expensive utility software. Nope. You can certainly invest in a commercial testing and repair utility if you like. My favorite is TechTool Pro from Micromat (www.micromat.com), but a third-party utility isn’t a requirement for troubleshooting. (I would, however, consider an antivirus application as a must-have, and you should have one already. Hint, hint.)
![]() There’s no hope if I can’t fix it. Sure, parts fail, and computers crash, but your Apple Service Center can repair just about any problem. And (ahem) if you backed up your iMac (as I preach throughout this book), you’ll keep that important data (even if a new hard drive is in your future).
There’s no hope if I can’t fix it. Sure, parts fail, and computers crash, but your Apple Service Center can repair just about any problem. And (ahem) if you backed up your iMac (as I preach throughout this book), you’ll keep that important data (even if a new hard drive is in your future).
![]() It takes forever. Wait until you read the Number One Rule in the next section; the first step takes but 15 seconds and often solves the problem. Naturally, not all problems can be fixed so quickly, but if you follow the procedures in this chapter, you should fix your iMac (or at least know that the problem requires outside help) in a single afternoon.
It takes forever. Wait until you read the Number One Rule in the next section; the first step takes but 15 seconds and often solves the problem. Naturally, not all problems can be fixed so quickly, but if you follow the procedures in this chapter, you should fix your iMac (or at least know that the problem requires outside help) in a single afternoon.
With those myths banished for good, you can get down to business and start feeling better soon.
Basic Troubleshooting 101
In this section, I walk you through my Should-Be-Patented Troubleshooting Tree as well as the Lion built-in troubleshooting application, Disk Utility. I also introduce you to a number of keystrokes that can make your iMac jump through hoops.
The Number One Rule: Reboot!
Yep, it sounds silly, but the fact is that rebooting your iMac can often solve a number of problems. If you’re encountering these types of strange behavior with your iMac, a reboot might be all you need to heal
![]() Intermittent problems communicating over a network
Intermittent problems communicating over a network
![]() A garbled screen, strange colors, or screwed-up fonts
A garbled screen, strange colors, or screwed-up fonts
![]() The Swirling Beach Ball of Doom that won’t go away after several minutes
The Swirling Beach Ball of Doom that won’t go away after several minutes
![]() An application that locks up
An application that locks up
![]() An external device that seems to disappear or can’t be opened
An external device that seems to disappear or can’t be opened
To put it succinctly, here’s a modest Mark’s Maxim:
Always try a reboot before beginning to worry. Always.
Try to save all your open documents before you reboot. That might not be possible, but try to save what you can.
If you need to force a locked application (one that’s not responding) to quit so that you can reboot, follow these steps to squash that locked application:
1. Click the Apple () menu and choose Force Quit, or press the ![]() + Option + Escape keyboard shortcut.
+ Option + Escape keyboard shortcut.
The dialog that you see in Figure 22-1 appears on your screen.

2. Click the offending application and then click the Force Quit button.
If you can get everything to quit, you should be able to click the Apple menu and choose Shut Down (not Restart) without a problem.
If your iMac simply won’t shut down (or you can’t get the offending application to quit), do what must be done:
1. Press and hold your iMac Power button until it shuts itself off.
You have to wait about four seconds for your iMac to turn itself off.
2. Wait about ten seconds.
3. Press the Power button again to restart the computer.
 Note that you should not simply pull your iMac’s power cord out of the AC socket (or turn off your power strip) to turn it off — pressing and holding the power switch on your iMac is a less destructive path to the same end.
After everything is back up, check whether the problem is still apparent. If you use your iMac for an hour or two and the problem doesn’t reoccur, you likely fixed it!
 Rebooting fixes problems because it resets everything — even your network connection. Rebooting also fixes problems due to brownouts or those notorious AC power flickerings that we all notice from time to time.
Special keys that can come in handy
A number of keys have special powers over your iMac. No, I’m not kidding! These keys affect how your iMac starts up, and they can really come in handy whilst troubleshooting.
Using Safe Boot mode
You can use Safe Boot mode to force Lion to run a directory check of your boot hard drive and disable any Login Items that might be interfering with Lion. Use the Shut Down menu item from the Apple () menu to completely turn off your iMac; press the Power button to start the computer. Then press and hold down the Shift key immediately after you hear the startup tone. After Lion has completely booted, restart your iMac again (this time without the Shift key) to return to normal operation.
Startup keys
Table 22-1 provides the lowdown on startup keys. Hold the indicated key down either when you push your iMac Power button or immediately after the screen blanks during a restart. (As I just mentioned, the Shift key is the exception; it should be pressed and held down after you hear the startup tone.)
Table 22-1 Startup Keys and Their Tricks
|
Key |
Effect on Your iMac |
|
C |
Boots from the CD or DVD that’s loaded in your optical drive |
|
Media Eject |
Ejects the CD or DVD in your optical drive |
|
Option |
Displays a system boot menu, allowing you to choose the operating system and startup volume |
|
Shift |
Prevents your Login Items from running; runs a directory check |
|
T |
Starts your iMac in FireWire or Thunderbolt Target Disk mode |
|
|
Boots from Lion’s Recovery HD |
|
|
Show Mac OS X Console messages |
|
|
Starts your iMac in Single User mode |
|
|
Resets Parameter RAM (PRAM) and NVRAM |
Some of the keys/combinations in Table 22-1 might never be necessary for your machine, but you might be instructed to use them by an Apple technician. I’ll warrant that you’ll use at least the ![]() +R startup key fairly often.
+R startup key fairly often.
All hail Disk Utility, the troubleshooter’s friend
Lion’s Disk Utility is a handy tool for troubleshooting and repairing your hard drive. You can find it in the Utilities folder within your Applications folder.
Fire up Disk Utility, click the volume, and click the First Aid tab to bring up the rather powerful-looking window shown in Figure 22-2.
In the left column of the Disk Utility window, you can see
![]() The physical hard drives in your system (the actual hardware)
The physical hard drives in your system (the actual hardware)
![]() The volumes (the data stored on the hard drives)
The volumes (the data stored on the hard drives)
You can always tell a volume because it’s indented underneath the physical drive entry.
![]() Any CD or DVD loaded on your iMac
Any CD or DVD loaded on your iMac
![]() Disk images you’ve mounted
Disk images you’ve mounted
![]() USB or FireWire flash drives
USB or FireWire flash drives
Figure 22-2: The physician of hard drives — Lion’s Disk Utility.

Danger, Will Robinson!
Many Disk Utility functions can actually wipe your hard drives clean of data instead of repairing them! These advanced functions aren’t likely to help you with troubleshooting a problem with your existing volumes, anyway.
Remember: Don’t use these Disk Utility functions unless an Apple technician tells you to use them:
![]() Partitioning and erasing drives
Partitioning and erasing drives
![]() Setting up RAID arrays
Setting up RAID arrays
![]() Restoring files from disk images
Restoring files from disk images
For example, Figure 22-2 shows that I have one internal hard drive (the 250.06GB entry), one external hard drive (the 500.11GB entry), and one USB flash drive (the 16.01GB entry). The internal hard drive has two volumes (Johann and Windows XP), and both the external drive and the USB drive have one volume each (Time Machine Backups and Transporter, respectively).
The information at the bottom of the Disk Utility window contains the specifications of the selected drive or volume . . . things like capacity, free space, and the number of files and folders for a volume, or connection type and total capacity for a drive.
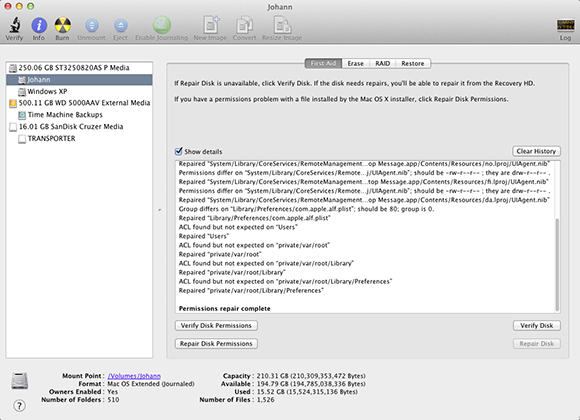
Repairing disk permissions
Because Lion is built on a UNIX base, lots of permissions can apply to the files on your drive — that is, who can open (or read or change) every application, folder, and document on your hard drive. Unfortunately, these permissions are often messed up by wayward applications or power glitches or application installers that do a subpar job of cleaning up after themselves. And if the permissions on a file are changed, often applications lock up or refuse to run altogether.
 I recommend repairing your disk permissions with Disk Utility once weekly. Figure 22-3 shows a permissions repair sweep on my internal hard drive’s volume.
Use these steps to repair permissions on your iMac’s hard drive:
1. Make sure that you’re logged in with an admin account.
2. Save and close any open documents.
Chapter 20 shows you how to log in as an admin user.
Figure 22-3: A successful run, using Repair Disk Permissions.
3. Click the Launchpad icon in the Dock; then click the Utilities folder and click the Disk Utility icon.
4. Click the volume that you want to check.
Remember, you can repair permissions only on a boot drive.
5. Click the Repair Disk Permissions button.
I don’t worry about verifying. If something’s wrong, you end up clicking Repair Disk Permissions, anyway. Just click Repair Disk Permissions; if nothing pops up, that’s fine.
6. To finish the process, always reboot after repairing permissions.
This last step allows you to see whether a problem has been corrected!
Repairing disks
Disk Utility can check the format and health of both hard drives and volumes with Verify Disk — and, if the problem can be corrected, fix any error with Repair Disk.
Using Disk Utility to repair your hard drive carries a couple of caveats:
![]() You can’t verify or repair the boot disk or the boot volume. This actually makes sense because you’re using that disk and volume right now.
You can’t verify or repair the boot disk or the boot volume. This actually makes sense because you’re using that disk and volume right now.
If you have an external drive connected to your iMac that has a Lion boot volume, you can boot from the Mac OS X installed on the external drive to check your current startup disk. Or you can boot your system from the Recovery HD partition and run Disk Utility from the menu. (To choose the startup volume, open System Preferences and click the Startup Disk icon, or restart your iMac and hold down the ![]() +R startup key shortcut to boot directly to the Recovery HD partition.)
+R startup key shortcut to boot directly to the Recovery HD partition.)
Using one of these methods, you should be able to run Disk Utility and select your boot hard drive or volume, and the Verify Disk and Repair Disk buttons should be enabled.
![]() You can’t repair CDs and DVDs. CDs and DVDs are read-only media and thus can’t be repaired at all (at least by Disk Utility).
You can’t repair CDs and DVDs. CDs and DVDs are read-only media and thus can’t be repaired at all (at least by Disk Utility).
If your iMac is having trouble reading a CD or DVD, wipe the disc with a soft cloth to remove dust, oil, and fingerprints. Should that fail, invest in a disc-cleaning contrivance of some sort.
I generally check my disks once every two or three days. If your iMac is caught by a power failure or Mac OS X locks up, however, it’s a good idea to immediately check disks after you restart your iMac.
If you need to verify and repair a disk or volume, follow these steps:
1. If you need to repair your boot drive and volume, save all your open documents and reboot from either an external drive or your Mac OS X Lion Recovery HD partition.
2. Click Launchpad in the Dock; then click the Utilities icon.
3. Click the Disk Utility icon.
Should I reinstall Mac OS X?
This question seems to get a lot of attention on Mac-related Internet discussion boards and Usenet newsgroups — and the answer is a definitive perhaps. (I know. That’s really helpful.)
Here’s the explanation. You shouldn’t lose a single byte of data by reinstalling Mac OS X, so it’s definitely okay to try it. However, reinstalling Mac OS X isn’t a universal balm that fixes all hardware and software errors.
Follow the iMac Troubleshooting Tree all the way to the end before you consider reinstalling Lion. Contact an Apple support technician via the Apple website before you take this step.
To reinstall, you can turn once again to Lion’s Recovery HD volume. (That thing really comes in handy!) Hold down the ![]() +R key shortcut immediately after you hear your iMac’s startup chord to boot directly to the Recovery HD partition. Click the Reinstall Mac OS X option in the window that appears.
+R key shortcut immediately after you hear your iMac’s startup chord to boot directly to the Recovery HD partition. Click the Reinstall Mac OS X option in the window that appears.
4. In the list at the left side of the Disk Utility window, click the disk or volume that you want to check.
5. Click the Repair Disk button.
6. If changes were made (or if you had to boot from a disc or external drive), reboot after repairing the disk or volume.
Mark’s iMac Troubleshooting Tree
As the hip-hop artists say, “All right, kick it.” And that’s just what my iMac Troubleshooting Tree is here for. If rebooting your iMac hasn’t solved the problem, follow these steps in order (either until the solution is found or you run out of steps — more on that in the next section).
Step 1: Investigate recent changes
This is a simple step that many novice Mac owners forget. Simply retrace your steps and consider what changes you made recently to your system. Here are the most common culprits:
![]() Did you just finish installing a new application? Try uninstalling it by removing the application directory and any support files that it might have added to your system. (And keep your applications current with the most recent patches and updates from the developer’s website.)
Did you just finish installing a new application? Try uninstalling it by removing the application directory and any support files that it might have added to your system. (And keep your applications current with the most recent patches and updates from the developer’s website.)
From time to time, an application’s preference file — which stores all the custom settings you make — can become corrupted. Although the application itself is okay, it might act strangely or refuse to launch. To check your preference files for signs of corruption, try scanning your iMac applications with PreferenceCleaner, a freeware utility from EchoMist Software, available from the company site at www.echomist.co.uk. (PreferenceCleaner’s Syntax Checker feature will flag any dicey preference files, setting them up for a quick trip to the Trash.)
![]() Did you just apply an update or a patch to an application? Uninstall the application and reinstall it without applying the patch. If your iMac suddenly works again, check the developer’s website or contact its technical support department to report the problem.
Did you just apply an update or a patch to an application? Uninstall the application and reinstall it without applying the patch. If your iMac suddenly works again, check the developer’s website or contact its technical support department to report the problem.
![]() Did you just update Lion by using Software Update? Updating Lion can introduce problems within your applications that depend on specific routines and system files. Contact the developer of the application and look for updated patches that bring your software in line with the Lion updates. (And use Software Update in automatic mode to check for Mac OS X updates at least once weekly.)
Did you just update Lion by using Software Update? Updating Lion can introduce problems within your applications that depend on specific routines and system files. Contact the developer of the application and look for updated patches that bring your software in line with the Lion updates. (And use Software Update in automatic mode to check for Mac OS X updates at least once weekly.)
![]() Did you just make a change within System Preferences? Return the options that you changed back to their original settings; then consult Chapter 6 for information on what might have gone wrong. (If the setting in question isn’t in Chapter 6, consider searching Lion’s online Help or the Apple support website for more clues.)
Did you just make a change within System Preferences? Return the options that you changed back to their original settings; then consult Chapter 6 for information on what might have gone wrong. (If the setting in question isn’t in Chapter 6, consider searching Lion’s online Help or the Apple support website for more clues.)
![]() Did you just connect (or reconnect) an external device? Try unplugging the device and then rebooting to see whether the problem disappears. Remember that many peripherals need software drivers to run — and without those drivers installed, they won’t work correctly. (Not to mention that updated drivers may be available.) Check the device’s manual or visit the company’s website to search for software that you might need.
Did you just connect (or reconnect) an external device? Try unplugging the device and then rebooting to see whether the problem disappears. Remember that many peripherals need software drivers to run — and without those drivers installed, they won’t work correctly. (Not to mention that updated drivers may be available.) Check the device’s manual or visit the company’s website to search for software that you might need.
If you didn’t make any significant changes to your system before you encountered the problem, proceed to the next step.
Step 2: Run Disk Utility
The preceding section shows how to repair disk permissions on your Lion boot drive.
If you’re experiencing hard drive problems, consider booting from your Mac OS X Recovery HD partition to run a full-blown Repair Disk checkup on your boot volume.
Step 3: Check your cables
Cables work themselves loose, and they fail from time to time. Check all your cables to your external devices — make sure that they’re snug — and verify that everything’s plugged in and turned on. (Oh, and don’t forget to check for crimps or even Fluffy’s teeth marks in your cables.)
If a FireWire, Thunderbolt, or USB device acts up, swap cables around to find whether you have a bad one. A faulty cable can leave you pulling your hair out in no time.
Step 4: Check your Trash
Check the contents of your Trash to see whether you recently deleted files or folders by accident. Click the Trash icon in the Dock once to display the contents. If something’s been deleted by mistake, drag it back to its original folder and try running the application again.
I know this one from personal experience. A slight miscalculation while selecting files to delete made an application freeze every time I launched it.
Step 5: Check your Internet and network connections
Now that always-on DSL and cable modem connections to the Internet are common, don’t forget an obvious problem: Your iMac can’t reach the Internet because your ISP is down, or your network is no longer working!
A quick visual check of your DSL or cable modem will usually indicate whether there’s a connection problem between your modem and your ISP. For example, my modem has a very informative activity light that I always glance at first. However, if your iMac is connected to the Internet through a larger home or office network and you can’t check the modem visually, you can check your Internet connection by pinging www.apple.com, as follows (see Figure 22-4):
1. Click the Launchpad icon in the Dock and then click the Utilities icon.
2. Click Network Utility icon.
3. Click the Ping button.
4. Enter www.apple.com in the Address box.
5. Click Ping.
You should see successful ping messages similar to those in Figure 22-4. If you don’t get a successful ping and you can still reach other computers on your network, your ISP is likely experiencing problems. If you can’t reach your network at all, the problem lies in your network hardware or configuration.
Figure 22-4: Ping www.apple.com to check your Internet connection.

Step 6: Think virus
If you made it to this point, it’s time to run a full virus and malware scan — and make sure that your antivirus application has the latest updated data files, too. My antivirus application of choice is Virus Barrier X from Intego (www.intego.com). (If a virus is detected and your antivirus application can’t remove it, try quarantining it instead, which basically disables the virus-ridden application and prevents it from infecting other files.) I can also recommend ClamXav 2, the antivirus application from www.clamxav.com. (If you like ClamXav 2, you can send a donation to the author.)
Step 7: Disable your Login Items
Mac OS X might encounter problems with applications that you’ve marked as Login Items within System Preferences. In this step, I show you how to identify login problems and how to fix ’em.
Checking for problems
It’s time to use another nifty startup key (refer to Table 22-1). This time, hold down Shift after you hear the startup tone.
This trick disables your account’s Login Items, which are run automatically every time you log in to your iMac. If one of these Login Items is to blame, your iMac will simply encounter trouble every time you log in.
Finding the Login Item that’s causing trouble
If your iMac works fine with your Login Items disabled, follow this procedure for each item in the Login Items list:
1. Open System Preferences, click Users & Groups, and then click the Login Items button.
2. Delete the item from the list; then reboot normally.
You can delete the selected item by clicking the Delete button, which bears a minus sign.
When your iMac starts up normally with Login Items enabled, you discovered the perpetrator. You’ll likely need to delete that application and reinstall it. (Don’t forget to add each of the working Login Items back to the Login Items list!)
Step 8: Turn off your screen saver
This is a long shot, but it isn’t unheard of to discover that a faulty, bug-ridden screen saver has locked up your iMac. (If you aren’t running one of the Apple-supplied screen savers and your computer never wakes up from Sleep mode or hangs while displaying the screen saver, you found your prime suspect.)
Open System Preferences, click Desktop & Screen Saver, click the Screen Saver button, and then either switch to an Apple screen saver or drag the Start slider to Never.
If this fixes the problem, you can probably remove the screen saver by deleting the application in the Screen Savers folder inside your Mac OS X Library folder. (If the application resides in the Library folder within your Home folder instead, hold down the Option key while clicking the Go menu, then click the Library menu item that appears to jump there directly. Now you can open the Screen Savers folder you find there.) If you can’t find the screen saver application at all, use Spotlight to search for it.
Step 9: Run System Profiler
Ouch. You reached Step 9, and you still haven’t uncovered the culprit. At this point, you’ve narrowed the possibilities to a serious problem, like bad hardware or corrupted files in your Mac OS X System folder. Fortunately, Lion provides System Information, which displays real-time information on the hardware in your system. Click the Apple menu and choose About This Mac, click More Info, and then click System Report. Figure 22-5 illustrates a typical healthy result from one of the Hardware categories, Disc Burning. Click each one of the Hardware categories in turn, double-checking to make sure that everything looks okay.
 You don’t have to understand all the technical hieroglyphics. If a Hardware category doesn’t return what you expect or displays an error message, though, that’s suspicious.
Figure 22-5: Check your iMac hardware from System Information.

Okay, I Kicked It, and It Still Won’t Work
Don’t worry, friendly reader. Just because you’ve reached the end of my iMac tree doesn’t mean you’re out of luck. In this section, I discuss the online help available on the Apple website as well as local help in your own town.
Apple Help Online
If you haven’t visited the Apple iMac Support site yet, run — don’t walk — to www.apple.com/support/imac, where you can find
![]() iMac Troubleshooting Tips, which identifies symptoms being displayed by your iMac and offers possible solutions
iMac Troubleshooting Tips, which identifies symptoms being displayed by your iMac and offers possible solutions
![]() The latest patches, updates, and how-to tutorials for the iMac
The latest patches, updates, and how-to tutorials for the iMac
![]() iMac and Mac OS X discussion boards, moderated by Apple
iMac and Mac OS X discussion boards, moderated by Apple
![]() Tools for ordering spare parts, checking on your remaining warranty coverage, and searching the Apple Knowledge Base
Tools for ordering spare parts, checking on your remaining warranty coverage, and searching the Apple Knowledge Base
![]() Do-it-yourself instructions (PDF files) that you can follow to repair or upgrade your iMac
Do-it-yourself instructions (PDF files) that you can follow to repair or upgrade your iMac
Local service, at your service
In case you need to take in your iMac for service, an Apple Store or Apple Authorized Service Provider is probably in your area. To find the closest service, launch Safari and visit
www.apple.com/buy/locator/service/
That’s the Find Service page on the Apple website. You can search by city and state or ZIP Code. The results are complete with the provider’s mailing address, website address, telephone number, and even a map of the location!
Always call your Apple service provider before you lug your (albeit lightweight) iMac all the way to the shop. Make sure that you know your iMac’s serial number (which you can display in System Profiler) and which version of Mac OS X you’re using.
..................Content has been hidden....................
You can't read the all page of ebook, please click here login for view all page.