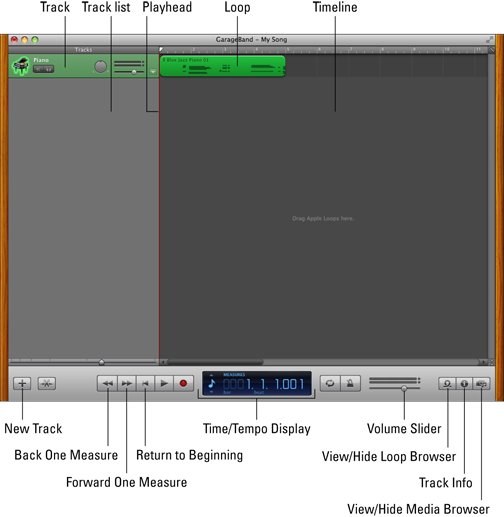
Figure 15-1: The GarageBand window — edged in wood grain, no less.
Chapter 15
Recording Your Hits with GarageBand
In This Chapter
![]() Navigating the GarageBand window
Navigating the GarageBand window
![]() Adding tracks and loops to your song
Adding tracks and loops to your song
![]() Repeating loops and extending your song
Repeating loops and extending your song
![]() Building arrangements
Building arrangements
![]() Adding effects to instruments
Adding effects to instruments
![]() Exporting your work to iTunes and iWeb
Exporting your work to iTunes and iWeb
![]() Burning your song to an audio CD
Burning your song to an audio CD
Do you dream of making music? I’ve always wanted to join a band, but I never devoted the time nor learned to play the guitar. You know the drill: Those rock stars struggled for years to gain the upper hand over an instrument, practicing for untold hours, memorizing chords, and. . . . Wait a second. I almost forgot. You don’t need to do any of that now!
Apple’s GarageBand lets a musical wanna-be (like yours truly) make music with an iMac — complete with a driving bass line, funky horns, and perfect drums that never miss a beat. In fact, the thousands of prerecorded loops on tap in this awesome application allow you to design your music to match that melody running through your head, from techno to jazz to alternative rock.
Oh, and did I mention that you can also use GarageBand ’11 to produce podcasts? That’s right! You can record your voice and easily create your own show, and then share it with others from your iWeb site! Heck, add photos if you like. You’ll be the talk of your family and friends and maybe even your Mac user group.
This chapter explains everything you need to know to create your first song. I also show you how to import your hit record into iTunes so that you can listen to it on your iPod with a big silly grin on your face (as I do) or add it to your next iMovie or iDVD project.
Don’t be too smug when you think of all that practicing and hard work you missed out on. What a shame!
Shaking Hands with Your Band
As you can see in Figure 15-1, the GarageBand window isn’t complex at all, and that’s good design. In this section, I list the most important controls so that you know your Play button from your Loop Browser button.
Your music-making machine includes
![]() Track list: In GarageBand, a track is a discrete instrument that you set up to play one part of your song. For example, a track in a classical piece for string quartet would have four tracks — one each for violin, viola, cello, and bass. The track list contains all the tracks in your song arranged so that you can easily see and modify them, like the rows in a spreadsheet. A track begins in the list, stretching out to the right all the way to the end of the song. As you can see in the upper left of Figure 15-1, I already have one track defined — a Grand Piano.
Track list: In GarageBand, a track is a discrete instrument that you set up to play one part of your song. For example, a track in a classical piece for string quartet would have four tracks — one each for violin, viola, cello, and bass. The track list contains all the tracks in your song arranged so that you can easily see and modify them, like the rows in a spreadsheet. A track begins in the list, stretching out to the right all the way to the end of the song. As you can see in the upper left of Figure 15-1, I already have one track defined — a Grand Piano.
 If you’re creating a podcast, a Podcast artwork track can also appear. Video podcasts can include a movie track as well.
![]() Timeline: This scrolling area holds the loops (see the following bullet) that you add, compose, or record, allowing you to move and edit them easily. When a song plays, the Timeline scrolls to give you a visual look at your music. (Bear with me; you’ll understand that cryptic statement in a page or two.)
Timeline: This scrolling area holds the loops (see the following bullet) that you add, compose, or record, allowing you to move and edit them easily. When a song plays, the Timeline scrolls to give you a visual look at your music. (Bear with me; you’ll understand that cryptic statement in a page or two.)
![]() Loop: This is a prerecorded clip of an instrument being played in a specific style and tempo. Loops are the building blocks of your song. You can drag loops from the Loop Browser to a track and literally build a bass line or a guitar solo. (It’s a little like adding video clips in iMovie to build a film.)
Loop: This is a prerecorded clip of an instrument being played in a specific style and tempo. Loops are the building blocks of your song. You can drag loops from the Loop Browser to a track and literally build a bass line or a guitar solo. (It’s a little like adding video clips in iMovie to build a film.)
![]() Playhead: This vertical line is a moving indicator that shows you the current position in your song while it scrolls by in the Timeline. You can drag the playhead to a new location at any time. The playhead also acts like the insertion cursor in a word processing application: If you insert a section of a song or a loop from the Clipboard, it appears at the current location of the playhead. (More on copying and inserting loops later, so don’t panic.)
Playhead: This vertical line is a moving indicator that shows you the current position in your song while it scrolls by in the Timeline. You can drag the playhead to a new location at any time. The playhead also acts like the insertion cursor in a word processing application: If you insert a section of a song or a loop from the Clipboard, it appears at the current location of the playhead. (More on copying and inserting loops later, so don’t panic.)
![]() Create a New Track button: Click this button to add a new track to your song.
Create a New Track button: Click this button to add a new track to your song.
![]() Track Info button: If you need to display the instrument used in a track, click the track to select it and then click this button. You can also control settings, such as Echo and Reverb, from the Edit pane of the Track Info display.
Track Info button: If you need to display the instrument used in a track, click the track to select it and then click this button. You can also control settings, such as Echo and Reverb, from the Edit pane of the Track Info display.
![]() View/Hide Loop Browser button: Click the button with the loop icon to display the Loop Browser at the right side of the window; click it again to close it. You can see more of your tracks’ contents at a time without scrolling by closing the Loop Browser.
View/Hide Loop Browser button: Click the button with the loop icon to display the Loop Browser at the right side of the window; click it again to close it. You can see more of your tracks’ contents at a time without scrolling by closing the Loop Browser.
![]() View/Hide Media Browser button: Click this button (which bears icons of a filmstrip, slide, and musical note) to display the media browser at the right side of the window; click it again to close it. By closing the media browser, you’ll see more of your tracks. If you’re already familiar with iDVD, iWeb, or iMovie, you recognize this pane in the GarageBand window; it allows you to add media (in this case, digital song files, still images, or movies) to your GarageBand project for use in a podcast or as iPhone ringtones.
View/Hide Media Browser button: Click this button (which bears icons of a filmstrip, slide, and musical note) to display the media browser at the right side of the window; click it again to close it. By closing the media browser, you’ll see more of your tracks. If you’re already familiar with iDVD, iWeb, or iMovie, you recognize this pane in the GarageBand window; it allows you to add media (in this case, digital song files, still images, or movies) to your GarageBand project for use in a podcast or as iPhone ringtones.
![]() Go to Beginning button: Clicking this button immediately moves the playhead back to the beginning of the Timeline.
Go to Beginning button: Clicking this button immediately moves the playhead back to the beginning of the Timeline.
![]() Move Back/Forward One Measure buttons: To move quickly through your song by jumping to the previous or next measure, click the corresponding button.
Move Back/Forward One Measure buttons: To move quickly through your song by jumping to the previous or next measure, click the corresponding button.
![]() Play button: Hey, old friend! At last, a control that you’ve probably used countless times before — and it works just like the same control on your audio CD player. Click Play, and GarageBand begins playing your entire song. Notice that the Play button turns blue. To pause the music, click Play again; the button loses that sexy blue sheen and the playhead stops immediately.
Play button: Hey, old friend! At last, a control that you’ve probably used countless times before — and it works just like the same control on your audio CD player. Click Play, and GarageBand begins playing your entire song. Notice that the Play button turns blue. To pause the music, click Play again; the button loses that sexy blue sheen and the playhead stops immediately.
![]() Time/Tempo display: This cool-looking LCD display shows you the current playhead position in seconds.
Time/Tempo display: This cool-looking LCD display shows you the current playhead position in seconds.
You can click the icon at the left of the display to choose other modes, such as
• Measures (to display the current measure and mark the beat)
• Chord (to display note and chord names)
• Project (to show or change the key, tempo, and signature for the song)
![]() Volume slider: Here’s another familiar face. Just drag the slider to raise or lower the volume.
Volume slider: Here’s another familiar face. Just drag the slider to raise or lower the volume.
Of course, more controls are scattered around the GarageBand window, but these are the main controls used to compose a song . . . which is the next stop!
Composing and Podcasting Made Easy
In this section, I cover the basics of composition in GarageBand, working from the very beginning. Follow along with this running example:
1. Close all existing GarageBand windows.
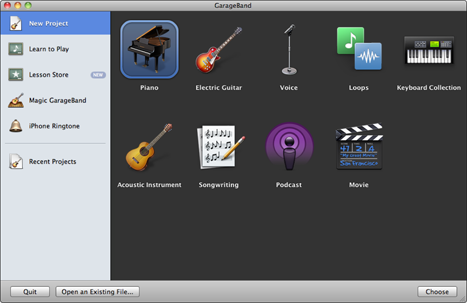
GarageBand displays the top-level New Project dialog, shown in Figure 15-2.
2. Click New Project on the list at the left.
3. Click the Piano icon and click Choose.
If I choose the Piano, my new GarageBand project will have one track already in place — a grand piano. If you choose Electric Guitar or Voice, you’ll have a project automatically created with an electric guitar track or male and female voice tracks. To create a completely empty project, choose Loops.
Figure 15-2: Start creating your new song here.
GarageBand displays the New Project From Template dialog.
4. Type a name for your new song and then drag the Tempo slider to select the beats per minute (bpm).
 A GarageBand song can have only one tempo (or speed) throughout, expressed as beats per minute.
5. If you want to adjust the settings for your song, you can select the
• Time signature (the Time box, expressed as beats per minute)
• Key (the Key box)
If you’re new to music theory (the rules and syntax by which music is created and written), just use the defaults. Most of the toe-tappin’ tunes that you and I are familiar with fit right in with these settings.
6. Click the Create button.
You see the window shown in Figure 15-1. (The Blues Jazz Piano 01 loop in Figure 15-1 — which I show you how to add in the next section — is an example of a typical loop.)
Adding tracks
Although I’m not a musician, I am a music lover, and I know that many classical composers approached a new work in the same way you approach a new song in GarageBand: by envisioning the instruments that they wanted to hear. (I imagine Mozart and Beethoven would’ve been thrilled to use GarageBand, but I think they did a decent job with pen and paper, too.)
In fact, GarageBand includes a Songwriting project (also available from the top-level New Project dialog). When you choose the Songwriting project, GarageBand presents you with a full set of four instrument tracks, plus a real instrument track for your voice. (More on software versus real instrument tracks in a page or two.) You’re instantly ready to start adding loops and recording your own voice!
If you’ve followed along to this point, you’ve noticed two problems with your GarageBand window:
![]() There’s no keyboard. You can record the contents of a software instrument track by “playing” the keyboard, clicking the keys with your mouse. (As you might imagine, this isn’t the best solution.) If you’re a musician, the best method of recording your own notes is with a MIDI instrument, which I discuss later in the chapter. For now, you can display the keyboard window by pressing
There’s no keyboard. You can record the contents of a software instrument track by “playing” the keyboard, clicking the keys with your mouse. (As you might imagine, this isn’t the best solution.) If you’re a musician, the best method of recording your own notes is with a MIDI instrument, which I discuss later in the chapter. For now, you can display the keyboard window by pressing ![]() +K. If the keyboard window is on the screen and you don’t need it, banish the window by clicking the Close button.
+K. If the keyboard window is on the screen and you don’t need it, banish the window by clicking the Close button.
Even if you’re not interested in the “point-and-click” keyboard, GarageBand offers a musical typing keyboard, where you press the keys on your keyboard to simulate the keys on a musical keyboard. (Hey, if you don’t have a MIDI instrument, at least it’s better than nothing.) To display the musical typing keyboard window, press Shift+![]() +K.
+K.
![]() The example song has only one track. If you want to write the next classical masterpiece for Grand Piano, that’s fine. Otherwise, on the GarageBand menu bar, choose Track⇒Delete Track to start with a clean slate. (I know, I could have started with a Loops project, but this way you get to see how to delete a track.)
The example song has only one track. If you want to write the next classical masterpiece for Grand Piano, that’s fine. Otherwise, on the GarageBand menu bar, choose Track⇒Delete Track to start with a clean slate. (I know, I could have started with a Loops project, but this way you get to see how to delete a track.)
These are the five kinds of tracks you can use in GarageBand:
![]() Software instrument tracks: These tracks aren’t audio recordings. Rather, they’re mathematically precise algorithms that your Mac renders (or builds) to fit your needs. If you have a MIDI instrument connected to your Mac, you can create your own software instrument tracks. (More on MIDI instruments later in this chapter.)
Software instrument tracks: These tracks aren’t audio recordings. Rather, they’re mathematically precise algorithms that your Mac renders (or builds) to fit your needs. If you have a MIDI instrument connected to your Mac, you can create your own software instrument tracks. (More on MIDI instruments later in this chapter.)
In this chapter, I focus on software instrument tracks, which are the easiest for a nonmusician to use.
![]() Real instrument tracks: A real instrument track is an actual audio recording, such as your voice or a physical instrument without a MIDI connection. (Think microphone.)
Real instrument tracks: A real instrument track is an actual audio recording, such as your voice or a physical instrument without a MIDI connection. (Think microphone.)
![]() Electric Guitar tracks: GarageBand includes a real instrument track especially made for an electric guitar, which allows you to use one of five different amplifiers and a number of stompboxes (those effect pedals that electric guitarists are always poking with their foot to change the sound of their instruments).
Electric Guitar tracks: GarageBand includes a real instrument track especially made for an electric guitar, which allows you to use one of five different amplifiers and a number of stompboxes (those effect pedals that electric guitarists are always poking with their foot to change the sound of their instruments).
![]() Podcast artwork track: You get only one of these; it holds photos that will appear on a video-capable iPod, iPhone, or iPad (or a window on your iWeb site) when your podcast is playing.
Podcast artwork track: You get only one of these; it holds photos that will appear on a video-capable iPod, iPhone, or iPad (or a window on your iWeb site) when your podcast is playing.
![]() Video tracks: The video sound track appears if you’re scoring (adding music) to an iMovie movie. Along with the video sound track, you get a cool companion video track that shows the clips in your movie. (More on this in the “Look, I’m John Williams!” sidebar, later in this chapter.)
Video tracks: The video sound track appears if you’re scoring (adding music) to an iMovie movie. Along with the video sound track, you get a cool companion video track that shows the clips in your movie. (More on this in the “Look, I’m John Williams!” sidebar, later in this chapter.)
Time to add a software instrument track of your very own. Follow these steps:
1. Click the New Track button (which carries a plus sign), labeled in Figure 15-1.
GarageBand displays the New Track dialog.
2. Click the Software Instrument icon and then click Create.
See all those great instruments in the Track Info pane on the right?
3. Choose the general instrument category by clicking it.
I chose Drum Kits.
4. From the right column, choose your specific style of weapon, such as Rock Kit for an arena sound.
Figure 15-3 illustrates the new track that appears in your list when you follow these steps.
Figure 15-3: The new track appears, ready to rock.

If you’re creating a podcast and you want to add a series of still images that will appear on a device’s screen (or on your iWeb page), follow these steps:
1. Click the View Media Browser button (labeled in Figure 15-1).
2. Click the Photos button.
GarageBand displays all the photos in your iPhoto library and Events.
3. Drag an image from your iPhoto library in the media browser to the Track list.
The Podcast track appears at the top of the Track list, and you can add and move images in the list at any time, just like the loops that you add to your instrument tracks. (More on adding and rearranging the contents of a track later in this section.)
Choosing loops
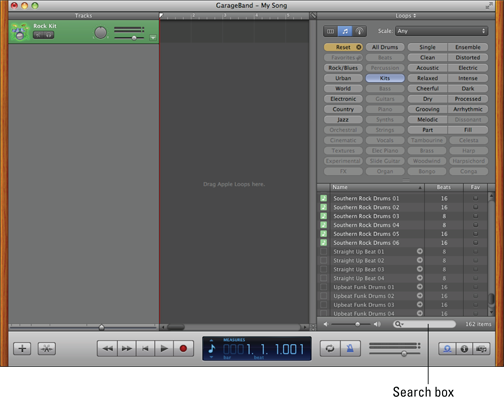
When you have a new, empty track, you can add loops to build your song. You do that by adding loops to your track from the Loop Browser — Apple provides you with thousands of loops to choose among — and photos from your media browser. Click the Loop Browser button (which bears the loop symbol, somewhat like a roller coaster) to display your collection, as shown in Figure 15-4.
If your Loop Browser looks different from what you see in Figure 15-4, that’s because of the view mode you’re using (just like the different view modes available for a Finder window). The three-icon button in the upper-left corner of the Loop Browser toggles the browser display between column, musical button, and podcast sounds view. Click the middle of the three buttons to switch to musical button mode.
Looking for just the right loop
The track in this running example uses a Rock drum kit, but you haven’t added a loop yet. (Refer to Figure 15-3.) Follow these steps to search through your loop library for just the right rhythm:
1. Click the button that corresponds to the instrument you’re using.
I chose the Kits button in the Loop Browser. Click it, and a list of different beats appears in the pane at the bottom of the Loop Browser window. (Check out Figure 15-4 for a sneak peek.)
Figure 15-4: The Loop Browser, shown in button view.
2. Click one of the loops with a green musical-note icon.
Go ahead; this is where things get fun! GarageBand begins playing the loop nonstop, allowing you to get a feel for how that particular loop sounds.
 The examples I chose for this chapter are software instruments, which are identified by a green musical-note icon. (If you’ve got a band at home, have at it with live instruments.)
3. Click another entry in the list, and the application switches immediately to that loop.
Now you’re beginning to understand why GarageBand is so cool for both musicians and the note-impaired. It’s like having your own band, with members who never get tired, never miss a beat, and play whatever you want while you’re composing. (Mozart would’ve loved this.)
If you want to search for a particular instrument, click in the Search box (labeled in Figure 15-4) and type the text you want to match. GarageBand returns the search results in the list.
4. Scroll down the list and continue to sample the different loops until you find one that fits like a glove.
For this reporter, it’s Southern Rock Drums 01.
5. Drag the entry to your Rock Kit track and drop it at the very beginning of the Timeline (as indicated by the playhead).
Your window will look like Figure 15-5.
If you want that same beat throughout the song, you don’t need to add any more loops to that track. (More on extending that beat in the next section.) However, if you want the drum’s beat to change later in the song, you add a second loop after the first one in the same track. For now, leave this track as is.
Whoops! Did you do something that you regret? Don’t forget that you can undo most actions in GarageBand by pressing the old standby ![]() +Z immediately afterward.
+Z immediately afterward.
Second verse, same as the first
When you compose, you can add tracks for each instrument that you want in your song:
![]() Each track can have more than one loop.
Each track can have more than one loop.
![]() Loops don’t have to start at the beginning; you can drop a loop anywhere in the Timeline.
Loops don’t have to start at the beginning; you can drop a loop anywhere in the Timeline.
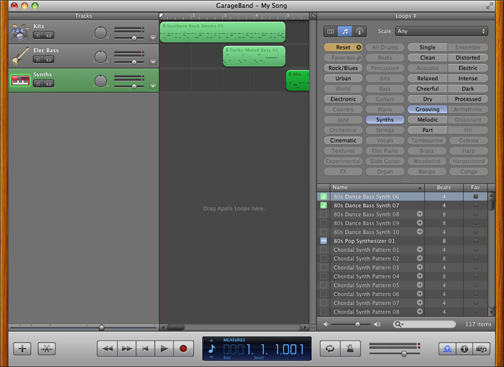
For example, in Figure 15-6, you can see that my drum kit kicks in first, but my bass line doesn’t begin until some time later (for a funkier opening).
You put loops on separate tracks so that they can play simultaneously on different instruments. If all your loops in a song are added on the same track, you hear only one loop at any one time, and all the loops use the same software instrument. By creating multiple tracks, you give yourself the elbow room to bring in the entire band at the same time. It’s über-convenient to compose your song when you can see each instrument’s loops and where they fall in the song.
Click the Reset button in the Loop Browser to choose another instrument or genre category.
Figure 15-5: A track with a loop added.
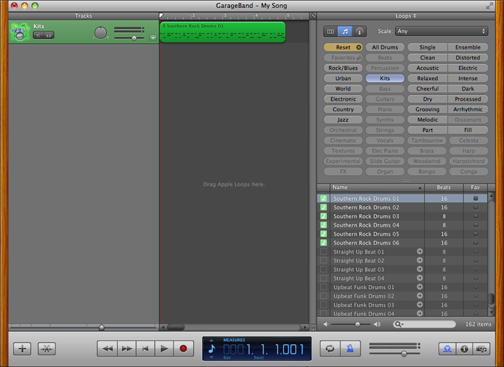
Figure 15-6: My Timeline with a synth and an electric bass onboard. Let’s rock!
Resizing, repeating, and moving loops
If you haven’t already tried listening to your entire song, try it now. You can click Play at any time without wreaking havoc on your carefully created tracks. Sounds pretty good, doesn’t it?
But wait: I bet the song stopped after about five seconds, right? (You can watch the passing seconds using either the Time/Tempo display or the second rule that appears at the very top of the Timeline.) I’m sure that you want your song to last more than five seconds! After the playhead moves past the end of the last loop, your song is over. Click Play again to pause the playback; then click the Return to Beginning button (labeled in Figure 15-1) to move the playhead back to the beginning of the song.
The music stops so soon because your loops are only so long. Most are five seconds in length, and others are even shorter. To keep the groove going, you have to do one of three things:
![]() Resize the loop. Hover your cursor over either the left or right edge of most loops, and an interesting thing happens: Your cursor changes to a vertical line with an arrow pointing away from the loop. That’s your cue to click and drag — and as you drag, most loops expand to fill the space you’re making, repeating the beats in perfect time. By resizing a loop, you can literally drag the loop’s edge as long as you like.
Resize the loop. Hover your cursor over either the left or right edge of most loops, and an interesting thing happens: Your cursor changes to a vertical line with an arrow pointing away from the loop. That’s your cue to click and drag — and as you drag, most loops expand to fill the space you’re making, repeating the beats in perfect time. By resizing a loop, you can literally drag the loop’s edge as long as you like.
![]() Repeat the loop. Depending on the loop that you chose, you might find that resizing it doesn’t repeat the measure. Instead, the new part of the loop is simply dead air. In fact, the length of many loops is limited to anywhere from one to five seconds. However, if you move your cursor over the side of a loop that you want to extend, it turns into a circular arrow, which tells you that you can click and repeat the loop. GarageBand actually adds multiple copies of the same loop automatically, for as far as you drag the loop. In Figure 15-7, I’ve repeated the bass loop that you see in Figure 15-6.
Repeat the loop. Depending on the loop that you chose, you might find that resizing it doesn’t repeat the measure. Instead, the new part of the loop is simply dead air. In fact, the length of many loops is limited to anywhere from one to five seconds. However, if you move your cursor over the side of a loop that you want to extend, it turns into a circular arrow, which tells you that you can click and repeat the loop. GarageBand actually adds multiple copies of the same loop automatically, for as far as you drag the loop. In Figure 15-7, I’ve repeated the bass loop that you see in Figure 15-6.
![]() Add a new loop. You can switch to a different loop to change the flow of the music. Naturally, the instrument stays the same, but there’s no reason you can’t use a horn-riff loop in your violin track (as long as it sounds good played by a violin)! To GarageBand, a software instrument track is compatible with any software instrument loop that you add from the Loop Browser as long as that loop is marked with your old friend the green musical note.
Add a new loop. You can switch to a different loop to change the flow of the music. Naturally, the instrument stays the same, but there’s no reason you can’t use a horn-riff loop in your violin track (as long as it sounds good played by a violin)! To GarageBand, a software instrument track is compatible with any software instrument loop that you add from the Loop Browser as long as that loop is marked with your old friend the green musical note.
You can also use the familiar cut (![]() +X), copy (
+X), copy (![]() +C), and paste (
+C), and paste (![]() +V) editing keys to cut, copy, and paste loops from place to place — both on the Timeline and from track to track. And you can click a loop and drag it anywhere.
+V) editing keys to cut, copy, and paste loops from place to place — both on the Timeline and from track to track. And you can click a loop and drag it anywhere.
Each track can be adjusted so that you can listen to the interplay between two or more tracks or hear how your song sounds without a specific track:
![]() Click the tiny speaker button under the track name in the list, and the button turns blue to indicate that the track is muted. To turn off the mute, click the speaker icon again.
Click the tiny speaker button under the track name in the list, and the button turns blue to indicate that the track is muted. To turn off the mute, click the speaker icon again.
![]() You can change the volume or balance of each individual track by using the mixer that appears next to the track name. This comes in handy if you want an instrument to sound louder or confine that instrument to the left or right speaker.
You can change the volume or balance of each individual track by using the mixer that appears next to the track name. This comes in handy if you want an instrument to sound louder or confine that instrument to the left or right speaker.
A track doesn’t have to be filled for every second with one loop or another. Most of my songs have a number of repeating loops with empty space between them as different instruments perform solo.
Using the Arrange track
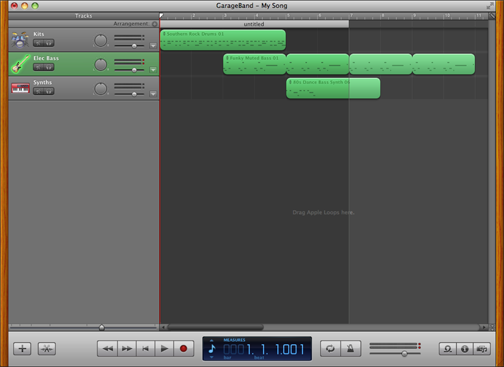
GarageBand includes another method you can use to monkey with your music: The Arrange track can be used to define specific sections of a song, allowing you to reorganize things by selecting, moving, and copying entire sections. For example, you’re probably familiar with the chorus (or refrain) of a song and how often it appears during the course of the tune. With the Arrange track, you can reposition the entire chorus within your song, carrying all the loops and settings within the chorus along with it! If you need another chorus, just copy that arrangement.
Figure 15-7: By repeating the bass loop, you can keep the thump flowing.

To use the Arrange track, display it by clicking Track⇒Show Arrange Track. The Arrange track then appears as a thin strip at the top of the track list. Click the Add Region button in the Arrange track (which carries a plus sign) and you’ll see a new, untitled region appear (as shown in Figure 15-8). You can drag the right side of the Arrangement region to resize it, or drag it to move it anywhere in the song.
Who wants an arrangement full of regions named “untitled”? To rename an Arrangement region, click the word untitled to select it (the Arrange track turns blue) and then click the title again to display a text box. Type a new name for the region and press Return.
Now, here’s where Arrangement regions get cool:
![]() To move an entire Arrangement region, click the region’s title in the Arrange track and then drag it anywhere you like in the song.
To move an entire Arrangement region, click the region’s title in the Arrange track and then drag it anywhere you like in the song.
![]() To copy an Arrangement region, hold down the Option key and drag the desired region’s title to the spot where you want the copy to appear.
To copy an Arrangement region, hold down the Option key and drag the desired region’s title to the spot where you want the copy to appear.
![]() To delete an Arrangement region, select it and press
To delete an Arrangement region, select it and press ![]() +Option+Delete.
+Option+Delete.
![]() To replace the contents of an Arrangement region with those of another Arrangement region, hold down the
To replace the contents of an Arrangement region with those of another Arrangement region, hold down the ![]() key and drag the desired region’s title on top of the offending region’s title.
key and drag the desired region’s title on top of the offending region’s title.
![]() To switch two Arrangement regions in your song — swapping the contents completely — drag one of the Arrangement region titles on top of the other and lift your finger from the mouse.
To switch two Arrangement regions in your song — swapping the contents completely — drag one of the Arrangement region titles on top of the other and lift your finger from the mouse.
Tweaking the settings for a track
You don’t think that John Mayer or U2 just “play and walk away,” do you? No, they spend hours after the recording session is over, tweaking their music in the studio and on the mixing board until every note sounds just as it should. You can adjust the settings for a track, too. The tweaks that you can perform include adding effects (pull a Hendrix and add echo and reverb to your electric guitar track) and kicking in an equalizer (for fine-tuning the sound of your background horns).
Figure 15-8: I’ve just added a new region in my song’s Arrange track.
To make adjustments to a track, follow these steps:
1. Click the desired track in the track list to select it.
2. Click the Track Info button (labeled in Figure 15-1).
3. Click the Edit tab to show the settings shown in Figure 15-9.
4. Click the button next to each effect you want to enable.
The button glows green when enabled.
Each of the effects has a modifier setting. For example, you can adjust the amount of echo to add by dragging its slider.
GarageBand offers a Visual Equalizer window that you can use to create a custom equalizer setting for each track. You can display the Visual EQ window by clicking the animated button next to the Visual EQ control on the Edit pane. To change the Bass, Low Mid, High Mid, or Treble setting for a track, click and drag the equalizer waveform in the desired direction. And yep, you can do this while your song is playing, so you can use both your eyes and ears to define the perfect settings!
Figure 15-9: Finesse your tune by tweaking the sound of a specific track.

5. To save the instrument as a new custom instrument, click the Save Instrument button.
Now you can use the instrument the next time you add a track.
6. Click the Track Info button again to return to GarageBand.
Time for a Mark’s Maxim:
 Save your work often in GarageBand, just as you do in the other iLife applications. One power blackout, and you’ll never forgive yourself. Press
 ![]() +S and enjoy the peace of mind (and use Time Machine with an external backup drive for good measure).
+S and enjoy the peace of mind (and use Time Machine with an external backup drive for good measure).
Automatic Composition with Magic GarageBand
In a hurry? Too rushed to snag loops and tweak effects? Never fear, GarageBand can even compose a song automatically! The Magic GarageBand feature provides a wide range of nine different genres of music to choose among — everything from blues to reggae to funk and rock.
To create a song automatically, follow these steps:
1. Close all GarageBand windows.
If you’re currently working on a song, GarageBand will prompt you to save it before closing the window.
2. Click the Magic GarageBand button in the New Project dialog.
3. Click the desired genre button and click Choose.
Hover your cursor over a genre button to get a preview of the song for that genre.
4. To hear the entire song with the default instruments, click Entire Song and press the Play button.
Alternatively, to hear a short sample of the song, click Snippet and press the Play button.
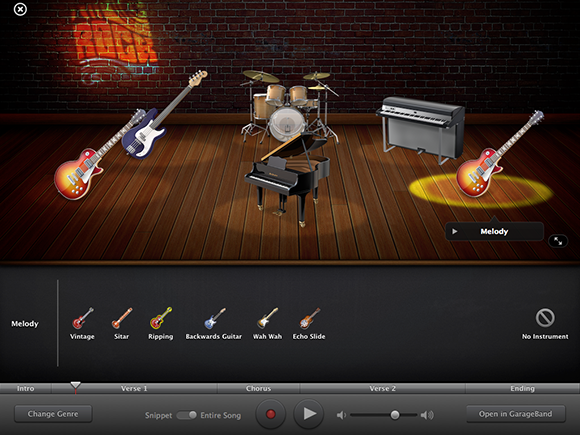
As shown in Figure 15-10, you see each instrument on stage. To choose a different musical style for an instrument (or a variation of the instrument), click it and then select the desired sound from the menu below the stage.
Click the My Instrument pop-up menu at the lower-left corner of the window to add your own voice or instrumental using your iMac’s keyboard, a microphone, or a MIDI instrument.
5. When the song fits like a glove, click Open in GarageBand to open the song as a project in GarageBand.
Now you can edit and tweak the song to your heart’s delight as you can any other GarageBand project, adding other software or real instrument tracks as necessary.
Figure 15-10: Creating my own arena-rock classic with Magic GarageBand.
Sharing Your Songs and Podcasts
After you finish your song, you can play it whenever you like through GarageBand. But then again, that isn’t really what you want, is it? You want to share your music with others with an audio CD or download it to your iPod so that you can enjoy it yourself while walking through the mall!
iTunes to the rescue! As with the other iLife applications that I cover in this book, GarageBand can share the music you make through the digital hub that is your Mac.
Creating MP3 and AAC files and ringtones
You can create an MP3 or AAC file (or even an iPhone ringtone, or a FaceTime ringtone for your iPad and iPod touch) from your song or podcast project in just a few simple steps:
1. Open the song that you want to share.
2. Choose Share⇒Send Song to iTunes.
GarageBand displays the settings you see in Figure 15-11.
To create a ringtone and send it to iTunes, choose Share⇒Send Ringtones to iTunes.
3. Click in each of the four text boxes to type the playlist, artist name, composer name, and album name for the tracks you create.
You can leave the defaults as they are, if you prefer. Each track that you export is named after the song’s name in GarageBand.
4. Click the Compress Using pop-up menu and choose the encoder GarageBand should use to compress your song file.
The default is AAC, but you can also choose MP3 encoding for wider device compatibility.
5. Click the Audio Settings pop-up menu to select the proper audio quality for the finished file.
The higher the quality, the larger the file. GarageBand displays the approximate file size and finished file information in the description box.
6. Click Share.
After a second or two of hard work, your Mac opens the iTunes window and highlights the new (or existing) playlist that contains your new song.
Sending a podcast to iWeb or iTunes
If you’ve prepared a new podcast episode in GarageBand, you can send it automatically to iWeb or iTunes by following these steps:
1. Open the podcast that you want to export to iWeb.
Make sure that the Podcast track is displayed. If necessary, click Track⇒Show Podcast Track to display it.
2. Choose Share⇒Send Podcast to iWeb (or Share⇒Send Podcast to iTunes).
3. Click the Compress Using pop-up menu and choose the encoder that GarageBand should use to compress your podcast file.
Your choices are AAC and MP3 format.
4. Click the Audio Settings pop-up menu to select the proper audio quality for the finished file.
5. Click Share.
Figure 15-11: Tweaking settings for iTunes song files.

Burning an audio CD
Ready to create a demo CD with your latest GarageBand creation? Follow these steps to burn an audio disc from within GarageBand:
1. Open the song that you want to record to disc.
2. Choose Share⇒Burn Song to CD.
3. Load a blank disc into your optical drive.
Note that the CD you create only has one track. To include more songs on the CD, add the song to your iTunes Library (as described earlier), create a playlist containing the song and burn that playlist within iTunes.
..................Content has been hidden....................
You can't read the all page of ebook, please click here login for view all page.