
Figure 12-1: iPhoto greets you with an attractive window.
Chapter 12
The Masterpiece That Is iPhoto
In This Chapter
![]() Importing pictures from your hard drive or digital camera
Importing pictures from your hard drive or digital camera
![]() Organizing images with iPhoto
Organizing images with iPhoto
![]() Tweaking the appearance of photographs
Tweaking the appearance of photographs
![]() Sharing photos with your friends
Sharing photos with your friends
Virtually every iMac owner is likely to have a digital camera, a cellphone equipped with a camera, or a scanner. Digital video (DV) camcorders have certainly grown more plentiful over the past three or four years, and the iPod is the hottest piece of music hardware on the planet at the time of this writing. The digital camera, however, has reached what those funny (strange) marketing people refer to as saturation, and iPhoto was written to address the needs of every person with a digital camera and an iMac!
With iPhoto, you organize, edit, and even publish your photographs. (It sports more features than a handful of Swiss Army knives.) After you shoot your photos with a digital camera (or even scan images from original film prints or negatives), you can import them into iPhoto, edit them, and publish them. You’re not limited to photos that you take yourself, either; you can edit, publish, and organize all kinds of digital image files. You can even create a photo album and use the iPhoto interface to order a handsome hardbound copy shipped to you, or create a slideshow that you can burn to a DVD.
To sum it all up, I’m willing to bet that iPhoto is either the first or the second iLife ’11 application that you fall in love with (running neck and neck with iTunes). In this chapter, I show you how you can work digital image magic with true Apple panache!
Delving into iPhoto
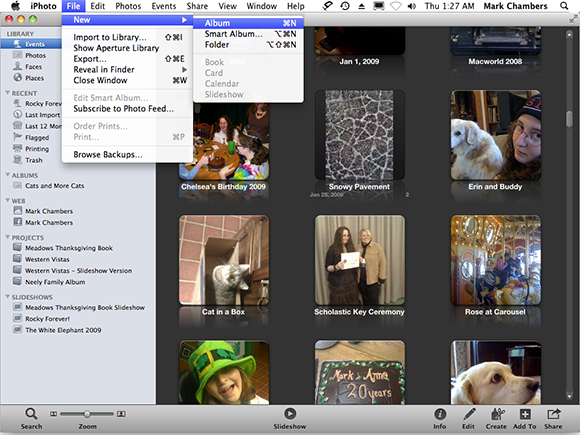
In Figure 12-1, you can see most of the major controls offered in iPhoto ’11. (Other controls automatically appear when you enter different modes; I cover them in upcoming sections of this chapter.)

Although these controls and sections of the window are covered in more detail in the following sections, here’s a quick rundown of what you’re looking at when you first launch iPhoto:
![]() Source list: This list of image locations determines which photos iPhoto displays.
Source list: This list of image locations determines which photos iPhoto displays.
• You can choose to display either your entire image library or just the last set of digital images that you downloaded from your camera.
• You can create new albums of your own that appear in the Source list; albums make it much easier to organize your photos.
• Photos can be grouped by Event (when they were taken), Faces (who appears in the photos), Places (where photos were taken), and Albums (the traditional method you may be familiar with from older versions of iPhoto).
• You can view the photos you’ve shared online using Facebook and Flickr (and those from your other iOS devices via Photo Stream, if you’re using Apple’s iCloud feature).
• You can create books, calendars, cards, and slideshows.
![]() Viewer: This pane displays the images from the currently selected photo source.
Viewer: This pane displays the images from the currently selected photo source.
 You can drag or click to select photos in the Viewer for further tricks, such as assigning keywords and image editing.
![]() Full Screen button: Click this button in the upper-right corner of the window to switch to a full-screen display of your photos. In full-screen mode, the Source list disappears, and both images and events appear as thumbnails. You can double-click a thumbnail to view the image (or the contents, if it’s an event) using your Mac’s entire screen real estate. You can also use the same controls that I discuss later in this chapter for chores such as sharing and editing images; the toolbar is still available at the bottom of the screen.
Full Screen button: Click this button in the upper-right corner of the window to switch to a full-screen display of your photos. In full-screen mode, the Source list disappears, and both images and events appear as thumbnails. You can double-click a thumbnail to view the image (or the contents, if it’s an event) using your Mac’s entire screen real estate. You can also use the same controls that I discuss later in this chapter for chores such as sharing and editing images; the toolbar is still available at the bottom of the screen.
![]() Search button: Click the button next to the Search text box to locate photos by specific criteria, or just click in the box and start typing to search by description and title.
Search button: Click the button next to the Search text box to locate photos by specific criteria, or just click in the box and start typing to search by description and title.
![]() Zoom slider: Drag this slider to the left to reduce the size of the thumbnails in the Viewer. This allows you to see more thumbnails at one time, which is a great boon for quick, visual searches. Drag the slider to the right to expand the size of the thumbnails, thereby making it easier to differentiate details between similar photos in the Viewer.
Zoom slider: Drag this slider to the left to reduce the size of the thumbnails in the Viewer. This allows you to see more thumbnails at one time, which is a great boon for quick, visual searches. Drag the slider to the right to expand the size of the thumbnails, thereby making it easier to differentiate details between similar photos in the Viewer.
![]() Play Slideshow: Select an event, album, book, or slideshow in the Source list (or multiple images you’ve selected in the Viewer) and click this button to start a full-screen slideshow using those images.
Play Slideshow: Select an event, album, book, or slideshow in the Source list (or multiple images you’ve selected in the Viewer) and click this button to start a full-screen slideshow using those images.
![]() Info button: Click this button to display information on the currently selected photos (or the item selected in the Source list).
Info button: Click this button to display information on the currently selected photos (or the item selected in the Source list).
![]() Edit button: Click this button to edit the currently selected photos. (I cover editing in depth later in the chapter.)
Edit button: Click this button to edit the currently selected photos. (I cover editing in depth later in the chapter.)
![]() Create button: Click this button to add a new blank album, book, calendar, card, or slideshow to your Source list.
Create button: Click this button to add a new blank album, book, calendar, card, or slideshow to your Source list.
![]() Add To button: Click this button to add the currently selected photos to an existing album, slideshow, book, card, or calendar.
Add To button: Click this button to add the currently selected photos to an existing album, slideshow, book, card, or calendar.
![]() Share button: Click this button to share the currently selected photos on Flickr or Facebook. Choose Photo Stream to send the selected photos to your iPhone, iPad, or iPod touch using iCloud. You can also order prints or e-mail the photos.
Share button: Click this button to share the currently selected photos on Flickr or Facebook. Choose Photo Stream to send the selected photos to your iPhone, iPad, or iPod touch using iCloud. You can also order prints or e-mail the photos.
 The toolbar buttons you see depend on which operation you’re performing; for example, you see different toolbar buttons when you’re editing a photo.
Working with Images in iPhoto
Even a superbly designed image display and editing application such as iPhoto would look overwhelming if everything were jammed into one window. Thus, Apple’s developers provide different operational modes (such as editing and book creation) that you can use in the one iPhoto window. Each mode allows you to perform different tasks, and you can switch modes at just about any time by clicking the corresponding toolbar button.
In this section, I discuss three of these modes — import, organize, and edit — and what you can do when you’re in them. Then I conclude the chapter with sections on publishing and sharing your images.
Import Images 101
In import mode, you’re ready to download images directly from your digital camera — as long as your specific camera model is supported in iPhoto. The Apple iPhoto support page at www.apple.com/macosx/upgrade/cameras.html lists many of the cameras that are supported in iPhoto. And you’re not limited to cameras, of course: You can also import photos from a memory card reader (such as the SDXC card slot sported by your iMac) or even a Kodak PhotoCD.
Follow these steps to import images:
1. Connect your digital camera to your iMac.
Plug one end of a USB cable into your camera and the other end into your iMac’s USB port, and prepare your camera to download images.
2. Launch iPhoto.
Your iMac will probably launch iPhoto automatically when your camera is detected, but you can always launch iPhoto manually by clicking its icon in the Dock (or double-clicking it in your Applications folder).
3. Type an event name for the imported photos, such as Birthday Party or Godzilla Ravages Tokyo (depending on your birthday parties, this could be the same event).
4. To allow iPhoto to automatically separate images into separate events based on the date they were taken, click to select the Split Events check box.
5. Click the Import All button to import your photographs from the camera.
The images are added to your Photo Library, where you can organize them as you want.
To select specific images to import, hold down the ![]() key and click each desired photo; click Import Selected instead of Import All.
key and click each desired photo; click Import Selected instead of Import All.
Depending on the camera, iPhoto may also import video clips.
6. Specify whether the images you’re importing should be deleted from the camera afterward.
If you don’t expect to download these images again to another computer or another device, you can choose to delete the photos from your camera automatically. This saves you a step, frees space for new photos, and helps eliminate the guilt that can crop up when you nix your pix. (Sorry, I couldn’t resist.)
“What’s that about an Event, Mark?” After you download the contents of your digital camera, those contents count as a virtual Event in iPhoto — based on either the date that you imported them or the date they were taken. For example, you can always display the last images you imported by clicking Last Import. If you want to see photos from your son’s graduation, they appear as a separate Event. (Events and Last Import will both appear in the Source list.) Think about that . . . It’s pretty tough to arrange old-fashioned film prints by the moment in time that they document, but iPhoto makes it easy for you to see just which photos are part of the same group! I explain more about Events in the next section.
Organize mode: Organizing and sorting your images
In the days of film prints, you could always stuff another shoebox with your latest photos or buy another sticky album to expand your library. Your digital camera, though, stores images as files instead, and many folks don’t print their digital photographs. Instead, you can keep your entire collection of digital photographs and scanned images well ordered and easily retrieved by using iPhoto’s organize mode. Then you can display them in a slideshow, e-mail them, print them, use them as Desktop backgrounds, or burn them to an archive disc.
A new kind of photo album
The most familiar method of organizing images in iPhoto is the album. Each album can represent any designation you like, be it a year, a vacation, your daughter, or your daughter’s ex-boyfriends. Follow these steps:
1. Create a new album.
You can either choose File⇒New Album or press ![]() +N, as shown in Figure 12-2.
+N, as shown in Figure 12-2.
2. Type the name for your new photo album.
3. Press Return.
Figure 12-2: Add a new album in iPhoto.
iPhoto also offers a special type of album called a Smart Album, which you can create from the File menu. (For even faster action, press Option+![]() +N.) If you’re familiar with the Smart Folders you can use within the Finder and the Smart Playlists within iTunes, you’ve figured this one out already: A Smart Album contains only photos that match certain criteria that you choose, including the keywords and rating that you assign your images. Other criteria include text in the photo filenames, dates the images were added to iPhoto, and any comments you might have added (as well as camera-specific data such as ISO and shutter speed). Now here’s the really nifty angle: iPhoto automatically builds and maintains Smart Albums for you, adding new photos that match the criteria (and deleting those that you remove from your Photo Library)! Smart Albums icons carry a gear symbol in the Source list.
+N.) If you’re familiar with the Smart Folders you can use within the Finder and the Smart Playlists within iTunes, you’ve figured this one out already: A Smart Album contains only photos that match certain criteria that you choose, including the keywords and rating that you assign your images. Other criteria include text in the photo filenames, dates the images were added to iPhoto, and any comments you might have added (as well as camera-specific data such as ISO and shutter speed). Now here’s the really nifty angle: iPhoto automatically builds and maintains Smart Albums for you, adding new photos that match the criteria (and deleting those that you remove from your Photo Library)! Smart Albums icons carry a gear symbol in the Source list.
You can display information about the currently selected item in the information pane at the far right of the window. Just click the Info button at the bottom of the iPhoto window, which sports the familiar “i-in-a-circle” logo. You can also type a short note or description in the Description box that appears in the Info pane, or add keywords to help you organize your photos.
You can also change information on an image by selecting it in the Viewer and clicking the Info button. Click any of the headings in the pane (Title, Date, Time, and so on) to display a text edit box, and you can simply type a new value.
You can drag images from the Viewer into any album you choose. For example, you can copy an image to another album by dragging it from the Viewer to the desired album in the Source list.
To remove a photo that has fallen out of favor, follow these steps:
1. In the Source list, select the desired album.
2. In the Viewer, select the photo (click it) that you want to remove.
3. Press Delete.
When you remove a photo from an album, you don’t remove the photo from your collection (which is represented by the Photos entry under the Library heading in the Source list). That’s because an album is just a group of links to the images in your collection. If you want to completely remove an offending photo from iPhoto, click the Photos entry under the Library heading to display your entire collection of images and delete the picture there. The photo disappears from all albums with which it is associated.
To remove an entire album from the Source list, just click it in the Source list to select it — in the Viewer, you can see the images that it contains — and then press Delete. (Alternatively, right-click or Control-click the offending album and choose Delete Album.)
To rename an album, click the entry under the Albums heading in the Source list to select it and then click again to display a text box. Type the new album name and press Return.
Change your mind? iPhoto comes complete with a handy-dandy Undo feature. Just press ![]() +Z, and it’s as though your last action never happened. (A great trick for those moments when you realize you just deleted your only image of your first car from your Library.) For an extra level of backup protection, you can invest in an external hard drive and use Lion’s Time Machine feature.
+Z, and it’s as though your last action never happened. (A great trick for those moments when you realize you just deleted your only image of your first car from your Library.) For an extra level of backup protection, you can invest in an external hard drive and use Lion’s Time Machine feature.
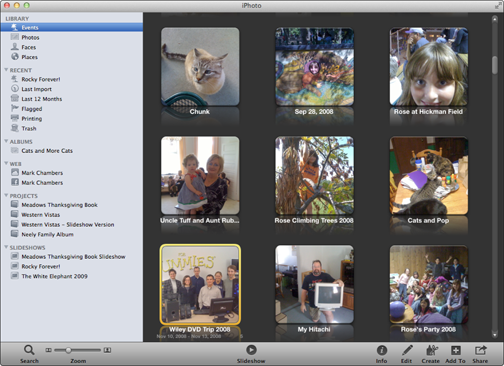
Arranging stuff by Events
As I mention earlier, an Event is a group of images that you shot or downloaded at the same time. iPhoto assumes that those images belong together (which is usually a pretty safe assumption). Figure 12-3 illustrates some of the Events I’ve created in my iPhoto collection.
An Event can be renamed, just as an album can — you just use a different procedure. Click the Events entry under the Library heading in the Source list to display your Events in the Viewer; then click the existing Event name in the caption underneath the thumbnail. A text box appears in which you can type a new name; click Return to update the Event.
Although a photo can appear in multiple albums, it can appear in only one Event.
Try moving your cursor over an Event thumbnail in the Viewer and you’ll see that iPhoto displays the date range when the images were taken, as well as the total number of images in the Event. Ah, but things get really cool when you move your cursor back and forth over an Event with many images: The thumbnail animates and displays all the images in the Event! (Why can’t I think of this stuff? This is the future, dear readers.)
To display the contents of an Event in the Viewer, just double-click the Event thumbnail. To return to the Events thumbnails, click the All Events button at the top of the Viewer.
Decided to merge those Prom Event pictures with your daughter’s Graduation Event? No problem! You could drag one Event thumbnail on top of another, but that’s the easy way. Alternatively, click the Events entry under the Library heading in the Source list to display your Events and then hold down ![]() while you click the Events that you want to merge. Heck, if the Events you want to merge are selected, right-click one of them and choose Merge Events from the menu that appears. Click Merge in the confirmation dialog that appears.
while you click the Events that you want to merge. Heck, if the Events you want to merge are selected, right-click one of them and choose Merge Events from the menu that appears. Click Merge in the confirmation dialog that appears.
Whilst organizing, you can create a brand-new empty Event by clicking Events⇒Create Event. Feel free to drag photos from albums, other Events, or your Photo library into your new Event.
Figure 12-3: Events help you organize by what happened, not just when it happened!
Working with Faces and Places
iPhoto includes two organizational tools called Faces and Places. These two categories appear in the Library section of the Source list.
First, let’s tackle Faces. (Ouch. Don’t literally tackle anyone’s face, dear reader.) Faces is a sophisticated recognition system that automatically recognizes human faces within the photos that you add to your Library. (I don’t know whether it works well with pets — but you can try, anyway.) Naturally, you have to identify faces first before iPhoto can recognize them, which it does through a process called tagging.
To tag a face, follow these steps:
1. In the Source list, click the Photos item to display your image library.
2. In the Viewer, click the photo with a person you want to tag.
The photo is selected, as indicated by the yellow border.
3. Click the Info button in the iPhoto toolbar at the bottom of the window.
iPhoto displays the Info pane you see in Figure 12-4.
4. Click the Add a Face link in the Faces section of the Info pane.
Note that iPhoto has indicated each person’s face in the photo with a label. If a face has already been tagged, the label will match the person’s face.
Figure 12-4: Adding another mug to my collection of Faces. (That still doesn’t sound right.)

5. If the face is unrecognized (labeled as Click to Name), click the label to open a text box and type the person’s name.
If iPhoto recognizes the face correctly and the name matches the person, click the check mark to confirm the tag. If the face is incorrectly identified, click the X at the right side of the text box and you can enter a new name.
If the name appears on an Address Book contact card — or is recognized as one of your Facebook friends — you can click the matching entry that appears to confirm the identity. Wowzers!
To delete a face recognition box that isn’t necessary, hover your mouse cursor over the box and click the X button that appears at the top-left corner of the box.
If iPhoto doesn’t recognize the face at all in the photo (which can happen if the person’s face is turned at an angle to the camera, or is in a darker area of the photo), click the box border and drag the box over the person’s face. If necessary, you can resize the box using the four handles at the corners of the box. Now you can click the label and type the person’s name.
6. Click the Info button to hide the Info pane after you’ve identified all the faces in the photo.
After you’ve tagged an image, it appears in your Faces collection, which you can view by clicking the Faces entry in the Source list. You can double-click a portrait in your Faces collection to see all the images that contain that person. As you might expect, the more tags you add for a specific person, the better iPhoto gets at recognizing that person!
Notice the Confirm Additional Faces button that appears next to the person’s name? Click it, and iPhoto displays other photos that it thinks might contain this person’s face, allowing you to tag them there as well. If a face is a match, click the thumbnail to confirm it.
Places makes it easy to track the location where photos were taken, but it requires a digital camera that includes GPS tracking information in the image metadata for iPhoto to do so without your help. (This is a relatively new feature for digital cameras, so older models aren’t likely to support GPS tracking. Naturally, both the iPhone and iPad support this feature.) Places also requires an Internet connection, because it uses Google Maps.
Click the Places entry in the Source list to display a global map, with pushpins indicating where your photos were taken. You can switch the Places map between terrain and satellite modes, or choose a hybrid display. If you’re familiar with Google Maps, these settings are old friends of yours.
Alternatively, click the text Location buttons at the top of the map to display a character-based browser, where you can click country, state, city, and place names.
No matter which view mode you choose, clicking a pushpin or location displays the images taken in that area.
Organizing with keywords
“Okay, Mark, albums, Events, Faces, and Places are great ideas, but there has to be a way to search my collection by category!” Never fear, good iMac owner. You can also assign descriptive keywords to images to help you organize your collection and locate certain pictures fast. iPhoto comes with a number of standard keywords, and you can create your own as well.
To illustrate, suppose you’d like to identify your images according to special events in your family. Birthday photos should have their own keyword, and anniversaries deserve another. By assigning keywords, you can search for Elsie’s sixth birthday or your silver wedding anniversary (no matter what Event or album they’re in), and all related photos with those keywords appear like magic! (Well, almost like magic. You need to choose View⇒Keywords, which toggles the Keyword display on and off in the Viewer.)
iPhoto includes a number of keywords that are already available:
![]() Favorite
Favorite
![]() Family
Family
![]() Kids
Kids
![]() Vacation
Vacation
![]() Birthday
Birthday
![]() RAW
RAW
![]() Photo Booth
Photo Booth
![]() Movie
Movie
![]() Checkmark
Checkmark
What’s the Checkmark all about, you ask? It’s a special case: Adding this keyword displays a tiny check mark icon in the bottom-right corner of the image. The checkmark keyword comes in handy for temporarily identifying specific images because you can search for just your checkmarked photos.
To assign keywords to images (or remove keywords that have already been assigned), select one or more photos in the Viewer. Choose Window⇒Manage My Keywords or press ![]() +K to display the Keywords window, as shown in Figure 12-5.
+K to display the Keywords window, as shown in Figure 12-5.
Drag the keyword buttons that you use the most to the Quick Group section of the Keywords window, and iPhoto automatically creates a keyboard shortcut for each keyword in the Quick Group. Now you don’t even need to display the Keywords window to get business done!
You’re gonna need your own keywords
I’ll bet you take photos of things other than just kids and vacations — and that’s why iPhoto allows you to create your own keywords. Display the iPhoto Keywords window by pressing ![]() +K, click the Edit Keywords button, and then click Add (the button with the plus sign). iPhoto adds a new unnamed keyword to the list as an edit box, ready for you to type its name.
+K, click the Edit Keywords button, and then click Add (the button with the plus sign). iPhoto adds a new unnamed keyword to the list as an edit box, ready for you to type its name.
You can rename an existing keyword from this same window, too. Click a keyword to select it and then click Rename. Remember, however, that renaming a keyword affects all the images that were tagged with that keyword. That might be confusing when, for example, photos originally tagged as Family suddenly appear with the keyword Foodstuffs. (I recommend applying a new keyword and deleting the old one if this problem crops up.)
To change the keyboard shortcut assigned to a keyword, click the Shortcut button. To remove an existing keyword from the list, click the keyword to select it and then click the Delete button, which bears a minus sign.
Figure 12-5: Time to add keywords to these selected images.

Click the buttons for the keywords that you want to attach to the selected images to mark them. Or click the highlighted keyword buttons that you want to remove from the selected images to disable them.
Digging through your library with keywords
Behold the power of keywords! To sift through your entire collection of images by using keywords, click the Search button in the toolbar, then click the magnifying glass button next to the Search box and choose Keyword from the pop-up menu. iPhoto displays a pop-up Keywords panel, and you can click one or more keyword buttons to display just the photos that carry those keywords.
The images that remain in the Viewer after a search must have all the keywords that you specified. If an image is identified, for example, by only three of four keywords you chose, it isn’t a match and it doesn’t appear in the Viewer. (You can create a Smart Album with specific keywords to get around this limitation.)
To search for a photo by words in its description, just click in the Search box and start typing. You can click that same magnifying glass by the Search box to search through your images by date and rating as well.
Speaking of ratings . . .
Playing favorites by assigning ratings
Be your own critic! iPhoto allows you to assign any photo a rating of anywhere from zero to five stars. I use this system to help me keep track of the images that I feel are the best in my library. Select one (or more) image and then assign a rating using one of the following methods:
![]() Choose Photos⇒My Rating and then choose the desired rating from the pop-up submenu.
Choose Photos⇒My Rating and then choose the desired rating from the pop-up submenu.
![]() Hover your cursor over the photo and click the More button in the lower-right corner of the thumbnail; then click the desired star rating in the menu that appears.
Hover your cursor over the photo and click the More button in the lower-right corner of the thumbnail; then click the desired star rating in the menu that appears.
![]() Use the
Use the ![]() +0 through
+0 through ![]() +5 shortcuts.
+5 shortcuts.
Sorting your images just so
The View menu provides an easy way to arrange your images in the Viewer by a number of different criteria. Choose View⇒Sort Photos and then click the desired sort criteria from the pop-up submenu. You can arrange the display by date, keyword, title, or rating. If you select an album in the Source list, you can also choose to arrange photos manually, which means that you can drag and drop thumbnails in the Viewer to place them in the precise order you want them.
Naturally, iPhoto allows you to print selected images, but you can also send photos via e-mail or by using Facebook, Flickr, or Photo Stream. Click Share and then choose the desired destination from the submenu.
Edit mode: Removing and fixing stuff the right way
Not every digital image is perfect — just look at my collection if you need proof. For those shots that need a pixel massage, iPhoto includes a number of editing tools that you can use to correct common problems.
The first step in any editing job is to select the image you want to fix in the Viewer. Then click the Edit button on the iPhoto toolbar to display the Edit mode controls at the right side of the window, as shown in Figure 12-6. Now you’re ready to fix problems, using the tools that I discuss in the rest of this section. (If you’re editing a photo that’s part of an Event, album, Faces, or Places, note the spiffy scrolling photo strip at the bottom, which allows you to switch to another image to edit from the same grouping.)
If you’d prefer to edit images while using more of your screen real estate, click the Full Screen button at the far left of the iPhoto toolbar. To switch back to the standard window arrangement, click the Full Screen button again or simply press the Esc key.
Need more features than iPhoto provides when editing a prized photograph? iPhoto even allows you to specify another image editing application like Photoshop Elements (instead of the built-in editing controls I cover in this section). First, click iPhoto and choose Preferences and then click the Advanced tab. Click the Edit Photos pop-up menu and click Choose App; then navigate to the image editor you want to use, select it, and click Open. Now close the Preferences dialog, and iPhoto will automatically open the application you selected when you click the Edit button! If you decide to return to iPhoto’s built-in editing controls, just open the Advanced pane again, click the Edit Photos pop-up menu again, and choose In iPhoto.
When you’re done with Edit mode, click the . . . (wait for it) . . . Edit button again to return to the Viewer!
Rotating tipped-over shots
If an image is in the wrong orientation and needs to be turned to display correctly, click the Rotate button to turn it once in a counterclockwise direction. Hold down the Option key while you click the Rotate button to rotate in a clockwise direction.
Figure 12-6: iPhoto is now in edit mode. Watch out, image problems!
Find yourself using that Option key often when rotating? Consider reversing the default direction! Click iPhoto⇒Preferences and click the General tab; then click the Rotate radio button to change the default direction (a great idea if your camera’s shots typically need rotating in the opposite direction).
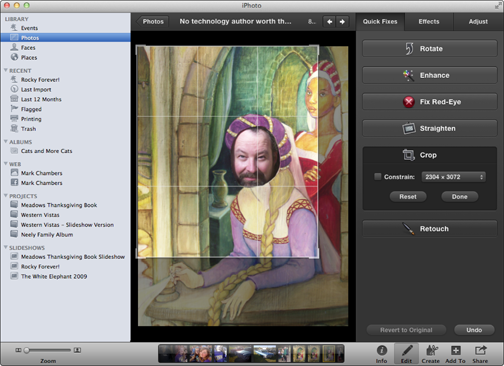
Crop ’til you drop
Does that photo have an intruder hovering around the edges of the subject? You can remove some of the border by cropping an image, just as folks once did with film prints and a pair of scissors. (We’ve come a long way.) With iPhoto, you can remove unwanted portions from the edges of an image; it’s a great way to get Uncle Milton’s stray head (complete with toupee) out of an otherwise perfect holiday snapshot.
Follow these steps to crop an image:
1. Click the Crop button in the Edit toolbar.
2. Select the portion of the image that you want to keep.
In the Viewer, click and drag the handles on the rectangle to outline the part of the image that you want. Remember, whatever’s outside this rectangle disappears after the crop is completed.
When you drag a corner or edge of the outline, a semi-opaque grid (familiar to amateur and professional photographers as the nine rectangles from the Rule of Thirds) appears to help you visualize what you’re claiming. (Check it out in Figure 12-7.)
You can expand the outline to the full dimensions of the image at any time — just click the Reset button.
3. (Optional) Choose a preset aspect ratio.
If you want to force your cropped selection to a specific aspect ratio — such as 4 x 3 or 16 x 9 for an iDVD project, or 5 x 7 to match the dimensions of photo paper — click the Constrain check box and select that ratio from the Constrain pop-up menu.
4. Click the Done button.
Oh, and don’t forget that you can use iPhoto’s Undo feature if you mess up and need to try again. Just press ![]() +Z.
+Z.
iPhoto features multiple Undo levels, so you can press ![]() +Z several times to travel back through your last several changes. Alternatively, you can always return the image to its original form (before you did any editing at all) by clicking the Revert to Original button.
+Z several times to travel back through your last several changes. Alternatively, you can always return the image to its original form (before you did any editing at all) by clicking the Revert to Original button.
Straightening what’s crooked
Was your camera slightly tilted when you took the perfect shot? Never fear! Click the Straighten button and then drag the Angle slider to tilt the image in the desired direction. Click the Done button to return to Edit mode.
Figure 12-7: Select the stuff that you want to keep in your photo.
Enhancing images to add pizzazz
If a photo looks washed out, click the Enhance button to increase (or decrease) the color saturation and improve the contrast. Enhance is automatic, so you don’t have to set anything — but be prepared to use Undo if you’re not satisfied with the changes.
Removing rampant red-eye
Unfortunately, today’s digital cameras can still produce the same “zombies with red eyeballs” as traditional film cameras. Red-eye is caused by a camera’s flash reflecting off the retinas of a subject’s eyes, and it can occur with both humans and animals. (I’m told pets get green-eye or blue-eye, but iPhoto can handle them, too!)
iPhoto can remove that red- and green-eye and turn frightening zombies back into your family and friends! Click the Red-Eye button and then select a demonized eyeball by clicking in the center of it. (If the Red-Eye circular cursor is too small or too large, drag the Size slider to adjust the dimensions.) To complete the process, click the Done button.
Retouching like the stars
The iPhoto Retouch feature is perfect for removing minor flecks or lines in an image (especially those you’ve scanned from prints). Click Retouch and you’ll notice that the cursor turns into a circle; as with the Red-Eye tool, you can drag the Size slider to change the size of the Retouch cursor. Just drag the cursor across the imperfection and click Done when you’re finished touching things up. Don’t forget to take a moment and marvel at your editing skill!
When you first enter Editing mode, the Quick Fixes tab is selected, providing you with the tools I’ve already covered. (These are the changes you’ll make most often, so having Quick Fixes as the default selection makes sense.) However, you can also choose to apply an effect from the Effects tab, or make specific changes to the appearance of an image from the Adjust tab.
Switching to black-and-white or sepia
Ever wonder whether a particular photo in your library would look better as a black-and-white (or grayscale) print? Or perhaps an old-fashioned sepia tone in shades of copper and brown? Just click the Effects tab, which offers nine different effects that you can apply to the photo. You can also make “one-click” changes to your photo from the Effects tab, including lightening and darkening an image or enhancing the contrast.
Adjusting photo properties manually
Click the Adjust tab to perform manual adjustments to brightness and contrast (the light levels in your image), as well as attributes such as sharpness, shadow, and highlight levels. To adjust a value, make sure that nothing’s selected in the image and then drag the corresponding slider until the image looks the way you want. Click the Close button to return to Edit mode.
While you’re editing, you can use the Next and Previous buttons at the left of the tab button to move to the next image in the current group (or back to the previous image).
Producing Your Own Coffee-Table Masterpiece
Book mode unleashes what I think is probably the coolest feature of iPhoto: the chance to design and print a high-quality bound photo book! After you complete an album — all the images have been edited just the way you want, and the album contains all the photos you want to include in your book — iPhoto can send your images as data over the Internet to a company that prints and binds your finished book for you. (No, they don’t publish For Dummies titles, but then again, I don’t get high-resolution color plates in most of my books, either.)
At the time of this writing, you can order many different sizes and bindings, including an 8.5-by-11-inch soft-cover book with 20 double-sided pages for about $20 and a hardbound 8.5-by-11-inch keepsake album with 10 double-sided pages for about $30 (shipping included for both). At the top of the chart, the 13-by-10-inch XL size photo book has 20 double-sided pages for about $50, with shipping also included. Extra pages can be added for about $0.70, $1.00, and $1.50 a pop, respectively.
iPhoto can also produce and automatically order calendars and cards (both the postal and greeting varieties), using a process similar to the one I describe in this section for producing a book. Who needs that stationery store in the mall anymore? (You can even order old-fashioned prints from the Share toolbar menu.)
If you’re going to create a photo book, make sure that the images have the highest quality and highest resolution. The higher the resolution, the better the photos look in the finished book. I personally always try to use images of more than 1,000 pixels in the shortest dimension.
To create a photo book, follow these steps:
1. Click the desired album in the Source list to select it.
Make sure that no individual photos are selected in the Viewer. This way, iPhoto uses all the images in the chosen album.
2. Click the Create toolbar button and click Book from the pop-up menu.
3. Select the type of book using the Binding buttons (Hardcover, Softcover, and Wire-bound) at the top of the window; for book size, use the Size buttons (Large and Extra-Large) at the left side of the window.
Your choices determine the number of pages and the size of the book. iPhoto displays the approximate cost of your book as you browse the options.
4. Choose a theme.
Use the left and right arrow keys to cycle through the theme selections. The theme you choose determines both the layout scheme and the background graphics for each page. To change the color scheme for a theme, click one of the color swatches at the right side of the window.
5. Click Create.
iPhoto adds your new book project under the Project heading in the Source list, and you see the controls shown in Figure 12-8.
In Book mode, the Viewer displays a collection of thumbnail images, each of which represents a portion of your book — either the front cover, internal pages, or the back cover. To display the photos you selected, click the Photos button in the toolbar. You can drag any image thumbnail into one of the photo placeholders to add it to the page.
It’s easy to switch to another theme at any time by clicking the Change Theme button at the top of the window.
6. Rearrange the page order to suit you by dragging the thumbnail of any page from one location to another.
If you’d prefer a book without page numbers, right-click any page and choose Show Page Numbers to toggle it off. (The check mark next to the menu item disappears.)
7. Need to change the look of a single page? Click either cover or a page to select it; then click the Design button in the toolbar to change the color and design layout for that element.
Clicking a design thumbnail automatically updates the page display.
Figure 12-8: Preparing to publish my own coffee-table masterpiece.

8. Double-click a page to edit captions and short descriptions.
Click any one of the text boxes in the page display and begin typing to add text to that page. Some themes do not have caption or description text boxes, but you can add them. To do so, display the Design pane and click the desired photo placeholder; then click one of the Border thumbnails that includes a text box.
After you’re done editing, click the All Pages button at the top of the window to return to your full spread.
9. To add pages to your book, click the Add Page button in the toolbar.
As I mention earlier, the price for additional pages varies according to the size and type of binding you choose.
10. To view the book at any time, right-click any page and choose Preview Book.
After a short wait, Lion’s Preview application opens, and you can scroll through the contents of your book (or even print a quick copy). To close the Preview window, choose Preview⇒Quit Preview.
Why limit yourself to just paper copies of your publishing success? You can also right-click any page and choose Save Book as PDF to create a snazzy electronic version of your book.
11. When you’re ready to publish your book, click the Buy Book button.
12. In a series of dialogs that appears, iPhoto guides you through the final steps to order a bound book.
Note that you’ll be asked for credit card information, so have that plastic ready.
Putting Photo Stream to Work
iPhoto includes a feature called Photo Stream that automatically shares the photos you take between your iMac, your PC and any Apple device running iOS 5.0 or later (which includes your iPhone 4/4S, your second or third-generation iPad and your iPod touch). Click Share and choose Photo Stream, and iPhoto automatically sends the selected images to all compatible devices over your Wi-Fi connection. (Note that all devices using Photo Stream must be configured using the same Apple ID.)
To turn on Photo Stream, just click iPhoto⇒Preferences and click the Photo Stream toolbar button. Click the Enable Photo Stream check box to enable it.
Optionally, you can also specify whether iPhoto should automatically import Photo Stream photos to you library, and whether iPhoto should automatically upload the most recent 1,000 photos to Photo Stream for sharing with your other devices.
E-Mailing Photos to Aunt Mildred
iPhoto can help you send your images through e-mail by automating the process. The application can prepare your image and embed it automatically in a new message.
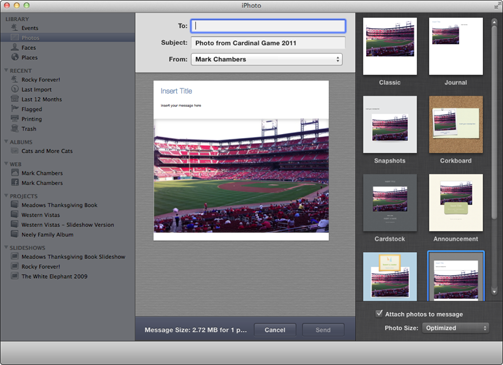
To send an image through e-mail, select it and click the Share button in the toolbar; then click the Email menu item. The layout shown in Figure 12-9 appears, allowing you to choose a theme for your message that is compatible with many e-mail applications (complete with a background image and matching font selection). You can also specify the size of the images from the Photo Size pop-up menu, which can save considerable downloading time for those recipients who are still using a dialup connection. To add the images as attachments to the message, click the Attach Photos to Message check box to enable it.
Figure 12-9: Preparing to send an image through Apple Mail.
Keep in mind that most ISP (Internet service provider) e-mail servers don’t accept an e-mail message that’s more than 4MB or 5MB, so watch that Size display at the bottom of the window. (In fact, the encoding necessary to send images as attachments can double the size of each image!). If you’re trying to send a number of images and the size goes over 4MB, you might have to click the Photo Size pop-up menu and choose a smaller size (reducing the image resolution) to get them all in a single message.
When you’re satisfied with the total file size and you’re ready to create your message, click the Compose button. iPhoto automatically creates a new message containing the images, ready for you to click Send!
..................Content has been hidden....................
You can't read the all page of ebook, please click here login for view all page.