Hour 11. Implementing Multiple Scenes and Popovers
,What You’ll Learn in This Hour:
![]() How to create multiple scenes in the storyboard
How to create multiple scenes in the storyboard
![]() The use of segues to transition between scenes
The use of segues to transition between scenes
![]() Ways to transfer data between scenes
Ways to transfer data between scenes
![]() How to present and use popovers
How to present and use popovers
This hour marks a major milestone in your iOS app development capabilities. In the preceding hour’s lesson, you learned about alert views and action sheets. These were the first user interface (UI) elements we’ve explored that act as (somewhat) independent views that a user interacts with. You’ve also seen how to hide and show views, making it possible to customize your user interface. All of these, however, took place within a single scene. That means that no matter how much was going on onscreen, we used a single view controller and a single initial view to deal with it. In this hour, we break through those limits and introduce the ability to create applications with multiple scenes—in other words, multiple view controllers and multiple views.
In this lesson, you learn how to create new scenes and the new view controller classes you need to back them up. You also learn how to visually define your transitions between scenes and trigger them automatically, or programmatically. In addition, iPad developers will explore the use of popovers to present information within a pseudo “window” on the display.
Before we begin, I want to add a disclaimer: In this hour, you learn several different ways to accomplish the same thing. Apple changes the iOS often, and despite their somewhat elegant software development kit (SDK), you will encounter inconsistencies. The takeaway is that you should do what you feel comfortable with. There are plenty of “clever” solutions to problems that result in code that, although correct, is never going to make sense to anyone but the person who wrote it.
Introducing Multiscene Storyboards
We’ve been able to build apps that do quite a few things using a single view, but many don’t lend themselves to a single-view approach. It’s rare to download an app that doesn’t have configuration screens, help screens, or other displays of information that go beyond the initial view that is loaded at runtime.
To use features like these in your apps, you need to create multiple scenes in your storyboard file. Recall that a scene is defined by the presence of a view controller and a view. You’ve been building entire applications in one view with one view controller for the past six hours. Imagine how much functionality you could introduce with unlimited scenes (views and view controllers). With the iOS project storyboard, that’s exactly what you can do.
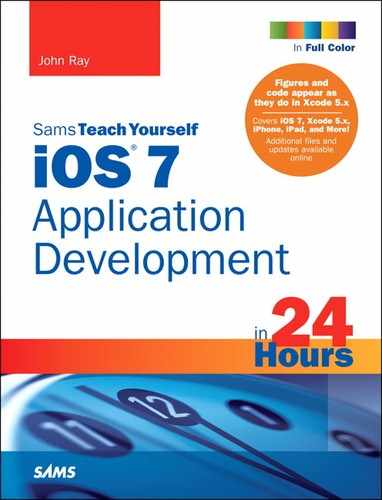
Not only that, but you can literally “draw” the connections between different scenes. Want to display an information screen if the user touches a Help button? Just drag from your button to a new scene. It “just works.” Figure 11.1 shows a multiscene application design with segues.
The Terminology
Before we head into multiscene development, we should introduce/review a few pieces of terminology, several of which you’ve learned previously but may not have really had to think about until now:
![]() View controller: A class that manages the user’s interactions with his iDevice. In many of the tutorials in this book, single-view controllers are used for most of the application logic, but other types exist (and are used in the coming hours).
View controller: A class that manages the user’s interactions with his iDevice. In many of the tutorials in this book, single-view controllers are used for most of the application logic, but other types exist (and are used in the coming hours).
![]() View: The visual layout that a user sees onscreen. You’ve been building views in view controllers for quite awhile now.
View: The visual layout that a user sees onscreen. You’ve been building views in view controllers for quite awhile now.
![]() Scene: A unique combination of view controller and view. Imagine you’re building an image-editing application. You may choose to develop scenes for selecting files to edit, another scene for implementing the editor, another for applying filters, and so on.
Scene: A unique combination of view controller and view. Imagine you’re building an image-editing application. You may choose to develop scenes for selecting files to edit, another scene for implementing the editor, another for applying filters, and so on.
![]() Segue: A segue is a transition between scenes, often with a visual transition effect applied. There are multiple types of segues available depending on the type of view controller you’re using.
Segue: A segue is a transition between scenes, often with a visual transition effect applied. There are multiple types of segues available depending on the type of view controller you’re using.
![]() Exit: The Exit icon appears in each scene in your storyboard. The exit can be used to transition back to a previous scene. If you display four scenes in sequence, for example, and want to move from the fourth back to the first, you would use the first scene’s exit.
Exit: The Exit icon appears in each scene in your storyboard. The exit can be used to transition back to a previous scene. If you display four scenes in sequence, for example, and want to move from the fourth back to the first, you would use the first scene’s exit.
![]() Unwind: The process of moving back to an earlier scene by way of the exit. This is considered an “unwind” segue.
Unwind: The process of moving back to an earlier scene by way of the exit. This is considered an “unwind” segue.
![]() Modal views: A modal view is one that is displayed over top of an original view when user interactions are required. You will mostly be using modal views (by way of the modal segue type) in this book.
Modal views: A modal view is one that is displayed over top of an original view when user interactions are required. You will mostly be using modal views (by way of the modal segue type) in this book.
![]() Relationship: A “segue” of sorts for certain types of view controllers, such as the tab bar controller. Relationships are created between buttons on a master tab bar that display independent scenes when touched. You learn about these in Hour 13, “Advanced Storyboards Using Navigation and Tab Bar Controllers.”
Relationship: A “segue” of sorts for certain types of view controllers, such as the tab bar controller. Relationships are created between buttons on a master tab bar that display independent scenes when touched. You learn about these in Hour 13, “Advanced Storyboards Using Navigation and Tab Bar Controllers.”
![]() Storyboard: The file that contains the scene, segue, and relationship definitions for your project.
Storyboard: The file that contains the scene, segue, and relationship definitions for your project.
You must create new class files to support the requirement for multiple view controllers; so, if you need a quick refresher on adding new files to Xcode, refer to Hour 2, “Introduction to Xcode and the iOS Simulator.” Other than that, the only prerequisite is the ability to Control-drag, something you should be very good at by now.
Preparing a Multiscene Project
To create an application with multiple scenes and segues, you must first know how to add new view controller and view pairings to your project. For each of these, you also need supporting class files where you can code up the logic for your additional scenes. To give you a better idea of how this works, let’s use a typical Single View Application template as a starting point.
As you’re well aware, the Single View Application template has a single view controller and a single view (in other words, a single scene). This doesn’t mean, however, that we’re stuck with that configuration. You can expand a single view application to support as many scenes as you want; it just provides us with a convenient starting point.
Adding Additional Scenes to a Storyboard
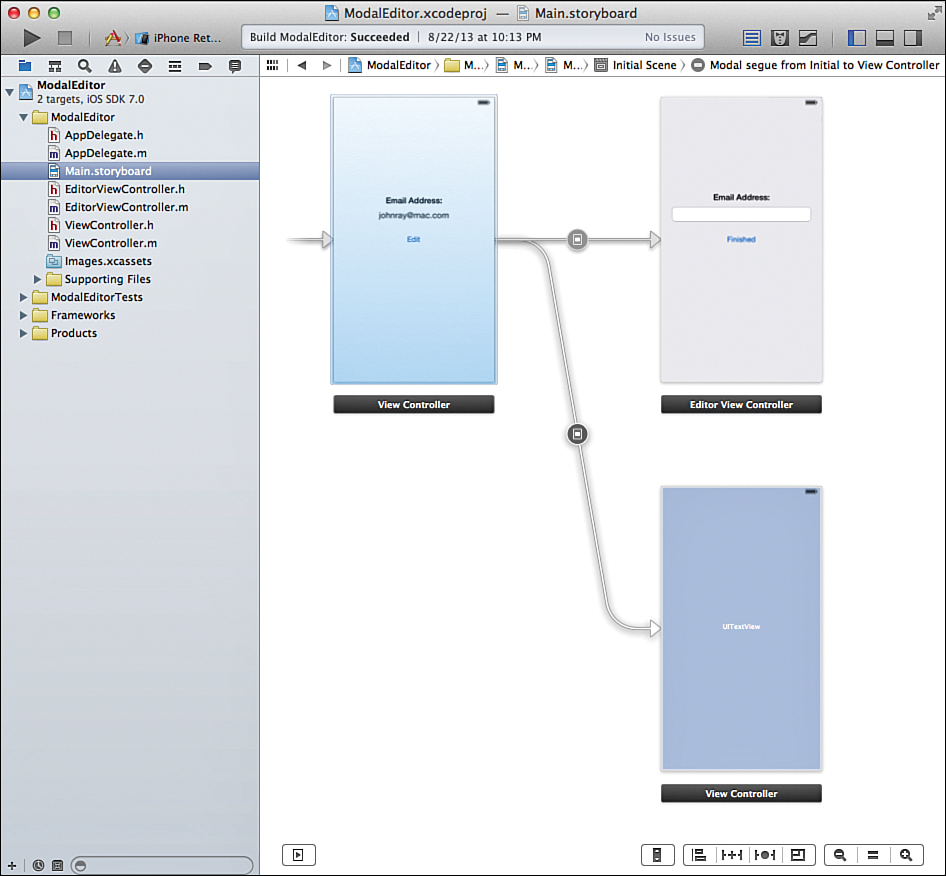
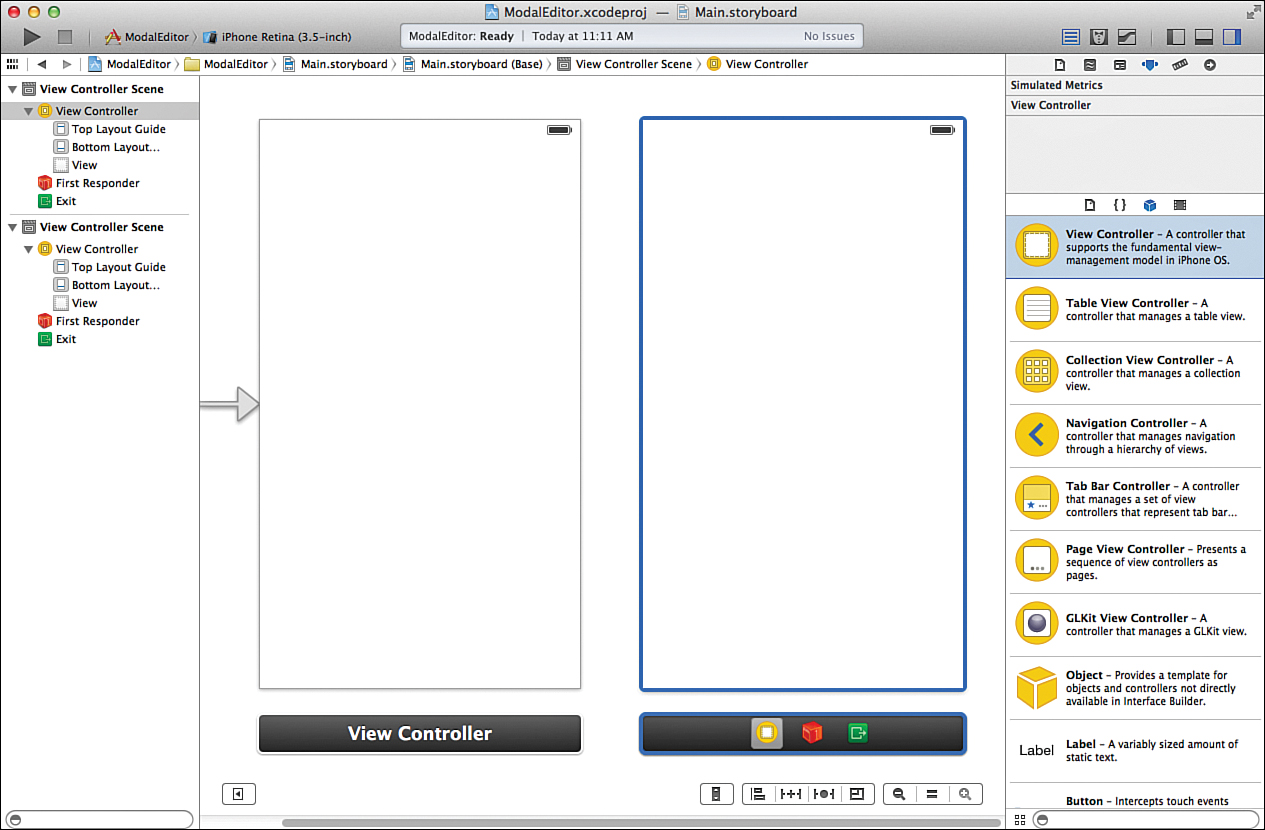
To add a new scene to a storyboard, open the storyboard file (Main.storyboard) in the Interface Builder (IB) editor. Next, make sure that the Object Library (Control-Option-Command-3) is open and type view controller in the Search field to show the view controller objects that are available, as shown in Figure 11.2.
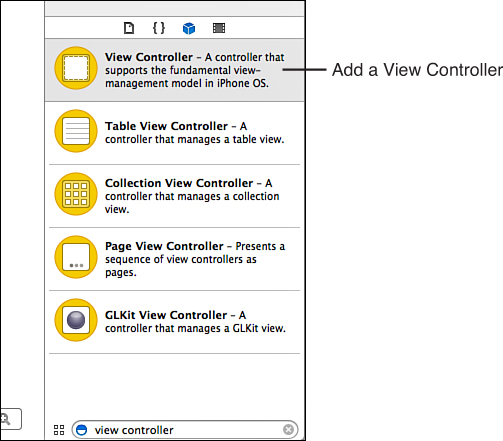
Next, drag the view controller into an empty portion of IB editor area. The view controller will add itself, with a corresponding view, to your storyboard, and just like that, you’ll have a new scene, as shown in Figure 11.3. You can drag the new view around in the storyboard editor to position it somewhere convenient.
Note
If you find it difficult to grab and drag the new view around in the editor, use the object dock beneath it. It provides a convenient handle for moving the object around.
Naming Scenes
After adding a new scene, you’ll notice there’s a bit of a problem brewing in the document outline area (Editor, Show Document Outline). By default, each scene is named based on its view controller class. We’ve been using a view controller class called ViewController, so the document outline shows the default scene as View Controller Scene. Once we add a new scene, it doesn’t have a view controller class assigned yet, so it also appears as View Controller Scene. Add another, and that scene also appears as View Controller Scene (and so on).
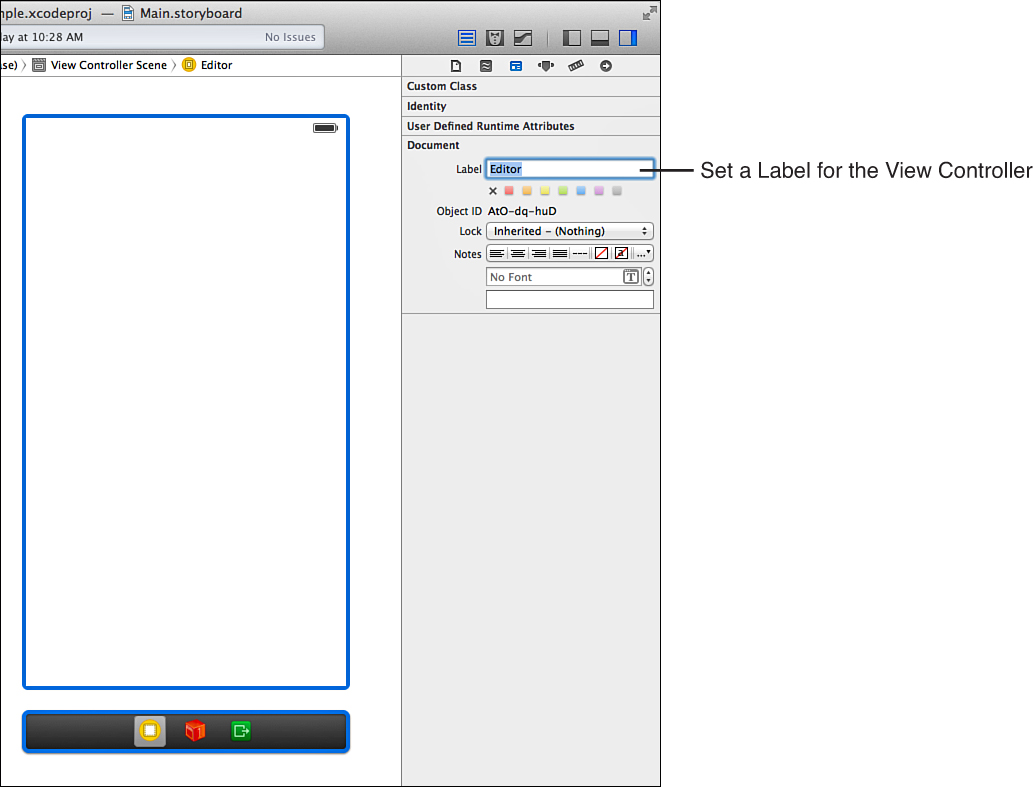
To deal with the ambiguity, you have two options: First, you can add and assign view controller classes to the new scenes. We’re going to do this anyway, but sometimes it’s nicer to have a plain English name for a scene that can be anything we want without it reflecting the underlying code. (“John’s Awesome Image Editor Scene” makes a horrible name for a view controller class.) The second option is to label a scene using any arbitrary string you want. To do this, select its view controller in the document outline, and then open the Identity Inspector and expand the Document section, as shown in Figure 11.4. Use the Label field to enter a name for the scene. Xcode automatically tacks Scene onto the end, so there’s no need to add that.
Adding Supporting View Controller Subclasses
After establishing the new scenes in your storyboard, you need to couple them to actual code. In the Single View Application template, the initial view’s view controller is already configured to be an instance of the ViewController class—implemented by editing the ViewController.h and ViewController.m files. We need to create similar files to support any new scenes we add.
Note
If you’re just adding a scene that displays static content (such as a Help or About page), you don’t need to add a custom subclass. You can use the default class assigned to the scene, UIViewController, but you won’t be able to add any interactivity.
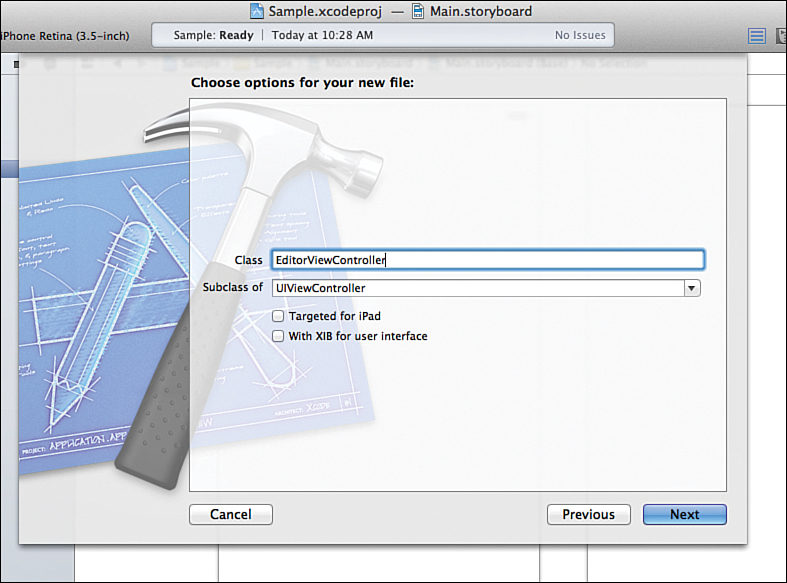
To add a new subclass of UIViewController to your project, make sure that the project navigator is visible (Command-1), and then click the + icon at the bottom-left corner of the window. When prompted, choose the iOS Cocoa Touch template category, then Objective-C class, and click Next. Now, select a subclass of UIViewController. You’ll also be asked to name your class, as shown in Figure 11.5. Name it something that differentiates it from other view controllers in your project. EditorViewController is better than ViewControllerTwo, for example. If you’re creating the controller for use in an iPad project, click the Targeted for iPad check box, and then click Next.
Finally, you’re prompted for where to save your new class. Use the group pop-up menu at the bottom of the dialog to choose your main project code group, and then click Create. Your new class is added to the project and ready for coding, but it still isn’t connected to the scene you defined.
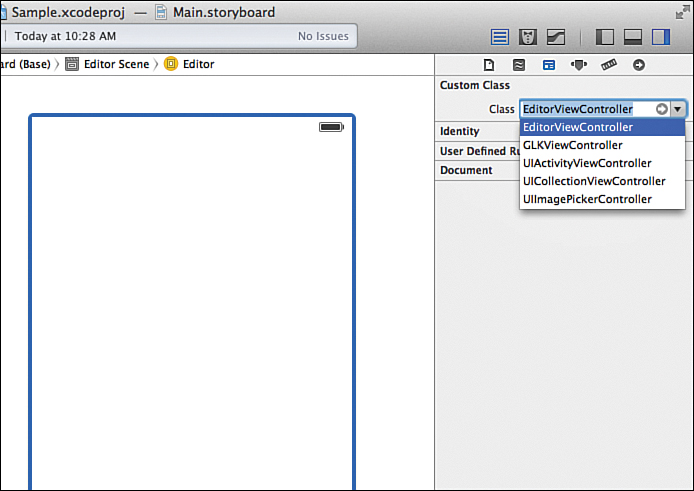
To associate a scene’s view controller with the UIViewController subclass, shift your attention back to the IB editor. Within the document outline, select the view controller line for the new scene, and then open the Identity Inspector (Option-Command-3). In the Custom Class section, use the drop-down menu to select the name of the class you just created (such as EditorViewController), as shown in Figure 11.6.
After the view controller is assigned to a class, you can develop in the new scene exactly like you developed in the initial scene, but the code will go in your new view controller’s class. This takes us most of the way to creating a multiscene application, but the two scenes are still completely independent. If you develop for the new scene, it’s essentially like developing a new application; there is no way for the scenes to exchange data and no way to transition between them.
Sharing Properties and Methods with #import and @class
As you add multiple view controllers (and any other classes) to your project, there’s a good chance they need to display and exchange information. For your classes to “know about each other” programmatically, they need to import one another’s interface files. For example, if MyEditorClass needs to access properties and methods in MyGraphicsClass, MyEditorClass.h would include #import "MyGraphicsClass.h" at its start.
Simple enough, right? Unfortunately, it isn’t always that easy. If both classes need access to one another, and both try to import the interface file from the other class, you’ll most likely end up with an error because the import lines have just created a reference loop. One class references the other, which references the other, which references the other, and so on.
To deal with this situation, you need to change your code around a bit and make use of the @class directive. @class enables an interface file to reference another class without creating a loop. Using the hypothetical MyGraphicsClass and MyEditorClass as examples of classes that both need to reference one another, the references could be added like this:
1. In MyEditorClass.h, add #import "MyGraphicsClass.h”. One half of the two references can be implemented with just an #import. Nothing special needs to happen.
2. In MyGraphicsClass.h, add @class MyEditorClass; after the existing #import lines.
3. In MyGraphicsClass.m, add the #import "MyEditorClass.h" line after the existing #import lines.
The first #import is performed normally, but to get around the circular reference, the second class’s #import moves to the implementation file, and a @class directive is added to the second class’s interface file. This might seem convoluted, but it works.
Note
In some cases, just adding an #import to each interface file will work, so don’t feel bad about trying that first. However, if you start getting unusual errors telling you your class doesn’t exist when you try to build your app, switch to this approach.
After you’ve created your new scenes, assigned the view controller classes, and added the appropriate import references between classes, you’re ready to create segues—the mechanism that enables you to transition from scene to scene.
Creating a Segue
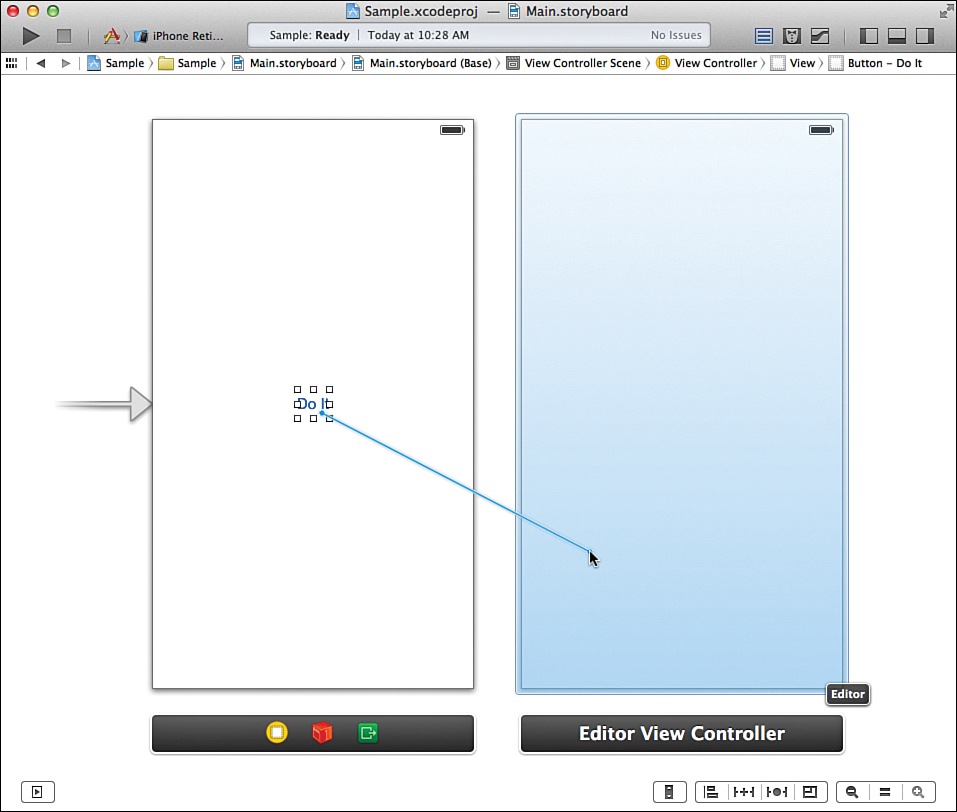
Creating a segue between scenes uses the same Control-drag mechanism that you have (hopefully) become very fond of over the first half of this book. For example, consider a two-scene storyboard where you want to add a button to the initial scene that, when clicked, will transition to the second scene. To create this segue, you Control-drag from the button to the second scene’s view controller (targeting either the visual representation of the scene itself, or the view controller line in the document outline), as shown in Figure 11.7.
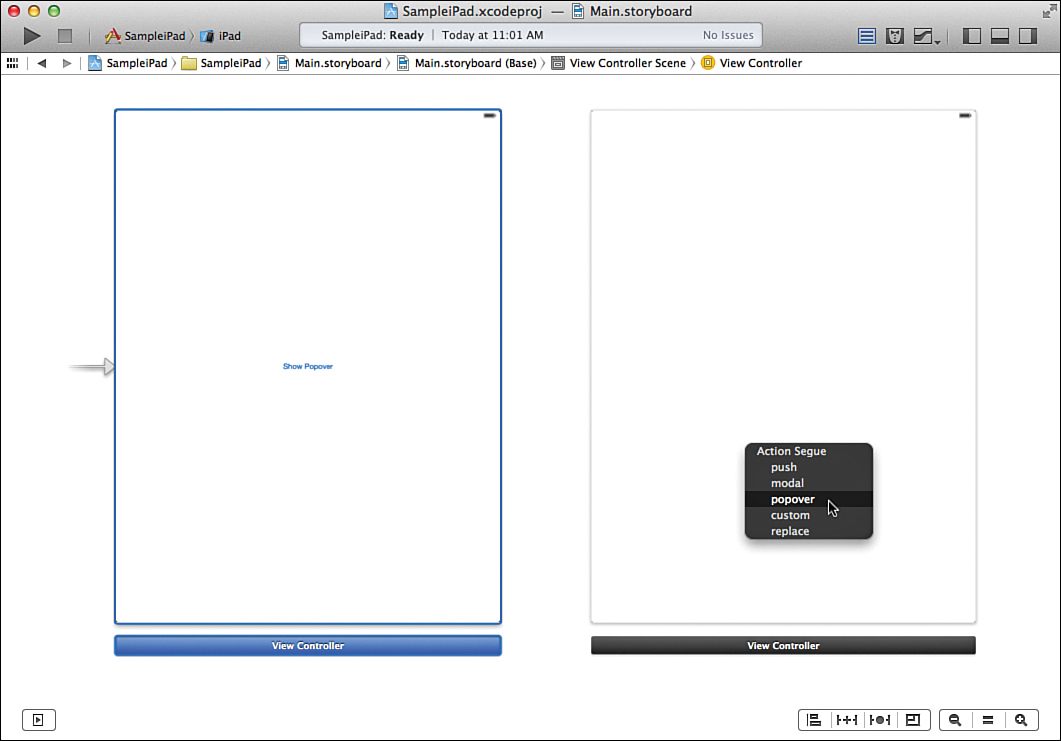
When you release your mouse button, a Storyboard Segues box appears, as shown in Figure 11.8. Here you can choose the style of segue that you’re creating, most likely Modal. A total of five potential options may appear:
![]() Modal: Transition to another scene for the purposes of completing a task. When finished, we dismiss the scene, and it transitions back to the original view. This is the primary segue we will be using.
Modal: Transition to another scene for the purposes of completing a task. When finished, we dismiss the scene, and it transitions back to the original view. This is the primary segue we will be using.
![]() Push: Create a chain of scenes where the user can move forward or back. This is used with navigation view controllers, which we look at in Hour 13.
Push: Create a chain of scenes where the user can move forward or back. This is used with navigation view controllers, which we look at in Hour 13.
![]() Replace (iPad only): Replace the current scene with another. This is used in some specialized iPad view controllers. We work with a popular iPad view controller called the split-view controller in Hour 14, “Navigating Information Using Table Views and Split View Controllers.”
Replace (iPad only): Replace the current scene with another. This is used in some specialized iPad view controllers. We work with a popular iPad view controller called the split-view controller in Hour 14, “Navigating Information Using Table Views and Split View Controllers.”
![]() Popover (iPad only): Displays the scene in a pop-up “window” over top of the current view. You learn about popovers later this hour.
Popover (iPad only): Displays the scene in a pop-up “window” over top of the current view. You learn about popovers later this hour.
![]() Custom: Used for programming a custom transition between scenes.
Custom: Used for programming a custom transition between scenes.
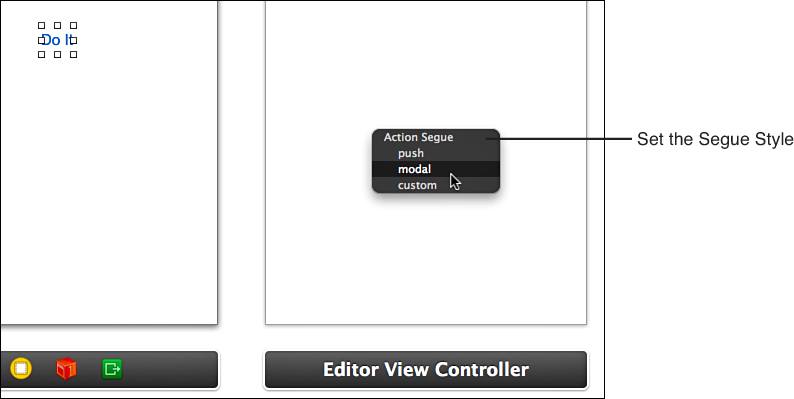
For most projects, you’ll want to choose a modal transition, which is what we use here. The other segues are used in very specific conditions and do not work unless those conditions are met. If that piques your interest, good; you’ll see more of these over the next few hours.
Tip
You can create a segue that isn’t attached to any particular UI element by Control-dragging from one scene’s view controller to another. This creates a segue that you can trigger, in your code, from a gesture or other event.
Configuring a Segue
After adding the segue to your project, you’ll see a line added to the editor area that visually ties your two scenes together. You can rearrange the individual scenes within the editor to create a layout that maps how the application will flow. This layout is solely for your benefit; it doesn’t change how the application will operate.
You’ll also notice a representation of it in your document outline. The scene that is initiating a segue will show a new line “Segue from <origin> to <destination>” in the outline. Selecting the segue line gives us the opportunity to configure its style, transition type, identifier, and presentation (iPad only), as shown in Figure 11.9.

The identifier is an arbitrary string that you can use to trigger a segue manually or identify which segue is underway programmatically (if you have multiple segues configured). Even if you don’t plan to use multiple segues, it’s a good idea to name this something meaningful (toEditor, toGameView, and so on).
The transition type is a visual animation that is played as iOS moves from one scene to another. You have four options:
![]() Cover Vertical: The new scene slides up over the old scene.
Cover Vertical: The new scene slides up over the old scene.
![]() Flip Horizontal: The view flips around horizontally, revealing the new scene on the “back.”
Flip Horizontal: The view flips around horizontally, revealing the new scene on the “back.”
![]() Cross Dissolve: The old scene fades out while the new scene fades in.
Cross Dissolve: The old scene fades out while the new scene fades in.
![]() Partial Curl: The old scene “curls up” like a piece of paper, revealing the new scene underneath.
Partial Curl: The old scene “curls up” like a piece of paper, revealing the new scene underneath.
On the iPad, you can also set a presentation attribute. This attribute determines how the new modal view is displayed on the screen. The iPad has more screen real estate than an iPhone, so it can do things a little differently. You have four presentation style options:
![]() Form Sheet: Sizes the scene smaller than the screen (regardless of orientation), showing the original scene behind it. This, for all intents and purposes, is the iPad equivalent of a window.
Form Sheet: Sizes the scene smaller than the screen (regardless of orientation), showing the original scene behind it. This, for all intents and purposes, is the iPad equivalent of a window.
![]() Page Sheet: Sizes the scene so that it is presented in the portrait format.
Page Sheet: Sizes the scene so that it is presented in the portrait format.
![]() Full Screen: Sizes the view so that it covers the full screen.
Full Screen: Sizes the view so that it covers the full screen.
![]() Current Context: Uses the same style display as the scene that is displaying it.
Current Context: Uses the same style display as the scene that is displaying it.
Caution: Choose Your Styles Carefully!
Not all styles are compatible with all transitions. A page curl, for example, can’t take place on a form sheet that doesn’t completely fill the screen. Attempting to use an incompatible combination will result in a crash. So if you’ve chosen a bad pair, you’ll find out pretty quickly (or you could review the documentation for the transition/style you plan to use).
After setting the identifier, style, transition, and presentation for a segue, you’re ready to use it. Without you writing any code, an application that has followed these steps can now present two fully interactive views and transition between them. What it can’t do, however, is interact with them programmatically. In addition, once you transition from one view to another, you can’t transition back. For that, you need some code. Let’s take a look at how you can create and trigger modal segues programmatically, and then the different ways of transitioning back—all of which require some coding.
Controlling Modal Segues Manually
Although it is easy to create segues with a single Control-drag, in several situations you have to interact with them manually. If you create a modal segue between view controllers that you want to trigger manually, for example, you need to know how to initiate it in code. When users are done with the task in another scene, they also need a mechanism to dismiss the modal scene and transition back to the original scene. Let’s handle these scenarios now.
Starting the Segue
First, to transition to a scene using a segue that you’ve defined in your storyboard, but don’t want to be triggered automatically, you use the UIViewController instance method performSegueWithIdentifier:sender. For example, within your initial view controller, you can initiate a segue with the identifier "toMyGame" using the following line:
[self performSegueWithIdentifier:@"toMyGame" sender:self];
That’s it. As soon as the line is executed, the segue starts and the transition occurs. The sender parameter should be set to the object that initiated the segue. (It doesn’t matter what that object is.) It is made available as a property during the segue if your code needs to determine what object started the process.
Dismissing a Modal Scene Programmatically
After users have finished interacting with your view, you’ll probably want to provide them with a means of getting back to where they started. At present, there is no facility in modal segues to allow for this, so you must turn to code. The UIViewController method dismissView ControllerAnimated:completion can be used in either the view controller that displayed the modal scene or the modal scene’s view controller to transition back to the original scene:
[self dismissViewControllerAnimated:YES completion:nil];
The completion block is an optional block of code that will be executed when the transition has completed. You can learn more about blocks in Hour 3, “Discovering Objective-C: The Language of Apple Platforms,” or wait to create one in Hour 22, “Building Background-Ready Applications.” Once you’ve dismissed a scene presented modally, control is returned to the original scene and the user can interact with it as she normally would.
What if you’ve performed several segues and want to jump back to where you started rather than just going back one? For that, you need to make use of Exits and Unwind sequels. Let’s look at that next.
Using the Exit (and Unwind Segues)
Apple has adopted the terminology of unwinding to mean “moving backward in a storyboard.” Storyboards show the path a user takes forward through an application, but (until now) haven’t really shown a means of moving backward. In the preceding section, you learned how to move back to an earlier view controller using dismissViewControllerAnimated:completion. This will likely be the most common method you use for unwinding, but it’s hardly a flexible solution for jumping back to an arbitrary point in your storyboard.
If you’ve displayed 10 modal view controllers, one after the other, and you want to jump from the tenth back to the second, do you really need to dismiss each view controller from number 10 back to number 2? Not if you make use of exits and the unwind segue.
Preparing a View Controller for an Exit
To use an exit, you must first decide what view controller should allow exits. This is the view controller for the scene that you want to exit to not from. Although this seems a bit counterintuitive to me, just remember that you implement the exit as your destination.
After you’ve made that determination, start by adding a new IBAction method declaration in the view controller’s interface (.h) file:
- (IBAction)<Method Name>:(UIStoryboardSegue *)sender;
The method name is up to you (unWindToHere, exitHere, and so on are all perfectly acceptable names), as long as the declaration follows the pattern shown here.
Next, add the method to the view controller’s implementation file:
- (IBAction)<Method Name>:(UIStoryboardSegue *)sender {
// Execute this code upon unwinding.
}
You don’t have to add any implementation code to the method, but the method itself must exist to use the exit. Once the method is in place, you can use the Exit icon in your scene.
Connecting to an Exit (Unwind Segue)
To connect to an exit, you follow almost the same process as creating a segue. First, you need something that will trigger the exit (like a button). Control-drag from that object to the Exit icon in the scene you want to exit to, as demonstrated in Figure 11.10.
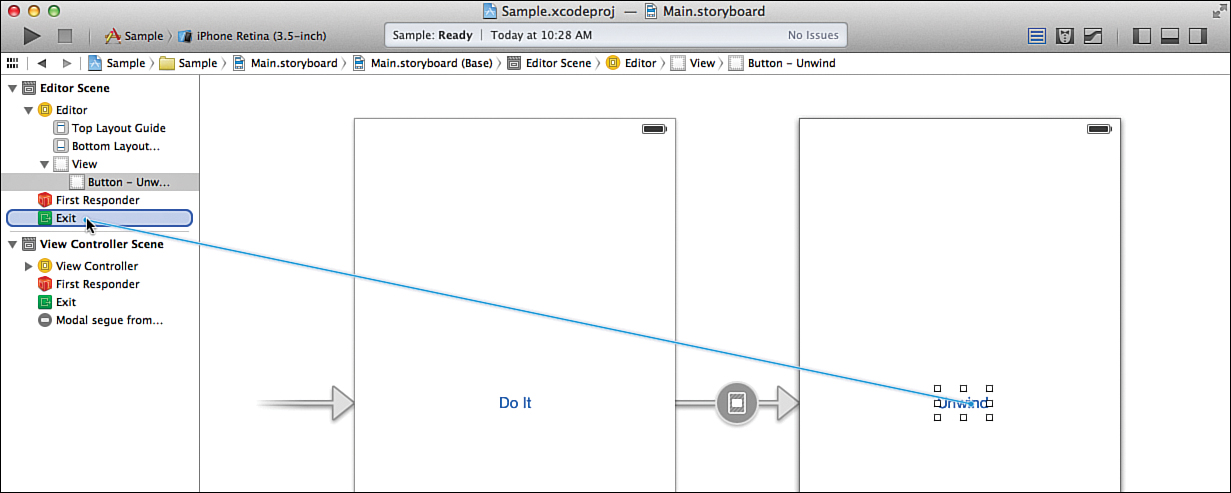
When you release your mouse button, you’ll be asked to pick from a list of the available Exit/Unwind methods; choose the exit/unwind method you implemented. You’ll notice that a new unwind segue is added to the scene you are transitioning from, as shown in Figure 11.11.
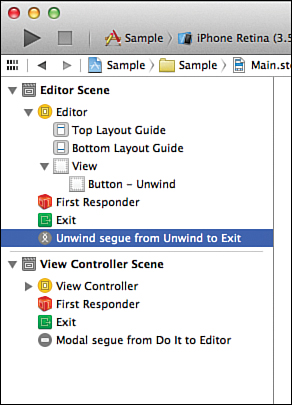
Once the segue is in place, activating the segue will jump from the activating view controller to the controller with the exit. You can work with the exit/unwind segues exactly like any other segue—including setting an identifier, creating a manual segue (by dragging from a view controller rather than a GUI element), and executing the unwind segue programmatically.
Programming a Modal Scene Switch
Xcode storyboarding has made multiscene applications much easier to create than they were in the past, but that doesn’t mean they’re the right choice for all your applications. If you’d rather go the route of programmatically presenting a scene without defining a segue at all, you certainly can. Let’s review the process.
Setting a Storyboard Identifier
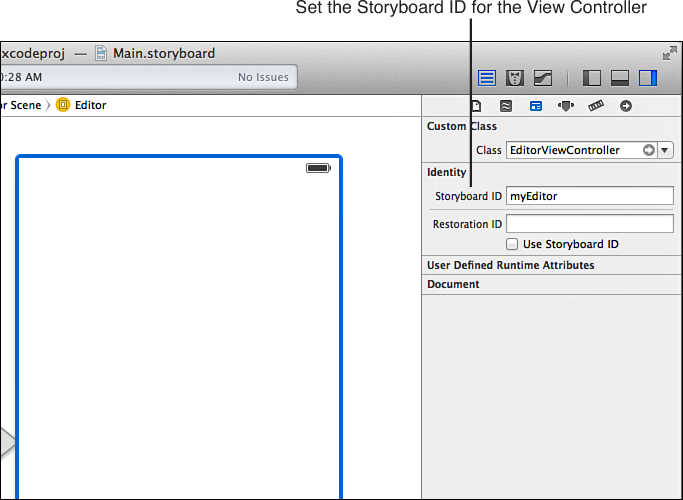
After creating your storyboard scenes, but before coding anything, you must provide a storyboard identifier for the view controller you want to display programmatically. This is done by selecting the view controller instance and opening the Identity Inspector (Option-Command-3) in the IB editor. Within the Identity section of the inspector, use the Storyboard ID field to enter a simple string to identify the view controller within your application’s storyboard. Figure 11.12 shows a view controller being configured with the storyboard ID myEditor.
Instantiating the View Controller and View
Switch your attention to your implementation files and open the method where you want to display the view controller through code. Your application will need to create a UIStoryboard object using the method storyboardWithName that references your storyboard file. This can be used to load view controllers and their associated views (that is, scenes).
For example, to create an object mainStoryboard that references the project’s Main.storyboard file, you could use the following:
UIStoryboard *mainStoryboard=[UIStoryboard
storyboardWithName:@"Main" bundle:nil];
Next, use the storyboard object to instantiate the view controller that you want to transition to using the instantiateViewControllerWithIdentifier method. Assume you’ve created a UIViewController subclass named EditorViewController and set the view controller storyboard identifier to "myEditor". You can instantiate a new instance of EditorViewController as follows:
EditorViewController *editorVC=[mainStoryboard
instantiateViewControllerWithIdentifier:@"myEditor"];
The EditorViewController instance, editorVC, is now ready to be displayed. Before that happens, however, you may want to adjust how it will appear onscreen.
Configuring the Modal Display Style
Earlier I covered the different transition styles and presentation types that are available for displaying modal scenes on the iPhone and iPad. When displaying a view controller manually, you can apply the same effects programmatically by setting the modalTransitionStyle and modalPresentationStyle view controller properties, respectively. For example, to configure the editorVC view controller instance, I might use this:
editorVC.modalTransitionStyle=UIModalTransitionStyleCoverVertical;
editorVC.modalPresentationStyle=UIModalPresentationFormSheet;
You can choose from the same transitions and presentation styles as mentioned earlier this hour, but you need to use these constants to identify your selections:
![]() Transition styles:
Transition styles: UIModalTransitionStyleCoverVertical, UIModalTransitionStyleFlipHorizontal, UIModalTransitionStyleCrossDissolve, or UIModalTransitionStyle PartialCurl
![]() Presentation styles:
Presentation styles: UIModalPresentationFormSheet, UIModalPresentationPageSheet, UIModalPresentationFullScreen, or UIModalPresentationCurrentContext
Displaying the View Controller
The final step in programmatically displaying a view is to, well, display it. To do this, use the UIViewController method presentViewController:animated:completion from within your application’s initial view controller:
[self presentViewController:editorVC animated:YES completion:nil];
The view controller and its associated scene are displayed on the screen using the transition and presentation styles you’ve selected. From here out, you can work with the scene as if it were one you displayed via a segue. You dismiss it using the same dismissViewControllerAnimated:completion method.
Note
In this example, we’re programmatically creating a segue to a scene. The methods we use to do this, however, refer to view controllers. Keep in mind that a scene is just a view controller and its associated view. Because we’re instantiating a view controller (with an associated view) from the project’s storyboard, we’re effectively instantiating a “scene.” We then configure the presentation of the view controller/view and display it (the same as a segue).
Although the terminology shifts when working in code, the end result is the same.
Passing Data Between Scenes
You know how to create and display scenes, but there is one very critical piece of the puzzle missing: the ability to share information between the different scenes in your application. Right now, they act as entirely independent applications, which is perfectly fine if that is your intention; however, chances are, you want an integrated user experience. Let’s make that happen.
The most straightforward way for any class to exchange information with any other is through properties and methods that it exposes in its interface file. The only trouble with this is that we need to be able to get an instance of one scene’s view controller from another, and, at present, when using a segue we create visually, this aren’t entirely obvious.
Tip
If you create and display a scene entirely programmatically, as demonstrated in the preceding section, you already have an instance of the new scene’s view controller in your initial view controller. You can set/access properties on the new view controller (editorVC.myImportantProperty=<value>) before displaying it and after it is dismissed.
The prepareForSegue:sender Method
One way to get references to the view controllers in a segue is by implementing the prepareForSegue:sender method. This method is automatically called on the initiating view controller when a segue is about to take place away from it. It returns an instance of UIStoryboardSegue and the object that initiated the segue. The UIStoryboard object contains the properties sourceViewController and destinationViewController, representing the view controller starting the segue (the source) and the view controller about to be displayed (the destination).
Listing 11.1 shows a simple implementation of this approach. In this example, I’m transitioning from my initial view controller (an instance of ViewController) to a new view controller, which is an instance of a hypothetical EditorViewController class.
LISTING 11.1 Using prepareForSegue:sender to Grab the View Controllers
- (void)prepareForSegue:(UIStoryboardSegue *)segue sender:(id)sender {
ViewController *startingViewController;
EditorViewController *destinationViewController;
startingViewController=(ViewController *)segue.sourceViewController;
destinationViewController=
(EditorViewController *)segue.destinationViewController;
}
First, I declare two variables to reference the source and destination controllers. Then, I assign them to typecast versions of the source and destination properties returned by the UIStoryboardSegue. I have to typecast the view controllers so Xcode knows what type of object they are; otherwise, I wouldn’t be able to access their properties. Of course, the source view controller is also just “self”, so this is a bit of a contrived example.
Once we have a reference to the destination view controller, however, we can set and access properties on it, even changing the presentation and transition styles before it is displayed. If it is assigned to a property/instance variable, it can be accessed anywhere within the source view controller.
What if we want the destination view controller to send information back to the source? In this case, only the source can communicate with the destination, because that’s where the prepareForSegue:sender method is implemented. One option is to create a property on the destination controller that stores a reference to the source controller. (We’ll even need to do this to solve a variation of this issue in the next hour.) Another approach, however, is to use built-in properties of UIViewController that make working with modally presented scenes easy, easy, easy.
The Easy Way
The prepareForSegue:sender gives us a generic way to work with any segue that is taking place in an application, but it doesn’t always represent the easiest way to get a handle on the view controllers involved. For modal segues, the UIViewController class gives us properties that make it easy to reference the source and destination view controllers: presentingView Controller and presentedViewController.
In other words, we can reference the original (source) view controller within a view controller that has just been displayed by accessing self.presentingViewController. Similarly, we can get a reference to the destination view controller from the original controller with self.presentedViewController. It’s as easy as that. For example, assume that the original view controller is an instance of the class ViewController, and the destination view controller is an instance of EditorViewController.
From the EditorViewController, you can access public properties in the original view controller with the following syntax:
((ViewController *)self.presentingViewController).<property>
And within the original view controller, you can manipulate public properties in the destination view controller with this:
((EditorViewController *)self.presentedViewController).<property>
The parentheses with the class name is necessary to typecast the presentingViewController/presentedViewController properties to the right object types. Without this notation, Xcode wouldn’t know what types of view controllers these were, and we wouldn’t be able to access their properties.
Notice that I specifically state public properties can be accessed with this notation? That’s because private properties are private and aren’t shared between classes! In other words, this works only with properties that you define in your interface files (ViewController.h, for example)—not with those in the @interface block at the top of your implementation (.m) files. This distinction will become important later in this lesson.
Before I move on to our tutorial project, I want to introduce another segue, one that displays a very specific type of view: an iPad popover. If you’re an iPhone-only developer, feel free to skip ahead; otherwise, read on to learn about this fascinating iPad-specific UI element.
Understanding the iPad Popover
Popovers are a UI element that displays content on top of an existing view, with a small indicator that points to an onscreen object, such as a button, to provide context. Popovers are everywhere in the iPad interface, from Mail to Safari, as demonstrated in Figure 11.13.

Using a popover enables you to display new information to your users without leaving the screen you are on, and to hide the information when the user is done with it. There are few desktop counterparts to popovers, but they are roughly analogous to tool palettes, inspector panels, and configuration dialogs. In other words, they provide user interfaces for interacting with content on the iPad screen, but without eating up permanent space in your UI.
The content in a popover is determined by a view and a view controller, just like the modal scenes we’ve covered. What makes a popover different is that it also requires an additional controller object, a popover controller (UIPopoverController). The controller determines the size of the popover and where it points. When the user is done with the popover, touching outside of its visible rectangle automatically closes the view.
Like the modal scenes, however, we can configure popovers directly in the IB editor without writing a single line of code.
Preparing Popovers
To create a popover, follow the exact same steps as when creating a modal segue. A popover is the same as any other view, it is just displayed a bit differently. Begin by adding a new scene to your project’s storyboard, and then create and assign a supporting view controller class; this will provide the content for the popover and is called the popover’s “content view controller.” Within your initial storyboard scene, create a UI element that you would like to trigger a popover.
Here is where things change. Instead of adding a modal segue between the element and the scene you want displayed in the popover, you create a popover segue.
Creating a Popover Segue
To create a popover segue, Control-drag from the element you want to display a popover to the view controller providing the popover content. When prompted for the type of storyboard segue, as shown in Figure 11.14, choose Popover.
To properly design the content of your popover, configure its size and hide the status bar so that your popover scene better represents what will be shown inside the actual popover.
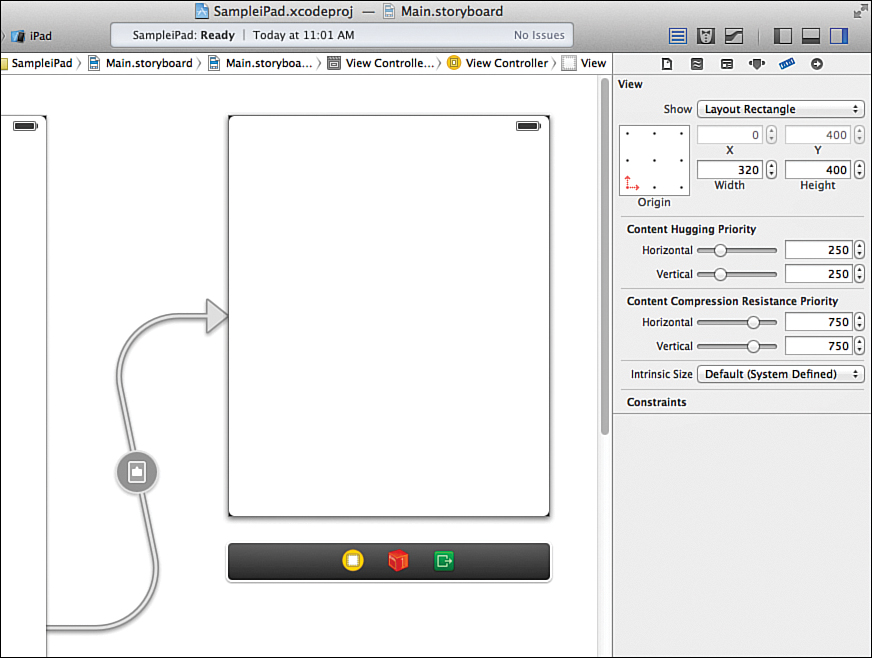
Setting the Popover Size
The default view associated with a new iPad scene is the same size as the main application interface. When you are displaying a popover, however, the scene needs to be much smaller. Apple allows popovers up to 600 points wide and the height of the iPad screen, but recommends that they be kept to 320 points wide or less. To set the size of the popover, select the view within the popover view controller, and open the Size Inspector (Option-Command-5). Use the Width and Height fields to enter a size for the popover. After you set the size of the view, the scene’s visual representation in the IB editor changes to the appropriate size, demonstrated in Figure 11.15. This makes building the content view much easier.
Caution: Can’t Set Your Popover Size?
If you find yourself looking at a dimmed-out size setting for the popover view, you probably haven’t yet created the popover segue. It isn’t until Xcode “knows” that you’re adding a popover scene that it unlocks the size settings.
Configuring the Presentation Direction and Passthrough Views
After setting the popover’s size, you want to configure a few attributes on the segue itself. Select the popover segue within the initiating scene, and then open the Attributes Inspector (Option-Command-4), as shown in Figure 11.16.
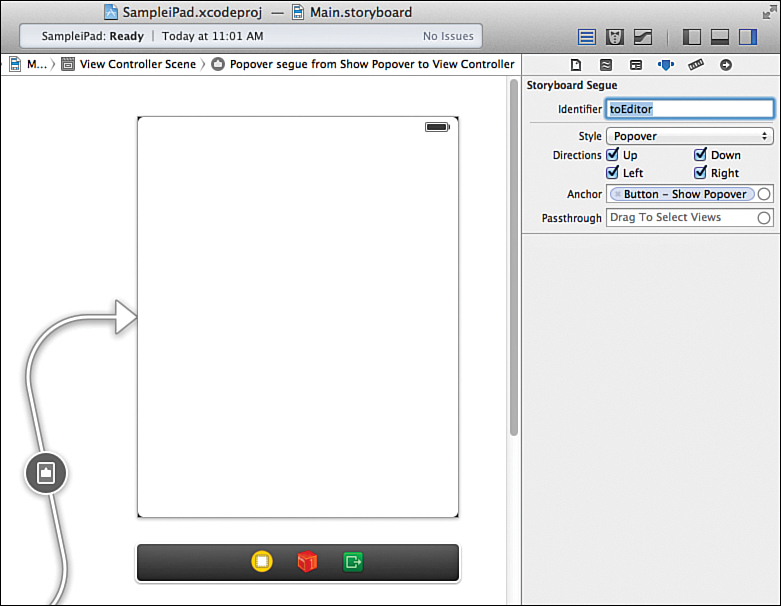
Within the Storyboard Segue settings, start by setting an identifier for the popover segue. Providing an identifier makes it possible to invoke the popover programmatically, something we look into shortly. Next, choose the directions that the popover’s “indicator” (can’t call it an arrow in iOS 7, thanks Apple!) will appear from; this determines where iOS will present the popover on the screen.
For example, if you only allow a presentation direction of left, the popover displays to the right of whatever object is invoking it.
When a popover is displayed, touching outside of it makes it disappear. If you want to exclude certain UI elements from dismissing the popover, just drag from the Passthrough field to those objects in your view.
By default, a popover’s “anchor” is set when you Control-drag from a UI object to a view controller. The anchor is the object that the popover’s arrow will point to.
As with the modal segue covered earlier, you can create “generic” popover segues that aren’t anchored. Control-drag from the originating view controller to the popover content view controller and choose a popover segue when prompted. We discuss how to display one of these generic popover segues from any button in a few minutes.
That’s all you need to do to create a working popover in IB. Unlike a modal view, a popover is automatically dismissed when you touch outside of it, so you don’t even need a single line of code to create a working interactive popover.
Displaying Popovers Manually
In some applications, you’ll find that it makes sense to define a popover that is displayed conditionally. This is needed, in fact, in Hour 15, “Reading and Writing Application Data.” It’s simple enough to add popover segues for each static UI element in Interface Builder, but if you need to display a popover programmatically, you can do so using a very similar method to displaying a modal scene, using the perform-SegueWithIdentifier:sender method:
[self performSegueWithIdentifier:@"myPopoverSegue" sender:myObject];
In this case, as long as a popover is configured with an identifier of myPopoverSegue, it will be displayed. Unfortunately, you might expect that it would point at the myObject object. Nope. The popover segue can still be invoked programmatically, but must be connected to an interface element in Interface Builder in order to work. Read the section “Programming a Popover Display” to learn how to completely customize a popover in code.
Responding to a Popover Dismissal
Unlike modal views and their associated segues, popovers aren’t the easiest thing to deal with in terms of exchanging information. The presentingViewController/presentedView Controller properties aren’t present, so there’s no easy way to grab a reference to the view controller that presented the popover. In addition, by default, there’s no way for the parent view controller to know when the popover has been dismissed.
To detect when a popover has been dismissed and retrieve its contents, we need to conform to the UIPopoverControllerDelegate protocol, which provides us with a method popoverControllerDidDismissPopover that we can implement to capture when the popover disappears. Within this method, we can also grab the content view controller for the popover and access any properties we may need.
If we want to approach the problem from the other side, we can implement the UIViewController viewWillDisappear method within the content view controller. This method is called when the view controller’s content is being removed from display (in the case of a popover, when it is being dismissed). Of course, we still need additional code, such as a property referencing the original view’s view controller to affect any change outside of the popover.
Implementing the UIPopoverControllerDelegate Protocol
In the preceding hour’s lesson, you learned how to implement protocols for alert views and action sheets. Adding the protocol for the popover is much of the same. First, we must declare that one of our classes is going to conform to the protocol. In small projects, this is likely the class that displayed the popover—probably the ViewController class—so ViewController.h would be edited so that its interface line reads as follows:
@interface ViewController : UIViewController <UIPopoverControllerDelegate>
The next step is to update the UIPopoverController that is displaying the popover so that its delegate property references the class implementing the protocol. When working with the alert views, we created the alert view instance, then set the property—no big deal. But now... now... where did we allocate and initialize a popover controller? The answer is nowhere; it happens entirely behind the scenes in Xcode, and IB provides no mechanism to set the delegate for this object.
To set a delegate for a popover, we must access the “hidden” UIPopoverController that Xcode and IB create for us by implementing the prepareForSegue:sender method. If you recall from the introduction to modal segues, this method is automatically called when a segue is about to take place. Using the segue property passed to the method, we can access the source and destination view controllers involved in the transition. When the segue is a popover segue, we can also use this property to grab the UIPopoverController instance that is active behind the scenes. Listing 11.2 shows a potential implementation that could be added to ViewController.m.
LISTING 11.2 Grabbing and Configuring the UIPopoverController
1: - (void)prepareForSegue:(UIStoryboardSegue *)segue sender:(id)sender {
2: if ([segue.identifier isEqualToString:@"toEditorPopover"]) {
3: ((UIStoryboardPopoverSegue *)segue).popoverController.delegate=self;
4: }
5: }
In this implementation, I’ve chosen to first check to make sure that the segue taking place is a popover segue I’ve identified as "toEditorPopover" (line 2); if it is, I know I’m working with a popover. Because this method is called for any segues taking place from one scene to another scene (popovers, modal segues, and so on), it’s important to run the right code for the right segue. If all you have are popovers, however, line 2 is entirely optional.
Line 3 casts the segue object to a subclass of UIStoryboardSegue called UIStoryboard PopoverSegue that is used when popovers are in play. From there, I can access the UIPopoverController instance with the property popoverController and set its delegate property to my current class (self). Now, when the popover is dismissed, the method popoverControllerDidDismissPopover will be called from ViewController.m. All that remains is to implement that method.
The popoverControllerDidDismissPopover method has a single parameter that is passed in: the UIPopoverController object that has been coordinating the display of the popover. From that object, we can access the contentViewController property to get a reference to the popover’s content view controller, then use that to access any properties we need. For example, assume that a popover is displaying a content view controller that is an instance of a class named EditorViewController. Within the EditorViewController class, there is a string property called email that we want to access when the popover is dismissed. A potential implementation of popoverControllerDidDismissPopover is shown in Listing 11.3.
LISTING 11.3 Accessing Properties from the Popover Upon Dismissal
1: - (void)popoverControllerDidDismissPopover:
2: (UIPopoverController *)popoverController {
3: NSString *emailFromPopover;
4: emailFromPopover=((EditorViewController *)
5: popoverController.contentViewController).email;
6: }
First, in line 3, a string (emailFromPopover) is declared so that we can store the reference to the email property in the popover’s content view controller (EditorViewController).
In lines 4–5, the popover’s content view controller is accessed by the contentViewController property and it is cast to the type of EditorViewController. The email property is then assigned to the emailFromPopover string.
As you can see, it isn’t difficult to work with popovers, but it certainly isn’t as straightforward as model segues. Many developers choose to manually create a reference on the popover content view controller that references the original view controller. We do that in the next hour’s lesson.
Now, to complete our tour of popovers, we look at how to manually create a popover in code. Hint: It’s just like manually creating a modal segue, but we also need a UIPopoverController object to manage the display of the popover.
Programming a Popover Display
To create a popover without defining a segue, you must first follow the same setup as you did in the section “Programming a Modal Scene Switch.” Begin by creating a scene and corresponding view controller that will provide the content for your popover. Be sure to set an identifier for the scene’s view controller (refer to Figure 11.9) for details.
Next, your code must allocate and initialize the content view and view controller. Again, this is identical to manually preparing a modal segue and starts creating an object that references the project’s Main.storyboard file:
UIStoryboard *mainStoryboard=[UIStoryboard
storyboardWithName:@"Main" bundle:nil];
Use the storyboard object to instantiate the view controller that you want to use as the popover content view controller using the instantiateViewControllerWithIdentifier method. Assume you’ve created a UIViewController subclass named EditorViewController and set the view controller identifier to "myEditor". You can instantiate a new instance of EditorViewController with the following:
EditorViewController *editorVC=[mainStoryboard
instantiateViewControllerWithIdentifier:@"myEditor"];
The EditorViewController instance, editorVC, is now ready to be displayed as the popover’s content. To do this, we must declare, initialize, and configure a UIPopoverController.
Creating and Configuring the UIPopoverController
Despite the wonders of ARC, there is sometimes a problem with allocating and initializing objects, only to have ARC deallocate them before we need to use them. It doesn’t happen often, but when it does, applications crash, even though the code is technically correct. To get around this, we can declare a strong property (or instance variable) that references the object we need to keep around. This reference prevents ARC from deallocating the object and makes everything work as expected.
Why am I bringing this up now? Because UIPopoverControllers fall victim to this behavior. If you attempt to declare, allocate, configure, and display a UIPopoverController in a single method, your application will crash. Hopefully this is something Apple fixes in the future, but for now, the workaround isn’t too tough.
To create a new UIPopoverController, first declare it as a private property in the class where you will be presenting the popover. I might add this to ViewController.m’s @interface block, for example:
@interface ViewController ()
@property (strong, nonatomic) UIPopoverController *editorPopoverController;
@end
With this line in place, we can create and configure the popover controller without fear of it going away. To allocate and initialize the popover controller itself, use the UIPopover Controller method initWithContentViewController. This gives us a means of telling the popover what content view we want to use. For example, if I want to initialize the popover controller with the editorVC view controller object I instantiated at the start of this section, I use the following:
self.editorPopoverController=[[UIPopoverController alloc]
initWithContentViewController:editorVC];
Next, use the UIPopoverController popoverContentSize property to set the width and height of the popover. This property is actually a structure called CGSize that contains both width and height. Conveniently, a CGSizeMake() function prepares the appropriate structure for us. To set the popover so that it will appear 300 points wide and 400 points tall, you write the following:
self.editorPopoverController.popoverContentSize=CGSizeMake(300,400);
As a final step before displaying the popover, it makes sense to set the delegate of the popover controller so that it automatically calls the popoverControllerDidDismissPopover method of the UIPopoverControllerDelegate method:
self.editorPopoverController.delegate=self;
Displaying the Popover
To display the popover using the popover controller that we’ve painstakingly configured, we must determine a few things about our display. First, what object is the popover going to presented from? Any object that you add to a view is a subclass of UIView, which has a frame property. Popovers are easily configured to appear from to the rectangle determined by an object’s frame; as long as you have a reference to the object displaying the popover, you’re set. If you’re triggering the popover from a UI action, the frame of any object that triggered the action, for example, is retrieved with this:
((UIView *)sender).frame
The incoming sender parameter (added by default when you create actions) contains a reference to the object that triggered the action. Because we don’t really care exactly what type of object it is, we can cast it as a UIView and access the frame property.
Note
You could certainly cast the sender as the object it really is (such as a UIButton), but this implementation gives us the flexibility to have any UI object trigger an action and grab its frame value.
Then, we have determined the popover’s presentation direction. Do this by choosing from these constants:
![]() UIPopoverArrowDirectionAny: The popover can be presented in any direction, giving iOS the greatest flexibility in determining how the popover is displayed.
UIPopoverArrowDirectionAny: The popover can be presented in any direction, giving iOS the greatest flexibility in determining how the popover is displayed.
![]() UIPopoverArrowDirectionUp: The arrow is only displayed pointing up, meaning the popover appears below the object.
UIPopoverArrowDirectionUp: The arrow is only displayed pointing up, meaning the popover appears below the object.
![]() UIPopoverArrowDirectionDown: The arrow is displayed pointing down, and the popover appears above the object.
UIPopoverArrowDirectionDown: The arrow is displayed pointing down, and the popover appears above the object.
![]() UIPopoverArrowDirectionLeft: The arrow is displayed pointing left, and the popover appears to the right of the object.
UIPopoverArrowDirectionLeft: The arrow is displayed pointing left, and the popover appears to the right of the object.
![]() UIPopoverArrowDirectionRight: The arrow is displayed pointing right, and the popover appears to the left the object.
UIPopoverArrowDirectionRight: The arrow is displayed pointing right, and the popover appears to the left the object.
Apple recommends using the UIPopoverArrowDirectionAny constant whenever possible. You can combine multiple presentation directions by separating them with a pipe (|) when displaying the popover. Speaking of which, after choosing the direction, we’re now prepared to do just that.
To present the popover, use the UIPopoverController method presentPopoverFromRect: inView:permittedArrowDirections:animated, like this:
[self.editorPopoverController presentPopoverFromRect:((UIView *)sender).frame
inView:self.view permittedArrowDirections:UIPopoverArrowDirectionAny
animated:YES];
It’s a lot to type, but what it does should be obvious. It presents the popover so that it is presented from the frame of an object referenced by a variable named sender, using any direction. The only parameter that we didn’t discuss is inView. This parameter is a reference to the view that is displaying the popover. Because we’re assumedly showing this from within our ViewController class, it is just self.view.
That’s it. To finish up this hour’s lesson, we create two simple projects that illustrate the use of modal and popover segues.
Using a Modal Segue
We’ve reached your favorite (I hope) part of the hour’s lesson: proving that the things we’ve learned about actually work. In the first tutorial, we demonstrate the use of a second view as an editor for information in the first view. The project shows a screen with an email address and an Edit button. When edit is clicked, a new scene is shown where the address can be changed. Dismissing the editor view updates the address in the original scene. The project is named ModalEditor.
Implementation Overview
To build the project, we start with a Single View Application template, and then add an additional view and supporting view controller class to the project. The first view contains a label that displays the current email address in use, along with an Edit button. The button initiates a segue to second controller, which shows the current address in an editable field, along with a Dismiss button. The Dismiss button updates the email label in the first view and dismisses the modal view. Although we could dismiss the view with a line of code, we’ll make use of the Exit icon and unwind segue so that you can get your hands dirty with this new iOS feature.
Setting Up the Project
Begin by creating a new single-view application named ModalEditor. Remember that we’re going to need to create additional views and view controller classes for the project, so the setup is very important. Don’t skip ahead until you’re sure you’ve done the preliminary work.
Adding the Editor View Controller Class
The view that is displayed to enable editing of the email address will be controlled by a class called EditorViewController that we add to our project. To do so, follow these steps:
1. After you’ve created the project, click the + button at the bottom-left corner of the project navigator, and then click New File.
2. When prompted, choose the iOS Cocoa Touch category and the Objective-C class icon, and then click Next.
3. On the subsequent screen, name the new class EditorViewController, and pick the UIViewController subclass, as shown in Figure 11.17. If you’re building the project on the iPad, be sure to check the Targeted for iPad check box.
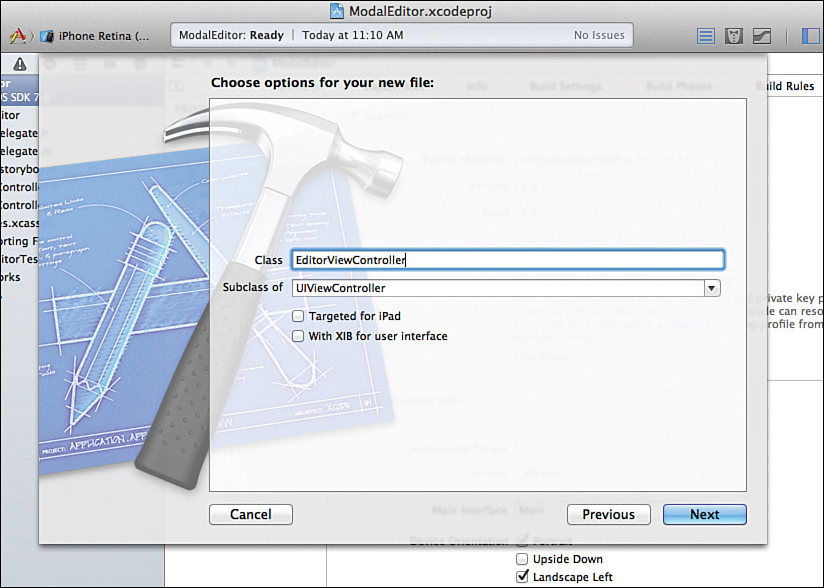
4. Click Next to continue.
5. On the final setup screen, pick the folder that contains your code files as the save location, choose your main project code group from the Group pop-up menu, and then click Create.
The new class will be added to your project. You now need to create an instance of it in the Main.storyboard file.
Adding the New Scene and Associating the View Controller
Open the Main.storyboard file in the IB editor. Display the Object Library (Control-Option-Command-3) and drag a new instance of a view controller into an empty area of the IB editor. Your display should now resemble Figure 11.18.
To associate the new view controller with the EditorViewController class you added to the project, select the View Controller icon in the second scene within the document outline, and then open the Identity Inspector (Option-Command-3). Use the Custom Class drop-down menu to select EditorViewController, as shown in Figure 11.19.

FIGURE 11.19 Associate the view controller in Interface Builder with the EditorViewController class.
After making the association, you’ll notice that the document outline area updates to show one scene named View Controller Scene and another named Editor View Controller Scene. How about we change those into something a bit more friendly?
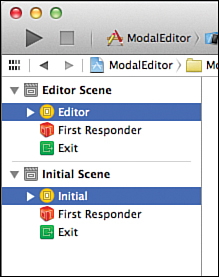
Select the view controller line for the first scene and make sure the Identity Inspector is still onscreen. Within the Document section, set the label for the first view controller to Initial. Repeat this for the second scene, changing its view controller label to Editor. The document outline will now display Initial Scene and Editor Scene, as shown in Figure 11.20. If nothing else, this is easier to type.
Now the structure for the application is in place, let’s think a bit about the connections we’re going to need in the implementation.
Planning the Properties and Connections
This application, as I’m sure you’ve gathered, is being written to demonstrate an iOS feature, not to do anything fancy (like hopping bunnies). The initial scene will have a label that contains that current email address. We will create a property to reference this called emailLabel. It will also have a button to trigger a modal segue, but we don’t need to define any outlets or actions for that.
The editor scene will have a field that will be referenced via a property named emailField. To ensure that the onscreen keyboard’s Done button isn’t ignored when the user finishes typing, we’ll add an action, hideKeyboard, that is connected to emailField.
Clicking a button in the scene will update the email label in the initial scene, by way of an action called updateEditor. This button will also serve double duty and trigger an unwind segue by connecting to the Exit icon in the initial scene.
A label, a field, and a button—those are the only objects that we need to connect to code in this project.
Preparing the View Controller for an Exit
To use the storyboard Exit feature, we must add an action in the view controller that we want to exit/unwind to. In this case, it’s the ViewController class. We’ll name this action exitToHere and we’ll have to create it manually, rather than with drag and drop. Because this method needs to be accessed by other classes, it is a public method, meaning that it is defined in ViewController.h and implemented in ViewController.m.
Update ViewController.h to declare a new method that conforms to the pattern setup for exit/unwind segues described earlier in this hour. We’ll name this exitToHere, so the method declaration (to be added anywhere above the @end line) looks like this:
- (IBAction)exitToHere:(UIStoryboardSegue *)sender;
After you’ve added that, enter the method itself in ViewController.m:
- (IBAction)exitToHere:(UIStoryboardSegue *)sender {
// Execute this code upon unwinding.
}
Note that the method doesn’t really need to do anything; it just needs to be there! Everything is now in place to make all our connections in IB.
Designing the Interface
To create the interfaces for the initial and editor scenes, open the Main.storyboard file and scroll the editor content so that you can focus on creating the initial scene. Using the Object Library, drag two labels and a button into the view.
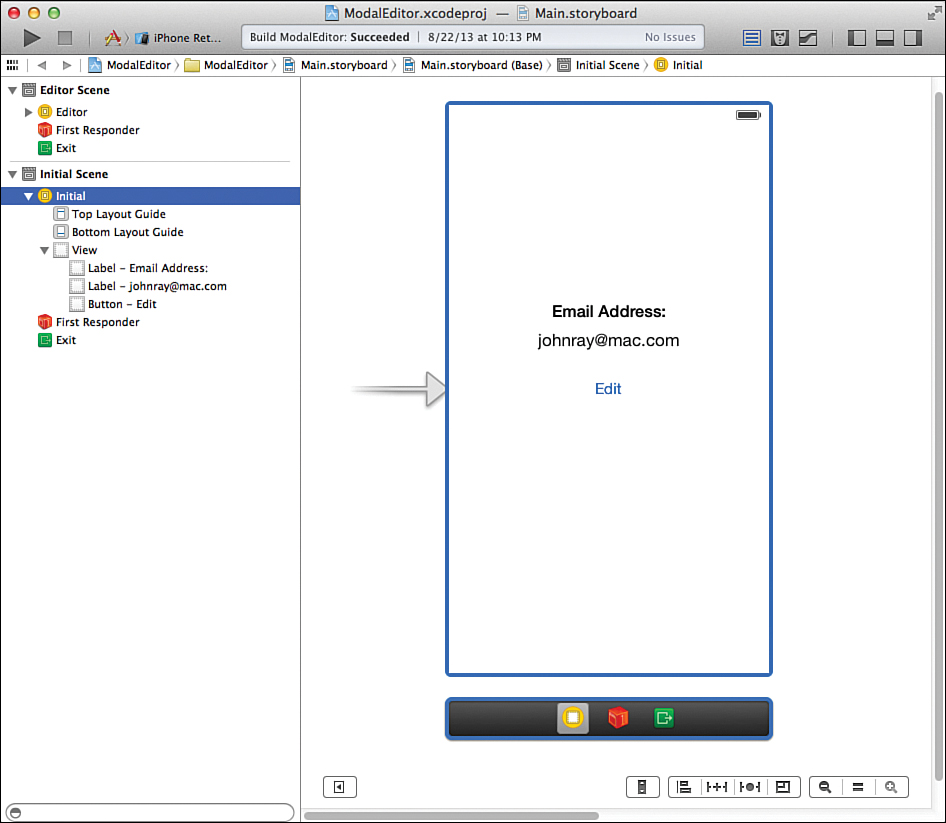
Set one of the labels to read Email Address: and position it near the top center of the screen. Beneath it, place the second label, with its content set to your personal email address. Stretch the second field so that its edges touch the side guides of the view (just in case we encounter a long email address). Finally, place the Edit button underneath the two labels. Use the Attributes Inspector (Option-Command-4) to set the style for the text to anything you want. My implementation of the initial scene is shown in Figure 11.21.
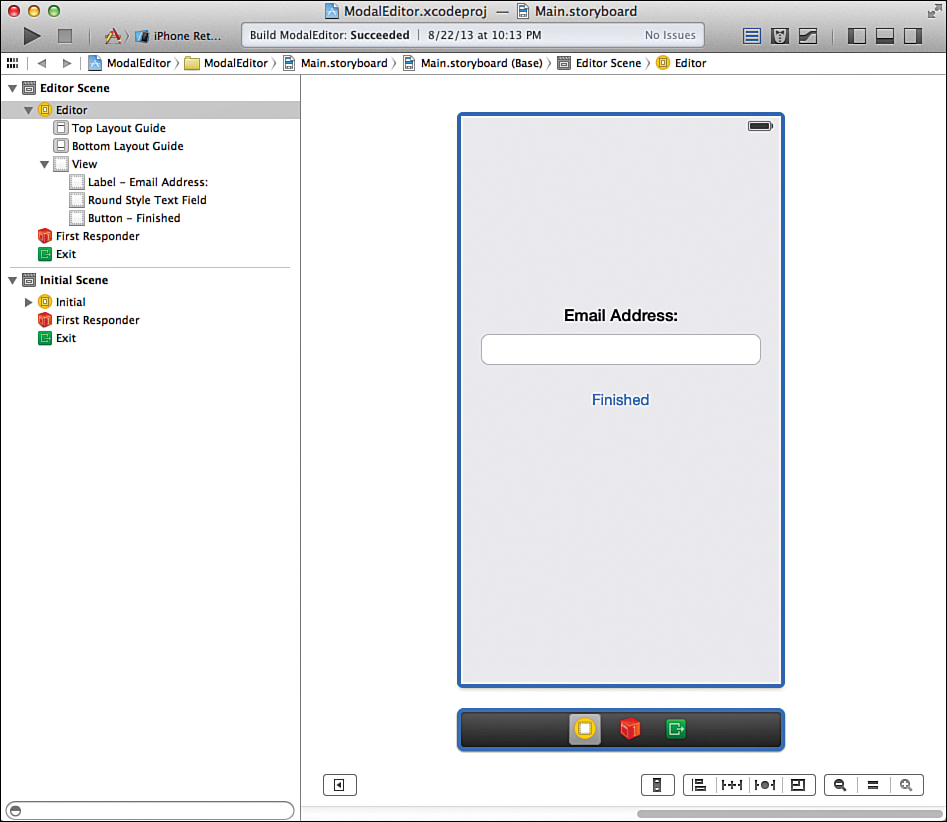
Next, turn your attention to the editor scene. This scene will look very similar to the first scene, but with an empty text field (UITextField) replacing the label that held the email address. This scene also contains a button, but rather than saying Edit, it should read Finished, as shown in my final implementation (see Figure 11.22).
With both scenes built, its time to start making the connections that will pull everything together. Let’s start by defining the segue.
Creating the Modal Segue
To create the segue from the initial view to the editor view, Control-drag from the Edit button to the onscreen representation of the editor in Interface Builder, or to the editor scene’s view controller line in the document outline (now labeled Editor), as shown in Figure 11.23.
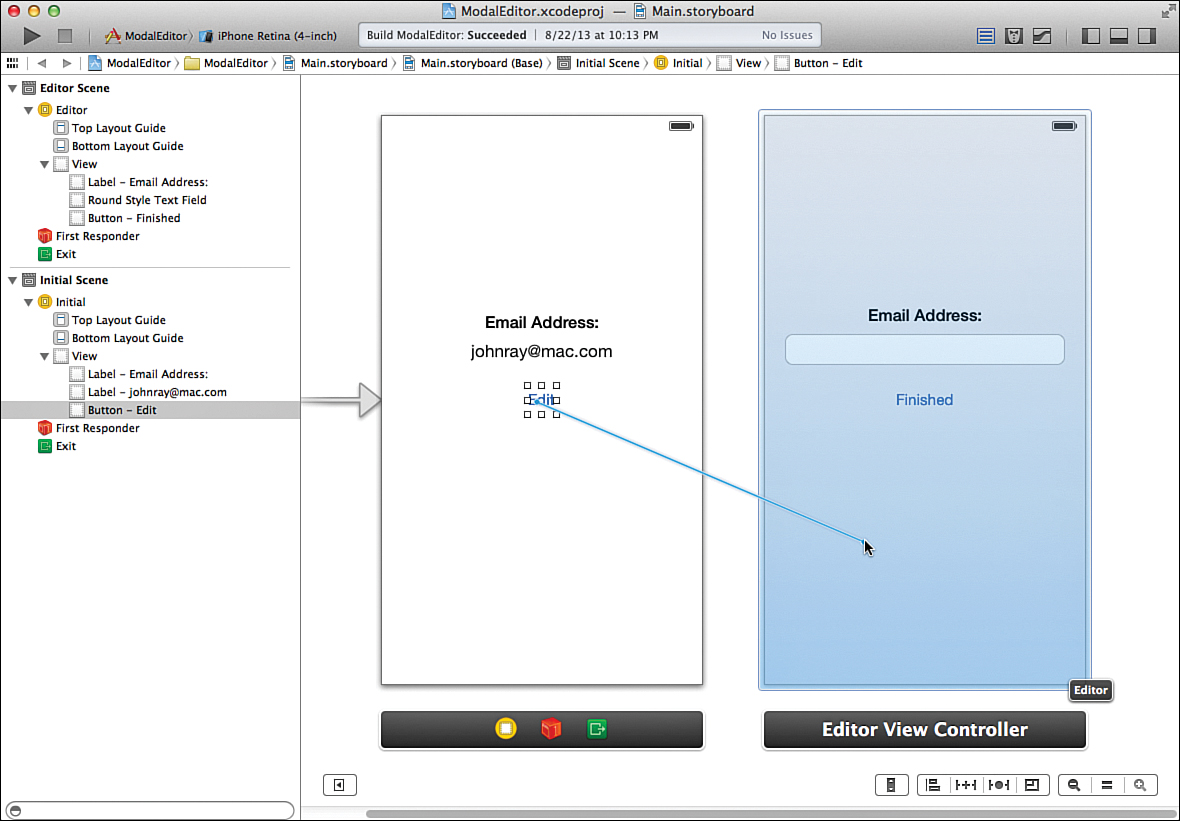
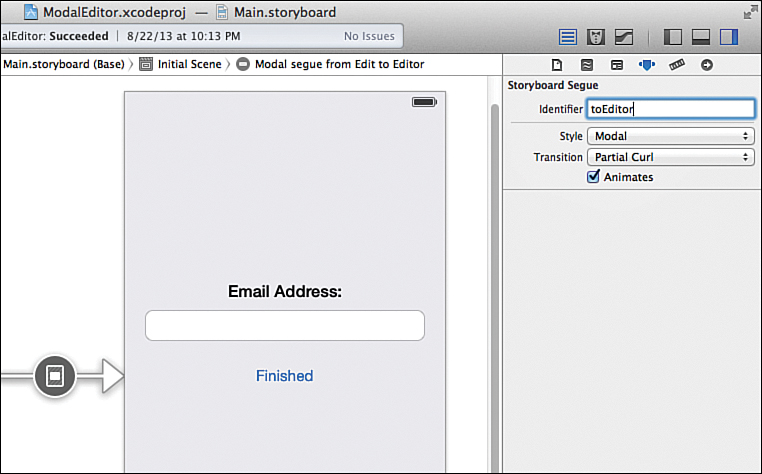
When prompted for the storyboard segue type, choose Modal. You will see a line “Modal segue from Edit to Editor” appear in the initial scene within the document outline. Select this line and open the Attributes Inspector (Option-Command-4) to configure the segue.
Although it is purely optional for a simple project like this, provide an identifier for the segue, such as "toEditor". Next, choose the transition style, such as Partial Curl. If you’re building this on the iPad, you can also set a presentation style. Figure 11.24 shows the settings for my modal segue.
Unwinding Back to the Initial Scene
The storyboard has a segue configured to go from the initial scene to the editor scene, but has no way to get back. For this, we’ll add an unwind segue by Control-dragging from the Finished button in the editor scene to the Exit icon in the Initial scene (you can target the Exit icon in either the document outline or in the dock underneath the scene layout).
Create the connection now. When you finish dragging, you’ll be prompted to choose the method to execute when the exit finishes. There is only one option, exitToHere, so choose that, as demonstrated in Figure 11.25.
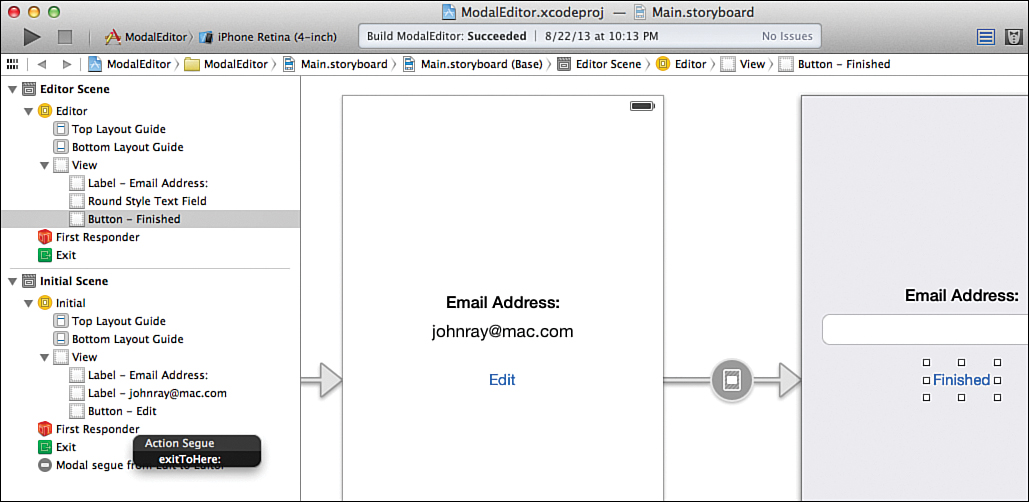
Notice that a new unwind segue is added to your editor scene: Unwind segue from Finished to Exit. Your application now has what it needs to transition between scenes, but we still need to make the appropriate connections from the scene’s view objects (the label, field, and button) to outlets/actions in their view controllers.
Creating and Connecting the Outlets and Actions
I know what you’re thinking: “I’ve done this a million times, I’ve only got three items to connect, what’s the big deal?” Although I have every faith you’ll make the appropriate connections, remember that you’re dealing with two distinct view controllers now. In this project, the ViewController class will share a public property with the EditorViewController class, but the EditorViewController class won’t need to share anything back—so its properties and methods will be private.
In other words, your outlets for ViewController should be in ViewController.h, and your outlets and actions for EditorViewController will be private and placed in the EditorViewController.m file. If you’re not seeing what you should be seeing in the assistant editor, use the drop-down menus that appear to choose the file you should be editing.
Adding the Outlets
Begin by selecting the label in the initial scene that contains your email address, and then switch to the assistant editor. Control-drag from the label to just below the @interface line in ViewController.h. When prompted, create a new outlet for a public property named emailLabel. One down, one to go.
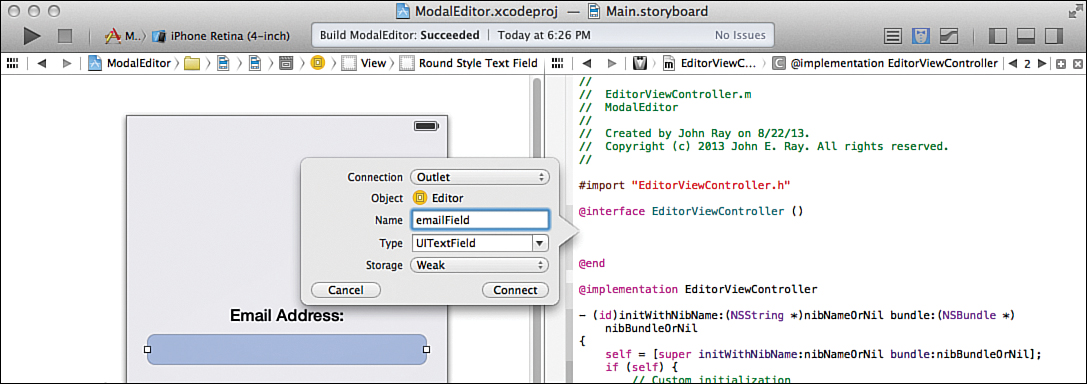
Move to the editor scene and select the UITextField. The assistant editor should update to show the EditorViewController.m file on the right. Control-drag from the field to EditorViewController.m, targeting a spot just below the @interface line. Name this outlet emailField, as shown in Figure 11.26.
Adding the Actions
There are two private actions to add. With the assistant editor still active, Control-drag from the Finished button in the editor scene to below the property definition in EditorViewController.m. When prompted, add a new action named updateEditor.
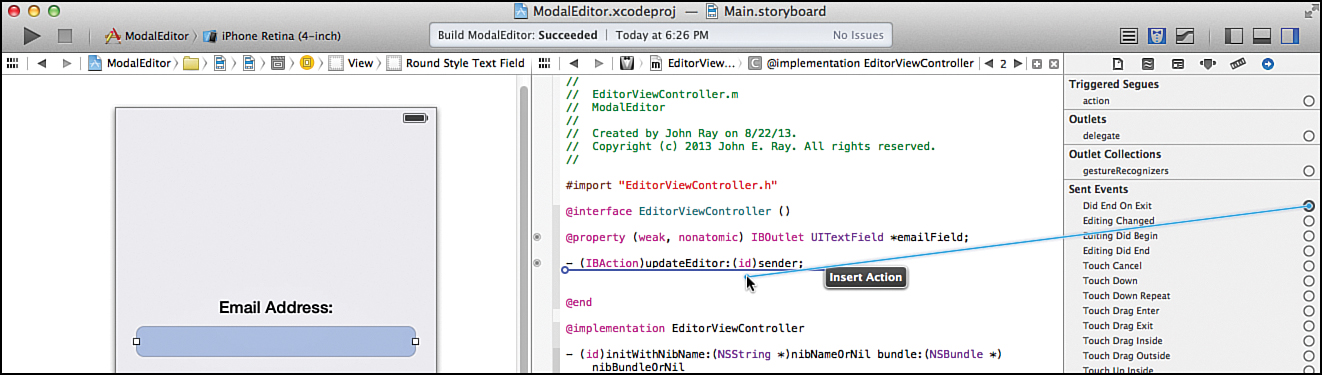
Next, select the field in the editor scene and display the Connections Inspector (Option-Command-6). Drag from the circle beside the “Did End on Exit” Sent Event to the just under the previous action you added, as shown in Figure 11.27. Name the new action hideKeyboard.
You’re done with the interface and connections. Let’s finish the implementation logic.
Implementing the Application Logic
You’re in the home stretch now. The application logic is pretty easy to understand. When the user displays the editor scene, the application should grab the content from the existing emailLabel property on the source view controller and place it in the editor’s emailField text field. When the user clicks Finished, the application should reverse the process, updating emailLabel with the content of the emailField text field. We initiate both of these changes from the EditorViewController class where we can access the initial scene’s view controller through the presentingViewController property.
Before we can do anything, however, we need to make sure that the EditorViewController class knows about the properties in the ViewController class. To do this, EditorView Controller.h should import the ViewController.h interface file. Add the following line after the existing #import statement in EditorViewController.h:
#import "ViewController.h"
Now we’re all set to implement our remaining three to four (literally) lines of code. To set the value of emailField when the editor scene first loads, we can update the EditorViewController class method viewDidLoad, as shown in Listing 11.4.
LISTING 11.4 Populating the Field with the Current Email Address
- (void)viewDidLoad
{
[super viewDidLoad];
self.emailField.text=
((ViewController *)self.presentingViewController).emailLabel.text;
}
This implementation sets the text property of the editor scene’s emailField to the text property of the emailLabel public property in the initial view controller. I can access the initial scene’s view controller through the current view’s presentingViewController, although I have to typecast it as a ViewController object; otherwise it wouldn’t know about the properties (emailLabel) that the ViewController class makes available.
Next, we need to implement the updateEditor method to do exactly the reverse of this. Update the updateEditor method stub with the full implementation, shown in Listing 11.5.
LISTING 11.5 Setting the Initial Scene’s Label to the Editor Scene’s Field
- (IBAction)updateEditor:(id)sender {
((ViewController *)self.presentingViewController).emailLabel.text=
self.emailField.text;
}
As you can see, this is exactly the reverse of what we did to set the default value for the field (see Listing 11.4).
Hiding the Keyboard
Finally, edit EditorViewController.m to include the implementation of hideKeyboard. Update the method to ask the emailField to resign its first responder status, thus hiding the keyboard, as shown in Listing 11.6.
LISTING 11.6 Hiding the Keyboard When Its Done Key Is Pressed
- (IBAction)hideKeyboard:(id)sender {
[self.emailField resignFirstResponder];
}
That’s it. There was more setup involved in this project than there was code.
Building the Application
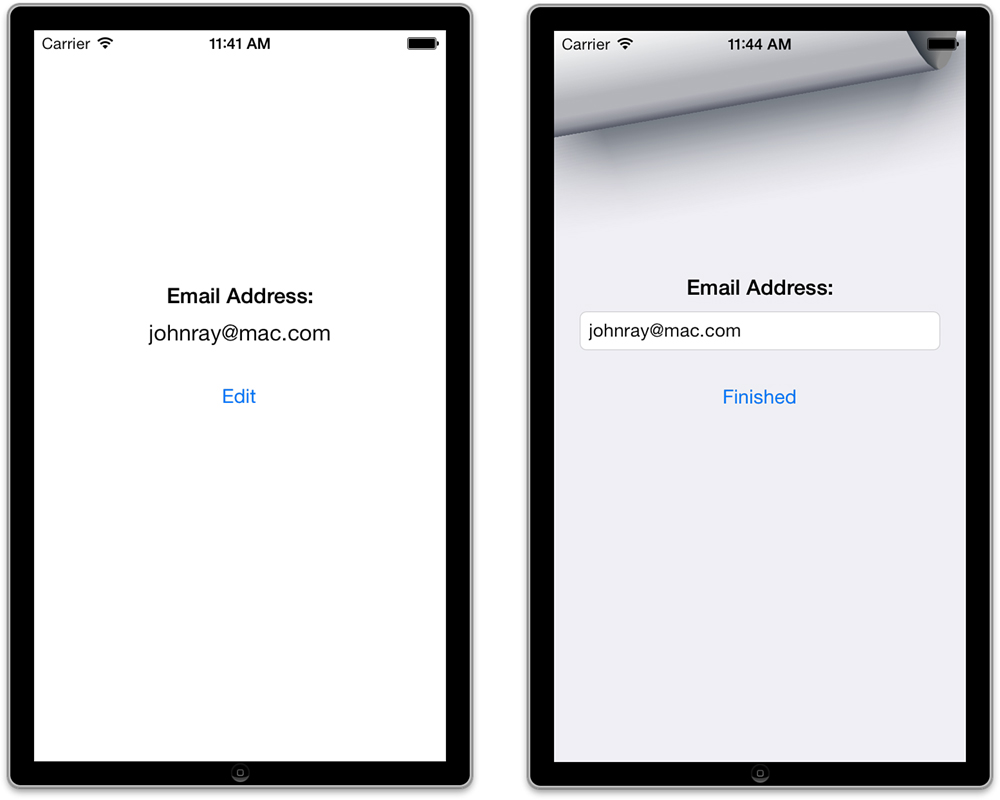
Run the application and give it a thorough workout (as much as you can do in an application that has two buttons and a field). The end result, which took us three actual lines of functional code, is an application that switches between scenes and exchanges data between them, as shown in Figure 11.28.
Using a Popover
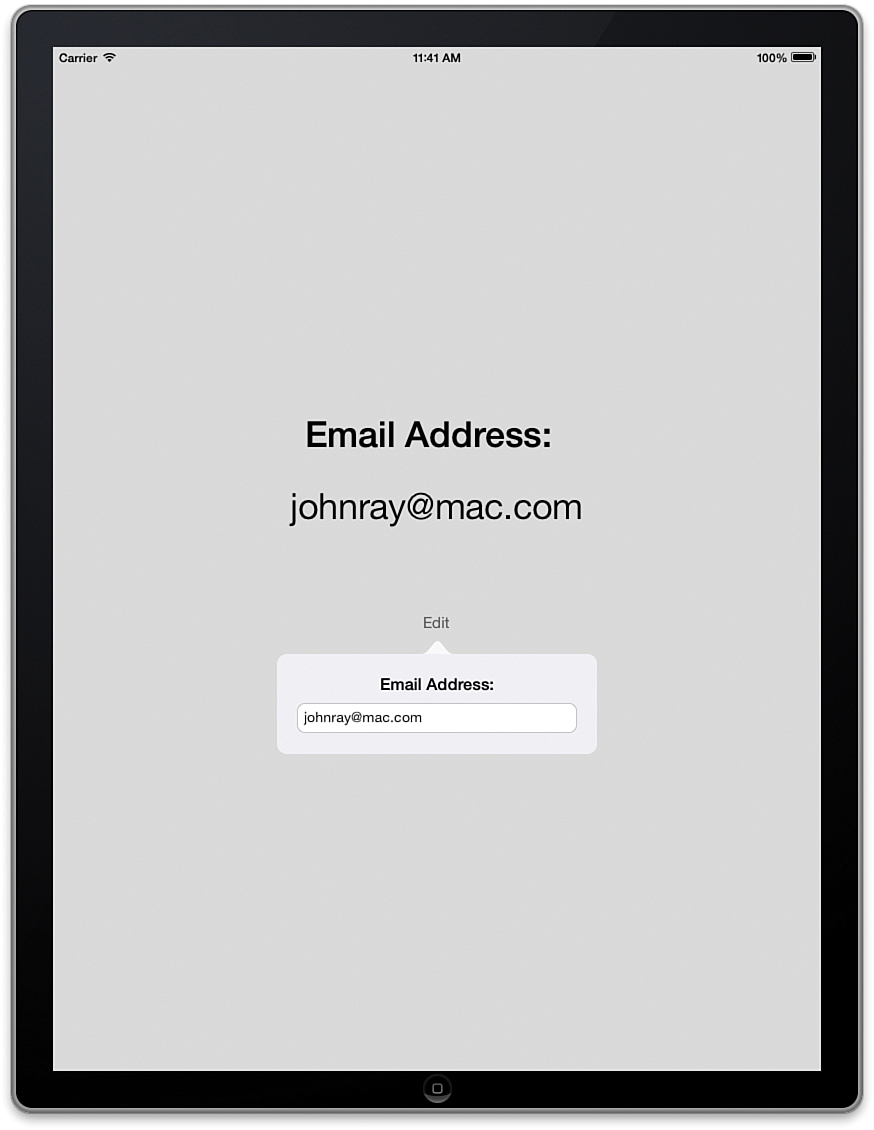
This hour’s second tutorial is less a complete tutorial, and more a variation of the ModalEditor tutorial you just completed. The project performs the same function as the previous project, but instead of the editor being displayed in a modal view, it is shown in a popover, as shown in Figure 11.29. When the user dismisses the popover, the content in the initial view updates; there is no need for a Finished button here.
Almost all of the setup is identical, with the code implementation being the primary difference. For that reason, we’re going to approach it a bit differently and just tell you what to do differently until you reach the coding.
Setting Up the Project
Create a new single-view iOS project named PopoverEditor. The project is using popovers, so it must target the iPad, not the iPhone. After creating the new project, follow the same steps of setting up an EditorViewController class and adding a new scene that is associated with the class. Set labels for the view controllers so that the scenes, once again, are labeled Initial Scene and Editor Scene in the document outline.
Planning the Properties and Connections
This version of the project requires the same two outlets: a UILabel in the initial scene named emailLabel and a UITextField in the editor scene named emailField. This time, however, emailLabel will be private, and emailField will be public. This is because the ViewController class will update itself with the value from EditorViewController, rather than the other way around.
Another big difference is that the editor scene will not require a Finished button (or an unwind segue) to close the popover. The user just touches outside the popover to make it disappear and enact the changes that they made in the editor.
Designing the Interface
Create the initial scene interface exactly as you did in the ModalEditor project. When you get to the editor scene, however, leave out the Finished button, and position the text field and accompanying label in the very upper-left corner of the editor view. Remember, this will be displayed as a popover, so its size is going to change dramatically after the popover segue is defined.
Creating the Popover Segue
Control-drag from the Edit button in the initial scene to the to onscreen representation of the editor in IB, or to the editor scene’s view controller line in the document outline (labeled Editor). This time, when prompted for the storyboard segue type, choose Popover. A line labeled “Popover segue from Edit to Editor” appears in the initial scene within the document outline. Select this line and open the Attributes Inspector (Option-Command-4) to configure the popover segue.
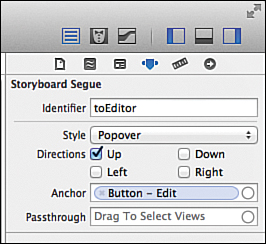
Exercise good coding practices by providing an identifier for the segue, such as "toEditor". Next, choose the directions the popover can present itself from. I’ve set mine to only "Up", meaning that the popover will have to be displayed below the button that opens it. All other settings can stay at their default values. Figure 11.30 shows the configuration for my popover segue.
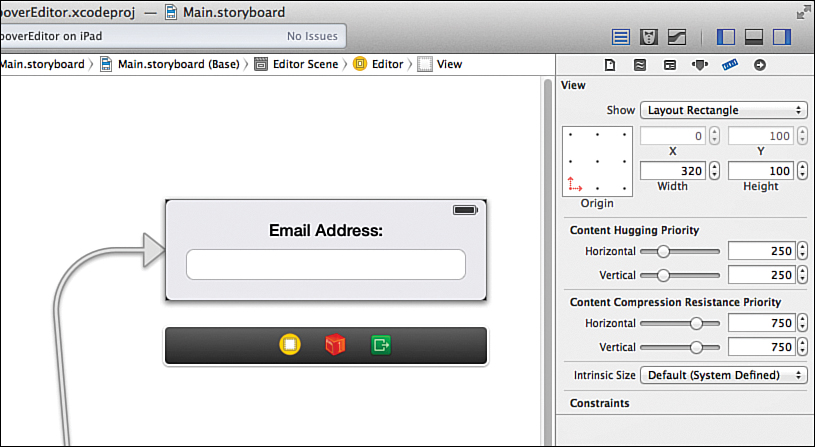
Setting the Popover View Size
After you create the popover segue, select the editor scene view that will provide content to the popover, and switch to the Size Inspector (Option-Command-5). Set a width of around 320 points and a height of 100 points, as shown in Figure 11.31. Adjust the content of the (now tiny) editor view so that it is nicely centered.
Creating and Connecting the Outlets
Connect the label containing your email address to a private outlet in ViewController.m named emailLabel and the field in the editor scene to a public outlet called emailField in EditorViewController.h. Connect the Did End on Exit event from the field to a new private action called hideKeyboard in EditorViewController.m. No button connections are required this time around.
The popover interface and connections are now completed. Unfortunately, the application logic is really very different from the ModalEditor project, because it isn’t as straightforward to exchange information between a popover’s content scene and the scene that displayed it.
Caution: Public Privacy
This is the first time we’ve used two classes in a project, so don’t worry if you’re feeling a bit confused about what goes where. The rules are as follows:
If something (a property or method) needs to be shared with another class, it is considered public. Public properties, actions, methods, and so on are defined in the interface file (.h) and implemented in the implementation file (.m).
If something doesn’t need to be shared, it is private. Private properties, actions, methods, and so on are defined and implemented within the implementation file (.m).
Implementing the Application Logic
In the last project, the EditorViewController object was responsible for getting and setting a public property in the ViewController object. In this implementation, however, it is easier for the ViewController object to get and set information in the popover’s content view controller (an instance of EditorViewController). This means that the ViewController class needs to import the interface file for the EditorViewController class. Switch to the standard editor and add the following line after the existing #import statement in ViewController.h:
#import "EditorViewController.h"
Recall that our first task is to populate the editor’s emailField with the current text in the initial scene’s emailLabel. To do this, we access the UIPopoverController’s contentViewController property (an instance of the EditorViewController class) in the prepareForSegue:sender method.
Implement the method shown in Listing 11.7 in your ViewController.m file.
LISTING 11.7 Accessing the Popover’s contentViewController
1: - (void)prepareForSegue:(UIStoryboardSegue *)segue sender:(id)sender {
2: UIStoryboardPopoverSegue *popoverSegue;
3: popoverSegue=(UIStoryboardPopoverSegue *)segue;
4:
5: UIPopoverController *popoverController;
6: popoverController=popoverSegue.popoverController;
7: popoverController.delegate=self;
8:
9: EditorViewController *editorVC;
10: editorVC=(EditorViewController *)popoverController.contentViewController;
11: editorVC.emailField.text=self.emailLabel.text;
12: }
Earlier this hour, I talked through the process of getting ahold of the UIPopoverController in charge of managing a popover that is created in Interface Builder, and that’s exactly what we do here. Line 2 declares an instance of a UIStoryboardSegue called popoverSegue. Line 3 casts the incoming segue as a UIStoryboardPopoverSegue and stores it in popoverSegue so that we can use it to get at the UIPopoverController object.
Line 5 declares a UIPopoverController called popoverController. This is assigned to the popoverController property in the popoverSegue object in line 6. We now have a variable dedicated to accessing the UIPopoverController. We use this to our advantage in line 7 to set a delegate for the popover controller. This enables us to implement the UIPopoverControllerDelegate protocol and respond to the popover being dismissed.
Line 9 declares a variable, editorVC, that references the EditorViewController contained in the popover, and line 10 assigns the popoverController’s contentViewController (cast to the EditorViewController object that we know it is) to editorVC.
Last but not least (deep breath), line 11 sets the contents of the editor view controller’s emailField property to the initial scene’s emailLabel text public property.
Caution: Isn’t There a Less-Verbose Way to Do This?
In the example earlier in this hour, I used a single line of code to set the UIPopover Controller’s delegate to "self". Could the same be done here? Yes. Technically, I could have written two lines of code to set the delegate and set the contents of the text field. Those two statements, however, would have been spanned several lines in the editor and contained multiple typecasting statements.
In other words, it would have been impossible to read. This code, although verbose and less than pretty, is much easier to follow than the alternative.
Interestingly enough, if you only need to access the popover’s content view controller, you can ignore the popover controller altogether. In the prepareForSegue:sender method, you can refer to the popover’s content view controller with segue.destinationViewController.
The PopoverEditor project is now approaching completion. It can run and copy the contents of the text label to the text field in the popover, but upon dismissing the popover, changes will not be copied back. To finish the project, we need to implement the UIPopoverControllerDelegate protocol to deal with the event of the user dismissing the popover.
Handling the Popover Dismissal
When the user dismisses the popover, we will be able to grab an instance of the popover content view controller (EditorViewController) in the popoverControllerDidDismissPopover method—if we conform to the popover controller delegate protocol. To state our intention to conform, edit the ViewController.h @interface line to include the protocol:
@interface ViewController : UIViewController <UIPopoverControllerDelegate>
Next, implement the popoverControllerDidDismissPopover method, as shown in Listing 11.8.
LISTING 11.8 Handling the Dismissal of the Popover
1: - (void)popoverControllerDidDismissPopover:
2: (UIPopoverController *)popoverController {
3: NSString *newEmail=((EditorViewController *)
4: popoverController.contentViewController).emailField.text;
5: self.emailLabel.text=newEmail;
6: }
Line 3 declares a string, newEmail, that is assigned to the emailField’s text, accessed through the popoverController’s contentViewController property. (The popover controller is provided a parameter to the method, so we don’t have to go digging for it as we did in Listing 11.7.)
Line 4 assigns the initial scene’s emailLabel to the newEmail string.
Hiding the Keyboard
Don’t forget to react to the Done button being pressed on the keyboard by implementing the hideKeyboard method in EditorViewController.m. The implementation is exactly the same as the modalEditor version (see Listing 11.6)—just a single line of code in the method:
[self.emailField resignFirstResponder];
Building the Application
You’ve built a popover-enabled application. Try running PopoverEditor and changing the email address a few times. While contrived, I hope this project gave you a few ideas about how you might use popovers to enable a user to perform actions within the context of a single scene (rather than jumping around between completely independent views).
I also want to take this second to note that if you find the popover approach to exchanging data between views cumbersome, you’re not alone. In the next hour’s lesson, we change things up a bit and make popovers work a bit more like a typical modally displayed scene.
Further Exploration
Let me be clear: Storyboards and segues are new and evolving. In fact, many developers are still using the previous version of Apple’s interface technology (NIB files) in their projects. I fully expect that Apple will expand and refine storyboards over the next few releases of Xcode, and I hope they address some of the shortcomings (popover delegates, anyone?) of the current interface.
In the meantime, read the View Controller Programming Guide for iOS; it will give you a good background on views, view controllers, and how they can be manipulated in code. It’s a very long guide, so you may want to jump around through the sections that interest you the most. The View Controller Catalog for iOS is another great reference and will walk you through the different view controller types (such as the modal controllers and popovers you’ve used this hour.)
Summary
This hour’s lesson was, yes, I know, longer than an hour. The topics that it introduced—multiple scenes and segues—are very important aspects of iOS development that can take your apps from being simple single-view “utility”-style programs to full-featured software. You learned how to visually and programmatically create modal segues, handle interactions between scenes, and “unwind” to previous scenes via the storyboard exit. We also explored the iPad-specific popover UI element and how it can be created and displayed from a segue, or via code.
Something to keep in the back of your mind while you develop is that while visually created segues are great, and handle many different situations, they might not always be the best approach. Programmatically switching between views and displaying popovers gives us a flexibility that we don’t have with preset segues in IB. If you find yourself struggling to make something work in IB, consider doing it through code.
Q&A
Q. Why doesn’t iOS just provide windows?
A. Can you imagine managing windows with just your fingers? The iOS interface is designed to be touched. It is not meant to model a typical desktop application environment, which was built around the mouse.
Q. What should I use in place of a popover on the iPhone?
A. Depending on the size of the content, you could simulate a popover by programmatically displaying a UIView in your main view. In most cases, you can just present the content in a modally displayed scene.
Workshop
Quiz
1. Modally displayed scenes can only be used as alerts. True or false?
2. Modally displayed scenes can be triggered and dismissed without writing code. True or false?
3. All presentation and transition styles are compatible with one another. True or false?
Answers
1. False. Although alert views are a modal view, any scene can be presented modally.
2. False. You can display a scene modally without code, but not dismiss it. Whether you dismiss the view via dismissViewControllerAnimated:completion or via an exit, you’ll need some code.
3. False. Some transitions will not work with some presentation styles. The full guidelines can be found in the developer documentation.
Activities
1. Return to a project in an earlier hour and implement a “configuration” interface by way of a modal view or popover.
2. Update the tutorials in this lesson to programmatically create and display a scene and popover.