Hour 15. Reading and Writing Application Data
,What You’ll Learn in This Hour:
![]() Good design principles for using application preferences
Good design principles for using application preferences
![]() How to store application preferences and read them later
How to store application preferences and read them later
![]() How to expose your application’s preferences to the Settings application
How to expose your application’s preferences to the Settings application
![]() How to store data from your applications
How to store data from your applications
Most substantial applications, whether on a computer or mobile device, allow users to customize their operation to their own needs and desires. You have probably cursed an application before, only to later find a setting that removes the unholy annoyance, and you probably have a favorite application that you’ve customized to your exact needs so that it fits like a well-worn glove. In this hour, you learn how your iOS application can use preferences to allow the user to customize its behavior and how, in general, the user can store data on iDevices.
Note
Apple uses the term application preferences, but you might be more familiar with other terms such as settings, user defaults, user preferences, or options. These are all essentially the same concept.
iOS Applications and Data Storage
The dominant design aesthetic of iOS applications is for simple single-purpose applications that start fast and do one task quickly and efficiently. Being fun, clever, and beautiful is an expected bonus. How do application preferences fit into this design view?
You want to limit the number of application preferences by creating opinionated software. There might be three valid ways to accomplish a task, but your application should have an opinion on the one best way to accomplish it and then should implement this one approach in such a polished and intuitive fashion that your users instantly agree that it’s the best way. Leave the other two approaches for someone else’s application. It might seem counterintuitive, but a much bigger market exists for opinionated software than for applications that try to please everyone.
This might seem like odd advice to find in a chapter about application preferences, but I’m not suggesting that you avoid preferences altogether. There are some very important roles for application preferences. Use preferences for the choices your users must make, rather than for all the choices they could possibly make. For example, if you are connecting to the application programming interface (API) of a third-party web application on behalf of your user and the user must provide credentials to access the service, this is something the user must do, not just something users might want to do differently. So, it is a perfect case for storing as an application preference.
Another strong consideration for creating an application preference is when a preference can streamline the use of your application (for example, when users can record their default inputs or interests so that they don’t have to make the same selections repeatedly). You want user preferences that reduce the amount of onscreen typing and taps that it takes to achieve the user’s goal for using your application.
After you decide a preference is warranted, you have an additional decision to make. How will you expose the preference to the user? One option is to make the preference implicit based on what the user does while using the application. An example of an implicitly set preference is returning to the last state of the application. For example, suppose a user flips a toggle to see details. When the user next uses the application, the same toggle should be flipped and showing details.
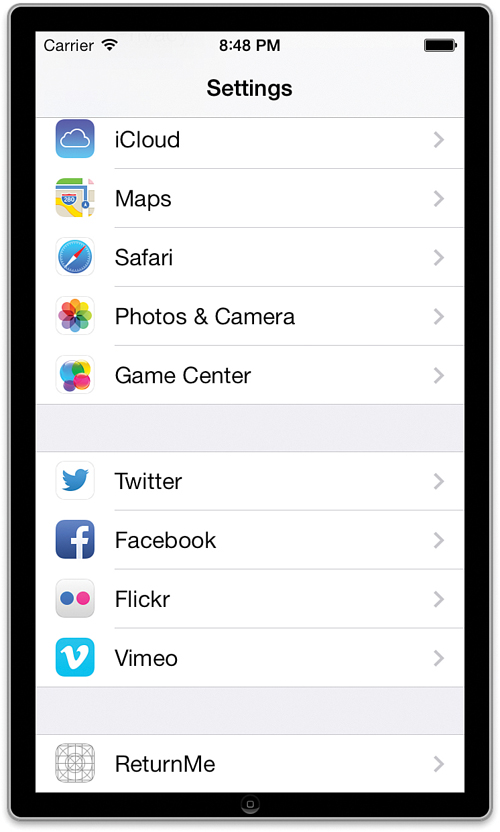
Another option is to expose your application’s preference in Apple’s Settings application, shown in Figure 15.1. The Settings application is built in to iOS. It provides a single place to customize a device’s operation. From the Settings application, you can customize everything from the hardware, built-in applications from Apple, and third-party applications.
A settings bundle lets you declare the user preferences of your application so that the Settings application can provide the user interface (UI) for editing those preferences. There is less coding for you to do if you let Settings handle your application’s preferences, but less coding is not always the dominant consideration. A preference that is set once and rarely changes, such as the username and password for a web service, is ideal for configuring in Settings. In contrast, an option that the user might change with each use of your application, such as the difficulty level in a game, is not appropriate for Settings.
Caution: Simplicity Is Key
Users will be annoyed if they have to repeatedly exit your application, launch Settings to change the preference, and then relaunch your application. Decide whether each preference belongs in the Settings application or within your own application. Sometimes it might even be wise to put them in both places for ease of access.
Also keep in mind that the UI that Settings can provide for editing your application preferences is limited. If a preference requires a custom interface component or custom validation code, it can’t be set in Settings. Instead, you must set it from within your application.
Data Storage Approaches
Once you decide that your application needs to store information, your next step is to decide how it is done. There are many, many ways for iOS applications to store information, but we focus on three approaches in this hour:
![]() User defaults: Settings that are stored on a per-application basis, typically without requiring user intervention
User defaults: Settings that are stored on a per-application basis, typically without requiring user intervention
![]() Settings bundles: Provide an interface for configuring an application through the iOS settings application
Settings bundles: Provide an interface for configuring an application through the iOS settings application
![]() Direct file system access: Enables you to write and read files in your application’s portion of the iOS file system
Direct file system access: Enables you to write and read files in your application’s portion of the iOS file system
Each approach offers its own pros and cons, and so you have to determine which is appropriate for your own applications. Before we start using them, though, let’s review a bit more detail about how they work and what they are usually used for.
User Defaults
Application preferences is Apple’s name for the overall preference system by which applications can customize themselves for the user. The application preferences system takes care of the low-level tasks of persisting preferences to the device, keeping each application’s preferences separate from other applications’ preferences, and backing up application preferences to the computer via iTunes so that users do not lose their preferences if the device needs to be restored. Your interaction with the application preferences system is through an easy-to-use API that consists mainly of the NSUserDefaults singleton class.
The NSUserDefaults class works similarly to the NSDictionary class. The main differences are that NSUserDefaults is a singleton and is more limited in the types of objects it can store. All the preferences for your application are stored as key/value pairs in the NSUserDefaults singleton.
Note
A singleton is just an instance of the Singleton pattern, and a pattern in programming is just a common way of doing something. The Singleton pattern is fairly common in iOS, and it is a technique used to ensure that there is only one instance (object) of a particular class. Most often, it is used to represent a service provided to your program by the hardware or operating system.
Writing and Reading User Defaults
All access to application preferences begins by getting a reference to your application’s NSUserDefaults singleton:
NSUserDefaults *userDefaults = [NSUserDefaults standardUserDefaults];
Values can then be written to and read from the defaults database by specifying the type of data being written and a key (an arbitrary string) that will be used to access it later. To specify the type, you use one of six different functions (depending on the type of data you want to store):
setBool:forKey
setFloat:forKey
setInteger:forKey
setObject:forKey
setDouble:forKey
setURL:forKey
The setObject:forKey function can be used to store NSString objects, NSDates, NSArrays, and other common object types.
For example, to store an integer value under the key "age" and a string using the key "name", you could use code that looks like this:
[userDefaults setInteger:10 forKey:@"age"];
[userDefaults setObject:@"John" forKey:@"name"];
When you write data to the defaults database, it isn’t necessarily saved immediately. This can lead to issues if you assume that your preferences are stored but iOS hasn’t gotten around to it yet. To ensure that all data is written to the user defaults, you use the synchronize method:
[userDefaults synchronize];
To read these values back into the application at a later time, you use a set of functions that read and return the value or object given their key. For example:
float myAge = [userDefaults integerForKey:@"age"];
NSString *myName = [userDefaults stringForKey:@"name"];
Unlike the “set” storage methods, retrieving values requires specific methods for strings, arrays, and so on so that you can easily assign the stored objects to a particular type object when you need to access them. Choose from arrayForKey, boolForKey, dataforKey, dictionary ForKey, floatForKey, integerForKey, objectForKey, stringArrayForKey, double ForKey, or URLForKey to retrieve your data into a usable object.
Settings Bundles
Another option for dealing with application preferences is through the use of settings bundles. Settings bundles use the underlying user defaults system that you just learned about, but they provide a UI that is managed through the iOS Settings application.
What makes settings bundles attractive from the development standpoint is that they are created entirely in Xcode’s plist editor. There is no UI design or coding—just defining the data you intend to store and the keys that it is stored under.
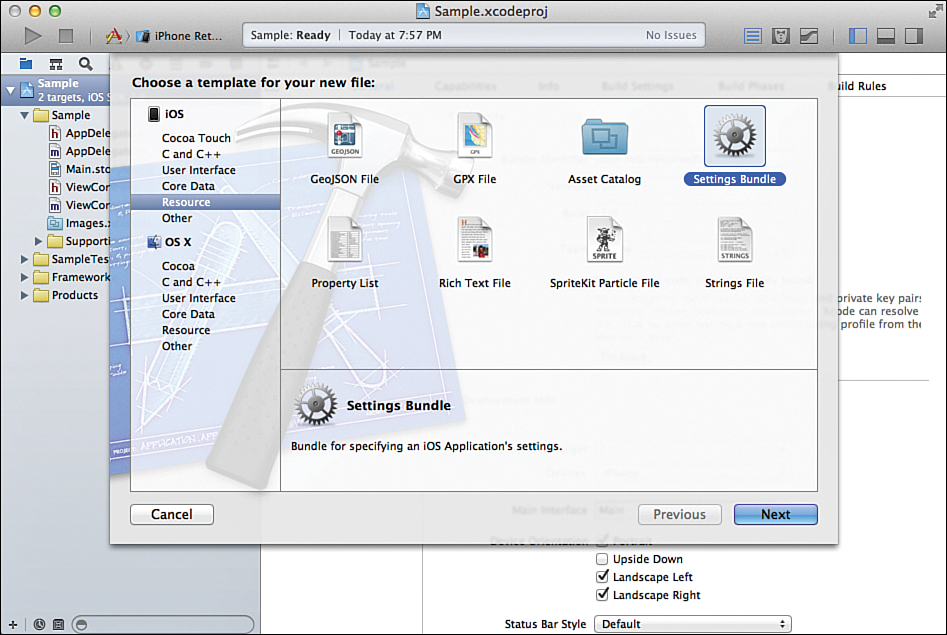
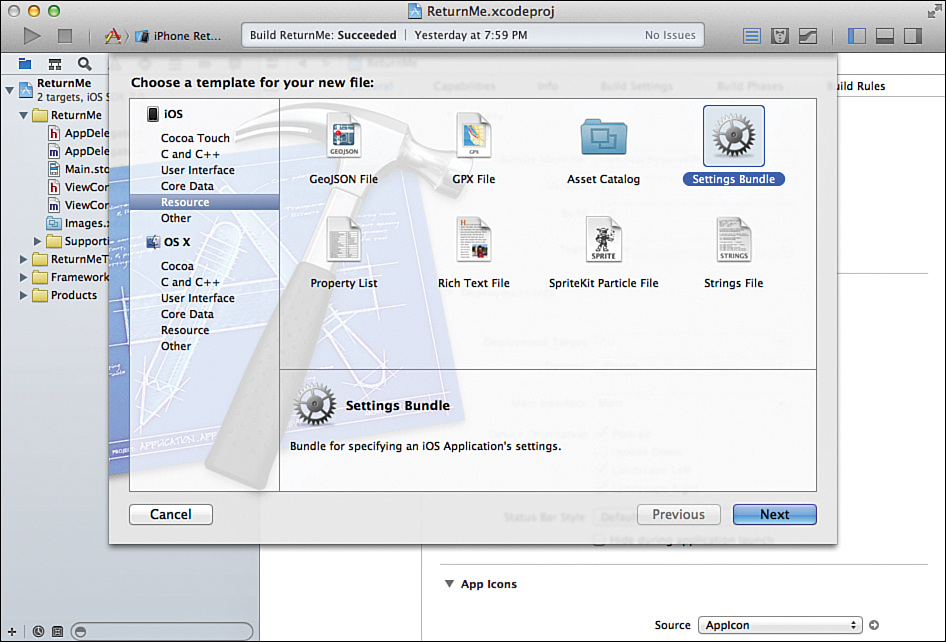
By default, applications do not include a settings bundle. You add them to your project by choosing File, New File and then picking Settings Bundle from the iOS Resource section, as shown in Figure 15.2.
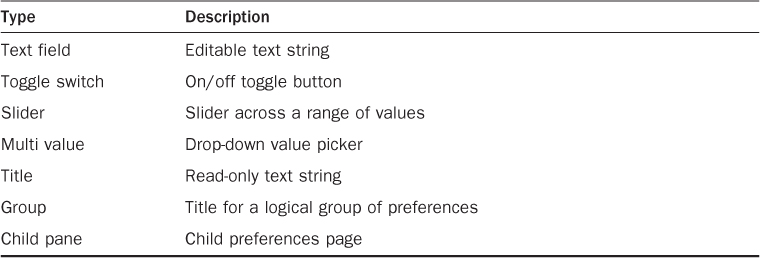
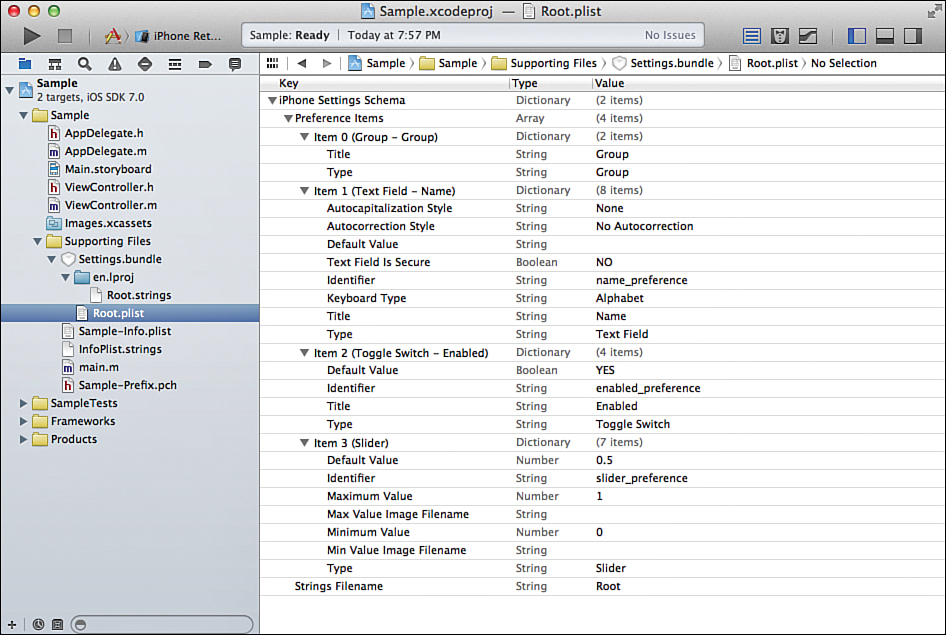
The file that controls how an application’s settings will appear in the Settings application is the Root.plist file in the settings bundle. Seven different preference types (see Table 15.1) can be read and interpreted by the Settings application to provide the UI to set our application’s preferences.
Creating custom settings bundles is just a matter of creating rows in the Preference Items key within the Root.plist file. You just follow the simple schema in the Settings Application Schema Reference in the iOS Reference Library to set all the required properties, and some of the optional properties, of each preference, as shown in Figure 15.3.
Once the settings bundle is complete, the user can alter user defaults through the Settings application, and you, the developer, can access the settings through the same techniques described in the section “Writing and Reading User Defaults.”
Tip
The identifier attribute of a preference item within the settings bundle is the same as the key you use to retrieve a value from the user defaults.
Direct File System Access
The final file access approach that we’ll be looking at in this hour is direct file system access (the ability to open files and read or write their contents). This technique can be used to store any data you want—files you download off the Internet, files your app creates, and so on—but not anywhere you want.
In creating the iOS software development kit (SDK), Apple introduced a wide range of restrictions designed to protect users from malicious applications harming their devices. The restrictions are collectively known as the application sandbox. Any application you create with the SDK exists in a sandbox. There is no opting out of the sandbox and no way to get an exemption from the sandbox’s restrictions.
Some of these restrictions affect how application data is stored and what data can be accessed. Each application is given a directory on the device’s file system, and applications are restricted to reading and writing files in their own directory. This means a poorly behaved application can, at worst, wipe out its own data but not the data of any other application.
It also turns out that this restriction is not terribly limiting. The information from Apple’s applications, such as contacts, calendars, and the photo and music libraries, is for the most part already exposed through APIs in the iOS SDK. (For more information, see Hour 19, “Working with Rich Media,” and Hour 20, “Interacting with Other Applications.”)
Caution: Play Within the Sandbox
With each version of the iOS SDK, Apple has been steadily ramping up what you can’t do because of the application sandbox, but parts of the sandbox are still enforced via policy rather than as technical restrictions. Just because you find a location on the file system where it is possible to read or write files outside the application sandbox doesn’t mean you should. Violating the application sandbox is one of the surest ways to get your application rejected from the iTunes Store.
Storage Locations for Application Data
Within an application’s directory, four locations are provided specifically for storing the application’s data: the Library/Preferences, Library/Caches, Documents, and tmp directories.
Note
When you run an application in the iOS Simulator, the application’s directory exists on your Mac in /Users/<your username>/Library/Application Support/iPhone Simulator/<device OS version>/Applications. This directory contains a number of applications, each with a directory named after a unique Xcode-provided application ID (a series of characters with dashes). The easiest way to find the directory of the current application you are running in the iOS Simulator is to look for the most recently modified application directory. Take a few minutes now to look through the directory of a couple applications from previous hours.
In OS X Lion (and later), the Library directory is hidden by default. You can access it by holding down Option and clicking the Finder’s Go menu.
You encountered the Library/Preferences directory earlier in this hour. It’s not typical to read and write to the Preferences directory directly. Instead, you use the NSUserDefaults API. The Library/Caches, Documents, and tmp directories are, however, intended for direct file manipulation. The main difference between them is the intended lifetime of the files in each directory.
The Documents directory is the main location for storing application data. It is backed up to the computer when the device is synced with iTunes, so it is important to store in the Documents directory any data users would be upset to lose.
The Library/Caches directory is used to cache data retrieved from the network or from any computationally expensive calculation. Files in Library/Caches persist between launches of the application, and caching data in the Library/Caches directory can be an important technique used to improve the performance of an application.
Any data you want to store outside of the device’s limited volatile memory, but that you do not need to persist between launches of the application, belongs in the tmp directory. The tmp directory is a more transient version of Library/Caches; think of it as a scratch pad for the application.
Caution: Space Concerns
Applications are responsible for cleaning up all the files they write, even those written to Library/Caches or tmp. Applications are sharing the limited file system space (usually 16GB to 64GB) on the device. The space an application’s files take up is not available for music, podcasts, photos, and other applications. Be judicious in what you choose to persistently store, and be sure to clean up any temporary files created during the lifetime of the application.
Getting a File Path
Every file on an iOS device has a path, which is the name of its exact location on the file system. For an application to read or write a file in its sandbox, it needs to specify the full path of the file.
Core Foundation provides a C function called NSSearchPathForDirectoriesInDomains that returns the path to the application’s Documents or Library/Caches directory. Asking for other directories from this function can return multiple directories, so the result of the function call is an NSArray object. When this function is used to get the path to the Documents or Library/Caches directory, it returns exactly one NSString in the array, and the NSString of the path is extracted from the array using an index of 0.
NSString provides a method for joining two path fragments called stringByAppendingPath Component. By putting the result of a call to NSSearchPathForDirectoriesInDomains with a specific filename, it is possible to get a string that represents a full path to a file in the application’s Documents or Library/Caches directory.
Suppose, for example, that your next blockbuster iOS application calculates the first 100,000 digits of pi and you want the application to write the digits to a cache file so that they won’t need to be calculated again. To get the full path to this file’s location, you first need to get the path to the Library/Caches directory and then append the specific filename to it:
NSString *cacheDir =
NSSearchPathForDirectoriesInDomains(NSCachesDirectory,
NSUserDomainMask, YES)[0];
NSString *piFile = [cacheDir
stringByAppendingPathComponent:@"American.pi"];
To get a path to a file in the Documents directory, use the same approach but with NSDocumentDirectory as the first argument to NSSearchPathForDirectoriesInDomains:
NSString *docDir =
NSSearchPathForDirectoriesInDomains(NSDocumentDirectory,
NSUserDomainMask, YES)[0];
NSString *scoreFile = [docDir stringByAppendingPathComponent:@"HighScores.txt"];
Core Foundation provides another C function called NSTemporaryDirectory that returns the path of the application’s tmp directory. As before, you can use this to get a full path to a file:
NSString *scratchFile =
[NSTemporaryDirectory() stringByAppendingPathComponent:@"Scratch.data"];
Reading and Writing Data
After creating a string that represents the path to the file that you want to use, reading and writing is rather straightforward. First, you’ll likely want to check to see whether the file even exists. If it doesn’t, your application will need to create it; otherwise, you’ll need to present an error condition. To check for the presence of a file represented by the string myPath, you use the NSFileManager method fileExistsAtPath:
if ([[NSFileManager defaultManager] fileExistsAtPath:myPath]) {
// file exists
}
Next, you use the NSFileHandle class methods fileHandleForWritingAtPath, fileHandleForReadingAtPath:, or fileHandleForUpdatingAtPath to grab a reference to the file for the purpose of writing, reading, or updating. For example, to create a file handle for writing, you could code the following:
NSFileHandle *fileHandle =
[NSFileHandle fileHandleForWritingAtPath:myPath];
To write data to the file referenced by fileHandle, use the NSFileHandle method writeData. To write the string stringData to the file, you could use this:
[fileHandle writeData:[stringData dataUsingEncoding:NSUTF8StringEncoding]];
The NSString method dataUsingEncoding ensures that the data is in a standard Unicode format before it is written to the file. After you’ve finished writing to the file, you must close it:
[fileHandle closeFile];
Later, to read the contents of the file into a string, you must perform similar operations, but with read methods rather than write. First get the file handle for reading, then read the entire contents into a new string with the NSFileHandle instance method availableData, and then close the file:
NSFileHandle *fileHandle =
[NSFileHandle fileHandleForReadingAtPath:myPath];
NSString *surveyResults=[[NSString alloc]
initWithData:[fileHandle availableData]
encoding:NSUTF8StringEncoding];
[fileHandle closeFile];
When you need to update the contents of a file, you can use other NSFileHandle methods, such as seekToFileOffset or seekToEndOfFile, to move to a specific location in the file. You use this approach in a tutorial later in this hour.
That concludes this introduction to data storage approaches in iOS. Now let’s put them to practice in three short tutorial exercises.
Creating Implicit Preferences
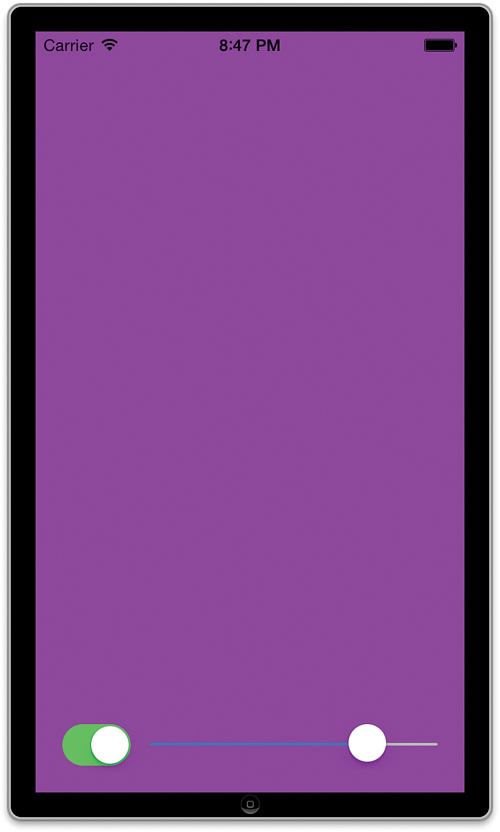
In our first exercise, we create an admittedly ridiculous application. The application has an on/off switch and a slider control for users to set a background color that they like. We use preferences to return the application to the last state the user left it in.
Implementation Overview
This project requires a total of two interface elements:
![]() A switch to turn the custom background color on and off
A switch to turn the custom background color on and off
![]() A slider to change the background hue
A slider to change the background hue
These are connected to outlets so that they are accessible in the application. The on/off status and hue, upon being changed, will be stored using user defaults. The stored values will automatically be restored when the application is restarted.
Setting Up the Project
Create a new single-view iOS application in Xcode and call it BackgroundColor. You’re only going to be coding up one method and modifying another, so little setup is work needed.
Planning the Properties and Connections
We need a total of two outlets and one action. The switch connects to an outlet that we call toggleSwitch, and the slider to hueSlider. When the slider or switch changes values, it triggers an action method, setBackgroundHueValue.
Note
To control the background color, you will be setting the view’s backgroundColor property to a UIColor object. To create the UIColor object, you’ll use the class method colorWithHue: saturation:brightness:alpha.
Adding Key Constants
As you learned at the start of this hour’s lesson, accessing the user default preferences system requires that you define keys for whatever you want to store. These are strings that you need when storing or accessing any stored data. Because these are used in multiple places and are static values, they’re good candidates for constants. We’ll define two constants for the project: kOnOffToggle for the key that refers to the current on/off state, and kHueSetting for the color of our application background.
Add these constants to the top of the ViewController.m interface file, following the #import line:
#define kOnOffToggle @"onOff"
#define kHueSetting @"hue"
Now, let’s lay out a simple UI.
Designing the Interface
Open the Main.storyboard file in the Interface Builder (IB) editor, making sure that the document outline and utility areas are visible.
Drag a UISwitch from the Object Library (View, Utilities, Show Object Library) onto the bottom left of the view. Drag a UISlider to the bottom right of the view. Size the slider to take up all the horizontal space not used by the switch and set its initial value to 0.
Your view should now look like Figure 15.4. Easiest interface layout ever, don’t you think?

Creating and Connecting the Outlets and Actions
The code we will write will need access to the switch and slider. We will also trigger the change of the background color based on the Value Changed event from the switch as well as the slider. In summary, you create and connect these outlets:
![]() The on/off switch (UISwitch):
The on/off switch (UISwitch): toggleSwitch
![]() The Hue (color) slider (UISlider):
The Hue (color) slider (UISlider): hueSlider
And the single action:
![]() Changing the value of the switch or slider (UISwitch/UISlider):
Changing the value of the switch or slider (UISwitch/UISlider): setBackgroundHueValue
Switch to the assistant editor, hiding the project navigator and utility area if needed.
Adding the Outlets
Control-drag from the switch that you added to the UI to just below the @interface line in ViewController.m. When prompted, create a new outlet named toggleSwitch. Repeat this for the slider, connecting it to hueSlider.
In addition to being able to access the two controls, our code needs to respond to changes in the toggle state of the switch and changes in the position of the slider.
Adding the Actions
To create the action that, ultimately, both the switch and the slider will use, Control-drag from the slider to below the @property declarations in ViewController.m. Define a new action, setBackgroundHueValue, that will be triggered on the Value Changed event, as shown in Figure 15.5.

To connect the switch to the same action, we can use the Connections Inspector (Option-Command-5) to drag from the Value Changed event of the switch to the newly added IBAction line, or we can rely on the fact that Control-dragging from the switch to the IBAction line will automatically select the Value Changed event. Whichever method you are comfortable with, complete it now.
Making sure that both the switch and slider are connected to the action ensures that immediate feedback is provided when the user adjusts the slider value or toggles the switch.
Implementing the Application Logic
What can I say? There’s not much logic here!
When the user toggles the custom background on or off and adjusts color, the application responds by adjusting the backgroundColor property of the default view. We use the UIColor class method colorWithHue:saturation:brightness:alpha to return an appropriate color object. Each argument in this method is a floating-point value between 0 and 1.0. The only argument we’ll vary is for the hue, based directly on the slider’s value. We’ll pick a few “middle of the road” values for saturation and brightness, and set the alpha to 1.0, because there’s no real point in having a transparent color for the background (there’s nothing behind it!).
When the custom background is toggled off, we’ll set the background to white, using the UIColor class method whiteColor.
Update the setBackgroundHueValue method in ViewController.m, as shown in Listing 15.1.
LISTING 15.1 Implementing the Initial setBackgroundHueValue Method
- (IBAction)setBackgroundHueValue:(id)sender {
if (self.toggleSwitch.on) {
self.view.backgroundColor = [UIColor colorWithHue:self.hueSlider.value
saturation:0.75
brightness:0.75
alpha:1.0];
} else {
self.view.backgroundColor = [UIColor whiteColor];
}
}
This simple method checks the on property of the toggleSwitch object, and, if it is true (that is, the switch is “on”) creates a new UIColor object using the colorWithHue:saturation: brightness:alpha method and assigns it the view’s backgroundColor property.
When creating the color, the hue is set to the value of the slider, while saturation, brightness, and alpha are set to 0.75, 0.75, and 1.0, respectively. Is there anything magic about these numbers? Nope. I tried a few and liked these settings. Feel free to try other values between 0 and 1.0 to see the effect. If the toggleSwitch is set to off, the code sets the backgoundColor to white (the iOS 7 default).
This is already enough code to make the application work. You can run the project yourself and see.
Storing the BackgroundColor Preferences
We don’t just want the custom color feature to work; we want it to return to its last state when the user uses the application again later. We’ll store the on/off state and the hue value as implicit preferences. Recall that we’ve defined two constants, kOnOffToggle and kHueSetting, to use as the keys for our storage.
Update the setBackgroundHueValue method, adding the lines shown in Listing 15.2.
LISTING 15.2 Implementing the Final setBackgroundHueValue Method
1: - (IBAction)setBackgroundHueValue:(id)sender {
2: NSUserDefaults *userDefaults = [NSUserDefaults standardUserDefaults];
3: [userDefaults setBool:self.toggleSwitch.on forKey:kOnOffToggle];
4: [userDefaults setFloat:self.hueSlider.value
5: forKey:kHueSetting];
6: [userDefaults synchronize];
7:
8: if (self.toggleSwitch.on) {
9: self.view.backgroundColor = [UIColor colorWithHue:self.hueSlider.value
10: saturation:0.75
11: brightness:0.75
12: alpha:1.0];
13: } else {
14: self.view.backgroundColor = [UIColor whiteColor];
15: }
16: }
In line 2, we get the NSUserDefault singleton using the standardUserDefaults method and then use the setBool and setFloat methods to store our preferences in line 3 and in lines 4–5. We wrap up in line 6 by using the synchronize method in NSUserDefaults to make sure that our settings are stored immediately.
Note
Our code now saves the values for our two keys, but where do they go? The idea here is that we don’t have to know because we are using the NSUserDefaults API to shield us from this level of detail and to allow Apple to change how defaults are handled in future versions of the iOS.
It can still be useful to know, however, and the answer is that our preferences are stored in a plist file. If you are an experienced Mac user, you may already be familiar with plists, which are used for Mac applications, too. When running on a device, the plist will be local to the device, but when we run our application in the iOS Simulator, the Simulator uses our computer’s hard drive for storage, making it easy for us to peek inside the plist.
Run the BackgroundColor application in the iOS Simulator, and then use Finder to navigate to /Users/<your username>/Library/Application Support/iPhone Simulator/<device OS version>/Applications. As you learned earlier, the directories in applications are unique IDs, but it should be easy to find the directory for BackgroundColor by looking for the most recent data modified. You’ll see BackgroundColor.app in the most recently modified directory, and you’ll see the com.yourcompany.BackgroundColor.plist inside its Library/Preferences subdirectory. This is a regular Mac plist file; so when you double-click it, it will open with the Xcode and show you the two preferences we stored for BackgroundColor.
Reading the BackgroundColor Preferences
Now our application is writing out the state of the two controls anytime the user changes the settings. So, to complete the desired behavior, we need to read in and use the preferences for the state of the two controls anytime our application launches. For this, we use the viewDidLoad method and the floatForKey and boolForKey methods of NSUserDefaults. Edit viewDidLoad and get the NSUserDefaults singleton in the same way as before, but this time set the value of the controls from the value returned from the preference rather than the other way around.
In the ViewController.m file, update viewDidLoad, as shown in Listing 15.3.
LISTING 15.3 Updating the Settings in viewDidLoad
1: - (void)viewDidLoad
2: {
3: [super viewDidLoad];
4:
5: NSUserDefaults *userDefaults = [NSUserDefaults standardUserDefaults];
6: self.hueSlider.value = [userDefaults floatForKey:kHueSetting];
7: self.toggleSwitch.on = [userDefaults boolForKey:kOnOffToggle];
8: if ([userDefaults boolForKey: kOnOffToggle]) {
9: self.view.backgroundColor =
10: [UIColor colorWithHue:[userDefaults floatForKey:kHueSetting]
11: saturation:0.75
12: brightness:0.75
13: alpha:1.0];
14: } else {
15: self.view.backgroundColor = [UIColor whiteColor];
16: }
17: }
In line 5, we get the NSUserDefault singleton and use it to grab and set the hue slider (line 6) and toggle switch (line 7). Lines 8–16 check to see whether the switch is on. If it is, the backgroundColor of the view is set to a new UIColor generated from the stored value of the slider. If the switch is off, the backgroundColor of the view is set to white.
Building the Application
That’s all there is to it. Run the application to verify its operation (see Figure 15.6). I assure you that this isn’t going to make you millions on the App Store, but it does demonstrate just how easy it is for your applications to read and write preferences.
Tip
If you’re running the application and press the Home button, be aware that your application won’t quit; it will be suspended in the background. To fully test the BackgroundColor app, be sure to stop the application using the Xcode Stop button. Then use the iOS task manager to force the application completely closed, and then verify that your settings are restored when it relaunches fresh.
Now that we’re through seeing red (or whatever color you’ve chosen as your background in this fine application), let’s look at a new app where the user takes more direct control of the application’s preferences.
Implementing System Settings
A second option to consider for providing application preferences is to use the Settings application. You do this by creating and editing a settings bundle for your application in Xcode rather than by writing code and designing a UI, so this is a very fast and easy option (once you get used to editing settings bundles). Initially, you might have to take a few cracks at making all the plist changes you need; there is a learning curve for the process.
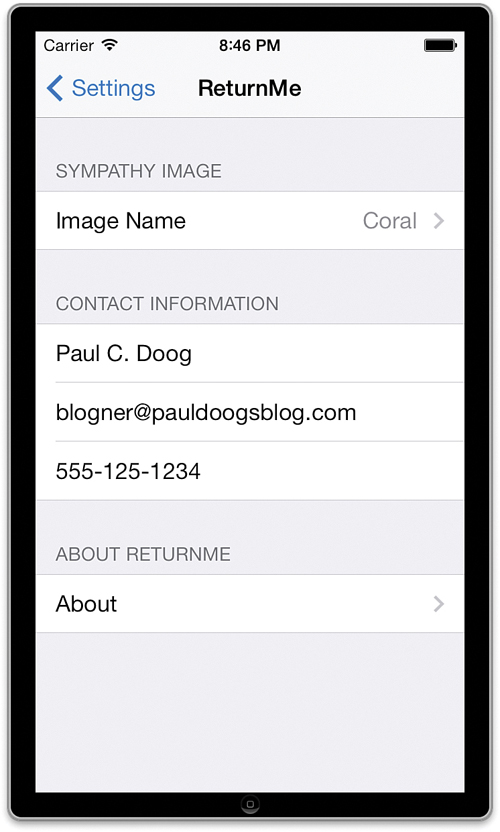
For our second application of the hour, we create an application that tells someone who finds a lost device how to return it to its owner. The Settings application is used to edit the contact information of the owner and to select a picture to evoke the finder’s sympathy.
Implementation Overview
What you’ll soon come to appreciate with settings bundles is that a great deal of tedious UI/storage work happens “automagically,” without needing to write any code. In this application, you create a settings bundle that defines several values that you can set within the iOS Settings application. These settings are read by the app and used to update the onscreen display when it is running. There will be no user inputs in the application itself, making our logic even simpler than the last tutorial.
Setting Up the Project
As we often do, begin by creating a new single-view iOS application in Xcode called ReturnMe.
We want to provide the finder of the lost device with a sympathy-invoking picture and the owner’s name, email address, and phone number. Each of these items is configurable as an application preference, so we need outlets (but no actions) for these UI elements.
Planning the Properties and Connections
For the three text values that we want to display, we need to define labels (UILabel), which we’ll call name, email, and phone. The image that we will be displaying will be contained within a UIImageView that will be named picture. That’s it. We don’t need any input controls; instead, all our values will be managed through our settings bundle.
Adding Key Constants
As in the previous project, we are referencing stored user default values using a key. We need a total of four keys to each of the values we’re working with. To keep things orderly, let’s define constants that we can use to refer to the keys whenever we want. Edit the ViewController.m file and add the following lines after the existing #import line:
#define kName @"name"
#define kEmail @"email"
#define kPhone @"phone"
#define kPicture @"picture"
These should be self-explanatory; the names and string values are probably a dead giveaway.
Adding the Image Resources
As part of this project, we display an image that will help goad our Good Samaritan into returning the lost device rather than selling it to Gizmodo. Within the project navigator, click the Images.xcassets file to open the project’s asset catalog. Then drag the Images folder from the Finder into the column on the left inside the Asset Library. You’ll see a new Images folder appear within the Assets catalog.
Tip
Remember, to support Retina-class displays, all you need to do is create images with twice the horizontal and vertical resolution as your standard image resources, include an @2x suffix on the filename, and add them to your project. The developer tools and iOS take care of the rest.
I’ve included @2x image resources with many of the projects in this book.
Designing the Interface
Now let’s lay out the ReturnMe application’s UI, as follows:
1. Open the IB editor by clicking the Main.storyboard file.
2. Open the Object Library so that you can start adding components to the interface.
3. Drag three UILabels onto the view.
4. Set the text to a default value of your choosing for the name, email, and phone number.
5. Drag a UIImageView to the view.
6. Size the image view to take up the majority of the device’s display area.
7. With the image view selected, use the Attributes Inspector to set the mode to be Aspect Fill, and pick one of the animal images you added to the Xcode project from the Image drop-down.
8. Add some additional UILabels to explain the purpose of the application and labels that explain each preference value (name, email, and phone number).
As long as you have the three labels and the image view in your UI, as shown in Figure 15.7, you can design the rest as you see fit. Have fun with it.

Creating and Connecting the Outlets
After you’ve finished building the interface, switch to the assistant editor and connect the UIImageView and three UILabels to corresponding outlets in ViewController.m: picture, name, email, and phone. There aren’t any actions to connect, so just Control-drag from each UI element to the ViewController.m file, providing the appropriate name when prompted.
Now that the interface is built, we create the settings bundle, which will enable us to integrate with the iOS Settings application.
Creating the Settings Bundle
Create a new settings bundle in Xcode by selecting File, New File from the menu bar and selecting Settings Bundle from the iOS Resource group in the sidebar, as shown in Figure 15.8. To choose where the settings bundle is stored, click Next. When prompted, leave the default location and name unchanged, but choose the Supporting Files group from the Group pop-up menu at the bottom of the Save dialog box. If you forget to do this, you can drag the settings bundle into your Supporting Files group later.
The ReturnMe preferences are grouped into three groups: Sympathy Image, Contact Information, and About. The Sympathy Image group will contain a Multi Value preference to pick one of the images, the Contact Information group will contain three text fields, and the About group will link to a child page with three read-only titles.
Caution: Read Slowly and Practice
Before you start building your application preferences, be aware that the language of Apple’s tools makes it difficult to describe the process without tying one’s tongue in knots.
Here are a few important things to keep in mind:
![]() When I refer to a property, I am referring to a line within the plist file. Properties are defined by a key, a type, and one or more values.
When I refer to a property, I am referring to a line within the plist file. Properties are defined by a key, a type, and one or more values.
![]() Properties can contain multiple other properties. I refer to these as being within an existing property (or children of the original property).
Properties can contain multiple other properties. I refer to these as being within an existing property (or children of the original property).
![]() The specific attributes that define a property (key, type, and value) are represented as columns within the plist editor. When possible, I refer to these by name where you need to make a change.
The specific attributes that define a property (key, type, and value) are represented as columns within the plist editor. When possible, I refer to these by name where you need to make a change.
![]() You can accomplish the same thing in many different ways. Don’t worry if you find a better way that accomplishes the same results.
You can accomplish the same thing in many different ways. Don’t worry if you find a better way that accomplishes the same results.
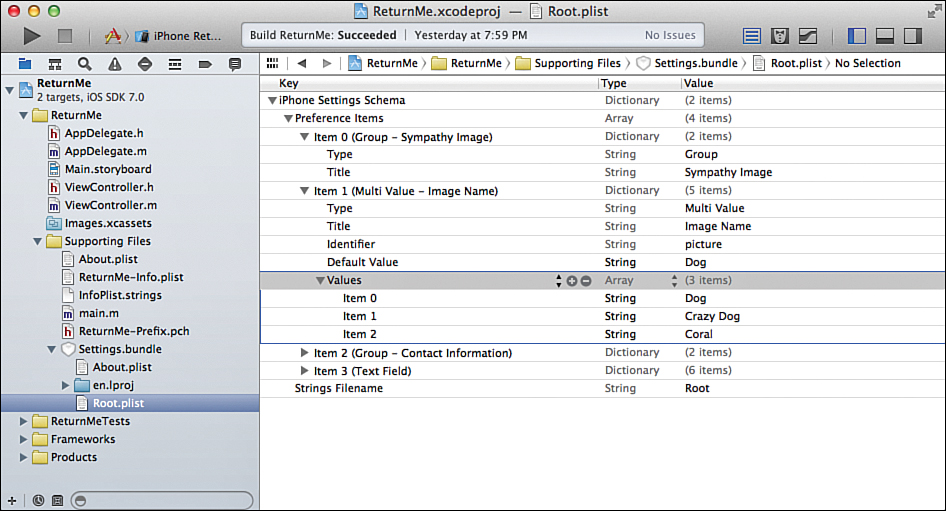
Expand the Settings.bundle in Xcode and click the Root.plist file. You’ll see a table of three columns: Key, Type, and Value. Expand the iPhone Settings Schema property, then Preference Items property within it. You’ll see a series of four dictionary properties. Xcode provides these as samples, and each is interpreted by Settings as a preference. You follow the simple schema in the Settings Application Schema Reference in the iOS Reference Library to set all the required properties, and some of the optional properties, of each preference.
Expand the first dictionary property under Preference Items called Item 0, and you’ll see that it has a Type property with a value of Group. This is the correct type to define a preference group (which groups together a set of related preferences), but we will need to make some changes to reflect the settings we want. Change the Title property’s value column to read Sympathy Image by clicking it and typing the new title. This provides a nice group heading in the Settings display.
The second preference item will contain multichoice settings for our Sympathy Image. Look at the value in parentheses to the right of the Item 1. Note that it is currently set to be a Text Field. Our Sympathy Image will be selected as a multivalue, not a text field, so change it to Multi Value by clicking the Key column of the property and picking from the pop-up list that appears. Next, expand the property and edit its child properties. Change the Title to Image Name, the Identifier (what we will use to reference the value in our app) to picture, and the Default Value to Dog.
You can change the type for most properties by simply clicking the label in the Key column; doing so opens a drop-down menu showing the available types. Unfortunately, not all types are represented in the menu. To access the full list of types, you need to expand the property and then set the underlying Type child property using the drop-down menu to the right of the Value column.
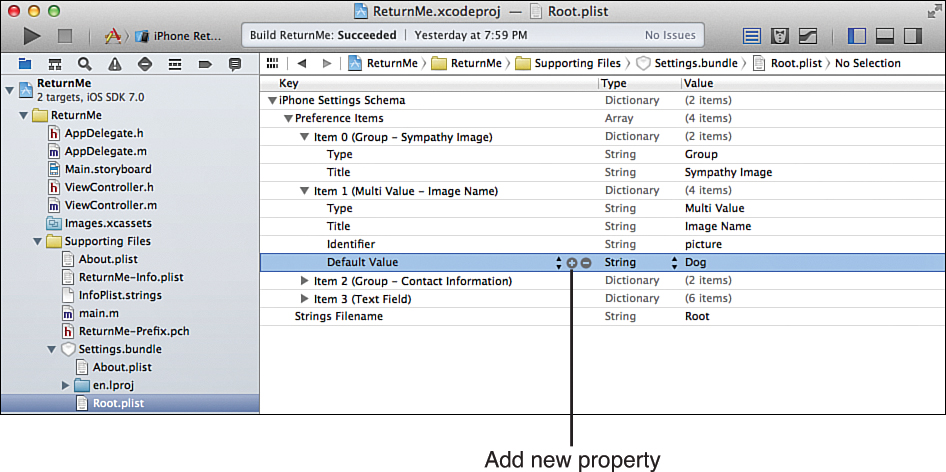
The choices for a multivalue picker come from two array properties: an array of item names and an array of item values. In our case, the name and value array properties will be the same, but we still must provide both of them. To add another property, click to select one of the existing properties (such as Default Value), and then click the + icon that appears (see Figure 15.9). This adds another property at the same level as the property you selected.
Set the name of the new property to Values and set the Type column to Array using the drop-down menus. Each of the three possible image names needs a property under Values. Expand the Values property to see what it contains (initially nothing). With it expanded, click the Values property and click the + icon three times to add new string properties as children: Item 0, Item 1, and Item 2, as shown in Figure 15.10.
Note
The +/– icon we’re using to add rows will add a row at the same level as the highlighted property, directly below the highlighted property. This holds true unless the property is a dictionary or array and is also expanded. In that case, it adds a new child property within the item.
In some cases, the +/– icons might not be visible (thanks a bunch, Xcode!). If you want to add a row below a property and you don’t see these icons, you can right-click a given property on the far-right side of its line and choose Add Row from the menu that appears.
Change the Value column of the three new child properties to Dog, Crazy Dog, and Coral. Repeat what you’ve done for the Values property to add a new array property at the same level as Values called Titles. Titles should also be an Array type with the same three String type children properties, as shown in Figure 15.11.

The third property (Item 2) in our Preference Items should be the type Group with a title of Contact Information. Click the Key column to change the Type; then expand the property and update the Title child property and remove all other items. The ultimate effect of this change will be that second group of settings with the title Contact Information appears within the Settings app.
The fourth property (Item 3) is the name preference. Click the Key column and change it to be a text field. Expand the property and configure the children properties as follows: Set the Identifier property value to Name, and the Default Value to Your Name. The Type column should be set to String for both. Add three more children properties under Item 3. Set the Property keys to Keyboard Type, Autocapitalization Style, and Autocorrection Style; and the values to Alphabet, Words, and No Autocorrection, respectively. The Type column, again, should be set to String for all three child properties. You may have surmised that these are optional parameters that set up the keyboard for text entry.
You can test your settings so far by running the ReturnMe application in the iOS Simulator, exiting the application with the Home button, and then running the Settings application in the Simulator. You should see a Settings selection for the ReturnMe application and settings for the Sympathy Image and Name.
Add two more Text Field properties as children to the Preference Items property in the plist. The easiest way to do this so that the properties are added below Item 3 is to make sure that Item 3 is collapsed and then right-click on the far right of the Item 3 line and choose Add Row from the pop-up menu that appears. After adding the properties, mirror what you set up for the name preference: one for email and one for phone number. Use the keys of email and phone, and change the values of child Keyboard Type property to Email Address and Number Pad, respectively. When you add the new properties, you might have more child properties than you were expecting. The Text Field properties you’re adding now, for example, include a Title property that can be removed by selecting it and pressing Delete or clicking the – icon. They don’t, however, contain the Keyboard Type, Autocapitalization Style, and so on. You can add these by adding a new row and then use the pop-up menus in the Key, Type, and Value columns to configure the missing properties.
The final preference is About, and it opens a child preference pane. We’ll add two more items to accomplish this. First, add a new property (Item 6) to the plist. Click the Key column for the property and set it to be a Group. Expand Item 6 and set the Title child property to a value About ReturnMe (configured with a Type column of String). As with the previous two groups, this creates a nicely titled division, About ReturnMe, within the Settings display.
Next, add Item 7. It can be any type you want, because the type property it contains needs to be adjusted a bit differently. Expand Item 7 and set the Type child property to Child Pane; unlike other preference types, this property is not available by clicking the property’s Key column. Update the Title child property’s value to About, and add a new child property with the key set to Filename, a type column of String, and a value column of About. Your completed Root.plist should resemble Figure 15.12. The child pane element assumes the value of the Filename identifier exists as another plist in the settings bundle. In our case, this is a file called About.plist.

The easiest way to create this second plist file in the settings bundle is by copying the Root.plist file we already have. Select the Root.plist file in the project navigator, and then choose File, Duplicate. Name the new file About.plist.
Select the About.plist file and right-click any property it contains. From the menu that appears, choose Property List Type, iPhone Settings plist. This tells Xcode what we intend to use the plist file for, which in turn gives us property names in plain English.
Edit About.plist’s Preference Items array to have four child properties. The first is a group property with a Title child property of About ReturnMe. The remaining three should be set to Title properties and are used for Version, Copyright, and Website Information. The Title properties contain three children properties by default: Type, Title, Key. Type should already be set to Title, and the Title property value set to the title strings for the information we want to display: Version, Copyright, or Website. The Key value doesn’t matter because we won’t be setting any of these in our code. Each of these three Title properties also needs a new (fourth) child property with the key Default Value added to them. This will be of the type String, and the Value will be set to whatever text information you want displayed in the Settings app for the parent property. Figure 15.13 shows my finished About.plist file.

If you have any difficulties setting up your plist files, run the application, exit it, and then compare your preferences UI to Figure 15.14 and your plists to the plists in the settings bundle in the sample project’s source code to see where you might have made a misstep.
Caution: Value and Values, Types and Type Keys, Aarrrrgh!
The plist editor can be confusing to deal with because the UI and the terminology are convoluted. In this exercise, for example, we created a multivalue picker that requires an array named Values. The items in the array also have a value, so we have to work with values’ Values. Fun, huh?
This is exacerbated by our need to add new properties of a certain type. Each property has an underlying data type (Array, Dictionary, String, and so on), but it may also have a child property with the identifier of Type that defines what that property (and its child properties) represents (like a text field). The result is a mishmash of terms that will drive you up the wall.
I recommend working through the exercise and changing keys and values to see the effect. It isn’t difficult once you get the hang of it, but Apple has made it an absolute bear to describe.
Implementing the Application Logic
We have now bundled up our preferences so that they can be set by the Settings application, but our ReturnMe application also has to be modified to use the preferences. We do this in the ViewController.m file’s viewDidLoad event. Here we will call a helper method we write called setValuesFromPreferences. Our code to use the preference values with the NSUserDefaults API looks no different from the BackgroundColor application. It doesn’t matter whether our application wrote the preference values or if the Settings application did; we can simply treat NSUserDefaults like a dictionary and ask for objects by their key.
We provided default values in the settings bundle, but it’s possible the user just installed ReturnMe and has not run the Settings application. We should provide the same default settings programmatically to cover this case, and we can do that by providing a dictionary of default preference keys and values to the NSUserDefaults registerDefaults method. Start by adding a prototype for the setValuesFromPreferences method in ViewController.m file. Add this line following the property definitions:
-(void)setValuesFromPreferences;
Next, implement the method in ViewController.m. Listing 15.4 shows a completed implementation of setValuesFromPreferences.
LISTING 15.4 Implementing the setValuesFromPreferences Method
1: -(void)setValuesFromPreferences {
2: NSUserDefaults *userDefaults = [NSUserDefaults standardUserDefaults];
3:
4:
5: NSDictionary *initialDefaults=@{kPicture:@"Dog",
6: kName:@"Your Name",
7: kEmail:@"[email protected]",
8: kPhone:@"(555)555-1212"};
9:
10:
11: [userDefaults registerDefaults:initialDefaults];
12: // [userDefaults synchronize];
13:
14: NSString *picturePreference = [userDefaults stringForKey:kPicture];
15: if ([picturePreference isEqualToString:@"Dog"]) {
16: self.picture.image = [UIImage imageNamed:@"dog1.png"];
17: } else if ([picturePreference isEqualToString:@"Crazy Dog"]) {
18: self.picture.image = [UIImage imageNamed:@"dog2.png"];
19: } else {
20: self.picture.image = [UIImage imageNamed:@"coral.png"];
21: }
22:
23: self.name.text = [userDefaults stringForKey:kName];
24: self.email.text = [userDefaults stringForKey:kEmail];
25: self.phone.text = [userDefaults stringForKey:kPhone];
26: }
Things kick off in line 2, where we grab a reference to the NSUserDefaults singleton.
Lines 5–8 allocate and initialize an NSDictionary named initialDefaults that contains the default value/key pairs that our application should use if no preferences have been set in the Settings app yet. The pairs are added to the dictionary value first, followed by the key (represented by the constants we added to the project earlier).
In line 11, we use the NSUserDefaults method registerDefaults to register our sample default values. After that, the code should remind you of the previous tutorial. Lines 13–24 simply get the values stored for each of our keys and set the user interface elements accordingly.
We still, however, need to load the preferences when the application starts. Edit ReturnMe ViewController.m, implementing the viewDidLoad method to invoke setValuesFrom Preferences, as shown in Listing 15.5.
LISTING 15.5 Loading the Settings When the Initial View Loads
- (void)viewDidLoad
{
[super viewDidLoad];
[self setValuesFromPreferences];
}
Building the Application
Run the ReturnMe application, wait until it starts in the iOS Simulator, and then click the Xcode Stop button. Using the iOS Simulator’s Settings app, change a few items for the ReturnMe application. Next, use the iOS application manager to terminate ReturnMe so that it isn’t waiting in the background, and then relaunch it. Your new settings should be represented in the application display.
Caution: Use the Xcode Stop Button!
If you do not use the Xcode Stop button to exit your application and then stop and restart it manually in the iOS Simulator, you will get an error in Xcode. The Xcode debugger will be upset because it can’t connect to the application anymore. For that reason, when testing the app, be sure to use Xcode’s Stop button and then run your tests of ReturnMe.
When we explore backgrounding in Hour 22, “Building Background-Ready Applications,” you learn how to programmatically deal with applications that are starting, stopping, and moving to and from the background.
You can see that with very little code on our part, we were able to provide a sophisticated interface to configure our application. The Settings bundle plist schema provides a fairly complete way to describe the preference needs of an application.
Implementing File System Storage
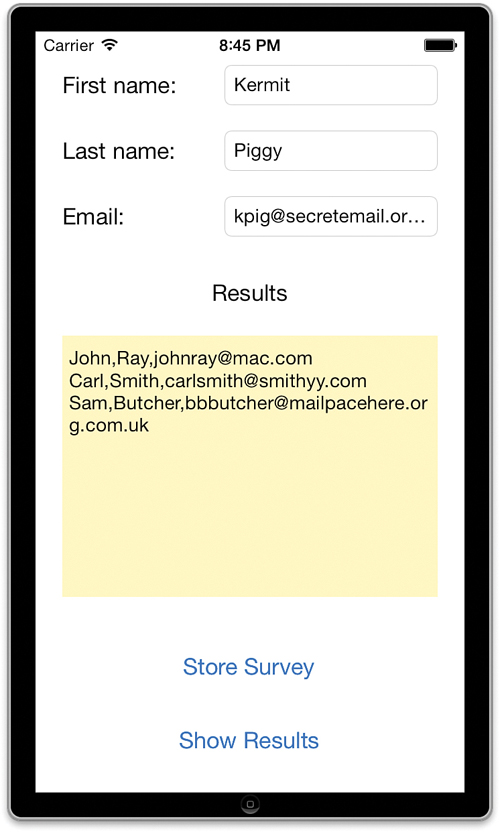
In the final example for this hour, we create a simple survey application. The application collects a person’s first name, last name, and email address and then stores them in a CSV file on the iOS device’s file system. Touching another button retrieves and displays the contents of the file.
Implementation Overview
The survey application’s user interface will be simple: three fields that collect data, a button to store the data, and another button to read all the accumulated results and display them in a scrolling text view. To store the information, we first generate a path to a new file in our application’s Documents directory. We then create a file handle to that path and output our survey data as a formatted string. Reading the data back in will be much the same, except we grab the file handle and read the entire contents of the file into a string and then display that in a read-only text view.
Setting Up the Project
Create a new single-view iOS application in Xcode and call it Survey. We do have several UI elements that our code will need to interact with, so let’s decide what they are and what they’ll be called.
Planning the Properties and Connections
Because this is a survey and we’ll be collecting information, obviously we need input areas for our data. In this case, these are text fields for collection first and last name and email address. We’ll call these firstName, lastName, and email, respectively. To demonstrate that we’ve properly stored a CSV file, we’ll read it in and output it in a text view that we will name resultsView.
We also need a total of three actions in this tutorial: two obvious and one less so. First, we need to store the data, so we add a button that triggers an action called storeSurvey. Next, we need to read the results and display them, so we have a second button that triggers an action called showResults. Unfortunately, there’s a third action we want to add—our handy hideKeyboard implementation so that the user can touch the background of the view or the Done button on the mini keyboard to hide the onscreen keyboard.
Designing the Interface
To design the interface, follow these steps:
1. Shift into design mode by clicking the Main.storyboard file and then opening the Object Library.
2. Drag three text fields (UITextField) into the view and position them near the top of the view. Add three labels beside the fields that read First Name:, Last Name:, and Email:.
3. Using the Attributes Inspector (Option-Command-4), select each field in turn, and then apply an appropriate Keyboard attribute (Email for the email field, for example), Return Key (such as Done), Capitalization, and any other features you think are appropriate. That completes our data entry form.
4. Drag a text view (UITextView) into the design and position it below the entry fields; this will display the contents of our survey results CSV file.
5. Add a label above it titled Results.
6. Using the Attributes Inspector, set the text view to be read-only, since a user won’t be able to use it to edit the survey results being displayed.
7. Add two buttons (UIButton) below the text view—one titled Store Survey and the other Show Results. These trigger our two actions that interact with files.
8. To deal with hiding the keyboard when the background is tapped, add a single UIButton sized to cover the entire view. Use the Attributes Inspector to set the button type to Custom; this will make it invisible.
9. Use the Editor, Arrange menu to set the custom button to the back (behind the rest of the UI), or simply drag the custom button to the top of the list of objects in the view using the document outline.
Your final survey UI should resemble Figure 15.15.

Creating and Connecting the Outlets and Actions
We need to wire up a number of connections in this project to interact with the user interface. Let’s review what we’ll be adding, starting with the outlets:
![]() The first name field (UITextField):
The first name field (UITextField): firstName
![]() The last name field (UITextField):
The last name field (UITextField): lastName
![]() Email address (UITextField):
Email address (UITextField): email
![]() Text view results area (UITextView):
Text view results area (UITextView): resultsView
And the actions:
![]() Touching the Store Survey button (UIButton):
Touching the Store Survey button (UIButton): storeSurvey
![]() Touching the Show Results button (UIButton):
Touching the Show Results button (UIButton): showResults
![]() Touching the background button (UIButton), or receiving the Did End on Exit event from any of the text fields:
Touching the background button (UIButton), or receiving the Did End on Exit event from any of the text fields: hideKeyboard
Switch to the assistant editor to begin adding outlets and actions. Make sure that the document outline is available so that you can get an easy handle on the invisible custom button.
Adding the Outlets
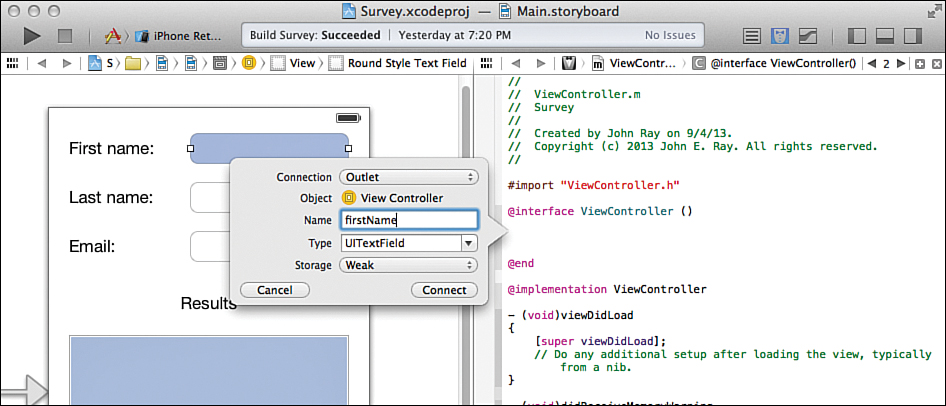
Add each of the necessary outlets by Control-dragging from their representation in the view to the space following the @interface line in ViewController.m. Connect the field beside the First Name label to firstName, as shown in Figure 15.16. Repeat this for each of the other fields, and for the text view, naming them with the conventions we’ve decided on. None of the other objects require an outlet.
Adding the Actions
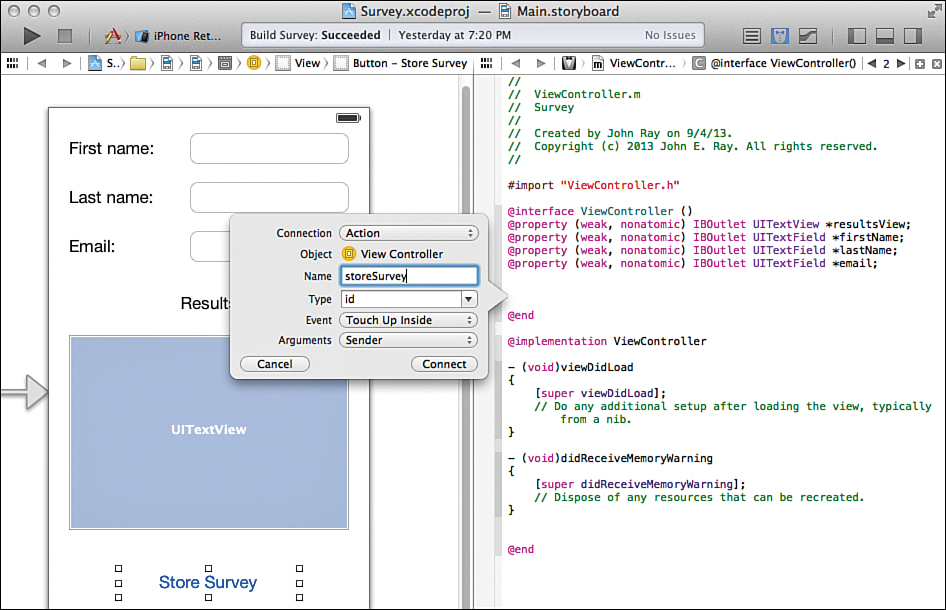
Once the outlets are in place, begin adding the connections to the actions. Control-drag from the Store Survey button to below the @property definitions in the ViewController.m interface file, creating a new action named storeSurvey, as shown in Figure 15.17. Do the same for the Show Results button, creating a new action called showResults.
As you probably remember, creating and connecting the hideKeyboard action isn’t quite as straightforward. Begin by creating the action by Control-dragging from the custom button to the ViewController.m file. It may be easiest to use the Button line in the document outline rather than trying to target the button in the view. Name the new action hideKeyboard. That takes care of the user touching the background, but we still need to handle the user touching the onscreen keyboard’s Done button.
Select the first of the text fields, and then open the Connections Inspector. You may need to hide the project navigator or document outline to make room in your workspace. From the Connections Inspector, drag from the Did End on Exit connection point to the hideKeyboard IBAction line at the top of ViewController.m. Do the same for the other two fields.
We’re done with the interface. Switch back to the standard editor and open the ViewController.m file to finish up the implementation.
Implementing the Application Logic
We need to implement three pieces of code to finish the application. First, we drop in the hide Keyboard code, just to get it out of the way. Next, we add storeSurvey and showResults using the methods you learned at the beginning of this hour’s lesson.
Hiding the Keyboard
To hide the keyboard, the object that currently has “control” of the keyboard must resign its first responder status using the method resignFirstResponder. In other words, our three text fields must each do this when hideKeyboard is invoked. Refer to Hour 7, “Working with Text, Keyboards, and Buttons,” if you have any questions about how this works, and then implement hideKeyboard as shown in Listing 15.6.
LISTING 15.6 Hiding the Keyboard When It Isn’t Needed
- (IBAction)hideKeyboard:(id)sender {
[self.lastName resignFirstResponder];
[self.firstName resignFirstResponder];
[self.email resignFirstResponder];
}
Storing the Survey Results
To store the survey fields, we format our incoming data, establish a path for the file that will contain the results, create a new file if needed, store the survey fields at the end of the file, and then close the file and clear out our survey form. Go ahead and enter the storeSurvey implementation in Listing 15.7, and then let’s walk through the code.
LISTING 15.7 Implementing the storeSurvey Method
1: - (IBAction)storeSurvey:(id)sender {
2:
3: NSString *csvLine=[NSString stringWithFormat:@"%@,%@,%@
",
4: self.firstName.text,
5: self.lastName.text,
6: self.email.text];
7:
8: NSString *docDir = NSSearchPathForDirectoriesInDomains(
9: NSDocumentDirectory,
10: NSUserDomainMask, YES
11: )[0];
12: NSString *surveyFile = [docDir
13: stringByAppendingPathComponent:
14: @"surveyresults.csv"];
15:
16: if (![[NSFileManager defaultManager] fileExistsAtPath:surveyFile]) {
17: [[NSFileManager defaultManager]
18: createFileAtPath:surveyFile contents:nil attributes:nil];
19: }
20:
21: NSFileHandle *fileHandle = [NSFileHandle
22: fileHandleForUpdatingAtPath:surveyFile];
23: [fileHandle seekToEndOfFile];
24: [fileHandle writeData:[csvLine
25: dataUsingEncoding:NSUTF8StringEncoding]];
26: [fileHandle closeFile];
27:
28: self.firstName.text=@"";
29: self.lastName.text=@"";
30: self.email.text=@"";
31: }
The implementation begins by creating a new string (csvLine) in lines 3–6 that is formatted as a CSV line. Each %@ in the format string is replaced with the contents of one of our text entry fields. The
at the end of the format string adds a newline (usually indicating a new record in a CSV file).
Lines 8–11 return the document directory for our application in the string docDir, which is then used to create the full survey path string, surveyPath, in lines 12–14 by appending the filename surveyresults.csv.
In lines 16–19, we check for the presence of the file represented by the path in surveyPath; if it does not exist, a new empty file with that name is created. After we’ve established that a file is present, we can write our data.
Lines 21–22 create a new file handle that points to our surveyPath file. The file handle is created using the method fileHandleForUpdatingAtPath because we want to update the existing contents of the file. Line 23 moves to the end of the existing file with seekToEndOfFile so that any data we write is written at the very end.
In line 24, our csvLine string is written to the file with the method writeData, and then the file is closed in line 26.
Lines 28–30 clean up the survey form by clearing the current values in the text fields.
Now that we’ve written to a file, let’s see whether we can get data back out.
Showing the Survey Results
To retrieve and display the survey results, we start by doing exactly what we did when storing them: establishing a path to the file. Next, we check for the existence of the file. If it is there, we have results we can read and display. If not, we don’t need to do anything. Assuming there are results, we create a file handle using the NSFileHandle class method fileHandleFor ReadingAtPath and then read the contents of the file with the method availableData. The last step is just to set the text view’s contents to the data we’ve read.
Implement the showResults method, as shown in Listing 15.8.
LISTING 15.8 Implementing the showResults Method
1: - (IBAction)showResults:(id)sender {
2: NSString *docDir = NSSearchPathForDirectoriesInDomains(
3: NSDocumentDirectory,
4: NSUserDomainMask, YES
5: )[0];
6: NSString *surveyFile = [docDir
7: stringByAppendingPathComponent:
8: @"surveyresults.csv"];
9:
10: if ([[NSFileManager defaultManager] fileExistsAtPath:surveyFile]) {
11: NSFileHandle *fileHandle = [NSFileHandle
12: fileHandleForReadingAtPath:surveyFile];
13: NSString *surveyResults=[[NSString alloc]
14: initWithData:[fileHandle availableData]
15: encoding:NSUTF8StringEncoding];
16: [fileHandle closeFile];
17: self.resultsView.text=surveyResults;
18: }
19: }
Lines 2–8 create the surveyPath string, which is then used to check for the existence of the file in line 10.
If the file exists, it is opened for reading in lines 11–12, and the availableData method is used to retrieve the entire contents, which is stored in the string surveyResults.
Finally, the file is closed in line 16, and the results view in the UI is updated with the contents of the surveyResults string.
That’s all there is to it. Run the application and give it a try. Store a few surveys, and then read and display the results, as shown in Figure 15.18. You now have the ability to write and read any data you want in the iOS file system.
Tip
I know I’ve been saying this a lot in this hour, but remember that iOS doesn’t “quit” applications when you exit them; it suspends the app and moves it to the background. To verify that data is truly persisting between runs of your app, you can use the iOS task manager to force-quit your programs.
You’ll learn more about application backgrounding in Hour 22. For now, be aware that there is a method called applicationDidEnterBackground in your application delegate class where you can put any application cleanup code that absolutely must be run before it quits.
Further Exploration
You have been exposed to most of what you need to know about preferences at this point. My main advice is to gain some more experience in working with preferences by going back to previous hours and adding sensible preferences to some of the applications you have already worked on. The application preferences system is well documented by Apple, and you should take some time to read through it.
I also highly recommend that you read Apple’s Archives and Serializations Programming Guide for Cocoa. This guide provides examples of not just how to save data but also how to store objects in files and read and instantiate them at will. This can be used, for example, to create database applications with rich objects containing images, sound, and so forth. For even more complex data needs, you should begin reviewing the documentation on Core Data.
Core Data is a framework that provides management and persistence for in-memory application object graphs. Core Data attempts to solve many of the challenges that face other, simpler forms of object persistence such as object archiving. Some of the challenging areas Core Data focuses on are multilevel undo management, data validation, data consistency across independent data assessors, efficient (that is, indexed) filtering, sorting and searching of object graphs, and persistence to a variety of data repositories. In layman terms, if you think your application might require a real database engine, you need Core Data.
Summary
In this hour, you developed three iOS applications, and along the way you learned three different ways of storing the application’s data. You captured the user’s implicit preferences with the BackgroundColor application, allowed the ReturnMe application to be explicitly configured from the Settings application, and stored the Survey application’s data through direct file system access. You also learned some important design principles that should keep you from getting carried away with too many preferences and should guide you in putting preferences in the right location.
This hour covered a lot of ground, and you have explored the topic of application data storage fairly exhaustively. At this point, you should be ready for most storage needs you will encounter while developing your own applications.
Q&A
Q. What about games? How should game preferences be handled?
A. Games are about providing the player with an immersive experience. Leaving that experience to go to the Settings application or to interact with a stodgy table view is not going to keep the player immersed. You want users to set up the game to their liking while still remaining in the game’s world, with the music and graphical style of the game as part of the customization experience. For games, feel free to use the NSUserDefaults API but provide a custom in-game experience for the UI.
Q. I have more complex data requirements. Is there a database I can use?
A. Although the techniques discussed in this hour’s lesson are suitable for most applications, larger apps may want to utilize Core Data. Core Data implements a high-level data model and helps developers manage complex data requirements. Although what happens behind the scenes is hidden from your application, Core Data uses SQLite to do its heavy lifting, so it is a database engine; you just don’t need to worry about managing it.
Workshop
Quiz
1. What are user defaults?
2. What is a plist file?
Answers
1. The user defaults system provides a means of storing application preferences or other key/value data pairs without needing to manage files or file access. Think of it as an NSDictionary that persists between executions of your application.
2. A plist file is an XML property list file used to store the user’s settings for a given application. Plist files can be edited from within Xcode, as you’ve discovered in this tutorial.
Activities
1. Update the BackgroundColor application to include preferences for all of the arguments to colorWithHue:saturation:brightness:alpha. Create a settings bundle to also manage these preferences in the iOS Settings app.
2. Return to an earlier application, such as ImageHop, and use implicit preferences to save the state of the program (the hop rate and whether the bunnies are hopping) before it exits. When the user relaunches the application, restore the application to its original state. This is a key part of the iOS user experience and something you should strive for.