
13. Discover iCloud’s My Photo Stream and Shared Photo Stream
In This Chapter
![]() Discover how to back up and share your latest images with all of your own Macs and iOS mobile devices using My Photo Stream
Discover how to back up and share your latest images with all of your own Macs and iOS mobile devices using My Photo Stream
![]() Use iCloud’s Shared Photo Stream feature to share groups of preselected images with other people online
Use iCloud’s Shared Photo Stream feature to share groups of preselected images with other people online
When it comes to iOS 7 (the operating system that runs on Apple’s iPhones and iPads), a key feature it offers can be summed up in one word—integration. In other words, apps can easily and automatically share information with other apps that are installed on your smartphone or tablet, and most of the apps that come preinstalled with iOS 7 (as well as a growing selection of third-party apps) also work seamlessly with Apple’s online-based iCloud service.
For example, the Camera app works seamlessly with the Photos and iPhoto apps, and the Photos app works with many other apps, enabling you to easily access and share your digital images. Meanwhile, the Photos and iPhoto apps also work with two core features of iCloud—My Photo Stream and Shared Photo Streams—which are related features, but each serves a unique purpose.
After obtaining a free iCloud account and activating My Photo Stream on each of your iOS mobile devices and Macs, every time you take a new photo using one of the iPhone or iPad’s built-in cameras, and that photo is saved in the Camera Roll folder on your device, as long as your mobile device has access to a Wi-Fi Internet connection, that same image automatically uploads to your iCloud account and is stored in your My Photo Stream.
Note
My Photo Stream is an easy way to share up to 1,000 of your most recently shot images with all of your own Macs and iOS mobile devices, as well as your Apple TV, that are linked to the same iCloud account. Thus, you can automatically and wirelessly access your own images on any of your computers or iCloud-supported mobile devices.
Shared photo streams, however, are separate albums that are stored online in your iCloud account. When creating or managing a shared photo stream, you decide exactly which images it includes. Thus, this is an ideal tool for organizing your favorite images into custom albums, which are then stored online (in the cloud) for backup or archival purposes.
What’s great about the Shared Photo Streams feature is that you can also opt to share individual shared photo streams with specific people, and grant them access to your images within a specific shared photo stream, while keeping other shared photo streams restricted. In other words, you decide who has access to specific shared photos streams.
When you share a shared photo stream with one or more other people, if they’re Mac or iOS mobile device users, they can view your images as an album from their own Mac using the iPhoto (or Aperture) software, or from their iOS mobile device using either the Photos or iPhoto app. However, you can also invite PC users (as well as non-iOS mobile device users) to view your shared photo stream(s) as online galleries via the Internet. When you do this, each shared photo stream is assigned its own website address (URL), which you can distribute to the people whom you want to be able to view your images.
Note
You can manage iCloud’s My Photo Stream and shared photo streams directly from the Photos or iPhoto app as it’s running on your iPhone or iPad. Throughout this chapter, directions are offered for how to use these features with the Photos app (which comes preinstalled with iOS 7). For more information about using these iCloud features with iPhoto, visit www.apple.com/support/ios/iphoto.
If your iPhone or iPad does not have Wi-Fi Internet access, you cannot access any photos or albums stored in your online-based iCloud account. Until web access is reestablished, only images stored on your iOS mobile device are accessible from the Photos or iPhoto app.
Use the My Photo Stream Feature
My Photo Stream creates a collection of 1,000 of your most recently shot (or imported) images and includes them in a single online album for up to 30 days. This album is accessible only by you—or anyone with access to your iCloud account—from any of your own Macs, iOS mobile devices, or Apple TV. It’s a collection of images that includes photos taken with your iPhone and/or iPad as well as images imported into or saved on any Macs that are linked to your iCloud account.
Access to My Photo Stream is available anytime the Mac or iOS mobile device you’re using has access to the Internet. After each month, you can save the images in My Photo Stream to your Mac as a standalone album. This can be set up to happen automatically using iPhoto. However, if within a single month you add more than 1,000 images to My Photo Stream, you can still save older images to your Mac and have newly added images replace them in your My Photo Stream.
Note
From the iPhone or iPad, My Photo Stream is accessible from the Photos or iPhoto apps. To view My Photo Stream from the Photos app, launch Photos, tap on the Albums icon (near the bottom of the screen), and then tap on the My Photo Stream folder.
Using My Photo Stream or shared photo streams from an iOS mobile device requires a Wi-Fi Internet connection. These features don’t work with a cellular data (3G, 4G, or LTE) connection.
Activate iCloud’s My Photo Stream on Each of Your iOS Mobile Devices
Before your iPhone or iPad can automatically upload new images you take (or that are stored in your smartphone or tablet) to My Photo Stream, or enable you to access My Photo Stream online via the Photos or iPhoto apps, you must turn on this feature.
It is necessary to separately turn on the My Photo Stream feature on each of your Mac and iOS mobile devices.
When you have an active iCloud account, to turn on My Photo Stream on your iPhone or iPad, from the Home screen, launch Settings and tap on the iCloud option. From the iCloud Control Panel (see Figure 13-1), tap on the Photos option. Then, from the Photos submenu (see Figure 13-2), turn on the virtual switch associated with My Photo Stream.
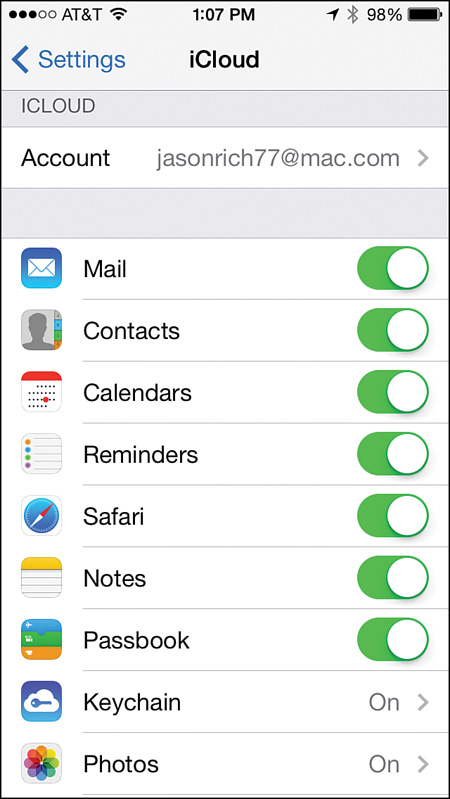
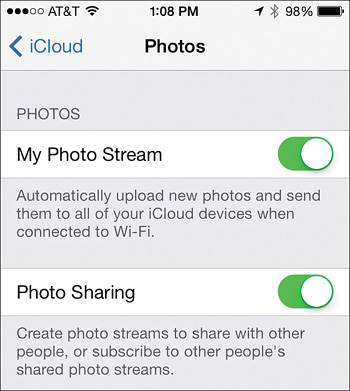
FIGURE 13-2 Turn on the virtual switch associated with the My Photo Stream option to turn on the My Photo Stream feature. The Photo Sharing option (which controls the Shared Photo Stream option) must be turned on separately.
Tip
For help initially creating a free iCloud account, visit http://support.apple.com/kb/HT4436. Your iCloud account comes with 5GB of free online storage space. This online storage space is for your personal data and files, excluding photos and iTunes Store and related content purchases. Apple provides, for free, as much online storage space as you need to maintain your My Photo Stream and an unlimited number of shared photo streams.
The allocated 5GB of online storage can be used for other tasks, such as the iCloud Backup feature, storing app-specific data related to Contacts, Calendars, Notes, and Reminders, or syncing and storing documents, data, and files related to the iWork for iOS apps (Pages, Numbers, and Keynote).
My Photo Stream enables any new images you take (or import into a computer or mobile device) to automatically and almost immediately become accessible on all of the computers and/or mobile devices that are linked to the same iCloud account.
Manage Your My Photo Stream Album from Your iPhone or iPad
You can manage the My Photo Stream album that’s created each month from your iPhone, iPad, or Mac (using iPhoto or Aperture). However, you can also view it on any HDTV that has an Apple TV device ($99.00, www.apple.com/appletv) connected to it.
From your iPhone or iPad, to manage the My Photo Stream album, first access it using the Photos or iPhoto app. Then, as you’re viewing the thumbnails in the My Photo Stream album (see Figure 13-3), tap on the Select option that’s displayed on the screen.

FIGURE 13-3 The My Photo Stream album can be viewed from within Photos (shown here on the iPhone 5s).
Using your finger, tap on one or more image thumbnails you want to select. As each is selected, a blue-and-white check mark appears in the bottom-right corner of the thumbnail.
After images are selected, three options become active—Share, Add To, and Trash (see Figure 13-4). On the iPhone, they’re displayed along the bottom of the screen, whereas on the iPad, these same options are displayed in the top-left corner of the screen.

FIGURE 13-4 After selecting one or more images from My Photo Stream, the Share, Trash, and Add To options become available.
Tap on the Share icon to share the selected image(s) with others using any of the options available from the Photos app’s Share menu, including AirDrop, Message, Mail, iCloud, Facebook, Twitter (if only one image is selected), or Flickr.
Tip
From the Share menu, it’s possible to copy the image onto the iPhone or iPad’s virtual Clipboard, so you can paste it into another app. You also can save the selected image(s) to the Camera Roll (in your device’s internal storage), assign a selected image to a contact, use a selected image as a Wallpaper image (for your device’s Lock screen and/or Home screen), or print the image using an AirPrint-compatible photo printer.
Tap on the Add To option to copy the selected image(s) from the My Photo Stream album that’s stored online in your iCloud account to an album that’s stored on your iOS mobile device. Tap on the Trash icon to delete the selected image(s) from the My Photo Stream album online. When you do this, it is almost instantly removed from the My Photo Stream that’s accessible from your Mac, Apple TV, and all of your other iOS mobile devices.
Note
When using an iPhone or iPad, to edit or enhance a photo that’s stored in My Photo Stream, you must download and save it to the internal storage of your mobile device (in the Camera Roll folder). To do this, select the image from My Photo Stream, tap the Share icon, and then select the Save to Camera Roll option. Now, when you access the Camera Roll folder from the Photos or iPhoto apps (or a compatible third-party app), the selected images are available to view and work with.
Keep in mind that after you turn on the My Photo Stream feature, all images you take using your iPhone or iPad are automatically uploaded to My Photo Stream and almost instantly become viewable from all of your other compatible computers and devices. This includes blurry or out-of-focus images as well as images you might or might not want to share with others. Images you import into your iOS mobile device or save from the Internet in your Camera Roll folder, for example, also become part of your shared photo stream.
Share Selected Groups of Images with Others Using Shared Photo Streams
Your iCloud account enables you to set up and maintain one My Photo Stream, which is accessible from all of your own Macs, Apple TV, and iOS mobile devices. However, you also have the option of creating and sharing as many shared photo streams as you want, for free, using the Photos or iPhoto apps on your iPhone or iPad. You can also create and share shared photo streams from a Mac (using the iPhoto or Aperture software).
Once again, on each Mac or iOS mobile device with which you’ll be using shared photo streams, you must first turn on this feature in Settings. To do this from each of your iPhones and/or iPads that are linked to your iCloud account, launch Settings and tap on the iCloud option to access the iCloud Control Panel. Next, tap on the Photos option. This time, from the Photos submenu (refer to Figure 13-2), turn on the virtual switch that’s associated with the Photo Sharing option. You need to do this only once per device, but for shared photo streams to work from your iPhone or iPad, a Wi-Fi Internet connection is required.
After activating shared photo streams on your smartphone or tablet, you can create, view, manage, and share these online-based albums.
Create a Shared Photo Stream
A shared photo stream is a standalone album that contains a group of images that you select and upload to your iCloud account. Each shared photo stream is assigned a unique name. You can then opt to share it with the specific people you want to view your images.
Use the Photos or iPhoto app on your iPhone or iPad to create an unlimited number of shared photo streams. This can also be done from a Mac using the iPhoto or Aperture software. To create a shared photo stream from scratch, make sure your smartphone or tablet is connected to a Wi-Fi Internet connection and launch Photos. Then, follow these steps:
1. Open the album that contains the images you want to include in a shared photo stream. For example, open the Camera Roll album.
2. As you’re viewing an album, tap on the Select option.
3. One at a time, tap on the thumbnails that represent the images you want to include in the shared photo stream (see Figure 13-5).
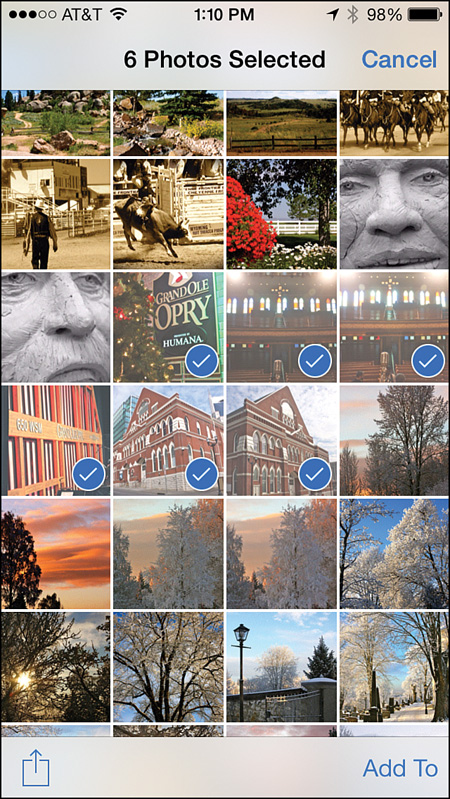
FIGURE 13-5 Select the thumbnails for the images you want to include in a new shared photo stream album.
4. After you’ve selected all the images you want from a particular album, tap on the Share icon and select the iCloud option.
5. When the iCloud window appears, if you want, fill in the optional Comment field with text that describes the shared photo stream you’re about to create. For example, you could write, Nashville Trip—Grand Ole Opry.
6. Tap on the Stream field. Near the top of the Add To Shared Stream window (see Figure 13-6), tap on the (+) New Shared Stream option.
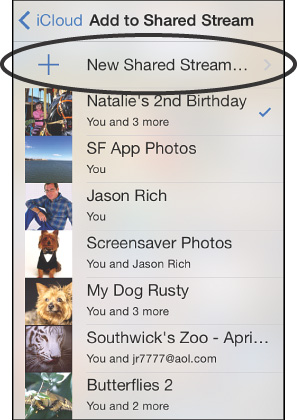
FIGURE 13-6 Tap on the (+) New Shared Stream option to create a new shared photo stream from scratch that will be published online in your free iCloud account.
Tip
If you want to add the selected images to an already created shared photo stream album, from the Add to Shared Stream window, tap on the name of the shared photo stream album you want to add the images to, instead of tapping on the (+) New Shared Stream option.
7. From the New Stream window, create a name for the shared photo stream album, and enter it into the Stream Name field. Keep the title short but descriptive, such as Nashville Trip—Grand Ole Opry.
9. One at a time, in the To field (see Figure 13-7), enter the email address for the person whom you want to invite to view your shared photo stream. If the person you’re adding already has an entry in your Contacts database, instead of manually entering an email address, simply type the first or last name, and the Contacts app inserts the email address (or enables you to choose which email address to use if that contact has multiple email addresses). To include multiple invitees, tap the plus sign (+) icon to the right of the To field.

FIGURE 13-7 As you’re creating a new shared photo stream album, you decide exactly who will be able to view it by automatically sending invitees an email invitation.
10. Tap on the Next option.
11. At this point, in the iCloud window, you can edit your optional comment or tap the Post option to create your shared photo stream and upload the preselected images to the newly created album.
At the same time the images are uploading to your iCloud account and being stored online in the shared photo stream you just created, your iPhone or iPad automatically sends an email to each of the people you invited to view your photo stream. This email contains the details they’ll need to access it online (see Figure 13-8).
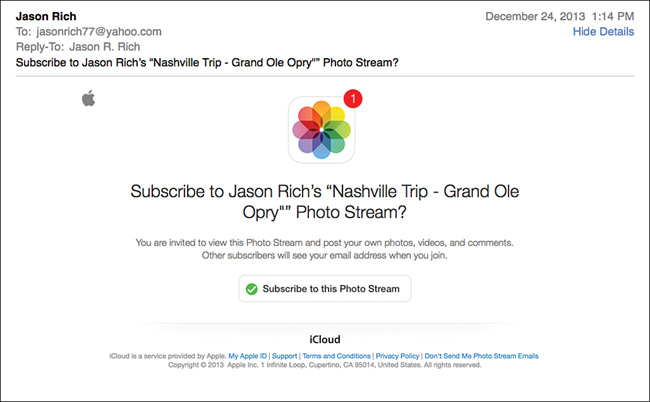
FIGURE 13-8 When you invite someone to access one of your shared photo streams, he or she will receive an email invitation that contains easy directions for accessing your photos.
View and Manage Shared Photo Streams from Your iPhone or iPad
After you’ve created one or more shared photo streams, as long as your iOS mobile device is connected to the Internet via a Wi-Fi connection, it’s possible to access, view, and manage these online-based albums at any time. To do this, launch either the Photos or iPhoto app.
From the Photos app, tap on the Shared command icon that’s displayed at the bottom of the screen. As you’re viewing the Shared Streams screen, you can either open a shared photo stream to view, or tap on the Edit option to select and delete an entire shared photo stream.
Caution
If you delete a shared photo stream that you created, it is no longer accessible to you or anyone whom you’ve invited to view it. The entire album is deleted from your iCloud account. There is no Undo option for this, so proceed with caution.
If you delete a photo stream you were invited to view but didn’t create, it is removed from your iOS mobile device but not from the creator’s iCloud account. Thus, you could later access it again using the original invitation email you received (or by requesting a new invitation).
To open, view, and work with a particular shared photo stream, tap on the album thumbnail from the Shared Streams screen. Thumbnails that represent each image appear. You now have several options, as detailed in the following sections.
View and Work with Single Images
To view an enlarged version of a single image on your smartphone or tablet’s screen, tap on the image’s thumbnail from any screen in Photos that displays the contents of an album using thumbnails. You can then tap the Edit option and edit/enhance the image (see Figure 13-9).

FIGURE 13-9 Images from a shared photo stream can be edited or enhanced, but must be saved in the Camera Roll folder on the mobile device on which you’re editing or enhancing them.
Initially, the image you’re viewing is stored online. However, after editing or enhancing it, when you tap on the Save command, it is saved in your device’s Camera Roll folder. Thus, it is now stored in the internal storage of your device as a new image. That edited image can now automatically be uploaded to your My Photo Stream because you’ve made changes to the original and the app now considers it a new image.
As you’re viewing a single image from a shared photo stream, you also have the option to “like” an image (by tapping on the Like option, which is associated with a happy face icon), or you can add a comment to the image. Yet another option is to tap on the Share icon, which gives you access to the Photos (or iPhoto) app’s Share menu, from which a wide range of options are available.
Manage a Shared Photo Stream’s Content
After accessing a specific shared photo stream that you’ve previously created, as you’re viewing the image thumbnails it contains, tap on the Select option to select one or more of the images. Upon doing this, the Photos or iPhoto app’s Share icon becomes active. Tap on it to access the app’s Share menu, and you can then share or print the selected images or use any of the other options available from this menu, such as Copy or Save to Camera Roll.
Note
As you’re viewing images in a shared photo stream, they are stored online and are being streamed to your iOS mobile device. To save the images to your mobile device’s internal storage in the Camera Roll folder, select the images, tap on the Share icon, and then tap on the Save to Camera Roll option.
If you’re working with a shared photo stream that you created, after tapping on the Select option and selecting one or more image thumbnails, the Trash icon also becomes active. Tap on this if you want to delete specific images from the shared photo stream album.
It’s also possible to add images to an existing shared photo stream. To do this, select and open an album that contains the images you want to add, select those images, tap on the Share icon, and then tap on the iCloud option. When the iCloud window appears, tap on the Stream field, and select the name of the shared photo stream to which you want to add the images. Tap on the Post option to upload the selected images to the shared photo stream album you chose.
Manage Who Has Access to Your Shared Photo Streams
When you first create a shared photo stream, you can invite specific people to access it. However, at any time later, it’s possible to invite additional people to view that shared photo stream album. It’s also possible to revoke someone’s access.
To manage who has access to your specific shared photo streams, launch the Photos app, tap on the Shared option, and then, from the Shared Streams screen, tap on the thumbnail that represents the album you want to open. When the desired shared photo stream album is open and you’re viewing the thumbnails for images in that shared photo stream, tap on the People option (see Figure 13-10). The Edit Photo Stream window appears.
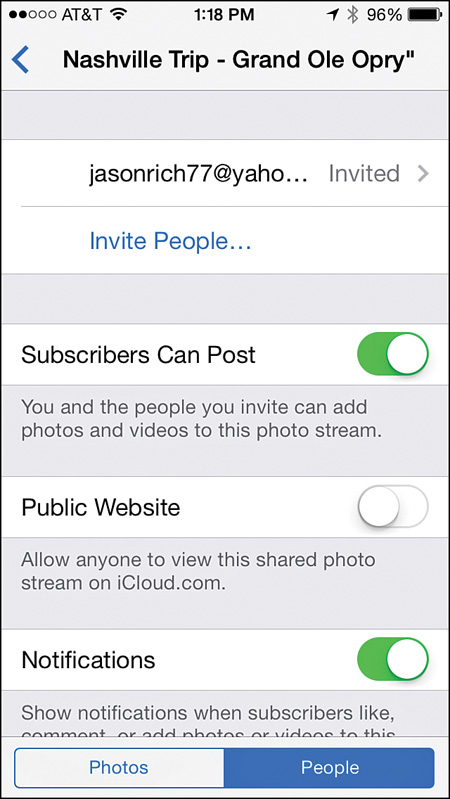
FIGURE 13-10 Access the Edit Photo Stream window to manage who has access to viewing your shared photo stream after it has been created.
Near the top of the Edit Photo Stream window is a list of people you’ve already invited to view the shared photo stream you’re working with. To revoke someone’s access to the shared photo stream, tap on his or her name, scroll down to the bottom of the Info window, and then tap on the Remove Subscriber option.
To invite more people to view your shared photo stream after it has been created, tap on the Invite People option. Then, in the To field, one at a time, enter the email addresses or names of the people you want to send invitations to.
More Options Available from the Edit Photo Stream Window
From the Edit Photo Stream window, in addition to managing the people who can access the shared photo stream you’re working with, there are three additional options, each with a virtual switch associated with it (refer to Figure 13-10).
Turn on the virtual switch associated with the Subscribers Can Post option if you want the people you invite to view your shared photo stream album to be able to also upload their own images to that album for everyone else who has access to that album (including yourself) to see.
Turn on the Public Website option if you know one or more of the people whom you’ve invited to view your shared photo stream are not Mac or iOS mobile device users. This enables people to access your shared photo stream as an online gallery using their computer’s web browser and by visiting the shared photo stream’s unique website address URL.
Note
When you turn on the Public Website option, theoretically, anyone who discovers the unique website address assigned to the shared photo stream can access your images. This includes total strangers. The odds of someone stumbling upon your unique shared photo stream URL and accessing it are slim, however. Using the Public Website option is the only way PC users or non-iOS mobile device users can access your shared photo stream via your iCloud account.
By turning on the Public Website feature, iCloud creates an online gallery in the form of a website (see Figure 13-11), which people can access by entering the gallery’s unique URL into their web browser. Upon inviting a PC user, for example, to visit your shared photo stream, if the Public Website option is turned on, the PC user receives the website link, as opposed to the ability to access the shared photo stream directly.
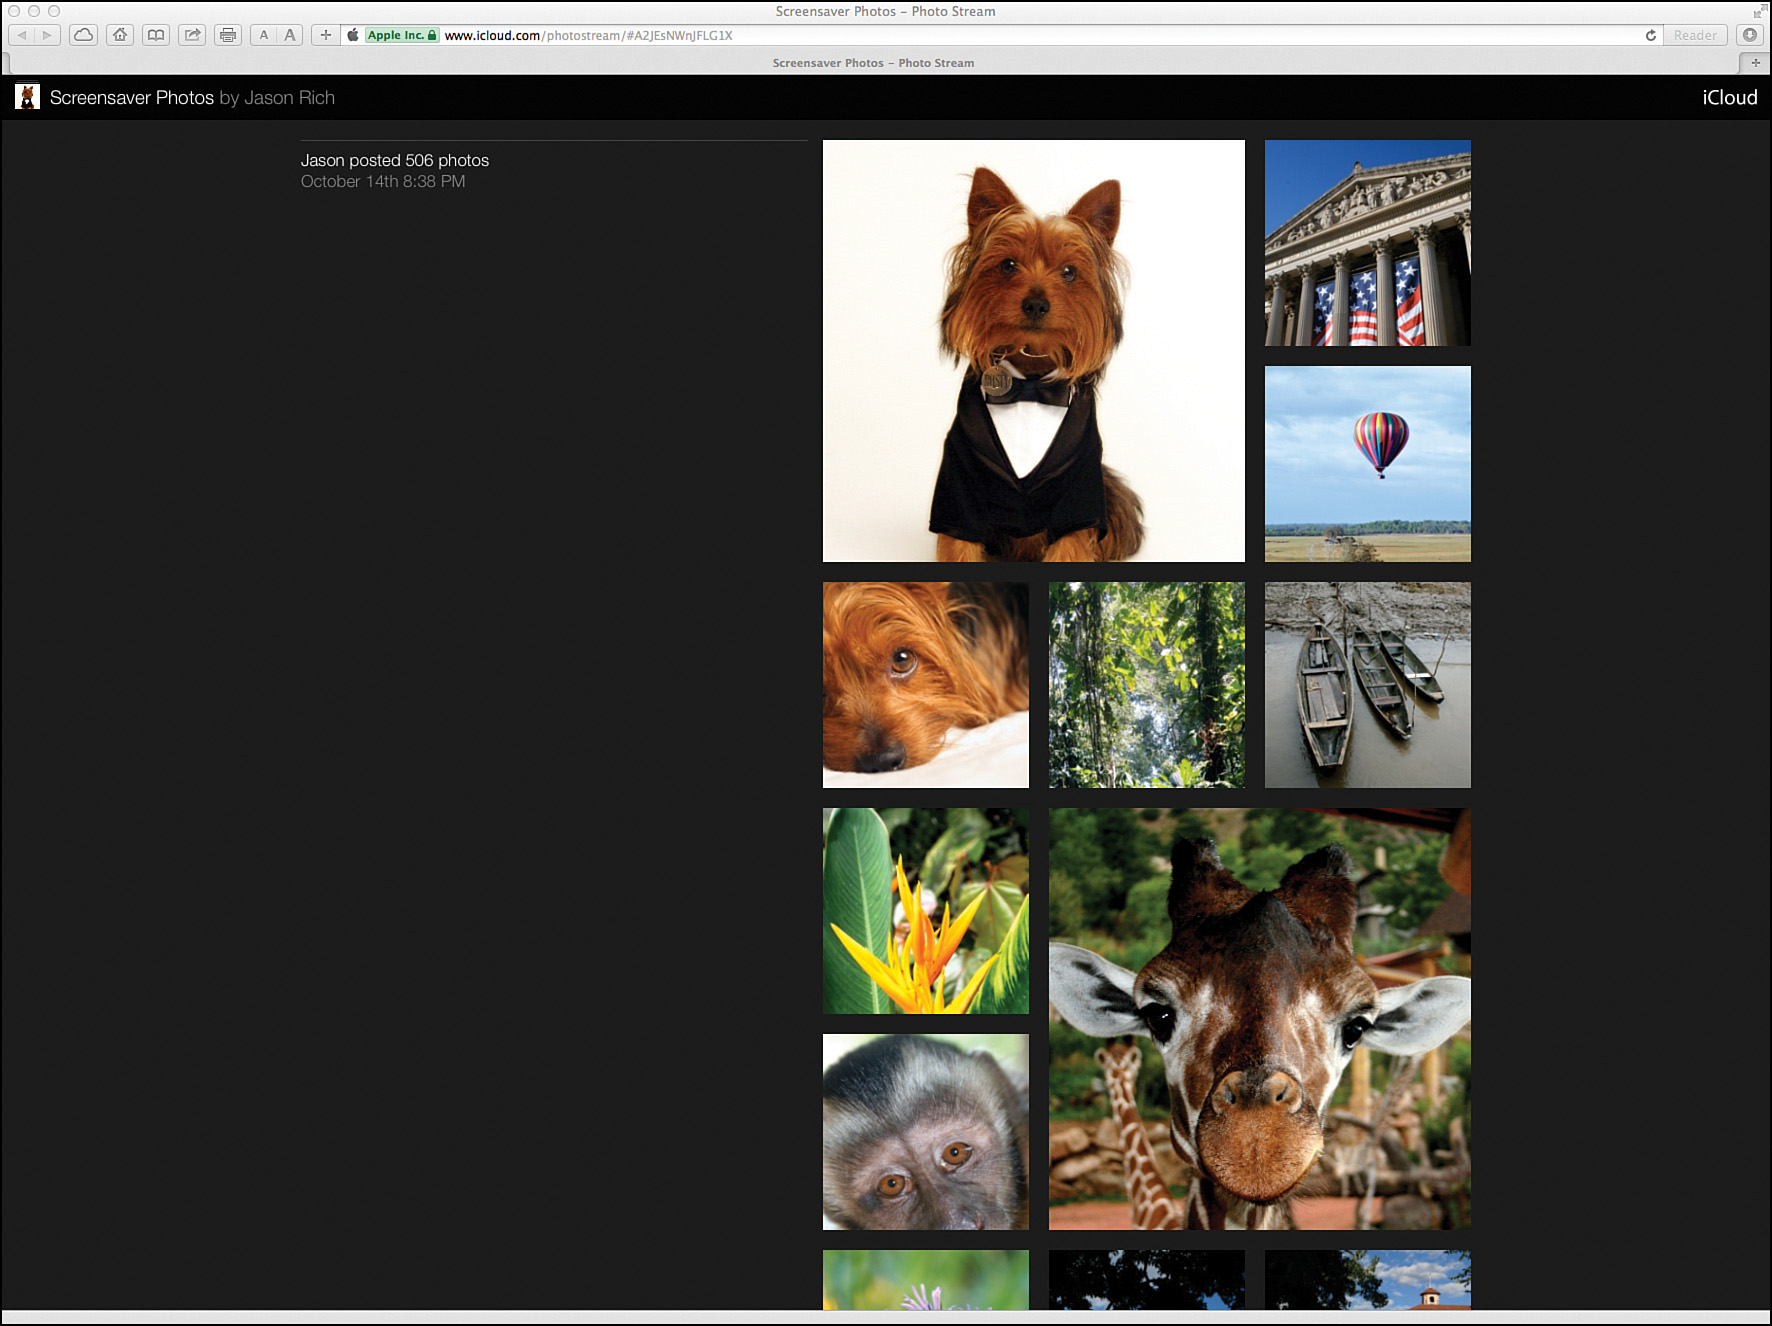
FIGURE 13-11 When the Public Website feature is turned on, this is what a shared photo stream’s online gallery looks like. (Shown here using the Safari web browser on a Mac.)
By turning on the virtual switch that’s associated with the Notifications option, you will receive a notification every time someone posts a comment, likes, or adds photos to your shared photo stream.
Located at the very bottom of the Edit Photo Stream window is a Delete Photo Stream option (displayed in red). Tap on this to delete the entire shared photo stream album from your iCloud account—and instantly revoke everyone’s access from viewing its contents. Keep in mind, there is no Undo option for this feature. If you delete a shared photo stream by mistake, you must re-create it from scratch.
Other Options for Sharing Groups of Photos Online
Shared photo streams are not your only option for sharing groups of images online or for creating online galleries. Many of the online photo sharing services, such as Flickr.com, Shutterfly.com, Smugmug.com, and others, have iPhone/iPad apps available that enable you to select images stored on your smartphone or tablet, upload them to your free online account with that service, and create an easy-to-access online album or gallery.
In addition, a handful of cloud-based file sharing services, including Dropbox (www.dropbox.com), Amazon Cloud Drive (www.amazon.com), or Microsoft OneDrive (http://onedrive.live.com), enable you to create online albums or galleries and share them with others. To accomplish this, you must set up a free account with the online file sharing service, and then install the service-specific app on your mobile device. For example, the Dropbox, Amazon Cloud Drive Photos, and the Microsoft OneDrive app are available from the App Store.