7. Expand Your Photo Editing Toolbox with iPhoto
In This Chapter
![]() Discover iPhoto’s enhanced tools for viewing and organizing digital images
Discover iPhoto’s enhanced tools for viewing and organizing digital images
![]() Edit and enhance photos with iPhoto
Edit and enhance photos with iPhoto
![]() Share and print photos using iPhoto
Share and print photos using iPhoto
![]() Consider using iPhoto instead of the Photos app
Consider using iPhoto instead of the Photos app
With the release of iOS 7, not only did Apple enhance its optional iPhoto app, which was previously sold through the App Store, but it also dropped the price of this feature-packed photography app (if you’ve purchased a new iPhone or iPad that runs iOS 7) to a very attractive price—free. Otherwise, the price for the app is $4.99. Meanwhile, the Mac version of iPhoto has long been a part of the iLife suite that comes bundled with all new iMacs and MacBooks.
You can use iPhoto to view, organize, edit, enhance, print, and share photos. The iOS 7 edition of iPhoto not only offers compatibility with its Mac counterpart, but it also offers many of the same features and functions as well as some useful tools that are not available from the Photos app or the Mac version of iPhoto.
The iOS 7 edition of iPhoto is now available for free from the App Store if you’ve purchased an iPhone or iPad with iOS 7 preinstalled. If you’re using an older device, the app is priced at just $4.99. It’s ideal for iPhone or iPad photographers who want access to a more robust set of tools for viewing, organizing, editing, enhancing, printing, and sharing their digital photos, but who also want the same integration to Apple’s online-based iCloud service that the Photos app offers.
One of the iPhoto app’s many features, which the Photos app does not include, is the capability to create a variety of photo projects from your iPhone or iPad that can be used to showcase your digital images. For example, directly from the iPhoto app, it’s possible to order prints from Apple’s own photo lab, and then have those professionally created prints shipped to you within a few business days. You can easily order prints in a wide range of sizes and pay for them from the iPhoto app.
In addition, the iPhoto app enables you to lay out and design photo books, and then upload them to Apple’s own photo lab to be printed. Keep in mind, however, that a wide range of other apps from third parties also offer the capability to create prints, photo books, and other photo projects directly from an iPhone or iPad. You learn more about these apps in Chapter 11, “Create Prints from Your iPhone/iPad Photos.”
Note
iPhoto makes it much easier to organize your photos. In addition to sorting images into customizable albums, and then viewing them by the date and/or location they were taken, iPhoto enables mobile photographers to mark individual photos as favorites, regardless of which album they’re stored in. Those favorite images can then all be viewed together. Images can also be flagged and tagged (associated with keywords), making them easier to locate quickly. How to use these features is explained shortly.
As you’ll discover, the iPhoto app also works with the Camera app, and most other apps used for taking pictures with the iPhone or iPad’s built-in cameras. The iPhoto app also has full access to the Camera Roll album, which is where new photos taken on your iOS mobile device are automatically saved.
One of the great things about the iOS 7 edition of iPhoto is that it can fully utilize the Retina display that’s built in to the latest iPhone and iPad models, including (but not limited to) the iPhone 5s, iPad Air, and iPad mini with Retina display. Thus, when you view your digital images on one of these devices, you’ll see them in vivid color and with the most detail possible.
Overview of the iPhoto App
When you launch iPhoto for the first time, it automatically imports images stored in your iPhone or iPad that you previously used the Photos app to view and organize. (These images continue to be fully accessible via the Photos app.) When this process is complete, the iPhoto app’s Library screen appears (see Figure 7-1).

FIGURE 7-1 The Library screen of the Photos app (with the Albums view selected) enables you to view, manage, and ultimately work with the digital images stored in your iPhone (shown here) or iPad.
iPhoto’s Library screen uses the main area of your iPhone or iPad’s display to showcase thumbnails of images stored in your device. How these images are organized and displayed depends on which viewing option you have selected. Displayed at the bottom center of the screen are three command icons, labeled Photos, Albums, and Projects.
Tap on the Photos option to view thumbnails of all images currently stored in your iPhone or iPad, grouped together by the month and year they were shot (see Figure 7-2). Using your finger, swipe upward or downward to view each month’s collection of photos, starting with the most recent at the bottom of the display.
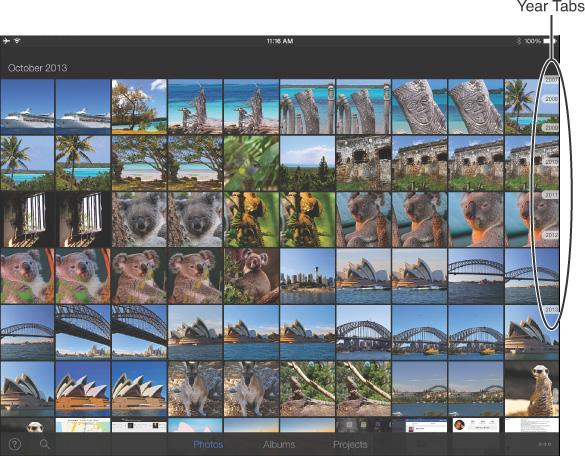
FIGURE 7-2 This Photos view is accessible from the Library screen of iPhoto. View thumbnails representing images stored in specific albums (shown here on the iPad). In the right margin, Year tabs are displayed.
Tip
As you’re scrolling up or down in the Photos view, tiny Year tabs are displayed along the right margin of the screen. Tap on one of these tabs to jump to a specific year, and then view a month-by-month collection of image thumbnails taken within that year.
After tapping on the Photos icon, tap on the Search icon to quickly search through and view image thumbnails that represent photos that have been flagged, marked as a favorite, edited using iPhoto, or used in a web journal, slideshow, or photo book created with the iPhoto app. From the menu that appears, tap on the appropriate icon to re-sort the image thumbnails.
Keep in mind that you can tap on multiple options from this menu at the same time. For example, you can opt to view images that have been flagged and selected as a favorite, or images that have been both flagged and edited.
Tap on the Albums icon to sort and display thumbnails of the images sorted by the album in which they’re currently saved (refer to Figure 7-1). Near the top-left margin of this screen, you see the Library label. Below it are thumbnails that represent each album that’s stored on your iPhone or iPad. Below the iCloud label are thumbnails representing the albums stored online, in your iCloud account, including your My Photo Stream and your separate shared photo streams.
Note
When you tap on the Albums icon, any shared photo streams you’ve been invited to view and access by others are also displayed under the iCloud heading.
Tap on the Projects icon to view thumbnails that represent each separate project you’ve created using the iPhoto app, including photo books, slideshows, and web journals (see Figure 7-3). You learn how to create these various projects later in this chapter.
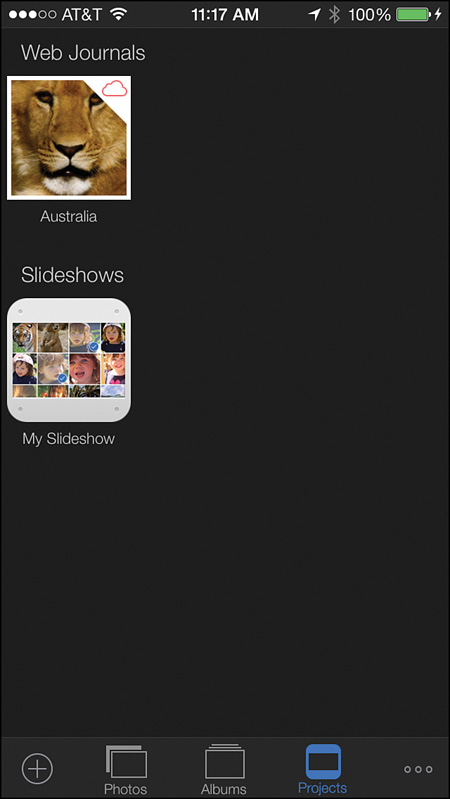
FIGURE 7-3 Each project you create in iPhoto is stored separately. Access any of them by tapping on the Projects icon.
Tip
To begin creating a new project from scratch, tap on the New Project icon displayed at the bottom-left corner of the screen when the Projects view has been selected. A menu appears, asking whether you want to create a new web journal, slideshow, or photo book. However, if you want to view or edit an existing project, simply tap on its thumbnail in the main area of the Projects screen.
Displayed near the bottom-right corner of iPhoto’s Library screen is the Options icon (it looks like three dots lined up in a horizontal row). From this menu, you can turn on or off virtual switches associated with Wireless Beaming, plus adjust other app-related settings, manage Location Services and geotagging capabilities of the iPhoto app, plus choose which of Apple’s professional labs you want to be able to place orders with, based on your location.
Tip
On the iPad, at the bottom-left corner of the screen, you’ll discover a Help icon (shaped like a question mark). Tap on it at anytime to launch iPhoto’s integrated Help feature to learn more about specific features and functions. On the iPhone, this same icon appears on many of the app’s screens, but not all of them.
View, Edit, and Enhance Your Photos
One of the primary reasons why you’d want to use iPhoto with or instead of the Photos app is to utilize a more expansive toolset for editing and enhancing photos.
After tapping on the Photos or Albums icon, tap on a thumbnail that represents an album you want to view in iPhoto. Upon doing this, you’ll see thumbnails for all of the images in the selected album. When the iPhone or iPad is held in Portrait mode, these images are displayed on the bottom portion of the screen (see Figure 7-4). When your iOS mobile device is held in Landscape mode, they’re displayed along the left margin (see Figure 7-5). Use your finger to scroll through all images in the selected album as needed.

FIGURE 7-4 This is what you’ll see when you select a single image by tapping on its thumbnail, while holding your device in Portrait mode. The number of thumbnails displayed at the bottom of the screen is adjustable.
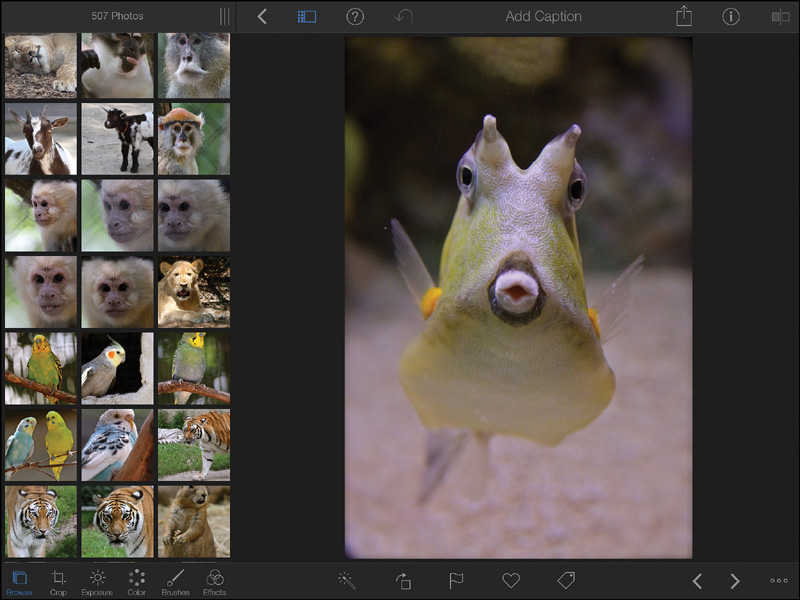
FIGURE 7-5 When you hold your iPhone or iPad (shown here) in Landscape mode, the selected image appears in the main area of the screen (on the right), while thumbnails for the rest of the images in that album are displayed along the left margin of the screen.
The Thumbnail Columns icon (which looks like three horizontal lines) can be moved to decrease or increase the number of thumbnail columns displayed at once. Drag this icon up or down (Portrait mode), or move it left or right (Landscape mode).
Tip
Displaying two or three thumbnail columns enables you to see more thumbnails at any given time, but this takes up more onscreen real estate than displaying one or no thumbnail columns.
To remove the image thumbnails from the screen altogether, tap on the Show/Hide Thumbnail Grid icon displayed along the top of the screen, between the Back and Help icons on the iPad or the Back and Share options on the iPhone.
To reorder the thumbnails, tap on the heading that displays the number of images in the album. A new menu enables you to sort images by the oldest or newest first, and/or using a Simple or Advanced filter.
Tap on any one image thumbnail to view a larger version of that image in the main area of the screen, and at the same time, you gain access to iPhoto’s editing and enhancement tools.
As you’re viewing individual images, to zoom in, double-tap on the image itself or use a reverse-pinch finger gesture. To zoom out, double-tap again on the image, or use a pinch finger gesture. Place and hold your finger somewhere on an image and drag it around to move around when viewing a zoomed-in image.
Tip
To close an image and return to the Library screen, use a pinch finger gesture when an image is not at all zoomed in. To view additional images in the same album, either tap on a different thumbnail or swipe a finger from right to left, or from left to right, to scroll through images and view them one at a time. On the iPad, you can also use the Forward and Back icons, displayed near the bottom-right corner of the screen as you’re viewing an image, to scroll through images in an album.
Work with an Individual Image
Once you select an individual image to work with in iPhoto, a handful of command icons become accessible along the top and bottom of the screen (see Figure 7-6). From left to right, along the top of the screen on the iPhone, these icons include Back, Show/Hide Thumbnail Grid, Share, Help, Show Original, and Options.
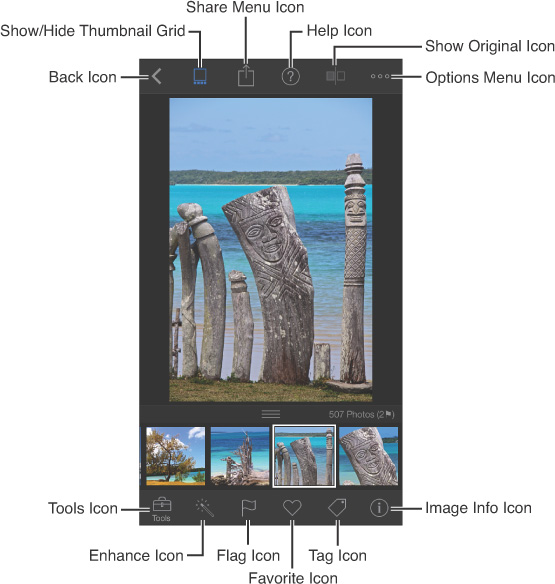
FIGURE 7-6 On the iPhone, a handful of command icons are displayed simultaneously along the top and bottom of the screen when viewing an image.
On the iPad, these icons include Back, Show/Hide Thumbnail Grid, Help, Undo, Add Caption, Share Menu, Show Photo Info, and Show Original (see Figure 7-7).
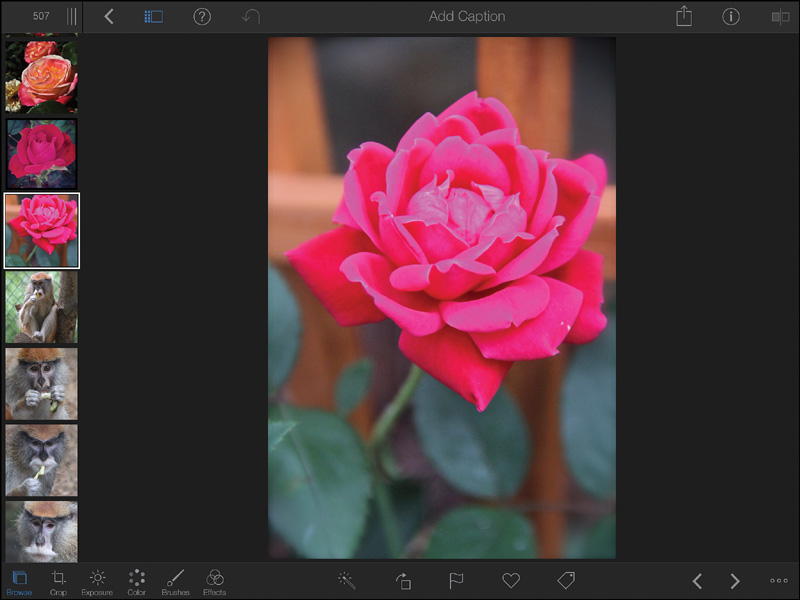
FIGURE 7-7 On the iPad, more command icons are displayed along the top and bottom of the screen than what’s seen on the iPhone.
Here’s a summary of what each of these icons and options is used for:
![]() Filter/Sort Images—Tap on the heading that displays the number of images in the selected album to access a menu that enables you to sort the images based on specific criteria.
Filter/Sort Images—Tap on the heading that displays the number of images in the selected album to access a menu that enables you to sort the images based on specific criteria.
![]() Thumbnail Columns—Slide this icon to determine how many rows of thumbnail columns are displayed on the screen at once.
Thumbnail Columns—Slide this icon to determine how many rows of thumbnail columns are displayed on the screen at once.
![]() Back—Return to the Library screen of iPhoto. Whatever changes or edits made to the images you were viewing and working with are saved.
Back—Return to the Library screen of iPhoto. Whatever changes or edits made to the images you were viewing and working with are saved.
![]() Show/Hide Thumbnail Grid—Tap on this icon to display or hide the thumbnail grid.
Show/Hide Thumbnail Grid—Tap on this icon to display or hide the thumbnail grid.
![]() Help—Access iPhoto’s interactive Help feature to learn about the app’s various commands, features, and functions.
Help—Access iPhoto’s interactive Help feature to learn about the app’s various commands, features, and functions.
![]() Undo—Tap on this icon to undo or remove only the last edit, enhancement, or change made to an image.
Undo—Tap on this icon to undo or remove only the last edit, enhancement, or change made to an image.
![]() Add Caption—Add a text-based caption to a specific image. Ultimately, the caption you add is linked to that image.
Add Caption—Add a text-based caption to a specific image. Ultimately, the caption you add is linked to that image.
![]() Share Menu icon—Access iPhoto’s expanded Share menu, which includes options for sharing the image you’re viewing via Mail, Facebook, Flickr, Twitter, Message, iTunes, Beam, or AirDrop. It’s also possible to create a project (web journal, slideshow, or photo book) from this menu or export the image to your Camera Roll folder, iMovie, or another compatible app. Options displayed at the bottom of the Share menu enable you to order prints from Apple’s photo lab or create prints using a home photo printer that’s linked to your iOS mobile device via AirPrint.
Share Menu icon—Access iPhoto’s expanded Share menu, which includes options for sharing the image you’re viewing via Mail, Facebook, Flickr, Twitter, Message, iTunes, Beam, or AirDrop. It’s also possible to create a project (web journal, slideshow, or photo book) from this menu or export the image to your Camera Roll folder, iMovie, or another compatible app. Options displayed at the bottom of the Share menu enable you to order prints from Apple’s photo lab or create prints using a home photo printer that’s linked to your iOS mobile device via AirPrint.
![]() Show Photo Info—View information (metadata) that’s associated with the digital image. The information displayed here varies, based on whether the image was taken using the camera that’s built in to your iPhone or iPad or it was taken using a standalone digital camera, and then imported into iPhoto.
Show Photo Info—View information (metadata) that’s associated with the digital image. The information displayed here varies, based on whether the image was taken using the camera that’s built in to your iPhone or iPad or it was taken using a standalone digital camera, and then imported into iPhoto.
![]() Show Original—Once you’ve made any edits or enhancements to an image using iPhoto, tap on this icon to toggle between seeing the original (unedited) version of the image and the newly edited or enhanced version.
Show Original—Once you’ve made any edits or enhancements to an image using iPhoto, tap on this icon to toggle between seeing the original (unedited) version of the image and the newly edited or enhanced version.
On the iPhone, displayed in the bottom-left corner of the screen is the Tools icon. Tap on it to reveal six additional icons that enable you to edit and enhance the image you’re viewing (see Figure 7-8). On the iPad, these same six command icons are displayed in a row, near the bottom-left corner of the screen. Here’s a summary of the tools accessible using each of these icons:
![]() Browse—On the iPhone, tapping on the Browse icon toggles the menu options and command icons that are displayed along the bottom of the screen. On the iPad, tapping on the Browse icon causes the Enhance, Rotate, Flag, Favorite, and Tag icons to be displayed. These icons are replaced by other options when one of the other icons displayed near the bottom-left corner of the screen is selected.
Browse—On the iPhone, tapping on the Browse icon toggles the menu options and command icons that are displayed along the bottom of the screen. On the iPad, tapping on the Browse icon causes the Enhance, Rotate, Flag, Favorite, and Tag icons to be displayed. These icons are replaced by other options when one of the other icons displayed near the bottom-left corner of the screen is selected.
![]() Crop—Use iPhoto’s Crop tool on the photo you’re currently viewing in the main area of the screen. For more information, refer to the “Use the Crop Tool” section later in this chapter.
Crop—Use iPhoto’s Crop tool on the photo you’re currently viewing in the main area of the screen. For more information, refer to the “Use the Crop Tool” section later in this chapter.
![]() Exposure—When you tap the Exposure icon, iPhoto’s Exposure slider is displayed at the bottom center of the screen. This slider has three different types of slider options in one that enable you to control the brightness, contrast, and shadows in the image separately. Slide the Brightness, Contrast, or Shadows icon to the left, along the slider, to darken the image. Move one of the icons to the right to lighten the image. Move the Brightness, Contrast, and Shadow icons around on the slider independently to achieve the desired results.
Exposure—When you tap the Exposure icon, iPhoto’s Exposure slider is displayed at the bottom center of the screen. This slider has three different types of slider options in one that enable you to control the brightness, contrast, and shadows in the image separately. Slide the Brightness, Contrast, or Shadows icon to the left, along the slider, to darken the image. Move one of the icons to the right to lighten the image. Move the Brightness, Contrast, and Shadow icons around on the slider independently to achieve the desired results.
![]() Color—On the iPhone, when you tap on the Color icon, four circular color options are displayed along the bottom of the screen. From left to right, these represent Saturation, Blue Skies, Greenery, and Warmth. Tap on one icon at a time to reveal a slider used to adjust that color-related option. On the iPad, when you tap on the Color option, four separate sliders appear near the bottom center of the screen. Adjust each one separately, as needed.
Color—On the iPhone, when you tap on the Color icon, four circular color options are displayed along the bottom of the screen. From left to right, these represent Saturation, Blue Skies, Greenery, and Warmth. Tap on one icon at a time to reveal a slider used to adjust that color-related option. On the iPad, when you tap on the Color option, four separate sliders appear near the bottom center of the screen. Adjust each one separately, as needed.
After tapping on the Color icon, the White Balance icon is displayed near the bottom-right corner of the screen. Tap on this to reveal the White Balance menu shown in Figure 7-9. This menu contains a series of icons that represent the type of natural or artificial lighting that was captured in the photo, such as direct sunlight, sunlight on a cloudy day, the iPhone’s (or a digital camera’s) flash, an outdoor shady area, incandescent lighting, fluorescent lighting, or underwater lighting. Choose the appropriate icon to correct the White Balance in a photo.
Tip
To adjust the skin tone on someone’s face, tap on the Face Balance icon. To sample a specific gray or white area of a photo, tap on the Custom icon, and then drag the onscreen circular icon that appears to a neutral gray area in the photo and tap on the center of it.
When a photo is captured, the image sensor in the digital camera can’t always tell when something in the photo is white, due to the natural or artificial lighting. Based on what the iPhone or iPad perceives as white, all of the other colors in an image are then adjusted accordingly. As a result, if what the camera perceives to be white is wrong, all the colors in the photo are also displayed incorrectly. Using the White Balance option to manually indicate the white area of a photo allows for this to be digitally corrected.
![]() Brushes—When editing or enhancing a photo using most of the tools offered within iPhoto (and all the tools offered in the Photos app), the tool in use automatically impacts the entire image. Using the Brushes tools available in iPhoto, it’s possible to manually adjust the red-eye, contrast, saturation, and/or sharpness in specific areas of an image. Here’s a rundown of the tools available from the Brushes menu:
Brushes—When editing or enhancing a photo using most of the tools offered within iPhoto (and all the tools offered in the Photos app), the tool in use automatically impacts the entire image. Using the Brushes tools available in iPhoto, it’s possible to manually adjust the red-eye, contrast, saturation, and/or sharpness in specific areas of an image. Here’s a rundown of the tools available from the Brushes menu:
When you select one of the Brush tools, tap on the Options icon to adjust the brush’s size and intensity. On the iPhone, the Options icon is displayed in the top-right corner of the screen. On the iPad, look for it in the bottom-right corner.
Also associated with the Brush tools is the Eraser icon. Tap on this to erase changes made to an image using one or more of the Brush tools. Tap on the Detect Edges icon to apply the Brush tool edits to areas of the photo that showcase the same color and lightness as the color you originally touch in the image.
![]() Repair—Tap on the Repair option to activate the Repair Brush, and then using your finger, draw on the area(s) of an image that you want to fix. The Repair tool removes what you paint over with your finger, and then blends that area with what’s around it.
Repair—Tap on the Repair option to activate the Repair Brush, and then using your finger, draw on the area(s) of an image that you want to fix. The Repair tool removes what you paint over with your finger, and then blends that area with what’s around it.
Tip
Use the Repair tool, for example, to remove a blemish from someone’s face when editing a portrait. It can also be used to remove a small and unwanted object from a photo.
![]() Red-Eye—When you take a photo of a person using a flash and the red-eye effect appears in the subject’s eyes, use this tool to digitally remove it.
Red-Eye—When you take a photo of a person using a flash and the red-eye effect appears in the subject’s eyes, use this tool to digitally remove it.
![]() Lighten—Tap on this option, and then use your finger to paint over areas of the selected image that you want to manually lighten, such as an unwanted shadow. Tap on the Options menu to adjust the Brush settings.
Lighten—Tap on this option, and then use your finger to paint over areas of the selected image that you want to manually lighten, such as an unwanted shadow. Tap on the Options menu to adjust the Brush settings.
![]() Darken—Tap on this option, and then use your finger to paint over areas of the selected image that you want to manually darken. Tap on the Options menu to adjust the Brush settings.
Darken—Tap on this option, and then use your finger to paint over areas of the selected image that you want to manually darken. Tap on the Options menu to adjust the Brush settings.
![]() Saturate—Use this tool to boost or enhance the colors depicted within a specific area of the selected image. Tap on the Options menu to adjust this Brush setting before applying it to an image.
Saturate—Use this tool to boost or enhance the colors depicted within a specific area of the selected image. Tap on the Options menu to adjust this Brush setting before applying it to an image.
![]() Desaturate—Use this tool to decrease or lighten the intensity and vividness of the colors depicted within a specific area of the selected image.
Desaturate—Use this tool to decrease or lighten the intensity and vividness of the colors depicted within a specific area of the selected image.
![]() Sharpen—If an area of an image appears slightly blurry, use this tool to digitally sharpen a portion of the image.
Sharpen—If an area of an image appears slightly blurry, use this tool to digitally sharpen a portion of the image.
![]() Soften—To add a slight blur to an area of the selected image, use this tool. For example, if you’re editing a portrait and you want to lighten the wrinkles on someone’s face or around the eyes, yet make the photo look natural, use the Soften tool.
Soften—To add a slight blur to an area of the selected image, use this tool. For example, if you’re editing a portrait and you want to lighten the wrinkles on someone’s face or around the eyes, yet make the photo look natural, use the Soften tool.
![]() Effects—Although the Photos app offers eight nonadjustable filters, the iPhoto app offers a vast collection of user-adjustable special effect filters. In addition to being able to select from a broader range of filters, you can adjust the intensity of each filter, plus mix and match filters when editing a single image to create a truly customized effect.
Effects—Although the Photos app offers eight nonadjustable filters, the iPhoto app offers a vast collection of user-adjustable special effect filters. In addition to being able to select from a broader range of filters, you can adjust the intensity of each filter, plus mix and match filters when editing a single image to create a truly customized effect.
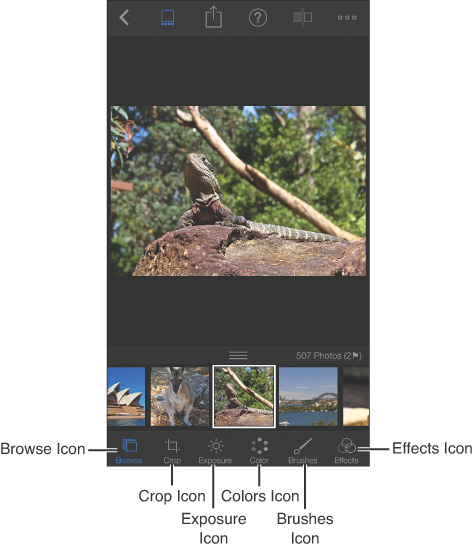
FIGURE 7-8 On the iPhone, tap on the Tools icon to reveal photo editing and enhancing tools offered by iPhoto.
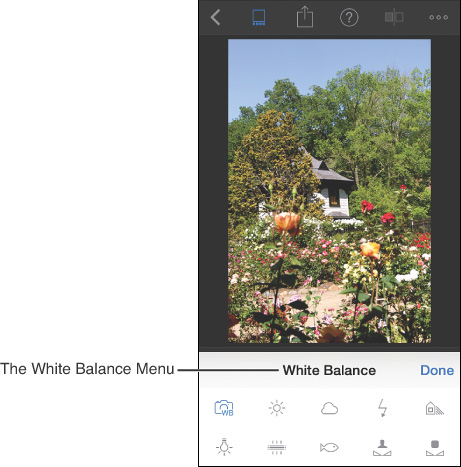
FIGURE 7-9 From the White Balance menu, select the type of lighting that is featured in an image to then adjust the White Balance of an image, if necessary. This allows for more accurate and authentic colors to be displayed.
Tip
First, tap on the selected filter option. Then, when that filter’s slider is displayed, as in Figure 7-10, drag your finger left or right to decrease or increase the intensity of the filter’s impact on your image.

FIGURE 7-10 Adjust the intensity of a selected filter using the slider that’s associated with it. How you adjust this slider dramatically impacts the look of an image, based on which filter is selected.
The main special effects filters available in iPhoto include Ink, Warm & Cool, Duotone, Black and White, Drama, Aura, Vintage, Camera Filters, and Artistic. Each offers several customizable adjustments, settings, or options.
On the iPhone, displayed to the right of the Tools icon are the Enhance, Flag, Favorite, Tag, and Show Photo Info icons (shown in Figure 7-11). On the iPad, the Enhance, Rotate, Flag, Favorite, and Tag icons are displayed near the bottom center of the screen. Here’s a summary of what these features and functions are used for:
![]() Enhance—With a single tap, this tool automatically adjusts the contrast, brightness, and saturation in an entire image.
Enhance—With a single tap, this tool automatically adjusts the contrast, brightness, and saturation in an entire image.
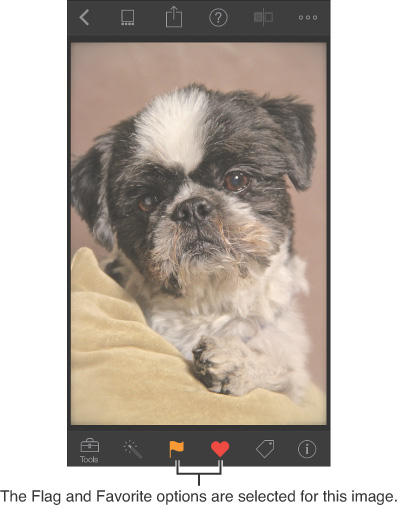
FIGURE 7-11 The Flag, Favorite, and Tag tools can be used to help you later find and sort images. This image has been both flagged and selected as a favorite.
![]() Rotate—On the iPad, tap on this icon to rotate the selected image 90 degrees counterclockwise. Tap twice to rotate the image 180 degrees, three times to rotate the image 270 degrees, or four times to return it to its original orientation. On the iPhone, place two fingers on the screen and use a twisting motion to rotate the image.
Rotate—On the iPad, tap on this icon to rotate the selected image 90 degrees counterclockwise. Tap twice to rotate the image 180 degrees, three times to rotate the image 270 degrees, or four times to return it to its original orientation. On the iPhone, place two fingers on the screen and use a twisting motion to rotate the image.
![]() Flag—In addition to organizing your images in albums, and then being able to sort and view them by date and location, iPhoto enables you to flag individual images and then quickly locate and view flagged images. When an image has been flagged, a Flag icon appears at the bottom center of its thumbnail (see Figure 7-12), and when viewing a larger version of the image in iPhoto, the Flag icon at the bottom of the screen is bright orange.
Flag—In addition to organizing your images in albums, and then being able to sort and view them by date and location, iPhoto enables you to flag individual images and then quickly locate and view flagged images. When an image has been flagged, a Flag icon appears at the bottom center of its thumbnail (see Figure 7-12), and when viewing a larger version of the image in iPhoto, the Flag icon at the bottom of the screen is bright orange.
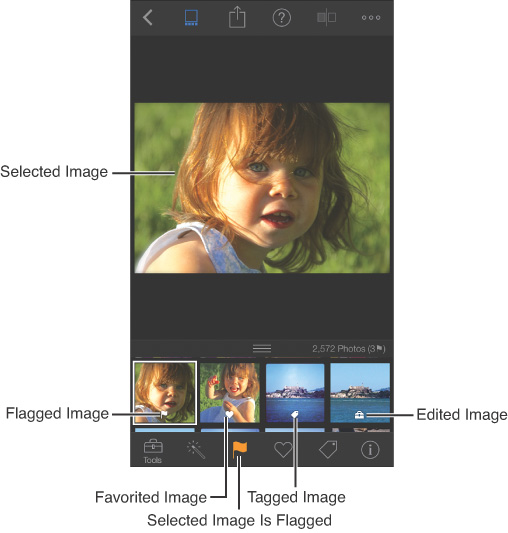
FIGURE 7-12 You can tell this image has been flagged because a Flag icon is displayed in its thumbnail.
Tip
When reviewing a collection of photos and choosing which ones to share with others or to create prints from, for example, one quick and easy way to highlight or set apart specific images is to flag them. To flag an image, simply select and view it, and then tap on the Flag icon once. To later remove a flag from an image, view it and again tap the Flag icon.
To view all the images you have flagged, regardless of which album each is stored in, return to the Library screen, tap on the Albums icon, and then, under the Library heading, tap on the thumbnail that represents the Flagged folder. All of the flagged images are then displayed as thumbnails, as if you’re looking at an album, even though the flagged images themselves might in fact be stored in different albums.
![]() Favorite—An alternative to flagging an image, in iPhoto you can add individual images to your Favorites list. To do this as you’re viewing an image, simply tap on the Favorites (heart-shaped) icon. The functions available related to favorite images work much the same way as flagged images, in that you can later view them all together or quickly find images you manually set apart as one of your favorites.
Favorite—An alternative to flagging an image, in iPhoto you can add individual images to your Favorites list. To do this as you’re viewing an image, simply tap on the Favorites (heart-shaped) icon. The functions available related to favorite images work much the same way as flagged images, in that you can later view them all together or quickly find images you manually set apart as one of your favorites.
![]() Tag—The Tag feature in iPhoto offers the capability to assign keyword-based tags to individual photos. It’s possible to later search and display images based on individual or groups of tags. For more information about assigning and using tags in iPhoto, see the “Work with Tags to Organize and Quickly Locate Images” section later in this chapter.
Tag—The Tag feature in iPhoto offers the capability to assign keyword-based tags to individual photos. It’s possible to later search and display images based on individual or groups of tags. For more information about assigning and using tags in iPhoto, see the “Work with Tags to Organize and Quickly Locate Images” section later in this chapter.
![]() Show Photo Info—View information (metadata) that’s associated with the digital image. The information displayed here varies, based on whether the image was taken using the camera that’s built in to your iPhone or iPad or it was taken using a standalone digital camera and then imported into iPhoto.
Show Photo Info—View information (metadata) that’s associated with the digital image. The information displayed here varies, based on whether the image was taken using the camera that’s built in to your iPhone or iPad or it was taken using a standalone digital camera and then imported into iPhoto.
Displayed near the top-right corner of the screen on the iPhone, and the bottom-right corner of the screen on the iPad, you’ll see the Options Menu icon, which offers a handful of additional tools for editing and enhancing, or managing an image. For example, from the Options menu, you can make the selected image the key photo in an album by tapping on the Set as Key Photo option. It’s also possible to delete or hide a photo, or copy and later paste Color and Effect settings between images. This can be a huge time-saver if you want to use the same collection of edits and effects on multiple images.
Use the Crop Tool
The Crop tool that’s built in to iPhoto offers the same functionality as what’s offered by the Crop tool in the Photos app, plus it enables users to straighten an image that was accidentally shot at an angle due to not holding the camera (the iPhone/iPad) straight.
When you tap on the Crop tool icon, a white frame appears around the selected image. Using the Gyro Mode dial that’s displayed at the bottom of the screen, use your finger to move it left or right to tilt or straighten the image (see Figure 7-13).
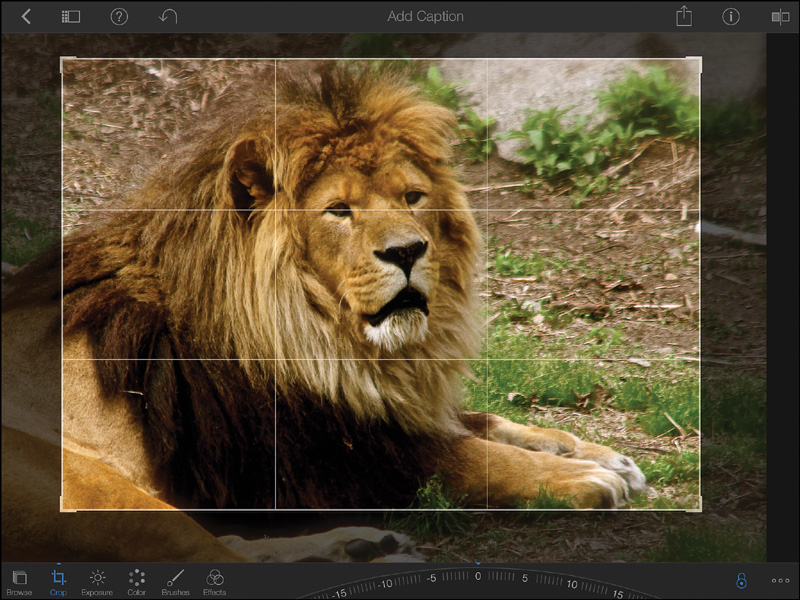
FIGURE 7-13 The Crop tool that’s built in to iPhoto offers more functionality than similar tools included in other apps, such as the Photos app.
Tip
Another way to tilt or straighten the image is to place two fingers, slightly separated, on the image, and then rotate your fingers to the left or right.
To zoom in and reframe or recompose an image, use a reverse-pinch finger gesture. To zoom out again, use a pinch finger gesture. Once you zoom in or out, to reposition the image within the crop frame, hold down one finger on the image and drag it around.
To resize the image and/or eliminate some of the background, place your finger on any side of the white frame around the image and drag it inward. It’s also possible to place your finger at one of the corners of the frame and drag inward, at a diagonal.
When using the Crop tool in iPhoto, to preserve the aspect ratio or select a preformatted aspect ratio to resize the image to specific measurements, tap on the More icon. It looks like three dots displayed in a horizontal row. An Aspect Ratio menu appears, allowing you to choose between a variety of common image sizes. To see all of your options, be sure to swipe horizontally when viewing this menu.
When you select an aspect ratio, to select and lock it, and then be able to resize the crop grid by moving the edges of the frame, tap on the Lock Aspect Ratio icon (which looks like a padlock) after the appropriate aspect ratio is set.
While you’re working with the Crop tool and readjusting the white frame around the selected image, hold down your finger anywhere outside the white frame to view the entire image, not just the portion that remains visible in the crop frame.
Tip
Using the Crop tool, it’s easy to reframe or recompose an image after it’s been shot. You can also zoom in on your subject after a picture has been taken to adjust the focal point of the image and incorporate the Rule of Thirds, for example. The Crop tool can also be used to resize an image.
Figure 7-14 shows an original image before the Crop tool was used. In Figure 7-15, the reverse-pinch finger gesture was used to zoom in, and then the image was repositioned within the frame. In Figure 7-16, some of the background of the image was removed by adjusting the crop grid. In Figure 7-17, the aspect ratio of the image was changed from its Original (default) setting to 8" × 10". As you can see, depending on how this tool is used, an image can be dramatically altered in a variety of ways.
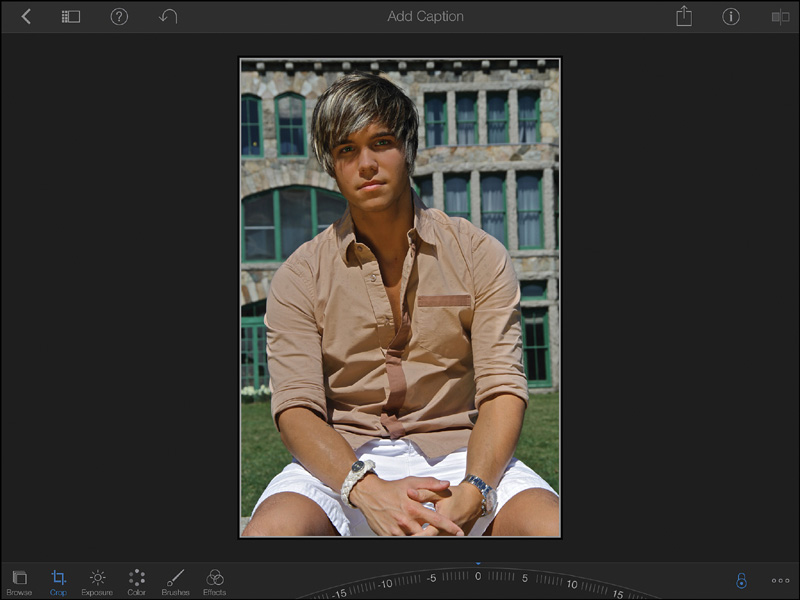

FIGURE 7-15 To zoom in on the intended subject, a reverse-pinch finger gesture was used. Then, the image was repositioned in the crop grid to incorporate the Rule of Thirds when reframing the shot.
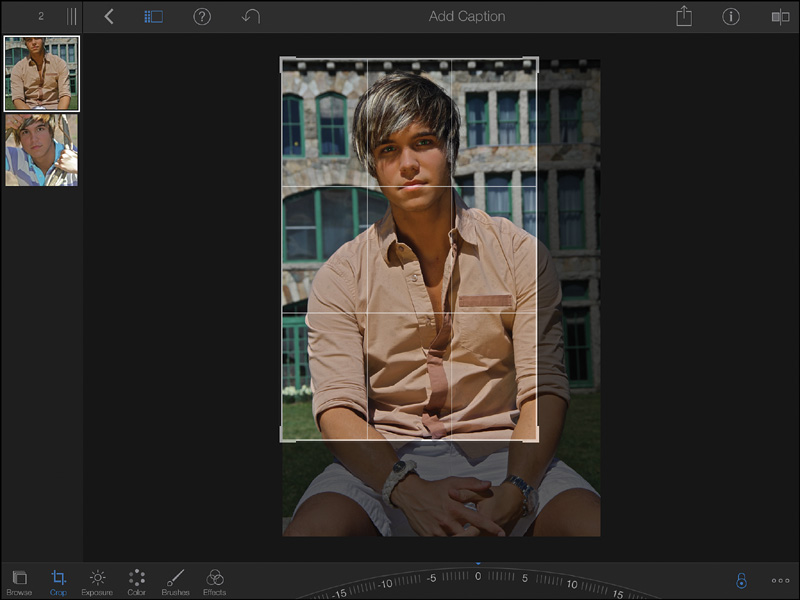
FIGURE 7-16 Here, some of the background of the original image (shown in Figure 7-14) was removed by moving the borders of the crop grid.
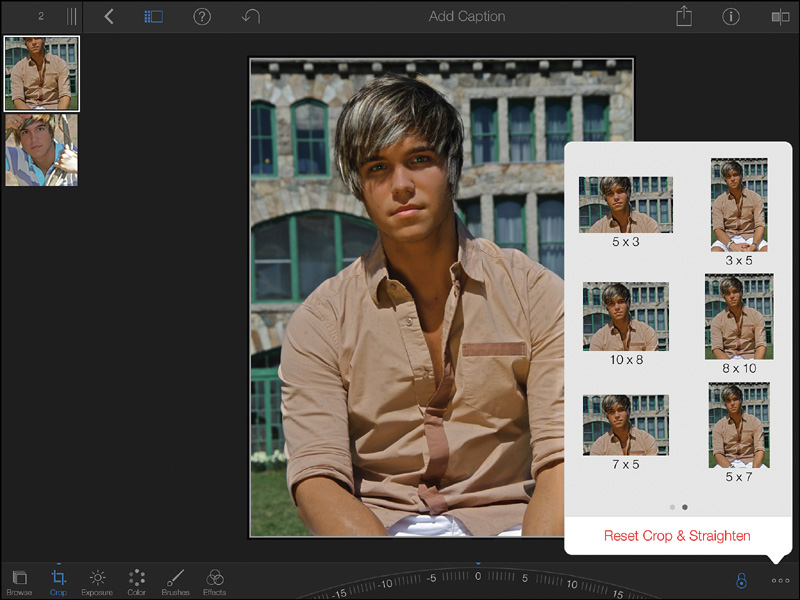
FIGURE 7-17 In this example, only the aspect ratio of the original image was changed from its Original (default) setting to 8" × 10".
As you’re working with a selected image, you can incorporate some or all of the different ways the Crop tool can be utilized. This gives you a tremendous amount of flexibility to reframe or recompose your photos after they’ve been shot, or to compensate for the fact you accidentally held the iPhone or iPad at an angle when taking a photo.
Use the Brush Tools
Instead of using an editing tool that fixes or impacts an entire image, the Brush tools offered by the iPhoto app enable you to edit only a specific area of an image. Plus, as you’ll discover, each separate Brush tool offers the ability to adjust a specific element of the image, such as its contrast, the vividness and brightness of colors, and clarity. Using the Repair tool, elements of a photo can also be removed, such as a blemish on someone’s face.
The subject shown in Figure 7-18 has unwanted blemishes on his face. Using the Repair tool, these can easily be removed (see Figure 7-19).

FIGURE 7-18 Using the Repair tool, you can remove unwanted blemishes from your subject’s face, or remove an unwanted item from an image.

FIGURE 7-19 Here, the Repair tool was used to remove the unwanted blemishes on the subject’s face. This process took less than 15 seconds to complete.
Unlike some of the other tools built in to iPhoto, the Brush tools require a bit more time and precision to utilize effectively. Sometimes, to achieve the best results, you need to use two or more separate Brush tools in a specific area of an image to achieve natural-looking results.
When you select a specific Brush tool, whether it’s Repair, Lighten, Darken, Saturate, Desaturate, Sharpen, or Soften, for example, be sure to customize the tool before you use it to alter your image. This is done by tapping on the Brush Options icon, and then using the slider that’s displayed in the Brush Options window to adjust the brush size, for example. Figure 7-20 shows the available Brush Options when the Saturate tool is selected.

FIGURE 7-20 Adjust the size of the virtual brush, as well as other options related to the Brush tool that’s selected, by accessing the Brush Options menu.
Tip
The way the Brush tools were designed, they simulate a virtual paintbrush that when editing your images, you apply to a photo using your finger, as if you’re finger-painting. Think of the selected Brush tool as a finger paint that’s applied directly onto the image by then moving your finger around on the iPhone or iPad’s touch screen over the specific areas of the selected image.
For increased precision when using any of these tools, first zoom in on the area of the image you want to edit using a Brush tool, then use the Brush Options menu to adjust the size of the brush and make it smaller. At this point, you might also consider using an optional pen-shaped stylus, instead of your finger, to apply the Brush tool and edit your image.
You learn more about optional stylus accessories that can make certain types of photo editing more accurate in Chapter 10, “Use Optional Accessories to Improve Your Pictures.”
From the Brush Options menu, most of the Brush tools offer an option that enables you to quickly apply the selected tool to an entire image, as opposed to a specific area. This speeds up the photo editing process, but then overlaps with what’s possible using other editing and image enhancement tools that are built in to iPhoto.
To help you see what areas of an image you’ve applied a Brush tool to, turn on the virtual switch associated with the Show Strokes option that’s found in the Brush Options menu for many of the Brush tools. After applying a Brush tool, if you don’t like how your photo looks, tap on the Erase [insert brush name] Strokes or Erase All Strokes option that’s also associated with many of the Brush tools in the Brush Options menu.
Note
It’s also possible to tap on the Eraser icon, and then use it the same way you’d use a Brush tool, but to remove Brush tool effects from an area of an image by “finger-painting” over that area of the image when the Eraser is selected.
Tip
An additional way to increase the precision of some Brush tools is to tap on the Detect Edges icon. Then, the Brush tool you select is only applied to nearby areas of the image that showcase the same color and lightness as where you initially touch. Again, consider zooming in to see a larger view of the area of an image you want to edit before applying a Brush tool.
As you’ll discover, Brush tools give you the most flexibility when editing your images, but they’re also the most difficult and time-consuming tools in iPhoto to utilize. With a bit of practice using each Brush tool, and then using some experimentation in terms of which tools work well with each other to achieve specific results, you’ll soon be able to utilize professional-level photo editing techniques in the iPhoto app that were previously only available from full-featured photo editing software available on Macs and PCs.
Work with Tags to Organize and Quickly Locate Images
As you begin using iPhoto, create a list of what will be commonly used tags, such as Vacation, Kids, Sports, Pets, Friends, Parties, and Christmas. To do this, as you’re viewing any single image, tap on the Tag icon displayed near the bottom of the screen. When the Tags menu appears (see Figure 7-21), tap on the Enter New Tag field to create a new tag.
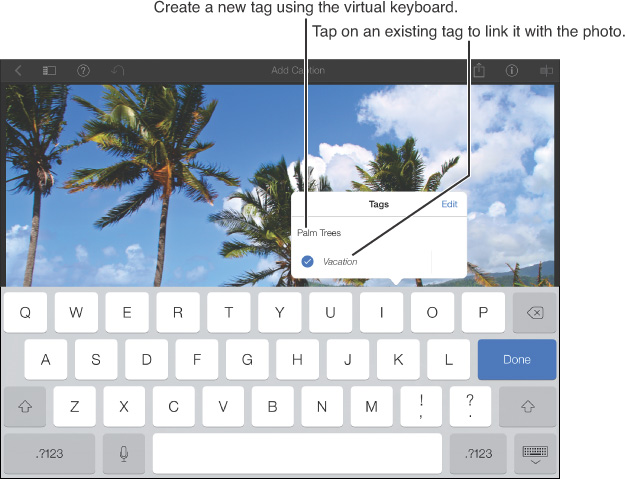
FIGURE 7-21 The Tags menu enables you to create new tags and apply specific tags to specific images. Later, you can search for and sort images based on the tags associated with them.
A tag can be any keyword or short phrase. After a tag is created, it becomes part of the app’s personalized Tags menu. Now, as you’re looking at photos and opt to add tags, you can quickly tap on one or more of the precreated Tag options. Each photo can have multiple tags associated with it, and you can create as many different tags as you desire.
Later, it’s possible to quickly find individual images by doing a tag search. For example, you can search for all images with the tags Kids and Christmas to see your collection of holiday photos featuring your kids that were taken throughout the years.
Note
The tags you add to an image become part of the metadata that’s stored with each image. If you later transfer an image from iPhoto on your iPhone or iPad to iPhoto on your Mac, the metadata information automatically transfers as well, so you’ll be able to find images on your Mac based on keywords (tags) that were assigned to photos while using iPhoto on your iOS mobile device. Likewise, the tags associated with photos on your Mac are accessible when images are transferred, copied, or synced to iPhoto on your iPhone or iPad.
To edit your Tags list, access the Tags menu and tap on the Edit option. You can then delete individual tags or rearrange the order in which tags appear in the menu by placing your finger on a Move icon that’s associated with a tag and dragging it upward or downward. By default, tags are displayed in the order they’re created.
When an image is tagged, a tag thumbnail is displayed in the bottom center of its thumbnail. As you’re viewing a larger version of the image, the Tag icon (displayed near the bottom center of the screen) is highlighted in blue. Tap on the Tag icon again to view which tags are associated with the photo.
Tip
To remove one or more tags from an image, as you’re viewing the image, tap on the Tag icon to access the Tags menu. Tap on each tag from the menu that you want to remove. The blue-and-white check mark associated with each selected tag disappears.
Share and Print Your Photos
As with just about any app you use on the iPhone or iPad, when it comes to sharing app-specific content, look for the Share Menu icon or Share option and tap on it. iPhoto offers an expanded Share menu, as shown in Figure 7-22.
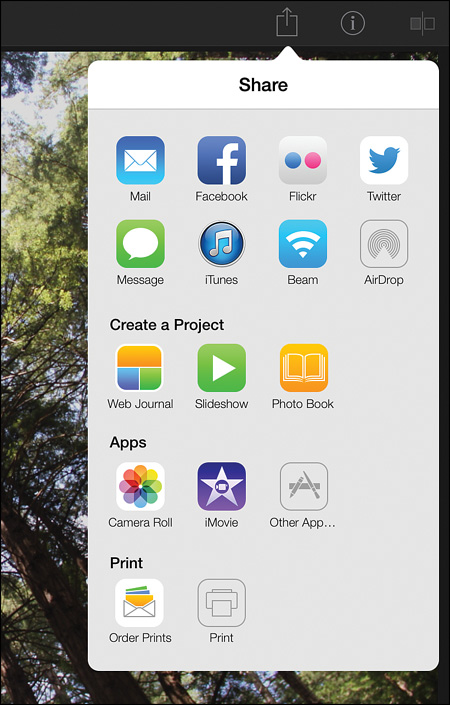
FIGURE 7-22 The Share menu incorporated into iPhoto offers a wide range of options for sharing individual images, groups of images, or projects.
Many of the Share menu options work just as they do when using the Photos app. Refer back to Chapter 6, “View, Organize, Edit, and Share Pictures Using the Photos App,” for more information about how to use the Mail, Facebook, Flickr, Twitter, and Message options.
Tip
To wirelessly share photos with other iOS mobile device users who are in close proximity to you, one option is to use the AirDrop feature built in to iOS 7. For information on how to use this feature, refer to Chapter 6.
Sync Photos via iTunes
You can sync individual photos, groups of preselected photos, or entire albums with your primary computer using the iTunes Sync process. Tap on the iTunes icon that’s found in the Share menu. From the iTunes submenu, it’s possible to sync just the selected image(s), or choose additional photos to sync by tapping on the Choose Photos option.
After you tap on the Choose Photos option, tap on the thumbnail for each image you want to select. A white check mark appears in each selected image thumbnail. After you’ve selected all the desired images, tap on the Next option. When the Share to iTunes pop-up menu appears, tap on the Export button. The selected images are then synced with iTunes running on your primary computer the next time it initiates an iTunes sync.
Tip
After tapping on the iTunes option to sync selected photos, and then tapping on the Choose Photos option, you also can select images based on a range. To do this, tap on the Range option. Then, tap on the first image thumbnail and the last image thumbnail you want to select. When you tap the Next option, all image thumbnails between the two selected thumbnails are selected. This is an alternative to tapping on each thumbnail separately.
Share Photos Using Beam
Although the iPhoto app supports AirDrop (which is compatible with the more recently released iPhone and iPad models) as a wireless method for transferring images between iOS mobile devices that are in close proximity, it also supports the Beam feature, which is listed in the app’s Share menu.
Note
For the Beam feature to work, both iOS mobile devices must be connected to the same wireless network via Wi-Fi, or both devices need to have Bluetooth turned on and be within range of one another. Using this feature, you can begin editing a photo on your iPhone, for example, and then quickly transfer it to your iPad and pick up exactly where you left off.
To use Beam, tap on the Beam option, select the photos you want to send, and then wait for your iOS mobile device to locate other compatible devices. These devices are displayed on the screen. Tap on the device to which you want to send the images. The recipient receives a message in a pop-up window asking if he or she wants to accept the images. If the recipient taps on the Yes button, the images are wirelessly transmitted to the recipient’s device and saved.
A Beam Completed message appears on your device when the transmission is finished.
To export one or more images from iPhoto to your Camera Roll folder, tap on the Camera Roll icon that’s displayed under the Apps heading in the Share menu. To select additional images to export, tap on the Choose Photos option.
Likewise, if you want to export images into the iMovie app (assuming iMovie is installed on your iPhone or iPad), tap on the iMovie icon. It’s also possible to easily export selected image(s) you’re working with in iPhoto into a compatible third-party photography app.
To do this, tap on the Other App icon. Select the image(s) you want to export using the Choose Photo option. Then, when the menu appears displaying the compatible apps you have installed on your iOS mobile device (see Figure 7-23), select the app to which you want to export the selected image(s) by tapping on the app’s thumbnail.

FIGURE 7-23 Select a compatible app that’s installed on your iPhone or iPad to which you want to export the selected photo(s).
Create Prints from iPhoto
When it comes to creating traditional prints from your digital images stored in iPhoto, the app offers two main options from within the Share menu. Tap on the Order Prints option to select prints and print sizes, and then order prints to be created by Apple’s own photo lab. After selecting one or more images, the Choose Format & Size screen appears. Tap on Auto-Sized, Traditional, Square, or Poster to see individual print size options and prices for each category. Then, tap on the print size you want to order (see Figure 7-24).

FIGURE 7-24 From directly within the iPhoto app, you can order prints from Apple’s own photo lab. Prints can be created in a variety of sizes.
From the Review Your Prints screen, use the virtual switch to turn on or off the Glossy Finish option. Tap on the Price icon to complete your order. Select your Ship To address when prompted. You can enter your own address, or choose any address from an entry in your Contacts database. Review your order details displayed in the Checkout screen, and tap Place Order to finalize your order. Keep in mind that a shipping and handling fee is applied to each order.
Tip
When purchasing prints, select the Glossy finish if you plan to display your prints alone or in a photo album or scrapbook. If the images will be framed behind glass or clear plastic, the Glossy finish is not needed. When a print with a Glossy finished is placed behind glass, it can create unwanted glares or make the image look too shiny.
When prompted, enter your Apple ID password in the Sign In With Your Apple ID window to complete the order. The credit/debit card that’s associated with your Apple ID will be charged for the prints. Within a few business days, the prints will be shipped and ultimately arrive at the designated address.
Tip
Instead of using Apple’s own photo lab to create professional-quality prints, there are a wide range of third-party apps you can use for this purpose. Chapter 11 offers more information about these apps and photo lab options, which include Shutterfly, Costco, and FreePrints. Later in this chapter, you’ll also discover how to use an AirPrint-compatible home photo printer to create your own prints from the images stored in your iPhone or iPad.
Create Web Journals to Showcase Your Photos
Web journals are one of the projects that can be created directly from iPhoto on your iPhone or iPad and used as a way to showcase groups of images via the Internet (see Figure 7-25) or on your iPhone or iPad’s own screen. To create a new web journal, tap on the Share Menu icon and select the Web Journal option that’s found under the Create a Project heading.
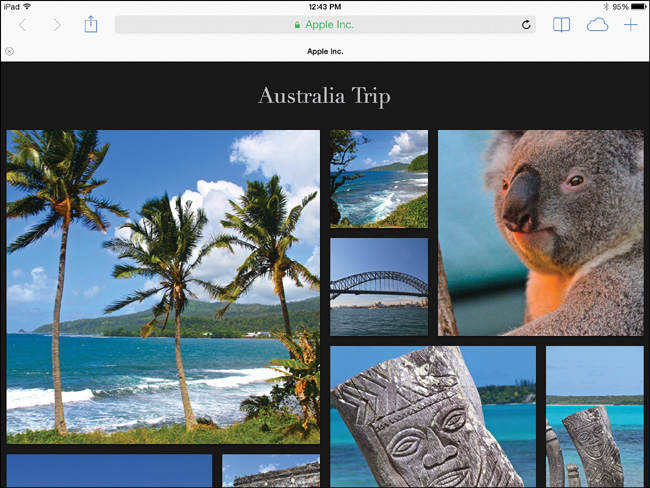
FIGURE 7-25 This web journal was created using iPhoto on an iPad, but then shared online via iCloud and made available to invitees using any web browser (shown here on an iPad running Safari).
Note
A web journal offers an alternative to using individual prints, a slideshow, a traditional online gallery, a photo album, or a photo book to showcase a group of related images in a visually interesting way. This is a feature that’s unique to the iPhoto app.
Next, select the images you want to include in the web journal. These can be images from a particular album or images from several different albums that you’ve flagged or otherwise preselected. You’ll then be asked whether you want to include the selected photos in an existing web journal that’s already been created, and if so, which one, or whether you’d like to create a new web journal from scratch.
To create a new web journal from scratch, tap on the New Web Journal option. This can be done from the Share menu or by tapping on the Projects option displayed near the bottom center of the Library screen, and then by tapping on the New Project icon (which looks like a circle with a plus sign in it), followed by the Web Journal option.
If you opt to create a new web journal, the next menu asks you to enter a title for your web journal and select a theme for it. Your theme options include Cotton, Border, Denim, Light, Dark, and Mosaic. Tap on the Create Web Journal to continue.
When iPhoto processes your web journal based on your selected images and the theme option you’ve selected, a pop-up window appears that says, “Web Journal Created.” It also displays the name of the web journal and how many photos it contains. Tap on the Show button to view your web journal.
Edit a Web Journal
Simply creating a web journal is easy and takes just a few seconds. However, you can invest a little more time and fully customize its appearance by manually adjusting the size and layout related to how each image is showcased. To do this, as you’re viewing the web journal on your iPhone or iPad, tap on the Edit option.
Next, one at a time, tap on each image. A blue border appears around the selected image (see Figure 7-26). You then have the option to resize the image. To drag it to another location, double-tap on the image. When a white left and right arrow appears in the image, use your finger to drag it to a new location in the web journal.
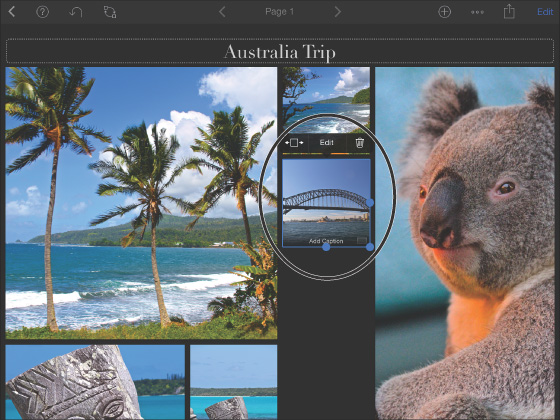
FIGURE 7-26 Control the size and location of each image displayed in a web journal. The image you’re working with will have a blue resizable frame around it.
Tip
To resize an image, in Edit mode, place your finger on one of the blue dots that appear on the blue frame that surround the selected image and drag it up, down, left, right, or at a diagonal. To add a text-based caption to an individual photo, tap on the Add Caption option that’s displayed near the bottom center of the image.
Figure 7-27 shows an image immediately after it was imported into a web journal, whereas Figure 7-28 shows the same image after is was resized, repositioned, and reordered.
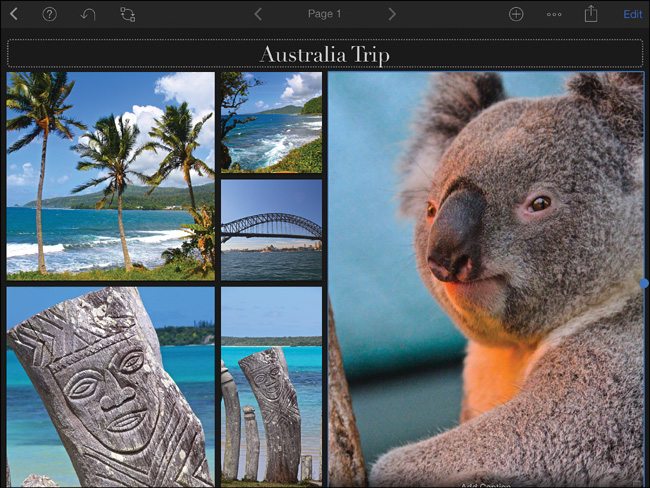

FIGURE 7-28 The same image after it was resized, repositioned, and reordered. This is just a sampling of what’s possible.
To truly customize your web journal, while in Edit mode, tap on the More Options icon (which looks like three dots displayed horizontally). From here, you can select a different theme, adjust the grid size, autosort the selected images, and choose a different layout. Tap on the Add icon to incorporate other elements to your web journal.
Add Additional Elements to Your Web Journal
Beyond just displaying photos with captions in a collage-like format, by tapping on the Add icon, it’s possible to incorporate additional elements to a web journal to make it more visually appealing, better organized, and informative. The Add menu, shown in Figure 7-29, offers 15 different options.
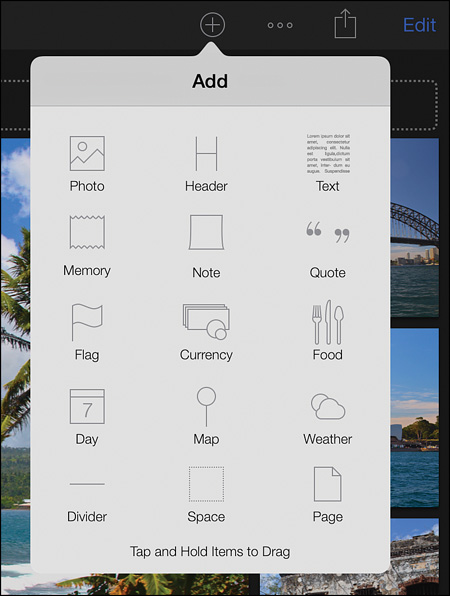
FIGURE 7-29 The Add menu enables you to incorporate a variety of optional elements into a web journal.
For example, tap on the Header option to add additional headlines to your web journal, beyond the main headline that displays the title, and that by default is seen at the top center of the web journal.
By tapping on the Text icon, it’s possible to easily add a box in the web journal that can contain text. You can decide on the size of the text box, and then determine how much text will be included, as well as customize the appearance of the text. Once a text box is created, it can be treated like a photo in the web journal and later repositioned or resized as you desire.
The Memory option enables you to create a text box, but then displays your text with a different background that looks like a torn sheet of paper. Meanwhile, the Note option gives you the opportunity to include what looks like yellow sticky notes in a web journal. By tapping on the Quote option, your text appears in large quotation marks, which is another way to format and display text in a web journal. Figure 7-30 shows examples of a Text Box, Memory, Note, and Quote after they’ve been added to a web journal.
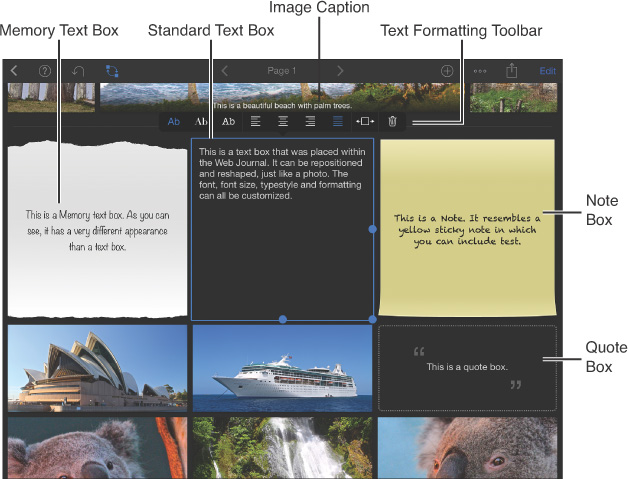
FIGURE 7-30 iPhoto offers a variety of ways to include text in a web journal. When you’re creating or editing text, the text formatting toolbar is accessible.
If you do a lot of traveling and ultimately use web journals to show off your vacation photos, tap on the Flag option to embed a graphic of a country’s flag. By default, iPhoto utilizes the geotag information associated with your photos and chooses the flag based on where the images were taken. However, by double- tapping on the flag graphic once it’s placed, you can turn off the virtual switch that’s associated with the Auto selection option, and then manually choose which flag to display.
Tip
To display a detailed map and showcase exactly where the selected photos in your web journal were taken, tap on the Add icon, and then choose the Map option. When the map is placed, you can resize the map, plus zoom in or out to determine what information is displayed (see Figure 7-31). To do this, use a reverse-pinch (zoom) or pinch (zoom out) finger gesture.

FIGURE 7-31 Adding a customizable map to your web journals graphically shows where images were taken.
Also from the Add menu, it’s possible to add further customizations to the appearance of the web journal. To do this, the Divider, Space, and Page options are available. From the Add menu, drag the Divider option onto your web journal layout and position it where you want it displayed. This drag-and-drop method also works with any of the elements that can be added from the Add menu.
If you want to give your web journal more of a traditional journal-like feel, tap on the Add icon and then select the Day option. A date graphic is added to your web journal that displays the day, month, and year the images were taken or that the web journal was created. After the Day graphic is placed, double-tap on it to customize the date information (refer to Figure 7-31).
Another way to make your web journal more journal-like is to add a graphic that displays the weather when the photos were taken. To do this, tap on the Add icon and select the Weather option. Then, when the Weather graphic is displayed, double-tap on it to customize the information it displays.
Publish Your Web Journal
After you’ve done the layout and design work that goes into creating a web journal, it is saved in the iPhone or iPad you’re using and can then be viewed at any time on your own device from within iPhoto. However, the true purpose of this feature is to allow you to share groups of images with other people. To achieve this, tap on the Share Menu icon and then choose iCloud, iTunes, Beam, or AirDrop as your sharing method. If you choose iCloud, the process for publishing your web journal is similar to creating and sharing a shared photo stream.
Tap on the iCloud option that’s found in the Share menu, and then when prompted, customize the options found in the iCloud menu that’s displayed. Your web journal is published online, as part of your free iCloud account. You then have the opportunity to decide exactly who will be invited to view your web journal and whether your invitees will be able to view it using just iPhoto or from any web browser.
Note
This process works very much like publishing a shared photo stream, which you learn how to do in Chapter 13, “Discover iCloud’s My Photo Stream and Shared Photo Stream.”
Note
Sharing a web journal using the iTunes, Beam, or AirDrop option works exactly the same way as you’d use these features to share individual photos while using iPhoto. Refer to the “Share and Print Your Photos” section earlier in this chapter.
What’s great about the Web Journal feature iPhoto offers is that you can create a professional-looking web journal and share it online with others in less than a minute or two. However, you also have the option of investing a bit more time to fully customize each web journal to create something that looks fantastic and unique.
Showcase Dazzling Animated Slideshows Using iPhoto
Long gone are the days when 35mm slides were used with a slide projector to create and present slide presentations to an audience. Today, slideshows are 100 percent digital. For example, PowerPoint or Keynote can be used to create business-style slideshow presentations that can incorporate your digital images. However, if you want to showcase a group of your digital photos, this can more easily be done from within iPhoto by creating an animated slideshow.
An animated slideshow created in iPhoto can include a group of images that you select, combined with titles, captions, animated slide transition effects, and background music. The end result is a presentation of your images that’s visually pleasing and professional looking, but that’s also fully customizable.
The slideshow you create can then be presented on your iPhone or iPad’s screen. It’s also possible to connect your iOS mobile device directly to an HD television set or projector to present your images to an audience. To accomplish this, you need optional adapters from Apple. Using the Apple TV device, it’s possible to wirelessly present an animated slideshow on an HD television set or monitor without the need for additional cables or adapters.
You can share the same digital slideshow you create using iPhoto online via iCloud so other iOS mobile device users (who also use iPhoto) or anyone with a web browser, including Mac and Windows PC users, can view it.
Tip
To create a slideshow from scratch using iPhoto, either tap on the New Project icon and select the Slideshow option, or while viewing an image, tap on the Share Menu icon, and then select the Slideshow option that’s displayed below the Create a Project heading.
When you opt to create a slideshow, you need to select exactly which photos will be featured. After you select the images, they are displayed as thumbnails on the iPhoto screen. Along the top of the Slideshow editing screen are a handful of command icons used for customizing and presenting the slideshow (see Figure 7-32).

FIGURE 7-32 From this Slideshow editing screen, you can create, edit, and manage slideshows that feature your own collection of preselected images. From the menu shown, choose the desired slide transitions and adjust other customizable options.
From left to right on the iPhone, you see the Back (<), Help, Play, Add, Options, and Share icons. On the iPad, you find the Back button icon (<), which returns you to iPhoto’s main Library screen, followed by the Help button and the Undo icon. Displayed at the top center of the screen is the Play icon. Tap Play to view your animated slideshow presentation.
Tip
To reorder the slides in your presentation, from the Slideshow editing screen, place your finger on an image thumbnail and drag it to a new location.
Tip
As a presentation is playing, tap on the screen to access onscreen controls, which include a Back icon (to return to the Slideshow editing screen), Time slider, Volume Control slider, as well as Rewind, Pause, and Fast Forward icons.
To add additional photos to your slideshow, tap on the Add icon. However, if you want to edit or delete a photo, double-tap on an image’s thumbnail while viewing the Slideshow editing screen, and then tap on the Edit or Trash Can option.
Displayed near the top-right corner of the Slideshow editing screen is the Slideshow Options Menu icon. Tap on this to choose your animation slide transition, whether you want to include background music as part of your presentation, and to set your slideshow speed (which determines how much time each slide is seen before transitioning to the next slide).
Tip
The Slideshow Options menu includes a dozen different slide transition formats to choose from. Simply tap on your option (refer to Figure 7-32). Then, move the Slideshow Speed slider left to slow down the speed at which slides are presented, or move it to the right to increase the slideshow speed.
Adding background music to a slideshow is also an easy process. Any music that’s already stored on your iPhone or iPad can be selected and used as slideshow background music, including music purchased from the iTunes Store or music composed using GarageBand.
Tip
To add music to your slideshow, access the Slideshow Options menu and turn on the virtual switch that’s associated with the Play Music option. When the Music field appears in the Slideshow Options menu, tap on it to select one of the preinstalled instrumental music tracks built in to the iPhoto app, or tap on the My Music option to select music that’s currently stored in the Music app. Choose a music selection that helps set the mood, based on the types of images you’re showcasing.
After your slideshow is created and saved in iPhoto, you can view or present it from within iPhoto or opt to share it with others via iCloud, Beam, or AirDrop. The slideshow can also be synced using the iTunes Sync process and viewed on your Mac or PC. All of these options are accessible by tapping on the Share Menu icon that’s displayed at the top-right corner of the Slideshow editing screen within iPhoto.
Be sure to read Chapter 12, “Share Your Digital Photos Online,” as well as Chapter 14, “Other Ways to Share Your Digital Photos,” to learn more about the different ways you can share a slideshow with others and/or present a slideshow to an audience.
Keep in mind that you can create digital slideshows that feature your photos using the Photos app, as well as many third-party apps. Each offers a different set of tools and features, as well as a different collection of themes and slide transitions, for example, that allow you to fully customize your presentation.
Design Your Own Photo Books
Creating a photo book, which will ultimately be professionally printed as a book and shipped to you from the printer, is yet another way to showcase and share a group of images. In recent years, the on-demand photo book printing process has advanced tremendously, while the cost to create these books has dropped significantly.
Note
Chapter 14 discusses a handful of additional options, services, and apps that can be used to create professional-looking photo books either directly from your iPhone or iPad or using the images taken with the camera(s) built in to your iOS mobile device(s).
When you opt to create a photo book from within the iPhoto app, the book you design on your iPhone or iPad’s screen will ultimately be uploaded to Apple’s own photo book printing service, be printed and bound as a book, and then shipped to the address you provide typically within a week or so.
Note
Regardless of whether you use Apple’s photo book printing service or another service from a company such as Shutterfly or Blurb, for example, the cost of your book will vary based on whether you choose to create a hardcover or softcover book, how many pages the book contains, and the trim size of the book. In some cases, the paper quality you select, the number of books you order, and other customizable options also impact pricing.
The benefits to creating a photo book using iPhoto include that you can design, upload, and order the photo book directly from your iOS mobile device, plus it’s possible to pay the printing and shipping costs using the credit/debit card that’s already associated with your Apple ID account. Additionally, there’s no need to first export your images out of the iPhoto app, and then import into another app to design the photo book.
Caution
Using the iPhoto app to create photo books offers a few drawbacks as well. For example, other photo book printing companies offer more options, such as the ability to choose between hardcover or softcover books, which are available in many different trim sizes. The various other photo book printing companies also offer their own collection of page templates (some of which can be fully customized), as well as different paper quality options. You’ll also discover third-party companies that offer lower photo book printing prices than what Apple charges.
For example, the TimeBox app offers a quicker and cheaper way to create photo books that offer fewer customizable options, whereas the Blurb.com photo book service offers many more customizable options for creating a higher-quality photo book.
From within iPhoto, the photo book creation and ordering process is relatively straightforward. When you tap on the Create Project icon, the Photo Book menu appears. From here, you select the book’s trim size; your options include 8" × 8" or 10" × 10". You also select an overall theme for the book.
When you then tap on the Create Photo Book option, the My Photo Book screen appears (see Figure 7-33). This includes empty page templates that compose what, by default, will be a 20-page printed book. Using the menu options and command icons displayed on the My Photo Book screen, you can then customize each page template, change the order of pages, and ultimately insert your photos into each template.

FIGURE 7-33 This is one of the screens you’ll see when creating or editing a photo book. Shown here are the page thumbnails that currently make up a 20-page book.
Tip
As you’re looking at the My Photo Book screen, tap on a page template to select it. Then, you can move that page to a different location by dragging it on the screen. It’s also possible to zoom in or out on the page thumbnail using a reverse-pinch or pinch finger gesture.
To edit and customize a page template and add photos to it, double-tap on the template. It is then displayed utilizing the entire screen, with command icons displayed along the top of the screen (see Figure 7-34).
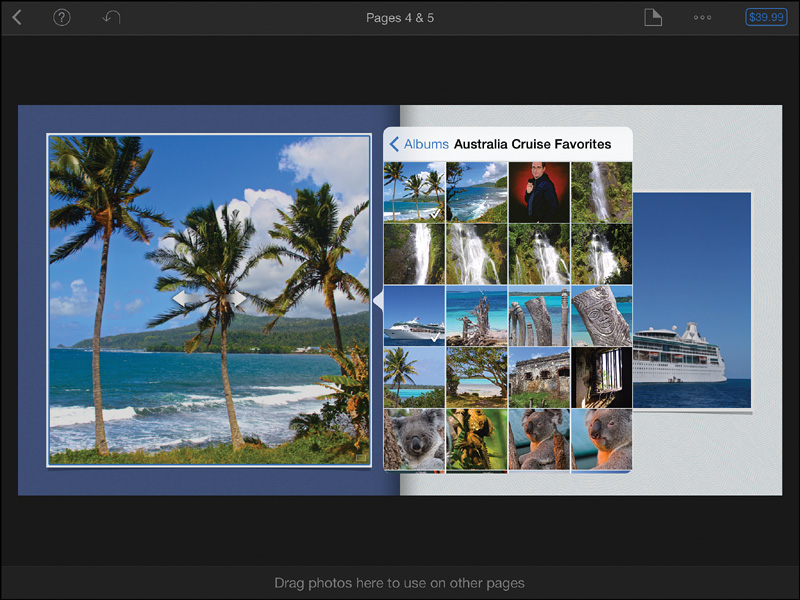
FIGURE 7-34 As you’re putting together your photo book, you can work with and customize one page, or one two-page spread at a time.
Tip
Along the bottom of the screen is a storage area where you can drag and drop images that you want to use elsewhere within your photo book. However, as you’re looking at a page template, tap on one of the photo frames (placeholders) on the virtual page to access the Add Photo option and select the image you want to place in that location. Once an image is placed, you can then edit, zoom, and reposition it as needed within that frame.
The trick to making a well-designed photo book is to select photos that best tell a story, and then choose an applicable theme and color scheme. Also, make sure the images that feature a subject oriented in a certain direction are always positioned so they’re facing into the book’s center spine, as opposed to off the page. An example of this appears in Figure 7-35, whereas an example of photos that are oriented in the wrong direction on the page is shown in Figure 7-36.
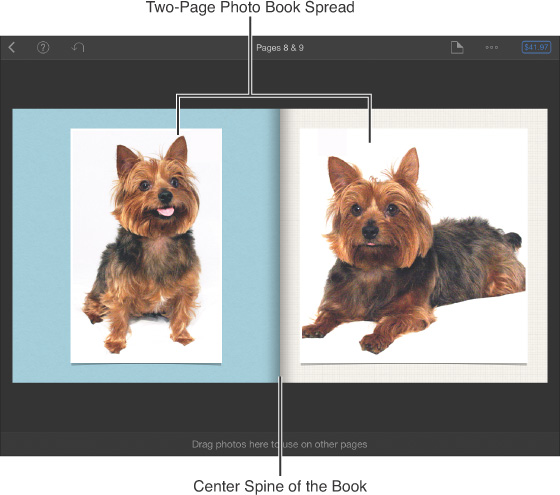
FIGURE 7-35 Shown here is a two-page layout in a photo book where the images are oriented so they’re facing toward the center of the book.
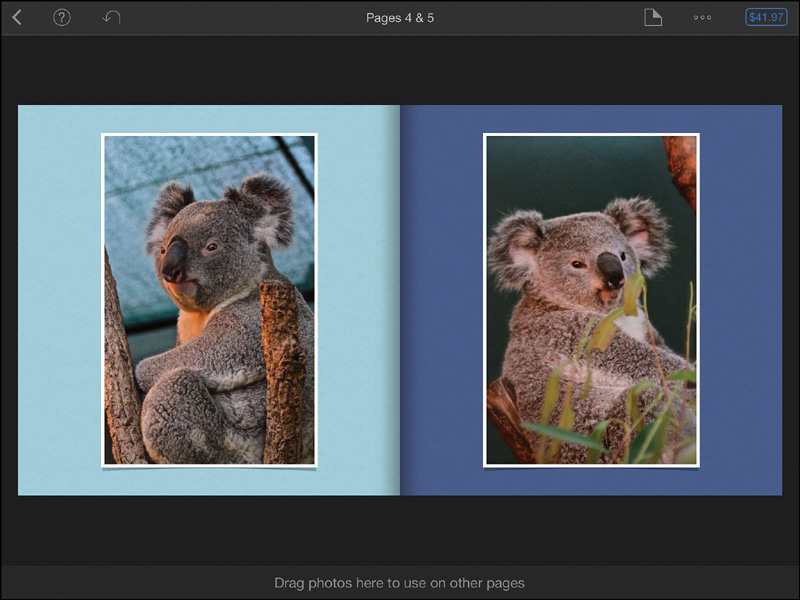
FIGURE 7-36 In this example, the images are oriented so they’re facing in the wrong direction, which ultimately takes away from the professional design of the book.
As you’re creating your photo book, tap on the New Page icon to add a page to the book and choose the page template you want to use. Keep in mind that iPhoto offers single-page templates as well as multipage spreads to choose from. This enables you to spread one photo, or a selection of photos, across two pages (see Figure 7-37).
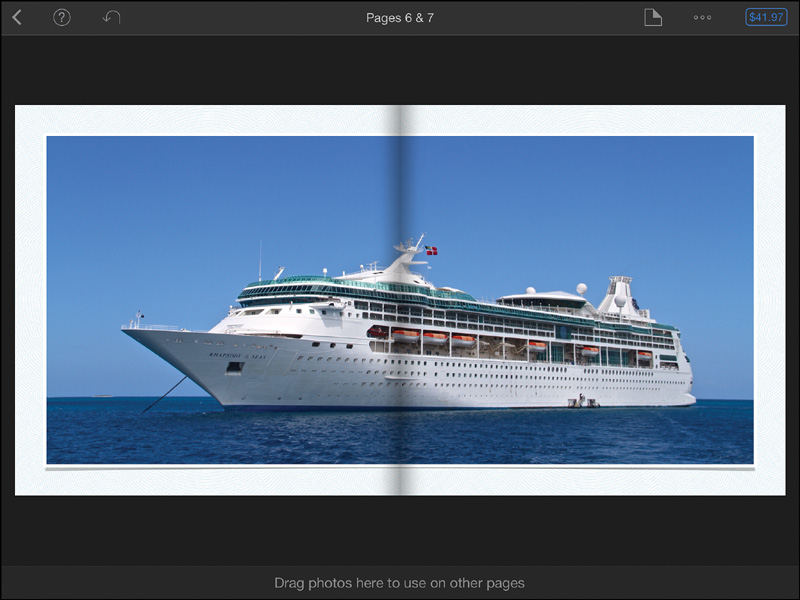
FIGURE 7-37 An example of how one image can be spread over two full pages when designing a photo book. This type of layout works particularly well with panoramic shots (that is, landscapes, city skylines, wide-angle shots, and/or photos of large groups).
Tip
On page layouts where the photo doesn’t take up an entire page, you can select a background color to be displayed. To do this, as you’re looking at a page thumbnail, tap on the Add Page icon, tap on the Background option, and then select your desired background color from the Background menu. From a visual continuity standpoint, it’s usually a good idea to use the same background color throughout a photo book, or at least on individual, two-page spreads.
As you go through the process of designing your unique photo book, the iPhoto app continuously displays the price for printing the book, based on the current number of pages and selected options. The price is displayed at the top-right corner of the screen, in a Price button (see Figure 7-38). When you’re finished designing your photo book, tap on this Price button to begin the ordering process, which is very much like ordering prints from the iPhoto app.

FIGURE 7-38 The iPhoto app keeps track of how much printing your photo book will cost. Tap on this Price button when you’re finished creating the book and you’re ready to order one or more copies of it.
It’s important to understand that photo books that are designed using iPhoto can only be printed using Apple’s own photo book printing service. If you want to use another photo book printing service, you must either export your photos into another photo book creation app or upload your pictures to an online-based photo book design and printing service.
Caution
When ordering prints or photo books from the iPhone app, pay attention to any warning messages that appear as you go through the ordering process. You will be notified if the resolution of an image, how an image is sized, or some other aspect of an image isn’t suitable for printing, or in the case of photo books, if you’ve made an error when formatting or designing specific pages or using various templates. Be sure to fix these errors before completing the ordering process.
If you accidentally place an order from Apple’s photo lab, but discover a problem within an hour after the order has been completed, it’s often possible to access Apple’s website to change or cancel the order, before it has been processed.
Some photo book printing services, including Blurb, allow you to create a printed photo book, and at the same time, order an eBook version of your photo book, which is fully compatible with the iBooks app. Thus, you can store your photo books in your iOS mobile device and view them anytime using iBooks.
More Reasons to Use iPhoto
In addition to all of the additional features and functions that iPhoto offers beyond what’s possible using the Photos app, while still maintaining full compatibility with iCloud, one of the great things about using iPhoto to edit and enhance photos is the Undo option.
Regardless of what feature or function you use to edit or enhance a photo, if the result is not to your liking, simply use the Revert, Remove, or Reset command, or tap on the Undo icon. On the iPhone or iPad, the Revert, Remove, or Reset command can typically be found when you tap on the Options Menu icon to reveal the Options menu related to a particular feature or function. On the iPad, there’s also the Undo icon, which can typically be found among the command icons at the top of the screen.
Tip
No matter what you’re doing in the iPhoto app, to go back to the previous screen, tap on the Back (<) icon that’s typically displayed near the top-left corner of the screen. When you do this, unless otherwise notified, your work is automatically saved.
In other words, anytime you’re working with a photo, you always have the option of quickly and easily undoing the last thing you did, removing a specific effect, or getting rid of the changes made to an image as the result of using a particular editing tool. Thus, you’re totally free to experiment by mixing and matching the use of various iPhoto tools to create the most visually impressive image possible, without running the risk of making mistakes you can’t easily recover from.