9. Photography Apps That Expand Your Photo Editing and Enhancement Capabilities
In This Chapter
![]() Learn about optional photography apps that enable you to view, edit, enhance, and share your photos
Learn about optional photography apps that enable you to view, edit, enhance, and share your photos
![]() Add filters and other elements to your images after they’ve been taken
Add filters and other elements to your images after they’ve been taken
You already know that the Camera app can be used to take photos by utilizing the front- and/or rear-facing cameras that are built in to the iPhone or iPad. Then, those photos can be viewed, edited, enhanced, printed, or shared from the Photos app. Or, if you want to expand what’s possible, instead of using the Photos app that comes preinstalled with iOS 7, you can take advantage of Apple’s own iPhoto app (which you learned about in Chapter 7, “Expand Your Photo Editing Toolbox with iPhoto”).
Yet another option is to download a third-party photography app that’s designed specifically for photo editing and image enhancement. These apps typically include tools and features not found in the Photos or iPhoto apps but that can be used to quickly and dramatically improve the appearance of your images, without first having to transfer them to a PC or Mac for editing. This chapter showcases a handful of third-party apps that can be used for photo editing, image enhancement, and sharing, directly from your iPhone or iPad.
Beyond the photography apps that are showcased in this chapter, be sure to visit the App Store and enter the phrase “Photo Editor” in the Search field to find hundreds of additional app alternatives you can use to edit, enhance, and/or share your images directly from your iPhone or iPad.
Third-Party Photo Editing and Image Enhancement Apps
In addition to offering photo editing and image enhancement tools not offered by the Photos or iPhoto apps, many of the third-party photography apps that are designed to handle photo editing and image enhancement also include specialized tools for sharing your images using online-based services that aren’t necessarily integrated with the Photos or iPhoto apps.
Keep in mind that although many of the third-party photo editing and image enhancement apps are compatible with the iPhone and iPad, doing detailed image editing that goes well beyond applying a precreated filter or frame to an entire image is much easier to do when you’re working with an iPad or iPad mini’s larger screen (compared with the iPhone).
Note
Instead of using the Photos or iPhoto apps and Apple’s own iCloud My Photo Stream and Shared Photo Stream features to automatically create an online backup of your images, as well as online albums or galleries that can be shared with others, many third-party photography apps offer integration with other, independent, cloud-based photo sharing and backup services, like Flickr.com, Smugmug.com, Dropbox, Adobe Creative Cloud, and Shutterfly.com. Thus, by using some of these third-party apps, you’re given more choices as to where you back up your images in the cloud and how you share your images online.
The following sections detail five popular and powerful photo editing and image enhancement apps that can be used on both images captured using your iOS mobile device or that are transferred into or stored on your iPhone or iPad. In some cases, these apps also have picture-taking capabilities built in, which can be used instead of the Camera app for snapping photos.
Adobe Photoshop Touch
Adobe Photoshop is one of the most powerful photo editing applications available for Macs and PCs. In fact, it’s a rather complex and costly application that most semiprofessional and professional photographers use.
The Adobe Photoshop Touch app ($4.99), however, offers some of the same photo editing and image enhancement capabilities as what was otherwise only possible on a Mac or PC, but allows anyone to use these tools directly on an iPhone or iPad.
What’s great about Adobe Photoshop Touch is that it enables you to edit or enhance specific areas in a photo, as opposed to simply applying a filter or effect to an entire image. If you’re a Photoshop Creative Cloud (Mac or PC) user, you can automatically sync images between your computer and your iPhone or iPad, and edit images on either platform.
Tip
Because Adobe Photoshop Touch allows for intricate editing to be done on specific areas of an image, when you use this functionality, it’s best to zoom in on the area of an image you want to work on and then, for added precision, utilize an optional pen-shaped stylus (instead of your finger) when painting, drawing, or using certain tools as part of the editing process.
When you first launch Adobe Photoshop Touch, be sure to take advantage of the onscreen tutorials to help you get acquainted with this rather detailed and complex app, as well as the specific editing and enhancement tools it offers (see Figure 9-1). Tap on the Begin a Tutorial button, and then select which feature or function you want to learn more about. For example, you can quickly learn how to use layers or selections, add dramatic flair to an image, paint with visual effects, replace individual colors within photos, add artistic frames, clean up the background in an image, or blend multiple images together into one.
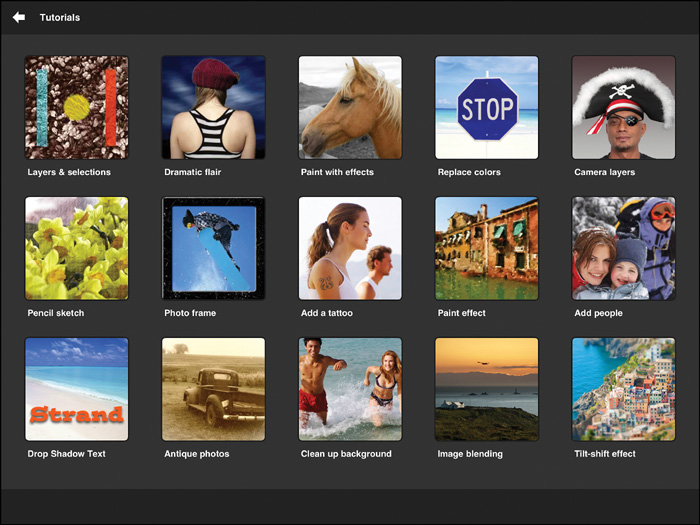
FIGURE 9-1 Due to its complexity and power, the Adobe Photoshop Touch app has built-in tutorials that explain exactly how to use each editing and enhancement tool that’s offered by the app.
As you’re ultimately working with your own images, you can mix and match the app’s built-in effects.
To begin editing your own images, tap on the Create a New Project icon or the Import Image icon, both of which are displayed near the bottom center of the main app screen.
When you use the Create a New Project option, you can start with a blank canvas of any size. Simply enter the desired width and height of the virtual canvas (which is measured in pixels). However, when you import an image, you can load any digital image that’s stored in your iOS mobile device or that’s stored online in Adobe’s Creative Cloud, Google, or Facebook. It’s also possible to import images directly from a standalone digital camera.
After a single image is loaded into the Adobe Photoshop Touch app (see Figure 9-2), all of your editing and image enhancement tools are displayed as icons along the top and in the left and right margins of the screen. Select a tool, and then use your finger or an optional stylus to use that tool on the selected image.
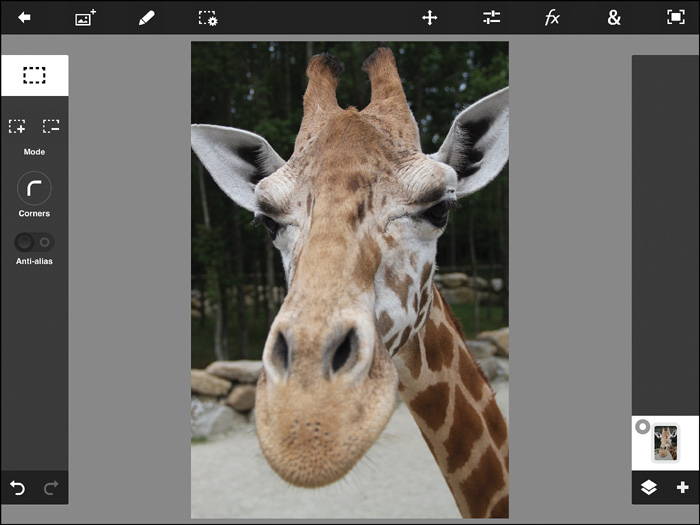
FIGURE 9-2 Load any digital image (up to 12MP resolution) into the iPhone or iPad version of Adobe Photoshop Touch to begin editing it.
For example, tap on the Adjustments icon (displayed near the top-right corner of the app’s screen) to access a menu that contains a dozen easy-to-use tools for adjusting specific elements of an image, such as saturation, brightness/contrast, temperature, or color balance.
Tap on the Auto Fix option to quickly enhance an image and automatically adjust all of these elements with a single tap. However, if you select one of these tools to work with, a specialized slider displays.
Tap on the fx icon to access 36 different special effect filters that you can instantly apply to an entire image, and then manually adjust the intensity of the filter using onscreen sliders (see Figure 9-3). Another option is to tap on the & icon, which then displays a submenu offering additional photo editing tools that are at your disposal, such as a Crop, Image Size, Rotate, or Lens Flare.
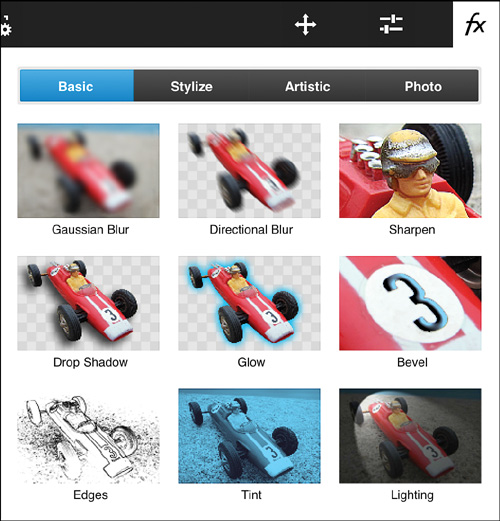
FIGURE 9-3 Adobe Photoshop Touch has 36 special effect filters built in to the app. Mix and match these filters to create truly customized visual effects.
Tip
As you’re working with an image, tap on the Full Screen View icon (displayed in the top-right corner of the screen) to showcase only your image, without the added onscreen clutter of menus and command icons. Use a reverse-pinch or pinch finger gesture to zoom in or out as you’re viewing the image. Doing this impacts your view of the image, not the image itself. Once you zoom in within a photo, drag your finger on the screen to reposition the image so you can view a specific part of it.
After you’ve used the various editing tools to edit or enhance your image, be sure to save your work in the Adobe Photoshop Touch app. Then, from the app’s main menu screen, tap on the Share icon to upload the image to Adobe Creative Cloud, export the image to your Camera Roll folder (to be stored on your iOS mobile device so it’s accessible using other photography apps, including Photos or iPhoto), or export and share the image via the Messages, Mail, Twitter, or Facebook app.
From the app’s Share menu, it’s also possible to export an image directly to another compatible photography app, such as iPhoto, Shutterfly, or Instagram, or print the image using an AirPrint-compatible printer.
Tip
The Adobe Photoshop Touch app is designed for advanced photo editing and image enhancement. Another alternative is the free Adobe Photoshop Express app, which is less feature-packed but much easier to use. It utilizes a series of one-tap filters (there are more than 20 to choose from) as well as image enhancement tools that you can quickly apply to an entire image.
Note
Both Adobe Photoshop Touch and Adobe Photoshop Express are fully compatible with Adobe’s own Creative Cloud online file sharing and image backup service, which can be used instead of Apple’s iCloud to back up, sync, and share images online. A free membership to Adobe Creative Cloud includes 2GB of online storage space.
If you’re serious about photo editing and want a powerful collection of tools available to you from your iPhone or iPad that rivals what’s possible using Adobe Photoshop Creative Cloud on a Mac or PC, you’ll definitely want to use the Adobe Photoshop Touch app, providing you’re willing to invest the time needed to learn how to use the app and its various features.
This app has a steep learning curve compared with others, but what’s possible using this app goes unrivaled, making it a must-have app for serious hobbyists, as well as semiprofessional and professional photographers.
Afterlight
The Afterlight app ($0.99) is really two apps in one. You can use it instead of the Camera app to actually take photos, plus it doubles as a feature-packed photo editing and image enhancement tool. From the app’s opening screen, tap on the Camera icon to begin taking photos, or tap on the Picture icon to begin working with images stored on your iPhone or iPad.
Tap on the gear-shaped Settings Menu icon that’s displayed at the bottom-right corner of the screen to customize some of the app’s settings. For example, you can set the app to automatically launch in Camera mode, so it’s ready to take photos.
The Camera mode works very much like the Camera app. The main area of the screen serves as your viewfinder. The large white circle icon is your Shutter button. Tap on the Grid option to superimpose a tic-tac-toe-like grid over the viewfinder to use as you frame and compose your shots.
Tip
As you’re using the Afterlight app as a camera, tap on the screen, directly over where your intended subject is located, to activate the autofocus sensor.
Use the Camera Selection icon to switch between the front- and rear-facing cameras built in to your iPhone or iPad. Tap on the Self-Timer icon one or more times to activate and then set the self-timer for 3, 7, or 10 seconds. Tap on the Cancel option to exit out of the Camera mode and return to the app’s main menu screen.
When you tap on Afterlight’s Photo Editor icon to begin editing your photos, you’re given the option to access any photo that’s stored on your iPhone or iPad. After you’ve selected an image, icons that represent your image editing tools appear along the bottom of the screen (see Figure 9-4). From left to right, this includes a Revert Image tool, the Adjustments Menu icon, the Filters Menu icon, an Effects Menu icon, a Crop/Rotation Tools Menu icon, and a Frame and Text Menu icon.
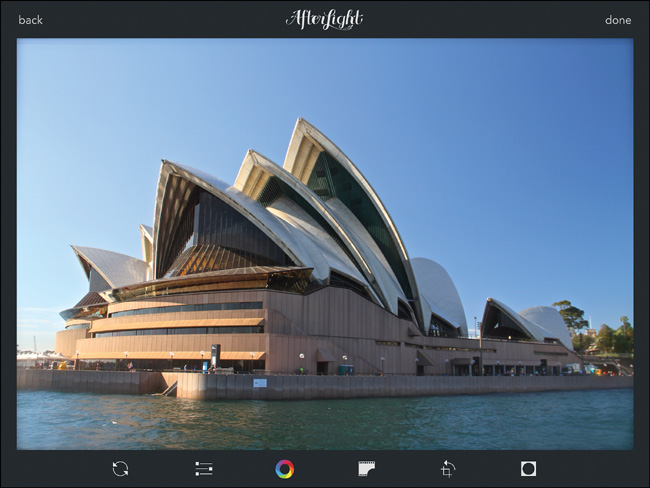
FIGURE 9-4 This is what the main image editing screen of the Afterlight app looks like on the iPad Air.
Although each of these tools impacts an entire image, after you select a specific tool, you can adjust its intensity using an onscreen slider. As you’ll discover, Afterlight offers dozens of easy-to-use and powerful photo editing and image enhancement tools but does not offer the capability to utilize each tool on specific areas of an image, which is something that Adobe Photoshop Touch offers. You can, however, mix and match photo editing and enhancement tools, plus adjust the intensity of each, which gives you a tremendous amount of flexibility and ability to use your own creativity when working with your images.
After you edit images, you can save them in Small, Medium, or Maximum resolution (which impacts an image’s file size) and then export them to your iOS mobile device’s Camera Roll folder as well as to Instagram, Flickr, Facebook, Twitter, or other third-party photography apps. You can also share them via email (using the Mail app) or send them as a virtual postcard from within the Afterlight app.
Photo Editor-
This free, advertiser-supported app offers a plethora of editing tools that you can use on any digital images stored on your iPhone or iPad. It also has a Camera mode, so you can take pictures using this app (with the front- or rear-facing cameras built in to your iPhone or iPad), and then edit them. To launch the picture-taking function, tap on the Camera Lens icon displayed near the top-left corner of the main app screen.
To load an image into this image editing app, launch Photo Editor-, and then tap on the File (folder-shaped) icon that’s displayed in the top-left corner of the screen. Choose an album, and then select one or more images by tapping on their respective thumbnails. When you do this, one at a time, the images appear in the main area of the screen, while a collection of 16 editing and enhancement tool icons appears along the bottom of the screen (see Figure 9-5).
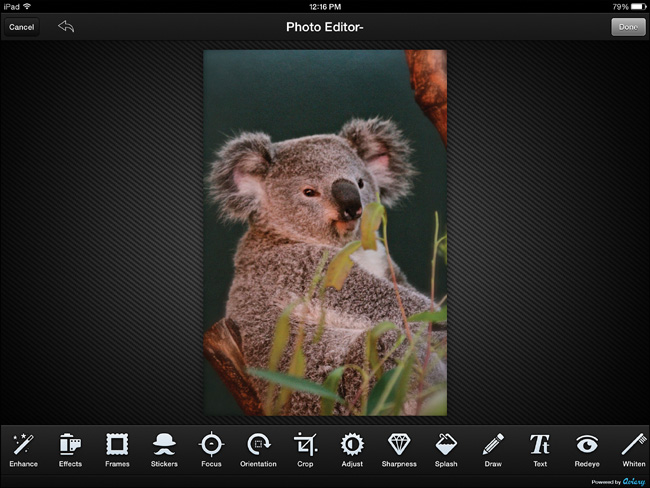
FIGURE 9-5 After you load an image, start by tapping on one of the 16 editing and enhancement tool icons that are displayed near the bottom of the screen.
From left to right, these 16 editing and enhancement tools are as follows:
![]() Enhance—Tap on this option to reveal a submenu that allows for one-tap image enhancements related to Hi-Def, Illuminate, or Color Fix.
Enhance—Tap on this option to reveal a submenu that allows for one-tap image enhancements related to Hi-Def, Illuminate, or Color Fix.
![]() Effects—With a single tap, apply one of a dozen “Original” effect filters to your entire image. These filters are not adjustable, but you can combine filters to create many unique effects (see Figure 9-6). Tap on the Add Effects button to add a dozen additional filters. (This requires a $1.99 in-app purchase.)
Effects—With a single tap, apply one of a dozen “Original” effect filters to your entire image. These filters are not adjustable, but you can combine filters to create many unique effects (see Figure 9-6). Tap on the Add Effects button to add a dozen additional filters. (This requires a $1.99 in-app purchase.)
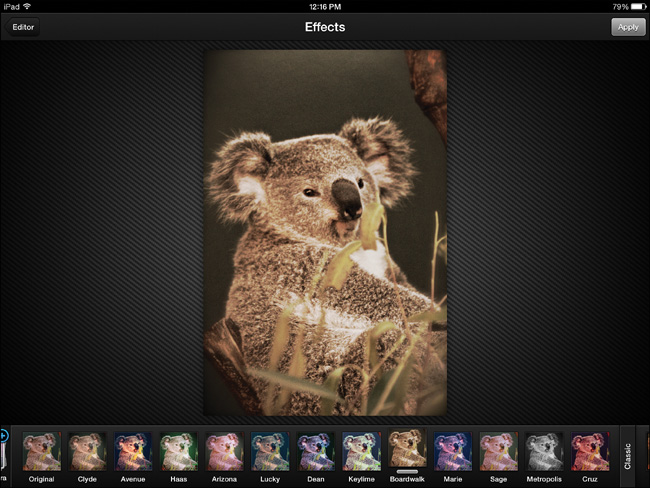
FIGURE 9-6 The Photo Editor- app has its own collection of special effect filters you can use to quickly and dramatically alter the appearance of an image.
Tip
When you tap on one of these tool icons, the impact it has on the image is immediately displayed. To save the enhancement, tap on the Apply button. To undo the enhancement, tap on the tool icon again. To return to the Editor menu, tap on the Editor button.
![]() Frames—Choose from a dozen digital frames that can be added as a border around the image you’re editing. You can acquire additional frame sets through in-app purchases.
Frames—Choose from a dozen digital frames that can be added as a border around the image you’re editing. You can acquire additional frame sets through in-app purchases.
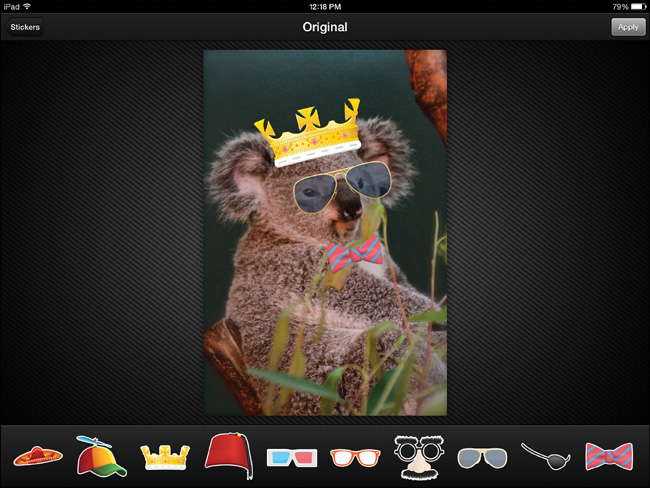
![]() Stickers—The app comes with a set of 24 virtual stickers that you can place in your images, and then resize and rotate (see Figure 9-7). Additional sticker “packs” are available through in-app purchases.
Stickers—The app comes with a set of 24 virtual stickers that you can place in your images, and then resize and rotate (see Figure 9-7). Additional sticker “packs” are available through in-app purchases.
![]() Focus—Choose what area of the image should be the primary focal point by selecting this tool, and then tapping on a specific area within the image. This autofocuses the image, ensuring that the area you selected becomes the sharpest area of the image. As you go further from the selected point, the image slightly blurs.
Focus—Choose what area of the image should be the primary focal point by selecting this tool, and then tapping on a specific area within the image. This autofocuses the image, ensuring that the area you selected becomes the sharpest area of the image. As you go further from the selected point, the image slightly blurs.
![]() Orientation—Tap on this tool to access a submenu that enables you to rotate an image left or right, or flip the image horizontally or vertically.
Orientation—Tap on this tool to access a submenu that enables you to rotate an image left or right, or flip the image horizontally or vertically.
![]() Crop—Manually crop the image you’re working with and/or set its aspect ratio.
Crop—Manually crop the image you’re working with and/or set its aspect ratio.
![]() Adjust—Access a submenu that enables you to manually adjust the brightness, contrast, warmth, and/or saturation within the image separately using sliders.
Adjust—Access a submenu that enables you to manually adjust the brightness, contrast, warmth, and/or saturation within the image separately using sliders.
![]() Sharpness—Use a slider to manually adjust the sharpness of an image, enabling you to transform a slightly blurry image into one that’s more in focus. Move the slider to the left to blur an image. This tool applies to the entire image.
Sharpness—Use a slider to manually adjust the sharpness of an image, enabling you to transform a slightly blurry image into one that’s more in focus. Move the slider to the left to blur an image. This tool applies to the entire image.
![]() Splash—Use this tool to transform a full-color image into black and white, and then to replace the color in only specific areas of the image (if you choose).
Splash—Use this tool to transform a full-color image into black and white, and then to replace the color in only specific areas of the image (if you choose).
![]() Draw—Using your finger, choose a pen thickness and color, and then manually draw on the screen. What you finger-paint on the screen is superimposed over the photo you’re editing.
Draw—Using your finger, choose a pen thickness and color, and then manually draw on the screen. What you finger-paint on the screen is superimposed over the photo you’re editing.
![]() Text—Add a text-based caption or title to your photo. You can also adjust the text size and font color, and then reposition or rotate the text manually. It’s not, however, possible to change the font.
Text—Add a text-based caption or title to your photo. You can also adjust the text size and font color, and then reposition or rotate the text manually. It’s not, however, possible to change the font.
![]() Redeye—Use this tool to quickly repair red-eye that appears in a photo as a result of using the flash.
Redeye—Use this tool to quickly repair red-eye that appears in a photo as a result of using the flash.
![]() Whiten—If your subject is smiling, tap on this tool and paint over the teeth to whiten and brighten his or her smile.
Whiten—If your subject is smiling, tap on this tool and paint over the teeth to whiten and brighten his or her smile.
![]() Blemish—Remove an unwanted blemish from a subject’s face. This tool is mainly for editing portraits but can be used to remove small and unwanted objects from an image.
Blemish—Remove an unwanted blemish from a subject’s face. This tool is mainly for editing portraits but can be used to remove small and unwanted objects from an image.
![]() Meme—Add a bold, text-based heading to the top and/or bottom of the image.
Meme—Add a bold, text-based heading to the top and/or bottom of the image.
Any of the tools built in to the Photo Editor- app can be mixed and matched as you’re working with an image.
When you’re finished editing an image, tap on the Done button. The image is saved and you have the opportunity to share it via AirDrop or using the Message, Mail, Twitter, Facebook, or Instagram apps. You also can export the image and use it with another app when you utilize the Copy command. Finally, you can print to an AirPrint-compatible printer by tapping on the Print button, which is part of the Share menu that automatically appears when you tap the Done button.
Tip
As you’re working with an image, tap on the curved, left-pointing arrow icon displayed near the top-left corner of the screen to revert back to the original image and remove all edits or enhancements you’ve added to an image using the Photo Editor- app.
Photo Editor- is an extremely easy-to-use app that makes editing and enhancing digital images a quick process. The capability to mix and match editing and enhancement tools is a huge benefit, although one drawback of this app is that many of the tools must be applied to an entire image, as opposed to just an area within an image.
Note
Because this is a free app, a banner ad is usually displayed along the bottom of the app screen. To remove the ads, it’s possible to upgrade to the Pro version of the Photo Editor- app for $0.99. To do this, tap on the Settings icon and choose the Pro Upgrade option.
PhotoToaster
Like Photo Editor-, the PhotoToaster app ($2.99) is easy to use, enables you to fix or enhance a photo in seconds, and offers a wide range of useful editing and enhancement tools and filters (shown in Figure 9-8).
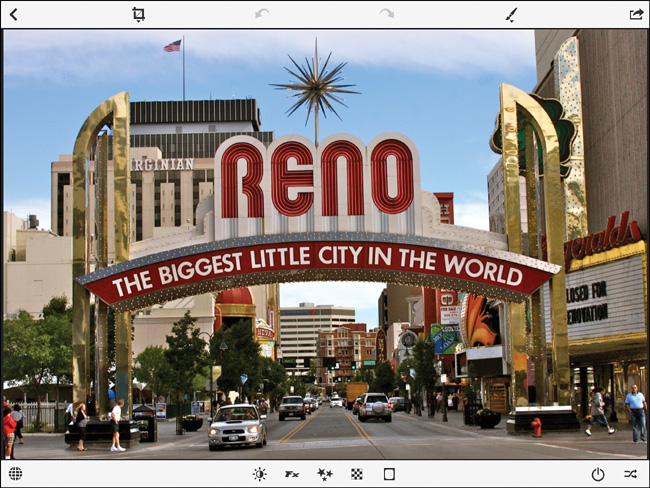
What’s great about PhotoToaster is that the majority of the available enhancement tools can be painted onto specific areas of an image, which gives you a tremendous level of creative control and flexibility. In addition to the various special effect filters, it’s possible to crop, rotate, or straighten an image; adjust the contrast, brightness, and saturation within an image; plus add an optional and selectable frame or border around the image (there are many to choose from).
Tip
If you want to apply a filter, effect, or applicable editing tool to an entire image, before tapping on a filter selection, activate the Global option by tapping on the globe-shaped icon that’s displayed near the bottom-left corner of the screen (see Figure 9-9). Otherwise, just tap on the icon for the tool you want to use, and then use your finger to paint that effect within specific areas of an image.
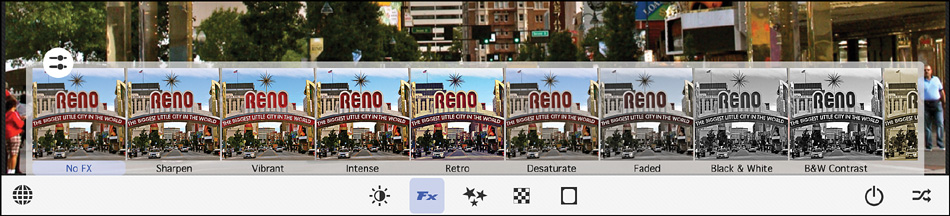
FIGURE 9-9 Some of the editing tools built in to the PhotoToaster app can be applied to either the entire image or just specific areas of an image. Choose the Global option to apply an effect to an entire image.
Once you select the Global option, rotate the virtual dial that’s displayed in the bottom-left corner of the screen to scroll through filter and effect options.
When you’ve finished editing an image, tap on the Share icon displayed in the top-right corner of the screen. When the Save To menu appears, you can opt to save the edited version of the image to your iOS mobile device’s Photo Library, email the image, print it using an AirPrint-compatible printer, or upload the image to Facebook, Flickr, Tumblr, or Twitter from directly within the app.
Tip
To create a virtual postcard that features your edited image, one that you can email to one or more recipients, tap on the Share icon, and then choose the Postcard option from the Save To menu. Also from within the app, it’s possible to directly order a canvas print of your image(s), in a wide range of sizes, for between $25.00 and $38.00 per image.
PhotoToaster is a powerful app for editing and enhancing photos. It is more versatile than many optional photography apps, but doesn’t offer as much control over individual editing options as the Adobe Photoshop Touch app (which is more complicated to use).
PicShop HD Photo Editor
Priced at $4.99, PicShop HD Photo Editor is also a comprehensive photo editing and image enhancement app that offers a straightforward and well-organized menu interface that walks you through the editing process. The app also has its own Camera mode for taking pictures.
From the main menu, tap on the leftmost Open Images From Menu icon to select the Camera option, or choose an image to edit from your iPhone or iPad’s internal storage (Gallery). It’s also possible to select an image from your online-based Facebook account.
After you’ve selected and displayed an image (see Figure 9-10), tap on the Edits button to access the Autofix, Crop, Straighten, Brightness, and Color tools (see Figure 9-11). Then, to add an optional special effect filter to the image, tap on the Filters button. There are 18 special effect filters to choose from. After a filter is applied to an entire image, it’s possible to use the onscreen slider to manually adjust the intensity of that filter.

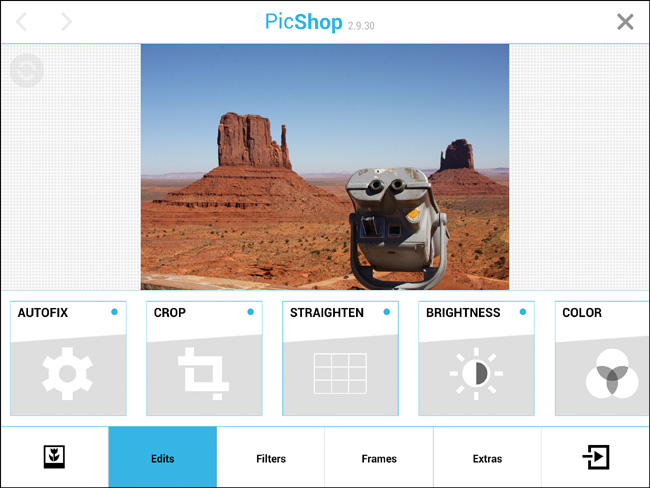
FIGURE 9-11 Most of the image editing tools built in to this app are accessible by tapping on large, well-labeled, onscreen buttons.
Tip
You can apply multiple filters to an image, but this must be done one at a time. Start by tapping on the Filters button, and then select one of the app’s built-in special effect filters (see Figure 9-12).
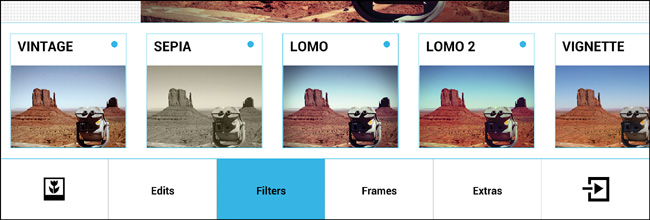
FIGURE 9-12 PicShop offers a nice selection of optional special effect filters, which you can mix and match as you’re editing your images.
Next, select an optional frame or border to superimpose around the outer edge of the image you’re working with by tapping on the Frames button, followed by the frame option of your choosing.
To create image layers, apply virtual stickers or pointers to your image, superimpose attention-getting shapes over your image, draw with your finger directly on an image, or add a variety of other effects, tap on the Extras button, and then choose the effect you want to add.
One interesting editing tool built in to PicShop is the Image Layer tool. Use it to blend two different images together into one, and control the opacity of each image as they’re being blended. To access this feature, tap on the Extras button, and then select Image Layer. Next, you are prompted to select a second image to blend into the one you’re currently working with. After selecting the second image, it’s possible to crop it (to use only a portion of the image), plus manually adjust its opacity, and then select its size and placement as it’s blended with the original image.
When you’ve finished editing the image you’re working with, tap on the Share button that’s displayed at the bottom-right corner of the screen. You can then save your image, send it via email, or upload it directly to Twitter or Facebook.
What’s nice about the PicShop HD Photo Editor is the large and easy-to-understand menu buttons, as well as the capability to mix and match enhancement tools and effects to quickly, but dramatically, enhance an image.
Tip
As you’re working with an image (prior to saving it), tap the Revert icon to remove all edits or enhancements you’ve made, or tap the Back icon to undo just your last action.
Specialized Apps Enable You to Create Unique Special Effects
In addition to the many third-party photo editing and image enhancement apps that offer a wide range of different tools, available from the App Store are hundreds of photography apps that enable you to incorporate specific types of special effects into your images. For example, the Photo Reflection HD app ($1.99) enables you to add customizable reflections to your images after they’ve been taken. MySketch Editor (free) enables you to transform digital images into what look like pencil sketches (see Figure 9-13).
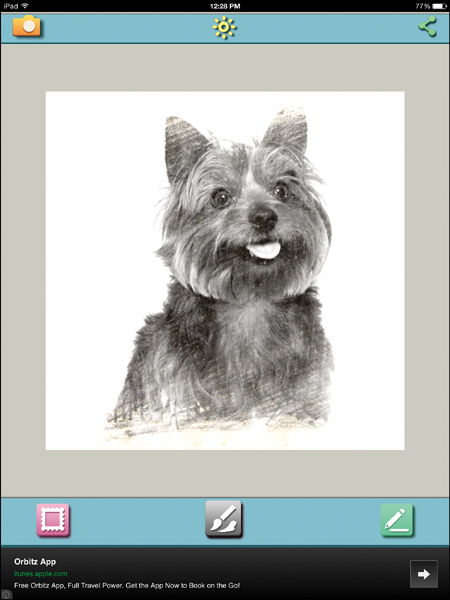
FIGURE 9-13 Use MySketch Editor to make a full-color photo look like a hand-drawn pencil sketch in just seconds.
Tip
The Facetune for iPad app ($2.99) is designed specifically for editing portraits of people, and makes it easy to erase blemishes and wrinkles while enhancing the visual quality of a portrait.
Use the Photo Mosaica app (free) to create single mosaic images from an entire album worth of images, or use the Over app ($1.99) to incorporate customized text and/or professionally designed clip art to your images.
If you want to transform a full-color photo into a visually stunning black-and-white image, and then be able to work with the monochromatic shades of gray, black, and white to create vivid effects, the Monokrom Photo Editor app ($0.99) is extremely useful (see Figure 9-14).
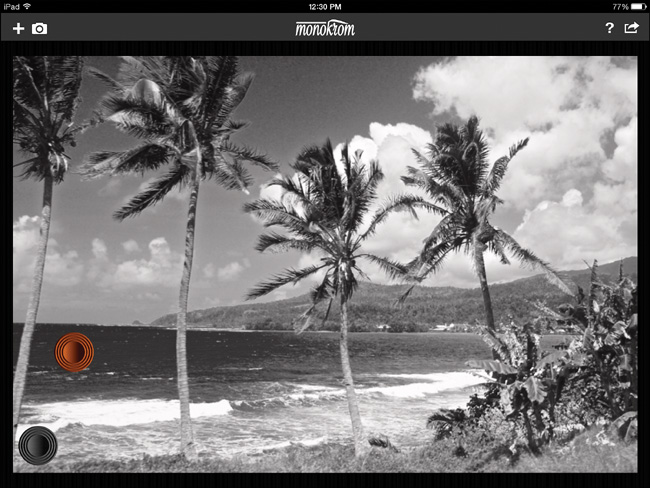
FIGURE 9-14 The Monokrom Photo Editor does more than just transform a full-color photo into black and white. It also enables you to fully customize the black-and-white effect for creative purposes.
Meanwhile, if you want to transform a photo into black and white, but colorize only a specific object or subject within your images, the Color Splash for iPad app ($0.99) makes creating this type of effect easy.
The Pic Stitch app (free) enables you to combine multiple images into one collage image that can be printed, viewed on a computer or iOS mobile device, or shared via any online social networking service. This app offers 232 different collage templates, plus special effect filters that can be added to one or more images within a collage. (Additional filters, frames, borders, and collage templates are available as in-app purchases.) You can also use the InstaStitch app (free) to combine multiple images into eye-catching collages.
Note
Many of these apps offer optional in-app purchases, which unlock additional tools, filters, and effects that can be used to edit or enhance your images.
Mix and Match Photography Apps to Get the Results You Need
Based on the places you’ll be shooting as well as your intended subjects, the available lighting, and the overall appearance of the shots you’re striving to capture, chances are you’ll achieve the best results by using a photography app that’s best suited to your particular needs during each shooting situation. In other words, get to know how several Camera app alternatives work and what their respective strengths are when it comes to taking pictures, and then choose which app will help you shoot the best images in a particular situation.
Next, from your iPhone or iPad, choose one or more of the photo editing or image enhancement apps that offer the tools you want or need to ultimately give your images the appearance you desire, and that will enable you to achieve your creative vision.
Tip
When it comes to editing your images, you always have the option of first transferring them from your iPhone or iPad to your Mac or PC, and then using full-featured photo editing software, such as Adobe’s Photoshop Elements 12 (PC/Mac), Adobe’s Photoshop CC (PC/Mac), Google’s Picasa (PC/Mac), Microsoft Photo Gallery (PC), Apple’s iPhoto (Mac), or Apple’s Aperture (Mac), for example, to work with the transferred images using a much broader range of tools.
To help you get the most out of the features and functions available to you from the third-party photography apps, consider using them with various iPhone or iPad photography accessories. Check out Chapter 10, “Use Optional Accessories to Improve Your Pictures,” to learn about some of the optional lenses, tripods, lights, and other tools you can use with your iOS mobile device when taking and/or editing photos.