
5. Overcome Common Picture-Taking Challenges
In This Chapter
![]() Discover common digital photography pitfalls and how to overcome them
Discover common digital photography pitfalls and how to overcome them
![]() Learn strategies for taking better pictures in a wide range of difficult situations
Learn strategies for taking better pictures in a wide range of difficult situations
![]() Use specific features and functions of the Camera and Photos apps to deal with problematic shooting situations
Use specific features and functions of the Camera and Photos apps to deal with problematic shooting situations
Even after you become proficient using the Camera and Photos apps on your iPhone or iPad, and simultaneously begin utilizing the shooting strategies described in Chapter 3, “Ten Strategies to Quickly Improve Your Picture-Taking Skills,” as you go about your everyday life taking pictures, or when you go on vacation and want to chronicle your experiences by taking photos using your iOS mobile device, you are going to be faced with many different types of challenges that you’ll need to overcome to consistently capture in-focus, well-lit, and great-looking shots.
This chapter offers tips and strategies for overcoming common problems you’ll run into as you’re using your iPhone or iPad to take pictures. By correctly dealing with these situations as you’re actually snapping photos, you’ll have much less work to do after the fact when attempting to edit or enhance the photos to compensate for the common problems, mistakes, or obstacles you encountered.
If you find yourself facing a challenging situation, and the Camera app that comes preinstalled on your iOS mobile device isn’t allowing you to achieve the photographic results you’re striving for when taking pictures, consider using one of the third-party photography apps that also enable you to take pictures using the cameras built in to your iPhone or iPad.
For example, there’s SmugMug’s free Camera! Awesome app. You learn more about these optional Camera app alternatives in Chapter 8, “Photography Apps That Enhance Your Picture-Taking Capabilities.”
Tip
Throughout this chapter, multiple references are made about the necessity to hold the iPhone or iPad very steady, especially when taking pictures in low-light situations or when using the zoom. Consider using both hands to hold your iOS mobile device. Then, instead of tapping on the Shutter Button icon (that’s displayed on the touch screen), use the Volume Up or Volume Down button on the side of your device as your Shutter button. Keep in mind that, whichever Shutter button you press, a photo isn’t actually taken until you remove your finger from the button or icon.
Strategies for Taking Pictures of People
There are many ways to capture people in pictures using your iPhone or iPad’s camera. However, all of your picture-taking opportunities that involve humans can be categorized as either posed or candid shots, and the approach you’ll take when capturing these two types of shots will vary greatly.
Take Posed Photos of People
A posed photo involves you, as the photographer, telling your subject(s) how and where to sit or stand, where to look, and exactly what to be doing as you take the photo. These photos usually begin with the photographer saying, “Stand over here, look at me, smile, and say ‘cheese’.” The end result is hopefully a photo where you had full control over the staging of the image. In other words, because you told your subject(s) what to do and preplanned the shot, this is considered a posed shot.
As you’re posing your subject and giving him or her direction, make sure no harsh light is shining on his or her face. This causes unflattering shadows to appear on the forehead, around eyes, and/or under the nose. If necessary, move your subject out of direct sunlight or away from a strong overhead light source.
Tip
Many people become very self-conscious when a camera, even the camera built in to an iPhone or iPad, is pointed at them. As the photographer, it’s your job to help your subjects feel at ease, so that their body language and facial expressions are relaxed, appear natural, and don’t look forced.
For example, when someone is uncomfortable in front of a camera, you might see his or her body actually tense up. Telling the person to take a deep breath and to relax his or her shoulders often helps him or her to adopt a more relaxed pose. Many people also become less self-conscious if you give them some type of prop to hold or interact with while a photo is being taken.
As you’re directing your subjects to take a posed photo or portrait, you’ll need to make a handful of creative decisions, including the following:
![]() Whether your subject will be standing or sitting
Whether your subject will be standing or sitting
![]() What your subject will be doing
What your subject will be doing
![]() Where your subject will be looking
Where your subject will be looking
![]() What props your subject will be holding or interacting with
What props your subject will be holding or interacting with
![]() What the subject’s facial expression and pose will be
What the subject’s facial expression and pose will be
![]() How your subject will be interacting with his or her surroundings
How your subject will be interacting with his or her surroundings
![]() What will appear in the foreground, the background, and to the sides of your subject
What will appear in the foreground, the background, and to the sides of your subject
Note
Make sure there’s nothing shiny or reflective in the photo that will distract attention from your intended subject when someone is looking at your photos. These distractions can include jewelry, a wristwatch, or even someone’s eyeglasses that are reflecting light back into the iPhone or iPad’s lens.
When taking posed portraits of people, your subjects do not necessarily need to be looking directly into the camera to capture a great shot. In some cases, you might discover that the photo is more thought provoking if the subject is staring off into the distance or looking at a particular object. If you’re photographing a couple in a romantic setting, a better shot might be acquired if the subjects are looking into each other’s eyes instead of into the camera.
There’s also no rule that says a subject must be smiling in a portrait. In some situations, a more serious expression, or one that showcases some other emotion, might make for a better photo.
When posing and directing your subjects and, at the same time, making creative decisions relating to your intended subjects, you also need to determine the following:
![]() How you’ll be holding the iPhone or iPad to utilize the Portrait or Landscape mode
How you’ll be holding the iPhone or iPad to utilize the Portrait or Landscape mode
![]() The location of your primary light source and how you’ll utilize it
The location of your primary light source and how you’ll utilize it
![]() How you’ll position yourself, based on the location of your subject(s)
How you’ll position yourself, based on the location of your subject(s)
![]() The best shooting angle or perspective from which to take the shot
The best shooting angle or perspective from which to take the shot
![]() Whether you want to utilize the digital zoom to get a close-up of your subject, without physically moving in closer
Whether you want to utilize the digital zoom to get a close-up of your subject, without physically moving in closer
![]() What camera-related features, functions, and/or filters you’ll want to use as you take each shot
What camera-related features, functions, and/or filters you’ll want to use as you take each shot
Tip
Don’t forget to utilize the Rule of Thirds as you frame each shot. This becomes more important if you plan to incorporate your subject’s surroundings in a photo.
Tip
If you’re using the Camera app, or one of many other third-party app alternatives that enable you to take photos using your iPhone or iPad’s camera, be sure to take advantage of the Face Recognition feature. When your iOS mobile device determines you’re taking pictures of people, the AE/AF sensor automatically focuses on each person’s face, helping to ensure an in-focus and well-lit photo.
Shoot Candid Shots That Feature People
Instead of directing your human subjects to create a posed photo, you often can capture more authentic emotions and actions by snapping candid pictures. The purpose of a candid photo is to capture a moment in time that happens spontaneously, with absolutely no direction from you, the photographer. Thus, you must take a different approach when taking candid pictures. In these situations, you want to be as unobtrusive and inconspicuous as possible, allowing your subjects to go about whatever it is they’re doing.
While this is going on, as the photographer, be sure to position yourself in front of the action or subjects you want to capture, and make sure you’re in the right place, at the right time, to snap a photo when the perfect opportunities arise.
Tip
When taking candid photos, you’re typically better off staying at a distance from your intended subjects and utilizing the Zoom feature of the Camera app (or whichever app you’re using) to get close-up shots of your subjects, without them being too conscious of your presence.
Tips for Capturing the Perfect Group Shot
The trick to capturing the perfect group shot is to make sure everyone can be clearly seen in your viewfinder as you get everyone to be doing the same thing, at the same time, each time you press the Shutter button. If someone is blocking someone else, or you can’t see someone in the viewfinder because he or she is standing in the back of a group and is too short, then your group photo will not turn out as planned. It’s your unenviable responsibility to position each person in the group so that everyone can be seen.
At the same time, you must make all of the same creative decisions as you would when taking a portrait of a single person, while also paying attention to the available light, avoiding unwanted shadows, and choosing the best shooting angle.
Next, tell the people in the group exactly what you want them to do and when. For example, say, “When I count to three, everyone look at me and smile.” Make sure everyone is paying attention, and take a few practice shots.
When you’re snapping group photos, always take several shots in a row. The fraction of a second difference between two or three shots taken in quick succession could mean the difference between capturing a photo where someone is blinking or looking in the wrong place, versus everyone doing exactly what they were instructed to do.
If you’re using the iPhone 5s, iPad Air, or iPad mini with Retina display, take advantage of the Burst shooting mode to capture a handful of similar shots in quick succession. Do this by holding down the Shutter button for two or three seconds at a time, as opposed to tapping it once. Then, go back and choose the one group photo where everyone is doing the same thing, and in which everyone can clearly be seen.
After taking several shots of your group, tell your group to stay put, but as the photographer, reposition yourself slightly, and then take a few more photos from a slightly different angle or perspective. For example, you could climb up on something and then shoot in a slight downward direction, or you could kneel down and shoot upward to create a more interesting group photo. Keep in mind that taking additional photos of the group increases your chances of capturing at least one perfect group shot, especially if one or more people in the group aren’t fully cooperating.
Especially if you’re taking a group photo featuring kids, it sometimes helps to ask them to make funny faces or pose in funny positions as you take a few initial shots, and then ask them to sit or stand still for a few more formal shots.
Tip
If you want to add yourself to a group shot, prop up your iPhone or iPad on a nearby table or ledge (something stable and that’s the appropriate height), or invest in a portable tripod or stand for your iOS device. (See Chapter 10, “Use Optional Accessories to Improve Your Pictures,” for details about available tripods and stands, like the GorillaPod from Joby.com.)
Next, use an optional photography app, such as Camera+, TimerCam Pro, Self-Timer, Camera Timer, Self Photo Pro, or Camera Timer+, that offers a self-timer feature.
Set up the camera (the iPhone or iPad) and frame your shot as you normally would (using the other people in the group, but leave a spot for yourself), and then activate the timer. Set it for 15 or 20 seconds, and join the group about to be photographed.
Capture Adorable Baby Pictures
Depending on the age and alertness of the baby, it’s sometimes easier to give a young child a rattle or toy as you attempt to capture a close-up, candid shot. The alternative is to have someone stand directly behind you (the photographer) and try to capture the baby’s attention using keys or a rattle, or by making silly faces at the child.
When taking photos of a baby or young child, perfect timing and patience are essential because as the photographer, you can’t direct your subject or tell the baby or young child how to act in front of the camera. Instead, what you can do is set up the perfect shot, and then be ready to snap photos when the young subject chooses to cooperate, does the action you want to capture, and/or looks directly into the camera, for example.
Tip
To avoid scaring the child or making him or her upset, take advantage of your iPhone or iPad’s HDR shooting mode, and utilize the ambient light. Don’t use the iPhone’s flash. Also, don’t get too close to the child. Instead, rely on the zoom lens to get a close-up shot. Just make sure you’re able to hold the iPhone or iPad perfectly steady, and that you take full advantage of the AE/AF sensor so that it locks in on your subject’s face.
Take Professional Looking Pictures of Animals
Pets, animals at a zoo or aquarium, and wild animals share the same challenges as taking photos of babies or young kids. As the photographer, you can’t give animals much direction. Worse, there’s no parent or loved one who can capture their attention or enthusiasm. Thus, it becomes your responsibility to be in the right place, at the right time, to capture great photos.
Sometimes, the best animal photos are extreme close-ups, or shots of the animal engaged in some type of action or activity. Remember, if you’re utilizing the zoom, it’s essential to hold the iPhone or iPad very still.
Instead of focusing in on an animal’s face, when taking pictures of animals, its eyes should be the focal point of your image (if you want the animal looking at you when a photo is taken). Animals express their emotions through their eyes, not using facial expressions.
To avoid scaring the animal, refrain from using the iPhone’s flash. If you’re at a zoo or aquarium and need to take photos through glass, be sure to follow the tips outlined later in this chapter.
If an animal is in motion, make sure you frame the image so the animal is moving into the shot (or coming toward you), and not moving out of the viewfinder as you’re taking the picture. If the animal is standing still but being shot from an angle, once again, the animal should be facing into the frame, not out of it. (Remember your Rule of Thirds!) This is also true when taking pictures of people.
Shoot In-Focus Images When Your Subject Is Moving
The main challenge you’ll face when your subject is moving is timing. If you’re using an iPhone 5s, iPad Air, or iPad mini with Retina display, ideally, you want to use the Burst shooting mode in this situation to help ensure you capture the perfect shot, at just the right moment.
In addition to paying attention to the location of your primary light source, you also need to prepare for the action that’s about to take place and preframe your shot. This means that in anticipation of your subject’s action, you must be in the right place and have a preconceived idea of the shot you’re about to take. Do everything that’s necessary to have your iPhone or iPad ready, the Camera app (or whichever app you’re using to snap pictures) running, and the zoom adjusted, so that when your subject moves into the frame and is exactly in the right spot, you can tap the Shutter button.
Figure 5-1 shows what your iPhone’s viewfinder might look like as you’re setting up a shot and waiting for your subject (in this case, a moving boat) to appear in the frame, whereas Figure 5-2 shows the intended subject moving across the frame, and moving rapidly.

FIGURE 5-1 When you know your subject will be moving quickly, preset everything related to your intended shot, and then wait for your subject to enter the frame.

FIGURE 5-2 As soon as your subject enters the frame as you anticipated, either use the Burst shooting mode or manually take several photos in quick succession.
Once again, from a photo composition standpoint, you want your subject to appear to be moving into the frame or directly toward you, which is why you need to position yourself accordingly, in advance.
Strategies for Taking Pictures at Sporting Events
Taking pictures at your child’s soccer or Little League game is a lot easier than capturing awesome shots at a professional sporting event for a variety of reasons. For example, at a professional sporting event, you’re probably required to stay in your seat, at a distance from the action. Thus, you must rely on the zoom lens to capture great photos because you can’t move around and you have no control over your shooting angle or perspective. In this situation, hold your iPhone or iPad as stable as possible, especially when using the zoom, to avoid blurry images.
Tip
If you know you want to take photos at a professional sporting event that’s being held outdoors, when selecting your seat, choose wisely. Avoid being seated in an area that’s directly facing the sun. Ideally, you want the sun behind you (the photographer) or directly overhead, but not in front of you. Attempting to shoot anything with the light from the sun shining directly into the iPhone or iPad’s lens will result in glares, overexposed images, and/or your subjects looking like silhouettes.
When taking pictures of your child engaged in a sport, chances are you have a bit more freedom to move around and be closer to the action. To capture the best shots at these events, use the following strategies:
![]() Learn as much about the sport as possible, so you can anticipate what’s about to happen.
Learn as much about the sport as possible, so you can anticipate what’s about to happen.
![]() Position yourself at the best possible shooting location, so that you can capture the action as it’s facing or coming toward you, not moving away from you. Be mindful of the location of your primary light source, ensuring that you won’t be shooting directly into the sun, for example.
Position yourself at the best possible shooting location, so that you can capture the action as it’s facing or coming toward you, not moving away from you. Be mindful of the location of your primary light source, ensuring that you won’t be shooting directly into the sun, for example.
![]() Have a plan. Know what types of shots you want to get before the action/game/competition begins. Then be ready to capture those shots.
Have a plan. Know what types of shots you want to get before the action/game/competition begins. Then be ready to capture those shots.
![]() In addition to capturing the action related to a sport, try to capture the facial expressions and emotions of the athletes themselves, particularly after something good or bad happens. You definitely want to utilize the zoom for this.
In addition to capturing the action related to a sport, try to capture the facial expressions and emotions of the athletes themselves, particularly after something good or bad happens. You definitely want to utilize the zoom for this.
Although the zoom that’s built in to the iPhone or iPad is good, if you’re kept at a distance from the sports action, having better zoom capabilities will definitely be to your advantage. For any iPhone model, consider investing in the OlloClip Telephoto and Circular Polarizing Lens accessory ($99.99, www.olloclip.com). It easily clips onto the iPhone over its existing lens, and instantly doubles its zoom capabilities.
When using the OlloClip Telephoto lens (or any optional zoom lens), holding the iPhone perfectly still when snapping photos becomes even more essential to avoid blurry images.
Shoot In-Focus Images When You (the Photographer) Are in Motion
Especially if you’re on vacation and being a tourist, taking photos while you, the photographer, are in motion is often a common necessity. You might also discover this need if you’re on a boat, in a car (but not driving), or even when you’re literally running around in your daily life.
Tip
When you (the photographer) are in motion, consider using a third-party photography app that offers image stabilization and a level gauge to help ensure your pictures come out in focus and don’t appear crooked. Shown in Figure 5-3, the Camera+ app is one example of a third-party photography app that offers these two useful features.
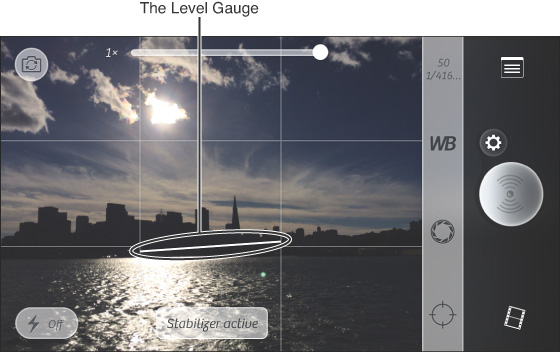
FIGURE 5-3 Turn on the Image Stabilization and Level Gauge features of the Camera+ app when taking photos while you, the photographer, are in motion and can’t hold the iPhone or iPad perfectly still.
In these situations, you will not be able to hold your iPhone or iPad perfectly steady. However, the technology that’s built in to the photography app you’re using and the iOS mobile device itself should be able to compensate for much of this movement, especially if you’re taking pictures in a well-lit area.
That being said, while holding the iPhone or iPad in your hands, you still want to keep it as steady as possible, to avoid any additional movement as you’re taking pictures. It also becomes more important than ever to rely on the AE/AF sensor and make sure it’s centered over your intended subject as you’re about to snap each photo.
Don’t rely on the AE/AF sensor to kick in and lock on to your subject automatically while you’re in motion. Instead, as you’re about to take a picture, activate the AE/AF sensor manually by tapping on the viewfinder (your iPhone or iPad’s screen), exactly where your subject is positioned in the frame. Make sure you see the AE/AF sensor box displayed and centered on your intended subject before taking the photo.
Caution
This should be common sense, but never try to take photos while you’re actually driving. Also, if you’re walking around or controlling any type of moving vehicle (including a skateboard or bicycle), don’t try to take photos using your iOS mobile device at the same time.
Overcome Problems Associated with Shooting Through Glass
As a passenger in a car, on a tour bus while sightseeing, or at an aquarium, these are just some of the situations where it might be necessary to take pictures through a window. This is actually a more common occurrence than you might think. When needing to take pictures with your iPhone or iPad while looking through glass, follow these steps:
1. Clean the window as much as possible. Get rid of fingerprints, dirt, and smudges.
2. Turn off the iPhone’s flash.
3. Hold the iPhone or iPad directly up against the window so that no light can seep through between the window and the smartphone or tablet’s camera lens (see Figure 5-4). All light to be captured in the photo should come from the opposite side of the glass. If necessary, use your hand or an article of clothing to block the unwanted light.

FIGURE 5-4 When shooting through glass, hold the iPhone or iPad right up to the glass so that no light (on your side of the glass) seeps between the glass and the camera lens.
4. Hold the iOS mobile device as steady as possible, and tap the Shutter button to take the picture.
If you leave the iPhone’s flash turned on when taking a photo through glass, you end up with an unwanted reflection that bounces off of the glass (see Figure 5-5). Likewise, if the iPhone or iPad’s camera picks up any light on your side of the glass because the iOS mobile device was not held directly up to the glass, this results in unwanted glares on the glass, causing what’s behind the glass to be out of focus, washed out, or not visible.

To take the image that’s shown in Figure 5-6, the optional Pro HDR app was used. This app offers an enhanced version of the Camera app’s HDR shooting mode and is ideal for taking photos in low-light situations. As you can see, the result is a clearer image that depicts the subject in more detail. Plus, there’s more visible background detail. Once a shot is taken using the Pro HDR app, it’s possible to manually adjust the brightness, contrast, saturation, warmth, and tint to bring out even more detail and color from the image (see Figure 5-7).

FIGURE 5-6 The Pro HDR app takes a few seconds longer to capture a photo, but this optional app enables you to capture more detailed images, especially in low-light situations.
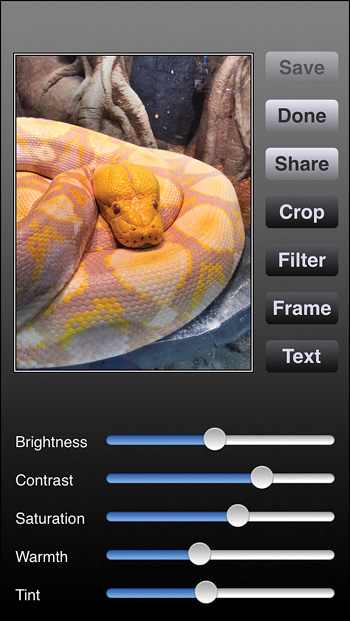
FIGURE 5-7 Immediately after you take a photo with the Pro HDR app, you can manually edit the image using sliders to control the brightness, contrast, saturation, warmth, and tint.
Use Your Creativity When Shooting Landmarks, Buildings, and Inanimate Objects
Landmarks, buildings, and inanimate objects all have one thing in common—they can’t pose for your photos. Thus, it becomes your sole responsibility as the photographer to capture these subjects in a creative and visually interesting way.
If the subject is large, shooting from a head-on perspective using Portrait or Landscape mode might not enable you to fit the entire object into the frame. Even if you utilize the Rule of Thirds, the image might still look uninteresting.
Instead, take a creative approach to shooting inanimate objects. In addition to adopting the Rule of Thirds when composing your shots, try shooting from a different perspective or angle. In other words, shoot from above your subject in a downward direction, from below your subject in an upward direction, from the side of your subject, or from a diagonal.
In addition, as necessary, take advantage of the app’s zoom or panoramic functions to either get really close to your subject or capture the widest angle shot possible. Using the optional OlloClip 4-in-1 lens accessory, you can add a fisheye lens to your iPhone (see Figure 5-8), which offers the opportunity to capture larger subjects from a visually unique perspective.
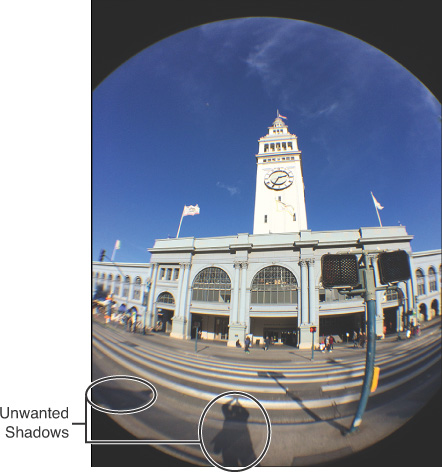
FIGURE 5-8 Using an optional fisheye lens (such as what’s offered by the OlloClip 4-in-1 lens) with your iPhone can create interesting visual effects.
Just as when taking photos of anything else, also try to utilize what’s in the foreground, the background, and to the sides of your intended subject to frame your subject visually and/or add a sense of depth to each photo.
Caution
You can see the shadow of the photographer in the foreground of Figure 5-8. By paying attention to what’s happening in your viewfinder, you can avoid capturing unwanted shadows that can ultimately be distracting or take away from the professional look of your shots.
Capture the Best Panoramic Shots Possible with Your iPhone
When taking digital photos using any iPhone model and the Camera app, instead of turning your smartphone sideways to take Landscape shots, you have the opportunity to use the Pano shooting mode to shoot panoramic images. The Pano shooting mode is ideal for capturing vast landscapes, city skylines, or large groups of people, for example.
The trick to capturing the best possible panoramic shots is to pay careful attention to your primary light source, and make sure that as you’re panning the iPhone from left to right (or right to left), at no point does the camera lens get pointed directly into the sun (or the primary light source).
Also, make sure your horizontal panning motions are smooth and steady. It’s essential that you hold the iPhone level as a panoramic shot is being taken. Once you start panning sideways, keep the fluid motion going until the white arrow on the screen crosses from the left to right side, or until you press the Shutter button a second time to stop the image capture process.
If your panning motions are too fast or shaky, a warning message appears on the screen (see Figure 5-9). Now, you have two options. You can follow the directions and continue taking the shot, or stop the process and start again (this time correcting the error). Some people find it useful to use a tripod to capture panoramic shots, but this requires carrying around extra equipment.
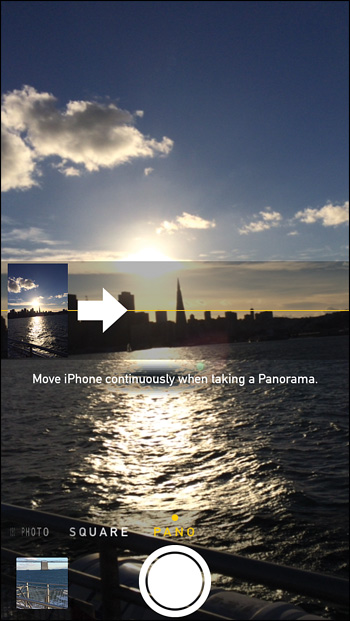
FIGURE 5-9 Watch for onscreen warning messages as you’re taking panoramic photos. If one appears, make the necessary adjustments to your shooting technique to ensure the best possible photo.
Strategies for Taking Close-Up Images Using the Zoom
When you use the Zoom feature while taking pictures with an iPhone or iPad, the biggest challenge is holding the device very still as you press the Shutter button. The higher-intensity zoom you’re using, the more sensitive the built-in cameras are to even the slightest movement. This is particularly relevant when using the zoom to take an extreme close-up of a tiny subject (thus utilizing the iPhone or iPad as a camera with a macro lens).
You’ll often find that the Zoom feature works better when plenty of light is available and you utilize the HDR shooting mode.
Tip
If taking close-up images of tiny subjects, such as flowers or insects, is important to you, consider investing in the OlloClip 4-in-1 clip-on lens for the iPhone ($69.99, www.olloclip.com). It includes a 10x and 15x macro lens.
Instead of using the digital zoom built in to the Camera app (and many other photography apps for the iPhone or iPad), take a regular photo of your subject, and then use the Photos app’s Crop tool to reframe your image and simulate a photo that used the zoom.
Figure 5-10 shows a photo taken without the Zoom feature used. Then, using the Crop tool offered by the Photos app, the same image was edited and repositioned after the fact to make the intended subject the focal point of the image, and to simulate the use of the zoom (see Figure 5-11).

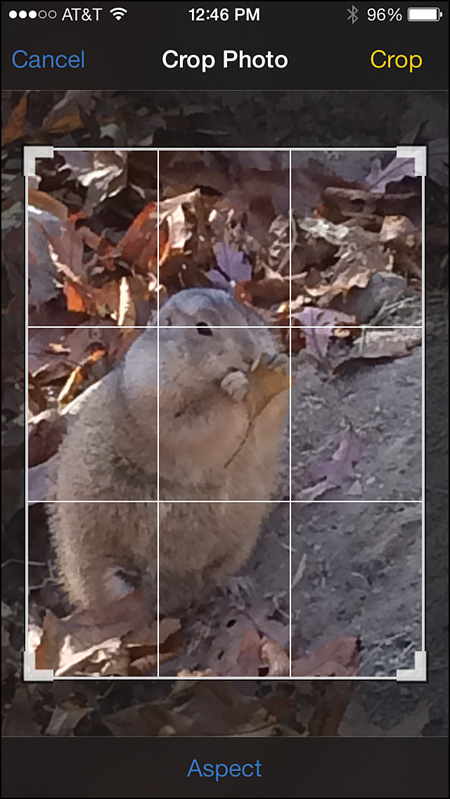
FIGURE 5-11 Using the image from Figure 5-10, I loaded the photo into the Photos app and used the Crop tool to reframe the image and simulate the Zoom feature.
Using the Crop tool when possible, instead of the zoom, helps to ensure you capture a clearer and more in-focus image, especially in low-light situations. Figure 5-12 shows the cropped and repositioned photo.

FIGURE 5-12 As you can see, using the Crop tool, you can zoom in on your subject after the fact, plus reframe the image—in this case, taking the subject out of the direct center of the frame.
Note
There is more information about how to use the Photos app’s Crop tool in Chapter 6, “View, Organize, Edit, and Share Pictures Using the Photos App.” A similar Crop tool is also available in many other photography apps, including iPhoto.
The Zoom feature is much more sensitive to movement. Thus, a shaky hand could result in a blurry image. Try to utilize the zoom only when you can hold the iPhone or iPad very still, there’s plenty of light, and your subject is stationary. This is how you’ll get the best results using the Zoom feature.
Use Reflections to Your Advantage
When taking pictures that involve lakes, oceans, rivers, or any type of water, take advantage of the reflections in the water (or created by the water) to capture more visually interesting images. For example, if your intended subject’s reflection can be seen in a body of water, capture that reflection in your shot (see Figure 5-13).

FIGURE 5-13 Take advantage of reflections in water to add an artistic or creative flare to what might otherwise be visually boring shots. Tree branches in the foreground were used here to add a more artistic element to the photo, as well as a sense of depth.
You can also creatively use reflections of your intended subject that are cast in a window, mirror, or just about any shiny object. Keep in mind that reflections can add an artistic flare to your images, but be careful of unwanted light that’s also reflected directly into the lens that could cause glares.
Tip
In digital photography, what might be considered the opposite of a reflection is a silhouette. This is caused when the primary light source is positioned behind your intended subject (and in front of the iPhone or iPad’s lens). When used intentionally, silhouettes can create dramatic and artistic visual effects, especially when taking pictures of subjects in front of a sunset, for example.
To counteract an unwanted silhouette effect, try using the iPhone’s flash to lighten up your subject, or add more light in front of your intended subject.
Give Your Photos a Sense of Scale and Depth
Sometimes, the actual size of a subject in a digital photo can be deceiving, unless something else in the image can be used as a size reference. For example, if you take an extreme close-up of a tiny bug, that bug will look huge in the photo, unless you take a photo of the bug standing on someone’s hand or next to an object that people inherently know the actual size of.
If you take photos of a large structure or object, consider having someone stand in front of or next to it to add a sense of scale in the image.
Tip
When the tiny or massive size of your subject appears misleading in photos, consider incorporating something additional in the image that adds a sense of scale and that’s easily identifiable.
Meanwhile, one easy way to add a sense of depth in your photos is to utilize what’s in the background and/or foreground. When doing this, be mindful of what the AE/AF sensor automatically focuses in on, and make sure it’s your intended subject. Also, make sure what you decide to include in the foreground or background doesn’t become the focal point of the image instead of your intended subject. For example, anything that’s brightly colored, reflective, or shiny immediately draws people’s eyes to it when they look at your photos. Make sure that your intended subject captures their attention.
Make Your Vacation Photos as Memorable as Your Actual Trip
The concept of taking photos that tell a chronological story becomes more important when you’re taking vacation photos, especially if you plan to showcase a group of images in a photo album, scrapbook, collage, photo book, or digital slideshow. As you’re shooting photos during your vacation, take plenty of candid shots of the people you’re traveling with, but combine those with posed photos as well as photos of the places you visit and the experiences you have.
Depending on where you’re vacationing, chances are you’ll be able to experience a gorgeous sunrise or sunset. To capture the best sunrise or sunset shots, plan your trip itinerary so that you’re at the most popular or most photographic tourist attractions, landmarks, beaches, or locations during a sunrise or just before and during a sunset, to take full advantage of the gorgeous natural lighting.
Turn on the HDR shooting mode, and try to avoid using the zoom capabilities of the iPhone or iPad’s camera as you point the lens directly toward the sun. As you do this, try repositioning the AE/AF sensor by tapping on various areas of the viewfinder to force the iOS mobile device to capture the natural light in different ways.
Tip
Many photo editing apps offer image filters you can apply after the fact to make the colors in your photos appear even more vivid. Some of these filters, particularly ones that improve an image’s brightness and contrast, while boosting colors in the image, work particularly well on sunrise or sunset shots.
For these types of sunset shots, you can add an artistic element to the photos by positioning people in the shot or using other natural objects in the area, such as trees or buildings, which will become visible in your shots as silhouettes (because the primary light source is behind those objects or people and is shining directly into the lens). The silhouettes in Figure 5-14, for example, add a sense of depth to the images when they’re positioned in front of the rising or setting sun.
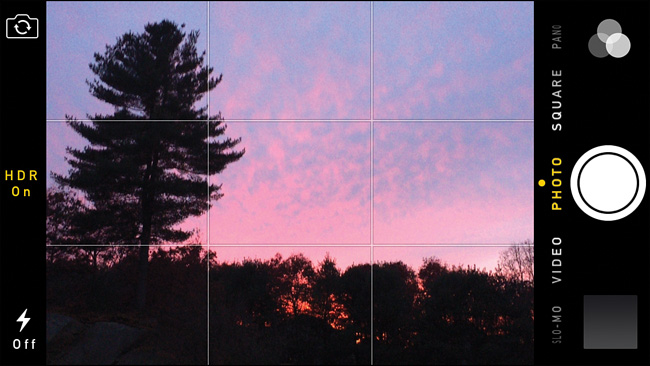
FIGURE 5-14 Incorporate nearby objects, such as trees, into your shots to add a sense of depth, make the photos look more visually interesting, and add some artistic flare.
Tip
Refrain from using the iPhone’s flash when taking sunset photos. The optional Pro HDR app is ideal for taking sunset photos because this app does a great job of capturing natural colors in low-light situations.
A handful of apps available from the App Store enable you to enter any location and date, and quickly determine the exact sunrise and sunset times. For example, there’s Living Earth - Clock & Weather ($2.99), Sunrise Sunset Pro ($1.99), and Sunset and Sunrise ($1.99), each of which can help you plan your schedule based on local sunrise and sunset times wherever you happen to be.
Tip
The Map-A-Pic Location Scout for Photographers app ($4.99) is a useful tool for choosing where you’ll want to take pictures, keeping track of where you’ve taken pictures, and quickly being able to determine sunrise and sunset times for those locations.
What to Do If Too Much Light Keeps You from Seeing the iPhone or iPad’s Viewfinder
When taking photos outside, one common problem you’ll encounter is that the sun reflects off the iPhone or iPad’s screen when you’re using the Camera app (or another photography app), which makes it almost impossible to see what’s appearing within your viewfinder.
From a lighting standpoint, your goal as a photographer is to place your primary light source behind you, so that it shines evenly onto your subject. Doing this, however, often causes the primary light source, such as the sun, to shine directly onto your iOS mobile device’s screen. Unfortunately, this issue is not unique to the iPhone or iPad. It happens when using almost any point-and-shoot digital camera.
The best way to prevent this is to try to position yourself (the photographer) in a shaded area, or cup one hand over the iPhone or iPad’s viewfinder screen as you hold the device and control the Camera app (or another photography app) with your other hand.
Ultimately, you might have to guesstimate when it comes to framing or composing your shots in the viewfinder if too much light is drowning out the display. In this situation, take a moment to find a shady area, and then view your images after they’re taken to ensure you’ve actually captured your intended subject as planned.
Using the new Control Center feature of iOS 7, you can quickly and manually adjust the iPhone or iPad’s screen brightness, which may improve your visibility when in direct sunlight. To do this, place your finger near the very bottom of the screen and swipe your finger upward to access the Control Center (see Figure 5-15).
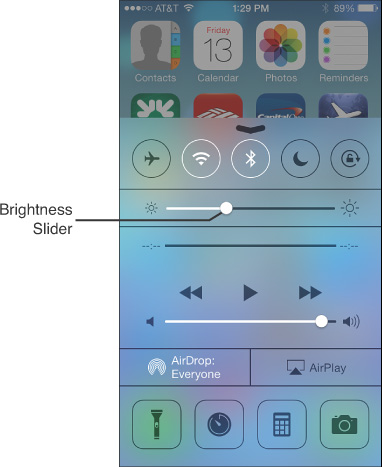
Next, place your finger on the white dot that’s displayed in the Screen Brightness slider and drag it left (to make the screen darker) or to the right (to make the screen brighter).
Tip
If too much glare from direct sunlight is a problem that occurs frequently when you’re taking pictures, consider investing in an optional protective film for your iPhone or iPad’s screen that offers glare reduction. Priced between $15.00 and $30.00, BodyGuardz (www.bodyguardz.com), as well as a handful of other companies, offers this type of glare reduction film that you can apply yourself to an iPhone or iPad’s screen.