1. Prepare Your iPhone or iPad to Take Awesome Photos
In This Chapter
![]() Learn what’s possible when it comes to taking pictures with your iOS mobile device
Learn what’s possible when it comes to taking pictures with your iOS mobile device
![]() Learn what you need to get started as a digital photographer
Learn what you need to get started as a digital photographer
![]() Get an overview of the iPhone and iPad’s digital photography capabilities
Get an overview of the iPhone and iPad’s digital photography capabilities
Apple’s iPhone smartphones and iPad tablets have become the most widely used digital cameras in the world. With each new iPhone and iPad model that’s been released, the picture-taking capabilities of these devices have been improved.
At the same time, hundreds of third-party photography apps are available from the App Store that further expand your digital photography toolset. Plus, there are a handful of accessories you can purchase that give you even more options when it comes to taking, viewing, organizing, editing, enhancing, printing, and sharing digital photos from just about anywhere.
Chapter 9, “Photography Apps That Expand Your Photo Editing and Enhancement Capabilities,” showcases just some of the more popular and powerful third-party apps that offer features and functions that go beyond what’s possible using just the Camera and Photos apps that come preinstalled with iOS 7.
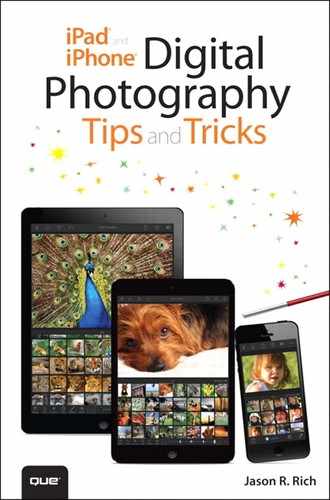
Thanks to the technology built in to your iPhone or iPad, as well as the Camera and Photos apps that come preinstalled with iOS 7, you have the equivalent of a full-featured, point-and-shoot digital camera, a mobile photo editing workstation (see Figure 1-1), and an Internet-enabled device that enables you to immediately share your photos available at your fingertips.
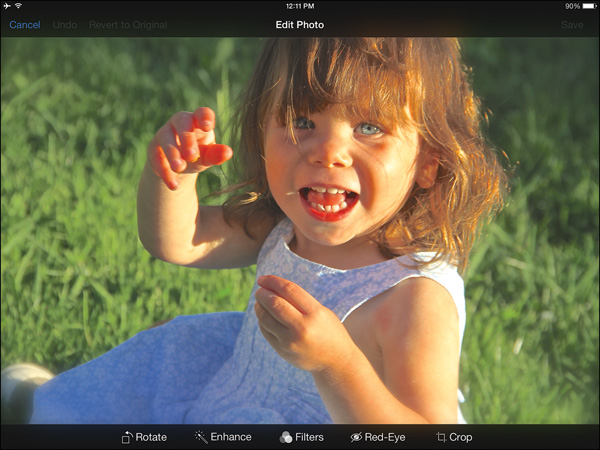
FIGURE 1-1 Wherever you are, whatever you’re doing, if you have your iPhone or iPad handy, you can photograph what’s happening and, if you choose, immediately edit or share those photos with friends and family.
Using the rear-facing camera that’s built in to your iPhone or iPad, you can easily take photos that are as detailed, clear, vibrant, and visually interesting as any photo you could otherwise take using a standalone point-and-shoot digital camera. And, because most people carry around an iPhone or iPad just about everywhere they go, taking lots of pictures as events in life unfold has become more convenient than ever. Thus, you’re able to capture memories, edit them almost instantly from your mobile device, and then share moments in your life with other people via email (see Figure 1-2), instant message, AirDrop, or by uploading images to a popular online social networking service (like Facebook, Twitter, Snapchat, or Instagram) or an online photo sharing service (like Shutterfly.com, Smugmug.com, or Snapfish.com).
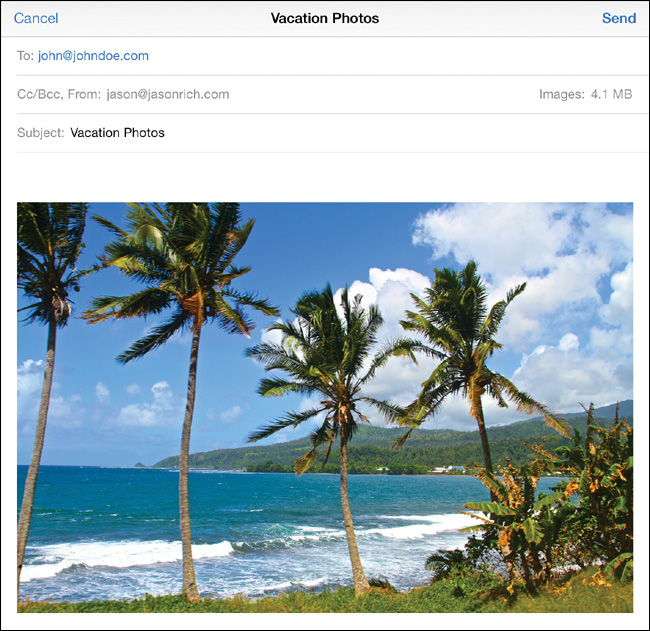
FIGURE 1-2 Using the Photos or Mail app, both of which come preinstalled with iOS 7, you can share photos taken on your iOS mobile device with other people via email.
Figure 1-3 shows a photo as it’s about to upload to Facebook via the Photos app that comes with iOS, which is one of many options available in that app. The official Facebook app, however, enables you to create, upload, and manage entire online galleries from your iOS mobile device. From this app, you can share groups of photos with all of your online-based Facebook friends.
FIGURE 1-3 Uploading photos taken on an iPhone or iPad directly to Facebook is easy using the Facebook option available from the Share menu of the Photos app.
There’s a Lot More You Can Do with the Photos You Take Using Your iPhone or iPad
After you’ve taken and edited digital photos using your iPhone or iPad, it’s possible to create traditional prints from those images. This can be done using a home photo printer or a one-hour photo lab (a service available at most pharmacies and mass-market retail superstores) or by uploading your digital image files to a professional photo lab (which then creates the prints and mails them to you within a few business days).
For example, if you have the Costco app installed on your iPhone or iPad, before heading to your local Costco store to do your shopping, you can select and upload images that you’ve shot on your mobile device and order prints to be made from them (see Figure 1-4).
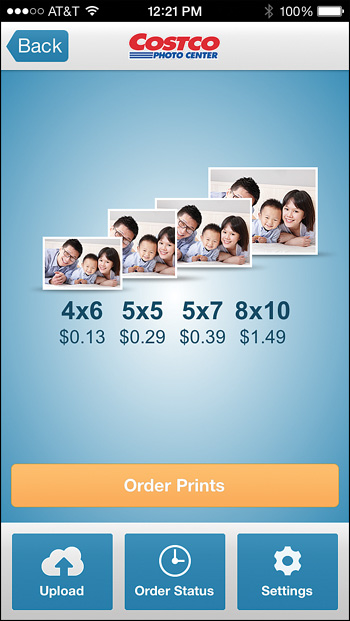
FIGURE 1-4 With the Costco app, for example, you can quickly select specific images stored on your iPhone or iPad, upload them to Costco’s one-hour photo-processing service, and then pick up your prints when you arrive at the store.
After choosing the images from within the Costco app, selecting what size prints you want, and selecting the quantity of prints for each image, within an hour or so, your prints will be available for pickup at the Costco Photo counter. Similar apps are available from Walgreens, CVS, Target, and Wal-Mart.
You can learn more about creating prints from your iPhone or iPad in Chapter 11, “Create Prints from Your iPhone/iPad Photos.”
As you’ll soon discover, you can also showcase your digital photos on your high-definition (HD) television set or online in the form of an online gallery or animated digital slideshow. You can also incorporate those same images into professionally bound hardcover or softcover photo books (or photo eBooks), or create all sorts of photo gifts that feature your images. These items include everything from T-shirts, refrigerator magnets, and mouse pads, to canvas enlargements and customized iPhone or iPad covers/cases (see Figure 1-5).
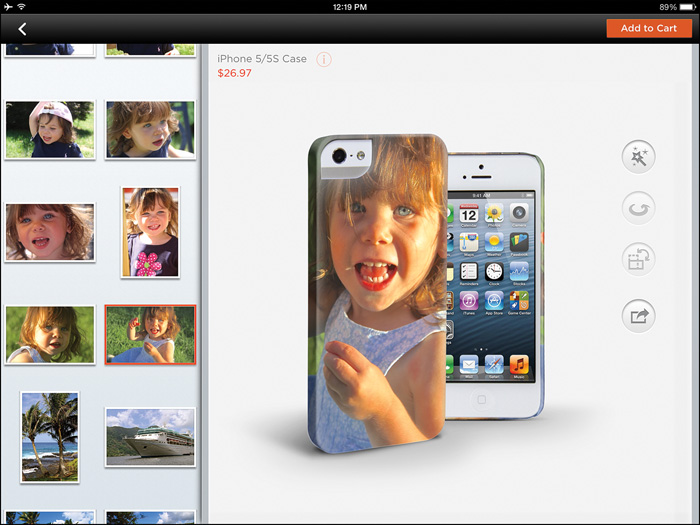
FIGURE 1-5 Using the Shutterfly app (shown here on the iPad), you can create and order a wide range of photo products and gifts, including a custom iPhone case.
Meanwhile, if you opt to share your photos on the Instagram online service, you can use the independent StickyGram service (https://stickygram.com) to order two-inch square magnets that feature your photos. Each StickyGram sheet ($14.99) includes nine photo magnets featuring your individual photos. You can use them to decorate your refrigerator, for example (see Figure 1-6).
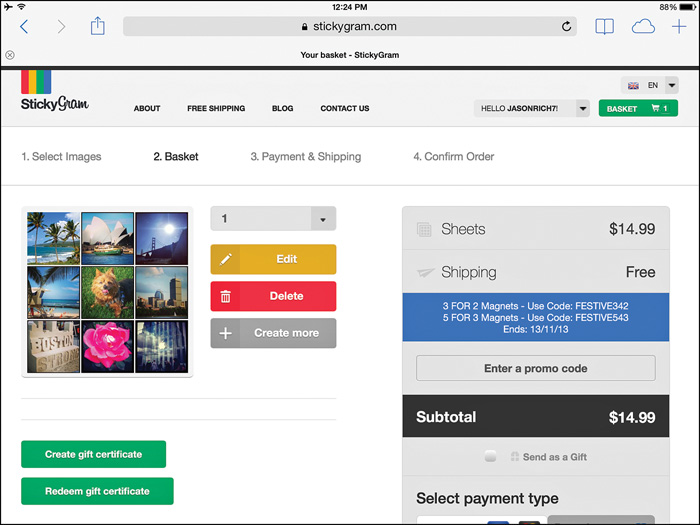
FIGURE 1-6 The StickyGram service enables you to create colorful and inexpensive magnets from digital photos that you have published on Instagram via your iPhone or iPad.
Right out of the box, you can use your iPhone or iPad camera to snap photos and shoot HD video clips. You can then view, edit, enhance, organize, print, and share those images using the Photos app. The fact is, using the Camera app, just about anyone with the most rudimentary understanding of how your iOS mobile device works can take decent quality photos.
However, if you’re more serious about consistently capturing high-quality, in-focus, well-lit, and professional-quality images using your iPhone or iPad, which you’ll be proud to show off to your friends and family, you can acquire the skills and information you’ll need from this book.
Digital Photography Is Both a Skill and an Art Form
Whether you’re taking pictures with a $5,000 digital Single Lens Reflex (SLR) camera from Nikon or Canon, a $400 point-and-shoot digital camera, or your iOS mobile device, the basic skills and knowledge you need as a photographer to take consistently good pictures are basically the same.
What you should understand right from the start is that digital photography is both a skill and an art form. To shoot good-quality photos, you must first learn how to properly use your camera—in this case, your iPhone or iPad, with a photography app. This means knowing how to operate your iOS mobile device and its built-in cameras, as well as being able to launch and use a photography app.
Just like using a computer or another cutting-edge technological gadget, this requires knowledge and a particular skill set. However, there is a second part to the equation, which is understanding that digital photography is also an art form that requires creative decision making and the ability to look at the world through the camera’s viewfinder and be able to capture visually interesting images that can convey a message or emotion or capture a moment in time in a meaningful way.
The art form aspect of digital photography requires you, as the photographer, to determine what to shoot, when to shoot, and how to best shoot your intended subject(s) in order to wind up with a visually interesting digital photograph. In addition to choosing your primary subject, as the photographer, you need to frame your shots utilizing what’s in the foreground, in the background, and to the sides of your intended subject in a way that creates a more compelling image that is visually pleasing to the eye.
At the same time, you must pay attention to and work with your primary light source, and sometimes overcome challenges that come from having too much or too little light shining on your intended subject(s). As you’re working with natural (ambient) light and/or artificial light (including light generated by the iPhone’s flash, for example), it’s your job as the photographer to watch out for unwanted shadows, glares, and other challenges that imperfect lighting often creates.
A good digital photographer also pays attention to the shooting angle or perspective, as well as how the subject is posed or positioned within the frame. Then, as all of these elements come together to create what will be a single photograph that’s captured when you tap on the Shutter button, determining exactly when to press that Shutter button to take a photo is another part of the creative decision process involved with being a digital photographer.
As you’ll soon discover—especially if you’re taking pictures of people or animals or your intended subject is in motion—developing a good sense of timing is important.
From this book, you’ll learn how to use the Camera and Photos apps that come preinstalled with the iPhone and iPad, so that you can begin taking, viewing, organizing, printing, and sharing digital photos almost immediately. You’ll also learn a wide range of photography techniques and strategies that are commonly used by professional photographers, but you’ll discover how to utilize them when taking pictures with your iOS mobile device.
Then, you’ll focus on how to use some of the third-party photography apps that greatly expand what’s possible, giving you more creative freedom as you take pictures in a wide range of situations and later edit, showcase, and share them.
What you’ll soon discover is that taking pictures using your iPhone or iPad is not only convenient, but it’s also fun. Plus, digital photography offers a powerful and versatile way to express yourself creatively, and at the same time, capture moments in your life that you can later reminisce about and/or share with others.
What You Need to Get Started as a Mobile Digital Photographer
This book focuses on teaching you how to take consistently high-quality, in-focus, and visually interesting digital pictures using the front- and rear-facing cameras that are built in to the iPhone or iPad. To take full advantage of what you’re about to learn, you definitely need an iPhone or iPad model updated to run iOS 7 or the most recently released version of the Apple operating system.
Tip
If you’re serious about taking the best-quality pictures possible using an iOS mobile device (instead of having to carry around your smartphone and a separate point-and-shoot digital camera), you should definitely consider upgrading to the Apple iPhone 5s.
This latest iPhone model offers an 8MP high-resolution, rear-facing camera, plus a better-quality image sensor and lens than other iPhone models (including the iPhone 5c, iPhone 5, and iPhone 4s). Plus, because the iPhone 5s uses a faster and more powerful processor (Apple’s A7 chip), it enables you to utilize camera features, such as burst shooting and an improved HDR (High Dynamic Range) shooting mode, that other iPhone models don’t support. Both of these features are explained in Chapter 2, “Snap Photos Using the Camera App.”
Although the latest iPad models, including the iPad Air and iPad mini with Retina display, are also powered using Apple’s A7 chip, the rear-facing camera that’s built in to these tablets offers 5MP resolution. When used with the Camera app and other technology built in to the tablet, this allows for excellent-quality digital photos to be taken, but these cameras are not as high-quality as what the iPhone 5s offers.
Make Sure You Have Power
Regardless of which iOS mobile device you wind up using to take pictures, in addition to choosing the best photography app(s) to meet your needs, it’s essential that you keep your iPhone or iPad charged, so when you want to snap photos, you have the battery power to do so.
Keep in mind that using the iPhone or iPad’s built-in cameras extensively, and then constantly uploading images to a cloud-based service or online social networking site, for example, depletes your device’s battery charge a bit faster than using it for some other applications, such as listening to music. Plus, if you’re using the iPhone’s built-in flash when taking pictures, this drains your smartphone’s battery even more quickly. So, plan accordingly and make sure you have an external battery pack and/or charging cable with you while on the go.
Have Adequate Storage
Another consideration—especially if you’re going on vacation, you plan to take a lot of photos, but you won’t be able to transfer them to your primary computer or upload them to an online service—is the internal storage capacity of your device. Although a 16GB iPhone or iPad can store thousands of digital photos, if you’re also storing lots of other files and content in your device (such as TV show episodes or movies acquired from the iTunes Store or other large files), that leaves less internal storage available for your images.
If you start running low on internal storage space, you might wind up needing to delete content from your iOS mobile device to make more room to store photos. Keep in mind that shooting HD video clips on your iPhone or iPad also utilizes a lot of internal storage space, so consider using this feature sparingly if available storage space is limited.
To determine how you’re currently utilizing the internal storage space of your iOS mobile device, and to manage what’s stored in it, launch Settings, tap on the General option, and then select the Usage option from the General submenu (see Figure 1-7). From this menu, under the Storage heading, you can see the total storage capacity of your smartphone or tablet, as well as how much of that storage is currently utilized.
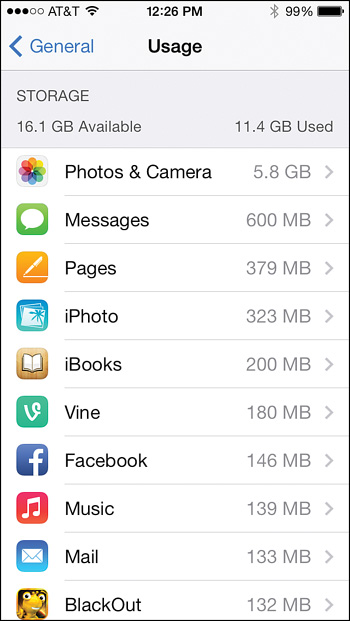
FIGURE 1-7 From Settings, you can easily determine how much internal storage space you have available on your iPhone or iPad, plus free up space by deleting apps or related app-specific content.
Below this information is a listing of all apps installed on your device, along with how much internal storage space the app and app-specific data use.
Note
Multimedia content, such as TV show episodes, movies, or music videos acquired from the iTunes Store, as well as HD video clips you’ve shot yourself using your iOS mobile device, tend to take up a lot of internal storage space within your device. Digital slide presentations created using Keynote (or PowerPoint presentations that are being used with Keynote) also tend to have large file sizes associated with them.
Tap on any app listing to see details about that app and its app-specific data. From the submenu screen that’s displayed for each app, there is an option to delete the app and its related data. Keep in mind that if you delete an app and its related data without backing up the data first, that data will be lost, but you can always reload the app for free.
By tapping on the Photos & Camera option, for example, you can see how much internal storage space is being used by digital photos and video clips stored in the Camera Roll folder, Photo Library, and Photo Stream folders. You’ll find specific tips for managing the Photos app in Chapter 6, “View, Organize, Edit, and Share Pictures Using the Photos App.”
Tip
If you plan to rely heavily on the cameras built in to your iPhone or iPad, when purchasing your iOS mobile device, choose a hardware configuration with plenty of internal storage space. Also, keep in mind that although iCloud’s Shared Photo Stream works only with a Wi-Fi Internet connection, other methods for uploading photos to various online services do work with a cellular data connection, which might be useful to you while you’re out and about taking pictures. So, when choosing an iPad model, consider one with Wi-Fi plus cellular Internet connectivity.
Add Some Apps or Accessories
Based on what you’re trying to accomplish and how you want to share your images, you’ll inevitably want to download and install some third-party photography apps that are available from the App Store. Some of these apps are free, whereas others have a fee associated with them. A handful of the most feature-packed and powerful photography apps, as well as strategies for how to best use them, are showcased in Chapter 9.
To discover all of the latest photography-related apps available from the App Store, launch the App Store app on your iPhone or iPad, and then tap on the Featured icon. On the iPhone, tap on the Categories option (displayed near the top-left corner of the screen), and then select the Photo & Video option.
On the iPad, after tapping the Featured icon, near the top center of the screen, tap on the More tab, and then select the Photo & Video option (shown in Figure 1-8).
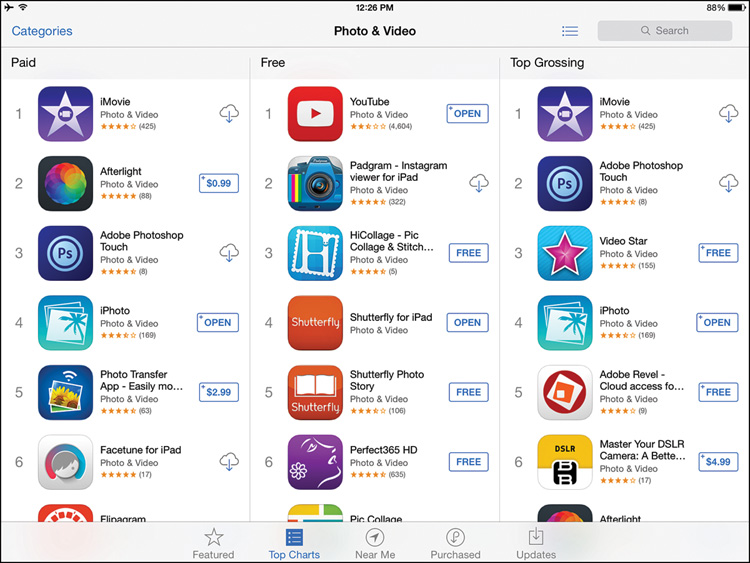
FIGURE 1-8 The App Store offers hundreds of specialty digital photography apps that greatly expand the picture taking, as well as photo editing and sharing capabilities, of your iPhone or iPad.
To see a listing of the most popular photography apps available from the App Store, after launching the App Store app, tap on the Top Charts icon. Next, tap on the Categories option, and then select the Photo & Video option. A list of the current most popular Paid, Free, and Top Grossing photography-related apps is displayed.
You might also want to invest in a few digital photography accessories that you can use with your iPhone or iPad, such as optional clip-on lenses and/or a tripod. You’ll learn more about these options in Chapter 10, “Use Optional Accessories to Improve Your Pictures.”
Places to Show Off Your Photos
Again, depending on what you plan to do with your photos, you might ultimately want to transfer them from your iOS mobile device to your Mac or PC, where they can be archived, viewed, printed, edited, and shared. This process can be done in a variety of ways, using Apple’s iCloud service (or another cloud-based service, such as Dropbox), the iTunes Sync process, or via email, to name just a few.
Another option is to upload your photos from your iPhone or iPad to an online social networking service, such as Facebook, Twitter, or Instagram, to share them with your online friends and/or the general public. All of the popular online services have their own iPhone/iPad apps that make it very easy to upload and share images directly from your mobile device, as long as an Internet connection is available.
To use any of the online social networking services, or any of the online photo sharing services, you must set up a free account if you don’t already have one. You learn how to do this in Chapter 12, “Share Your Digital Photos Online.” You also learn in Chapter 12 how to share individual photos with specific people, as well as how to easily and quickly create online galleries or animated slideshows to showcase groups of images online.
Caution
To ensure that only the people you want will be able to view the photos you publish online, whether you’re using iCloud’s Shared Photo Stream, Facebook, or an online gallery created on the Shutterfly.com service, for example, it’s important that you correctly set up the service’s privacy settings.
Also, to protect your online privacy, you might opt to refrain from tagging photos and/or attaching location-based information to them. What precautions to take and how to take them are the subjects of Chapter 12.
Develop Your Photographer’s Eye
By combining your knowledge of how to operate your iPhone or iPad and the various digital photography apps available for it with the artistic and creative elements of being a digital photographer, with a bit of practice, you’ll soon be taking amazing photos that you’ll be excited to share with friends, family, co-workers, and even complete strangers.
As you gain experience taking pictures using your iOS mobile device, you’ll begin to see things differently as you look at the viewfinder and plan your shots, and then frame or compose them before tapping the Shutter button to capture the image. How you see the world around you when looking at the viewfinder, and the creative decisions you make related to how to best capture your intended subject(s), is often referred to as using your “photographer’s eye.”
Instead of just pointing the camera lens at your intended subject, centering the subject in the frame, and then shooting from a head-on perspective, using your photographer’s eye, you should be able to quickly come up with creative and artistic ways to take more visually interesting and imaginative photos. How to tap your creativity to achieve this objective is covered throughout this book.
It’s important to understand that simply snapping a photo is only the first step before it’s ready to be showcased or viewed by others. Using the photo editing and enhancement tools that are built in to many of the photography apps for the iPhone and iPad, in a few seconds, and with just a few taps on the screen, it’s possible to quickly edit, enhance, crop, and work with your images, one at a time, to create true visual masterpieces.
Tip
Even if you capture what looks like an ordinary, not-too-visually interesting photo, don’t get discouraged right away. Try using the editing and enhancement tools available, as well as the image filters that are built in to many of the photography apps, and you’ll often be pleasantly surprised at the quick image transformations that are possible.
Figure 1-9 is an image shot using the Camera app on an iPhone 5s. With no filter and without using HDR mode, the image looks pretty ordinary. However, using the tools offered in the Photos app, the image can quickly be enhanced, as you can see in Figure 1-10.

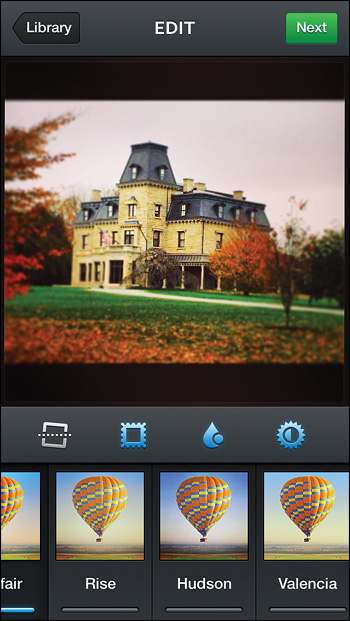
FIGURE 1-10 In less than 10 seconds, the original image was edited and enhanced using the Instagram app to create a more visually compelling and professional-looking shot.
Not too shabby! However, using the more extensive and powerful image editing tools offered by a third-party photography app, like Mobli (see Figure 1-11) or Adobe’s Photoshop Touch, even more incredible things can be done to enhance an image. Even if you are not at all technically savvy and don’t consider yourself to be a creative individual, this kind of power is all within your reach.

FIGURE 1-11 Using the Mobli app, a photo can be transformed into black and white, with only a selected portion colorized.
Start Taking Pictures Using the Camera App
Although many apps available from the App Store enable you to control the cameras that are built in to your iPhone or iPad, let’s start by becoming acquainted with shooting photos using the Camera app already installed on your iOS mobile device.
Discovering how to use the various features and functions of the Camera app, in a wide range of shooting situations, is the primary focus of the next chapter. Start by learning the basic technical skill you’ll need to take pictures, and then move on to developing your photographer’s eye and focusing on the creative aspects of digital photography.