8. Photography Apps That Enhance Your Picture-Taking Capabilities
In This Chapter
![]() Discover third-party alternatives to the Camera app
Discover third-party alternatives to the Camera app
![]() Learn about optional apps that offer specialized picture-taking capabilities
Learn about optional apps that offer specialized picture-taking capabilities
As you know, the Camera app comes preinstalled with iOS 7 and can be used to control the front- or rear-facing cameras that are built in to your iPhone or iPad.
In Chapter 2, “Snap Photos Using the Camera App,” you learned all about how to use the Camera app and its various features. However, available from the App Store are a wide range of third-party apps that offer feature-packed alternatives to the Camera app when it comes to taking pictures with your iOS mobile device.
To discover more apps that can be used instead of the Camera app, enter the search phrase Camera. From the search results, choose apps that offer photography and picture-taking features that you find useful. Tap on the app’s Price button to download and install the app, or tap on the app’s title or logo to read a more detailed description of the app.
Many of these third-party apps can be used with the optional clip-on lenses, tripods, external lights, and other accessories that you’ll learn more about in Chapter 10, “Use Optional Accessories to Improve Your Pictures.” For example, if you want to use the Camera! Awesome app’s Interval Timer, or if you want to capture a clear, 360-degree panoramic photo using the Cycloramic app, using an optional tripod to hold your iPhone or iPad still and level would be extremely beneficial.
Note
This chapter focuses on third-party apps that can be used as an alternative to the Camera app for taking pictures. Chapter 9, “Photography Apps That Expand Your Photo Editing and Enhancement Capabilities,” showcases a handful of apps that can be used instead of the Photos or iPhoto app to edit and enhance the pictures taken with or being stored on your iOS mobile device.
Camera App Alternatives
This section showcases a handful of third-party photography apps, listed in alphabetical order, which you can use instead of the Camera app.
Tip
With the greater selection of photography features and functions available to you as you’re taking pictures using a third-party app, you might discover you’re inspired more from a creative standpoint when it comes to capturing your subject(s) in visually interesting ways, and also when it comes to framing and composing your shots.
As you’re about to discover, using a third-party picture-taking app often gives you access to extremely useful and powerful photography features, like a self-timer, a larger selection of filters that can be applied in real time to images while you’re shooting, different ways to capture light, or the ability to utilize the camera lenses that are built in to your iPhone or iPad a bit differently. All of these additional tools can be used to enhance the professional quality or visual appeal of the photos you take using your iOS mobile device.
Note
The majority of the third-party photography apps can control the front- and rear-facing cameras that are built in to your iPhone or iPad, as well as utilize the iPhone’s built-in flash. Most of these apps automatically store your photos in the Camera Roll folder that’s also utilized by the Photos and iPhoto apps for storing photos, and they’re compatible with a wide range of third-party photo editing apps. Keep in mind that before third-party apps can access your device’s Camera Roll folder, you must initially grant the app permission to do so. This needs to be done only once.
Camera Plus
This $0.99 app adds a handful of useful autofocus modes to the iPhone or iPad’s picture-taking functionality, which gives photographers the added ability to highlight their intended subject(s). For example, as you’re preparing to take a photo and tapping on your subject to select where the autofocus sensor should lock on to, you can choose from several different AF modes, based on your proximity to your subject and whether you want some of the background to be blurred.
Using the Lumy feature that’s built in to the app and continuously displayed in the viewfinder as you’re taking pictures, it’s possible to make an image brighter using a controllable slider (see Figure 8-1). This is particularly useful when shooting in low-light situations. To quickly reset the brightness setting, double-tap on the slider.
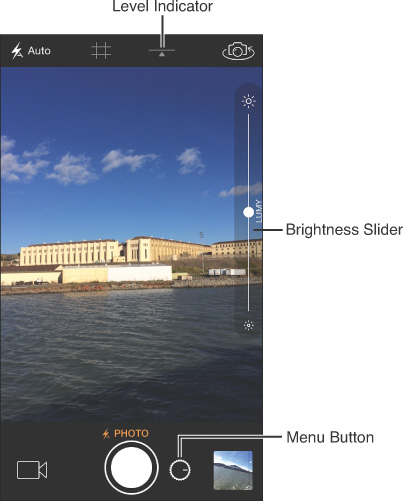
FIGURE 8-1 The viewfinder view of the Camera Plus app. From this screen, you can frame your image, adjust various feature-related settings, and snap your photos.
Like the Camera app, the Flash controls for the iPhone appear in the top-left corner of the screen, whereas the Camera Selection icon is found at the top-right corner of the screen. As you’re preparing to take a photo and looking through the viewfinder (your iPhone or iPad’s screen), it’s possible to tap on the Grid icon to superimpose a tic-tac-toe-like grid over the viewfinder to utilize the Rule of Thirds. (This grid does not appear in your actual photos.)
From the viewfinder screen of the Camera Plus app, tap on the Menu icon that’s displayed to the right of the Shutter button to turn on and utilize additional picture-taking features, such as image stabilization, a Burst shooting mode, and/or a self-timer (see Figure 8-2).
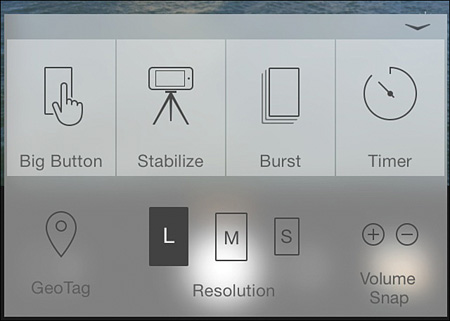
FIGURE 8-2 Tap on the Menu icon to reveal the Camera Plus app’s menu. From here, you can easily adjust a variety of options by tapping on the displayed command icons.
Tip
Anytime you (the photographer) are in motion and can’t hold the iPhone or iPad perfectly still while taking a picture, activate the Image Stabilization feature to help ensure that you’ll capture an in-focus and sharp photo. For example, if you’re in a car or on a boat or bus that’s moving, use Image Stabilization to compensate for that movement.
Another useful feature that’s available as you’re taking pictures using the Camera Plus app is the Level Gauge. Tap on the icon for this. You’ll see it near the top center of the viewfinder screen, and an onscreen Level Gauge is superimposed in the center of the viewfinder (see Figure 8-3). This feature helps to ensure you’re holding your iPhone or iPad level as you’re taking pictures.
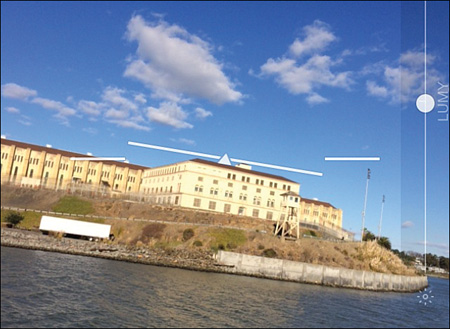
FIGURE 8-3 The app’s built-in Level Gauge helps ensure you’re holding your iPhone/iPad perfectly level when taking a picture. This is useful if you’re standing at an angle or you (as the photographer) are in motion.
Also available from the app’s menu screen is the Geotag feature. It’s used to add the location where the picture was shot to the image’s metadata. Plus, you can manually adjust the resolution of the image as you’re shooting (which impacts its file size).
In general, you always want to shoot photos at the highest resolution possible. You can always make a copy of the image later and, while working with the copy, reduce its resolution, shrink its file size, or make other edits.
After you’ve taken some photos, Camera Plus has several built-in editing and enhancement features that go beyond what’s possible using the Photos app’s Enhance feature.
Tip
Anytime you’re using the Camera Plus app, mildly shake the iPhone (or iPad) to quickly launch the Camera mode so you can begin snapping photos. This is a quick way to switch from the app’s image Viewing, Editing, or Sharing mode back to the Picture-taking mode, without having to tap anywhere on the screen.
Like the Camera app, Camera Plus immediately displays a tiny thumbnail of the last image you’ve shot. It’s displayed near the bottom-right corner of the screen. Tapping on this thumbnail icon enables you to view and work with images stored in your device’s Camera Roll folder. As you’re viewing photos, use the Pix’d feature to quickly enhance an image. This feature works just like the Camera app’s Enhance feature to automatically adjust things like contrast, brightness, and color saturation within the image to improve its appearance. Beyond using the one-tap Pix’d feature, however, you can tap the Edit icon to access an additional selection of image editing and cropping tools.
From directly within the Camera Plus app, images taken using the app or that are stored in your iOS mobile device can be shared via Facebook, Twitter, Flickr, Instagram, the Messages app, or email (using the Mail app).
Note
The Camera Plus app can also be used for shooting HD video.
In addition to offering a handful of useful picture-taking and image enhancement features that are not available from the Camera and Photos apps, Camera Plus is surprisingly easy to use, and it offers an intuitive interface that you’ll have no trouble getting used to, especially if you’re already familiar with the Camera app. For less than $1.00, this app is an excellent investment if you’re interested in expanding your iPhone or iPad’s picture-taking capabilities.
If there are photos you want to “lock up” within your device, making sure they can’t be accidentally deleted or viewed by unauthorized people, the Camera Plus app offers an in-app purchase (for an additional $0.99), which adds a Lock function to the app. It’s accessible (by tapping on the lock-shaped icon) when viewing or editing an image. Another feature that becomes available with this in-app upgrade is the ability to wirelessly beam photos to other iOS mobile devices that are connected to the same wireless network.
Camera! Awesome
The free Camera! Awesome app, shown in Figure 8-4, also offers a handful of features not offered by Apple’s Camera app. As you’re looking at the viewfinder screen of the Camera! Awesome app, command icons are displayed along the top and bottom of the display.
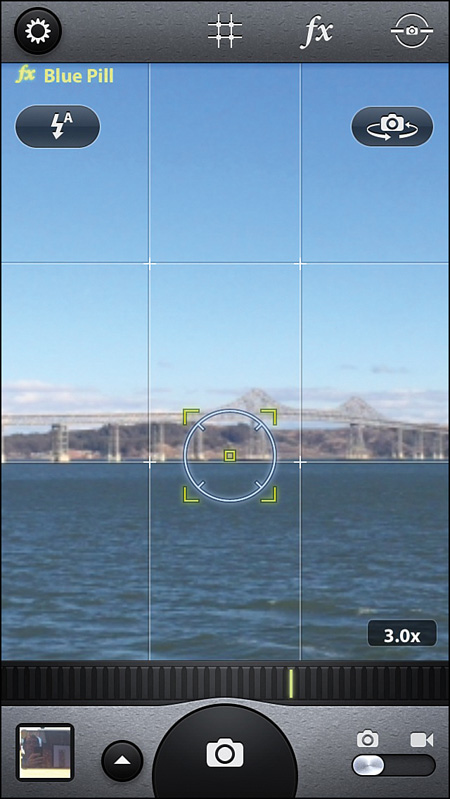
FIGURE 8-4 The viewfinder screen of the Camera! Awesome app from SmugMug. This is the screen you’ll see as you’re actually taking pictures using this app.
The Camera! Awesome app was developed by SmugMug (www.SmugMug.com), which is a popular online-based photo sharing and image backup service used by amateur and professional photographers alike. A basic SmugMug account, which is not required to use the app, is free. However, premium (fee-based) accounts are also available.
Near the top-left corner of the screen is the gear-shaped Settings icon. Tap on it to reveal the app’s Settings menu. From here, you can turn on or off various options that relate directly to picture-taking features, such as the ability to automatically add a geotag (location information) to each picture taken. It’s also possible to decide whether a pinch finger gesture will activate the app’s zoom feature.
Tip
From the Settings menu, be sure to scroll down and then set up the integration options for the various online-based photo sharing services that you currently use. One of the great features of this app is that you can share images from within the app directly to services, including SmugMug, Facebook, Twitter, Tumblr, Flickr, Picasa, Photobucket, and YouTube (for videos). Tap on the listing for each service you have an account with and, when prompted, enter your username and password for that service.
Also displayed along the top of the screen are the Grid and fx (special effect filter) icons. When you tap on the Grid icon, it’s possible to superimpose a tic-tac-toe-like grid over your viewfinder, which is useful when composing your shots. However, the app also offers other composition tools that can be displayed in your viewfinder instead of a basic grid.
When you tap on the fx icon, a menu that offers nine special effect filters is displayed along the top of the screen. As you’re taking pictures, select a filter to incorporate into your image in real time (see Figure 8-5).

FIGURE 8-5 When taking pictures with the Camera! Awesome app, you can incorporate a filter into your image as you’re shooting.
Note
These same filters can also be added to photos after they’ve been taken (during the editing process).
Located in the top-right corner of the viewfinder screen is a Level Gauge icon. When you tap on this, a level gauge graphic is displayed in the center of the viewfinder. Use this to determine whether you’re holding the iPhone or iPad level as you’re taking pictures.
If you’re using the Camera! Awesome app on an iPhone, displayed just below the Settings icon as you’re looking at the viewfinder screen is the Flash icon. Tap on this to set the iPhone’s flash to Auto, Off, On, or Flashlight mode. The Flashlight mode turns on the iPhone’s flash so it emits a steady light, as opposed to working as a traditional flash, which activates only when you tap the Shutter button to take a photo. Using this mode helps reduce red-eye when taking photos, but it’s primarily used when shooting video.
Displayed below the level gauge on the viewfinder screen is the Camera Selection icon. Tap on this to switch between activating the front- and rear-facing cameras on your iPhone or iPad.
Along the bottom of the viewfinder screen are four additional icons. Look to the bottom-left corner of the screen for a thumbnail preview window, which shows the last image taken using the app. To the right of this is a Menu icon (shaped like an upward-facing arrow). It offers access to several additional picture-taking features, including an Image Stabilization, Big Button, Slow Burst mode, Fast Burst mode, Self-Timer, and Interval Timer feature.
Use Image Stabilization to avoid blurs when you’re taking pictures and can’t hold your iPhone or iPad perfectly still. The Big Button feature superimposes a large Shutter Button icon on the screen, making it easier to tap when you’re taking pictures. Slow Burst mode enables you to hold down the Shutter button and take multiple photos in quick succession.
Caution
The Fast Burst feature enables you to capture even more images per second when you hold down the Shutter button, but the resolution of these images will be lower. In most situations, you’re better off using the Slow Burst feature when taking pictures that involve a fast-moving subject, so you wind up with higher-resolution images.
The Self-Timer feature is adjustable. Set up the iPhone or iPad to snap a photo between 5 and 60 seconds after you press the Shutter button. Another feature not found in too many other picture-taking apps is the Interval Timer. This enables you to set up the iPhone or iPad to have it continuously snap a photo automatically at a user-selected interval (between 5 and 60 seconds). This continues until you press the Shutter button again to stop the process.
As you’re taking a photo with the Camera! Awesome app, manually activate the Auto Focus feature by tapping on the screen directly over where your intended subject is displayed. This feature works the same way as the Camera app, although the AF sensor box that appears looks slightly different (refer to Figure 8-5).
Tip
Displayed just above the Shutter button, near the bottom of the viewfinder screen, is the Zoom slider. Place your finger on this slider and drag it to the right to zoom in on your subject. Move it back to the left to zoom out. From the Settings menu, you also can turn on or off the ability to use the pinch and reverse-pinch finger gestures to adjust this slider.
Like the majority of other apps that serve as an alternative to the Camera app, the Camera! Awesome app enables you to shoot HD video. To switch to Video mode, tap on the Camera/Video selection switch displayed at the bottom-right corner of the screen.
In addition to offering a nice selection of features that enable you to take better pictures using your iPhone or iPad, once you’ve taken the photos, the Camera! Awesome app offers an equally impressive selection of photo editing, enhancement, and sharing tools. To access them, tap on the Image Preview thumbnail that’s displayed in the viewfinder screen.
Instead of an Enhance feature, the Camera! Awesome app includes the Awesomize features. Tap on this icon as you’re viewing an image to reveal a menu of editing and enhancement tools, many of which have adjustable sliders associated with them, allowing you to select the intensity of a specific effect, texture, or filter. Built in to the app are also a selection of frames and borders you can add to images before sharing them.
Tip
From the app’s Edit Photo screen, tap on the Transform icon to access several image cropping and aspect ratio tools, as well as a rotation tool.
The ability to mix and match special effect filters, and adjust the intensity of them, is another useful feature that the Camera! Awesome app offers. However, in addition to the filters that are built in to the app, additional filters, textures, frames, and presets can be added through in-app purchases.
A set of nine popular portrait filters are priced at $0.99. All 63 available filters can be purchased for $3.99. For a one-time fee of $9.99, all of the available filters, textures, and frames currently available for the app, or that will be added in the future, become available.
Tip
After you’ve taken and edited a photo using the Camera! Awesome app, it’s possible to share it from within the app, save it to your Camera Roll (or another folder), or export it for use in another app. As you do this, you’re given the option to export the original (unedited) image or export the edited version of the image.
Whereas the Photos app enables you to back up your images to your iCloud-based My Photo Stream automatically, the Camera! Awesome app enables you to select which cloud-based service you want to use and then takes advantage of your iPhone or iPad’s Wi-Fi or cellular data connection to maintain an archive of the images taken using this app. From within Settings, be sure to turn on the Archive Over Wi-Fi Only feature if you want to conserve your cellular data usage.
Overall, the Camera! Awesome app offers many welcome enhancements and features over the Camera app, and makes available a nice collection of tools for taking, editing, and sharing photos in ways not offered by most other photography apps. It’s definitely one of the most feature-packed Camera app alternatives available from the App Store.
Camera+
Priced at $1.99, with optional special effect filters offered as in-app purchases for $0.99, the Camera+ app, shown in Figure 8-6, includes a nice collection of photography tools that can be utilized while taking pictures, as well as editing and enhancement tools that can be used after the fact, before you publish or share your pictures.
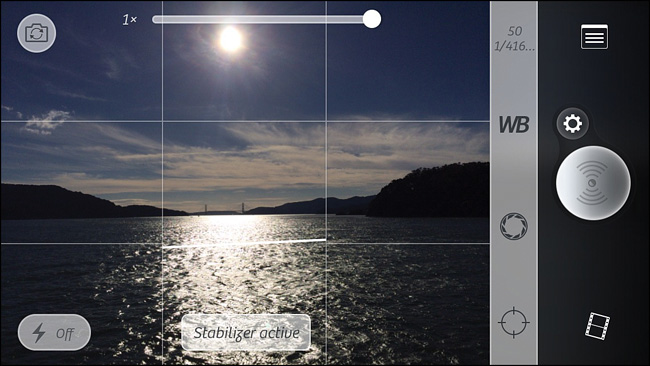
FIGURE 8-6 Shown here is the viewfinder screen of the Camera+ app while the iPhone is being held in Landscape mode with the app’s Stabilizer mode active.
More than 10 million copies of this app have been sold worldwide, making it one of the most popular Camera app alternatives available, and with good reason. The Camera+ app’s primary goal is to help anyone take better photos. This is done in several different ways.
For example, instead of providing a single Auto Focus and Auto Exposure option, the Camera+ app makes this two separate, but related, settings. This gives you, the photographer, more control over your picture-taking capabilities. Also built in to the app are an Image Stabilizer, Self-Timer, and Burst shooting mode as well as a 6x digital zoom. The onscreen viewfinder includes an optional level gauge.
Tip
For added control when taking pictures, access the app’s menu and turn on the Live Exposure option. Then, from the viewfinder screen, you can separately set the Auto Focus, Auto Exposure, and White Balance sensors. When you opt to adjust the Auto Exposure, while looking at the viewfinder screen, tap on your subject, or use a slider to make manual adjustments.
As a photographer, you’ll often be taking photos in a wide range of situations. To help you consistently capture well-lit and in-focus images, the Camera+ app enables you to select a Scene mode after a photo is taken. Based on the scene you select (there are more than a dozen to choose from), the app automatically adjusts and enhances the image accordingly (see Figure 8-7).
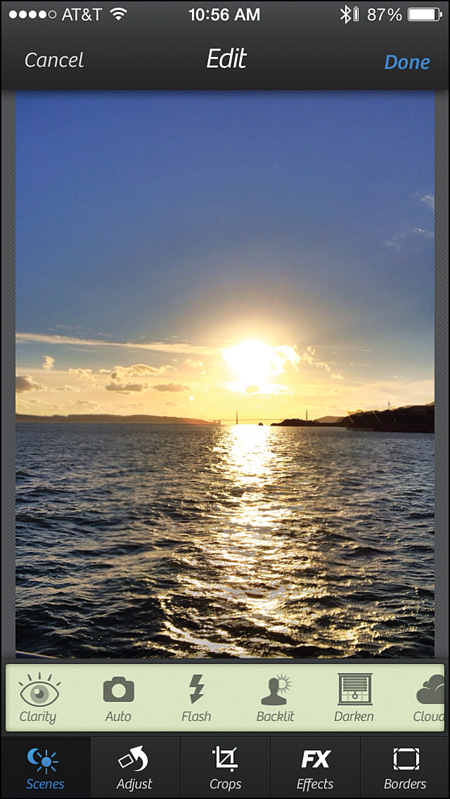
FIGURE 8-7 Choose a scene, and your image is automatically enhanced accordingly, based on how the brightness, contrast, and saturation, for example, should be set for that particular scenario.
In addition, many editing and enhancement tools are available within the app. For example, instead of just being able to rotate an image, the Camera+ app enables images to be flipped horizontally and/or vertically, as well as manually cropped. The Aspect Ratio tool enables images to be resized with ease, while the FX Effects tools include image filters and lighting effects that can be added to photos.
For taking pictures with the iPhone or iPad, and then editing, enhancing, and ultimately sharing them, the Camera+ app is powerful and replicates many of the features you’d find in a standalone point-and-shoot camera.
Tip
As you begin using the Camera+ app, be sure to tap on the Menu icon (displayed in the bottom-right corner of the screen) to access a selection of customizable options for turning on or off features utilized while taking pictures, as well as editing, enhancing, and sharing them later.
For example, turn on the capability to use the iPhone or iPad’s Volume Up or Volume Down buttons as your Shutter button. Turn on the Grid feature to superimpose a tic-tac-toe-like grid over your viewfinder, turn on the level gauge so it’s continuously displayed in the viewfinder, and/or turn on or off the Geotagging feature.
Cycloramic Studio 360 Panorama
The iPhone is capable of capturing panoramic shots using the Camera app, which is something not possible using the same Camera app on the iPad. These extreme wide-angle shots are ideal for taking photos of landscapes, city skylines, or large groups of people, for example.
The free Cycloramic Studio 360 Panorama app not only offers a different tool for capturing panoramic shots using an iPhone, but it also makes this capability available to iPad users. Taking this concept a step further, however, this app enables you to capture 360-degree panoramic shots with your iOS mobile device, which can then be viewed using this app. Later, if you want to share your 360-degree panoramic shots with others or publish them online, the app enables you to export the images into a short movie clip, which can easily be viewed on services like Facebook, or in a website or blog, for example.
Tip
If you’re an iPhone 5s user, one awesome feature of the Cycloramic Studio 360 Panorama app is that you can launch the app and then place the smartphone on a flat surface. The app then uses the iPhone’s vibration feature to automatically rotate itself around in a circle as it’s taking pictures, so the 360-degree shot can be captured automatically.
In addition to the entertainment-oriented uses of this app, many realtors, for example, are using it to capture the inside of houses they’re selling as they create detailed listings that will be posted online.
Tip
The Cycloramic Studio 360 Panorama app walks you through the process of taking 360-degree panoramic images. In reality, to do this, the app has you take up to 10 separate images while you rotate the iPhone or iPad in a steady and level manner, to the right, in between taking each shot. Use the onscreen guide (see Figure 8-8) to tell you exactly how much to rotate the smartphone or tablet, and be sure to pause when the Stop icon appears on the display during the picture-taking process.
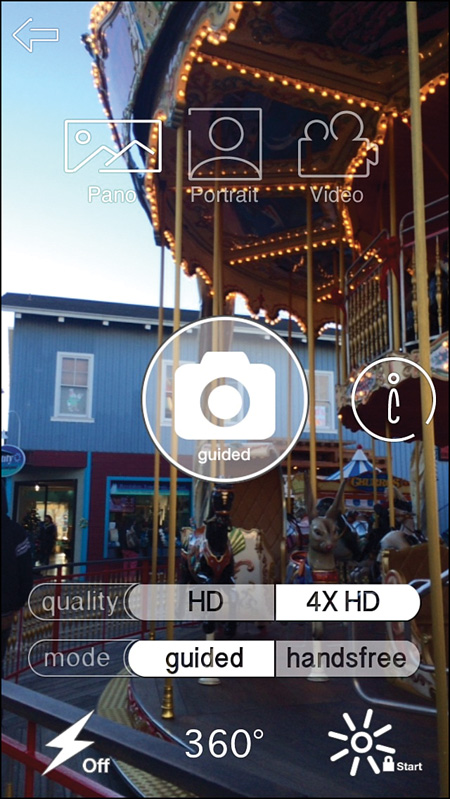
FIGURE 8-8 Taking 360-degree panoramic shots using your iPhone or iPad is easy if you follow the onscreen directions and capture each separate shot as instructed.
After you take a 360-degree panoramic shot, it’s possible to preview it on your iPhone or iPad’s screen, and then tap on the Instagram, Facebook, or Mail button to share the image. It’s also possible to access the app’s Photo Editor to enhance the image and/or add special effects.
Along the bottom of the Photo Editor screen, shown in Figure 8-9, you’ll find a series of menu icons, labeled Enhance, Effects, Frames, Stickers, Focus, Orientation, Crop, Adjust, Sharpness, Splash, Draw, Text, Red-Eye, Whiten, Blemish, and Meme (used for incorporating text into an image). Each reveals a separate set of tools for editing or enhancing the panoramic or 360-degree panoramic photos taken using the app.
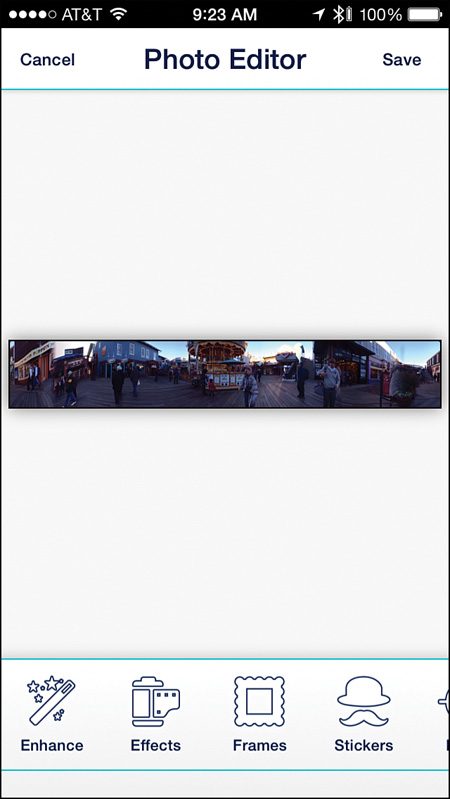
FIGURE 8-9 The Cycloramic Studio 360 app offers a nice selection of photo editing and enhancement tools.
Tip
As you’re editing a photo, use a reverse-pinch finger gesture on the screen to zoom in on an area of the 360-degree image. You can then hold your finger on the screen and drag it around to reposition the image, or use a left/right swipe motion. Zooming in enables you to see more detail as you’re adding effects or editing.
Note
As an optional in-app purchase ($1.99), it’s possible to unlock the 4x HD feature. This enables you to take much higher-quality panoramic or 360-degree panoramic shots, captured at 1250 × 9300 or 2500 × 18600 pixel resolution. Taking higher-resolution images increases their file sizes, but the results are visually impressive because more detail is visible within the images, and the colors appear more vivid.
Once you discover how easy it is to capture panoramic shots and 360-degree panoramic images with your iOS mobile device, and then enhance and share the images, you’ll love using this app. It can also be used for taking traditional photos while holding the iPhone or iPad in Portrait or Landscape mode. This enables you to use the app’s extensive editing and image enhancement tools on these regular images as well.
Hipstamatic
The Hipstamatic app ($1.99) is also designed to replace the Camera app. What sets it apart is that as you’re taking pictures using this app on your iOS mobile device, the app simulates various types of film-based cameras, flash types, and film types. As a result, with very little or no editing, it’s possible to create old-fashioned-looking images that can immediately be shared via Facebook, Twitter, Instagram, Tumblr, or Flickr, for example.
The company that developed the Hipstamatic app, shown in Figure 8-10, also has its own photo lab. Thus, from within the app, it’s possible to order traditional prints and have them shipped to your door. An extra fee applies for this service.
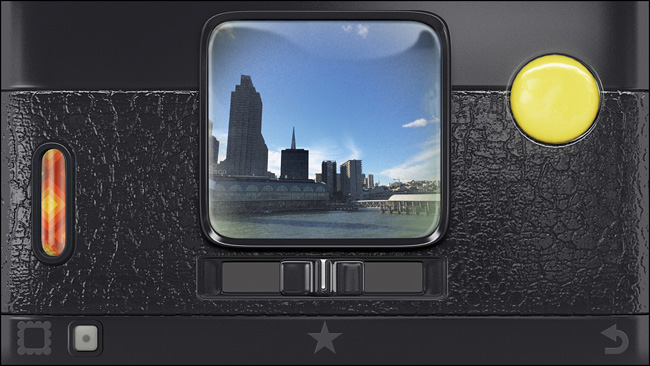
FIGURE 8-10 The main viewfinder screen of the Hipstamatic app simulates an old-fashioned film camera.
Note
In addition to the effects filters that can be incorporated in real time as you’re taking pictures, 10 different “add-on filter packs” are available as in-app purchases. They’re priced between $0.99 and $1.99 each, and they expand the types of visual effects that can be added to photos as they’re being taken, or after they’ve been shot and stored in your iPhone or iPad.
As soon as you launch the Hipstamatic app, you’ll discover that the viewfinder screen looks like an old, film-based camera. The actual viewfinder is a small window displayed near the center of the app’s screen.
Tip
Immediately below the viewfinder is the app’s Flash switch. Swipe it left or right to activate the iPhone’s flash. A sound effect is used to make the app more closely resemble an old camera.
After you’ve framed your image in the viewfinder, tap on the Shutter button to snap a photo. In this app, the Shutter button looks like a yellow circle, and it’s displayed near the top-right corner of the screen.
Displayed along the bottom of the viewfinder screen are several command icons. Tap on the icon in the bottom-left corner to access Hipstamatic’s photo editing, management, and sharing tools. Tap on the Favorite icon (shaped like a star) to choose a camera/film/flash combination that you want the app to simulate, and save it as a quickly accessible favorite.
To switch to a front-facing view of the camera (see Figure 8-11), tap on the curved arrow-shaped icon that’s displayed in the bottom-right corner of the screen. This same icon can be used to switch from the front- to rear-facing view.
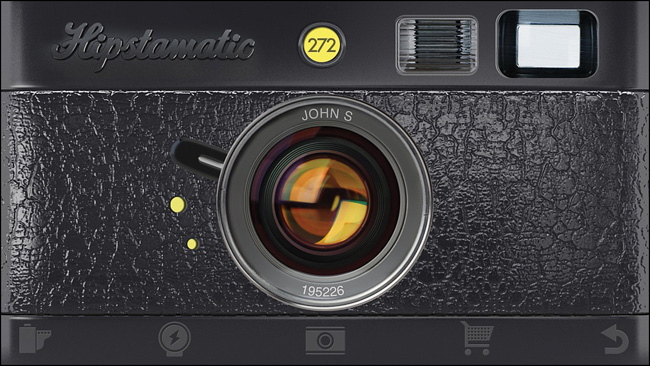
FIGURE 8-11 From the app’s front-facing view, you can change the virtual camera, lens, flash, and film type you’ll be shooting with. Thanks to optional in-app purchases, your options are extensive.
From the front view of the Hipstamatic app, it’s possible to swap virtual lenses by swiping your finger across the center lens either right or left. The app has a collection of built-in lenses to choose from, but more are available as in-app purchases.
To switch between different types of simulated films, tap on the Film icon that’s displayed in the bottom-left corner of the screen (when looking at the front view of the app). To change virtual flash types, tap on the Flash icon. To switch camera types, tap on the Camera Selection icon that’s displayed near the bottom center of the screen. Additional “Camera Gear” (also known as in-app purchases) can be acquired by tapping on the Shopping Cart icon.
Tip
After snapping photos using the Hipstamatic app, tap on the Viewing and Sharing icon to view and manage the images taken using this app. As you’re about to share individual or groups of images from within the app, you can add your own captions or attach a summary that describes what virtual camera equipment was used to snap the photo(s).
Images taken using the Hipstamatic app are stored in the app but can be exported to your Camera Roll folder from within the app. This enables you to view, edit, print, and share the images from the Photos app or another photography app that’s running on your iPhone or iPad.
Hipstamatic is a well-designed app for creative photographers who want to use digital photography “gear” that realistically replicates traditional film-based cameras, 35mm film effects, and various flash types. One interesting feature is that you can mix and match virtual camera gear that would not otherwise have been compatible if you were using actual film-based cameras. The ability to order prints in four different sizes from within the app is also a convenient feature.
Tip
It’s important to select the camera type, film type, and flash type (optional) before snapping a photo using the Hipstamatic app. Each option you select dramatically alters the appearance of your images as you’re actually taking pictures. It’s not possible to add these visual effects after the fact.
Pro HDR
You already know that the Camera app has the HDR (High Dynamic Range) shooting mode built in. When turned on, this shooting mode actually captures several versions of the same image, each utilizing the available light differently, and then merges those images into one. When you want to take “existing light” photos in low-light situations, HDR mode is used. As a result, your pictures appear a bit crisper and the colors are more vibrant and natural, based on ambient light.
If you find yourself wanting or needing to take photos in low-light situations, but don’t want to use your iPhone’s flash (or you’re shooting with the cameras built in to the iPad), the Pro HDR app ($1.99) dramatically expands your picture-taking capabilities. The main viewfinder screen of the app is shown in Figure 8-12. The app also offers a handful of user-adjustable image editing and enhancement tools you can use immediately after photos are taken in order to improve them.

Tip
The Pro HDR app can also be used in well-lit situations and during sunrises or sunsets, for example, to capture brighter and more vivid colors.
What’s great about this app is that it blends areas of an image that have too much or too little light, ensuring that all of the natural colors within an image are as clear and vibrant as possible, without compromising clarity. Using the image enhancement programming that’s built in to the HDR shooting mode of this app, the resolution of images is automatically improved.
Note
Each time you press the Shutter button, the app takes a few seconds to analyze the available light. It then snaps two separate photos, one at a time, so the picture-taking process using this app takes several seconds. The end result, however, is vastly superior to what you’d get using the HDR mode of the Camera app.
In fact, the photos you wind up taking, based on your iPhone or iPad model, can be equivalent to 12MP resolution. Typically, when taking photos using the rear-facing camera of the iPhone 5s, for example, achieving a maximum of 8MP resolution is possible.
Tip
As you’re taking photos, you can turn on the app’s Auto HDR shooting mode and allow the app to adjust all the picture-taking settings based on the available light. However, for more creative control, switch to the manual shooting mode. This enables you to adjust the exposure of each shot taken, before multiple shots are merged into one. You can also turn off HDR mode altogether and simply use the Pro HDR app to take normal, unenhanced photos.
As you’re taking pictures using the Pro HDR app, it’s possible to take advantage of the built-in Zoom feature, Grid, or Self-Timer, for example, to give yourself additional tools and further customize how your photos turn out. After images are taken, the app has a built-in Crop tool, allows for text-based captions to be added to photos, and offers a nice selection of optional filters and frames.
When it comes to editing photos, there are manually adjustable sliders for Brightness, Contrast, Saturation, Warmth, and Tint, which give you extra creative control (see Figure 8-13). To increase or decrease the intensity of these effects, simply drag your finger left or right on the appropriate slider.
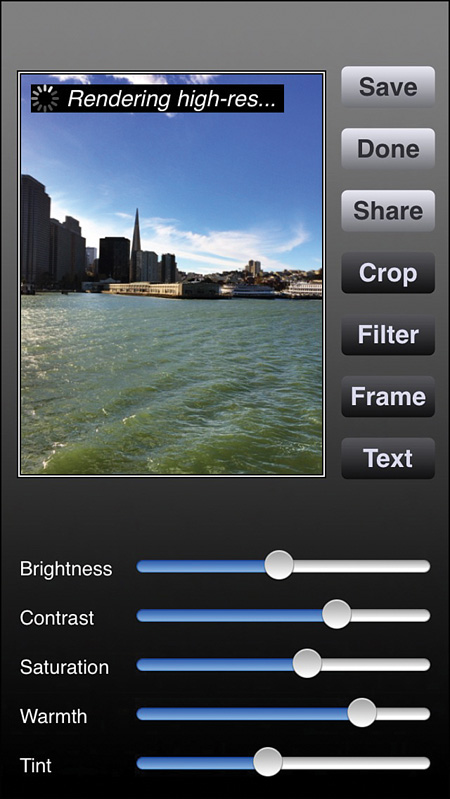
FIGURE 8-13 Many of the editing tools built in to the Pro HDR app are adjustable using onscreen sliders.
When you’re finished editing your image(s), tap on the Save button to save your changes. Then, tap on the Share button if you want to share your images with others via email, text message, Facebook, or Twitter. From the Share menu, tap on the More option to turn on integration with additional online-based services, such as Evernote, Tumblr, Flickr, or Instagram.
Edited images can also be exported from the Pro HDR app and used with any other digital photography app that’s installed on your iOS mobile device or used in an app that enables you to import photos, such as Pages, Numbers, or Keynote. If you have an AirPrint-compatible printer linked with your iPhone or iPad, creating prints from within the Pro HDR app is as easy as tapping on the Print button.
Note
The Pro HDR app supports both the front- and rear-facing cameras built in to your iPhone or iPad, but you’ll wind up with higher-resolution and better-quality images if you use the app with your device’s rear-facing camera. Although the app’s user interface isn’t as well designed as some other photography apps, the capabilities of this app exceed what’s possible using many photography apps.
Pro HDR is a versatile photography app for taking, editing, printing, and sharing photos, but the primary reason to use this app is to take full advantage of its greatly enhanced HDR shooting mode, which is ideal for taking photos in low-light situations (without using a flash), and for accurately capturing the ambient light that surrounds your intended subject(s) in daylight.
ProCam 2
This $2.99 app is also an excellent picture-taking app that can serve as a feature-packed alternative to the Camera app. In fact, ProCam 2 (shown in Figure 8-14) is chock full of useful tools for taking and editing photos that can help you enhance the quality of your images in a wide range of shooting situations.
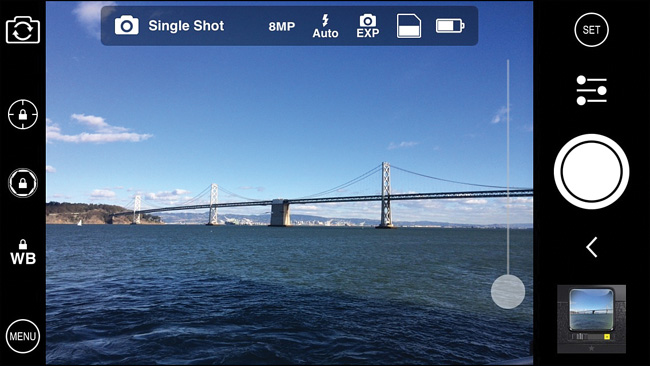
FIGURE 8-14 The ProCam 2 app’s viewfinder screen enables you to frame and capture images and access and adjust a vast selection of picture-taking features. It’s shown here on an iPhone being held in Landscape mode.
For example, ProCam 2 includes more than 25 “live filters.” Choose your favorite (see Figure 8-15), and it can be incorporated into your photos as they’re being taken. Other useful app picture-taking features include the Night mode with a Timer option, an adjustable Anti-Shake mode, a Self-Timer, a Burst shooting mode, an Interval shooting mode that’s also adjustable, a Face Detection feature, 6x digital zoom, as well as full focus and exposure control.
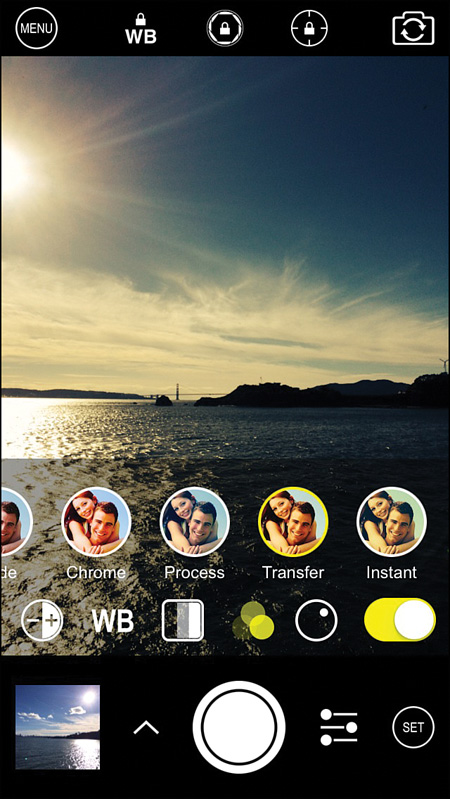
FIGURE 8-15 The ProCam 2 app has a handful of filters that you can add to your photos in real time, as you’re shooting.
Also as you’re taking photos, ProCam 2 records the time, date, and location where all photos are shot, allows you to add an optional Copyright stamp, and enables you to superimpose a grid onto the viewfinder. You can also manually adjust the aspect ratio and resolution of photos being taken and on the iPhone, control the flash from within the app.
Tip
Using the Night mode takes much of the guesswork out of taking pictures in low-light situations and helps to ensure properly exposed and in-focus images.
Even with all of the features and functions built in to the app that give you added control over your picture taking, the app is surprisingly easy to use. As you’re using the app’s viewfinder screen to take pictures, along the top and bottom of the screen you’ll discover a handful of command icons that can be used to quickly adjust the camera’s settings.
Look to the right margin of the viewfinder screen to see the exact settings currently being used as you’re taking pictures. Among the things you can quickly determine are whether you’re taking single shots (or using Burst mode), the resolution, whether the flash is turned on, and the iPhone or iPad’s battery level.
In addition to turning on or off certain features, when using ProCam 2, many options are adjustable using onscreen sliders (see Figure 8-16). For example, displayed to the right of the Shutter button is a Menu icon that displays sliders for a handful of customizable functions that can be used while shooting, such as contrast control, white balance adjustments, color saturation, and filter options.
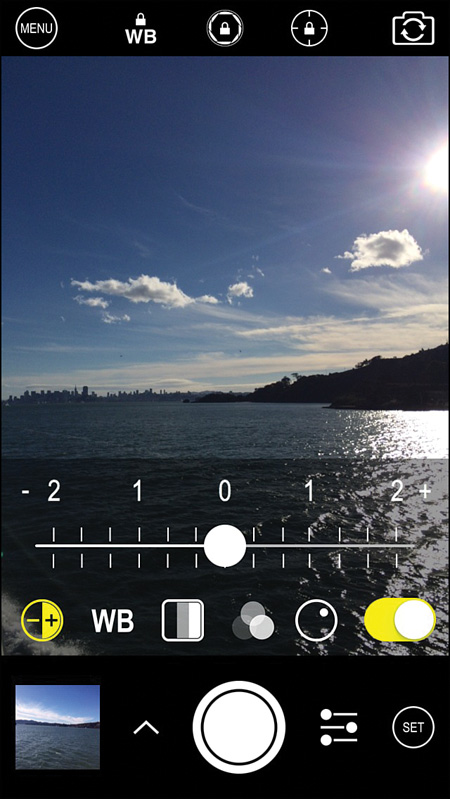
FIGURE 8-16 Use sliders to control certain features of the ProCam 2 app during the picture-taking process. This gives you a tremendous level of control over how your photos turn out.
Tap on the Menu icon that’s displayed to the left of the Shutter button to access another menu that offers a handful of adjustable options when taking pictures (shown in Figure 8-17).
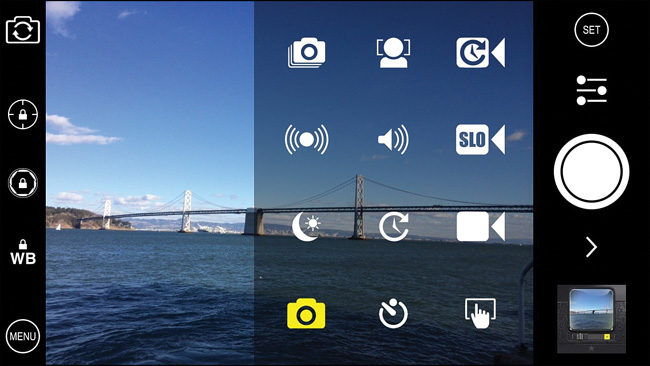
FIGURE 8-17 From this menu, you can turn on or off features such as Burst shooting mode, a self-timer, and image stabilization.
Tip
To quickly change shooting options, tap on the arrow-shaped icon that’s displayed to the left of the Shutter button, or tap on the other Menu icon that’s displayed to the right of the Shutter button.
ProCam 2 is best suited for serious iPhone/iPad photographers who want maximum control over the front- and rear-facing cameras that are built in to their mobile devices as they’re taking pictures.
Note
After each photo is taken using ProCam 2, an image preview thumbnail is displayed on the screen. Tap on this thumbnail to view a larger version of the photo and access the app’s Share options. As you’ll discover, the objective of this app is to give you the maximum creative control when taking pictures. It’s not designed for after-the-fact photo editing. For that, you can rely on other photography apps.
SnappyCam Pro
For a mere $1.99, it’s possible to purchase and download the SnappyCam Pro app, shown in Figure 8-18, and dramatically expand your picture-taking and photo editing capabilities when using your iPhone or iPad as a digital camera. For example, this app adds a Burst shooting mode to all iOS mobile devices, not just the iPhone 5s, iPad Air, and iPad mini with Retina display.
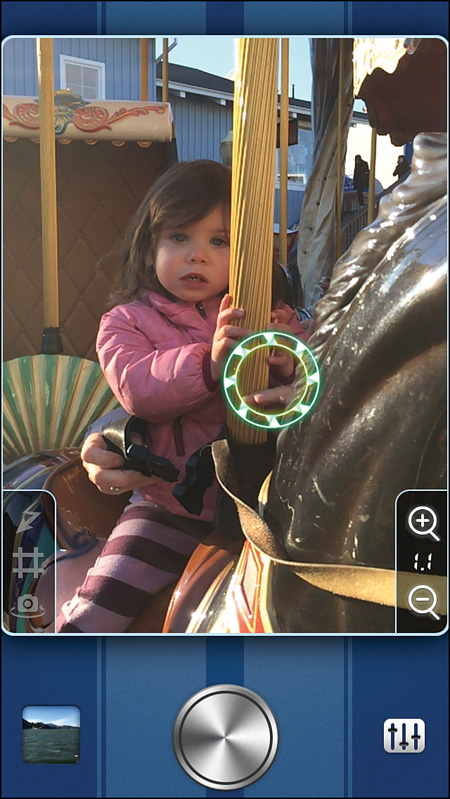
FIGURE 8-18 The SnappyCam Pro app’s viewfinder screen looks a bit different than other apps. As you can see, the actual viewfinder is displayed in an onscreen window.
Note
When used with an iOS mobile device that contains Apple’s A7 processor (including the iPhone 5s, iPad Air, and iPad mini with Retina display), the app’s Burst shooting mode becomes programmable. Using this feature, it’s now possible to capture up to 30 frames per second in full resolution, or up to 120 frames per second at a lower resolution.
Adding a Burst shooting mode enables you to more effectively take pictures when your subject is in motion, and ensures that you can capture that perfectly timed shot. It’s especially well suited for taking pictures during sporting events, for example.
Tip
By manually adjusting the Burst shooting mode with SnappyCam Pro’s self-timer, it’s possible to use this app for time lapse photography. For example, you can set up your iPhone or iPad on a tripod and have it automatically take one shot at a time, at any interval, up to one shot per hour.
As you’re taking photos using SnappyCam Pro, it’s possible to take full advantage of the app’s manual-focus mode, or double-tap on the viewfinder screen to activate the app’s autofocus feature. To create two separate autofocus sensors on the screen simultaneously, use a reverse-pinch finger gesture, and then double-tap on each of two separate subjects to activate each sensor, one at a time.
To activate the Burst shooting mode, simply hold down the Shutter button, which is located near the bottom center of the screen.
Tip
To adjust the app’s Zoom feature, use the + and - magnifying glass shaped icons that are displayed near the bottom-right corner of the viewfinder window. To adjust the iPhone’s built-in Flash mode, superimpose a grid on the viewfinder screen, or switch between the front- and rear-facing cameras, tap the command icons displayed near the bottom-left corner of the viewfinder window.
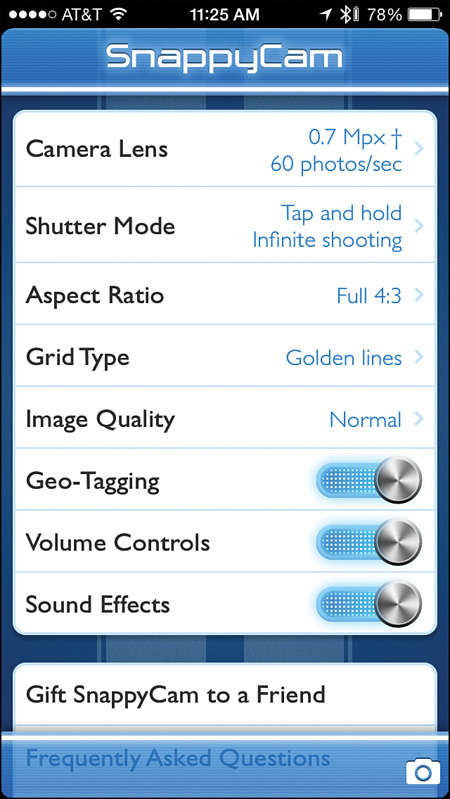
As you’re taking pictures, tap on the Menu icon that’s displayed to the right of the Shutter button to adjust a variety of picture-taking features and functions that are built in to the app, such as the virtual Camera Lens, Shutter Mode, Aspect Ratio, Grid Type, Image Quality, and Geo-Tagging. The menu screen is shown in Figure 8-19.
SnappyCam Pro is primarily a picture-taking app and is not designed for after-the-fact photo editing. Images taken using this app are stored in a separate folder in your iPhone or iPad but can easily be exported into the Camera Roll folder, where they can be imported into other apps for editing and sharing. The Export feature also enables you to send photos via email or upload them to Instagram.
Although this app doesn’t offer the vast selection of picture-taking features and functions offered by some photography apps, it is a good alternative to the Camera app if you’re interested in utilizing a Burst shooting mode and maximizing the capabilities of this feature to take pictures of moving subjects or other time-sensitive actions.
So Many More Photography Apps Are at Your Disposal
Beyond the photography apps described in this chapter, by visiting the App Store, you can find many other apps that can be used as an alternative to the Camera app for taking pictures with your iPhone or iPad. Some of these apps are designed for general-purpose photography, whereas others are designed to help you successfully take very specific types of photos.
In the next chapter, you’ll read about apps that can be used to help you view, organize, edit, enhance, print, and share your images after they’ve been taken. However, there are two other categories of photography apps you should be aware of. The first are apps that can replace the Camera app for taking pictures, enable you to quickly edit or enhance the pictures, and then upload those images to a specific online service so they can be shared.
The Instagram app is the perfect example of this. Using the Instagram app, you can snap photos; automatically crop them into a square shape; add a filter and/or border as well as your location, caption, and/or keywords; and then upload one image at a time to the Instagram service to share it. The whole process takes just seconds.
Note
You’ll learn more about the Instagram app and online social networking service in Chapter 12, “Share Your Digital Photos Online.”
Tip
Apple’s own Photo Booth app comes preinstalled on the iPad. It too can be used for taking pictures instead of the Camera app. What sets these two apps apart is that the Photo Booth app has eight additional built-in special effect filters that can be used in real time when taking photos, and it’s designed so you can take and share whimsical photos of yourself and the people around you.
Another type of photography app transforms your iPhone or iPad into a tool that can remotely control your digital SLR camera (and its settings while you’re taking pictures), when the camera is linked to your iOS mobile device wirelessly or via a special cable. In essence, the iPhone or iPad becomes a camera accessory for your high-end, standalone Nikon or Canon digital SLR camera. If you’re interested in this type of application, be sure to read Chapter 10.