
Taking pictures
Importing your pictures
Viewing and admiring pictures
Creating a slideshow
Using pictures for wallpaper
E-mailing pictures
Assigning photos to contacts
Adding photos to MobileMe
Camera phones may outsell dedicated digital cameras nowadays, but with relatively few exceptions, they're rather mediocre picture takers. Come to think of it, most mobile phones don't show off digital images all that well, either.
Of course, most mobile phones aren't iPhones.
The device you have recently purchased (or are lusting after) is a spectacular photo viewer. And though its built-in digital camera isn't the one we'd rely on for snapping pictures during an African safari or even your kid's fast-paced soccer game, the iPhone in your steady hands can produce perfectly acceptable photos.

Over the next few pages, you discover how best to exploit the iPhone's camera. We then move on to the real magic — making the digital photos that reside on the iPhone come alive — whether you imported them from your computer or captured them with the iPhone's camera.
As with many applications on the iPhone, you find the Camera application icon on the Home screen. Unless you moved things around, it's positioned on the upper row of icons, all the way to the right and adjacent to its next of kin, the Photos icon. We tap both icons throughout this chapter.
Might as well snap an image now:
Tap the camera icon on the Home screen.
This tap turns the iPhone into the rough equivalent of a Kodak Instamatic, minus the film and flash, of course.
Keep your eyes fixed on the iPhone display.
The first thing you notice on the screen is something resembling a closed camera shutter. But that shutter opens in about a second, revealing a window into what the camera lens sees. In case you were wondering, the lens is hiding behind the small foxhole in the upper-left corner of the back of the iPhone. (The position of the camera lens is shown in Chapter 1, in Figure 1-3.)
Aim the camera at whatever you want to shoot, using the iPhone's brilliant 3½-inch display as your viewfinder.
We marvel at the display throughout this book; the Camera application gives us another reason to do so.
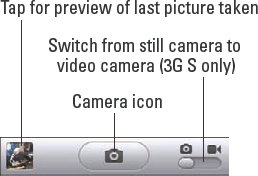
When you're satisfied with what's in the frame, tap the camera icon at the bottom of the screen (see Figure 9-1) to snap the picture.
Warning
If you're using a 3GS camera, make sure the switch at the bottom-right corner of the screen is set to camera mode rather than video mode. The on-screen button is under the little picture of a camera rather than the little picture of a video camera.
Warning
Be careful. The camera icon is directly above the Home button. We've seen more than one iPhone user erroneously hit the Home button instead.
You'll experience momentary shutter lag, so be sure to remain still. When the shutter reopens, you see the image you just shot, but just for a blink. The screen again functions as a viewfinder so that you can capture your next image.
That's it: You've snapped your first iPhone picture.
Repeat Steps 3 and 4 to capture additional images.
Tip
If you position the iPhone sideways while snapping an image, the picture is saved in landscape mode.
Keep a couple more things in mind while snapping pictures with the iPhone.
In our experience, the iPhone camera button is supersensitive. We have accidentally taken a few rotten snapshots because of it. Be careful: A gentle tap is all that's required to snap an image.
Tip
If you have trouble keeping the camera steady, try this trick. Rather than tap the camera icon at the bottom of the screen (as suggested in Step 4), keep your finger pressed against the icon and release it only when you're ready to snap an image.
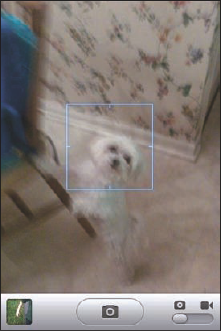
If you have the 3GS iPhone, you can take advantage of the new feature dubbed Tap to Focus. Normally, the camera on the 3GS focuses on a subject in the center of the display, which you're reminded of when you momentarily see a square appear in the middle of the screen, as shown in Figure 9-2. But if you tap elsewhere in the frame, perhaps on the face of your kid in the background, the iPhone accordingly shifts its focus there, adjusting the exposure and the phenomenon that photographers refer to as the white balance. For another moment or so, you see a new, smaller square over the child's face.
You needn't use only the iPhone's digital camera to get pictures onto the device, of course, and in most cases, we suspect that you won't. Instead, you can synchronize photos from a PC or Macintosh by using the Photos tab on the iTunes iPhone page, which is described in Chapter 3. (The assumption here is that you already know how to get pictures onto your computer.)
Quickie reminder: On a Mac, you can sync photos via iPhoto software version 4.03 or later and Aperture. On a PC, you can sync with Adobe Photoshop Album 2.0 or later and Adobe Photoshop Elements 3.0 or later. Alternatively, with both computers, you can sync with any folder containing pictures.
When the iPhone is connected to your computer, click the Photos tab on the iTunes iPhone page. Then click the appropriate check boxes to specify the pictures and photos you want to synchronize. Or, choose All Photos and Albums if you have enough storage on the iPhone to accommodate them.
Syncing pictures is a two-way process, so photos captured with the iPhone's digital camera can also end up in the photo library on your computer.
Tip
Mac users: Connecting the iPhone with photos in the camera roll usually launches iPhoto in addition to iTunes.
Note
So where exactly do your pictures hang out on the iPhone? The ones you snapped on the iPhone end up in a photo album appropriately dubbed the camera roll. Of course, the photos you imported are readily available too (and grouped in the same albums they were on the computer). We show you not only where they are but also how to display them and share them with others — and how to dispose of the duds that don't measure up to your lofty photographic standards.
Get ready to literally get your fingers on the pics (without having to worry about smudging them):
Tap the Preview icon (refer to Figure 9-1).
The shutter closes for just an instant and is replaced by the last image you shot. You see the camera controls shown in Figure 9-3. If you don't see the camera controls (they disappear after a few seconds), tap the screen again.
Tap the Camera Roll button in the upper-left corner of the screen.
You see thumbnail images of the complete roll of pictures you shot with the iPhone. The camera roll is displayed in Figure 9-4.
On the 3GS, the camera roll shows photos and videos you've shot. (The process of shooting videos is described in Chapter 8.) On older iPhone models, you see just photos.
Alternatively, you can tap the Photos icon on the Home screen and then tap camera roll or any other album in the list of photo albums.
Note
Using the method described in Step 1, you can access only the camera roll. Using the alternative method, you can access the camera roll and all your other photo albums.
Browse through the thumbnail images in the album until you find the picture you want to display.
If the thumbnail you have in mind doesn't appear on this screen, flick your finger up or down to scroll through the pictures rapidly or use a slower dragging motion to pore through the images more deliberately.
Tap the appropriate thumbnail.
The picture you selected fills the entire screen.
Tap the screen again.
The picture controls appear (refer to Figure 9-3). We discuss later what they do.
To make the controls disappear, tap the screen again or just wait a few seconds and they go away on their own.
To transform the iPhone back into a picture-taker rather than a picture-viewer, make sure that the picture controls are displayed and then tap Done in the upper-right corner.
Note that this option is available only if you arrived at the camera roll from the Camera application. If you didn't, you have to back out of this application altogether by tapping the Home button. Then tap the Camera application icon on the Home screen to call the iPhone's digital camera back into duty.
To return to the thumbnails view of your camera roll or the thumbnails for any of your other albums, make sure the picture controls are displayed. Then tap the Camera Roll button in the upper-left corner.
The Camera Roll button carries the name of one of your other photo albums if you're trying to return to that collection of pictures instead.

Photographs are meant to be seen, of course, not buried in the digital equivalent of a shoebox. And, the iPhone affords you some neat ways to manipulate, view, and share your best photos.
You may already know (from the preceding section) how to find a photo and view it full-screen and display picture controls. But you can do a lot of maneuvering of your pictures without summoning those controls. Here are some options:
Skip ahead or view the previous picture: Flick your finger left or right, or tap the left- or right-arrow control.
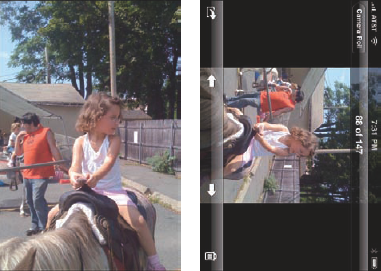
Landscape or portrait: The iPhone's wizardry (or, more specifically, the device's accelerometer sensor) is at work. When you turn the iPhone sideways, the picture automatically reorients itself from portrait to landscape mode, as the images in Figure 9-5 show. Pictures shot in landscape mode fill the screen when you rotate the iPhone. Rotate the device back to portrait mode and the picture readjusts accordingly.
Zoom: Double-tap to zoom in on an image and make it larger. Do so again to zoom out and make it smaller. Alternatively, take your thumb and index finger and pinch to zoom in, or unpinch the photo to zoom out.
Pan and scroll: This cool little feature is practically guaranteed to make you the life of the party. After you zoom in on a picture, drag it around the screen with your finger. Besides impressing your friends, you can bring front and center the part of the image you most care about. That lets you zoom in on Fido's adorable face as opposed to, say, the unflattering picture of the person holding the dog in his lap.
Those of us who store a lot of photographs on computers are familiar with running slideshows of those images. It's a breeze to replicate the experience on the iPhone:
Choose your camera roll or another album from the Photo Albums list.
To do so, tap the Photos icon from the Home screen or tap the Camera Roll button in the Camera application.
Tap the Play button at the bottom of the thumbnails screen and you're finished.
Enjoy the show.
You can alter the length of time each slide is shown, change the transition effects between pictures, and display images in random order.
From the Home screen, tap Settings and then scroll down and tap Photos. Then tap any of the following to make changes:
Play Each Slide For: You have five choices (2 seconds, 3 seconds, 5 seconds, 10 seconds, 20 seconds). When you're finished, tap the Photos button to return to the main Settings screen for Photos.
Transition: This effect is the one you see when you move from one slide to the next. Again, you have five choices (cube, dissolve, ripple, wipe across, wipe down). Why not try them all, to see what you like? Tap the Photos button when you're finished.
Repeat: If this option is turned on, the slideshow continues to loop until you stop it. If it's turned off, the slideshow for your camera roll or album plays just once. The Repeat control may be counterintuitive. If Off is showing, tap it to turn on the Repeat function. If On is showing, tap it to turn off the Repeat function.
Shuffle: Turning on this feature plays slides in random order. As with the Repeat feature, tap Off to turn on shuffle or tap On to turn off random playback.
Tap the Home button to leave the settings and return to the Home screen.
Ed loves backing up slideshows with Sinatra, Sarah Vaughan, or Gershwin, among numerous other artists. Bob loves using Beatles songs or stately classical music.
Adding music to a slideshow couldn't be easier. Just tap iPod and begin playing a song. Then return to the Photo application to start up a slideshow, as described in the beginning of the earlier section "Launching Slideshows."
We told a tiny fib by intimating that photographs are meant to be seen. We should have amended that statement by saying that some pictures are meant to be seen. Others, well . . . you can't get rid of them fast enough. Fortunately, the iPhone makes it a cinch to bury the evidence:
From the camera roll, tap the objectionable photograph.
Tap to display the picture controls, if they're not already displayed.
Tap the trash can icon.
Tap Delete Photo (or Cancel, if you change your mind).
The photo gets sucked into the trash can and mercifully disappears.
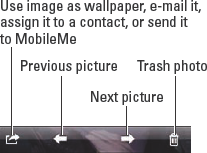
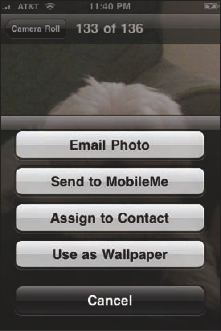
You can take advantage of the photos on the iPhone in a few more ways. In each case, you tap the picture and make sure the picture controls are displayed. Then tap the icon at the bottom left (the one that looks like an arrow trying to escape from a rectangle). That displays the four choices shown in Figure 9-6.
Here's what each choice does:
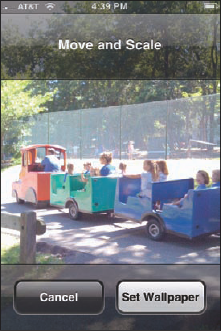
Use As Wallpaper: The default background image on the iPhone when you unlock the device is a gorgeous view of Earth. Dramatic though it may be, you probably have an even better photograph to use as the iPhone's wallpaper. A picture of your spouse, your kids, or your pet, perhaps?
When you tap the Use As Wallpaper button, you see what the present image looks like as the iPhone's background picture. And, as Figure 9-7 shows, you're given the opportunity to move the picture around and resize it, through the now familiar action of dragging or pinching against the screen with your fingers. When you're satisfied with what the wallpaper will look like, tap the Set Wallpaper button. Per usual, you also have the option to tap Cancel. (You can find out more about wallpaper in Chapter 13.)
Email Photo: Some photos are so precious that you just have to share them with family members and friends. When you tap Email Photo, the picture is automatically embedded in the body of an outgoing e-mail message. Use the virtual keyboard to enter the e-mail addresses, subject line, and any comments you want to add — you know, something profound, like "Isn't this a great-looking photo?" (Check out Chapter 11 for more info on using e-mail.)
Tip
You can also press and hold the screen until a Copy button appears. Tap that button, and now you can paste the image into an e-mail.
After the 3.0 software upgrade, Apple began supporting picture messaging through what's called MMS, or Multimedia Messaging Service. As this book was being published, AT&T hadn't flipped the switch on the service in the United States, so depending on when you read this book, you may not yet be able to take advantage of MMS.
Assign to Contact: If you assign a picture to someone in your Contacts list, this image pops up whenever you receive a call from that person. To make it happen, tap Assign to Contact. Your list of contacts appears on the screen. Scroll up or down the list to find the person who matches the picture of the moment. As with the wallpaper example, you can drag and resize the picture to get it just right. Then tap Set Photo.
As you may recall from Chapter 4, you can also assign a photo to a contact by starting out in Contacts. As a refresher, start by tapping Phone, and then tapping Contacts. From Contacts, choose the person, tap Edit, and then tap Add Photo. At that point, you can take a new picture with the iPhone's digital camera or select an existing portrait from one of your onboard picture albums.
To change the picture you assigned to a person, tap her name in the Contacts list, tap Edit, and then tap the person's thumbnail picture, which also carries the label Edit. From there, you can take another photo with the iPhone's digital camera, select another photo from one of your albums, edit the photo you're already using (by resizing and dragging it to a new position), or delete the photo you no longer want.
Send To MobileMe: If you're a member of Apple's $99-a-year MobileMe online service (formerly .Mac), you can publish a photo to an album in the MobileMe Gallery. Tap the Send To MobileMe control, and then tap the appropriate Gallery album to which you want to add the picture. Enter the title of the photo and an optional description in the spaces provided in the Publish Photo screen that pops up. Tap Publish. Your photo is on its way to the "cloud." You also have to check an Album Setting box in the Gallery that has a strangely worded label: Adding of Photos via E-Mail or iPhone.
Tip
Before leaving this photography section, we want to steer you to the App Store, which we explore in greater depth in Chapter 14. As of this writing, hundreds of photography-related applications, many free, are available. These come from a variety of sources and range from Omer Shoor's Photogene (a $2.99 suite of photo-editing tools) to Imaging Luminary's iFlash Ready v2.1 (which attempts to brighten pictures by using a software-based flash). We also want to point out that many picture apps take advantage of the iPhone's location smarts. Pictures can be geotagged with the location in which they were shot. The first few times you use the iPhone's Camera application, it asks for your permission to use your current location. Similarly, third-party apps ask whether it's okay to use your location. Later on, you might plot a picture's location on a map or use geotagged images to see where friends or like-minded individuals are hanging out.
You have just passed Photography 101 on the iPhone. We trust that the coursework was a, forgive the pun, snap.