
Chapter 9: How Do I Max Out My iPhone’s Photo and Video Features?
Your iPhone is a perk-filled device, to be sure, and one of the best of those perks is that the iPhone moonlights as a digital media player. Not only do you have the music, podcasts, and audiobooks that I talk about briefly in Chapter 8, but you also have movies, TV shows, videos, photos, and even YouTube right there in the palm of your hand. So when you’re tired of calling, researching, emailing, scheduling, and other serious iPhone pursuits, you can kick back with a photo slide show or a video to relax. However, your iPhone is capable of more than just playing and viewing media. It’s actually loaded with cool features that enable you to create and manipulate photos and videos, and use those files to enhance other parts of your digital life. This chapter is your guide to these features.
Getting More Out of iPhone Photos
Getting More Out of iPhone Videos
Getting More Out of iPhone Photos
Your iPhone comes with a couple of built-in digital cameras that you can use to take pictures while you’re running around town. Taking a picture is straightforward. First, on the Home screen, tap Camera. (Alternatively, from any screen, swipe up from the bottom to display the Control Center, then tap the Camera icon.) If this is the first time you’ve opened the Camera app, it asks if it can use your current location. This is an excellent idea because it tags your photos with your present whereabouts, so be sure to tap OK. When the Camera app appears, make sure the Mode switch (pointed out later in Figure 9.1) is on Photo (or Square, to take a square shot). Now line up your shot and tap either the Shutter button (which, again, I point out in Figure 9.1) or the Volume Up switch, which appears on the top edge of the iPhone when you hold it in the landscape position with the Home button on the left. To view your photo, tap the Camera Roll button, which appears in the lower left corner of the Camera app screen (see Figure 9.1).
While using the cameras may be simple, what you can do with photos on your iPhone is pretty cool. You can email photos to friends, take a photo and assign it to a contact, or make a slide show with music in the background. The large screen on your iPhone makes it the perfect portable photo album. No more whipping out wallet shots of your kids. Now you can show people your iPhone photo album!
To get to your photos, tap the Photos icon in your iPhone Home screen to display the Albums screen, which lists your photo albums. Tap an album to see its pictures, and then tap the picture you want to check out.
Understanding the iPhone camera features
Before getting to the Photos app, I should take a second here to talk about the coolest camera features found in the iPhone:
- Rear and front-facing cameras. The iPhone 6 and 6 Plus come with two cameras: an 8-megapixel iSight camera on the back for regular shots, and a 1.2-megapixel FaceTime HD camera on the front for taking self-portraits. In the Camera app, tap the Switch Camera button (pointed out in Figure 9.1) to switch between the front and rear cameras.
- Autofocus. The iPhone cameras automatically focus on whatever subject is in the middle of the frame.
- Tap to set the focus and exposure. If the subject you want to focus on is not in the middle of the frame, you can tap the subject and the iPhone automatically moves the focus to that object. It also automatically adjusts the white balance and exposure.
- 5X digital zoom. You can zoom using the iPhone back camera. Pinch two fingers together on the screen to display the zoom slider, shown in Figure 9.1. Then tap and drag the slider right to zoom in, or left to zoom out.
- Auto image stabilization. The iPhone 6 (and 5s) actually takes multiple shots at the same time and combines them automatically to produce a sharp, stable image. The iPhone 6 iSight camera also features optical image stabilization, which uses the iPhone gyroscope and motion chip to precisely adjust the lens to compensate for hand shake.
- Burst mode. When you hold down the Shutter button in the iPhone 6s (or 5s), the Camera app takes photos at a rate of 10 per second.
- Geotagging. The iPhone can use its built-in GPS sensor to add location data to each photo, a process called geotagging. This means you can organize your photos by location, which is great for vacation snaps and other trip-related photos.
- LED flash. The iPhone has a built-in LED flash that sits right beside the rear camera, so you can take pictures at night or in extremely low-light conditions. The LED flash is in Auto mode by default, which means it flashes automatically when the ambient light is low. To control this in the Camera app, tap the Flash button (pointed out in Figure 9.1), and then tap On (to use the flash with every shot), Off (to never use the flash), or Auto.
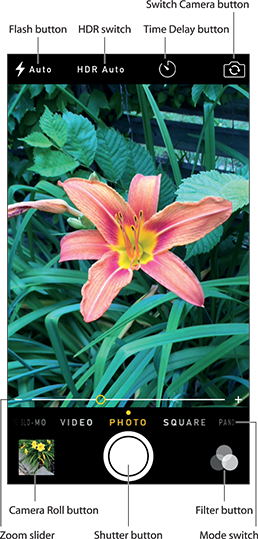
9.1 Tap the screen and then drag the slider to zoom in and out.
Taking a panoramic photo
One of the biggest challenges all photographers face is capturing very wide shots, particularly landscapes. If you have a high-end digital SLR camera, you can swap out your regular lens for a wide-angle lens, but that’s not an option with the iPhone. In the past the only alternative was to take a series of side-by-side shots and then use an app such as AutoStitch or Photosynth to combine those photos into a single panoramic shot. The results were usually decent, but not always great.
That should change now that the iOS 6 or later version of the Photos app comes with its own Panorama feature. Panorama beats out other panoramic photo apps because it uses the built-in three-axis gyroscope to precisely align the images as you shoot them, even if the iPhone shakes or your pan isn’t perfectly straight. The result is a seamless panoramic view of up to 240 degrees (up to a maximum image resolution of 28 megapixels). The Panorama feature is available for the iPhone 4s and later.
Follow these steps to take a panoramic photo:
- On the Home screen, tap Camera. The Camera app appears.
- Use the Mode switch to select Pano. Camera displays the Panorama tool, shown in Figure 9.2.
- Position the iPhone so that the camera is pointing at the leftmost part of the panoramic scene you want to capture. If you’d prefer to pan from right to left, instead, tap the arrow to reverse the direction.
- Tap the Shutter button to begin the shot.
- Pan the iPhone, keeping the following pointers in mind:
- Pan the iPhone steadily and continuously.
- Don’t pan too fast. If you see “Slow down” on the screen, it means you’re panning too quickly.
- Don’t pan in the opposite direction or Camera will end the shot.
- Try to keep the arrow centered on the horizontal line.
- If the arrow falls below the line, either raise the iPhone or tilt the top of the iPhone towards you.
- If the arrow moves above the line, either lower the iPhone or tilt the top of the iPhone away from you.
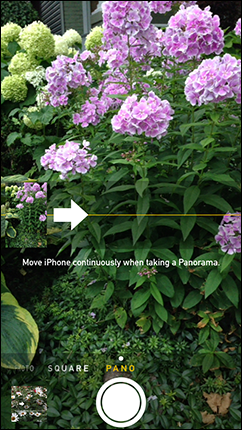
9.2 Use the Mode switch to select Pano to see the Panorama tool.
- When your panorama is complete, tap Done. Camera also stops the shot automatically if you pan a full 240 degrees. Camera stitches together the shots and saves the panorama to the Camera Roll.
Taking High Dynamic Range photos
Your iPhone usually takes a pretty decent picture, but it works best when the ambient light isn’t too extreme — that is, not too dark or too light. In particular, your iPhone has trouble taking good photos in places where the light conditions cause a wide variation in tone. The best example is an outdoor scene on a bright, sunny day, where some parts of your subject are bathed in sunlight and others are mired in shade. This large contrast between bright and dark elements is called a High Dynamic Range (HDR), and your iPhone — indeed, any digital camera — won’t do well in these scenarios. Depending on where you focus the shot, you usually end up with either the sunlit elements overexposed and washed out or the shaded elements underexposed and murky. Either way, you lose crucial details and the photo just doesn’t look right.
Fortunately, your iPhone comes with a feature called HDR that can often compensate for these problems and actually produce beautiful, detailed photos of high-contrast scenes. The HDR feature works by taking not one, not two, but three photos of the scene: one underexposed to capture the high-contrast areas of the scene, one overexposed to capture the low-contrast areas, and one with normal exposure. The iPhone then blends all three shots into a finished photo that — theoretically, at least — combines the best parts of each shot. No, I’m sorry to say that it doesn’t work perfectly every time, but I think you’ll be pleasantly surprised at how often it does work.
Before you get started with HDR, you need to make a decision. As I mentioned earlier, HDR takes three photos: underexposed, overexposed, and normal. By default, HDR saves the composite version that combines all three exposures, as well as the normal exposure photo. Keeping the normal exposure shot is a good idea because that photo is sometimes better than the composite version. If you don’t want to clutter your iPhone Camera Roll with extra pictures — or if later you find that the normal exposure shot is rarely (or never) superior to the composite version — then you can configure HDR not to save the normal exposure.
Follow these steps:
- On your iPhone Home screen, tap Settings. The Settings app appears.
- Tap Photos & Camera. The Photos screen appears.
- In the HDR section, tap the Keep Normal Photo switch to Off.
To take an HDR shot, open the Camera app, tap the HDR switch to On, and then take your shot. Figure 9.3 shows a High Dynamic Range scene shot with normal exposure, and Figure 9.4 shows the HDR version of the same scene.

9.3 A High Dynamic Range scene captured with normal exposure.

9.4 The HDR version of the same scene shown in Figure 9.3.
Taking a time-delayed photo
The term selfie (that is, a photo that you take of yourself, possibly with a friend or two included) was named Oxford Dictionaries’ Word of the Year for 2013, which I’m sure isn’t even remotely shocking news to you. You only have to look around at any event or occasion to realize that each of us has become our favorite photo subject. To make selfies even easier to shoot, just switch to the iPhone’s front camera, which seems nearly tailor-made for taking selfies.
I say “nearly” because the front camera method for taking selfies does come with a couple of drawbacks:
- The front camera is low resolution compared to the rear camera, and it doesn’t support flash.
- All shots must be taken more or less at arm’s length, which gives every such photo a characteristic “This is me taking a selfie” look.
Creative selfie-takers have worked around these limitations by using mirrors and other tricks, but now iOS 8 offers a simpler alternative: time-delay. This feature tells the Camera to wait for several seconds after you tap the Shutter button before taking the photo. This means your photo-taking steps change as follows:
- Use Switch Camera to select the camera you want to use.
- Position the iPhone (on, say, a desk or chair) so that it’s pointing toward the scene you want to shoot.
- Tap Shutter.
- Scurry into the frame before the shot is taken.
Note that the Camera app takes not one photo, but a burst of 11 photos. To choose what photo you want to keep, tap Camera Roll, tap the photo burst, tap Select, tap the photo you want to keep, tap Done, and then tap Keep Only 1 Favorite.
Taking time-lapse photos
If you want to document a scene that’s changing, the two standard-issue techniques are to take a new photo every so often, or switch to video mode and shoot the entire scene. These techniques work well enough, but it’s a pain to have to remember to take individual shots, and for a scene that’s changing slowly, a video might be overkill.
In many such cases a better solution is to use the new Time Lapse mode, which creates a video of a scene by automatically taking a picture every second or so. This saves you the hassle of taking individual shots as well as the storage space required for a full-blown video.
To take time-lapse photos, set the Mode switch to Time Lapse and then tap the Shutter button.
Preventing blurry iPhone photos
The iPhone camera hardware is gradually getting better and the iPhone generally takes pretty good shots. However, probably the biggest problem most people have with iPhone photos is blurry images, which are caused by not holding the phone steady while taking the shot.
The iPhone 6 does offer optical image stabilization, but still there are a few things you can do to minimize or hopefully eliminate blurred shots:
- Widen your stance to stabilize your body.
- Lean your shoulder (at least) or your entire side (at best) against any nearby object, such as a wall, doorframe, or car.
- Place your free arm across your torso with your forearm parallel to the ground, then rest the elbow of your “shooting” arm (that is, the one holding the iPhone) on the free arm, which should help steady your shooting arm.
- Hold your breath while taking the shot.
- Remember that your iPhone takes the shot when you release the Shutter button, not when you press it. Therefore, keep your subject composed and yourself steadied as best you can until you lift your finger off the Shutter button.
- After you release the Shutter button, keep the phone steady until the photo thumbnail appears in the lower left corner of the screen. If you move while the iPhone is finalizing the photo, you’ll blur the shot.
Keep some or all of these pointers in mind while shooting with your iPhone, and you’ll soon find that blurry iPhone photos are a thing of the past.
Marking a photo as a favorite
If you take a lot of photos with your iPhone (and I know you do), you’ll probably like most of them, but a few will be real gems. That’s great, but the problem is you must scroll through a ton of not-so-gemlike images to view your favorites. I know you don’t have time for that, so what’s the solution? Tell your iPhone which of your photos are your favorite ones? The Photos app maintains an album named Favorites that stores these keepers, so you can access your greatest hits with just a few taps.
To mark a photo as a favorite, display it in the Camera Roll and then tap the Favorite button (the heart icon).
Scrolling, rotating, zooming, and panning photos
You can do quite a lot with your photos after they are in your iPhone, and it isn’t your normal photo browsing experience. You aren’t just a passive viewer because you actually have some control over what you see and how the pictures are presented.
You can use the following techniques to navigate and manipulate your photos:
- Scroll. You move forward or backward through your photos by flicking. Flick from the right to left to view the next photo; flick left to right to view the previous shot. Alternatively, tap the screen, and then tap the Previous and Next buttons to navigate your photos.
- Rotate. When a landscape shot shows up on your iPhone, it gets letterboxed at the top (that is, you see black space above and below the image). To get a better view, rotate the screen into the landscape position and the photo rotates right along with it, filling the entire screen. When you come upon a photo with a portrait orientation, rotate the iPhone back to the upright position for best viewing.
- Zoom. Zooming magnifies the shot that’s on the screen. There are two methods to do this:
- Double-tap the area of the photo on which you want to zoom in. The iPhone doubles the size of the portion you tapped. Double-tap again to return the photo to its original size.
- Spread and pinch. To zoom in, spread two fingers apart over the area you want magnified. To zoom back out, pinch two fingers together.
- Pan. After you zoom in on the photo, you may find that the iPhone didn’t zoom in exactly where you wanted or you may just want to see another part of the photo. Drag your finger across the screen to move the photo along with your finger — an action known as panning.
Adding an existing photo to a contact
You can assign a photo from one of your albums to any of your contacts. This is one of my favorite iPhone features because when the person calls you, her smiling mug appears on your screen. Now that’s caller ID! There are two ways to assign a photo to a contact: straight from a photo album or via the Contacts app.
First, here’s how you assign a photo from a photo album:
- Tap Photos in the Home screen. The Photos screen appears.
- Tap the photo album that has the image you want to use.
- Tap the photo you want to use. Your iPhone opens the photo.
- Tap the image to reveal the controls.
- Tap the Activities button. This is the icon with the arrow on the left side of the menu bar. (If you don’t see the menu bar, tap the screen.) Photos displays a list of activities you can perform.
- Tap Assign to Contact. A list of all your contacts appears.
- Tap the contact you want to associate with the photo. The Move and Scale screen appears.
- Drag the image so that it’s positioned on the screen the way you want.
- Pinch or spread your fingers over the image to set the zoom level you want.
- Tap Choose. iPhone assigns the photo to the contact and returns you to your photo album.
Enhancing a photo
Don’t worry if you have a photo that’s too bright in some spots or if the color is washed out in others — the Photos app comes with an Enhance tool that can automatically adjust the color and brightness. Here’s how to use it:
- In the Photos app, open the photo you want to fix.
- Tap the photo to display the controls.
- Tap Edit. The Photos app displays its editing tools at the bottom of the screen.
- Tap Enhance (the magic wand icon in the menu bar). The Photos app adjusts the color and brightness.
- Tap Done. The Photos app saves your changes.
Removing red-eye
When you use a flash to take a picture of one or more people, in some cases the flash may reflect off the subjects’ retinas. The result is the common phenomenon of red-eye, where each person’s pupils appear red instead of black. Some cameras come with a red-eye reduction feature, which is usually a double flash: one to make the pupils contract before the shot and then another for the actual picture.
If you have a photo on your iPhone where one or more people have red-eye due to the camera flash, you can use the Photos app to remove it and give your subjects a more natural look. Here’s how:
- In the Photos app, open the photo that contains the red-eye you want to remove.
- Tap the photo to display the controls.
- Tap Edit. The Photos app displays its editing tools.
- Tap Red-Eye (in the menu bar, it’s the icon consisting of an eye with a line through it).
- Tap the red-eye that you want to remove. The Photos app removes the red-eye.
- Repeat Step 5 until you’ve removed all the red-eye in the photo.
- Tap Done. The Photos app applies the changes to the photo.
Cropping and straightening
If you have a photo containing elements that you do not want or need to see, you can often cut them out. This is called cropping and you can use the Photos app to do it. When you crop a photo, you specify a rectangular area of the image that you want to keep. The Photos app then discards everything outside of the rectangle. Cropping is a useful skill because it can help you give focus to the true subject of a photo. Cropping is also useful for removing extraneous elements that appear on or near the edges of a photo.
As you probably know from hard-won experience, getting an iPhone camera perfectly level when you take a shot is very difficult. It requires a lot of practice and a steady hand. Despite your best efforts, you might still end up with a photo that is not quite level. To fix this problem, you can also use the Photos app to rotate the photo clockwise or counterclockwise so that the subject appears straight.
Follow these steps to crop and straighten a photo:
- In the Photos app, open the photo that you want to edit.
- Tap the photo to display the controls.
- Tap Edit. The Photos app displays its editing tools.
- Tap Crop (the button to the right of Cancel). The Photos app displays a grid for cropping and straightening, as shown in Figure 9.5.
- Tap and drag a corner of the grid to set the area you want to keep.
- To straighten the photo, tap and drag the Straightening tool (the arc with the degree markings) left or right until the image is level.
- Tap Done. The Photos app applies the changes to the photo.

9.5 Tap Crop to display the cropping and straightening tools.
Applying a filter
The stunning popularity of the Instagram app and similar apps such as Hipstamatic has created a mania for applying filters to photos. A filter is a special effect applied to a photo’s colors to give it a different feel. The Camera app comes with a Filters icon (see Figure 9.1), as does the Photos app in Edit mode. When you tap Filter, you see nine effects that you can apply to your photo, including Mono (which gives you a black-and-white photo) and Instant (which makes the photo look as though it was taken by an old Polaroid film camera). Here’s how to apply a filter to a photo using the Photos app:
- Open the photo you want to edit.
- Tap the photo to display the controls.
- Tap Edit. The Photos app displays its editing tools.
- Tap Filters. Photos displays thumbnail versions of the photo that demonstrate each effect.
- Tap the effect you want to use.
- Tap Save. The Photos app applies the filter to the photo.
Sending a photo via email
More often than you’d think, it really comes in handy to be able to email photos from your iPhone. This is particularly true if it’s a photo you’ve just taken with one of the iPhone cameras, because then you can share the photo pronto, without having to trudge back to your computer. You also have the option of emailing an existing photo in one of your iPhone photo albums.
Here are the steps to follow to email a photo:
- If necessary, use the Camera app to take the photo you want to send, then tap the Camera Roll button to open the Camera Roll photo album. Otherwise, open Photos and then display the photo album that has the image you want to send.
- Tap the photo. Your iPhone opens the photo.
- Tap the Activities button. Your iPhone displays a list of activities you can perform.
- Tap Mail. The New Message screen appears and displays the photo in the body of the message.
- Choose your message recipient and enter a Subject line.
- Tap Send. If the photo is large, your iPhone asks whether you want to scale the image to a smaller size.
- If you want to send the photo as is, tap Actual Size. Otherwise, tap either Small or Medium to create a scaled-down version of the photo. Your iPhone sends the message and returns you to the photo.
Texting a photo
The new Messages app sends text messages outside of your cellular provider’s messaging system. This means that you can use the Messages app to send unlimited (yes, that’s right: unlimited) text messages via Wi-Fi or cellular to other people using iOS devices, including iPads, iPod touches, other iPhones, as well as Macs running OS X Mountain Lion or later. You can also send a photo in a text message. Here are the steps to follow:
- If necessary, use the Camera app to take the photo you want to send, then tap the Camera Roll button to open the Camera Roll photo album. Otherwise, open Photos and then display the photo album that has the image you want to send.
- Tap the photo. Your iPhone opens the photo.
- Tap the Activities button. Your iPhone displays a list of activities you can perform.
- Tap Message. The New Message screen appears and displays the photo in the body of the message.
- Select a message recipient.
- Type your message text.
- Tap Send. Your iPhone sends the message with the photo attached.
Sending and receiving a photo via AirDrop
Sharing a photo via email or text message works well, but it has a slightly primitive feel to it. After all, your iPhone is the ultimate wireless device, so surely there must be some way to send a photo directly from one device to another? Happily, the answer to that question is a resounding “Yes!” A feature called AirDrop is a Bluetooth service that lets two nearby devices — specifically, an iPhone 5 or later, a fourth-generation iPad or later, an iPad mini, or a fifth-generation iPod touch or later — exchange photos directly. Here are the steps to follow:
- Use the Photos app to open the photo you want to share.
- Tap the Activities button. The AirDrop section shows an icon for each nearby device.
- Tap the icon for the person with whom you want to share the photo. The other person sees a dialog asking for permission to accept the photo. When she taps Accept, her version of the Photos app loads and displays the photo.
Posting a photo to Facebook
If you set up your Facebook account on your iPhone (I cover this in Chapter 2), you can post a photo for your friends to see. Here’s how it works:
- In the Photos app, open the photo you want to post.
- Tap the Activities button.
- Tap Facebook. The Photos app displays the Facebook dialog.
- Type your post text in the large text box, as shown in Figure 9.6.
- To change the Facebook album where the photo will appear, tap Album, and then tap the album you want to use.
- If you want to include your present whereabouts as part of the post, tap Location.
- To choose who can see the photo, tap Audience and then tap the group you want to use.
- Tap Post. Your iPhone posts the photo to your Facebook Timeline.

9.6 Type some text to accompany your Facebook photo.
Tweeting a photo
If you set up your Twitter account (or accounts) on your iPhone (again, see Chapter 2), you can use it to tweet a sweet photo to your followers. Here’s how it works:
- In the Photos app, open the photo you want to tweet.
- Tap the Activities button.
- Tap Twitter. The Photos app displays the Twitter dialog.
- If you added more than one account to the iPhone Twitter settings, tap Account and then tap the name of the account you want to use to send the tweet.
- Type your tweet text in the large text box.
- If you want to include your present whereabouts as part of the tweet, tap Location.
- Tap Post. Your iPhone posts the photo as a tweet.
Controlling photo sharing options
In the previous few sections you learned how to share a photo via email, text message, Facebook, and Twitter. These and several other sharing options — including Flickr and iCloud — appear in the Activities screen. If you don’t use some of these services, you can remove them from the Activities screen to reduce clutter. Similarly, if there are services you use most often, you can change the order so that those frequently used services appear on the left side of the Activities screen. Follow these steps:
- In the Photos app, open any photo.
- Tap the Activities button.
- Flick left on the sharing services to display the rest of the options.
- Tap More. The Activities screen appears, as shown in Figure 9.7.

9.7 While playing back a video, tap the screen and then tap the Output button to display different output choices that allow you to stream the video to your Apple TV.
- To remove a service from the Activities screen, tap its switch to Off.
- To change the order of the services, tap and drag the Move icons that appear to the right of each service.
- Tap Done. Your iPhone puts the new settings into effect.
Saving a photo from a text message
If someone sends you a nice photo in a text message, you might want to save it to your iPhone so you can check it out whenever you want, assign it to a contact, sync it to your computer, and so on. Follow these steps to save a photo from a text message:
- On the Home screen, tap Messages. The Messages screen appears.
- Tap the conversation that contains the photo message. The Messages app opens the conversation screen.
- Tap the photo. Your iPhone opens the photo for viewing.
- Tap the Activities button. The Activities options appear.
- Tap Save Image. Your iPhone saves the image to the Camera Roll.
Activating your iCloud photo library
If you have an iCloud account, the My Photo Stream feature is turned on automatically. This feature ensures that your latest iPhone photos are not only stored in iCloud but are also sent to your other iCloud devices, such as your iPad and your iPod touch. My Photo Stream is a wonderful feature, but it could be better. For example, the copies of the photos that get stored in iCloud and your other devices are scaled-down versions of the originals. Also, My Photo Stream shares only your most recent 1,000 photos with your other devices.
To overcome these problems, iOS 8 now offers the iCloud Photo Library. This service not only stores full-resolution versions of each photo on iCloud, but it also syncs those same versions to your iCloud devices. Not only that, but iCloud Photo Library stores all your photos, not just your most recent ones. Or, I should say, it stores all your photos up to the size of your iCloud Photo Library storage capacity. You get 5GB of storage free with your iCloud account, and you can purchase more storage as you need it (in the U.S., the current prices are 20GB of storage for $0.99 a month, up to 1TB for $19.99 a month).
Follow these steps to turn on the iCloud Photo Library for your iPhone:
- Tap Settings to open the Settings app.
- Tap Photos & Camera to open the Photos & Camera screen.
- Tap the iCloud Photo Library switch to On. Settings lets you know that it will activate the iCloud Photo Library as well as disable My Photo Stream.
- Tap OK. Your iPhone activates the iCloud Photo Library and begins syncing your photos.
Playing a slide show with background music
Here’s a little bonus that the iPhone throws your way. Yes, you can wow them back home by running a slide show, but you can positively make their jaws hit the floor when you add a music soundtrack to the show! They’ll be cheering in the aisles.
Here’s how you do it:
- Tap the Photos icon. The Photos app appears.
- Open the photo album you want to use.
- Tap the first photo you want to see in the slide show.
- Tap the Activities button and then tap Slideshow. The Photos app displays the Slideshow Options screen.
- Tap the Play Music switch to On.
- Tap Music. Your iPhone opens the Music app and displays the Songs list.
- Use the Music app to select the song you want to play.
- Tap Start Slideshow. Your iPhone starts the slide show and the music.
Creating a custom photo slide show
Okay, the basic slide show is pretty neat, but your iPhone also offers a few settings for creating custom slide shows. To display them on your iPhone, tap the Home screen’s Settings icon and then tap the Photos & Camera icon. Your iPhone displays the Photos & Camera screen, where in the Slideshow section you get three settings to configure your custom slide show:
- Play Each Slide For. You use this setting to set the amount of time that each photo appears on-screen. Tap Play Each Slide For, and then tap a time: 2 Seconds, 3 Seconds (this is the default), 5 Seconds, 10 Seconds, or 20 Seconds.
- Repeat. This setting determines whether the slide show repeats from the beginning after the last photo is displayed. To turn this setting on, tap the Repeat switch to On.
- Shuffle. You use this setting to display the album photos in random order. To turn this setting on, tap the Shuffle switch to On.
Creating a photo album
Normally you’d use your computer to organize your photos into albums prior to syncing them to your iPhone. However, if you have been taking a lot of pictures on your iPhone and your computer is nowhere in sight, you don’t have to wait to organize your pics. The Photos app enables you to create your own photo albums right on your iPhone. These albums aren’t transferred to your computer when you sync, but they’re handy if you need to organize your photos quickly. Here’s what you do:
- In the Photos app, tap Albums. The Albums screen appears. If you see an album, instead, tap Albums in the upper left corner.
- Tap the Add (+) button. The Photos app prompts you for an album name.
- Type the name and then tap Save. You return to the Albums screen.
- Open an album and tap each image that you want to include in your new album. A check mark appears next to each photo you select. You can also open the Moments collection and tap Select beside each grouping you want to include in the new album.
- Tap Done. The Photos app creates the new album and adds it to the Albums screen.
Deleting a photo
If you mess up a photo using one of the iPhone cameras, you should delete it before people think you have shoddy camera skills (because we all know it was the phone’s fault, right?).
You might think that deleting a photo would be a straightforward proposition. Nope, not even close. That’s because your iPhone differentiates between two types of photos:
- Photos that you add to the iPhone via syncing with iTunes.
- Photos that you create directly on the iPhone by using the cameras; taking a screenshot; saving a photo from an email, text message, or web page; and so on.
Synced photos can’t be deleted directly via the iPhone, but photos you create on the iPhone can be deleted. Clear as mud, I know.
To delete a photo, follow these steps:
- Tap Photos in the Home screen.
- Tap the photo album that has the image you want to blow away.
- Tap the doomed photo. Your iPhone opens it.
- Tap the Trash icon. The Trash icon is on the right side of the menu bar. (If you don’t see the menu bar, tap the screen.) Your iPhone asks you to confirm the deletion.
- Tap Delete Photo. Your iPhone tosses the photo into the trash, wipes its hands, and displays the previous photo in the album.
Getting More Out of iPhone Videos
The iPhone is a visual medium (it uses a touchscreen after all). The large screen makes it a perfect portable media device. The Videos app organizes and plays back videos that you import from your computer. Your commute (okay, your nondriving commute) doesn’t have to be boring any more. Just put in your headphones and start an episode of your favorite show.
Playing iPhone videos on your TV
You can carry a bunch of videos with you on your iPhone, so why shouldn’t you be able to play them on a TV if you want? That’s a good question; you can indeed connect your phone to your TV. You have to buy another cable, but that’s the only investment you have to make to watch iPhone videos right on your TV.
For the iPhone 5 or later you have two choices:
- Apple Lightning Digital AV Adapter. This $49 cable has a Lightning connector on one end to attach your iPhone, and an HDMI connector at the other end to attach an HDMI cable that in turn connects to your TV’s HDMI input port.
- Apple Lightning to VGA Adapter. This $49 cable has a Lightning connector on one end, and a VGA connector on the other to attach a VGA cable that connects to your TV’s VGA input port.
To connect your iPhone 4s or earlier to your TV, you have two choices:
- Apple 30-pin Digital AV Adapter. This $45 cable has a 30-pin connector on one end that connects to the iPhone or an Apple Universal Dock. The other end has another 30-pin connector so you can connect your iPhone to a power outlet and an HDMI port that enables you to make a connection to the corresponding HDMI input on your HDTV.
- Apple Composite AV cable. This $45 cable plugs into the iPhone or Apple Universal Dock connector on one end and the composite inputs on your TV at the other.
The cable you choose depends on the type of TV you have. Older sets have composite inputs, more recent TVs have component inputs, and the latest sets have at least one HDMI port.
After connecting your cables, set your TV to the input and play your videos as you normally would.
Streaming iPhone video to Apple TV
If you have an Apple TV that supports AirPlay, you can use AirPlay to stream a video from your iPhone to your TV. Here’s how it works:
- Make sure your Apple TV is turned on.
- On your iPhone, start the video you want to stream.
- Swipe up from the bottom of the screen to display the Control Center.
- Tap AirPlay. Your iPhone displays a menu of output choices.
- Tap the name of your Apple TV device. Your iPhone streams the video to that device, and hence to your TV.
Mirroring the iPhone screen on your TV
You can set up a mirrored display, which means that what you see on your iPhone is also displayed on your TV in HD. One way to do this is to use the Apple Lightning Digital AV Adapter or the Apple 30-pin Digital AV Adapter to connect your iPhone to your TV’s HDMI port. However, iOS also offers wireless AirPlay mirroring through Apple TV. As long as you have a second-generation Apple TV (and it has been updated with the latest software), you can use AirPlay mirroring to send not only videos to your TV but also photos, slide shows, websites, apps, games, and anything else you can display on your iPhone.
Follow these steps to start mirroring the iPhone screen on your TV:
- Turn on your Apple TV device.
- On your iPhone, swipe up from the bottom of the screen to display the Control Center.
- Tap the AirPlay button. Your iPhone displays the AirPlay screen, which offers a menu of output choices.
- Tap the name of your Apple TV device.
- Tap the Mirroring switch to On, as shown in Figure 9.8. Your iPhone streams the screen to your Apple TV.
- Tap Done.

9.8 To display your iPhone screen on your Apple TV, select your Apple TV as the AirPlay device and then tap the Mirroring switch to On.
Watching videos from a shared iTunes library
If you have iTunes Home Sharing activated on your computer, you can use your iPhone to tap in to that library and play its video content. I show you how to activate iTunes Home Sharing in Chapter 8. Assuming that’s done, your next task is to configure your iPhone Videos app with the same Home Sharing Apple ID and password. (If you already did this using the Music settings, as I describe in Chapter 8, then you can skip the steps that follow.) Follow these steps:
- On your iPhone Home screen, tap Settings. The Settings app appears.
- Tap Videos to open the Videos screen.
- In the Home Sharing section, use the Apple ID and Password boxes to type the same account information that you used to set up Home Sharing in iTunes.
Now open the Videos app on your iPhone and then tap Shared. The Videos app displays icons for the available shared libraries. Tap the library you want to access, and the Videos app displays that library’s video content instead of your iPhone videos.
Converting a video file to iPhone format
Your iPhone is happy to play video, but only certain formats are compatible with it. Here’s the list:
- H.264 video. Up to 1080p, 30 frames per second, High Profile level 4.1 with AAC-LC audio up to 160 Kbps, 48 kHz, stereo audio in M4V, MP4, and MOV file formats.
- MPEG-4 video. Up to 2.5 Mbps, 640 × 480 pixels, 30 frames per second. Simple Profile with AAC-LC audio up to 160 Kbps, 48 kHz, stereo audio in M4V, MP4, and MOV file formats.
- Motion JPEG video. Up to 35 Mbps, 1280 × 720 pixels, 30 frames per second, audio in u-law PCM stereo audio using the AVI file format.
If you have a video file that doesn’t match any of these formats, you might think you’re out of luck. Nope. You can use iTunes to convert that video to an MPEG-4 file that’s iPhone friendly. Here’s how:
- If the video file isn’t already in iTunes, choose File ⇒ Add to Library, or press
 +O. The Add To Library dialog appears. If the file is already in iTunes, skip to Step 3.
 - Locate and choose your video file, and then click Open. iTunes copies the file into the library, which may take a while depending on the size of the video file. Usually, iTunes adds the video to the Movies section of the library.
- In iTunes, click your movie.
- Choose File ⇒ Create New Version ⇒ Create iPod or iPhone Version. iTunes begins converting the video to the MPEG-4 format. This might take some time for even a relatively small video. When the conversion is complete, a copy of the original video appears in the iTunes library.
Recording video with an iPhone camera
Any smartphone worthy of the name should do all the things you need it to do during the course of your busy life, and one of the things you probably want to do is record events, happenings, moments, or just whatever’s going on. Sure, a picture is worth the proverbial thousand words, but at 30 frames per second, a video is worth a lot more than that.
Your iPhone 5 or later is very smart, indeed, and it comes with a rear iSight video camera that supports 1080p HD recording at 30 frames per second (up to 60 frames per second on the iPhone 6) and a video stabilization feature that helps to reduce shaky shots. The iPhone 6 and 5s also come with a Slo-Mo video setting that captures video at 120 frames per second (up to 240 frames per second on the iPhone 6) for slow-motion fun. (The front FaceTime HD camera supports 720p HD recording at 30 frames per second.) And, this being an iPhone and all, it’s no surprise that recording a video is almost criminally easy. Here’s what you do:
- On the Home screen, tap Camera. The Camera screen appears.
- Flick the Mode switch to Video (or Slo-Mo on the iPhone 6 or 5s).
- Tap the screen to focus the video, if necessary.
- Tap the Flash icon, and then tap On, Off, or Auto.
- Tap the Switch Camera icon if you want to use the front camera rather than the rear camera.
- Tap the Record button. Your iPhone starts recording video and displays the total recording time in the upper right corner of the screen.
- If you want to take a still photo while you’re recording the video, tap the Shutter icon in the lower left corner of the screen.
- When you’re done, tap the Record button again to stop the recording. Your iPhone saves the video to the Camera Roll.
Editing recorded video
Okay, being able to record video at the tap of a button is pretty cool, but your iPhone tops that by also letting you perform basic editing chores right on the phone. (Insert sound of jaw hitting floor here.) It’s nothing fancy — basically, you can trim video from the beginning and end of the file — but it sure beats having to first sync the video to your computer and then fire up iMovie or some other video-editing software.
Here’s how to edit a video right on your iPhone:
- Open the Camera Roll album:
- Camera app. Tap the Camera Roll button in the lower left corner of the screen.
- Photos app. Display the Albums screen and then tap Camera Roll. You can also tap the Videos album for a more direct route to your recorded videos.
- Tap the video you want to edit. The Photos app displays the video and a timeline of the video along the top of the screen.
- Tap and drag the left edge of the timeline to set the starting point of the video.
- Tap and drag the right edge of the timeline to set the ending point of the video. The trimmed timeline appears surrounded by orange, as shown in Figure 9.9.
- Tap Play to ensure you’ve set the start and end points correctly. If not, repeat Steps 3 and 4 to adjust the timeline as needed.
- Tap Trim. Your iPhone trims the video and then saves your work.

9.9 Use the video timeline to set the start and end points of the video footage you want to keep.
Sending a video via email
If you want to share your newly shot and edited video with someone, you can email it by following these steps:
- Open the Camera Roll album:
- Camera app. Tap the Camera Roll button in the lower left corner of the screen.
- Photos app. Display the Albums screen and then tap Camera Roll.
- Tap the video you want to send.
- Tap the Activities button in the lower left corner. The Activities options appear.
- Tap Mail. Your iPhone creates a new email message that includes your video as an MPEG-4 video file attachment.
- Fill in the rest of your message and send it.
Uploading recorded video to YouTube
Of course, you want to be able to instantly record something because you can then upload that video to YouTube and share it with the world. Your iPhone is happy to help here, too, as shown by the following steps:
- Open the Camera Roll album:
- Camera app. Tap the Camera Roll button in the lower left corner of the screen.
- Photos app. Display the Albums screen and then tap Camera Roll or Videos.
- Tap the video you want to share.
- Tap the Activities button in the lower left corner.
- Tap YouTube. Your iPhone compresses the video and prompts you to log in to your YouTube account.
- Enter your YouTube username and password, and then tap Sign In. The Publish Video screen appears.
- Tap a title, description, and tags for your video, and then choose a category.
- If you want to upload an HD version of the video, tap HD. HD versions of iPhone videos are more than three times larger than standard-definition versions, so uploading them takes longer.
- Tap Publish. Your iPhone publishes the video to your YouTube account. This may take several minutes, depending on the size of the video. When the video is published, you see a dialog with a few options.
- Tap one of the following options:
- View on YouTube. Tap this option to cue up the video on YouTube.
- Tell a Friend. Tap this option to send an email message that includes a link to the video on YouTube.
- Close. Tap this option to return to the video.