Chapter 10: Can I Use My iPhone to Manage Contacts and Appointments?
The iPhone has never just been about the technology. Yes, it looks stylish, has enough bells and whistles to cause deafness, and it just works. iPhone users don’t know or care about things like antennae, flash drives, memory chips, and whatever else Apple somehow managed to cram into that tiny case. These things don’t matter because iPhone has always been about helping you get things done and making your life better, more creative, and more efficient. And, as you’ll see in this chapter, your iPhone can also go a long way toward making your life — particularly your contacts and your calendar — more organized.
Managing Your Contacts
One of the paradoxes of modern life is that as contact information becomes more important, you store less and less of it in the easiest database system of all — your memory. Instead of memorizing phone numbers like you used to, you now store your contact info electronically. When you think about it, this isn’t exactly surprising. It’s not just a landline phone number that you have to remember for each person anymore but also a cell number, email and website addresses, a Twitter username, a physical address, and more. That’s a lot to remember, so it makes sense to go the electronic route. And for the iPhone, electronic means the Contacts app, which seems basic enough but is actually loaded with useful features that can help you get organized and get the most out of the contact management side of your life.
Creating a new contact
I show you how to sync your computer’s contacts program (such as Contacts on Mac or Windows or the Outlook Contacts folder) in Chapter 7. That’s by far the easiest way to populate your iPhone Contacts app with a crowd of people, but it might not include everyone in your posse. If someone’s missing and you’re not around your computer, you can add that person directly to your iPhone Contacts.
Begin by creating a contact with just the basic info: first name, last name, and company name. In subsequent sections, I show you how to add data such as phone numbers and email addresses. Here are the steps to follow:
- In the Home screen, tap the Contacts icon. Note that, in a bit of a head scratcher, Apple has secreted the Contacts app on the second Home screen inside the Extras folder. Your iPhone opens the All Contacts screen. If you’re in the Phone app, you can also tap the Contacts button.
- Tap the New Contact (+) button at the top right corner of the screen. The New Contact screen appears, as shown in Figure 10.1.
- Tap the First box and then type the person’s first name. If you’re jotting down the contact data for a company or some other inanimate object, skip to Step 5.
- Tap the Last box and then type the person’s surname.
- If you want to note where the person works (or if you’re adding a business to your Contacts app), tap the Company box and type the company name.
- Tap Done. Contacts saves the new contact and returns you to the All Contacts screen.

10.1 Use the New Contact screen to type the person’s name and company name.
Editing an existing contact
Now that your new contact is off to a flying start, you can go ahead and fill in details, such as phone numbers, addresses (email, web, and real world), and anything else you can think of (or have the patience to enter into your iPhone; it can be a lot of tapping!). The next few sections take you through the steps for each type of data. When you’re done, be sure to tap Done to preserve all your hard work.
Here are the steps required to open an existing contact for editing:
- Open Contacts and tap the contact you want to edit.
- Tap Edit. Contacts displays the contact’s data.
- Make your changes, as described in the next few sections.
- Tap Done. Contacts saves your work and returns you to the All Contacts screen.
Assigning phone numbers to a contact
Your iPhone is, of course, a phone, so it’s only right and natural to use it to call your contact. Sure, but which number? Work? Home? Cell? Fortunately, there’s no need to choose just one, because your iPhone is happy to store all these numbers, plus a few more if need be.
Here are the steps to follow to add one or more phone numbers for a contact:
- With the contact’s data open for editing, tap Add Phone. Contacts creates a new phone field and displays a numeric keypad.
- Type the phone number with the area code first. Contacts helpfully adds extra stuff like parentheses around the area code and the dash.
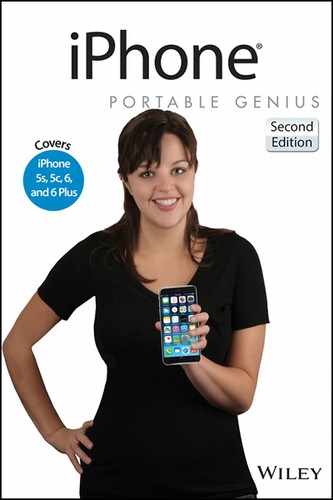
- Examine the label box to see if the default label (home) is the one you want. If it is, skip to Step 5; if it’s not, tap the label box to open the Label screen, shown in Figure 10.2.
- Tap the label that best applies to the phone number you’re adding (Contacts automatically sends you back to the contact’s data screen after you tap), such as mobile, iPhone, home, or work.
- Repeat Steps 1 to 4 to add any other numbers you want to store for this contact. Note that each time you add a number, Contacts creates a new Add Phone field below the current field, and you tap that field to add a new number.
10.2 Tap the label you want to use for a contact’s phone number.
Assigning email addresses to a contact
It makes sense that you might want to add a phone number or three for a contact, but would you ever need to enter multiple email addresses? Well, sure you would! Most people have at least a couple of addresses — usually for home and work — and some type-A emailers have a dozen or more. Life is too short to enter that many email addresses, but you need at least the important ones if you want to use your iPhone Mail app to send a note to your contacts.
Follow these steps to add one or more email addresses for a contact:
- With the contact’s data open for editing, tap Add Email. Contacts creates a new email field and displays the keyboard.
- Type the person’s email address.
- Check out the label box to see if the default label (home) is the one you want. If it is, skip to Step 5; if it’s not, tap the label box to open the Label screen.
- Tap the label that best applies to the email address you’re inserting (Contacts automatically sends you back to the contact’s data screen after you tap), such as home or work.
- Repeat Steps 1 to 4 to add other email addresses for this contact, as you see fit. Note that each time you add an email address, Contacts creates a new Add Email field below the current one. You tap inside that new field to add a new email address.
Assigning web addresses to a contact
Who on earth doesn’t have a website these days? It could be a humble home page, a blog, a Tumblr page, a home business site, or someone’s corporate website. Some busy web beavers may even have all five! Whatever web home a person has, it’s a good idea to toss the address into her contact data because then you can simply tap it and your iPhone (assuming it can see the Internet from here) immediately fires up Safari and takes you to the site. Does your pal have multiple websites? No sweat: Your iPhone is happy to take you to all of them.
You can add one or more web addresses for a contact by making your way through these steps:
- With the contact’s data open for editing, tap Add URL. Contacts creates a new URL field and displays the keyboard. Note the . (period) and .com keys in the on-screen keyboard, which come in very handy.
- Type the person’s web address.
- Examine the label box to see if the default label is the one you want. If it is, skip to Step 5; if it’s not, tap the label box to open the Label screen.
- Tap the label that best applies to the web address you’re inserting (Contacts automatically sends you back to the contact’s data screen after you tap), such as home page or work.
- Repeat Steps 1 to 4 to add other web addresses for this contact. Note that each time you add a web address, Contacts creates a new Add URL field below the current one and you tap inside that field to add a new URL.
Assigning social network data to a contact
These days, many of us are far more likely to contact friends, family, and colleagues via social networks, such as Twitter, Facebook, and LinkedIn, than we are through more traditional methods like email. The Contacts app reflects this new reality by enabling you to save social network data for each contact, including data for Twitter, Facebook, LinkedIn, and Flickr. Here are the steps to follow to add one or more social network details to a contact:
- With the contact’s data open for editing, tap Add Social Profile. Contacts creates a new Social Profile field.
- If you want to use a different social network, tap the Twitter label to see a list of social networks, as shown in Figure 10.3.
- Tap the label that suits the social network data you’re entering, such as Facebook or Flickr. The Contacts app adds the new label.
- Tap inside the field and then tap the person’s username for the chosen social network.
- If necessary, repeat Steps 1 to 4 to add more social networks as needed.

10.3 Tap Twitter to see the social networks supported by the Contacts app.
Assigning physical addresses to a contact
With all this talk about cell numbers, email addresses, and web addresses, it’s easy to forget that people actually live and work somewhere. You may have plenty of contact information in which the location of that somewhere doesn’t much matter. But, if you ever need to get from here to there, taking the time to insert a contact’s physical address really pays off. Why? Because you need only tap the address and your iPhone displays a map that shows you the precise location. From there you can get directions, see a satellite map of the area, and more. (I talk about all this great map stuff in Chapter 11.)
Tapping out a full address is a bit of work, but as the following steps show, it’s not exactly root-canalishly painful:
- With the contact’s data open for editing, tap Add Address. Contacts displays the address fields.
- Tap the first Street field and then type the person’s street address.
- If necessary, tap the second Street field, and type even more of the person’s street address.
- Tap the City field and type the person’s city.
- Tap the State field and type the person’s state. Depending on what you later select for the country, this field might have a different name, such as Province.
- Tap the ZIP field and type the ZIP code. Again, depending on what you later select for the country, this field might have a different name, such as Postal Code.
- Tap the Country field to open the Country screen, and then tap the contact’s country.
- Examine the label box to see if the default label is the one you want. If it is, skip to Step 10; if it’s not, tap the label box to open the Label screen.
- Tap the label that best applies to the physical address you’re inserting (Contacts automatically sends you back to the contact’s data screen after you tap), such as home or work.
- Repeat Steps 1 to 9 to add other addresses for this contact.
Creating a custom label
When you fill out contact data, your iPhone insists that you apply a label to each tidbit, such as home, work, and mobile. If none of the predefined labels fits, you can always just slap on the generic other label. However, this seems so, well, dull. If you’ve got a phone number or address that you can’t shoehorn into any of the prefab labels, get creative and make one up. Here’s how:
- With the contact’s data open for editing, tap the label beside the field you want to work in. The Label screen appears.
- Tap Add Custom Label. Scroll to the bottom of the screen to see this command. The Custom Label screen appears.
- Type the custom label.
- Tap Done. Contacts returns you to the screen for the field you were editing and applies the new label.
Conveniently, you can apply your custom label to any type of contact data. For example, if you create a label named college, you can apply that label to a phone number, email address, web address, or physical address.
Adding extra fields to a contact
The New Contact screen (which appears when you add a contact) and the data screen (which appears when you edit an existing contact) display only the fields you need for basic contact info. Besides the fields you’ve looked at so far, you can also click the following items to add more fields to a contact’s data:
- Add Birthday. Tap this item to add the contact’s day, month, and year of birth.
- Add Data. Tap this item to add any other date, such as an anniversary.
- Add Related Name. Tap this item to specify another contact who is related to the contact you’re editing. For example, if you also have the contact’s brother in your Contacts list, tap Add Related Name, tap More Info (the i icon), tap the brother, tap the field label (the default is mother), and then tap the relationship type.
- Add Instant Message. Tap this item to add the contact’s instant messaging data for a service such as Skype, Google Talk, or AIM.
- Notes. Use this field to add general observations or contact data that doesn’t fit into any other field.
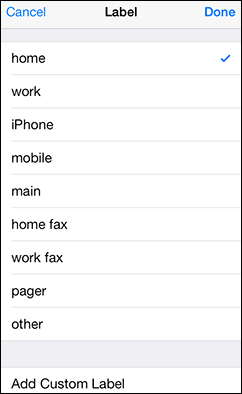
Despite these additional fields, the contact data screen still lacks quite a few common fields. For example, you might need to specify a contact’s prefix (such as Dr. or Professor), suffix (such as Jr., Sr., or III), or job title. Thankfully, your iPhone is merely hiding these and other useful fields. There are nine hidden fields that you can add to any contact, as shown in Figure 10.4. The iPhone is only too happy to let you add as many of these extra fields as you want. Here are the steps involved:
- With the contact’s data open for editing, tap Add Field. The Add Field screen appears, as shown in Figure 10.4.
10.4 The Add Field screen shows the hidden fields that you can add to any contact.
- Tap the field that you want to add. Your iPhone adds the field to the contact’s data.
- Type the field data.
- Tap Done. Your iPhone saves the new info.
Creating a new contact from an electronic business card
Entering a person’s contact data by hand is a tedious bit of business at the best of times, so it helps if you can find a faster way to do it. If you can cajole a contact into sending his contact data electronically, then you can add it with just a couple of taps. What do I mean when I talk about sending contact data electronically? Long ago, the world’s contact-management gurus came up with a standard file format for contact data — the vCard. It’s a kind of digital business card that exists as a separate file. People can pass this data along by attaching their (or someone else’s) card to an email message.
If you get a message with contact data, you see an icon for the VCF file, as shown in Figure 10.5.

10.5 If your iPhone receives an email message with an attached vCard, an icon for the file appears in the message body.
To get this data into your Contacts app, follow these steps:
- In the Home screen, tap Mail to open the Mail app.
- Tap the message that contains the vCard attachment.
- Click Tap to Download and then tap the icon for the vCard file. Mail opens the vCard.
- Tap Create New Contact. If the person is already in your Contacts app, but the vCard contains new data, tap Add to Existing Contact and then tap the contact.
Sending and receiving a contact via AirDrop
Sharing your contact data using a vCard has worked well for many years, but sharing data via attachments is beginning to feel decidedly old-fashioned. Fortunately, these days of exchanging virtual business cards may soon be over thanks to an iOS feature called AirDrop, which is a Bluetooth service that lets two nearby devices — specifically, an iPhone 6, 5s, 5c, or 5, a fourth-generation iPad or later, an iPad mini, a fifth-generation iPod touch or later, or a Mac running OS X Yosemite — swap contacts directly. Here are the steps to follow:
- Use the Contacts app to open the contact you want to share.
- Tap Share Contact. The AirDrop section shows an icon for each nearby device.
- Tap the icon for the person with whom you want to share the contact. The other person sees a dialog asking for permission to accept the contact. When she taps Accept, her version of the Contacts app loads and displays the contact.
Working with Facebook contacts
If you’ve signed in to your Facebook account on your iPhone, as I describe back in Chapter 2, iOS automatically updates Contacts with all your Facebook friends. This means that all the profile data that each person shares with friends is automatically available via Contacts. This often includes info such as the person’s profile picture, occupation, company name, email address, location, and birthday, but it can also include the following fields:
- Mobile. Tap this field to call the friend’s cell phone.
- URL. Tap this field to visit the friend’s website.
- Facebook. Tap this field to view the friend’s Facebook profile page.
- Facebook Message. Tap this field to send an instant message to the friend.
Managing contacts with Siri voice commands
If you have an iPhone 4s or later, the Siri voice recognition app enables you to locate and query your contacts using simple voice commands. To get started, tap and hold the Home button (or press and hold the Mic button of the iPhone headphones, or the equivalent button on a Bluetooth headset) until Siri appears.
To display one or more contacts, use the following techniques within Siri:
- Displaying a specific contact. Say “Show (or Display or Find) first last,” where first and last are the person’s first and last names as given in the Contacts list; you can also just say the person’s name. If the contact is a business, say “Show (or Display or Find) company,” where company is the business name as given in your Contacts list; you can also just say the company name.
- Displaying a contact who has a relationship with you. Say “Show (or Display or Find) relationship,” where relationship is the connection you’ve defined (such as sister or father).
- Displaying a contact with a unique first name. Say “Show (or Display or Find) first,” where first is the person’s first name as given in your Contacts list.
- Displaying multiple contacts who have some information in common. Say “Find people criteria,” where criteria defines the common data. Examples: “Find people named Stevens” or “Find people who live in New York.”
To query your contacts, you use the following general syntax:
Question contact info?
Here, question can be “What is” (for general data), “When is” for dates, or “Who is” (for people); contact specifies the name (or relationship) of the contact; and info specifies the type of data you want to retrieve (such as “birthday” or “home phone number”). Here are some examples:
- “What is Alex Blandman’s mobile phone number?”
- “When is my sister’s anniversary?”
- “What is David Cutrere’s address?”
- “Who is Kyra’s husband?”
Tracking Your Events
When you meet someone and ask, “How are you?” the most common reply these days is a short one: “Busy!” We’re all as busy as can be these days, and that places-to-go, people-to-see feeling is everywhere. All the more reason to keep your affairs in order, and that includes your appointments. Your iPhone comes with a Calendar app that you can use to create items called events, which represent your appointments, vacations, trips, meetings, and anything else that can be scheduled. Calendar acts as a kind of electronic personal assistant, leaving your brain free to concentrate on more important things.
Adding an event to your calendar
I show you how to sync your computer’s calendar application (such as Calendar on the Mac, or the Outlook Calendar folder) in Chapter 7, and that’s the easiest way to fill your iPhone with your events. However, something always comes up when you’re running around, so you need to know how to add an event directly to your iPhone Calendar.
Here are the steps to follow:
- In the Home screen, tap the Calendar icon. The Calendar app appears.
- Using the week calendar near the top of the screen, scroll to the date on which the event occurs, then tap to select it. If the event happens sometime in the future, tap the current month in the upper left corner of the screen, scroll to the date, and then tap it.
- Tap the + button at the top right corner of the screen. The Add Event screen appears, as shown in Figure 10.6.

10.6 Use the Add Event screen to create your event.
- The cursor starts off in the Title box, so enter a title for the event.
- Tap the Location box and type the location of the event.
- Tap Starts and then use the scroll wheels to set the date and time that your event begins.
- Tap Ends and then use the scroll wheels to set the date and time that your event finishes.
- Tap Done. The Calendar app saves your info and returns you to the Add Event screen.
- If you have multiple calendars, tap Calendar, and then tap the one in which you want this event to appear.
- Tap Done. The Calendar app adds the event to the calendar.
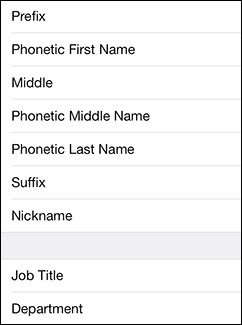
When you add an event in Calendar, the Month view displays a dot underneath the day as a visual reminder that you have something going on that day. Tap the day and Calendar displays a list of all the events you have scheduled, as shown in Figure 10.7. If you have multiple calendars and you want to see all your events, tap Calendars and then tap All to open the All Calendars screen.
10.7 Tap a date in Calendar to see all the events you have scheduled on that day.
Editing an existing event
Whether you’ve scheduled an event by hand or synced it from your computer, the event details might change: a new time, a new location, and so on. Whatever the change, you need to edit the event to keep your schedule accurate.
Here are the steps to follow to edit an existing event:
- In the Home screen, tap the Calendar icon. The Calendar app appears.
- Tap the date that contains the event you want to edit.
- Tap the event. You can do this in either Month or Day view. Calendar displays the event info.
- Tap Edit. Your iPhone displays the event data in the Edit screen.
- Make your changes to the event.
- Tap Done. Your iPhone saves your changes and returns you to the event details.
Setting up a repeating event
One of the truly great timesavers in Calendar is the repeat feature. It enables you to set up a single event and then get Calendar to automatically repeat it at a regular interval. For example, if you set up an event for a Friday, you can also set Calendar to automatically repeat it every Friday. You can continue repeating events indefinitely or end them on a specific date.
Follow these steps to configure an existing event to repeat:
- In Calendar, tap the date that contains the event you want to edit.
- Tap the event. Calendar opens the event info.
- Tap Edit. Calendar displays the event data in the Edit screen.
- Tap Repeat. The Repeat screen appears.
- Tap the repeat interval you want to use. Calendar selects the interval and returns you to the Edit screen.
- Tap End Repeat. The End Repeat screen appears.
- You have two choices here (either way, tap Edit to return to the Edit screen when you’re done):
- Set the event to stop repeating on a particular day. Tap On Date and then use the scroll wheels to set the day, month, and year that you want the final event to occur.
- Set the event to repeat indefinitely. Tap Never.
- Tap Done. Calendar saves the repeat data and returns you to the event details.
Converting an event to an all-day event
Some events don’t really have specific times that you can pin down. These include birthdays, anniversaries, sales meetings, trade shows, conferences, and vacations. What all these types of events have in common is that they last all day: in the case of birthdays and anniversaries, literally so; in the case of trade shows and the like, “all day” refers to the entire workday.
Why is this important? Well, suppose you schedule a trade show as a regular event that lasts from 9 a.m. to 5 p.m. When you examine that day in Calendar, you see a big fat block that covers the entire day. If you also want to schedule meetings that occur at the trade show, Calendar lets you do that, but it displays these new events on top of the existing trade show event. This makes the schedule hard to read, so you might miss a meeting.
To solve this problem, you can configure the trade show as an all-day event. Calendar clears it from the regular schedule and displays the event separately near the top of the Day view. Here are the steps to follow:
- In Calendar, tap the date that contains the event you want to edit.
- Tap the event. Calendar opens the event info.
- Tap Edit. Calendar switches to the Edit screen.
- Tap the All-day switch to On.
- Tap Done to return to the Edit screen.
- Tap Done. Calendar saves the event and returns you to the event details.
Adding an alert to an event
One of the truly useful secrets of stress-free productivity in the modern world is what I call the set-it-and-forget-it school of scheduling. That is, you set up an event electronically and then get the same technology to remind you when the event occurs. That way, your mind doesn’t have to waste energy fretting about missing the event because you know your technology has your back.
With your iPhone, the technology of choice for doing this is Calendar and its alert feature. When you add an alert to an event, Calendar automatically displays a reminder of the event, which is a Notification Center banner that pops up on the screen. Your iPhone also vibrates and sounds a few beeps to get your attention. You can choose when the alert triggers (such as a specified number of minutes, hours, or days before the event) and you can even set up a second alert just to be on the safe side.
Follow these steps to set an alert for an event:
- In Calendar, tap the date that contains the event you want to edit.
- Tap the event. Calendar opens the event info.
- Tap Edit. Calendar displays the event data in the Edit screen.
- Tap Alert. The Event Alert screen appears, as shown in Figure 10.8.
- Tap the number of minutes, hours, or days before the event you want to see the alert. If you’re editing an all-day event, you can set the alert at 9 a.m. on the day of the event, or one day before, two days before, or a week before the event.
- To set up a backup alert, tap Second Alert. Tap the number of minutes, hours, or days before the event you want to see the second alert, and then tap Done.
- Tap Done. Calendar saves your alert choices and returns you to the event details.
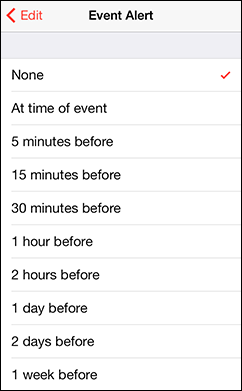
10.8 Use the Event Alert screen to tell Calendar when to remind you about your event.
Figure 10.9 shows an example of an alert. Tap OK to close the alert, or tap Options to see three more choices: Snooze (redisplay the alert in five minutes), View Event (display the event details), or Close (dismiss the alert).
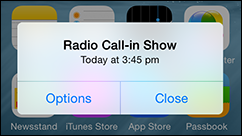
10.9 Your iPhone displays an alert similar to this to remind you of an upcoming event.
Controlling events with Siri voice commands
On the iPhone 4s or later, the Siri personal assistant offers a number of voice commands for creating, editing, and querying your events.
To get Siri to schedule an event, you use the following general syntax:
Schedule what with who at when.
Here, schedule can be any of the following:
- “Schedule”
- “Meet”
- “Set up a meeting”
- “New appointment”
The what part of the command (which is optional) determines the topic of the event, so it could be something like “lunch” or “budget review” or “dentist”; you can also precede this part with “about” (for example, “about expenses”). The who part of the command specifies the person you’re meeting with, if anyone, so it can be a contact name or a relationship (such as “my husband” or “Dad”). The when part of the command sets the time and date of the event; the time portion can be a specific time such as “3” (meaning 3 p.m.) or “8 a.m.” or “noon”; the date portion can be “today” or “tomorrow,” a day in the current week (such as “Tuesday” or “Friday”), a relative day (such as “next Monday”), or a specific date (such as “August 23rd”).
Here are some examples:
- “Schedule lunch with Karen tomorrow at noon.”
- “Meet with my sister Friday at 4.”
- “Set up a meeting about budgeting next Tuesday at 10 a.m.”
- “New appointment with Sarah Currid on March 15 at 2:30.”
You can also use Siri to modify existing events. For example, you can change the event time by using the verbs “Reschedule” or “Move”:
- “Reschedule my meeting with Sarah Currid to 3:30.”
- “Move my noon appointment to 1:30.”
You can also use the verb “Add” to include another person in a meeting, and the verb “Cancel” to remove a meeting from your schedule:
- “Add Charles Aster to the budgeting meeting.”
- “Cancel my lunch with Karen.”
Finally, you can query your events to see what’s coming up. Here are some examples:
- “When is my next appointment?”
- “When is my meeting with Sarah Currid?”
- “What is on my Calendar tomorrow?”
- “What does the rest of my day look like?”
Handling Microsoft Exchange meeting requests
If you’ve set up a Microsoft Exchange account in your iPhone, there’s a good chance you’re already using its push features. That is, the Exchange Server automatically sends incoming email messages to your iPhone, as well as new and changed contacts and calendar data. If someone back at headquarters adds your name to a scheduled meeting, Exchange generates an automatic meeting request, which is an email message that tells you about the meeting and asks if you want to attend.
How will you know? Two ways (see Figure 10.10): First, you see an alert for the invitation; second, the Calendar app’s Inbox item in the lower right corner displays a number beside it telling you how many meeting requests you have waiting for you.
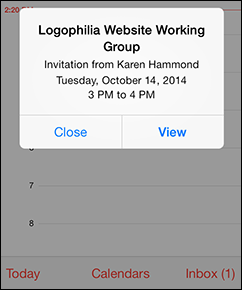
10.10 When a meeting invitation arrives, you see an alert, and the Inbox item in the Calendar menu bar shows you how many meeting requests you have.
It’s best to handle such requests as soon as you can, so here’s what you do:
- In Calendar, tap Inbox. Calendar displays your pending meeting requests.
- Tap the meeting request to which you want to respond. Calendar displays the meeting details, as shown in Figure 10.11.
- Tap your response:
- Accept. Tap this button to confirm that you can attend the meeting.
- Maybe. Tap this button if you’re not sure and will decide later.
- Decline. Tap this button to confirm that you can’t attend the meeting.
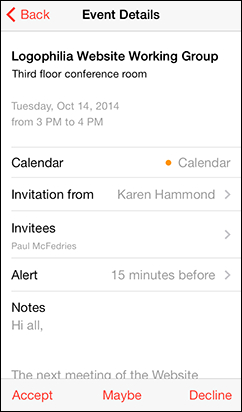
10.11 The details screen for an Exchange meeting request.
Subscribing to a calendar
If you know someone who has published a calendar, you might want to keep track of it within your iPhone Calendar app. You can do that by subscribing to the published calendar. iPhone sets up the published calendar as a separate item in the Calendar app, so you can easily switch between your own calendars and the published calendar.
To pull this off, you need to know the address of the published calendar. This address usually takes the following form: server.com/calendar.ics. Here, server.com is the address of the calendar server and calendar.ics is the name of the file (which is almost always an iCalendar format file with the extension .ics), preceded (usually) by a folder location.
For calendars published to iCloud, the address always looks like this: ical.icloud.com/member/calendar.ics. Here, member is the iCloud member name of the person who published the calendar and calendar is the name of the file. Here’s an example address:
ical.icloud.com/aardvarksorenstam/aardvark.ics
Follow these steps to subscribe to a published calendar:
- On the Home screen, tap Settings. The Settings app appears.
- Tap Mail, Contacts, Calendars. The Mail, Contacts, Calendars screen appears.
- Tap Add Account. The Add Account screen appears.
- Tap Other. Your iPhone displays the Other screen.
- Tap Add Subscribed Calendar. You see the Subscription screen.
- Type the calendar address in the Server text box.
- Tap Next. Your iPhone connects to the calendar.
- Tap Save. Your iPhone adds an account for the subscribed calendar.
To view the subscribed calendar, tap Calendar on the Home screen to open the Calendar app, and then tap Calendars to open the Calendars screen. Your new calendar appears in the Subscribed section. Tap the calendar to view its events.
Creating Reminders
The Calendar app is an excellent tool for tracking appointments, meetings, and other events. By adding an alert to an event, you get a digital tap on the shoulder to remind you when and where your presence is required.
However, our days are littered with tasks that could be called subevents. These are things that need to be done at a certain point during your day but don’t rise to the level of full-fledged events: returning a call, taking the laundry out of the dryer, turning off the sprinkler. If you need to be reminded to perform such a subevent, it seems like overkill to crank out an event using the Calendar app.
Fortunately, iOS offers a better solution: the Reminders app. You use this app to create reminders, which are simple nudges that tell you to do something, to be somewhere, or whatever. These nudges come in the form of Notification Center banners that appear on your screen at a time you specify or when your iPhone reaches a particular location. If you have an iCloud account, you can sync your reminders between your iPhone, your Mac, your iPad, and any other supported device.
Setting a reminder for a specific time
Here are the steps to follow to set up a reminder that alerts you at a specific time:
- On the iPhone Home screen, tap Reminders. The Reminders app appears.
- Tap the list you want to use to store the reminder.
- Tap the first empty line below the list name. The Reminders app creates a new reminder.
- Type the reminder text and then tap the More Info icon (the i) that appears on the right side of the new reminder. The Details screen appears, as shown in Figure 10.12.
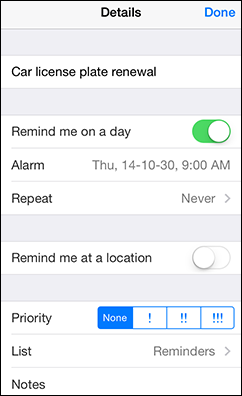
10.12 Tap More Info to see the full Details screen options.
- Tap the Remind me on a day switch to On.
- Tap the date that appears, and then use the scroll wheels to set the date and time of the reminder.
- Tap Done.
- Use the Repeat setting to set up a repeat interval for the reminder.
- Use the Priority setting to assign a priority to the reminder: None, Low, Medium, or High.
- Use the Notes text box to add some background text or other information about the reminder.
- Tap Done.
Setting a reminder for a specific location
Getting an alert at a specific time is the standard way of working with reminders, but the Reminders app supports a second type of criterion: location. That is, when you specify a particular location for a reminder, the app sets up a geo-fence — a kind of virtual border — around that location. When your iPhone crosses that geo-fence, the associated reminder appears on your screen. So, for example, if you’re on your way to a meeting with a client, you could create a reminder that includes notes about the meeting or the client, and then specify the meeting location as the Remind Me criterion.
Here’s how it works:
- On the iPhone Home screen, tap Reminders. The Reminders app appears.
- Tap the list you want to use to store the reminder. If an existing list is displayed and you want to choose another, tap the list name and then tap the list you want to use.
- Tap the first empty line below the list name. The Reminders app creates a new reminder.
- Type the reminder text and then tap the More Info icon (the i) that appears on the right side of the new reminder. The Details screen appears.
- Tap the Remind me at a location switch to On. If your iPhone asks whether the Reminders app can use your location, tap OK.
- To choose a location other than your current address, tap Location, use the Search box to specify the address of the location you want to use, and then tap the location when it appears in the search results.
- To have the reminder appear when your iPhone first comes within range of the location, tap When I Arrive. If you prefer to see the reminder when your iPhone goes out of range of the location, tap When I Leave instead.
- Tap Details and then follow Steps 8 to 11 from the previous section to fill in the reminder details.
Creating a new list
The Reminders app comes with three preset lists that you can use: Reminders, Home, and Work. The default is Reminders, but you can also select a different list if it’s more suitable or if you want to keep your personal and business reminders separate. If none of these three prefab lists is exactly right for your needs, feel free to create your own list by following these steps:
- If the Reminders app is currently displaying a list, tap the list name. The Reminders app displays the Lists screen.
- Tap New List. If you have multiple reminder accounts (such as iCloud and Exchange), Reminders asks which one to use, so tap the account you want to use to store the new list. Reminders converts the Create New List button into a text box and displays the keyboard.
- Tap the name of your list.
- Tap Done. The Reminders app adds the list to the left pane.
Completing a reminder
When a reminder is complete, you don’t want it lingering in the Reminders list (or whatever list it’s in), cluttering the screen and making it hard to look through your remaining reminders. To avoid that, once the reminder is done, tap the radio button beside it. This tells Reminders that the reminder is complete, and the app immediately moves it to the Completed list.
Deleting a reminder
If you no longer need a reminder, it’s a good idea to delete it to keep your reminder lists neat and tidy. To delete a reminder, follow these steps:
- In the Reminder app, tap the list that contains the reminder you want to delete. The Reminders app displays the list’s reminders.
- Tap Edit. Reminders places the list into Edit mode.
- Tap the red Delete icon to the left of the reminder you want to delete. Reminders prompts you to delete the reminder.
- Tap Delete. Reminders deletes the reminder.
Setting the default Reminders list
The default list is the one that Reminders uses when you don’t specify a particular list when you create a reminder. If you have a particular list you’d prefer to use as the default, follow these steps to set it:
- On the Home screen, tap Settings. The Settings app appears.
- Tap Reminders. The Reminders screen appears.
- Tap Default List. The Default List screen appears.
- Tap the list you want to use as the default.
Setting reminders with Siri voice commands
iPhone 4S or later users can also create reminders via voice using the Siri app. Time-based reminders use the following general syntax:
Remind me to action at when.
Here, action is the task you want to be reminded to perform, and when is the date and time you want to be reminded (as described earlier in the chapter when I discuss creating calendar events using Siri). Here are some examples:
- “Remind me to call my wife at 5.”
- “Remind me to pick up Greg at the airport tomorrow at noon.”
- “Remind me to bring lunch.”
Location-based reminders use the following general syntax:
Remind me to action when I location.
Again, action is the task you want to be reminded to perform; location is the place around which you want the geo-fence set up (including either “get to” or “leave,” depending on whether you want to be reminded coming or going). Here are some examples:
- “Remind me to pick up milk when I leave here.”
- “Remind me to call my husband when I get to LaGuardia Airport.”
- “Remind me to call my sister when I get home.”
- “Remind me to grab my sample case when I arrive at Acme Limited.”
For the last of these, you can assume that “Acme Limited” is a company name defined (with an address) in your Contacts list.
Working with Passes
You’ve probably had the experience of walking into your favorite coffee shop or a movie theater, remembering that you have a loyalty card, gift card, or coupon, and then fumbling around to find it in your purse or wallet. Or, worse, you forget you have a card or you leave it at home, so you miss out.
Many merchants are feeling your pain and are doing something about it by creating iOS apps that include gift cards, loyalty cards, coupons, special offers, freebies, and even train or plane boarding passes. These app items usually include bar codes or QR codes, so after you arrive at the destination, the merchant offers a scanner that you can use to scan the code and redeem your card, check in, or whatever. These are great because as long as you have your iPhone (and I know you always have your iPhone), you have your cards and passes.
Of course, you still have to fumble about a bit to locate the app, use the app’s interface to locate the card or pass, and then place your iPhone into the scanner. And, unfortunately, having the card or pass on your iPhone doesn’t guarantee that you’ll remember to scan it.
iOS aims to solve all these problems by offering an app called Passbook that acts as a kind of digital wallet to store all the gift cards, loyalty cards, coupons, tickets, special offers, and boarding passes that you’ve accumulated through your apps.
Passbook offers the following advantages over using merchant apps directly:
- All your passes are stored in one convenient location.
- Passes can have embedded time and location data, so they appear automatically in the Notification Center and the Lock screen when the time is reached or when you arrive at the location.
- Passes are “live” in the sense that if any information changes — for example, your flight’s boarding gate gets changed — the pass updates automatically and lets you know about the change.
If you don’t have any apps that offer passes, open Passbook and tap the App Store button. This loads the App Store and shows you a list of available apps that offer coupons, passes, store cards, and so on.
Note, however, that when you install any of these apps, they at first show up on the iPhone Home screen as normal. After you use the app at least once, it then appears within the Passbook app.