
Chapter 1: How Do I Start Using My iPhone?
When you first look at your iPhone, you notice its sleek, curvaceous design, and then you notice what might be its most remarkable feature: it's nearly button-free! Unlike your garden-variety smartphone bristling with keys and switches and ports, your iPhone has very few physical buttons. This makes for a stylish, possibly even sexy, design, but it also leads to an obvious problem out of the box: How do you work the darn thing? This chapter solves that problem by giving you the grand tour of your iPhone. You learn about the few physical buttons on the phone, and then I show you the real heart of the iPhone, the remarkable touchscreen.
Working with the Sleep/Wake Button
Working with the Ring/Silent Switch
Getting to Know the Rest of the iPhone
Running Your iPhone from the Control Center
Using the Home Button
The starting point for most of your iPhone excursions is the Home button, which is the circular button on the face of the phone at the bottom, as shown in Figure 1.1. The Home button has five main functions:
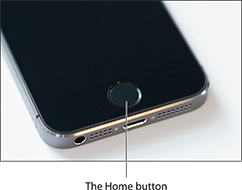
1.1 Press the Home button to (among other things) leave standby mode or to return to the Home screen.
- When the iPhone is in standby mode, pressing the Home button wakes the iPhone and displays the unlock screen.
- When the unlock screen is displayed, leave your thumb (or whichever finger you’ve trained) on the Home button to unlock your iPhone using your fingerprint (assuming you have Touch ID configured; see Chapter 2).
- When the iPhone is running, pressing the Home button returns the iPhone to the Home screen.
- Pressing and holding the Home button invokes Siri, which enables you to control many iPhone features using voice commands. (If Siri is turned off, pressing and holding the Home button invokes Voice Control, Siri’s predecessor.)
- Double-pressing the Home button displays the multitasking bar, which enables you to quickly switch between your running apps.
If your iPhone is in standby mode, press the Home button to display the slide to unlock screen, shown in Figure 1.2. (The iPhone displays this screen for up to about 8 seconds, and if you don’t do anything the phone just drops back into standby mode.) Place your finger on the left side of the screen and slide it to the right side of the screen. This either unlocks the iPhone and displays the Home screen or, if you configured a passcode during setup, it prompts you to enter that code.

1.2 Slide your finger along the screen from left to right to unlock your iPhone.
Working with the Sleep/Wake Button
If your iPhone is on but you’re not using it, the phone automatically goes into standby mode after one minute. This is called Auto-Lock and it’s a handy feature because it saves battery power when your iPhone is just sitting there. However, you can also put your iPhone into standby mode at any time by using the Sleep/Wake button. You find this button at the top of your phone. It’s the dash-shaped button on the right (see Figure 1.3) and, as you see in this section, this button actually has three main functions: sleeping and waking, powering on and off, and handling incoming calls.
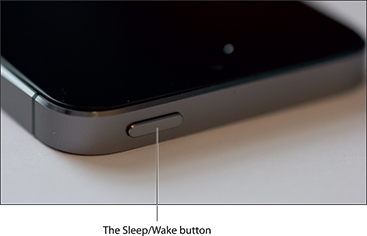
1.3 The Sleep/Wake button on your iPhone.
Sleeping and waking the iPhone
If you’re currently using your iPhone, you put the phone in standby mode by pressing the Sleep/Wake button once. You can still receive incoming calls and texts, but the screen powers down, which drops the power consumption considerably. Tap the Sleep/Wake button again to wake your iPhone. This is just like pressing the Home button: You’re prompted with the slide to unlock screen, and you slide your finger from the left side of the screen to the right to unlock the phone (or enter your passcode).
Powering the iPhone on and off
You can also use the Sleep/Wake button to turn off your iPhone so that it uses no power. This is a good idea if your battery is getting low and you don’t think you’ll be able to charge it any time soon. You can still periodically check your messages or make an outgoing call when needed, but as long as you turn the phone off when you’re done, you minimize the chance that your battery will drain completely. You might also want to turn off your iPhone if you won’t be using it for a few days.
Follow these steps to turn off your iPhone:
- Press and hold the Sleep/Wake button for three seconds. The slide to power off slider appears on the screen.
- Use your finger to drag the slider all the way to the right. The iPhone shuts down after a few seconds.
When you’re ready to resume your iPhone chores, press and hold the Sleep/Wake button until you see the Apple icon. The iPhone powers up and then a few seconds later displays the unlock screen.
Silencing or declining a call
The Sleep/Wake button has another couple of tricks up its electronic sleeve, and these features give you quick ways to handle incoming calls:
- Silence an incoming call. Press the Sleep/Wake button once. This temporarily turns off the ringer, which is great in situations where you don’t want to disturb the folks around you. You still have the standard four rings to answer, should you decide to. If you don’t answer, your iPhone sends the call to your voicemail.
- Decline an incoming call. Press the Sleep/Wake button twice. This sends the call directly to voicemail, which is useful in situations where you don’t want the ringing to disturb your neighbors and you don’t want to answer the call. Note that, in this case, you don’t have the option of answering the call.
Working with the Ring/Silent Switch
When a call comes in and you press the Sleep/Wake button once, your iPhone silences the ringer. That’s great if you’re in a meeting or a movie, but the only problem is that it may take you one or two rings before you can tap Sleep/Wake, and by that time the folks nearby are already glaring at you.
To prevent this phone faux pas, you can switch your iPhone into silent mode, which means it doesn’t ring, and it doesn’t play any alerts or sound effects. When the sound is turned off, only alarms that you’ve set using the Clock application will sound. The phone will still vibrate unless you turn this feature off as well.
You switch the iPhone between ring and silent modes using the Ring/Silent switch, which is located on the left side of the iPhone, near the top (assuming you’re holding the phone in portrait mode, where the Home button appears at the bottom), as shown in Figure 1.4.
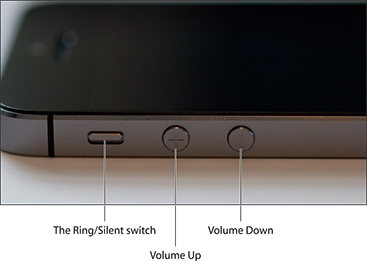
1.4 Use the Ring/Silent switch to toggle your phone between ring and silent modes.
Use the following techniques to switch between silent and ring modes:
- Put the phone in silent mode. Flick the Ring/Silent switch toward the back of the phone. You see an orange stripe on the switch, the iPhone vibrates briefly, and the screen displays a bell with a slash through it.
- Resume normal ring mode. Flick the Ring/Silent switch toward the front of the phone. You no longer see the orange stripe on the switch and the iPhone displays a bell on the screen.
Operating the Volume Controls
The volume controls are on the left side of the iPhone (again, when you’re holding the phone in portrait mode), right below the Ring/Silent switch (see Figure 1.4). The button closer to the top of the iPhone is Volume Up, and you press it to increase the volume; the button closer to the bottom of the iPhone is Volume Down, and you press it to decrease the volume. As you adjust the volume, a speaker appears on-screen with filled-in dashes representing the volume level.
You use these buttons to control the volume throughout your iPhone:
- If you’re on a call, the volume controls adjust your speaker volume.
- If you’re using the Music app, the volume controls adjust the music volume.
- In all other situations, the volume controls adjust the output of sounds such as alerts and effects.
Getting to Know the Rest of the iPhone
Except for the touchscreen, there are a number of other physical features of your iPhone that you need to be familiar with.
For starters, the bottom panel of your iPhone has four features (see Figure 1.5):
- Headset jack. The headset jack is located at the left of the bottom panel of the iPhone. This is where you plug in the EarPods that came with your iPhone to listen to music or a phone call. You can also use this jack to plug in any other headset or headphones that use a 3.5mm stereo audio jack.
- Microphone. This feature is also located at the bottom of your phone, to the right of the headset jack. This is where the iPhone picks up your voice for phone conversations, recording voicemail, and anything else that requires you to speak.

1.5 The bottom panel of your iPhone houses the headset jack, microphone, Lightning connector, and speaker.
- Lightning connector. This feature is on the bottom panel of the phone, between the speaker and microphone. This is where you connect the cord to either charge your iPhone or hook it up to a computer.
- Speaker. This is located at the bottom of your phone, on the right side of the bottom panel. This is where the sound is broadcast when you turn on the speakerphone or listen to music.
The front of the iPhone holds the Home button, as you’ve seen, but it also has four other features near the top (see Figure 1.6):
- Front camera. This is one of the two cameras on the iPhone, and you use this one to take pictures of yourself (and perhaps a nearby friend or loved one) or to conduct FaceTime video calls.
- Front microphone. This second (and amazingly tiny) microphone is used for noise cancellation when you’re on a call. This microphone picks up the ambient sounds around you and the iPhone then cancels them out, so the person you’re talking to can hear you more clearly.
- Proximity sensor. When you’re on a phone call, this sensor (which is behind the screen and so can’t be seen) determines when your head is near the iPhone, and it then turns off the screen to prevent you from accidentally tapping the screen with your cheekbone.
- Ambient light sensor. This sensor (also behind the screen) monitors the surrounding light and automatically turns up the screen brightness when there’s a lot of light and turns down the screen brightness if it’s dark.
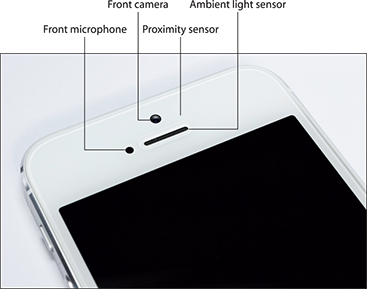
1.6 The front of the iPhone holds the front camera and a couple of sensors.
The back of the iPhone is home to three more features (see Figure 1.7):
- Rear camera. This is the second of the two iPhone cameras. This one has much higher resolution, so you’ll use it to take most of your iPhone photos.
- Rear microphone. Yes, a third microphone! This one is also used for noise cancellation, particularly with video recording through the rear camera.
- LED flash. This is the flash used by the rear camera in low-light situations.

1.7 The back of the iPhone is where you’ll find the rear camera and its LED flash.
Finally, the right panel is where you’ll find the SIM card tray, which holds the Nano-SIM card provided by your cellular company. To open the tray, push a SIM removal tool or a pin into the hole on the cover. This ejects the tray, as shown in Figure 1.8.

1.8 Push a SIM removal tool or pin into the hole to eject the tray.
Operating the Touchscreen
I can’t get enough of the touchscreen on the iPhone, and I think it’s the phone’s best feature, by far. You can zoom in and out, scroll through lists, drag items here and there, and even type messages. Amazingly, the touchscreen requires no external hardware to do all this. You don’t need a stylus or digital pen, and you don’t need to attach anything to the iPhone. Instead, the touchscreen requires just your finger (or, for some operations, a couple of fingers).
Navigating the touchscreen
There are a few maneuvers that you need to be familiar with to successfully use the touchscreen in all its glory. Take some time to try these out now. I’ll refer to these gestures throughout the rest of the book, so play around and make sure you understand them.
- Tap. This means that you use your finger to quickly press and release the screen where desired. This gesture is what you use to initiate just about any action on the iPhone. This opens applications, activates options, enters text boxes, and much more.
- Double-tap. This is what it sounds like: two quick taps with your finger. In applications such as Photos or Safari, it zooms in on images or chunked parts of web pages. A second double-tap zooms back out.
- Swipe and flick. To swipe means to drag your finger across the screen. You use this technique to scroll through lists, drag items to different spots, and unlock the iPhone. Flicking is just an exaggerated swipe. This rapidly scrolls through lists. Flick your finger up and down (or sometimes left and right) on the screen and the iPhone rapidly scrolls through the list. The faster the flick, the faster the scroll. Touch the screen to stop the scrolling process.
- Spread and pinch. You use these techniques to zoom in on or out of the screen. To spread means to move two fingers apart, and you use it to zoom in; to pinch means to move two fingers closer together, and you use it to zoom out. This is especially useful when viewing web pages because the text is often too small to read. Spread to zoom in on the text, making it readable, and pinch to return to the full screen for easy scrolling and navigation.
Searching your iPhone
Parkinson’s Law of Data pithily encapsulates an inescapable fact of digital life: “Data expands to fill the space available for storage.” With each new iteration of the iPhone, the space available for storage keeps getting larger: from 4GB in the original phone to 128GB in a top-of-the-line iPhone 6 Plus. So, following Parkinson’s Law, we keep adding more data to our iPhones: music, photos, contacts, email messages, Safari bookmarks, and on and on.
That’s cool because it means you can bring more of your digital world with you wherever you go, but there’s another law that quickly comes into play; call it McFedries’ Law of Digital Needles in Electronic Haystacks: “The more data you have, the harder it is to find what you need.” Fortunately, iOS rides to the rescue by adding welcome search features to the iPhone.
If you use a Mac, then you probably know how indispensable the Spotlight search feature is. It’s just a humble text box, but Spotlight enables you to find anything on your Mac in just a blink or two of an eye. It’s an essential tool in this era of massive hard drives. (Windows users get much the same functionality with Start screen or Start menu searches.)
The size of your iPhone hard drive might pale in comparison to your desktop’s drive, but you can still pack an amazing amount of stuff into that tiny package, so you really need a way to search your entire iPhone, including email, contacts, calendars, bookmarks, apps, and much more. And, best of all, Spotlight on the iPhone is just as easy to use as Spotlight on the Mac:
- Tap the Home button to return to the Home screen.
- Flick down on the screen. The iPhone displays the Search iPhone box at the top of the screen.
- Enter your search text. Your iPhone immediately begins displaying items that match your text as you type, as shown in Figure 1.9.
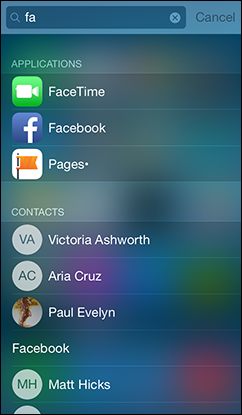
1.9 Flick down on the Home screen and then type your search text.
- Tap Search to see the complete results. If you see the item you’re looking for, tap it to open it.
Typing on the keyboard
You can type on your iPhone, although don’t expect to pound out the prose as easily as you can on your computer. The on-screen keyboard (see Figure 1.10) is a bit too small for rapid and accurate typing, but the iPhone does typing better than any other touchscreen phone out there.

1.10 Trust the touchscreen even though the keys may be small.
To use the keyboard, tap into an area that requires text input, and the keyboard appears automatically. Tap the keys that you want to enter. As you touch each key, a magnified version of the letter pops up. If you touch the wrong key, slide your finger over to the correct one. The keyboard does not enter a key until your finger comes off the screen.
Special keys
The keyboard has a few specialty keys that allow you to do some tricks:
- Shift. This key is a little upward-pointing arrow. Tap this key once to engage shift. The key glows white and the next letter you type will be a capital letter. The Shift key returns to normal automatically.
- 123. Tap this key (it shows as .?123 if you don't have Siri enabled) to display the numeric keyboard, which includes numbers and most punctuation marks. The key then changes to ABC. Tap this key to return to the standard keyboard.
- #+=. This key appears within the numeric keyboard. Tap this key to enter yet another keyboard that contains more punctuation marks as well as a few symbols that aren’t used very frequently.
- Backspace. This key is shaped like a left-pointing arrow with an X inside it. This key deletes at three different speeds. The first speed deletes in response to a single tap, which deletes just a single letter. The second speed deletes in response to being held. If you hold the delete key, it begins moving backward through letters and won’t stop after a single letter. The third speed kicks in if you hold the delete key long enough. This deletes entire words.
- Return. This key moves to the next line.
Editing text
Everyone asks me how you’re supposed to move throughout the text to edit it. The only obvious option is to delete all the way back to your error, which is impractical to say the least. The solution is, of course, in the touchscreen, which enables you to zoom in on the specific section of text you want to edit. Follow these steps:
- Press and hold your finger on the line you want to edit. iPhone displays the text inside a magnifying glass, and within that text you see the cursor (you might need to angle your iPhone just so to see the cursor).
- Slide your finger along the line. As you slide, the cursor moves through the text in the same direction.
- When the cursor is where you want to begin editing, remove your finger.
Understanding predictive typing
As you type, the iPhone often tries to predict which word you want to use, and in iOS 8 it displays its suggestions in a bar that appears just above the keyboard. (In earlier versions, a single suggestion appears in a little bubble underneath the current word.) This is called predictive typing and the suggestions you see depend on the context of your writing. You have three ways to handle these suggestions:
- To accept the highlighted suggestion, tap the spacebar or any punctuation.
- To use another suggestion, tap it.
- To keep your typing as is, tap the suggestion that appears in quotation marks.
The suggestion feature also shows up with misspelled words. The iPhone guesses the correct word and provides a suggestion. If the suggestion is the word you want, tap it to accept it.
Selecting and copying noneditable text
How you select and then either cut or copy text depends on whether that text is editable or noneditable.
The simplest case is noneditable text, such as you get on a web page. In that scenario, when the text you want to use is on the screen, tap and hold anywhere within the text. After a second or two, your iPhone selects the text and displays blue selection handles around it, as shown in Figure 1.11. If necessary, tap and drag the selection handles to select more or less of the text, and then tap Copy.

1.11 For text you can’t edit, tap and hold within the text to select it, and then tap Copy to copy it.
Selecting and then cutting or copying editable text
If the text is editable, such as the text in a note, an email message you’re composing, or any text box, then the process is more involved, but only ever so slightly:
- Tap and hold anywhere within the text. After a short pause for effect, your iPhone displays a couple of buttons above the text, as shown in Figure 1.12 (if you’ve previously copied some text, you’ll also see a Paste button; more on this follows).
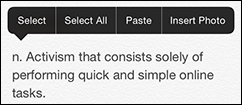
1.12 For editable text, tap and hold within the text to see these options.
- Tap one of the following options:
- Select. Tap this button if you only want to select some of the text. Your iPhone displays blue selection handles around the word you tapped.
- Select All. Tap this button if you prefer to select all the text. The iPhone displays the buttons shown in Figure 1.13; if you don’t need to adjust the selection, skip to Step 4.
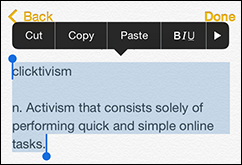
1.13 Select your text and then choose what you want to do with it.
- Tap and drag the selection handles to select the text you want to work with. The iPhone displays a new set of buttons above the text, as shown in Figure 1.13.
- Tap the action you want iPhone to take with the text:
- Cut. Tap this button to remove the text and store it in the memory of your iPhone.
- Copy. Tap this button to store a copy of the text in the memory of your iPhone.
Pasting text
With your text cut or copied and residing snugly in the memory of your iPhone, you’re ready to paste the text. If you want to paste the text into a different app, open that app. Position the cursor where you want the text to appear, tap the cursor, and then tap Paste, as shown in Figure 1.14. Your iPhone dutifully adds the cut or copied text.
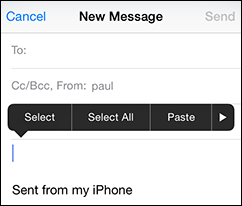
1.14 Tap the cursor, and then tap Paste to place your cut or copied text in the app.
Copying and pasting a photo
If you want to make a copy of a photo, such as an image shown on a web page, the process is more or less the same as copying noneditable text:
- Tap and hold the photo. After a second or two, your iPhone displays a pop-up menu of image options.
- Tap Copy. The iPhone copies the photo into its memory.
- Open the app where you want the copy of the photo to appear.
- Position the cursor where you want the photo to appear, and then tap the cursor.
- Tap Paste. The iPhone pastes the photo.
Undoing a paste
The addition of the Cut, Copy, and Paste commands makes the iPhone feel even more like a computer. That’s good, but it also means that you can make the same pasting errors that you can with your regular computer. For example, you might paste the text or photo in the wrong spot, or once you’ve performed the paste you might realize that you selected the wrong data.
Frustrating? Yes. A big problem? Nope! Slap your forehead lightly in exasperation, and then perform one of the coolest iPhone tricks: Shake it. Your iPhone displays the options shown in Figure 1.15. Tap Undo Paste to reverse your most recent paste, and then move on with your life.

1.15 Reverse an imprudent paste by shaking the iPhone and then tapping Undo Paste.
Running Your iPhone from the Control Center
As you read the rest of this book, you’ll see that your iPhone is rightly called a “Swiss Army phone” because it’s positively bristling with useful tools. However, unlike the easy-to-access tools in a typical Swiss Army knife, the tools on your iPhone aren’t always so readily accessible. Most features and settings require several taps, which doesn’t sound like much, but it can get old fast with features you use frequently.
Fortunately, iOS aims to solve that problem by offering the Control Center. This is a special screen that offers one-flick access to a dozen of the most useful features on your iPhone. By “one-flick access” I mean just this: From any iPhone screen, flick your finger up from the bottom of the screen. This displays the Control Center, as shown in Figure 1.16, which also points out what each icon and control represents. Most of these features are covered elsewhere in the book, so I won’t go into the details here. To hide the Control Center, either tap the Home button or tap the downward-pointing arrow that appears at the top of the Control Center screen.

1.16 Flick up from the bottom of any screen to come face-to-face with the Control Center.