
Chapter 5: How Can I Make the Most of iPhone Web Surfing?
One of the most popular modern pastimes is web surfing, and now you can surf even when you’re out and about thanks to the large screen on your iPhone and support for speedy networks, such as LTE and Wi-Fi. You perform these surfin’ safaris using, appropriately enough, the Safari web browser app, which is easy to use and intuitive. However, the Safari app offers quite a few options and features, many of which are hidden in obscure nooks and crannies of the iPhone interface. If you think your surfing activities could be faster, more efficient, more productive, or more secure, this chapter can help.
Browsing Tips for Faster Surfing
Getting More Out of Safari on Your iPhone
Touchscreen Tips for Websites
The touchscreen operates much the same way in Safari as it does in the other iPhone apps. You can use it to scroll pages, zoom in and out, tap links, fill in forms, enter addresses, and more. The screen is remarkably fluid in its motion, and its response to your touch is neither hyperactive nor sluggish. It actually makes surfing the web a pleasure, which isn’t something you can say about most smartphones.
Here’s a little collection of touchscreen tips that ought to make your web excursions even easier:
- Double-tap. A quick way to zoom in on a page that has various sections is to double-tap on the specific section — it could be an image, a paragraph, a table, or a column of text — that you want magnified. Your iPhone zooms the section to fill the width of the screen. Double-tap again to return the page to the regular view.
- One tap to the top. If you’re reading a particularly long-winded web page and you’re near the bottom, you may have quite a long way to scroll if you need to head back to the top to get at the address/search bar. Save the wear and tear on your flicking finger! Instead, tap the status bar at the top of the screen; Safari immediately transports you to the top of the page.
- Tap and hold to see where a link takes you. You “click” a link in a web page by tapping it with your finger. In a regular web browser, you can see where a link takes you (that is, the URL) by hovering the mouse pointer over the link and checking out the link address in the status bar. That doesn’t work on your iPhone, but you can still find out the address of a link before tapping it. Hold your finger on the link for a few seconds. Safari then displays a pop-up screen showing the link text and, more importantly, the URL, as shown in Figure 5.1. If the link looks legit, either tap Open to surf there in the current browser page or tap Open in New Page to start a fresh page (see the section about opening and managing multiple browser tabs later in this chapter for more info). If you decide not to follow the link, tap Cancel.

5.1 Hold your finger on a link to see the URL and several link options.
- Tap and hold to make a copy of a link address. If you want to include a link address in another app, such as a note or an email message, you can copy it. Tap and hold your finger on the link for a few seconds and Safari displays the pop-up screen shown in Figure 5.1. Tap Copy to place the link address into memory, switch to the other app, tap the cursor, and then tap Paste.
- Quick access to common top-level domains. A top-level domain (TLD) is the part of the domain name that comes after the last dot. For example, in wiley.com, the .com part is the TLD. You might think you have to type them the old-fashioned way. Nope! Tap and hold the period (.) key, and a pop-up appears with keys for .com, .net, .edu, and .org, and another for your current country TLD (such as .us for the United States). Just slide your finger over the one you want.
Browsing Tips for Faster Surfing
If you’re like me, the biggest problem you have with the web is that it’s just so darned huge. We spend great big chunks of our day visiting sites and still never seem to get to everything on that day’s To Surf list. The iPhone helps lessen (but, alas, not eliminate) this problem by allowing you to surf wherever Wi-Fi can be found (or just wherever if you only have a cellular connection). Even so, the faster and more efficient your iPhone surfing sessions are, the more sites you see. The touchscreen tips I covered earlier can help, and in this section I take you through a few more useful tips for speedier surfing.
Opening and managing multiple browser tabs
When you’re perusing web pages, what happens when you’re on a page that you want to keep reading, but you also need to leap over to another page for something? On your computer’s web browser, you probably open another tab, use that tab to open the other page, and then switch back to the first page when you finish. It’s an essential web-browsing technique, but can it be done with the Safari browser on your iPhone?
The short answer: yes. The slightly longer answer: yes, although the “tabs” that Safari uses look (and act) more like separate browser windows. In any case, you can open a second tab and load a different page into it. Then, it’s just a quick tap and flick to switch between them. You’re not restricted to a meager two tabs either. Your iPhone lets you open up as many tabs as you need.
Here are the steps to follow to open and load multiple tabs:
- Tap the title bar that appears at the top of the Safari screen, or swipe down on the screen. Safari reveals its menu bar.
- Tap the Tabs button in the menu bar (see Figure 5.2). Safari displays a thumbnail version of the current tab.

5.2 Tap the Tabs button to open a new tab.
- Tap New Tab (the + button). Safari opens a new tab and displays a list of recent sites you’ve visited.
- Load a website into the new tab. You can do this by tapping a recent site, selecting a bookmark, entering an address, or whatever.
- Repeat Steps 1 to 4 to load as many tabs as you need.
Once you have two or more tabs fired up, here are a couple of techniques you can use to impress your friends:
- Switch to another tab. Tap the title bar (or swipe down) and then tap the Tabs button to get to the thumbnail view (see Figure 5.3). Flick up or down to bring the page into view, and then tap the page.

5.3 Tap the Tabs button to see thumbnail versions of your open tabs.
- When you no longer need a page. Tap the title bar (or swipe down) and then tap the Tabs button, and flick up or down to bring the page into view. Then tap the X in the upper left corner (or tap and drag the page off the left edge of the screen). Safari trashes the page without a whimper of protest.
Working with iCloud tabs
Tabs are handy browsing tools because they let you keep multiple websites open and available while you surf other sites. That’s fine as long as you use just a single device to surf the web, but how realistic is that? It’s much more likely that you do some web surfing not only on your iPhone, but also on your Mac or Windows PC, your iPad, perhaps even your iPad touch. So what do you do if you’re using your iPhone to surf and you remember a site that’s open in a tab on one of your other devices?
If you have an iCloud account, you can use it to sync your open Safari tabs in multiple devices, and then access those tabs in your iPhone. For this to work, you must be using Safari 6 or later on OS X, Windows, or iOS, and you must configure iCloud on each of those devices to sync Safari data.
With that done, open Safari on your iPhone, tap the Tabs button in the menu bar, and then scroll down. Once you scroll below all your iPhone tabs, Safari displays a list of the open tabs on your other devices, as shown in Figure 5.4.

5.4 Tap the Tabs button and then scroll down to see a list of the Safari tabs that you have open in your other devices.
Opening a tab in the background
When you tap and hold a link and then tap Open in New Tab, Safari immediately switches to the new tab and loads the link while you wait. That’s often the behavior you want because it lets you view the new web page as soon as it loads. However, you might find that most of the time you prefer to stay on the current web page and check out the new tab later. In those situations, having to perform those extra taps to get back to the current tab gets old in a hurry. The solution is to configure Safari to always open new tabs in the background. Here’s how:
- On the Home screen, tap Settings. The Settings app slides in.
- Tap Safari. Your iPhone displays the Safari screen.
- Tap Open Links. Your iPhone displays the Open Links screen.
- Tap In Background.
Viewing a page without distractions
Reading an article or essay online is no picnic. The problem is the sheer amount of distraction on almost any page: background colors or images that clash with the text; ads above, to the side of, and within the text; site features such as search boxes, feed links, and content lists; and those ubiquitous icons for sharing the article with your friends on Facebook, Twitter, Pinterest, and on and on. Figure 5.5 shows a typical example.
Fortunately, Safari helps to solve this problem by offering the Reader feature. Reader removes all those extraneous page distractions that just get in the way of your reading pleasure. So, instead of a cacophony of text, icons, and images, you see pure, simple, large-enough-to-be-easily-read text. How do you arrive at this blissful state? By tapping the title bar at the top of the Safari screen and then tapping the Reader button, which appears on the left side of the address bar, as pointed out in Figure 5.5. Safari instantly transforms the page, and you see something similar to the page shown in Figure 5.6 (which is the Reader version of the page shown in Figure 5.5).

5.5 Today’s web pages are all too often festooned with ads, icons, and other bric-a-brac.

5.6 The Reader version of a web page is a simple and easy-to-read text affair.
Requesting a website’s desktop version
Many websites recognize that you’re surfing iPhone-style and display a “mobile” version of the site. This version is usually easier to read and navigate, but that ease almost always comes at the cost of having access to fewer site features. If a site isn’t displaying the feature you want, you can request the site’s “desktop” version (that is, the full version that you’d see if you were using a desktop computer). Here’s how:
- Double-tap the site’s address at the top of the screen. Safari opens the address for editing.
- Swipe down on the screen to reveal the commands.
- Tap Request Desktop Site, as shown in Figure 5.7.
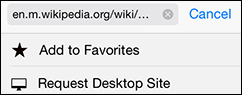
5.7 Open the address bar for editing, swipe down, and then tap Request Desktop Site.
Adding bookmarks manually
Although you’ve seen that the Safari browser on your iPhone offers a few tricks to ease the pain of typing web page addresses, it’s still slower and quite a bit more cumbersome than a full-size, physical keyboard (which lets even inexpert typists rattle off addresses lickety-split). All the more reason that you should embrace bookmarks with all your heart. After all, a bookmark lets you jump to a web page with precisely no typing — just a tap or three and you’re there.
But even if you’ve done the sync and now have a large collection of bookmarks at your beck and call, it doesn’t mean your iPhone bookmark collection is complete. After all, you might find something interesting while you’re surfing with the iPhone. If you think you’ll want to pay that site another visit down the road, you can create a new bookmark right on the iPhone. Here are the steps to follow:
- On the iPhone, use Safari to navigate to the site you want to save.
- Tap the web page title bar (or swipe down on the screen) and then tap the Actions button in the menu bar. This is the button with the arrow in the middle of the Safari menu bar (pointed out earlier in Figure 5.2).
- Tap Bookmark. This opens the Add Bookmark screen.
- Tap in the top box and enter a name for the site that helps you remember it. This name is what you see when you scroll through your bookmarks.
- Tap Location. This displays a list of your bookmark folders.
- Tap the folder you want to use to store the bookmark. Safari returns you to the Add Bookmark screen.
- Tap Save. Safari saves the bookmark.
Managing your bookmarks
Once you have a few bookmarks stashed away in the Bookmarks list, you may need to perform a few housekeeping chores from time to time, including changing a bookmark’s name, address, or folder; reordering bookmarks or folders; or getting rid of bookmarks that have worn out their welcome.
Before you can do any of this, you need to get the Bookmarks list into Edit mode by following these steps:
- In Safari, tap the web page title bar (or swipe down on the screen) and then tap the Bookmarks button in the menu bar. Safari opens the Bookmarks list.
- Tap the Bookmarks tab.
- If the bookmark you want to mess with is located in a particular folder, tap to open that folder. For example, if you’ve synced with Safari, then you should have a folder named Bookmarks Bar that includes all the bookmarks and folders that you’ve added to the Bookmarks Bar in your desktop version of Safari.
- Tap Edit. Your iPhone switches the Bookmarks list to Edit mode. With Edit mode on the go, you’re free to toil away at your bookmarks. Here are the techniques to master:
- Edit bookmark info. Tap the bookmark to fire up the Edit Bookmark screen. From here, you can edit the bookmark name, address, or folder. Tap Done when you’re ready to move on.
- Change the bookmark order. Use the Drag icon on the right to tap and drag a bookmark to a new position in the list. Ideally, you should move your favorite bookmarks near the top of the list for easiest access.
- Add a bookmark folder. Tap New Folder to launch the Edit Folder screen, then tap a folder title and select a location. Feel free to use bookmark folders at will because they’re a great way to keep your bookmarks neat and tidy (if you’re into that kind of thing).
- Delete a bookmark. No use for a particular bookmark? No problem. Tap the Delete button — the minus (–) sign to the left of the bookmark — and then tap the Delete button that appears.
When the dust settles and your bookmark chores are done for the day, tap Done to get out of Edit mode.
Surfing links from your Twitter feed
If you’ve used your iPhone to connect to your Twitter account, as I describe in Chapter 2, Safari offers a bonus: the Shared Links list, which displays the recent links that have been shared by the people you follow on Twitter. Here’s how you get there from here:
- In Safari, tap the web page title bar (or swipe down on the screen) to display the menu bar.
- Tap the Bookmarks button in the menu bar. Safari opens the Bookmarks list.
- Tap the Shared Links tab. Safari displays your Twitter feed’s most recent links, as shown in Figure 5.8.

5.8 With your iPhone connected to your Twitter account, the Safari Shared Links list offers up recent links from the folks you follow.
Saving a page to read later
In your web travels, you’ll often come upon a page with fascinating content that you can’t wait to read. Unfortunately, a quick look at the length of the article tells you that you’re going to need more time than you currently have available. So what’s a body to do? Quickly scan the article and move on with your life? No, when you come across good web content, you need to savor it. So, should you bookmark the article for future reference? That’s not bad, but bookmarks are really for things you want to revisit often, not for pages that you might read only once.
The best solution is the Safari feature called the Reading List. As the name implies, this is a simple list of things to read. When you don’t have time to read something now, add it to your Reading List and you can read it at your leisure.
There are a couple of techniques you can use to add a page to your Reading List:
- Use Safari to navigate to the page that you want to read later, tap the Actions button, and then tap Add to Reading List.
- Tap and hold a link for the page that you want to read later and then tap Add to Reading List.
When you’re settled into your favorite easy chair and have the time (finally!) to read, open Safari, tap the Bookmarks button, and then tap the Reading List tab. Safari displays all the items you’ve added to the list and you just tap the article you want to read. To make the list a bit easier to manage, tap Show Unread to see just the pages you haven’t yet perused.
Retracing your steps with the handy History list
Bookmarking a website is a good idea if that site contains interesting or fun content that you want to revisit in the future. However, sometimes you may not realize that a site had useful data until a day or two later. Similarly, you might like a site’s stuff but decide against bookmarking it, only to regret that decision down the road. You could waste a big chunk of your day trying to track down the site. Unfortunately, you may have run into Murphy’s Web Browsing Law: A cool site that you forget to bookmark is never found again.
Fortunately, your iPhone has your back. As you navigate the nooks and crannies of the web, iPhone keeps track of where you go, storing the name and address of each page in the History list. The limited memory on iPhone means that it can’t store tons of sites, but it might have the one you’re looking for. Here’s how to use it:
- In Safari, tap the web page title bar (or swipe down on the screen) to display the menu bar, and then tap the Bookmarks button. Safari opens the Bookmarks list.
- Tap the Bookmarks tab.
- Tap History. Safari opens the History screen, which shows the sites you’ve visited today at the top, followed by a list of previous surfing dates.
- If you visited the site you’re looking for on a previous day, tap that day. Safari displays a list of only the sites you visited on that day.
- Tap the site you want to revisit. Safari loads it.
Filling in Online Forms
Many web pages include forms where you fill in some data and submit it, which sends the data off to some server for processing. Filling in these forms in your Safari browser is mostly straightforward:
- Text box. Tap inside the text box to display the touchscreen keyboard, tap out your text, and then tap Done.
- Text area. Tap inside the text area, and then use the keyboard to tap your text. Most text areas allow multiline entries, so you can tap Return to start a new line. When you finish, tap Done.
- Check box. Tap the check box to toggle the check mark on and off.
- Radio button. Tap the radio button to activate it.
- Command button. Tap the button to make it do its thing (usually submit the form).
Many online forms consist of a bunch of text boxes. If the idea of performing the tap-type-Done cycle over and over isn’t appealing to you, fear not. The Safari browser on your iPhone offers an easier method:
- Tap inside the first text box. The keyboard appears.
- Tap to type the text you want to submit. Above the keyboard, notice the Previous and Next buttons, as shown in Figure 5.9.

5.9 If the form contains multiple text boxes, you can use the Previous and Next buttons to navigate them.
- Tap Next to move to the next text box. If you need to return to a text box, tap Previous instead.
- Repeat Steps 2 and 3 to fill in the text boxes.
- Tap Done. Safari returns you to the page.
I haven’t yet talked about selection lists, and that’s because the browser on your iPhone handles them in an interesting way. When you tap a list, Safari displays the list items in a picker, as shown in Figure 5.10. Tap the item you want to select. As with text boxes, if the form has multiple lists, you see the Previous and Next buttons, which you can tap to navigate from one list to another. After you make all your selections, tap Done to return to the page.

5.10 Tap a list to see its items in a separate box for easier selection.
Turning on AutoFill for faster form input
The Safari browser on your iPhone makes it relatively easy to fill in online forms, but it can still be slow going, particularly if you have to do a lot of typing. To help make forms less of a chore, Safari supports a welcome feature called AutoFill. Just as with the desktop version of Safari (or just about any other mainstream browser), AutoFill remembers the data you enter into forms and then enables you to fill in similar forms with a simple tap of a button. You can also configure AutoFill to remember usernames and passwords.
To take advantage of this nifty feature, you first have to turn it on by following these steps:
- In the Home screen, tap Settings. Your iPhone opens the Settings app.
- Tap Safari. The Safari screen appears.
- Tap Passwords & AutoFill to open the Passwords & AutoFill screen.
- Tap the Use Contact Info switch to On. This tells Safari to use your item in the Contacts app to grab data for a form. For example, if a form requires your name, Safari uses your contact name. Safari displays the All Contacts screen.
- Tap My Info and then tap your name in the All Contacts list.
- If you want Safari to remember the usernames and passwords you use to log in to sites, tap the Names and Passwords switch to On.
- If you want Safari to remember the credit card data you enter when making online purchases, tap the Credit Cards switch to On.
Now when you visit an online form and access any text field in the form, the AutoFill button becomes enabled. Tap AutoFill to fill in those portions of the form that correspond with your contact data, as shown in Figure 5.11. Notice that the fields Safari was able to automatically fill in appear with a colored background.
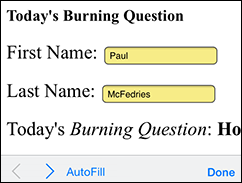
5.11 Tap the AutoFill button to fill in form fields with your contact data.
Saving website login passwords
If you enabled the Names & Passwords option in the AutoFill screen, each time you fill in a username and password to log in to a site, Safari displays the dialog shown in Figure 5.12. It asks if you want to remember the login data, and gives you three choices:

5.12 If you configured Safari to remember usernames and passwords, you see this dialog when you log in to a site.
- Save Password. Tap this button to have Safari remember your username and password.
- Never for This Website. Tap this button to tell Safari not to remember the username and password, and to never again prompt you to save the login data.
- Not Now. Tap this button to tell Safari not to remember the username and password this time, but to prompt you again next time you log in to this site.
Getting More Out of Safari on Your iPhone
You’ve seen a lot of great Safari tips and techniques so far in this chapter, but I hope you’re up for even more, because you’ve got a ways to go. In the rest of this chapter, you learn such useful techniques as maintaining your privacy, tweeting a web page, changing the default search engine, configuring the Safari security options, and searching a web page.
Maintaining your privacy by deleting the History list
The History list of sites you’ve recently surfed on your iPhone is a great feature when you need it, and it’s an innocuous feature when you don’t. However, there are times when the History list is just plain uncool. For example, if you visit a private corporate site, a financial site, or any other site you wouldn’t want others to see, the History list might betray you.
And sometimes unsavory sites can end up in your History list by accident. For example, you might tap a legitimate-looking link in a web page or email message, only to end up in some dark, dank Net neighborhood. Of course, you high-tail it out of there right away with a quick tap of the Back button, but that nasty site is now lurking in your history.
Whether you’ve got sites on the History list that you wouldn’t want anyone to see, or you just find the idea of your iPhone tracking your movements on the web to be a bit sinister, follow these steps to wipe out the History list:
- In Safari, tap the web page title bar (or swipe down on the screen) to display the menu bar, and then tap the Bookmarks button. Safari opens the Bookmarks list.
- Tap the folder names that appear in the upper left corner of the screen until you get to the Bookmarks screen.
- Tap History. Safari opens the History screen.
- Tap Clear. Safari asks how much of your history you want to clear.
- Tap a time period: The Last Hour, Today, Today and Yesterday, or All Time. Safari deletes every site from the History list for that time period.
Deleting website data
As you wander around the web, Safari gathers and saves bits of information for each site. For example, it stores some site text and images so that it can display the page faster if you revisit the site in the near future. Similarly, if you activated AutoFill for names and passwords, Safari stores that data on your iPhone. Finally, most major sites store small text files called cookies on your iPhone that save information for things like site preferences and shopping carts.
Storing all this data on your iPhone is generally a good thing because it can speed up your surfing. However, it’s not always a safe or private thing. For example, if you elect to have Safari save a site password, you might change your mind later on, particularly if you share your iPhone with other people. Similarly, cookies can sometimes be used to track your activities online, so they’re not always benign.
Here are the steps to follow to delete data for individual websites:
- On the Home screen, tap Settings. Your iPhone opens the Settings app.
- Tap Safari. The Safari screen appears.
- Tap Advanced. The Advanced screen appears.
- Tap Website Data. Safari displays a list of the recent sites for which it has stored data, as well as the size of that data.
- If you don’t see the site you want to remove, tap Show All Sites at the bottom of the list.
- Tap Edit.
- Tap the red Delete button to the left of the site you want to clear.
- Tap the Delete button that appears to the right of the site’s data size value. Safari removes the site’s data.
Browsing privately
If you find yourself constantly deleting your browsing history or website data, you can save yourself a bit of time by configuring Safari to do this automatically. This is called private browsing and it means that Safari doesn’t save any data as you browse. Specifically, it doesn’t save the following:
- Sites aren’t added to the history (although the Back and Forward buttons still work for navigating sites that you’ve visited in the current session).
- Web page text and images aren’t saved.
- Search text isn’t saved with the search box.
- AutoFill passwords aren’t saved.
To activate private browsing, follow these steps:
- In Safari, tap the web page title bar (or swipe down on the screen) to display the menu bar.
- Tap the Tabs button.
- Tap Private in the lower left corner of the screen. Safari creates a separate set of tabs for private browsing.
- Tap Add Tab (+). Safari creates a new private tab.
Tweeting a web page
If you have a Twitter account, there’s a good chance that one of your favorite 140-characters-or-less pastimes is sharing interesting, useful, or funny websites with your followers. Using a client such as the official Twitter app or Tweetbot is fine for this, but it means you have to copy the site address, switch to the app, and then paste the address. For quick tweets, it’s easier and faster just to stay in Safari, which lets you send a tweet directly from a web page. Here’s what you do:
- Use Safari to navigate to the page that you want to tweet.
- Tap the web page title bar (or swipe down on the screen) to display the menu bar, and then tap the Actions button.
- Tap Twitter. Safari displays the Twitter dialog.
- If you added more than one account to the Twitter settings, tap the username in the Account section and then tap the name of the account you want to use to send the tweet.
- Type your tweet text in the large text box. As you can see in Figure 5.13, the Tweet dialog displays a number in the lower left corner telling you how many characters you have left.

5.13 iOS lets you tweet about a website directly from Safari.
- If you want to include your present whereabouts as part of the tweet, tap Location.
- Tap Post. Your iPhone posts the tweet to your followers.
Sharing a link on Facebook
You learn in Chapter 2 that if you sign in to your Facebook account on your iPhone, you can use Siri to update your Facebook status. A timely, pithy, or funny status update is a time-honored (relatively speaking) Facebook tradition, but your friends would probably appreciate at least the occasional tidbit of non-narcissistic content. I speak, in this case, of sharing links to useful, interesting, funny, or even downright weird web pages.
Happily, link-sharing with your Facebook pals is now built directly into Safari, so there’s no need to surf to the Facebook site or fire up the Facebook app to get the job done:
- Use Safari to display the web page you want to share.
- Tap the web page title bar (or swipe down on the screen) to display the menu bar, and then tap the Actions button.
- Tap Facebook. Safari displays the Facebook dialog.
- Use the large text box to type some text to accompany the link.
- If you want to include your current location as part of the post, tap Location.
- To select who will see the link, tap Audience and then tap a group in the list that appears.
- Tap Post. Your iPhone posts the link to your Facebook Timeline.
Changing the default search engine
Google is the default search engine on your iPhone. Almost everyone uses Google, of course, but if you have something against it, you can switch and use a different search engine. Here’s how:
- In the Home screen, tap Settings. Your iPhone opens the Settings app.
- Tap Safari. The Safari screen appears.
- Tap Search Engine. Your iPhone opens the Search Engine screen.
- Tap the search engine you want to use. You have four choices: Google, Yahoo!, Bing, or DuckDuckGo.
Searching web page text
When you’re perusing a page on the web, it’s not unusual to be looking for specific information. In those situations, rather than reading through the entire page to find the info you seek, it would be a lot easier to search for the data. You can easily do this in the desktop version of Safari or any other computer browser, but, at first glance, the Safari app doesn’t seem to have a Find feature anywhere. It’s there all right, but you need to know where to look:
- Use the Safari app to navigate to the web page that contains the information you seek.
- Tap the web page title bar (or swipe down on the screen) to display the menu bar, and then tap inside the address/search box at the top of the Safari window.
- Tap the search text you want to use. Safari displays the usual web page matches, but it also displays “On This Page (X matches),” where X is the number of times your search text appears on the web page.
- Flick the search results up to hide the keyboard. The On This Page message now appears at the bottom of the results screen, as shown in Figure 5.14.

5.14 The On This Page message tells you the number of matches that appear on the current web page.
- Tap Find “search” (where search is the search text you entered). Safari highlights the first instance of the search term, as shown in Figure 5.15.

5.15 Safari highlights the first instance of the search term that appears on the current web page.
- Tap the right-pointing arrow to cycle forward through the instances of the search term that appear on the page. Note that you can also cycle backward through the results by tapping the left-pointing arrow. Also, when you tap the right-pointing arrow after the last result appears, Safari returns you to the first result.
- When you’re finished with the search, tap Done.
Searching the web with Siri voice commands
You can use Safari to type search queries either directly into the search box or by navigating to a search engine site. However, if you have an iPhone 4s or later, typing suddenly seems like such a quaint pastime thanks to the voice-recognition prowess of the Siri app. So why type a search query when you can just tell Siri what you’re looking for?
Launch Siri by tapping and holding the Home button (or pressing and holding the Mic button of the iPhone headphones, or the equivalent button on a Bluetooth headset). Here are some general tips for web searching with Siri:
- Searching the entire web. Say “Search the web for topic,” where topic is your search criteria.
- Searching Wikipedia. Say “Search Wikipedia for topic,” where topic is the subject you want to look up.
- Searching with a particular search engine. Say “Engine topic,” where Engine is the name of the search engine, such as Google or Bing, and topic is your search criteria.
Siri also understands commands related to searching for businesses and restaurants through its partnership with Yelp. To look for businesses and restaurants using Siri, the general syntax to use is the following (although, as usual with Siri, you don’t have to be too rigid about this):
“Find (or Look for) something somewhere.”
Here, the something part can be the name of a business (such as “Starbucks”), a type of business (such as “gas station”), a type of restaurant (such as “Thai restaurants”), or a generic product (such as “coffee”). The somewhere part can be something relative to your current location (such as “around here” or “near me” or “within walking distance”) or a specific location (such as “in Indianapolis” or “in Broad Ripple”). Here are some examples:
- “Find a gas station within walking distance.”
- “Look for pizza restaurants in Indianapolis.”
- “Find coffee around here.”
- “Look for a grocery store near me.”
Note, too, that if you add a qualifier such as “good” or “best” before the something portion of the command, Siri returns the results organized by their Yelp rating.
Siri also partners with Wolfram Alpha, the “computational knowledge engine,” so you can search for specific tidbits of information, such as “What was the Best Picture of 1959?” or “What is the population of Scotland?”
Sharing a link via AirDrop
Here’s an all-too-common scenario in this digital, mobile age: You’re out with friends or colleagues, you look up something on your iPhone, and you find a page that one of your peeps wants to check out. How do you get the page address from your iPhone to her device? iOS uses AirDrop, a Bluetooth service that lets two nearby devices — specifically, an iPhone 5 or later, a fourth-generation iPad or later, an iPad mini, a fifth-generation iPod touch or later, or a Mac running OS X Yosemite — exchange a link wirelessly. Here’s how it works:
- Use Safari to navigate to the web page you want to share.
- Tap the web page title bar (or swipe down on the screen) to display the menu bar, and then tap the Actions button. The AirDrop section shows an icon for each nearby device, as shown in Figure 5.16.

5.16 When you tap Actions, the AirDrop section shows an icon for each nearby AirDrop-friendly device.
- Tap the icon for the person with whom you want to share the link. The other person sees a confirmation dialog. When she taps Accept (or Save and Open in OS X Yosemite), her version of Safari loads and displays the page. Pie-easy!