
Chapter 2: How Do I Configure My iPhone?
The iPhone is justly famous for its stylish design and its effortless touchscreen. However, although good looks and ease of use are important for any smartphone, it’s what you do with that phone that’s important. The iPhone helps by offering a lot of features, but chances are those features aren’t set up to suit the way you work. Maybe your most-used Home screen icons aren’t at the top of the screen where they should be, or perhaps your iPhone goes to sleep too soon. This chapter shows you how to configure your iPhone to solve these and many other annoyances so the phone works the way you do.
Working with App Notifications
More Useful iPhone Configuration Techniques
Enhancing Your iPhone with Apps
Customizing the Home Screen
The Home screen is your starting point for all things iPhone, and what could be simpler? Just tap the icon you want, and the app loads lickety-split. Ah, but things are never so simple, are they? In fact, there are a couple of hairs in the Home screen soup:
- The icons in the top row and the left column are a bit easier to find and a bit easier to tap.
- When you have more than 24 icons on the iPhone 6 (or 20 icons on the iPhone 5 or 16 on earlier iPhones), they extend onto a second (or third or fourth) Home screen. If the app you want isn’t on the main Home screen, you must first flick to the screen that has the app’s icon (or tap its dot) and then tap the icon. Note, however, that even when your icons extend onto multiple Home screens, the four icons in the iPhone Dock appear on every Home screen, so they’re always available.
You can make the Home screen more efficient by moving your four most-used icons to the iPhone Dock and by moving your other often-used icons to the top row or left column of the main Home screen. You can do all this by rearranging the Home screen icons as follows:
- Display the Home screen.
- Tap and hold any Home screen icon. When you see the icons wiggling, release your finger.
- Tap and drag the icons into the positions you prefer. To move an icon to a previous screen, tap and drag it to the left edge of the current screen. To move it to a later screen, tap and drag it to the right edge of the current screen. Next, wait for the new screen to appear and then drop the icon where you want it.
- Rearrange the existing Dock icons by dragging them left or right to change the order.
- To replace a Dock icon, first tap and drag the icon off the Dock to create some space. Then tap and drag any Home screen icon into the Dock.
- Press the Home button. Your iPhone saves the new icon arrangement.
Creating an app folder
The best way to make the main Home screen more manageable is to reduce the total number of icons you have to work with. This isn’t a problem when you’re just starting out with your iPhone, because out of the box it comes with only a limited number of apps. However, the addictive nature of the App Store almost always means that you end up with screen after screen of apps. In fact, the iPhone lets you use a maximum of 11 screens. If you fill each screen to the brim — that’s 24 apps per screen on the iPhone 6 — you end up with a total of 268 icons (including the four Dock icons; the iPhone 5 can have up to 224 icons and earlier iPhone versions can have up to 180 icons). That’s a lot of icons.
Now, when I tell you to reduce the number of icons on the Home screens, I don’t mean that you should delete apps. Too drastic! Instead, you can take advantage of a great feature called app folders. Just like a folder on your hard drive that can store multiple files, an app folder can store multiple app icons. You can store nine apps per page and create multiple pages. This enables you to group related apps together under a single icon, which not only reduces your overall Home screen clutter but can also make individual apps easier to find.
Here are the steps to follow to create and populate an app folder:
- Navigate to the Home screen that contains at least one of the apps you want to include in your folder.
- Tap and hold any icon until you see all the icons wiggling.
- Tap and drag an icon that you want to include in the folder, and drop it on another icon that you want to include in the same folder. Your iPhone creates the folder and displays a text box so that you can name it. The default name is the underlying category used by the apps, as shown in Figure 2.1. If the apps are in different categories, your iPhone uses the category of the app you dragged and dropped.

2.1 Drop one app icon on another to create an app folder.
- Tap inside the text box to edit the name, if you feel like it, and tap Done when you finish.
- Press the Home button. Your iPhone saves your new icon arrangement.
Use the following techniques to work with your app folders:
- To add another app to the folder, tap and drag the app icon and drop it on the folder.
- To launch an app, tap the folder to open it and tap the app.
- To rename a folder or rearrange the apps within a folder, tap the folder to open it. Then tap and hold any app icon within the folder. You can then edit the folder name, or drag and drop the apps within the folder.
- To remove an app from a folder, tap the folder to open it. Tap and hold any app icon within the folder, then drag it out of the folder.
Adding a Safari web clip to the Home screen
Do you have a web page that you visit all the time? If so, you can set up that page as a bookmark in the iPhone Safari browser, but there’s an even faster way to access it: Add it to the Home screen as a web clip icon. A web clip is a link to a page that preserves that page’s scroll position and zoom level. For example, suppose a page has a form at the bottom. To use that form, you have to navigate to the page, scroll to the bottom, and then zoom in to see it better. However, you can perform all three actions — navigate, scroll, and zoom — automatically with a web clip.
Follow these steps to save a page as a web clip icon on the Home screen:
- Use the Safari browser on your iPhone to navigate to the page you want to save.
- Scroll to the portion of the page you want to see.
- Pinch and spread your fingers over the area you want to zoom in on until you can comfortably read the text.
- Tap the Share icon (the arrow) at the bottom of the screen. iPhone displays a list of actions.
- Tap Add to Home Screen. iPhone prompts you to edit the web clip name.
- Edit the name as needed. Names up to about 10 to 14 characters display on the Home screen without being broken. The fewer uppercase letters you use, the longer the name can be. For longer names, iPhone displays the first and last few characters (depending on the locations of spaces in the name) separated by an ellipsis (...). For example, if the name is My Home Page, it appears in the Home screen as My Ho...Page.
- Tap Add. iPhone adds the web clip to the Home screen and displays the Home screen. If your main Home screen is already filled to the brim with icons, iPhone adds the web clip to the first screen that has space available.
Resetting the default Home screen layout
If you make a bit of a mess of your Home screen, or if someone else is going to be using your iPhone, you can reset the Home screen icons to their default layout. Follow these steps:
- On the Home screen, tap Settings. The Settings app appears.
- Tap General. The General screen appears.
- Scroll down and tap Reset. The Reset screen appears.
- Tap Reset Home Screen Layout. iPhone warns you that the Home screen will be reset to the factory default layout.
- Tap Reset Home Screen. iPhone resets the Home screen to the default layout, but it doesn’t delete the icons for any apps you’ve added.
Working with App Notifications
A lot of apps take advantage of an iOS feature called notifications, which enables them to send messages and other data to your iPhone. For example, the Facebook app displays an alert on your iPhone when a friend sends you a message. Similarly, the Foursquare app, which lets you track where your friends are located, sends you a message when a friend checks in at a particular location.
If an app supports notifications, then the first time you start it, your iPhone usually displays a message like the one shown in Figure 2.2, asking if you want to allow notifications for the app. Tap OK if you’re cool with that; if you’re not, tap Don’t Allow.

2.2 Your iPhone lets you allow or disallow notifications for an app.
There are actually four kinds of notifications:
- Sound. This is a sound effect that plays when some app-related event occurs.
- Alert. This is a message that pops up on your iPhone screen. You must then tap a button to dismiss the message before you can continue working with your current app.
- Banner. This is a message that appears at the top of the screen. Unlike an alert, a banner allows you to keep using your current app and disappears automatically after a few seconds. If you prefer to switch to the app to view the message, tap the banner.
- Badge. This is a small, red icon that appears in the upper right corner of an app icon. The icon usually displays a number, which might be the number of messages you have waiting for you on the server.
Displaying the Notification Center
If you miss an alert or banner, or if you see a banner but ignore it, you can still eyeball your recent notification messages by displaying the Notification Center. This is a feature that combines all your recent alerts and banners in one handy location. So, not only can you see the most recent alert, but you can also see the last few so you don’t miss anything.
Even better, displaying the Notification Center is a snap — just swipe down from the top of the screen and then tap Notifications. The Notification Center displays your recent messages sorted by app. From here, you can either tap an item to switch to that app or swipe up from the bottom of the screen to hide the Notification Center.
Handling notifications within the Notification Center
Tapping a notification opens the associated app so that you can work with the item. For example, if the notification concerns a recently received email message, you might want to tap the notification to open Mail and read or delete the message. However, for simple actions (such as deleting an email), opening the app feels like overkill. Fortunately, the iOS 8 Notification Center can often save you a tap or two by enabling you to handle some notifications directly within the Notification Center.
You do this by swiping left on a notification. This reveals one or more buttons that you can tap to handle the notification. For example, if you swipe left on an email message, you see two buttons: Mark as Read and Trash (see Figure 2.3).

2.3 Swipe left on a notification to reveal one or more buttons that enable you to handle the item from within the Notification Center.
Customizing notifications
For each app, your iPhone also lets you toggle individual notification types (sounds, alerts, and badges), switch between banner and alert messages, or remove an app from the Notification Center altogether. You can also configure app notifications to appear in the Lock screen (with the Lock screen displayed, swipe down from the top of the screen to see the Notification Center). This is handy because you can see your notifications without having to unlock your iPhone.
Here’s how to configure app notifications:
- On the Home screen, tap Settings. The Settings app appears.
- Tap Notification Center. The Notification Center screen appears.
- Tap the app you want to customize. The app notification settings appear. Figure 2.4 shows the settings for the Game Center app. Note that not all apps support all possible settings.

2.4 Use each app’s notification settings to control notifications on your iPhone.
- To remove the app from the Notification Center, tap the Allow Notifications switch to Off.
- To set the maximum number of app messages that appear on the Notification Center, tap Show in Notification Center and then tap the number of messages.
- If the app supports sounds, use the Sounds switch to toggle this type of notification on or off.
- If the app supports badges, use the Badge App Icon switch to toggle this type of notification On or Off.
- Use the Show on Lock Screen switch to toggle whether the app’s notifications appear in the iPhone Lock screen.
- In the Alert Style section, tap the style you prefer for message notifications. Tap None to turn off alerts, or tap the style you want: Banners or Alerts.
- If you prefer to see alerts only from people you know, tap Show Alerts from My Contacts.
- Tap Notifications to return to the Notification Center screen.
- Repeat Steps 3 to 11 to customize each app.
Configuring Do Not Disturb settings
The Notification Center is a truly useful tool that helps you see what’s going on in your world at a glance and gives you a heads-up about activities, incoming messages, app happenings, and more. The Notification Center is a great innovation, but it’s also a distracting one with its banners, alerts, and sounds. If you’re in a meeting, at a movie, or going to sleep, you certainly don’t want your iPhone disturbing the peace. Most people handle this by activating Airplane mode, which turns off all the antennas on the iPhone. That ensures you’re distraction-free for a while, but it suffers from a major drawback: Without any working antennas, your iPhone can’t communicate with the world, so it doesn’t download messages or perform any other online activities. That might be what you want, but it’s less than optimum if you’re expecting something important.
iOS solves this conundrum by offering Do No Disturb mode, which silences all iPhone distractions — including Notification Center alerts and phone calls — but keeps your iPhone online so that it can continue to receive data. That way, when you’re ready to get back to the action, all your new data is already on your iPhone, so you can get back up to speed quickly.
You can get even more out of Do Not Disturb by configuring it to suit the way you work. Here are the steps to follow:
- Tap Settings to open the Settings app.
- Tap Do Not Disturb. The Do Not Disturb screen appears.
- To set a time to automatically activate and deactivate Do Not Disturb, tap the Scheduled switch to On. You then tap the From/To control; use From to set the start time and use to set the end time, then tap Do Not Disturb.
- If you want to allow certain calls even when Do Not Disturb is activated, tap Allow Calls From and then tap who you want to get through: Everyone, No One, Favorites (that is, anyone in the Phone app’s Favorites list), or a particular contact group.
- If you want Do Not Disturb to allow a call through when the same person calls twice within three minutes, leave the Repeated Calls switch in the On position. If you don’t want to allow this exception, tap the Repeated Calls switch to Off.
- If you want Do Not Disturb to handle calls and notifications normally (that is, non-silently) when your iPhone is unlocked, tap the Only While iPhone is Locked option.
More Useful iPhone Configuration Techniques
You’ve seen quite a few handy iPhone customization tricks so far, but you’re not done yet — not by a long shot. The next few sections take you through a few more heartwarmingly useful iPhone customization techniques.
Changing the name of your iPhone
When you first configure your iPhone, one of the chores you perform is giving it a custom name. This might sound frivolous, but there’s a good reason to give your iPhone a unique name. First, in Chapter 7, I explain that when you sync your iPhone, iTunes automatically creates a backup of the iPhone data. Each backup is identified by the name of the iPhone and the date the backup was performed. If you’re in an environment where the same copy of iTunes is used to sync multiple iPhones, giving each iPhone its own name enables you to differentiate between multiple iPhone backups.
Of course, feel free to rename your iPhone for the sake of giving it a cool or snappy name if the mood strikes. Here’s how:
- In the iPhone Home screen, tap Settings. The Settings screen appears.
- Tap General. The General settings appear.
- Tap About. The About page appears.
- Tap Name. The Settings app displays a text box with the current name of your iPhone inside.
- Edit the name as you see fit.
Turning sounds on and off
Your iPhone is often a noisy little thing that makes all manner of rings, beeps, and boops, seemingly at the slightest provocation. Consider a short list of the events that can give the lungs of your iPhone a workout:
- Incoming calls
- Incoming and outgoing email messages
- Incoming text messages
- New voicemail messages
- Outgoing tweets and Facebook posts
- Calendar and reminder alerts
- Locking and unlocking the phone
- Tapping the keys on the on-screen keyboard
What a racket! None of this may bother you when you’re on your own, but if you’re in a meeting, at a movie, or anywhere else where extraneous sounds are unwelcome, you might want to turn off some (or all) of the iPhone sound effects.
First, you should know that when a call comes in and you press the Sleep/Wake button once, your iPhone silences the ringer. That’s a sweet and useful feature, but the problem is that it may take you one or two rings before you can dig out your iPhone and press Sleep/Wake. By that time, folks nearby are already glaring at you.
To prevent this faux pas, you can switch your iPhone into silent mode, as I describe in Chapter 1, which means it doesn’t ring and it doesn’t play any alerts or sound effects. When the sound is turned off, the only alarms that are audible are the ones you’ve set using the Clock app. The phone still vibrates unless you also turn this feature off. If silent mode is a bit too drastic, you can control exactly which sounds your iPhone utters by following these steps:
- On the Home screen, tap Settings. The Settings app appears.
- Tap Sounds. The Sounds screen appears.
- The two switches in the Vibrate section determine whether your iPhone vibrates when the phone rings or is in silent mode. Vibrating probably isn’t all that important in ring mode, so feel free to change this setting to Off. The exception is if you reduce and/or lock the ringer volume (see Steps 4 and 5), in which case setting Vibrate on Ring to On might help you notice an incoming call. Vibrating in silent mode is a good idea, so On is a good choice for the Vibrate on Silent setting.
- In the Ringer and Alerts section, drag the volume slider to set the volume of the ringtone that plays when a call comes in.
- To lock the ringer volume, tap the Change with Buttons switch to Off. This means that pressing the volume buttons on the side of the iPhone will have no effect on the ringer volume.
- To set a different default ringtone, tap Ringtone to open the Ringtone screen. Tap the ringtone you want to use (iPhone plays a preview), and then tap Sounds to return to the Sounds screen.
- For each of the other events in the list (from Text Tone to Reminder Alerts), tap the event and then tap the sound you want to hear. You can also tap None to turn off the event sound.
- To turn off the sound that your iPhone makes when you lock and unlock it, tap the Lock Sounds switch to Off.
- To turn off the sound that your iPhone makes each time you tap a key on the virtual keyboard, tap the Keyboard Clicks switch to Off.
Customizing the keyboard
Although you can type on your iPhone, don’t expect to pound out the prose as easily as you can on your computer. The on-screen keyboard is a bit too small for rapid and accurate typing, but it’s still a far sight better than any other phone out there, mostly because the keyboard was thoughtfully designed by the folks at Apple. It even changes depending on the app you use. For example, the regular keyboard features a spacebar at the bottom. However, if you’re entering an email address in the Mail app, the keyboard that appears offers a smaller spacebar and uses the extra space to show an at sign (@) key and a period (.) key, two characters that are part of any email address. Nice!
Another nice innovation you get with the iPhone keyboard is Auto-Capitalization. If you type a punctuation mark that indicates the end of a sentence — for example, a period (.), a question mark (?), or an exclamation mark (!) — or if you press Return to start a new paragraph, the iPhone automatically activates the Shift key, because it assumes you’re starting a new sentence.
On a related note, double-tapping the spacebar activates a keyboard shortcut: Instead of entering two spaces, the iPhone automatically enters a period (.) followed by a space. This is a welcome bit of efficiency because otherwise you’d have to tap the Number key (123) to display the numbers and punctuation marks, tap the period (.), and then tap the spacebar.
For many people, one of the keys to quick iPhone typing is to clear the mind and just tap away without worrying about accuracy. In many cases, you’ll actually be rather amazed at how accurate this willy-nilly approach can be. Why does it work? The secret is the Auto-Correction feature on your iPhone, which eyeballs what you’re typing and automatically corrects any errors. For example, if you tap hte, your iPhone automatically corrects this to the. Your iPhone displays the suggested correction before you complete the word (say, by tapping a space or a comma), and you can reject the suggestion by tapping the typed text that appears with quotation marks in the predictive typing bar. If you find you never use the predictive suggestions, you can turn them off to save a bit of screen real estate.
One thing the iPhone keyboard doesn’t seem to have is a Caps Lock feature that, when activated, enables you to type all-uppercase letters. To do this, you need to tap and hold the Shift key, and then use a different finger to tap the uppercase letters. However, the iPhone actually does have a Caps Lock feature: Double-tap Shift to turn Caps Lock on, then tap Shift to turn Caps Lock off.
Finally, your iPhone also supports multiple keyboard layouts. This is great if you need to type in another language, but your iPhone also comes with an Emoji keyboard so that you can punctuate your writing with colorful and fun icons.
To change the settings for any of these keyboard features, follow these steps:
- On the Home screen, tap Settings. The Settings app appears.
- Tap General. The General screen appears.
- Tap Keyboard. The Keyboard screen appears.
- Use the Auto-Capitalization, Auto-Correction, Enable Caps Lock, Predictive, and “.” Shortcut switches to toggle these features off and on.
- To add an extra keyboard layout, tap Keyboards to open the Keyboards screen, tap Add New Keyboard, and then tap the keyboard layout you want to add (such as Emoji).
Creating text shortcuts
The Auto-Correction keyboard feature that I mentioned earlier can speed up your typing chores a tad because Auto-Correction displays predictive suggestions whenever it recognizes the word you’re currently typing. When the suggestion appears as the default in the predictive typing bar, tap a word-ending character, such as a space, comma, or period, and your iPhone automatically fills in the rest of the word.
Still, this is only marginally useful for speeding up typing because Auto-Correction plays it safe and usually waits until you have only a character or two left before it displays the suggested word. If you really want to shift your iPhone typing into a higher gear, you need to take advantage of the text shortcuts feature. If you’ve ever created a keyboard macro or used the AutoText feature in Microsoft Word, you’ll know exactly what’s happening here. A text shortcut is a short sequence of characters (usually just two or three) that represents a longer phrase. When you type the shortcut characters, your iPhone displays the phrase (much the same way that Auto-Correction does) and you then type a word-ending character to replace the shortcut characters with the entire phrase.
These phrases can be dozens or even hundreds of characters long, so if you have phrases or boilerplate that you use all the time, your iPhone typing fingers will thank you for saving them a ton of wear and tear. Here are the steps to follow to create a text shortcut:
- If you have the phrase you want to use somewhere on your iPhone, copy it. This saves some time later when you create your shortcut.
- On the Home screen, tap Settings. The Settings app appears.
- Tap General. The General screen appears.
- Tap Keyboard. The Keyboard screen appears.
- Tap Shortcuts and then tap Add New Shortcut (the + icon). The Shortcut screen appears.
- If you copied the phrase earlier, paste it into the Phrase text box. Otherwise, type the phrase.
- Use the Shortcut text box to type the characters you want to use to represent the phrase. The shortcut must be at least two characters long.
- Tap Save. Your iPhone saves the text shortcut.
Configuring Siri
Controlling a computer with just voice commands has been a mainstream dream ever since the first Star Trek series. OS X and Windows offer speech-recognition features, but few people use them because they’re difficult to configure and are more often than not frustrating to use. Third-party speech recognition programs are more powerful, but they tend to be expensive and still don’t work all that well.
The dream of voice control remains unfulfilled on desktop machines, but on the iPhone (that is, on every model since the iPhone 4s), voice control is a reality that comes in the form of the Siri app. Siri replaced the Voice Control feature from the iPhone 3Gs and 4, which was limited to placing phone calls and controlling the Music app with voice commands. Siri is one of the slickest iPhone features because it goes well beyond this by also giving you voice control over web searching, your appointments, your contacts, your reminders, map navigation, text messages, and notes. In iOS 8, Siri has been beefed up with lots of new features that enable you to retrieve the latest sport scores, get movie times in your area, book restaurant reservations, recognize (and even purchase) a song that's playing nearby, and more.
First, make sure that Siri is activated by tapping Settings in the Home screen, tapping General, tapping Siri, and then tapping the Siri switch to On. While you’re here, you should also tell Siri who you are, so that when you use references such as “home” and “work,” Siri knows what you’re talking about. In the Siri screen, tap My Info, and then tap your item in the Contacts list.
You crank up Siri by using any of the following techniques:
- Saying “Hey Siri” (for this to work, your iPhone must be connected to a power source).
- Pressing and holding the Home button.
- Pressing and holding the Mic button on your iPhone headphones.
- Pressing and holding the Mic equivalent on a Bluetooth headset.
In each case, wait until you hear a two-tone beep and you see the Siri screen.
Siri is often easier to use if you define relationships within it. So, for example, instead of saying “Call Sandy Evans,” you can simply say “Call mom.” You can define relationships in two ways:
- Within the Contacts app. Open the Contacts app, tap your contact item, tap Edit, tap Add Related Name, and then tap the relationship you want to use. Tap the blue More icon to open the All Contacts list and then tap the person you want to add to the field.
- Within Siri. Say “Name is my relationship,” where Name is the person’s name as given in your Contacts list, and relationship is the connection, such as wife, husband, spouse, partner, brother, sister, mother, or father. When Siri asks you to confirm, say “Yes.”
Signing in to your Facebook account
Much ink — both real and virtual — has been spilled in the past few years describing the technological juggernaut that is Facebook, with its hundreds of millions of users (probably more than a billion by the time you read this). While the world’s pundits and talking heads can’t seem to say enough about Facebook’s impact on the world, the rest of us just use it day in and day out to stay in touch with friends, family, colleagues, and college buddies. On your iPhone, this usually involves accessing the Facebook app. That’s fine, but it has long seemed odd that all your Facebook friends and events are separate from your other iPhone contacts and calendars, and that performing simple social tasks such as sharing a link or a photo required a few extra hoops to jump through.
However, iOS also comes with Facebook support built right in to the system. You can integrate your Facebook friends with the Contacts app, see Facebook events in the Calendar app, easily post links, photos, and other content to your Facebook Timeline, and even send simple status updates without having to load the Facebook app.
Here’s how to sign in:
- On the Home screen, tap Settings. The Settings app appears.
- Tap Facebook. The Facebook screen appears.
- Type your Facebook username or email address in the User Name text box.
- Type your account password in the Password text box.
- Tap Sign In. A screen appears with information about signing in to Facebook.
- Tap Sign In. Your iPhone connects to your Facebook account. It also prompts you to install the free Facebook iPhone app, so tap Later or Install, as you prefer.
- If you don’t want the Calendar app to display your Facebook events, tap the Calendar switch to Off.
- If you don’t want the Contacts app to display your Facebook friends, tap the Contacts switch to Off.
Using Siri to update Facebook
With Siri activated and configured and your iPhone signed in to your Facebook account, it’s time to combine these tools and use Siri to compose and send a Facebook status update. Here’s how it works:
- Use any of the methods I mentioned earlier to launch Siri.
- Say “Post to Facebook.” Siri responds with “OK...what would you like to say?” and displays the Facebook dialog, as shown in Figure 2.5.
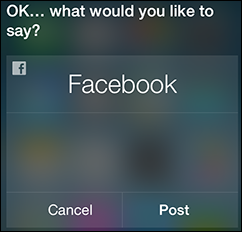
2.5 Siri is happy to pass along your status update to Facebook.
- Dictate your message. Siri processes the speech and then displays the text in the Facebook dialog.
- Say “Post.” Siri posts the status update to your Facebook account.
Signing in to your Twitter account
Twitter, that 140-characters-or-less phenomenon, started off by asking you the not-so-musical question, What are you doing? It’s a question that seems crafted to elicit nothing but the most trivial of replies: I just woke up; I’m having toast for breakfast; I’m in a boring meeting; I just finished dinner; I’m going to bed. But Twitter users took that original question and broadened it into a world of new questions: What are you reading? What great idea did you just come up with? What are you worried about? What interesting person did you just see or hear? What great information did you stumble upon on the web? What hilarious video would you like to share? Which is why, a few years ago, Twitter itself changed the original question from What are you doing? to What’s happening?
Of course, what’s most likely happening is that you’re working or playing with your iPhone, and you’ve got something to share with your Twitter followers: a link, a photo, a video, or what have you. Sharing such things has never been easier because Twitter is baked right into your iPhone. Once you sign in to your Twitter account using the Settings app, you can tweet stuff directly from apps such as Safari and Photos.
Here’s how to sign in:
- On the Home screen, tap Settings. The Settings app appears.
- Tap Twitter. The Twitter screen appears.
- Type your Twitter account name in the User Name text box.
- Type your account password in the Password text box.
- Tap Sign In. Your iPhone connects to your Twitter account. It also prompts you to install the free Twitter iPhone app, so tap Later or Install, as you prefer.
Using Siri to send a tweet
Earlier I showed you how to use Siri to post a Facebook status update, so it will come as absolutely no surprise that you can also use Siri to tweet. Follow these steps:
- Use any of the methods I mentioned earlier to launch Siri.
- Say “tweet” or “Twitter.” Siri responds with “OK...what would you like to say?” and displays the Twitter dialog.
- Dictate your message. Siri processes the speech and then displays the text in the Twitter dialog.
- Say “Send.” Siri posts the tweet to your Twitter account.
Controlling your privacy
Third-party apps occasionally request permission to use the data from another app. For example, an app might need access to your contacts, your calendars, your photos, or your Twitter and Facebook accounts. You can always deny these requests, of course, but if you’ve allowed access to an app in the past, you might later change your mind and decide you’d prefer to revoke that access. Fortunately, iOS offers a Privacy feature that enables you to control which apps have access to your data. Here’s how it works:
- On the Home screen, tap Settings to open the Settings app.
- Tap Privacy. The Privacy screen appears.
- Tap the app or feature for which you want to control access. Your iPhone displays a list of third-party apps that have requested access to the app or feature.
- To revoke a third-party app’s access to the app or feature, tap its switch to Off.
Resetting the iPhone
If you’ve spent quite a bit of time in the Settings app, your iPhone probably doesn’t look much like it did fresh out of the box. That’s okay, though, because your iPhone should be as individual as you are. However, if you’ve gone a bit too far with your customizations, your iPhone might feel a bit alien and uncomfortable. That’s okay, too, because there’s an easy solution to the problem: You can erase all your customizations and revert the iPhone to its default settings.
A similar problem that comes up is when you want to sell or give your iPhone to someone else. Chances are you don’t want the new owner to see your data — contacts, appointments, email and text messages, favorite websites, music, and so on — and it’s unlikely the other person wants to wade through all that stuff anyway (no offense). To solve this problem, you can erase not only your custom settings but also all the content you’ve stored on the iPhone.
The Reset app handles these scenarios and a few more to boot. Here’s how it works:
- On the Home screen, tap Settings. The Settings app appears.
- Tap General. The General screen appears.
- Tap Reset. The Reset screen appears.
- Tap one of the following reset options:
- Reset All Settings. Tap this option to reset your custom settings to the factory default settings.
- Erase All Content and Settings. Tap this option to reset your custom settings and remove any data you’ve stored on the iPhone.
- Reset Network Settings. Tap this option to delete your Wi-Fi network settings. This is often an effective way to solve Wi-Fi problems.
- Reset Keyboard Dictionary. Tap this option to reset your keyboard dictionary. This dictionary contains a list of the keyboard suggestions that you’ve rejected. Tap this option to clear the dictionary and start fresh.
- Reset Home Screen Layout. Tap this option to reset your Home screen icons to their default layout.
- Reset Location & Privacy. Tap this option to wipe out the location preferences for your apps. A location warning is the dialog you see when you start a GPS-aware app for the first time. When you start one of these, your iPhone asks if the app can use your current location, and you then tap either OK or Don’t Allow.
- When the iPhone asks you to confirm, tap the red button. Note that the name of this button is the same as the reset option. For example, if you tapped the Reset All Settings option in Step 4, the confirm button is called Reset All Settings. iPhone resets the data.
Protecting Your iPhone
These days, an iPhone is much more than just a phone. You use it to surf the web, send and receive email and text messages, manage your contacts and schedules, find your way in the world, and much more. This is handy, for sure, but it also means that your iPhone is jammed with tons of information about you. Even though you might not store the nuclear launch codes on your iPhone, chances are what is on it is pretty important to you. Therefore, you should take steps to protect your iPhone, and that’s what the next few sections are all about.
Locking your iPhone with a passcode
When your iPhone is asleep, the phone is locked in the sense that tapping the touchscreen or pressing the volume controls does nothing. This sensible arrangement prevents accidental taps when the phone is in your pocket, or rattling around in your backpack or handbag. To unlock the phone, you press either the Home button or the Sleep/Wake button, drag across the screen, and you’re back in business.
Unfortunately, this simple technique means that anyone else who gets his or her mitts on your iPhone can also be quickly back in business — your business! If you have sensitive or confidential information on your phone, or if you want to avoid digital joyrides that run up massive roaming or data charges, you need to truly lock your iPhone.
You do that by specifying a passcode that must be entered before anyone can use the iPhone. You can either set a simple four-digit passcode, or set one that is longer and more complex, using any combination of numbers, letters, and symbols. Follow these steps to set up your passcode:
- On the Home screen, tap Settings. The Settings app appears.
- Tap Touch ID & Passcode to open the Touch ID & Passcode screen. On the iPhone 5c or 5, tap Passcode Lock, instead.
- If you prefer to set a complex passcode, tap the Simple Passcode switch to Off.
- Tap Turn Passcode On. The Set Passcode screen appears.
- Tap your passcode. For security, the characters appear in the passcode box as dots.
- If you’re entering a complex passcode, tap Next. Your iPhone prompts you to reenter the passcode.
- Tap your passcode again.
- If you’re entering a complex passcode, tap Done.
With your passcode now active, iOS enables the following settings on the Passcode & Fingerprint screen:
- Turn Passcode Off. If you want to stop using your passcode, tap this button and then enter the passcode. This is for security (otherwise an interloper could just shut off the passcode).
- Change Passcode. Tap this button to enter a new passcode. Note that you must first enter your old passcode before you can enter the new one.
- Require Passcode. This setting determines how much time elapses before the iPhone locks the phone and requests the passcode. The default setting is Immediately, which means you see the Enter Passcode screen as soon as you finish dragging Slide to Unlock. The other options are After 1 minute, After 5 minutes, After 15 minutes, After 1 hour, and After 4 hours. Use one of the latter if you want to be able to work with your iPhone for a bit before getting locked out. For example, the After 1 minute option is good if you want to quickly check email without having to enter your passcode.
- Simple passcode. Use this switch to toggle between a simple four-digit passcode and a complex passcode.
- Voice Dial. When this setting is On, you can voice dial a call when your iPhone is locked.
- Allow Access When Locked. When the settings in this section are On, you can use these features — Today, Notifications View, Siri, Passbook, and Reply with Message — even when your iPhone is locked. If you change a setting to Off, you can no longer use that feature when your iPhone is locked.
- Erase Data. When this setting is On, your iPhone will self-destruct — er — I mean erase all its data when it detects ten incorrect passcode attempts. Ten failed passcodes almost always means that some nasty person has your phone and is trying to guess the passcode. If you have sensitive or private data on your phone, setting it to erase automatically is a good idea.
With the passcode activated, when you bring the iPhone out of standby, you drag across the screen as usual, and then the Enter Passcode screen appears. Type your passcode (and tap Done if it’s a complex passcode) to unlock the iPhone.
Unlocking your iPhone with a fingerprint
Protecting your iPhone with a passcode is just good sense in this age of so-called “iCrime,” where thieves routinely go “Apple picking” by snatching iPhones and other Apple devices from the unwary. With a passcode acting as a digital barrier between the crook and your iPhone, at least your personal data is safe from prying eyes. Yes, a passcode is a smart safety precaution, but it’s not always a convenient one. First, having to tap that four (or more) character code many times during the day adds a small but nevertheless unwelcome annoyance to using the iPhone. Second, because iOS, perhaps unwisely, highlights each character as you type your passcode, it’s at least theoretically possible that some shoulder-surfing snoop could discern your code.
But that’s the price of living in the big city, right? Not necessarily. If you have an iPhone 6 or 5s, help is but a fingertip (or thumbtip) away. I speak, of course, of Touch ID, the fingerprint sensor built into the Home button of the iPhone 6 and 5s. By teaching the device your unique fingerprint, you can unlock your phone merely by leaving your finger or thumb resting on the Home button. That’s right: No more passcode tapping to get to your Home screen. As an added bonus, you can use the same fingerprint to approve purchases you make in the iTunes Store, the App Store, the iBooks Store, and even some third-party apps, so you no longer have to enter your Apple ID password.
Here’s how to set up Touch ID:
- On the Home screen, tap Settings. The Settings app appears.
- Tap Touch ID & Passcode and then type your passcode (if you have one) to open the Touch ID & Passcode screen.
- Tap Add a Fingerprint. The Touch ID screen appears.
- Lightly rest your thumb — or whatever finger you most often use to press the Home button when you’re unlocking your iPhone — on the Home button.
- Repeatedly lift and place your finger as Touch ID learns your fingerprint pattern.
- When you see the Adjust Your Grip screen, tap Continue.
- Once again, repeatedly lift and place your finger, this time emphasizing the edges of the finger.
- When you see the Complete screen, tap Continue. If you haven't yet specified a passcode, your iPhone prompts you to do so now.
- Tap your passcode and then tap it again when you're asked to confirm. Settings returns you to the Touch ID & Passcode screen.
- If you want to use your fingerprint to unlock your iPhone, tap the iPhone Unlock switch to On.
- If you want to use your fingerprint to approve iTunes Store, App Store, and iBooks Store purchases, tap the iTunes and App Store switch to On, then enter your Apple ID password.
- To specify another fingerprint, repeat Steps 3 to 8.
Here’s how you use Touch ID:
- Unlock your iPhone. Use your fingerprint-scanned finger to tap the Home button to wake the phone, then leave the same finger resting on the Home button until the Home screen appears.
- Make a purchase. In the iTunes Store, the App Store, or the iBooks Store, tap the price of the item you want to buy, and then tap the Buy button. When the Touch ID dialog appears, rest your finger on the Home button until the purchase is approved.
Configuring your iPhone to sleep automatically
You can put your iPhone into standby mode at any time by pressing the Sleep/Wake button once. However, if your iPhone is on but you’re not using it, it automatically goes into standby mode after two minutes. This is called Auto-Lock and it’s a handy feature because it saves battery power (and prevents accidental taps) when your iPhone is just sitting there. It’s also a crucial feature if you’ve protected your iPhone with a passcode lock, as I describe earlier, because if your iPhone never sleeps, it never locks, either.
To make sure your iPhone sleeps automatically, or if you’re uncomfortable with the default Auto-Lock interval, you can make it shorter or longer (or turn it off altogether). Here are the steps to follow:
- On the Home screen, tap Settings. The Settings app appears.
- Tap General. The General screen appears.
- Tap Auto-Lock. The Auto-Lock screen appears.
- Tap the interval you want to use. You have six choices: 1 Minute, 2 Minutes, 3 Minutes, 4 Minutes, 5 Minutes, or Never.
Backing up your iPhone
When you sync your iPhone with your computer, iTunes automatically creates a backup of your current iPhone data before performing the sync. Note, however, that iTunes doesn’t back up your entire iPhone, which makes sense because most of what’s on your phone — music, photos, videos, apps, and so on — is already on your computer. Instead, iTunes backs up only data unique to the iPhone, including your call history, text messages, web clips, network settings, app settings and data, and Safari history and cookies.
However, what if you’ve configured iTunes not to sync your iPhone automatically? Is there a way to back up your iPhone without performing a sync? You bet there is:
- Connect your iPhone to your computer.
- Open iTunes, if it doesn’t launch automatically.
- In the Devices list, click your iPhone.
- Click the Summary tab.
- Click Back Up Now. iTunes backs up the iPhone data.
If you have an iCloud account, you can also control where your iPhone gets backed up: to your computer or to iCloud. To configure this, connect your iPhone to your computer and then click your iPhone when it appears in the Devices list. In the Summary tab’s Automatically Back Up section, select either iCloud or This Computer.
You can then follow these steps to back up your data to iCloud directly from your iPhone:
- Connect your iPhone to a Wi-Fi network. iPhone-to-iCloud backups don’t work if your iPhone is running using a cellular network connection.
- Tap Settings to launch the Settings app.
- Tap iCloud.
- Tap Backup.
- Check that the iCloud Backup switch is On. If not, tap the switch to On and then tap OK when iCloud confirms the setting. This tells your iPhone to make automatic backups whenever it is locked, connected to a Wi-Fi network, and plugged in to a power source.
- Tap Back Up Now. Your iPhone backs up its data to your iCloud account.
Configuring parental controls
If your children have access to your iPhone, or if they have iPhones of their own, then you might be a bit worried about some of the content they might be exposed to on the web, on YouTube, or in iTunes. Similarly, you might not want them installing apps or giving away their current location.
For all those and similar parental worries, you can sleep better at night by activating the parental controls on your iPhone. These controls restrict the content and activities that kids can see and do. Here’s how to set them up:
- On the Home screen, tap Settings. The Settings app appears.
- Tap General. The General screen appears.
- Tap Restrictions. The Restrictions screen appears.
- Tap Enable Restrictions. iPhone displays the Enable Restrictions screen, which you use to specify a four-digit code that you can use to override the parental controls. (Note that this code is not the same as the passcode lock that I discuss earlier in this chapter.)
- Tap the four-digit restrictions passcode and then retype the code. iPhone returns you to the Restrictions screen and enables all the controls, as shown in Figure 2.6.
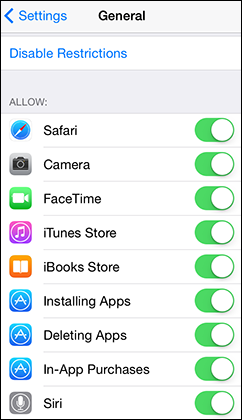
2.6 Use the Restrictions screen to configure the parental controls you want to use.
- In the Allow section, for each app or task, tap the On/Off switch to enable or disable the restriction.
- Under Allowed Content, tap Ratings For and then tap the country with the ratings you want to use.
- For each of the content controls — Music & Podcasts, Movies, TV Shows, Books, Apps, Siri, and Websites — tap the control and then tap the highest rating you want your children to use.
- If you don’t want your children to be able to make purchases within apps, tap Require Password and then tap Immediately. This ensures that your children must type a password before they can make in-app purchases. If you leave the Require Password setting at 15 minutes, it means your kids can make in-app purchases without a password for up to 15 minutes after the initial purchase of the app.
- If you don’t want your children to make changes to certain settings, tap the corresponding setting types in the Privacy section and then tap Don’t Allow Changes.
- If you don’t want your children to make changes to the current mail, calendar, or contacts account settings, tap Accounts under Allow Changes, and then tap Don’t Allow Changes.
- If you don’t want your children to adjust the maximum volume limit you’ve set (as explained in Chapter 8), tap Volume Limit, and then tap Don’t Allow Changes.
- In the Game Center section, tap the On/Off switches to enable or disable multiplayer games, and to enable or disable adding friends.
Locating and protecting a lost iPhone
If there’s a downside to using a smartphone (particularly one as smart as the iPhone), it’s that you end up with a pretty large chunk of your life on that phone. Initially, that may sound like a good thing, but if you happen to lose your phone, you’ve also lost that chunk of your life. Plus, assuming you haven’t configured your iPhone with a passcode lock, as described earlier, you’ve opened a gaping privacy hole because anyone can now delve into your data.
If you’ve been syncing your iPhone with your computer regularly, then you can probably recover most, or even all, of that data. However, I’m sure you’d probably rather find your iPhone because it’s expensive and there’s just something creepy about the thought of some stranger flicking through your stuff.
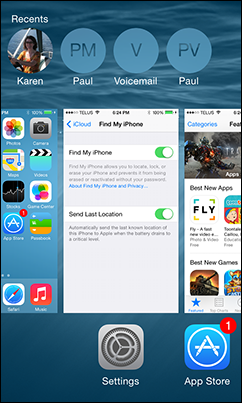
The old way of finding your missing iPhone consisted of scouring every nook and cranny that you visited before losing it, and calling up various lost-and-found departments to see if anyone turned it in. The new way to find your iPhone is via an app called Find My iPhone. (You can also use this feature through your iCloud account, if you have one.) Find My iPhone uses the GPS sensor embedded inside your iPhone to locate the device. You can also use Find My iPhone to play a sound on your iPhone, remotely lock it and send a message, or, in a real pinch, remotely delete your data. The next few sections provide the details.
Activating Find My iPhone
Find My iPhone works by looking for a particular signal that your iPhone beams out into the ether. This signal is turned off by default, so you need to turn it on if you ever plan to use Find My iPhone. Here are the steps to follow:
- Add your iCloud account, if you haven’t done so already, as described in Chapter 13. When you add the account, be sure to tap OK when iCloud asks if it can use your location.
- On the Home screen, tap Settings. The Settings app appears.
- Tap iCloud. Your iCloud account settings appear.
- Tap Find My iPhone. The Find My iPhone screen appears.
- Tap the Find My iPhone switch to On. Your iPhone asks you to confirm.
- Tap OK. Your iPhone activates the Find My iPhone feature.
With Find My iPhone now active on your iPhone, you can use the Find My iPhone app or iCloud to locate it at any time. The next two sections show you how to do this.
Locating your iPhone using the Find My iPhone app
Follow these steps to see your lost iPhone on a map using the Find My iPhone app:
- On an iPhone, iPad, or iPod touch that has the Find My iPhone app installed, tap the app to launch it. Find My iPhone prompts you to sign in with your Apple ID.
- Type your Apple ID and password. Note that you must use the same Apple ID as the one you used to activate the Find My iPhone setting on your iPhone.
- Tap Go. The app signs in to your Apple account.
- In the list of devices, tap your lost iPhone. The Find My iPhone app locates the iPhone on a map, as shown in Figure 2.7.

2.7 In the list of devices, tap your iPhone to locate it on a map.
- To see if the location has changed, tap the Refresh Location button (the circular arrow).
Locating your iPhone using iCloud
Follow these steps to see your lost iPhone on a map using iCloud:
- Log in to your iCloud account.
- Click Find My iPhone. The iCloud Find My iPhone application appears.
- Click All Devices. iCloud displays the My Devices list.
- Click your iPhone in the list. iCloud locates your iPhone on a map.
- To see if the location has changed, click the location and then click the Refresh Location button (the circular arrow).
Getting an email message when your iPhone comes online
Find My iPhone is only useful if you can, you know, find your iPhone. That won’t happen if your iPhone is powered off or not connected to the Internet. You could keep refreshing the list of devices, but it could be hours before your iPhone comes online. To avoid a constant vigil, you can tell Find My iPhone to send an email message to your iCloud account as soon as your iPhone comes online:
- Display the My Devices list.
- Tap or click your iPhone in the devices list. Find My iPhone displays information about your iPhone.
- If Find My iPhone has no location data for your iPhone, select Notify When Found.
Playing a sound on your iPhone
If you misplace your phone, the first thing you should try is calling your number using another phone so you can (hopefully!) hear it ringing. That might not work, however, because your phone might have Ring/Silent switched to silent mode, it might be in Airplane mode, or you might not have another phone handy. In any case, you only get so many rings before the call goes to voicemail, so unless you locate your phone right away, calling your number isn’t always the best solution.
Your next step when looking for a lost iPhone is to use Find My iPhone to play a sound on your phone. This sound plays even if your iPhone is in silent mode or Airplane mode, and it plays loudly even if your iPhone has its volume turned down or muted. Here’s how it works:
- Display the My Devices list.
- Tap or click your iPhone in the list. Find My iPhone locates your iPhone on a map.
- Tap or click Play Sound. Find My iPhone begins playing the sound on your iPhone and it also displays the alert shown in Figure 2.8.

2.8 Find My iPhone also displays this alert on your iPhone.
- When you find your iPhone (fingers crossed), tap the alert to silence the sound.
Locking the data on your lost iPhone
If you can’t find your iPhone right away by playing a sound, your next step should be to ensure that some other person who finds the phone can’t rummage around in your stuff. You do that by putting your iPhone into lost mode, which remotely locks the iPhone using the passcode that you set earlier. (Sorry, if you didn’t protect your iPhone with a passcode, you can’t remotely lock your phone.) You can also provide a phone number where you can be reached and send a message for whoever finds your iPhone. Follow these steps to put your iPhone into lost mode:
- Display the My Devices list.
- Tap or click your iPhone in the list. Find My iPhone locates your iPhone on a map.
- Tap or click Lost Mode. Find My iPhone displays the Lost Mode dialog, which prompts you for a phone number where you can be reached.
- Type your phone number and then click Next. Find My iPhone prompts you to type a message that will appear on the iPhone along with the phone number.
- Type the message and then tap or click Done. Find My iPhone remotely locks the iPhone and displays the message, as shown in Figure 2.9.
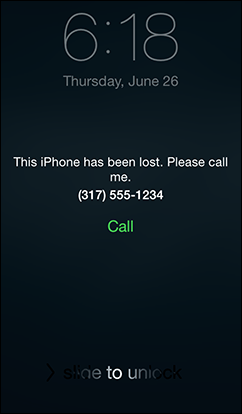
2.9 After you remotely lock your lost iPhone, Find My iPhone displays your message on the lock screen.
Deleting the data on your lost iPhone
If you can’t get the other person to return your iPhone and it contains sensitive or confidential data — or just that big chunk of your life I mentioned earlier — you can use the Find My iPhone app or the iCloud Find My iPhone feature to take the drastic step of remotely wiping all the data from your iPhone. Here’s what you do:
- Display the My Devices list.
- Tap or click your iPhone in the list. Find My iPhone locates your iPhone on a map.
- Tap or click Erase iPhone. Find My iPhone asks you to confirm.
- Tap or click Erase. Find My iPhone prompts you for your Apple ID password.
- Type your password and then tap or click Next. Find My iPhone asks you to enter an optional phone number where you can be reached, which will appear on the iPhone after it has been erased.
- Type your phone number, and then select Next. Find My iPhone prompts you to type a message that will appear on the iPhone along with the phone number, after it has been erased.
- Type the message, and then tap or click Done. Find My iPhone remotely wipes all data from the iPhone.
Enhancing Your iPhone with Apps
Your iPhone is an impressive, eyebrow-raising device right out of the box. It does everything you want it to do — or so you think, until you find out about some previously unknown feature and wonder how you ever lived without it. It’s hard to imagine that anyone would, or even could, improve the iPhone. However, as you see in this section, the App Store can make your iPhone more convenient, more productive, and more, well, anything!
Accessing the App Store on your computer
You’ve seen that your iPhone comes loaded not only with a basketful of terrific technology but also a decent collection of truly amazing apps, all of which take advantage of the special features on your iPhone. But it probably also won’t escape your notice that the iPhone suite of apps is incomplete. Where are the news and sports headlines? Why isn’t there an easy way to post a short note to your blog or a photo to your Tumblr account?
Fortunately, it’s possible to fill in these and many other gaping iPhone app holes with the App Store. You browse and purchase apps in the App Store the same way that you browse and purchase music in the iTunes Store — although many apps are free for the downloading. You can even use the familiar iTunes software on your Mac or Windows PC, or you can connect to the App Store directly from your iPhone, which is explained later.
To access the App Store on your computer, follow these steps:
- Launch iTunes.
- Click iTunes Store. The iTunes Store interface appears.
- Click App Store. iTunes loads the main App Store page.
- Click the iPhone tab. iTunes loads the iPhone version of the App Store page.
From here, use the links to browse the apps, or use the iTunes Store search box to look for something specific.
Accessing the App Store on your iPhone
Getting apps from iTunes is great, but what if you’re away from your desk and you hear about an amazing iPhone game, or you realize that you forgot to download an important app using iTunes? This isn’t even remotely a problem because your iPhone can establish a wireless connection to the App Store anywhere you have Wi-Fi access or a cellular signal (ideally LTE or 3G for faster downloads). You can browse and search the apps, check for updates, or purchase any app you want (unless it’s free, of course). The app then downloads to your iPhone, installs itself on the Home screen, and you’re good to go!
To access the App Store on your iPhone, tap the Home button to return to the Home screen and then tap the App Store icon.
As you can see in Figure 2.10, your iPhone organizes the App Store similar to the iTunes Store (as well as the Music app). That is, you get five browse buttons in the menu bar: Featured, Top Charts, Near Me, Search, and Updates. You use these buttons to navigate the App Store.

2.10 Use the browse buttons in the App Store menu bar to locate and manage apps for your iPhone.
Here’s a summary of what each browse button does for you:
- Featured. Tap this button to display a list of videos picked by the App Store editors. The list shows each app’s name, icon, category, and price. Tap New & Noteworthy to see the latest apps and tap Categories to see a list of app categories, such as Games and Newsstand. Tap a category to see a list of the apps that are available.
- Top Charts. Tap this button to see three lists of the most downloaded apps: Paid, Free, and Grossing (that is, the apps that have generated the most revenue).
- Near Me. Tap this button to see a list of apps that are popular in and around your current location.
- Search. Tap this button to display a Search text box. Tap inside the box, enter a search phrase, and then tap Search. The App Store sends back a list of apps that match your search term.
- Updates. Tap this button to install updated versions of your apps.
Syncing apps
After you download an app or two into iTunes, they won’t do you much good just sitting there. To actually use the apps, you need to get them on your iPhone. Here’s how:
- Connect your iPhone to your computer. iTunes opens and accesses the iPhone.
- In iTunes, click your iPhone in the Devices list.
- Click the Apps tab.
- In the app list, click Install beside each app that you want to sync.
- Click Apply. iTunes syncs the iPhone using your new app settings.
Multitasking apps
Your iPhone is capable of multitasking, which enables you to run multiple apps at the same time. This is useful if, say, you’re playing a game and an email message comes in. You can switch to the message, read it, respond to it, and then resume your game right where you left off.
At its most basic, multitasking on the iPhone means that whenever you run an app and then switch to another app, your iPhone keeps the first app running in the background. In most cases, the first app does nothing while it’s in the background — it doesn’t take any processor time away from your current app and it doesn’t use battery power. This means that you’re free to open as many apps as you like. However, if the first app is performing some task and you switch to another app, the first app continues to perform the task in the background.
To get a firm grip on how iPhone multitasking works, you need to understand the three modes an app can have on the iPhone:
- Closed State. This mode means the app is completely shut down. If you reboot your iPhone (by turning it off and then back on), all your apps are then in the Closed State.
- Suspended State. If you launch an app, then press the Home button to return to the Home screen, usually your iPhone places the running app into the Suspended State. This means the app remains loaded into memory, but it’s not running, it’s not using up processor time, and it’s not draining the battery. However, the app still maintains its current conditions, so that when you return to it, the app resumes where you left off.
- Background State. If you launch an app, start some process such as playing music, and then press the Home button to return to the Home screen, your iPhone puts the app into the Background State, which means it keeps the app’s process running in the background. When you return to the app, either you see the process still running or it has been completed.
I should note, as well, that the vast majority of apps go into the Suspended State when you switch to another app. However, if you launch an app and your iPhone doesn’t have enough free memory available, the iPhone starts putting suspended apps into the Closed State to free up memory.
So how do you switch from one app to another? Double-click the Home button (that is, press the Home button twice in succession) to reveal the multitasking screen, which displays the running apps, as shown in Figure 2.11. Flick left or right to bring the app icon into view and then tap the app to switch to it.
2.11 Double-tap the Home button to see the running apps.
Using Siri to launch an app
One of the main complaints about the initial incarnation of Siri, the voice-activated iPhone assistant, was that you couldn’t use it to launch apps. True, that’s not a big deal if you have just a couple of Home screens to flick through, but if you’re rocking your iPhone with dozens of apps, Siri is a great way to avoid the drudgery of scrolling through a bunch of screens to locate the app you want.
Fortunately, that shortcoming was overcome in iOS 6, and Siri now lets you launch any app on your iPhone by using any of the following verbs: “launch,” “run,” “open,” or “start,” followed by the name of the app. Here are some examples:
- “Launch Safari.”
- “Run Photos.”
- “Open Settings.”
- “Open Wi-Fi Settings.”
- “Start Notes.”