Choosing the format and settings for burning a disc
Burning an audio CD, an MP3 CD, or a data DVD
Locating and backing up files in the iTunes library
Backing up your entire iTunes library
You might think that your digital content is safe, stored as-is, on your iPod, iPhone, Apple TV, and hard drive. However, demons in the night are working overtime to render your hard drive useless — and at the same time, someone left your iPod out in the rain, your iPhone can't phone home, and your Apple TV is on the fritz.
Copyright law and common sense prohibit you from using copyrighted content and then selling it to someone else. However, with iTunes, you're allowed to make copies of music, videos, audio books, and podcasts that you own for personal use, including copies for backup purposes.
This chapter boils down everything you need to know about burning your own discs to make copies of your content. I burn audio CDs or MP3 CDs to make safety copies of songs I buy from the iTunes Store. I also like to custom-mix songs from different artists and albums onto an audio or MP3 CD.
I burn data DVDs to back up my video files — and I also copy my entire iTunes library to another hard drive as a backup, as I describe in this chapter. This operation is very important, especially if you've purchased items that don't exist anywhere else in your collection but on your computer. That way, even if your hard drive fails, you still have your iTunes library.
Note
To find out how to consolidate media files into one library, how to manage multiple iTunes libraries for easier synchronization with multiple devices, and how to move a library from one computer to another (such as a PC to a Mac or vice versa), visit this book's companion Web site.
Note
You should not rely on your iPod, iPhone, or Apple TV as your sole music storage device or as a backup for your iTunes library. Although purchases you make with your iPod touch or iPhone are copied back to your iTunes library, you can't copy any other content from your iPod, iPhone, or Apple TV to your computer via iTunes. It's a one-way trip from iTunes to your iPod, iPhone, or Apple TV because record labels and video distributors don't want indiscriminate copying, and Apple has complied with these requests. You can, however, use third-party utility programs (not supported by Apple) to copy content both ways.
Note
To find out more about third-party utility programs for managing your iPod or iPhone, visit the Tips section of my Web site (www.tonybove.com).
The iTunes Store uses Apple FairPlay technology for some content (such as commercial movies and TV Shows), which protects the rights of copyright holders while also giving you some leeway in using the copyrighted content. But you can still copy the media files freely so that backup is easy and straightforward on either a Mac or a PC.
Warning
Do not violate copyright law. You're allowed to copy content for your own use, but you cannot legally copy content for any other purpose. Consult a lawyer if you're in doubt.
Once upon a time, when vinyl records were popular, rock radio disk jockeys (who didn't like disco) held disco-meltdown parties. People were encouraged to throw their disco records onto a pile to be burned or steamrolled into a vinyl glob. I admit that I shamelessly participated in one such meltdown. However, this section isn't about that. Rather, burning a disc is the process in which the CD drive recorder's laser heats up points on an interior layer of the disc to record information.
If you have a CD-R, CD-RW, or DVD-R drive (such as the Apple SuperDrive for a Mac) and a blank CD-R (R stands for recordable), you can burn music, audio books, and audio podcast episodes on audio CDs that play in most CD players. You can fit up to 74 minutes of music on a high-quality audio-format CD-R; most can go as high as 80 minutes.
Blank audio CD-Rs (I'm talking discs now and not drives) are available in stores that carry consumer electronics. You can also get them online from the Apple Store (not the music store — the store that sells computers and accessories). Choose iTunes
You can also burn an audio CD-R of song files in the MP3 format, which is useful for backing up a music library or making discs for use in MP3 CD players. You can play MP3 files burned on a CD-R in MP3 format on any MP3 disc player, on combination CD/MP3 players, on many DVD players, and (of course) on computers that recognize MP3-formatted CDs (including computers with iTunes). An MP3-formatted CD-R can hold more than 12 hours of music. You read that right — 12 hours on one disc. This is why MP3 discs are popular: because they are essentially CD-Rs with MP3 files stored on them.
If you have a DVD burner, such as an Apple SuperDrive, you can burn data discs in the DVD-R or DVD-RW format to use with other computers. This approach is suitable for making backup copies of media files (or any data files). A DVD-R can hold about 4,700,000,000 bytes (more than 4GB).
To burn a CD (actually a CD-R, but most people refer to recordable CD-R discs as CDs), you must first define a playlist for the CD. (See Chapter 14 to find out how to create a playlist.) You can use songs encoded in any format that iTunes supports; however, you get higher-quality music with the uncompressed AIFF and WAV formats or with the Apple Lossless format. (You can back up your library to DVD without creating a playlist, as I describe in the section "Backing up to DVD-Rs or CD-Rs," later in this chapter.)
If your playlist includes music purchased from the iTunes Store in the older protected AAC-encoding format (before 2009), some rules might apply. You can burn seven copies of the same playlist containing protected songs to an audio CD, but no more. As of this writing, all music you purchase in the store is in the newer unprotected iTunes Plus format, with no limit on burning discs.
Tip
You can get around this limitation by creating or using a new playlist, copying the protected songs to the new playlist, and then burning more CDs with the new playlist.
When you create an audio CD playlist, you can calculate how many songs can fit on the CD by totaling the durations of the songs. You can see the size of a playlist by selecting it; the bottom of the iTunes window shows the number of songs, the duration of the songs, and the amount in megabytes for the selected playlist. Click the duration to see a more precise total time for the playlist, as shown in Figure 15-1.
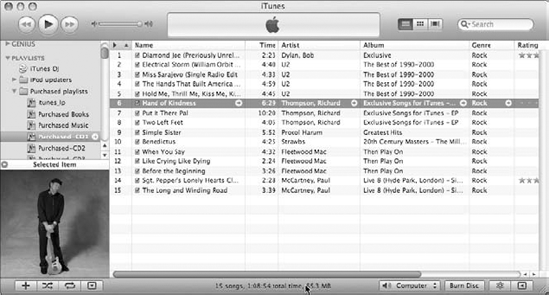
In Figure 15-1, the selected playlist takes about 1.1 hours (1:08:54, to be precise) to play, so it fits on a standard audio CD. (The 15 songs take up only 65.3MB of hard drive space; they were purchased from the iTunes Store.)
Note
A one-hour playlist of AIFF-encoded music, which occupies over 600MB of hard drive space, also fits on a standard audio CD. You calculate the amount you can fit on a standard audio CD using the duration, not the hard drive space occupied by the music files. Although a CD holds between 650MB and 700MB (depending on the disc), the music is stored in a special format known as CD-DA (or Red Book) that fills byte sectors without error-correction and checksum information. Thus, you can fit about 90MB more — 740MB total — of AIFF-encoded music on a 650MB disc. I typically put 1.1 hours (about 66 minutes) of music on a 74-minute or an 80-minute CD-R, leaving minutes to spare.
Note
Always use the actual duration in hours, minutes, and seconds to calculate how much music you can fit on an audio CD — either 74 or 80 minutes for blank CD-Rs. I recommend leaving at least one extra minute to account for the gaps between songs.
You do the opposite for an MP3 CD or a data DVD. Use the actual megabytes to calculate how many song files can fit on a disc — up to 700MB for a blank CD-R. You can fit lots more music on an MP3 CD-R because you use MP3-encoded songs rather than uncompressed AIFF songs.
If you have too many songs in the playlist to fit on a CD, iTunes gives you the option to cancel the burn operation, or to burn as many songs in the playlist as will fit on the CD (either audio or MP3). Then it asks you to insert another CD to continue burning the remaining songs in the playlist.
Before you rip an audio CD of songs that you want to burn to an audio CD-R, you might want to change the import settings (as I describe in Chapter 8). Use the AIFF, WAV, or Apple Lossless encoders for songs from audio CDs if you want to burn your own audio CDs with music at its highest quality. You can also burn MP3-encoded songs on an audio CD, but the quality is not as good as with AIFF, WAV, or Apple Lossless.
AIFF is the standard digital format for uncompressed sound on a Mac, and you can't go wrong with it. WAV is basically the same thing for Windows. The Apple Lossless encoder provides CD-quality sound in a file size that's about 55 to 60 percent of the size of an AIFF- or WAV-encoded file. Both the AIFF encoder and the WAV encoder offer the same custom settings for sample rate, sample size, and channels, which you can set by choosing Custom from the Settings pop-up menu in the Importing section of the Advanced pane of iTunes Preferences. You can choose the automatic settings, and iTunes detects the proper sample rate, size, and channels from the source. Apple Lossless is always set to automatic.
Note
The songs you purchase from the iTunes Store are supplied in an unprotected format encoded in AAC that carries no restrictions. (The format is also known as iTunes Plus.) However, you may still have songs in the older protected AAC format in use up until 2009. You can't convert the protected format to anything else, but you can still burn the songs onto CDs, and the quality of the result on CD is acceptable. Audio books also come in a protected format that can't be converted by iTunes, but you can burn them onto CDs with acceptable quality.
The AAC encoder creates an audio file that is similar in audio quality to one created by the MP3 encoder but takes up less space; both are acceptable to most CD listeners. I think AAC offers a decent trade-off of space and quality and is suitable (although not as good as AIFF or Apple Lossless) for burning to an audio CD.
Note
For a complete description of these encoders, visit this book's companion Web site.
MP3 discs are essentially CD-Rs with MP3 files stored on them. Consumer MP3 CD players are readily available in consumer electronics stores, including hybrid models that play both audio CDs and MP3 CDs.
You can fit 8–12 hours of stereo music on an MP3 CD with the MP3 format — the amount varies depending on the encoding options and settings you choose. For example, you might be able to fit up to 20 hours of mono (monaural) recordings because they use only one channel and carry less information. On the other hand, if you encode stereo recordings at high bit rates (above 192 bits per second), you may fit up to 9 hours.
Warning
You can use only MP3-encoded songs to burn an MP3 CD-R. Any songs not encoded in MP3 are skipped and not burned. Audible books and commercial spoken-word titles are typically provided in an audio format that uses security technologies, including encryption, to protect purchased content; however, you can include anything that is encoded in MP3, including audio books from other sources. But you can't burn an MP3 CD-R with Audible files; any Audible files in a burn playlist are skipped when you burn an MP3 CD-R.
Burning a CD is a simple process, and getting it right the first time is a good idea because when you burn a CD-R, it's done — right or wrong. You can't erase content and reuse a CD-R. Fortunately, CD-Rs are inexpensive, so you won't be out more than a few cents if you burn a bad one. (Besides, they're good as coasters for coffee tables.)
Follow these steps to burn a disc:
Select the playlist and then click the Burn Disc button.
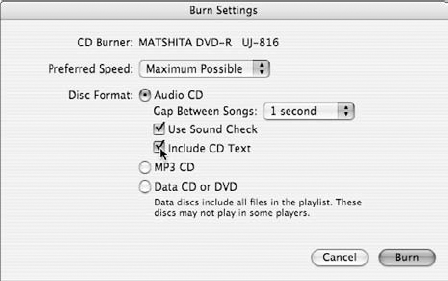
The Burn Disc button appears in the lower-right corner of the iTunes window whenever you select a playlist (refer to Figure 15-1). After clicking Burn Disc, the Burn Settings dialog appears, as shown in Figure 15-2.
Select options in the Burn Settings dialog and click the Burn button.
See the following section for instructions on selecting these important options.
Insert a blank disc (label side up).
iTunes immediately checks the media and begins the burn process, displaying a progress bar and the names of the songs burning to the disc.
Note
If you chose the MP3 CD format, iTunes skips over any songs in the playlist that aren't in this format.
When iTunes finishes burning the disc, iTunes chimes, and the disc is mounted on the Desktop.
Eject the newly burned disc from your drive and then test it.
Don't delete your burn playlist yet.
You can read why in the later section "Troubleshooting burns."
Burning takes several minutes. You can cancel the operation at any time by clicking the X next to the progress bar, but canceling the operation isn't like undoing the burn. If the burn has already started, you can't use that CD-R or DVD-R again.
If the playlist has more music than can fit on the disc using the chosen format, iTunes asks whether you want to create multiple audio CDs with the playlist. If you choose to create multiple audio CDs, iTunes burns as many full songs as possible from the beginning of the playlist and then asks you to insert another disc to burn the rest. To calculate the amount of music in a playlist, see the earlier section "Calculating how much music to use."
Tip
Spoken-word fans: Audible audio books with chapter markers are burned onto a CD with each chapter as a separate track.
Set the following options in the Burn Settings dialog to ensure that you burn your CD right the first time (refer to Figure 15-2):
Preferred Speed: Choose a specific recording speed or the Maximum Possible option from the Preferred Speed pop-up menu. iTunes typically detects the rating of a blank CD-R and adjusts the recording speed to fit. However, if your blank CD-Rs are rated for a slower speed than your burner or if you have problems creating CD-Rs, you can change the recording speed setting to match the CD's rating.
Disc Format: The disc format is perhaps the most important choice you have to make. Decide whether you're burning an audio CD (CD-R), an MP3 CD (CD-R), or a Data CD (CD-R) or DVD (DVD-R or DVD-RW). Your choice depends on what type of player you're using or whether you're making a data backup of files rather than a disc that plays in a player. Choose one of the following:
Audio CD: Burn a normal audio CD of up to 74 or 80 minutes (depending on the type of blank CD-R) using any iTunes-supported music files, including songs bought from the iTunes Store. Although connoisseurs of music might use AIFF- or WAV-encoded music to burn an audio CD, you can also use songs in the AAC and MP3 formats.
MP3 CD: Burn an MP3 CD with songs encoded in the MP3 format. No other formats are supported for MP3 CDs.
Data CD or DVD: Burn a data CD-R, CD-RW, DVD-R, or DVD-RW with music files. You can use any encoding formats for the songs. Important: Data discs won't play on most consumer CD players: They're meant for use with computers. However, data discs are good choices for storing backup copies of music bought from the iTunes Store.
Gap between Songs: You can add an appropriate gap between songs, just like commercial CDs. With this option enabled, you can set the gap time as well. You can choose from a gap of 0 to 5 seconds, or None. I recommend leaving the menu set to the default setting of 2 seconds for playlists of studio-recorded songs, and None for concerts and songs recorded live. Albums and song selections that you set to be gapless (see Chapter 8) will likewise be gapless if you set the Gap between Songs option to None.
Use Sound Check: Musicians do a sound check before every performance to check the volume of microphones and instruments and their effect on the listening environment. The aptly named Use Sound Check option in the Burning preferences dialog turns on the Sound Check feature to balance your tunes, volume-wise.
Note: This option, for audio CDs only, works regardless of whether you're already using the Sound Check option in the Playback preferences for iTunes playback as described in Chapter 13. You can select this option for burning without ever changing the preferences for iTunes playback.
Include CD Text: Selecting this option adds the artist and track name text to the CD for certain CD players (often, in-car players) that can display the artist and track name while playing a CD.
If you like to keep your records properly filed, you'll love iTunes and its nice, neat file-storage methods. For all content items, iTunes creates a folder named for the artist and subfolders within the artist folder named for each album. These folders are stored in the iTunes Media folder unless you change your storage preferences. Note, however, that if you updated a previous version of iTunes that used the iTunes Music folder, iTunes continues to use the self-same iTunes Music folder.
The default method of storing content in the iTunes library is to store all media files — including music, videos, podcasts, and audio books — in the iTunes Media folder (or iTunes Music folder if you updated from a previous version of iTunes), which is inside the iTunes folder. With this method, media files that you drag to the iTunes window are copied into the iTunes Media folder (without deleting the original files). The iTunes folder also has folders for mobile applications and album artwork. So that's easy — everything is inside the iTunes folder.
Tip
iTunes maintains a separate iTunes folder (with a separate iTunes Media folder) in each home folder (Mac) or user folder (PC). If you share your computer with other users who have home folders, each user can have a separate iTunes library on the same computer (and, of course, a separate iPod that synchronizes with it). You need only one copy of the iTunes program.
On a Mac, iTunes stores your content library in your home folder's Music folder. The path to this folder's default location is
your home folder/Music/iTunes/iTunes MediaOn a Windows PC, iTunes stores your content library in your user folder. The path to this folder's default location is
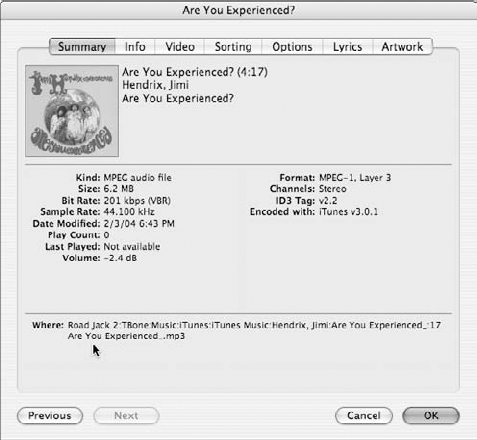
your user folder/My Documents/My Music/iTunes/iTunes MediaYou can find the location of any media file by selecting the item (such as a song or video), choosing File
Note
If you access shared libraries on a network, you probably have content you can display in iTunes that isn't actually in your library but is part of a shared library or playlist on a network. In those situations, when you look at the Summary tab of the information dialog for an item in a shared library, the Where section doesn't appear. For more information about sharing iTunes libraries over a network, visit this book's companion Web site.
Tip
You can also open the folder that contains the media file for any item. Select the item in List, Grid, or Cover Flow view. Then, on a Mac, choose File
You can easily store the music that you rip from your CDs in other locations: After the music becomes digital, you can copy it endlessly with no subsequent loss in quality. You can copy media files to other hard drives and computers without any restrictions on copying — just keep in mind that protected items, such as movies and TV shows you purchased from the iTunes Store, have some playback restrictions (see Chapter 7 for iTunes Store details).
To copy the media file for an item to another hard drive or folder (such as a song or video), you can drag the item directly from the iTunes window to the other hard drive or folder.
You can also copy the files and folders from the iTunes Media folder to other hard drives or other computers using the operating system's copying function. For example, on a Mac, you can use the Finder to copy content files. Windows PCs offer several methods, including using Windows Explorer, to copy files. For example, copying an entire album, or every song by a specific artist, is easy — just drag the folder to its new home folder on another hard drive.
Backups? You don't need no stinkin' backups!
Yes, you do, so think twice about not making them! I know: Backing up your files can be inconvenient and can eat up the capacity of all your external hard drives. Still, it must be done. And fortunately, it's easy to do, either manually as described in this section, or automatically with a system backup utility such as Apple's Time Machine.
With iTunes, you can copy your library to another hard drive on your computer or to another computer. You can burn as many data DVDs as needed to store all the files.
Tip
Apple provides a handy wizard that walks you through backing up your iTunes library, playlists, and iTunes Store purchases to CD-Rs or DVD-Rs. You can choose to back up the entire library, perform incremental backups (only items added or changed since the last backup), or save only store purchases. Choose File
Back Up Entire iTunes Library and Playlist: This might take a stack of DVD-Rs (or a truckload of CD-Rs), but it's worth doing if you have no other way to back up your library.
Back Up Only iTunes Store Purchases: This is an essential procedure, because if you lose these files, you have to repurchase them. You can use CD-Rs or DVD-Rs.
Only Back Up Items Added or Changed Since Last Backup: Use this method to copy only items that were added or changed since your last backup.
To restore your iTunes library from a stack of backup DVD-Rs or CD-Rs, open iTunes and insert the first disc. Then follow the instructions that appear automatically after inserting the disc.
To copy your entire library to another hard drive, locate the iTunes folder on your computer (see the section "Finding the iTunes library," earlier in this chapter). Drag this folder to another hard drive or backup device, and you're all set. This action copies everything, including the playlists in your library.
Warning
The copy operation might take some time if your library is huge. Although you can interrupt the operation anytime, the newly copied library might not be complete. Finishing the copy operation is always best.
If you restore the backup copy to the same computer with the same names for its hard drive, the backup copy's playlists work fine. Playlists are essentially lists of songs in the XML (eXtensible Markup Language) format, with pathnames to the song files. If the hard drive name is different, the pathnames won't work. However, you can import the playlists back into iTunes by choosing File
Note
For a complete description of how to copy your iTunes library to other computers and hard drives, including from Mac to PC or vice versa, visit this book's companion Web site.