Setting your music importing preferences
Ripping music from CDs and adding music files
Subscribing to podcasts on Web sites
Adding video files to your library
If iPods and iPhones were spaceships, iTunes would be the space station they dock with to get supplies. iTunes is the central repository of all content. You can bring your music from audio CDs into iTunes to preserve the music forever in digital format and play the music on your iPod, iPhone, or Apple TV without having to fumble for discs. You can import sound and video files downloaded from the Internet into iTunes to keep all your content organized and to take it with you in your iPod or iPhone.
In this chapter, I show you not only how to import music from audio CDs, but also how to import music, videos, and podcasts from Web sites into your iTunes library.
Bringing music tracks from a CD into iTunes is called ripping a CD (audio programmers do have a sense of humor). Ripping, in technical terms, is extracting the song's digital information from an audio CD. In common terms, ripping includes compressing the song's digital information and encoding it in a particular sound file format (such as AAC or MP3, explained later in this chapter).
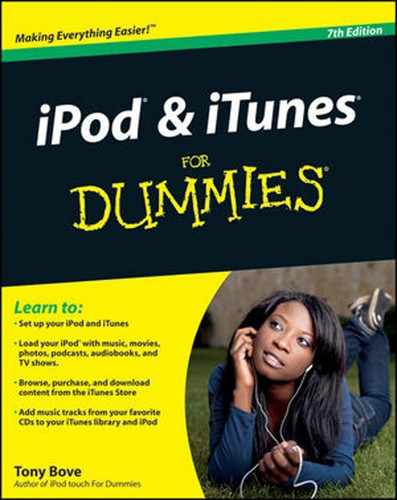
How easy is it to rip a CD? Pop an audio CD into your CD-ROM/DVD drive, and unless you've changed your preferences (as described in the following section), you'll see the message in Figure 8-1. Click the Yes button to rip your CD into iTunes and, without further ado, your CD tracks are absorbed into your iTunes library.
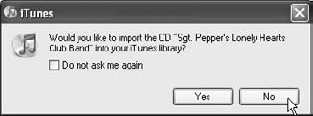
Figure 8-1. Click Yes to rip your CD into iTunes automatically or No to set preferences or edit song information first.
Before ripping, you may want to edit the song information, as I describe in Chapter 12, or set the Gapless Album option, which I describe in "Don't fall into the gaps" in this chapter. If this is your first time ripping a CD, you may want to set your import settings more precisely to improve sound quality or to reduce the amount of disk space occupied by songs. If you want to edit the song information, set the Gapless Album option, or change import settings, click the No button to stop the import operation and make your changes first. Then start the rip, as I describe in the section "Ripping music from CDs," later in this chapter.
The import settings affect sound quality as well as hard drive space on both the computer and the iPod or iPhone, and compatibility with other types of players and computers. After setting them, your import settings stay the same until you change them again. Read on to find out about changing your import preferences and settings before ripping.
To change your import preferences and settings or change the way iTunes rips — whether it rips right away, asks first, or automatically ejects afterward — follow these steps:
Choose iTunes

The iTunes Preferences dialog opens, showing the General preferences, including the When You Insert a CD pop-up menu and the Import Settings button.
Choose what action iTunes should take for the When You Insert a CD option in the General preferences.
Choose one of the following actions on the pop-up menu for when you insert an audio CD, as shown in Figure 8-2:
Show CD: iTunes does nothing else. This setting is ideal if you regularly edit the song information first, as I describe in Chapter 12.
Begin Playing: See Chapter 6 for details on playing CDs.
Ask to Import CD: iTunes displays the dialog that asks whether you want to import the CD (refer to Figure 8-1).
Import CD: iTunes uses the current import settings and automatically imports the CD. Don't use this setting unless you're sure that the import settings are already set to your liking.
Import CD and Eject: iTunes automatically imports and then ejects the CD, making way for the next one. This option is useful for importing a batch of CDs. Don't use this setting unless you're sure that the import settings are already set to your liking.
Select the Automatically Retrieve CD Track Names from Internet check box.
This option is selected by default, but make sure that the box is checked. iTunes automatically grabs the song titles, artist names, album titles, and so on directly from the Internet database of songs, as I describe in Chapter 12. If you don't want to use an Internet connection at this time, you can grab this information later, as I explain in Chapter 12.
Click the Import Settings button in the General preferences.
The Import Settings dialog appears, as shown in Figure 8-3.
Make your changes, guided by my suggestions that follow, and then click the OK button.
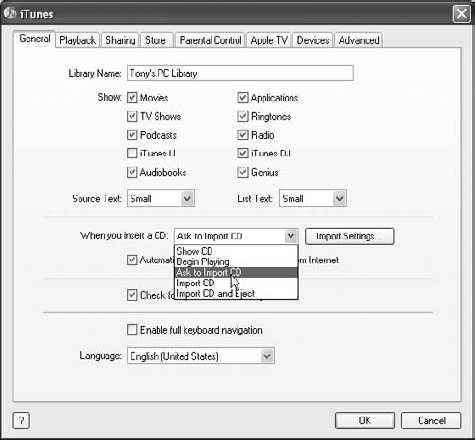
The Import Settings dialog offers the following choices:
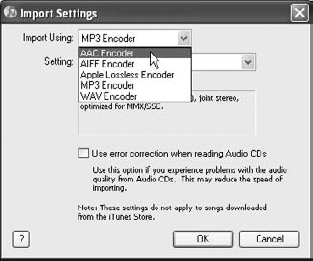
Import Using: Set this pop-up menu to choose the import encoder. This choice is perhaps the most important, and I describe it in more detail later in this section.
Setting: This offers different settings depending on your choice of encoder. For example, in Figure 8-4, the AAC Encoder is already selected, and I'm in the process of choosing the iTunes Plus setting, which is the quality setting for music available in the iTunes Store. Set this pop-up menu to the iTunes Plus or High Quality setting for most music, or choose Custom to choose a custom setting. The Spoken Podcast setting is for lower-quality voice recordings. See below for more information about encoders and settings and how they affect quality and file size.
Use Error Correction When Reading Audio CDs: Although you'll reduce importing speed, select this check box to use error correction if you have problems with audio quality or if the CD skips. (Not every skipping CD can be imported even with error correction, but it might help.)

For a quick and pain-free ripping session, choose from among the following encoders in the Import Using pop-up menu, based on how you plan to use the music:
AAC Encoder: I recommend AAC for almost all music. (However, AIFF, Apple Lossless, or WAV is better if you plan to burn another audio CD at the highest quality with the songs you ripped, and MP3 is the only format to use for MP3 CDs and other MP3 players.) For music, choose the High Quality or iTunes Plus settings from the Setting pop-up menu.
AIFF Encoder: Use AIFF if you plan to burn the song to an audio CD using a Mac (use WAV for Windows), or use it with a DVD project. AIFF offers the highest possible quality, but it takes up a lot of space (about 10MB per minute). Choose the Automatic option from the Setting pop-up menu for best results. Don't use the AIFF format for songs that you intend to transfer to your iPod or iPhone, or to an MP3 CD; convert them first to AAC or MP3.
Tip
You can rip a CD as many times as you want, and use a different encoder each time, as long as you modify the album name or song title to identify each version. For example, you might rip Sgt. Pepper's Lonely Hearts Club Band with the AAC encoder for use in your iPod or iPhone. You might then rip it again after changing the encoder to the higher-quality Apple Lossless or AIFF encoder, using a different album name (such as Sgt. Pepper-2), for burning onto an audio CD. After burning the CD, you can delete Sgt. Pepper-2 to reclaim the hard drive space.
Apple Lossless Encoder: Use the Apple Lossless encoder for songs that you intend to burn onto audio CDs as well as for playing on an iPod or iPhone. The files are just small enough (about 60–70 percent of the size of the AIFF versions) that they don't hiccup on playback.
MP3 Encoder: Use the MP3 format for songs that you intend to burn on MP3 CDs or that you intend to use with MP3 players or your iPod or iPhone — it's universally supported. If you use MP3, I recommend choosing the Higher Quality option from the Setting pop-up menu.
WAV Encoder: WAV is the high-quality sound format that's used on PCs (like AIFF on Macs), but it also takes up a lot of space (about 10MB per minute). Use WAV if you plan on burning the song to an audio CD or using WAV with PCs. Choose the Automatic option from the Setting pop-up menu for best results. Don't use WAV for songs that you intend to transfer to your iPod or to an MP3 CD; use MP3 instead.
Note
To find out more about audio encoding formats, how to adjust custom settings to reduce space and increase audio quality, and how to convert songs from one format to another (and what problems to look out for when doing so), visit this book's companion Web site.
Some CDs — particularly live concert albums, classical albums, rock operas (such as The Who's Tommy), and theme albums (such as Sgt. Pepper's Lonely Hearts Club Band by The Beatles) — are meant to be played straight through, with no fading between the songs.
Fortunately, you can turn on the Gapless Album option for multiple songs or for an entire album. With the Gapless Album option set in iTunes, songs play seamlessly one to the next. You can also play these songs seamlessly on your iPod or iPhone (including seventh-, sixth-, and fifth-generation models).
To turn on the Gapless Album option for an entire CD before importing it, follow these steps:
Click the No button if the import dialog appears (to postpone importing).
Select the CD title in the Source pane.
The CD title appears in the Source pane under Devices.
Choose File
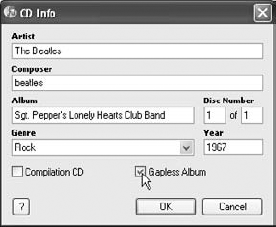
The CD Info dialog opens, as shown in Figure 8-5.
Select the Part of a Gapless Album check box and then click the OK button.
To turn on the Gapless Album option for multiple songs on the CD but not the entire CD, follow these steps:
Follow Steps 1 and 2 in the preceding list.
Select the songs in the List pane.
From the album, select the songs that you want to play continuously (such as the first two songs of Sgt. Pepper).
Tip
To select multiple songs, click the first one, press and hold

Choose File
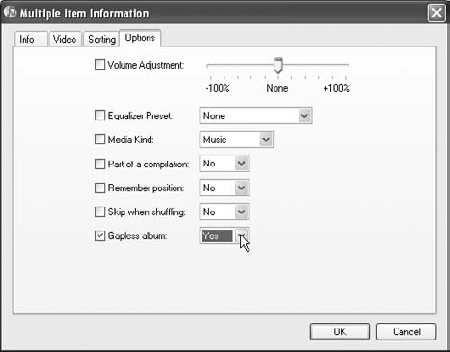
The Multiple Item Information dialog opens.
Click the Options tab to see the Options pane, as shown in Figure 8-6.
Select Yes from the Gapless Album pop-up menu.
After choosing Yes on the pop-up menu, a check mark appears next to the Gapless Album option to indicate that it has changed.
Click the OK button to close the Multiple Item Information dialog and update the options for the selected songs.
Tip
For older iPod models, or as an alternative to using the Gapless Album option, you can use the Join Tracks option when ripping a CD to join the tracks in your iTunes library so that they play seamlessly on an iPod or iPhone. To join tracks, select the tracks and choose Advanced
After changing your import settings and preferences, you're ready to rip. To rip a CD, follow these steps:
Insert an audio CD into your computer.
The songs appear in the List pane as generic, unnamed tracks at first. If your computer is connected to the Internet and you've turned on the option to automatically retrieve song information from the Internet and the CD is in the Gracenote CDDB database (described in Chapter 12), iTunes automatically retrieves the track information.
A dialog appears asking whether you want to import the CD, with Yes and No buttons.
Click Yes to import (and skip to Step 5) or No to set options first.
Click the No button to set preferences and import settings as described in the previous section, to set songs to be skipped, or if you see unnamed tracks rather than the proper track, artist, and album names in the List pane. If all you need to change are the import settings, click the Import Settings button in the lower right corner of the List pane.
Tip
If the first attempt at retrieving song information doesn't work and you see unnamed tracks, check your connection to the Internet first. If everything is fine with your connection, stop the importing operation and then choose Advanced
(Optional) Deselect the check boxes next to any songs on the CD that you don't want to import.
iTunes imports only the songs that have check marks next to them; when you remove the check mark next to a song in the List pane, iTunes skips that song.
Note
Be sure to set your import settings and the Gapless Album option to your liking before actually ripping the CD.
Click the Import CD button.
The Import CD button appears next to the Import Settings button in the lower-right corner of the List pane after you insert a CD. The status display shows the progress of the operation. To cancel, click the small x next to the progress bar in the status display.
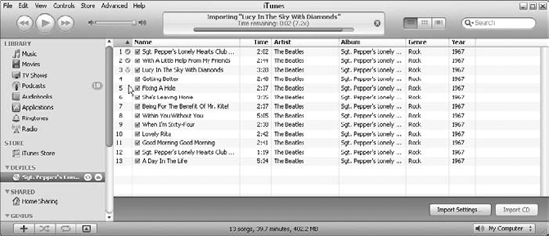
iTunes displays an orange, animated waveform icon next to the song that it's importing. When iTunes finishes importing each song, it replaces the waveform icon with a check mark, as shown in Figure 8-7. (On a color monitor, the check mark is green.) iTunes chimes when it finishes the import list.
When all the songs are imported, eject the CD by clicking the Eject button next to the disc name in the Devices section of the Source pane.
You can also choose Controls
If you already have music or other audio files — MP3, AAC, AIFF, or WAV files — that you downloaded or copied to your hard drive, you can simply drag them over the Library section of the Source pane, or the List pane, of the iTunes window to bring them into your library. If you drag a folder or disk icon, all the audio files that it contains are added to your iTunes library (and if you drag it into the Playlists section of the Source pane, a playlist is created — see Chapter 14 for details). You can also choose File
Note
When you add an audio file to your iTunes library, a copy is placed inside the iTunes Media folder without changing or deleting the original file; that is, as long as you have your iTunes preferences set for Copy Files to iTunes Media Folder When Adding to Library. (This is the default setting, which you can find on the Advanced tab of the iTunes Preferences dialog.) See Chapter 15 for details on storing music in your iTunes Media folder.
If you have files in another folder or on another hard drive and you want to add them to the iTunes library without copying the files to the iTunes Media folder, you can copy a link to the original files without copying the files by doing the following:
Choose iTunes
Click the Advanced tab in the iTunes Preferences dialog.
Turn off the Copy Files to iTunes Media Folder When Adding to Library setting.
You can check out the contents of your iTunes Media folder by using the Finder on a Mac or Windows Explorer on a Windows PC, as I describe in detail in Chapter 15.
Tip
MP3 CDs are easy to add because they're essentially data CDs. Simply insert them into your CD-ROM drive, open the CD in the Finder, and drag and drop the MP3 audio files into the iTunes window — no need to rip, in other words. Downloaded audio files are even easier — just drag and drop the files into iTunes. If you drag a folder or CD icon, all the audio files it contains are added to your iTunes library.
A podcast can be anything from a single song or video to a radio or TV show — an audio podcast is an MP3 audio file, and a video podcast is a video file (see "Adding Videos" in this chapter for technical details).
You can add podcasts to your iTunes library by subscribing to them in the iTunes Store (as I describe in breathtaking detail in Chapter 7) or by subscribing to them directly from Web sites that host them. Similar to a recording of a radio broadcast, you can save and play a podcast at your convenience — both in iTunes on your computer and on your iPod, iPhone, and Apple TV.
The podcast producer uses Really Simple Syndication (RSS) technology — the same technology used to distribute blogs and news feeds across the Internet — to publish the podcast. RSS feeds are typically linked to an RSS or an eXtensible Markup Language (XML; the language of RSS) button. With a feed reader, aggregator application, or browser plug-in, you can automatically check RSS-enabled Web pages and display updated stories and podcasts. RSS version 2, the most popular version for podcasting, is supported directly by some Web browsers, including Apple's Safari for Mac OS X and Windows.
With iTunes, you can play a podcast, incorporate it into playlists, make copies, and burn it onto CD as much as you like.
The Podcasts section of the iTunes Store offers access to many thousands of podcasts, but more than a million podcasts exist, many of which are available only on their respective Web sites. The iTunes Store makes it easy to subscribe to podcasts, so check there first — turn to Chapter 7 to see how to find and subscribe to podcasts in the iTunes Store.
By subscribing, I mean simply listing the podcast in your iTunes Podcasts pane so that new episodes are downloaded automatically. It's like a magazine subscription that's updated with a new issue every month or so. You don't have to register or fill out any form. You don't have to provide an e-mail address or any other information. Your copy of iTunes automatically finds new podcast episodes and downloads them to your computer.
The easiest way to subscribe to a podcast is through the iTunes Store. However, if you can't find a podcast in the store and you know how to find its Web site, open your browser and go to that Web site. Some Web sites also offer an iTunes button to click to go directly to the iTunes Store to subscribe to the podcast.
If you don't see an iTunes button, you can still subscribe to a podcast directly from iTunes by grabbing information from its Web site first. Follow these steps:
In your browser, Control-click (Mac) or right-click (Windows or Mac) the podcast's RSS2 link on the Web page.
Look for the RSS version 2 link on the Web page.
Copy the podcast's RSS2 link:
Safari: Choose Copy Link.
Firefox or Internet Explorer: Choose Copy Link Location.
In iTunes, choose Advanced
The Subscribe to Podcast dialog opens.
Paste the RSS2 link into the dialog that appears by choosing Edit
As an alternative, you can also press
When you paste it, the link should look something like this:
http://www.rockument.com/blog/?feed=RSS2
iTunes downloads the podcast to your computer and switches to the Podcasts selection in the Source pane.
Click the i icon to see information about the podcast.
You can click the i icon on the far-right podcast listing margin to display separate information about the podcast's newest episode.
Select the podcast and then click the Play button.
You can now play the podcast just like a song or video in your iTunes library. You can use the iTunes playback controls to fast-forward, rewind, or play the podcast from any point. The blue dot next to a podcast means that you haven't played it yet. As soon as you start listening to or watching a podcast, the dot disappears. You can even drag podcast episodes into a playlist, as I describe in Chapter 14, and then burn that playlist onto a CD, as I describe in Chapter 15.
If the podcaster embedded a photo in an audio podcast file or included a link to a video from the file, the photo or video content appears in the Artwork pane.
Many podcast feeds provide new material on a regular schedule. iTunes can check these feeds automatically and update your library with new podcast episodes. You can, for example, schedule iTunes to check for new podcast episodes — such as news, weather, traffic reports, and morning talk shows — before you wake up and automatically update your iPod or iPhone. When you get up, you have new podcast episodes to listen to in your iPod or iPhone.
To check for updates manually, select Podcasts in the Library section of the Source pane and then click the Refresh button in the lower-right corner of the Podcasts pane, which appears if podcasts need to be updated. All subscribed podcast feeds are updated immediately when you click Refresh, and iTunes downloads the most recent (or all) episodes, depending on how you set your podcasts preferences to schedule podcast updates.
To change your podcast settings so that iTunes can check for new podcasts automatically, click the Settings button at the bottom of the Podcasts pane to display the Podcast Settings dialog, as shown in Figure 8-8.
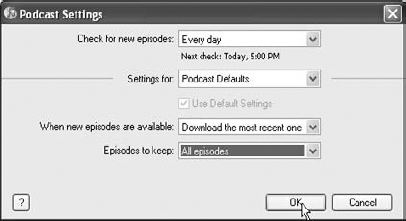
You can change the settings for each podcast separately by choosing the podcast in the Settings For pop-up menu. The settings are as follows:
Check for New Episodes: Choose to check for podcasts every hour, day, week, or manually — whenever you want.
Settings For: Choose which podcast in your iTunes library you are scheduling updates for, or choose Podcast Defaults to apply these settings to all podcasts in your library.
When New Episodes Are Available: You can download the most recent one (useful for news podcasts), download all episodes (useful for podcasts you might want to keep), or nothing so that you can use the Refresh button to update manually as you need.
Episodes to Keep: Choose to keep all episodes, all unplayed episodes, the most recent episodes, or previous episodes (refer to Figure 8-8).
Tip
Keeping unplayed episodes is a useful way to organize your news podcasts. If you've played an episode (or a portion of it), you likely don't need it anymore, but you probably do want to keep the ones you haven't played yet. With this setting, iTunes automatically deletes the ones you've played.
Warning
If you copy podcasts automatically when synchronizing your iPod or iPhone, as I describe in Chapter 9, don't set the Episodes to Keep pop-up to All Unplayed Episodes — use All Episodes instead. This is why: If you listen to part of a podcast episode on your iPod or iPhone and then synchronize your iPod or iPhone, the podcast episode disappears from iTunes (because it is no longer unplayed). But don't worry; the episodes are still out there on the Internet. You can always recover them by choosing Download All for the When New Episodes Are Available option.
Besides purchasing and downloading videos from the iTunes Store, as I describe in nearly orgasmic detail in Chapter 7, you can also download video files (files that end in .mov, .m4v, or .mp4) from the Internet, or copy them from other computers and bring them into iTunes. From iTunes, you can sync them to your iPod, iPhone, and Apple TV after converting them into a format that looks best for those devices.
To convert a video for use with an iPod or iPhone, select the video (see Chapter 11 for browsing instructions) and choose Advanced
Note
To find out more about bringing videos from other sources into iTunes and converting videos for use with iPods, iPhones, and Apple TV, visit the Tips section of the author's Web site (www.tonybove.com).
You can drag a video file into iTunes just like an audio file. Drag each video file from the Mac Finder or Windows Desktop to the Library section of the Source pane, or directly to a playlist in the Playlists section of the Source pane, or to the List pane. The video files that you import into iTunes show up in the Movies section of your iTunes library — click Movies in the Library section of the Source pane to see them.
Video files are organized in folders and stored in the iTunes Media library on your hard drive just like audio files. You can find the video file's location on your hard drive and its type by selecting the video and choosing File