Checking and sending e-mail with an iPod touch or iPhone
Changing message settings and sending options
Setting the Push and Fetch features for optimal e-mail retrieval
Your e-mail is just a touch away. The Mail app on your iPod touch or iPhone can display richly formatted messages, and you can send as well as receive photos and graphics, which are displayed in your message along with the text. You can even receive Portable Document Format (PDF) files, Microsoft Word documents, and Microsoft Excel spreadsheets as attachments and view them on your iPod touch or iPhone.
The Mail app can work in the background to retrieve your e-mail when your iPod touch is connected to Wi-Fi or your iPhone is connected to Wi-Fi or 3G. If you signed up for Apple's MobileMe service (formerly the .Mac service, now www.me.com), as I describe in illustrious detail in Chapter 10, your iPod touch or iPhone receives e-mail the instant it arrives in the mailbox on the MobileMe service. Services such as MobileMe, Microsoft Exchange, and Yahoo! Mail push e-mail messages to your iPod touch or iPhone so that they arrive immediately, automatically. You get a single beep when your mail has arrived (unless you turned off the New Mail sound effect, as I describe in Chapter 4).
Other types of e-mail services let you fetch e-mail from the server — when you select the account in Mail on your iPod touch or iPhone, Mail automatically starts fetching the e-mail, and you can browse your e-mail accounts or even use other apps while Mail fetches messages. You can also tell Mail to fetch more messages by tapping the Fetch (circular arrow) icon in the lower-left corner of the Mail, Mailboxes, or message screens.
If you've set up an e-mail account, a list of mailboxes appears for that account, as shown in Figure 20-1 (left side). If you've set up more than one e-mail account, Mail displays the Accounts screen, listing the e-mail accounts you synchronized with your iPod touch or iPhone (see Figure 20-1, middle). Tap an account on the Accounts screen to view the mailboxes for that account (see Figure 20-1, right side). (See Chapter 10 for details on synchronizing, setting up, deleting, and changing settings for e-mail accounts.)
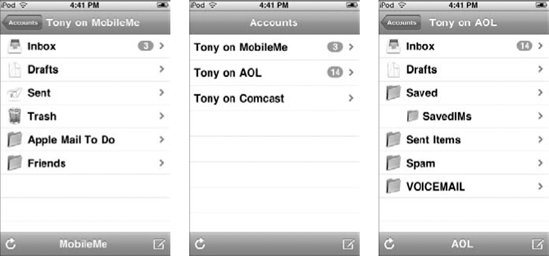
Figure 20-1. A MobileMe account's mailboxes (left); multiple e-mail accounts (middle), and the mailbox (Inbox) of an AOL e-mail account (right).
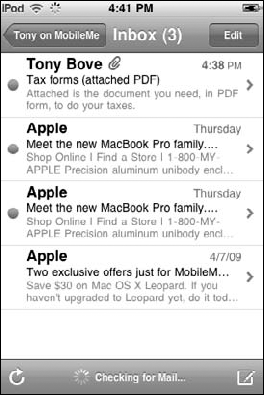
Next, tap Inbox in the list of mailboxes. A list of incoming message headers appears, as shown in Figure 20-2, with the sender's name, subject, and the first sentence or two of each message, along with a blue dot if the message hasn't been read yet.
Tap a message header to read the message. You can scroll the message by flicking or dragging your finger, and zoom into and out of the message by unpinching and pinching with your fingers. You can also zoom directly into a column in the message by double-tapping the message, and zoom out by double-tapping it again.
If the e-mail includes an attachment, a button appears within the message showing the icon of an attached file and a right arrow, as shown in Figure 20-3 (left side) — to view the attachment, just tap the right arrow. If the format of the attached file is one of the supported formats (which include files that have the extensions .doc, .docx, .htm, .html, .pdf, .txt, .xls, and .xlsx), Mail downloads and opens the attachment as shown in Figure 20-3 (right side). If not, Mail displays a document icon with the name of the file — but you can't open it.
You can see all the recipients of a message (except Bcc, or blind carbon copy, recipients) by opening the message and tapping the blue word Details in the upper-right corner of the message. Tap a name or e-mail address that appears to see the recipient's contact information. Tap Hide to hide the recipients.
Tip
You can add the sender or recipient to your Contacts list on your iPod touch or iPhone by tapping the name or e-mail address. A screen appears with the Email, Create New Contact, and Add to Existing Contact buttons. Tap Create New Contact to create a new contact (or tap Add to Existing Contact if you want to add the information to an existing contact). Tap the Email button to send an e-mail to that recipient's address. (See the "Sending E-Mail" section, later in this chapter.)
Links appear in a message underlined in blue, and pictures embedded in the message may also have links. Tapping a link can take you to a Web page in Safari, open a map in Maps, or open a new preaddressed e-mail message in Mail. To return to your e-mail, press the physical Home button and tap Mail on the Home screen.
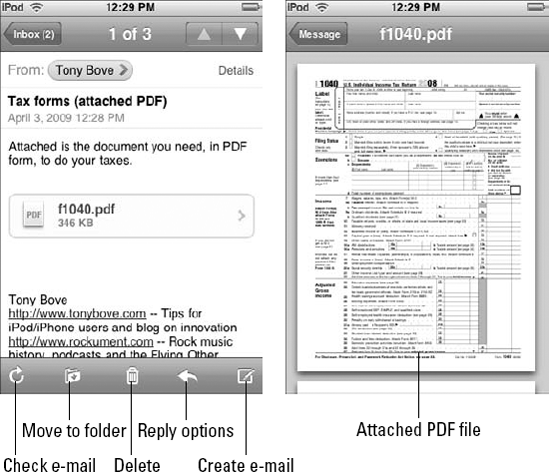
Figure 20-3. The e-mail message appears with an attachment (left side); tap the right arrow to view the attachment (a PDF file).
Tip
You can mark a message as unread so that it stays in your Inbox: Open the message, tap the blue word Details in the upper-right corner, and tap the blue Mark as Unread text next to the blue dot inside the message. The message is marked as unread — a blue dot appears next to the message header in the mailbox list until you open it again.
To delete an open message, tap the Trash icon at the bottom center of the message display. Mail deletes the message from your iPod touch or iPhone (but not from your computer or mail server unless it's set up that way — see Chapter 10 for details on setting up e-mail accounts) and then displays the next message in sequence. You can also move to the previous or next message by tapping the up and down arrows in the upper-right corner.
Tip
You can also delete a message without opening it. In the list of message headers, drag your finger across a message header and tap the Delete button that appears.
Tip
To delete a list of messages quickly, choose the mailbox (such as Inbox) and tap the Edit button in the upper-right corner of the screen. The messages appear with empty circles next to them. Tap each message so that a check mark appears in the empty circle. After checking off the messages to delete, tap the Delete button in the lower-left corner.
You can use the Mail app to reply to any message instantly and send e-mail to any e-mail address in the world. You can even send a message to a group of people without having to select each person's e-mail address.
To send an e-mail, follow these steps:
Tap Mail on the Home screen.
The Accounts screen appears if you've set up more than one e-mail account, and you should look at Step 2; otherwise, the mailboxes appear for your account, and you can skip to Step 3.
(Optional) Choose an e-mail account from the Accounts screen for sending the e-mail.
You can skip this step if you have only one e-mail account. If you have several e-mail accounts on your iPod touch or iPhone, you can select one of them or you can use the default account for sending e-mail. (See the next section in this chapter to set the default account.) You can also defer this decision until Step 6.
Tap the pencil-document icon in the lower-right corner of the Mail screen.
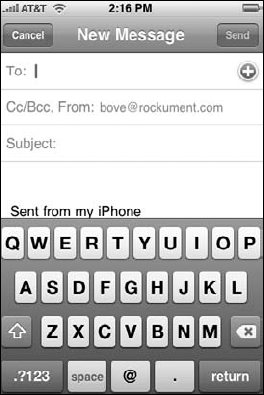
The New Message screen appears, as shown in Figure 20-4, along with the keyboard. If you have multiple accounts set up on your iPod touch or iPhone, the default account for sending e-mail appears in the From field, as shown in Figure 20-4.
Enter the recipient's e-mail address in the To field.
If your recipient is listed in your Contacts, tap the circled plus (+) sign in the To field (see Figure 20-4) and choose a contact to add the contact's e-mail address to the To field. You can repeat this process to add multiple e-mail addresses to the To field from your contacts.
If your recipient isn't listed in your Contacts or if you don't know whether the recipient is listed, tap the To field entry and use the keyboard to type one or more e-mail addresses (and use a comma to separate each address). As you type an e-mail address, addresses that match from your Contacts list appear below. Tap one to add it to the To field.
(Optional) Add more addresses to the Cc or Bcc field.
You can add e-mail addresses to the Cc (carbon copy) and Bcc (blind carbon copy) fields to copy others. Whereas Cc addresses appear on messages received by recipients, indicating that they were copied on the message, Bcc addresses don't appear on messages received by recipients — they're like stealth readers. Tap the Cc/Bcc letters to expand the message to include the Cc and Bcc fields; then enter addresses the same way you do in Step 4.
(Optional) Change the From address.
You can change the e-mail address for the sender to one of your e-mail accounts. The default e-mail account for sending e-mail is already selected; tap the From field (refer to Figure 20-4) to display a pop-up menu of e-mail accounts and then tap an e-mail account to use as the sender's account.
Enter the e-mail subject.
Tap the Subject entry field (refer to Figure 20-4) to type a subject with the keyboard; then tap underneath the Subject field to type a message. Press Return on the keyboard when you're finished.
Tap Send in the upper-right corner of the display (refer to Figure 20-4) to send the message.
You can also forward and reply to any message you receive. Open the message and tap the curled left-arrow button that appears in the lower-left side of the message display. Then tap Reply to reply to the sender of the message, Reply All to reply to all the recipients as well as the sender (but not the Bcc recipients), or Forward to forward the message to someone else (or Cancel to go back to the message). The New Message screen appears with the keyboard so that you can type your reply or add a message to the one you're forwarding. Tap Send to send the reply or forwarded message.
Note
When you reply to a message, files or images attached to the initial message aren't sent with the reply. When you tap Forward to forward a message, a pop-up menu with the Include and Don't Include buttons appears for a message with an attachment. Tap Include to include the attachment in the forwarded message, or tap Don't Include to forward the message without the attachment.
To save a message as a draft so that you can work on it later, start typing the message as described in the preceding steps, but before tapping Send, tap Cancel in the upper-left corner of the display (refer to Figure 20-4). Then, from the menu that appears, tap Save to save the message in your Drafts mailbox or tap Don't Save to discard the message (or Cancel to go back to typing the message). You can find the saved message in the Drafts mailbox of the same e-mail account. Tap the message to add to it or change it and then send it.
Tip
To send one or more photos in a message, tap Photos on the Home screen and select them as described in Chapter 18.
To change your e-mail message settings and sending options, choose Settings
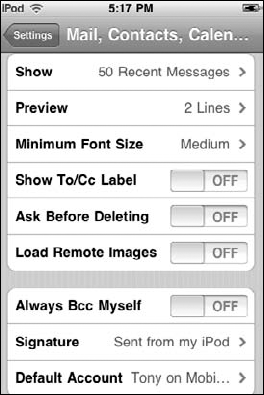
In the Mail section, you can change global settings for messages in all accounts. To set the number of messages you can see at once in a mailbox, tap Show and then choose a setting. You can choose to see the most recent 25, 50, 75, 100, or 200 messages. (To download additional messages when you're in Mail, scroll to the bottom of your Inbox and tap Download More.)
Tip
If you think you have shaky fingers and might delete a message by mistake, you can set Mail to confirm that you want to delete a message first before deleting. Tap the Off button to turn on the Ask before Deleting option. (Tap it again to turn it off.) If Ask before Deleting is on, Mail warns you first when you delete a message, and you have to tap Delete to confirm the deletion.
You can also set how many lines of each message are previewed in the message list headers. Choose Preview (refer to Figure 20-5) and then choose to see any amount from zero to five lines of each message. To set a minimum font size for messages, tap Minimum Font Size and then choose Small, Medium, Large, Extra Large, or Giant.
If you want to see all the images in your e-mails and don't mind waiting for the images to download, turn on the Load Remote Images option. If you leave it off, your messages appear faster but you have to touch each image icon to download and see each image.
If you care about whether a message was sent directly to you or whether you were sent it as a Cc copy (which still might make it important, but at least you know), you can set whether Mail shows the To and Cc labels in message lists. Tap the Off button for the Show To/Cc Label option to turn it on. (Tap it again to turn it off.) If the Show To/Cc Label option is on, you see To or Cc in the list next to each message.
For those who are obsessive about making sure that e-mails are sent — and you know who you are — Mail can send you a copy of every message you send. Tap the Off button to turn on the Always Bcc Myself option. (Tap it again to turn it off.) The Bcc refers to blind carbon copy, and it means that your message is sent and copied back to you without your e-mail address appearing in the recipient's list.
You can add a signature to your messages that can include any text — not your real, handwritten scrawl but rather a listing of your name, title, phone number, favorite quote, or all of these — to personalize your e-mails. Tap Signature (refer to Figure 20-5) and then type a signature with the on-screen keyboard. The signature remains in effect for all future e-mails sent from your iPod touch or iPhone.
To set the default e-mail account for sending messages, tap Default Account (refer to Figure 20-5) and then choose an e-mail account. Your iPod touch or iPhone will use this account whenever you start the process of sending a message from another application, such as sending a photo from Photos or tapping the e-mail address of a business in Maps.
For details on synchronizing e-mail accounts automatically from iTunes or MobileMe, as well as for setting up an account, changing account settings, and deleting accounts manually on your iPod touch or iPhone, see Chapter 10.
The Push and Fetch options control how your iPod touch or iPhone receives e-mail. You can set these options for all accounts and specifically for each account.
MobileMe, Microsoft Exchange, and Yahoo! Mail e-mail accounts can push messages to your iPod touch or iPhone so that they arrive immediately after arriving at the account's e-mail server. With other types of accounts, the Mail app fetches messages from the account's e-mail server — either on a time schedule or manually. (If manually, you select the account before the Mail app retrieves the e-mail.) Push accounts (such as MobileMe e-mail) can be set to either push or fetch.
You can turn the Push feature on or off as you please. Keeping it on uses more battery power because the iPod touch or iPhone receives messages immediately when it's connected to the Internet. When you turn the Push feature off, Mail fetches the e-mail from the accounts instead, and you can set the timetable for fetching, or set fetching to manual.
Tip
For optimal battery life, turn Push off and set Fetch to Manually so that Mail fetches only when you tap the e-mail account to read or send e-mail. Pushing e-mail as it arrives, or fetching e-mail often, uses up a considerable amount of battery power; doing both drains the battery even more quickly.
To turn Push on or off, choose Settings
If you like, set a timetable for fetching e-mail automatically so that you don't have to think about it. Choose a time interval on the Fetch New Data screen — pick Every 15 Minutes, Every 30 Minutes, or Hourly. You can also pick Manually so that Mail fetches only when you tap the e-mail account to read or send e-mail.
You can also set Push or Fetch settings for individual accounts. Scroll the Fetch New Data screen to the bottom and touch Advanced. The Advanced screen appears. Each account in the list shows Push or Fetch, depending on whether the account offers push e-mail. Tap the account to change its settings separately.
Tip
Setting Push to Off or setting Fetch to Manually on the Fetch New Data screen overrides the individual account settings.