STEP SIX
Gather Your Team and Make a Schedule
OVERVIEW
Work Breakdown Structure
Critical Path Diagrams
Gantt Charts
Project Tracking Spreadsheets
Now it's time to move into the Plan phase of project management. Here you'll leverage everything you know about the project and build a strategy to meet the business and project objectives. This strategy will include tasks, people who will work on the tasks, dependencies of the tasks, and a timeline. All of these factors appear in your project schedule.
In building a project schedule, you'll work with the following elements:
![]() Tasks—the specific jobs that need to be done to create the project output.
Tasks—the specific jobs that need to be done to create the project output.
![]() Milestones—Points in the project where you stop and ask, How are we doing?
Milestones—Points in the project where you stop and ask, How are we doing?
![]() People—the individual(s) best suited to each task to maximize the opportunities for success.
People—the individual(s) best suited to each task to maximize the opportunities for success.
![]() Dependencies—the order in which tasks must be done to achieve success.
Dependencies—the order in which tasks must be done to achieve success.
![]() Time—the hours, days, or weeks each specific task will take.?
Time—the hours, days, or weeks each specific task will take.?
When Demmy
reached the spot where he planned to build his brick house, he dropped the handle of his brick-wagon. He was feeling a bit guilty about the way he'd treated Speedy. But, gracious sakes, his brother was always so quick to change course. Couldn't he see the real danger in BB Wolf? Demmy wondered how Goldy was faring but, if history was any indicator, he was probably asleep by now.
It was getting late. Demmy took a nervous glance at the wagonload of bricks. He had lots to do and not much time before deep nightfall. To organize himself, he took pencil and paper from his backpack and made a list of things to be done:
- get in the house and go to sleep
- stack bricks into a house shape
- unload bricks as close to the clearing as possible
- carry bricks the rest of the way to the clearing
- use the wagon as a roof, and put the remaining bricks on top to secure it
- check on Goldy
- apologize to Speedy.
Although sleep was his first thought, he knew it wasn't his first task. And he couldn't get distracted by his brothers if he hoped to get the very important building work done tonight.
“Well,” he thought, “I'm the only one working here, so I'd better put all these tasks in order and estimate how long it'll take to do each one.” He wrote up a new list:
- unload bricks close to the clearing—15 minutes
- carry bricks into the clearing—30 minutes
- stack bricks into a house shape—90 minutes
- use the wagon as a roof, and put the last of the bricks on top to secure it—30 minutes
- get into the house and go to sleep—5 minutes
- tomorrow, check on Goldy and apologize to Speedy.
By Demmy's calculations, it would be almost three hours before he could sleep safely, and with that goal in mind, he began his work.?
In this step, you'll build a project schedule—a blueprint with the tasks, the people assigned to them, the order in which the tasks will be completed, delivery dates, and milestones. This schedule will be your guide for managing the project in the Manage phase.
Time to Complete This Step
The time it takes to build a project schedule depends entirely on the complexity of the project. It can take anywhere from half a day to a week, once the necessary project information is figured out. If you're going to load the schedule into project management software as well, double the time. Fight the tendency to fall into analysis paralysis. Build a “good enough” schedule because you'll be changing it. Perfection is not cost effective.
Stakeholders
Sharing the schedule with your stakeholders will help you in these two critical ways:
1. manage the stakeholders' expectations by helping them understand the amount of work that will be done
2. manage the stakeholders' commitment by helping them assign calendar time well in advance of the tasks for which they or their staff will be responsible.
Stakeholders may not care about the early project schedule de-tails—just when it will be done. In fact, many of them think that how you get the project done has nothing to do with them, and that it's solely the responsibility of the project manager and team. The schedule will help stakeholders see the complexity of the entire project, not just the part that affects them. Your stakeholders may have strong opinions about what tasks need to be done, when, and by whom. If they don't look at the project schedule in the beginning, they'll likely find fault late in the project, thus creating disruption. As soon as practical, share with them the details of the project schedule, especially the tasks for which they're responsible.
POINTER
Creating a project schedule is a lot of work. Once you've prepared it, you won't want to change it. But while you were working on the schedule, business change continued in the background. It's very likely that your schedule will change almost as soon as you get it off the copier. It may be “done,” but it can't be frozen. Think flexible structure—at all times you have a schedule, but at all times you're ready to adapt it as the situation requires.?
Questions to Ask
Before you begin to brainstorm the tasks required to complete the project, take a moment to ask the stakeholders and the sponsor these questions:
![]() How many other projects will you be responsible for at the same time? Beyond your project responsibilities, what will your additional workload be? (Explain to each stakeholder that the answers to these questions will help them under-stand how much time they'll be able to spend on the project tasks and how much additional help they'll need.)
How many other projects will you be responsible for at the same time? Beyond your project responsibilities, what will your additional workload be? (Explain to each stakeholder that the answers to these questions will help them under-stand how much time they'll be able to spend on the project tasks and how much additional help they'll need.)
![]() Who chooses the people for the project team? Who is likely to be involved? What time commitments to other work does each person have? (Explain to the stakeholders that this information will help them figure out how much time they'll get from other people working on the project tasks.
Who chooses the people for the project team? Who is likely to be involved? What time commitments to other work does each person have? (Explain to the stakeholders that this information will help them figure out how much time they'll get from other people working on the project tasks.
![]() Who will act as subject-matter experts on the project? What time conflicts do they have? If the subject-matter ex-pert is already busy, it's likely to be difficult to schedule his or her time. If there are several experts, how will disagreements among stakeholders be negotiated, and by whom? (It's not unusual for stakeholders from different parts of the business to have different views of the project requirements. This will alert you to dynamics that might stall your project.)
Who will act as subject-matter experts on the project? What time conflicts do they have? If the subject-matter ex-pert is already busy, it's likely to be difficult to schedule his or her time. If there are several experts, how will disagreements among stakeholders be negotiated, and by whom? (It's not unusual for stakeholders from different parts of the business to have different views of the project requirements. This will alert you to dynamics that might stall your project.)
![]() Are there any meetings, holidays, vacations, or other important time events (like performance reviews or end-of-year processing) that will occur during your project? What impact will these events have on project work and on the availability of your project team members and stakeholders?
Are there any meetings, holidays, vacations, or other important time events (like performance reviews or end-of-year processing) that will occur during your project? What impact will these events have on project work and on the availability of your project team members and stakeholders?
Ask experienced project managers and yourself the following questions:
![]() What has happened on similar projects in the past that un-expectedly altered the time required to complete tasks?
What has happened on similar projects in the past that un-expectedly altered the time required to complete tasks?
![]() What challenges have arisen in the past in working with these stakeholders, team members, and subject-matter experts?
What challenges have arisen in the past in working with these stakeholders, team members, and subject-matter experts?
Project Manager's Toolkit: Setting Tasks, Resources, and Schedules
A project schedule documents
![]() tasks to be done
tasks to be done
![]() people who will do the tasks
people who will do the tasks
![]() the task sequence—the dependency
the task sequence—the dependency
![]() milestones, or dates for checking project progress.
milestones, or dates for checking project progress.
These components are documented in different ways, depending on the size and complexity of the project. In most cases, you'll use
![]() a work breakdown structure (WBS) to identify the tasks required to complete a project
a work breakdown structure (WBS) to identify the tasks required to complete a project
![]() the critical path method to illustrate your project's critical path network
the critical path method to illustrate your project's critical path network
![]() a Gantt chart to give a calendar view of the requisite tasks and a calendar view of those tasks by person
a Gantt chart to give a calendar view of the requisite tasks and a calendar view of those tasks by person
![]() a project tracking spreadsheet to chart projects that are less complex.
a project tracking spreadsheet to chart projects that are less complex.
If you're using project management software, any of those documents can be printed once the project information is entered. In fact, you can enter the project task information by using a simple table or drawing any of the diagrams in the software itself. One database holds the project data and all the diagrams are printed from the same data. With a central database, whenever a change is made to one document or diagram, it's reflected automatically on the others.
If your project is not large enough to merit the use of project management software, you can create your documentary diagrams using drawing software like Visio or even PowerPoint. In that situation, of course, the project data will not be updated automatically across documents, so it's better to use fewer types of diagrams when you draw them manually. You'll learn more about each of these illustrative documents and what they're best used for later in this step.
The Tasks
Building a realistic project schedule requires some brainstorming. A work breakdown structure is the tool most commonly used to identify tasks that need to be done.
Work Breakdown Structure
Brainstorming using a work breakdown structure (WBS) is a hierarchy-illustration approach that helps you translate the big-picture goals of the project into the tasks (the work) that will be done to meet those goals. The WBS is not a project tracking document, and it isn't maintained for the life of the project. It's just a worksheet to get you ready to prepare your project schedule.
Let's look at example 6.1. It shows a simple work breakdown. A WBS resembles an organizational chart because it identifies and illustrates hierarchical relationships—in this case, among tasks. In the top box, usually called an “activity,” you place the name of your project. At the next level down, you place a box for each big-picture sub-activity your project demands. The highest-level activities are arranged horizontally across the top; the lower-level activities break down into branches from there. (Although I've imagined that the project WBS diagramed in example 6.1 has three big-picture sub-activities, I've only filled in the details of the first one—”Hold Project Status Meeting.”)
When you've identified all the big picture sub activities, consider each of them separately. Is “Hold Project Status Meeting” an activity that cannot be broken into smaller tasks? Or does it comprise several lower-level endeavors? Although it might seem that holding a project status meeting is a basic task, there really are several actions involved in it. Identifying those lower-level tasks—all the way down to the most basic action—is what the WBS is all about. It breaks down the work of the project to its most elemental components—what we ultimately call “tasks.”
EXAMPLE 6.1
Work Breakdown Schedule Basics

So, what's involved in holding a project status meeting? Here's how I've broken it down in the example:
![]() schedule the meeting
schedule the meeting
![]() hold the meeting
hold the meeting
![]() follow up after the meeting.
follow up after the meeting.
Next, consider each of those component activities to identify any lower-level tasks required. Are there smaller tasks to be done in scheduling the meeting? I think there are, and here's my list of tasks:
![]() reserve meeting room and equipment
reserve meeting room and equipment
![]() set the agenda
set the agenda
![]() invite attendees
invite attendees
![]() create handouts.
create handouts.
In our example, I've decided that “Hold the Meeting” is so basic that it has no lower-level required work. “Follow Up after the Meeting,” however, is an activity that must be broken down to the next subordinate level of component tasks:
![]() document conclusions of the meeting
document conclusions of the meeting
![]() distribute conclusions
distribute conclusions
![]() update the project schedule as needed.
update the project schedule as needed.
At this breakdown depth, I think that the work is basic and measurable enough to be considered “tasks” and assigned to people.
To be clear here, “tasks” are always the lowest level of detail—the last branches on the WBS diagram. But the last branches don't always occur at the same level. In example 6.1, “Hold the Meeting” is a task because it has no lower-level work—it's at the end of its branch. However, activities at the same level as “Hold the Meeting” do have component tasks. “Schedule the Meeting” and “Follow Up after the Meeting” branch deeper into subordinate tasks, and it is those tasks that I'll put into my project schedule. Only tasks (not higher-level activities) are time scheduled and assigned to a person or group of people.
Even in our simple example, you probably thought of an activity that you would either remove, change, or add to my branch structure. That's the power of this visual exploration of what needs to be done—it's a way for a group of people to share their ideas and deepen their understanding of the project.
Here are some other points to remember about the WBS:
![]() Use your project's scope diagram to identify the highest-level activities. The data flows between the project and the stakeholders in the scope diagram point these out.
Use your project's scope diagram to identify the highest-level activities. The data flows between the project and the stakeholders in the scope diagram point these out.
![]() An unlimited number of equal-importance (“peer”) activities can be listed at any level of the breakdown. Your goal in creating this diagram is to bring to the surface every bit of work needed to accomplish the project.
An unlimited number of equal-importance (“peer”) activities can be listed at any level of the breakdown. Your goal in creating this diagram is to bring to the surface every bit of work needed to accomplish the project.
![]() Any activity can have an unlimited number of component activities/tasks. If an activity has only one component task, it's not necessary to list it.
Any activity can have an unlimited number of component activities/tasks. If an activity has only one component task, it's not necessary to list it.
Tool 6.1 offers some additional ideas to spark your task break-down brainstorming. Much of the research you've already done on your project will come in handy as you define project tasks.
A WBS can be quite extensive and complex when all the activities are carefully broken down, step by step, into basic tasks. In a brainstorming session, I find it useful to build these branching diagrams on flipcharts with sticky notes. Trying to build these charts with software is usually frustrating because printing all the branches on a standard sheet of paper is nearly impossible—unless you're willing to deal with type so tiny you need a magnifier. Because the WBS is a temporary worksheet, build it on flipcharts or a white-board, and take a digital picture of it for documentary purposes. WBS diagrams are not shared as part of the communications plan. Once the tasks are slotted into the project schedule, the WBS is no longer needed.
TOOL 6.1
Sources of Information to Use When Brainstorming Project Tasks
1. The scope context diagram:
![]() Arrows going out to stakeholders show output to be delivered. What tasks will need to be done to get that output built?
Arrows going out to stakeholders show output to be delivered. What tasks will need to be done to get that output built?
![]() Arrows coming into the project from the stakeholders show their input. What tasks will need to be done to request these inputs and to provide feedback on what else is needed?
Arrows coming into the project from the stakeholders show their input. What tasks will need to be done to request these inputs and to provide feedback on what else is needed?
2. Risk scenarios:
![]() The risk scenarios you described earlier identified tasks needed to mitigate high risks. Have those tasks been added to your work breakdown?
The risk scenarios you described earlier identified tasks needed to mitigate high risks. Have those tasks been added to your work breakdown?
3. Communication plans:
![]() Each stakeholder requires some sort of communication from the project. What tasks will need to be done to ensure that each stakeholder has the needed communication?
Each stakeholder requires some sort of communication from the project. What tasks will need to be done to ensure that each stakeholder has the needed communication?
![]() How often will you hold project status meetings? Who will be there? What will have to be done to hold these meetings successfully?
How often will you hold project status meetings? Who will be there? What will have to be done to hold these meetings successfully?
4. Project management activity:
![]() What tasks are you committed to planning, organizing, and controlling for the project?
What tasks are you committed to planning, organizing, and controlling for the project?
![]() What tasks are needed to measure the ongoing status of the project and achieve the milestones?
What tasks are needed to measure the ongoing status of the project and achieve the milestones?
Your company may have a standard project method that includes a list of the tasks to be done. In training development, for example, there's an instructional systems design method called the ADDIE (Analysis, Design, Development, Implementation, and Evaluation) approach; and in information technology there are many sys-tem development life-cycle approaches, including structured, object-oriented, and agile methods. Standard methods are not meant to be applied in the same way to every project. Instead, they document the greatest number of tasks you would ever need. As an expert on your project, you'll choose which parts of the method are appropriate for your project. These preset methods, based on a good deal of research, are great ways to jump-start your project task discovery and they often prompt you to think of things you might not have considered on your own. If your organization doesn't have a standard method, search the web for some options. Many companies and public organizations publish their methods for others to use.
People approach the WBS in different ways. Some people don't like to brainstorm from the big picture to the detailed level—what's called “top-down” brainstorming. Some prefer to brainstorm only at the detailed level, and others start somewhere in the middle by defining the larger functions that need to be done and working down to the detailed tasks. Use whatever technique works best for you, as long as it results in a comprehensive list of the tasks needed to complete the project.
Task Assignments
Many project managers know how to build a schedule, working with tasks, dependencies, time, and milestones like pieces of a giant jig-saw puzzle. But the truly critical elements of a project schedule are the people assigned to the tasks. Everyone can think of a time when having the wrong person on a project team hindered progress.
Suppose you're ready to begin a highly charged, mission-critical project. What can you do when you're staring down the project gun barrel? How can you build a schedule that will minimize troubles and maximize success? At an address I gave on project management for the American Museum Association conference, I was approached by a woman who shared with me precisely those fears about a politically sensitive project. She asked for advice about what to demand from her stakeholders to ensure success. As she talked, she began answering her own question. “Sure,” she said, “I know I have to ask for a lot of extra people since I can't ask for more time because we can't have it. The museum opening is fixed and advertised.” When I told her I wouldn't ask for lots of extra people, she was surprised, and she pointed out that the nice thing about politically charged projects is that, at least in the beginning, the project manager has some clout to get more of what she needs. Here's why I disagreed with her approach.?
Extra bodies don't help a project; they slow it down. If I were in her shoes, I'd ask for a few great people—quality trumping quantity. Better to have fewer people on a time-constrained project because the communication among them is more efficient. And it's vital that these people be A+ players. A highly political, time-constrained project is no place to develop talent.
In addition to being technically great, the people you choose must be superior collaborators. Great technical people with outsized egos will cripple a project like this. High-profile projects attract people who want to make a splash, get noticed, stand out. If the project is “all about me” for the people on the team, the team will struggle to work collaboratively toward project goals.
Your team members must also be customer centered, no matter what happens. Under stress, many strong and talented people become whiney blamers. It's rare to find people who can take the punches of a tough project, keep from pointing fingers, and continue asking the customer, What can we do to help with this situation? That doesn't mean that scope changes are ignored, but it does mean that the communication lines are kept wide open through a constant partnership with the sponsors of the project.
I've found that a project manager rarely gets to pick the members of the project team. More often, the executive sponsor picks a team for you to work with. When this occurs, make a special effort in the beginning to help your team understand how important it is that they be great collaborators and customer advocates.
If this truly is a mission-critical project, there's a decision that your sponsor can make that will be extremely helpful: she or he can dedicate each team member's full time to the project. Ask that the members of the team be gathered in a common space, away from the day-to-day crises and interruptions. The kind of single focus that an incubator-style environment will produce keeps the project on track and achieves the best results.
Research has shown multitasking to be counterproductive for most people, and the loss of focus expands exponentially when project pressures grow. Most of us do our best work focused on one issue at a time.
Task Estimating
With a compiled list of tasks and people assigned to your project, it's time to figure out the amount of time needed to complete each task. The word duration is used here to describe how long each task will take, but it's used in different ways as the project progresses:
![]() Task duration is how long a task will take a person with average skills working uninterrupted. The key words here are average skills and uninterrupted. This is the first step in estimating, and it's done during this Plan phase.
Task duration is how long a task will take a person with average skills working uninterrupted. The key words here are average skills and uninterrupted. This is the first step in estimating, and it's done during this Plan phase.
![]() Planned task duration is the amount of time you've set aside for a task, given the assigned worker's skill level and time available. The planned task duration is adjusted based on the person working on it, and this happens during the Plan activities as well.
Planned task duration is the amount of time you've set aside for a task, given the assigned worker's skill level and time available. The planned task duration is adjusted based on the person working on it, and this happens during the Plan activities as well.
![]() Elapsed time duration is how much time you think it will take for the assigned person to complete a task. This is the time on the clock or calendar that will be required to complete the task—this differs from task duration in that it presumes typical interruptions.
Elapsed time duration is how much time you think it will take for the assigned person to complete a task. This is the time on the clock or calendar that will be required to complete the task—this differs from task duration in that it presumes typical interruptions.
POINTER
Building the Best Team
![]() Start with a few great people instead of lots of mediocre people. Productive project teams comprise fewer people, not more.
Start with a few great people instead of lots of mediocre people. Productive project teams comprise fewer people, not more.
![]() Don't pick people for their technical abilities only. Consider how they work with others as you make your choices.
Don't pick people for their technical abilities only. Consider how they work with others as you make your choices.
![]() Pick people who understand the business and care about helping the business meet its strategy goals.
Pick people who understand the business and care about helping the business meet its strategy goals.
![]() Dedicate the team to the project as fully as you can. If you can't have team members full-time, figure out ways to have them work on your project in large chunks of time, rather than five minutes here and there.
Dedicate the team to the project as fully as you can. If you can't have team members full-time, figure out ways to have them work on your project in large chunks of time, rather than five minutes here and there.
The differences among these three meanings of duration may be confusing at this point, so let's try to clarify them with an ex-ample. Given the task “reserve meeting room and equipment” from the brainstormed WBS in example 6.1, the project manager determines that an average-skilled worker doing the task without interruptions will need one hour. In other words, it will take the average person 60 minutes to figure out what person to call, to call him or her, and to give that person all the details needed to reserve the room and equipment. Therefore, the task duration is estimated at one hour.
Now let's say the project manager is going to do this task her-self. She has scheduled meetings many times in the past, and she knows exactly which person to call and what to ask for. Because of her familiarity with the task, she'll use less time to complete it. She sets the planned task duration at 30 minutes. (Later in this step we'll talk more about how to adjust planned task duration according to the skills of the person working on the task.)
But neither the one-hour task duration nor the 30-minute planned task duration guarantees the actual clock or calendar time needed for the task. What if the person in charge of scheduling rooms is in an offsite meeting or away on family leave? What if there aren't any rooms available? What if the equipment is being serviced? So many uncontrollable things could happen, and they'll increase the time it takes to reserve the room and equipment. Our project manager realizes that some other work will interrupt this task and that there'll be phone tag or email tag adding time to it, so she takes all of that into account to estimate the elapsed time duration. This is the span of time, on the clock, that stretches from the moment she begins the task (decides who to contact) until she completes it (ends the phone call or email confirming the arrangements). She estimates that at four hours.
As you see, we have three amounts of time—one hour, 30 minutes, and four hours. Creating a project schedule based on the 30-minute planned task duration would severely underestimate the time needed to reserve the meeting room and equipment. In the real world, we rarely have time to work on tasks uninterrupted, and it's equally rare that everyone and everything we need to complete a task will be available at exactly the moment we need them. Therefore, it's not enough to estimate task duration or to rethink that estimate and produce an estimated planned task duration in light of the skills of the person doing the work. The real world demands that we go one step further and arrive at an estimate of the time a task will take when all the likely uncontrollable factors are accounted for—that is, the elapsed time duration.
It's important to note that all estimates of the time needed for a task are best-guesses. For making those guesses, experience and instinct are good foundations. The experience of people who've done these tasks before is your strongest asset when estimating the initial task duration. If you're new to project management, ask some of the more experienced managers you know to take a look at your estimates.
Most people are overly optimistic when estimating time. The problem is, of course, that you never work on a project task uninterrupted and no one has average skills. We've all been amazed when tasks of short duration took hours on the clock, and we've all been frustrated by people taking twice as long doing tasks at which we're expert. That's why the project schedule needs to show elapsed time duration rather than the task duration and planned task duration estimates that help you arrive at the actual clock/calendar time.
In Step 7 you'll be managing the project in progress, and you'll monitor a fourth time measurement—actual task duration. This is the amount of time the completed task really did take, and it's recorded during the Manage phase because it's useful for adjusting the project's ongoing schedule, and because it's helpful in learning lessons at the post-project review.
So, how do we convert task duration and planned task duration estimates to workable elapsed time duration estimates for the project schedule? In the early 1980s, AT&T Bell Labs developed an algorithm for doing that. Worksheet 6.1 presents the process for working from the initial task duration to elapsed time, based on the following factors:
1. The knowledge and skills of the person doing the task (termed the resource): Highly experienced resources can finish a task more quickly than the average person. Resources with little or no experience can take up to four times as long to finish a task. When you've factored in the abilities of the resource, you have moved from task duration to planned task duration.
WORKSHEET 6.1
Converting a Task Duration Estimate to an Elapsed Time Estimate
Instructions: Begin by writing the amount of time you believe the task would take a person with average skills working without interruption. Then follow the directions for making the three calculations.
Task duration:___________________________
Step A: Consider the Resource Factor: How knowledgeable about the business area and the required technical skills is the person who will be doing this task?
![]() With a highly experienced resource, multiply the task duration figure by a resource factor of 0.5.
With a highly experienced resource, multiply the task duration figure by a resource factor of 0.5.
![]() For an inexperienced resource, multiply the task duration figure by a resource factor of 4.0.
For an inexperienced resource, multiply the task duration figure by a resource factor of 4.0.
![]() For everyone else, make an assumption about their skill levels and multiply the task duration figure by a resource factor between 0.5 and 4.0 that corresponds to your assumption of their skills.
For everyone else, make an assumption about their skill levels and multiply the task duration figure by a resource factor between 0.5 and 4.0 that corresponds to your assumption of their skills.
Step A calculation: Task duration x____=_____
Step B: Consider the Project Factor: How much project work really can be done in one day? What other project work will compete with the task for time? What is the project's risk level? How much extra time will be spent on re-planning and communication because of the level of risk involved?
![]() If the resource will be dedicated to the task full time and the project has a low level of risk, add a project factor of 10 percent of the amount calculated in step A.
If the resource will be dedicated to the task full time and the project has a low level of risk, add a project factor of 10 percent of the amount calculated in step A.
![]() If the resource is splitting time between several high-risk projects, add a project factor of 30 percent of the amount calculated in step A.
If the resource is splitting time between several high-risk projects, add a project factor of 30 percent of the amount calculated in step A.
![]() For other availability and risk combinations, add a project factor between 10 and 30 percent of the amount calculated in step A.
For other availability and risk combinations, add a project factor between 10 and 30 percent of the amount calculated in step A.
Step B calculation: Amount calculated in step A +____=____
Step C: Consider the Company Factor: How much time will be diverted from the project task by company processes and typical business tasks—taking vacations, holidays, and sick leave; answering email; attending training sessions and all-hands meetings? The corporate culture will determine to what extent this factor will affect the time needed to complete a task.
![]() Calculate 10 to 20 percent of the amount of time arrived at in step B, and then add that percentage to the time calculated in step B.
Calculate 10 to 20 percent of the amount of time arrived at in step B, and then add that percentage to the time calculated in step B.
Step C calculation:
Amount calculated in step B +_____=_____= Elapsed Time Duration
2. The project's level of risk: Potential problems directly affect the amount of time that must be spent managing and communicating.
3. Interruptions related not to the project but to company practices and culture.
Example 6.2 uses the calculations described in worksheet 6.1 to arrive at an elapsed time duration for one task in our blog project. Notice that a task with a 20-hour task duration became almost 58 hours of elapsed time. Although this inflation seems stunning, we routinely underestimate how long it will take to finish a task. Did anything you did yesterday take longer than you expected? Enough said.
EXAMPLE 6.2
Blog Project: Conversion of Task Duration Estimate to Elapsed Time Estimate
Task: Create a high-level blueprint
Task duration: 20 hours
Step A calculation (assuming a resource with average skills and experience): 20 hours x 2 = 40 hours
Step B calculation (using a multiplier of 20 percent, assuming a project with midlevel risks and a resource who spends part of the time on the project):40 hours + 8 hours = 48 hours
Step C calculation (using a multiplier of 20 percent, assuming an intense corporate culture that frequently interrupts project work):48 hours + 9.6 hours = 57.6 hours
Elapsed time duration: 57.6 hours ?
POINTER
Project Management Time
In our proposals, depending on the risk of the project, we do a time estimate and then add between 10 and 30 percent for project management activities. The higher the risk, the more time we'll spend on project management.
Today's project management software can make some calculations for you because it lets you enter the percentage of a person's time you'll use. This feature is very helpful in large, interdisciplinary projects on which people serve as part-time re-sources, but it gets confusing when you're working with 10 percent of a person. For example, the program will tell you the person will be available to you four hours in one week, but how do you know which four hours it will be? The project management software considers only the resource factor—not project and company factors. You'll need to figure those out on your own.
Using the three-step conversion for every task your project re-quires would be too time consuming for most projects. As a short-cut, when you do your initial task duration estimate, think about the person who'll be doing the task and add the resource factor then. Then consider adding 20 percent for risk and 20 percent for company-mandated diversions. You can put dummy tasks into the schedule to hold this extension of time prior to each milestone. Or you might add one large task at the start of the project schedule to provide the extra time you may need as the project moves along. If you're using management software, lower the percentage of time each resource is available. That spreads the time required across the entire project.
Two psychological issues influence our task-estimating accuracy:
1. All of us estimate optimistically; we lean toward the best-case estimate rather than the most realistic one. In most cases, our estimates are too low.
2. If we adjust our estimates to make them more realistic, we know we've made that adjustment and we think of it as “extra” time. We may become less attentive to tasks that are running late.
The three steps of estimating described on worksheet 6.1 and illustrated in example 6.2 can help with the first psychological is-sue, but may encourage the second. Remember, you're not adding “extra” time; you're making the estimate realistic. To overcome any negative results of these psychological issues, approach estimating in the following way:
1. Build your initial task duration estimate based on your historical experience, and lean toward a reasonable rather than a best-case estimate.
2. Consider who will be working on the tasks, and inflate the task according to the guidelines in conversion step A.
3. Determine the best way to acknowledge that you will use an additional 10-20 percent of the project time for project management, and 10-20 percent of the time for company “interruptions.”
Task Scheduling with the Critical Path Method
Now that you've estimated how long each individual task will take, figure out the order in which the tasks will be done. It's time to plug all the tasks together, using the critical path method to create what's called a critical path diagram. This diagram will enumerate each task and show how the tasks depend on each other. If tasks can be done at the same time along parallel paths, the diagram shows you which parallel path will take the most time—that is, which path is critical. The project manager needs to monitor most closely the critical (longest) path of tasks because the project will be late if any of the tasks on that path are late. You'll update your critical path diagram throughout the project, adjusting it as actual task durations or project changes affect the schedule.
Critical path diagrams can be constructed using sticky-notes, drawing packages like Microsoft Office Visio or Smart Draw, or more complex and rigorous project management software such as Microsoft Project or Primavera. Your choice should depend on the complexity of your project and on how many people will share the diagram. Clearly, using software to calculate (and recalculate) dates saves a lot of time on a large project. When first setting up a critical path diagram, it usually is helpful to do your initial thinking with sticky-notes and then enter the information into software, if you're using any.
At this point, you'll also want to determine what the mile-stones of the project will be. Milestones are points in the project where you stop and measure progress. By definition, milestones have no duration, so they're not tasks. They do, however, have dates associated with them. For example, in the “Hold Project Status Meeting” branch of the WBS illustrated in example 6.1, there were tasks under “Schedule the Meeting” and “Follow Up after the Meeting”; and “Hold the Meeting” was a task. Milestones might be set up in two places—after the “Schedule the Meeting” tasks and “Hold the Meeting” are completed, and then again after the “Follow Up after the Meeting” tasks. On the project schedule, milestones show up like tasks, but they have only a date, not a duration.
Figure 6.1 shows you the graphic elements of a critical path diagram. Notice that the tasks on this diagram are represented by squares; milestones are represented by round-corner rectangles. Arrows indicate the relationships among tasks.
There are two types of dependencies illustrated in the critical path diagram: task dependency and resource dependency. Task dependencies occur when one task must be finished before another task can begin. (For example, task 1 in figure 6.1 must be completed before task 3 can begin.) Resource dependencies occur when more than one task will be done by the same person. (In figure 6.1, to show you resource dependency, I've assigned task 1 and task 2 to the same person so the project manager decides which task should be done first and which should be done second.)
In figure 6.1, two milestones are set—one to start the project and one to make sure that the first phase of the project is complete. Notice there is an arrow leading out of milestone 2; it indicates that there is more to come in the project. Remember, a mile-stone has no duration; it's simply a date monitored by the project manager. All tasks leading up to a milestone must be completed before the milestone date—and that's why paths that diverge along the way reconnect at the milestone.
FIGURE 6.1
Critical Path Diagram
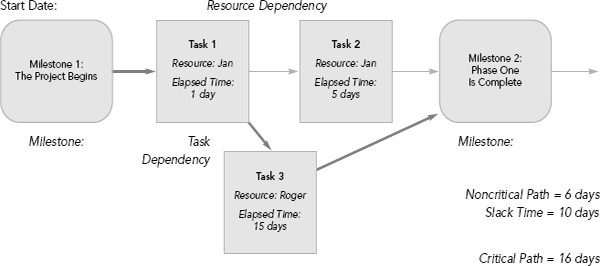
The critical path is the task path that will take the longest to complete. Figure 6.1 shows two paths:
1. The path from milestone 1 (where the project begins) to task 1 (one day) to task 2 (five days) to milestone 2. That path duration equals six days.
2. The path from milestone 1 (where the project begins) to task 1 (one day) to task 3 (which cannot begin until task 1 is completed, and is estimated to take 15 days) to mile-stone 2. That path duration equals 16 days.
The path that includes task 3 is the longer path. Therefore, it is called the critical path, and the arrows indicating the relationships among tasks (dependencies) along that path are heavier.
The other path is a noncritical path. In fact, it's a full 10 days shorter than the critical path. Those 10 days are called “slack time” and the resources involved on this path have 10 “free days.” The project manager can think about assigning some of the resources in this noncritical path to task 3 or to another project during this “free” time.
Project management software automatically calculates critical paths, slack time, and end dates (for milestones) on the basis of tasks, resources, and elapsed time estimates. In fact, if you're using project management software, it's best to let the software calculate as many dates as possible.
Now that you've seen what a critical path diagram looks like and how to read it, let's talk about how you create one for your project. Before you can build a critical path diagram for a specific project, you must have (1) a complete list of tasks and milestones, (2) a list of the resources assigned to the tasks, and (3) estimates of elapsed time duration for each task.
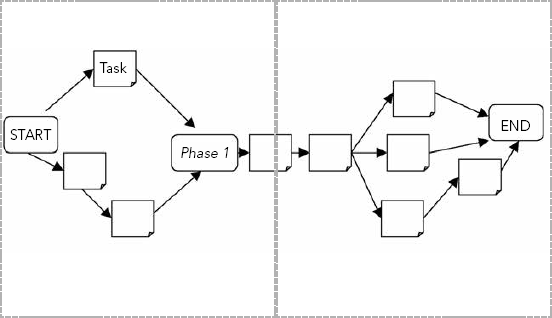
The first thing you do is to arrange all project tasks and mile-stones in order. This arranging does two important things: (1) it shows how tasks are related to one another, and (2) it begins to answer the question on all stakeholders' and team members' minds: When will my task(s) start and end? Your task sequencing depends on whether a task has to be completed before another (task dependency) or whether multiple tasks will be done by the same per-son (resource dependency). To do this arranging work, get some large flipchart paper and some sticky-notes. Get a copy of your WBS and, for each task, write the task description, the name of the per-son assigned to it, and the elapsed time duration estimate on its own sticky-note. Do the same for all of the project tasks identified in your WBS. Remember, only the tasks in the bottom-most branches are used for the project schedule. Arrange the sticky-notes in order on the flipchart paper, moving from a “START” milestone on the left to an “END” milestone on the right. Show dependencies by drawing arrows between tasks and milestones. For larger projects, this may take several or many flipchart pages posted side by side on the wall.
In arranging the notes, remember these two things:
1. Tasks that are being done by the same person must be connected with an arrow to show dependency.
2. If one task must be completed before another can begin, those two tasks must be connected with an arrow to show dependency.
Tasks with no dependencies can be done in any order you feel is appropriate. Figure 6.2 shows how this sticky-note arrangement might look. In the process of putting these tasks together, it's not unusual to discover some new tasks or to decide that the brainstorming session broke some tasks down too low. The list of tasks taken from the WBS is just a guideline, not a hard-and-fast rule. Feel free to make adjustments as you create your critical path diagram.
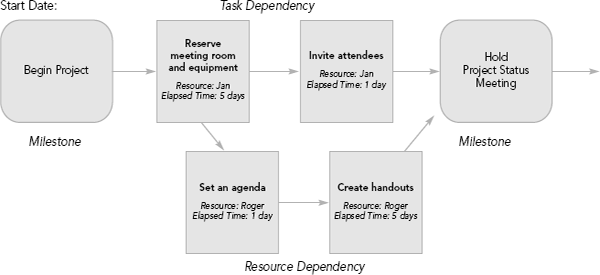
Example 6.3 shows how the tasks for example 6.1, “Hold Project Status Meeting,” would be mapped to a critical path diagram. Notice how the tasks that have been put in the diagram are the lowest-level tasks from the WBS. The diagram in example 6.3 is slightly more complex than the diagram presented in figure 6.1. There's a task dependency between “Reserve Meeting Room and Equipment ”and “Invite Attendees” because you can't send invitations until you know in what room the meeting will be held. There's a resource dependency between “Set an Agenda” and “Create Handouts” because Roger is working on both tasks. You could make a case that there's a task dependency between these two tasks as well. These dependencies are shown by the arrows. The dark arrows show the critical path.
FIGURE 6.2
Task Arrangement Using Flipchart Pages and Sticky-Notes
What would the duration of the critical path be for this diagram? Notice that the two paths leading into the task “Hold the Meeting” both have durations of six days. That means that both of these paths are the longest paths, so both also are critical paths. Moving to the next parallel paths that go out from “Hold the Meeting,” the top path is three days and the bottom is two days, so the top path is the critical path. The total duration of the entire critical path shown in this example is 6 + 3 = 9 days. What is the slack time of the noncritical path? The slack time is one day because that path requires one day less than the parallel path above it in the picture.
EXAMPLE 6.3
Critical Path Diagram for Part of a Project
If you're using project management software to build your critical path diagram, remember that the slack time defined by the soft-ware is the slack time for the entire path—not for any one specific task. The software doesn't allocate the extra time across multiple tasks; and if one task on a path uses all the slack time, there is no slack time for other tasks along that path.
Task Scheduling with a Gantt Chart
A Gantt chart (named for American engineer Henry Gantt) shows the same tasks, resources, milestones, dates, and time estimates as does the critical path diagram, but it arranges them differently. Gantt charts depict progress in relation to time. For example,
![]() overall project progress across a calendar
overall project progress across a calendar
![]() each person's progress in completing tasks across a calendar.
each person's progress in completing tasks across a calendar.
A critical path diagram is good to answer the questions, How is my critical path doing? and What tasks are dependent on others? A Gantt chart is good at answering the question, It's Monday, so where should my project be, what should my team be doing, and what's the status?” Critical path diagrams are useful for planning and adjusting schedules; and Gantt charts are good for managing project tasks and teams.
Take a look at the basic Gantt chart I've drawn (figure 6.3). It includes generic labels to show you what goes where and how to depict each element. This Gantt chart shows people down the vertical axis and dates across the horizontal axis. All the people involved start at the first milestone, indicated by a dark diamond. Notice that person 2 hasn't started any project tasks at the beginning, but the milestone is still shown. Similarly, all the people involved have ending milestones.
The length of the task bar depends on the amount of elapsed time each task would take. You can write the name of the task in the task bar or directly above it. Task 2, assigned to person 2, can't begin until task 1, assigned to person 1, is finished. that dependency isn't as obvious in the Gantt chart as it is in the arrow-defined critical path diagram. You can see that task 2 isn't scheduled to start until after task 1 is finished if you look at the way the task bars line up, but you don't know if this is a task dependency or if person 2 simply couldn't start until then. Remember, information about task dependencies is easier to see on the critical path diagram.
FIGURE 6.3
Generic Gantt Chart

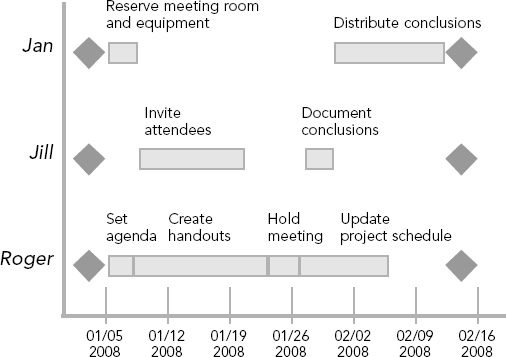
Example 6.4 uses the Gantt chart to illustrate the “Hold Project Status Meeting” tasks we identified earlier. Jan, Jill, and Roger are working on this project. Notice that Roger's work begins at the Start milestone and he has some slack time to complete his last task before the final milestone. Jan begins work at the Start mile-stone and has slack time between her first and second tasks. Jill does not begin work at the Start milestone, and she has two periods of slack time between her first task and the final milestone. Using this view of the project schedule is likely to provoke some new questions and may help you uncover even more tasks. For example, why aren't Jill and Jan going to the meeting? How can Jill document the conclusions of the meeting if she isn't there?
If you use project management software, you'll find that different views of the project information can be created instantly. As you learned earlier, the project schedule data are stored in one place, and the software lets you to look at them in many different ways: as a table, as a critical path diagram, and as multiple types of Gantt charts. It's difficult to draw and maintain changing critical path diagrams and Gantt charts by hand. If the size and risk of your project merit the time investment and learning curve, mechanizing your project schedule can be both a time saver and a tool to expand your comprehension of the project you're managing.
EXAMPLE 6.4
Gantt Chart for “Hold Project Status Meeting”
Task Scheduling with a Project Tracking Spreadsheet
If you have a small- to medium-size project, consider managing by dates rather than tasks. Use a project tracking spreadsheet instead of the critical path method.
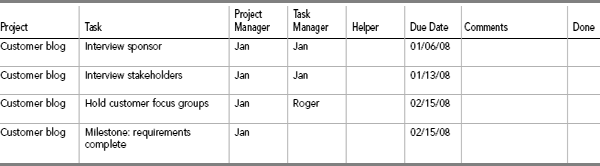
Many of my projects are event related (training, facilitation, and so forth), so they're not as complex as some of your projects may be. To communicate with my stakeholders, I convert my critical path diagram into a simple spreadsheet (see example 6.5). Tasks, people assigned, and completion dates are included.
The critical path method works best when you're able to re-quest a project completion date. The primary difference between my spreadsheet approach and a critical path approach is that I use the spreadsheet to manage to a date, that has been given to me, rather than to manage by task duration. In setting up the spreadsheet for an event to be held on a certain date, for example, I begin with that date (generally supplied by my sponsor) and work backward, subtracting a task's elapsed time duration to figure out what date the task must begin. As I set the dates, I keep in mind who's working on the tasks and all task dependencies that I've identified in my critical path diagram. Generally, there are fewer than 50 tasks on my list, so it's not difficult to keep all this in mind as I set dates. Example 6.6 shows how to start at the end and work back-ward to set the start dates for project tasks.
Notice in example 6.5 that I include both a project manager and a task manager on the spreadsheet. As is clear throughout these 10 steps, the project manager is accountable for making sure every project task is completed on time, within budget, and within quality specifications. But the project manager doesn't have to do all the tasks. The task manager is the person who'll be doing the task. In many of my projects, I wear both hats for some or all of the work, and I make that clear on the tracking spreadsheet. This spreadsheet helps me keep track of my project management responsibilities and my other deliverable tasks within the project. It also reminds me to check back with other people working on tasks on the project before they do get late.
The limitation of this spreadsheet is that it doesn't show task or resource dependencies. If you're managing a project that's too large to keep these dependencies clear in your head, a simple spreadsheet is not going to be adequate for planning or tracking. Select the critical path diagram and/or Gantt chart instead. But for any size project, a simple spreadsheet can be useful as a macroscopic communication tool to keep all parties informed. You'll learn more about this in Step 7.
EXAMPLE 6.5
Blog Project Tracking Spreadsheet
EXAMPLE 6.6
Working Backward from a Due Date to Identify a Start Date

Communication
Having a project schedule gives you crucial data you'll track to monitor the status of the project, and it will provide information for you to pass along to your stakeholders. The schedule will change and, when it's adjusted, the stakeholders need to be notified so they see how the change affects the overall schedule. Their resources and tasks may be delayed. Remember flexible structure: at all times you have a schedule, and at all times you're ready to adapt it to meet the needs of the business.
Again, it's the stakeholders who'll judge the success of the project at the end. The more communication you establish in the beginning and maintain all the way through, the greater the likelihood they'll be happy when the project is complete. The project schedule is one of the most important communication tools.
What If I Skip This Step?
Don't. Doing the work needed to break a project down into requisite tasks, to arrange those tasks in the appropriate order with dependencies identified, and to plug all of that information into a manual or digital scheduling mechanism takes a lot of focus. But it will drive the success of your project. You can't manage what you don't understand. Even if you're the only one on the project, doing your work on the fly and dreaming up your next task as you go along absolutely guarantees rework, misunderstanding, and a last-minute crisis. That may explain the current statistic that 80 percent of projects fail to meet their pre established goals for quality, cost, or timelines. Creating a good project schedule isn't hard; it just takes discipline.
Now, of course, the downside: Before you get your left brain too excited about this wonderful scheduling and tracking, be warned that the minute you finish your schedule, it will be wrong or obsolete. Something will happen to a resource or a time estimate or to the business and some part of your schedule will be upended. So it's good to think of the project schedule as an evolving blueprint rather than the Holy Grail. Keeping it up-to-date is part of the deal.
As fragile and mutable as the details of your schedule may seem at any moment, however, preparing a schedule offers such critical advantages (tool 6.2) that it's unlikely you'll be successful without one.
Lurking Landmines
![]() You discover that you're not going to be given enough re-sources. The time to talk about this is right at the start, not when your project is late. Don't be tempted to stretch the provided resources (most likely, you) by building over-time into the project before it starts. Planning “best case” is a dangerous and usually destructive activity. Talk about cutting scope or extending the deadline now.
You discover that you're not going to be given enough re-sources. The time to talk about this is right at the start, not when your project is late. Don't be tempted to stretch the provided resources (most likely, you) by building over-time into the project before it starts. Planning “best case” is a dangerous and usually destructive activity. Talk about cutting scope or extending the deadline now.
![]() The constraints seem to be changing. Your sponsor told you back in Step 2 that quality was the primary goal for this project. Now, as you complete the project schedule, the sponsor asks you to get it done in half the time you've planned. Not only does this alter your project schedule, but the constraints have also changed. Revisit the deliverables in Step 2 to make sure that you and the sponsor still agree on the Define phase deliverables, especially the business case.
The constraints seem to be changing. Your sponsor told you back in Step 2 that quality was the primary goal for this project. Now, as you complete the project schedule, the sponsor asks you to get it done in half the time you've planned. Not only does this alter your project schedule, but the constraints have also changed. Revisit the deliverables in Step 2 to make sure that you and the sponsor still agree on the Define phase deliverables, especially the business case.
TOOL 6.2
Advantages of the Project Schedule
![]() A detailed project schedule is your game plan. Everyone involved with the project—sponsors, stakeholders, team members—can look at the plan and figure out what's going on and, more important, what they're supposed to be doing at any given point.
A detailed project schedule is your game plan. Everyone involved with the project—sponsors, stakeholders, team members—can look at the plan and figure out what's going on and, more important, what they're supposed to be doing at any given point.
![]() The impact of change can be illustrated and communicated visually through a well-maintained project schedule. When large change is brewing, the schedule will serve as a what-if simulator, indicating the downstream effects of a change at any point.
The impact of change can be illustrated and communicated visually through a well-maintained project schedule. When large change is brewing, the schedule will serve as a what-if simulator, indicating the downstream effects of a change at any point.
![]() The extensive detail in the schedule frees the project manager to work on influencing and troubleshooting. When everything is written down or charted, there's no need for the manager to explain every task to every person when it's time to perform the task. Kept up-to-date and used correctly, the schedule keeps the project manager from becoming the constraint of the project. If the only place project status exists is in the head of the project manager, she or he will be interrupted continually whenever there is a question.
The extensive detail in the schedule frees the project manager to work on influencing and troubleshooting. When everything is written down or charted, there's no need for the manager to explain every task to every person when it's time to perform the task. Kept up-to-date and used correctly, the schedule keeps the project manager from becoming the constraint of the project. If the only place project status exists is in the head of the project manager, she or he will be interrupted continually whenever there is a question.
![]() The schedule provides a detailed audit of what really happened on a project so people can learn from the experience and use those lessons on future projects.
The schedule provides a detailed audit of what really happened on a project so people can learn from the experience and use those lessons on future projects.
Step 6 Checklist
![]() Identify the tasks needed to complete the project.
Identify the tasks needed to complete the project.
![]() Identify the people who will be working on the project.
Identify the people who will be working on the project.
![]() Assign resources to each task.
Assign resources to each task.
![]() Estimate the elapsed time duration for each task, adjusting when necessary.
Estimate the elapsed time duration for each task, adjusting when necessary.
![]() Sequence the tasks, based on task and resource dependencies.
Sequence the tasks, based on task and resource dependencies.
![]() Set due dates for key milestones.
Set due dates for key milestones.
![]() Build a project schedule using the techniques that are best for your project.
Build a project schedule using the techniques that are best for your project.
![]() Send a copy of your project schedule to everyone involved.
Send a copy of your project schedule to everyone involved.
The Next Step
The next step begins the Manage phase of project management. As the project begins, you'll learn to track your project status so that you see trouble coming early enough to adapt your project to counteract delays.