Chapter 26. TODO List

TODO List enables you to manage tasks in a fast, easy, and attractive way. Mark tasks with colored stars and/or detailed descriptions. Filter them in multiple ways, such as seeing overdue tasks, tasks due today, or tasks with stars. See what you’ve accomplished in a “done” list, with the ability to undo tasks. Trim the filters to only the ones you care about.
TODO List contains more code than most of the apps in this book, mostly because of list management: viewing items, viewing details for each item, sorting items, adding and deleting items, and editing items. The app has five pages: a main page, a details page, a page for adding or editing an item, a settings page, and an instructions page. The pages and code that enable all of the list management can be trivially adapted to any app that enables the user to manage items.
The main purpose of TODO List, however, is to demonstrate the pivot control. The pivot is one of the two signature user interface paradigms introduced by Windows Phone 7. (The other is the panorama covered by the next chapter.)
The Pivot Control
A pivot is basically a tabbed user interface in which you can swipe horizontally or tap one of the headers to switch to a different tab. This style of user interface is featured prominently in the built-in Mail, Calendar, and Settings apps, but also used by most of the other built-in apps: Internet Explorer, Maps, Marketplace, Music + Videos, People, and Pictures.
Pivots are designed to provide filtered views over the same set of data (as in the Mail app), distinct views over the same set of data (as in the Calendar app), or to provide easily switchable views over separate sets of data (such as application versus system settings in the Settings app). They are not meant to be used to expose sequential steps in a task, such as a wizard-style user interface. They are meant to occupy the entire page except, perhaps, for an application bar and/or status bar.
Just like the list box and list picker, pivot is an items control. Although the Pivot class exposes an Items collection to which any type of object can be added, only PivotItem objects or data objects should be added.
PivotItem is a simple content control with Content and Header properties of type object. Although these properties can be set to anything, Content is typically set to a panel such as a grid that contains a complex user interface, whereas Header is typically set to a string.
The pivot and panorama controls reside in an assembly that isn’t referenced by default in “Windows Phone Application” projects!
![]()
![]()
→ Header text should be lowercase, with the exception of proper names.
→ As already mentioned, do not use one to organize sequential tasks that the user must complete.
→ There should be no more than seven pivot items in a single pivot.
The Main Page
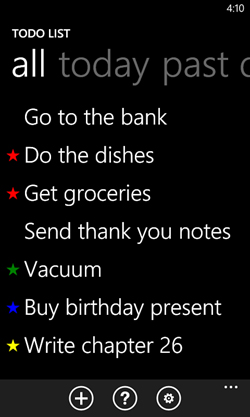
TODO List’s main page is the only one that uses a pivot. It contains five pivot items, all shown in Figure 26.1 in their empty states when first launching the app.
Figure 26.1 The five pivot items in their initial states.

The User Interface
Listing 26.1 contains the XAML for the main page.
Listing 26.1 MainPage.xaml—The Main User Interface for TODO List
<phone:PhoneApplicationPage x:Class="WindowsPhoneApp.MainPage"
xmlns="http://schemas.microsoft.com/winfx/2006/xaml/presentation"
xmlns:x="http://schemas.microsoft.com/winfx/2006/xaml"
xmlns:phone="clr-namespace:Microsoft.Phone.Controls;assembly=Microsoft.Phone"
xmlns:shell="clr-namespace:Microsoft.Phone.Shell;assembly=Microsoft.Phone"
xmlns:controls="clr-namespace:Microsoft.Phone.Controls; assembly=Microsoft.Phone.Controls"
xmlns:toolkit="clr-namespace:Microsoft.Phone.Controls; assembly=Microsoft.Phone.Controls.Toolkit"
xmlns:local="clr-namespace:WindowsPhoneApp"
FontFamily="{StaticResource PhoneFontFamilyNormal}"
FontSize="{StaticResource PhoneFontSizeNormal}"
Foreground="{StaticResource PhoneForegroundBrush}"
SupportedOrientations="PortraitOrLandscape" shell:SystemTray.IsVisible="True">
<!-- The application bar, with 3 buttons and 1 menu item -->
<phone:PhoneApplicationPage.ApplicationBar>
<shell:ApplicationBar>
<shell:ApplicationBarIconButton Text="new"
IconUri="/Shared/Images/appbar.add.png" Click="AddButton_Click"/>
<shell:ApplicationBarIconButton Text="instructions"
IconUri="/Shared/Images/appbar.instructions.png"
Click="InstructionsButton_Click"/>
<shell:ApplicationBarIconButton Text="settings"
IconUri="/Shared/Images/appbar.settings.png"
Click="SettingsButton_Click"/>
<shell:ApplicationBar.MenuItems>
<shell:ApplicationBarMenuItem Text="about" Click="AboutMenuItem_Click"/>
</shell:ApplicationBar.MenuItems>
</shell:ApplicationBar>
</phone:PhoneApplicationPage.ApplicationBar>
<phone:PhoneApplicationPage.Resources>
<!-- A data template shared by the first four list boxes -->
<DataTemplate x:Key="DataTemplate">
<StackPanel Orientation="Horizontal" local:Tilt.IsEnabled="True">
<!-- Add a context menu to the item -->
<toolkit:ContextMenuService.ContextMenu>
<toolkit:ContextMenu Opened="ContextMenu_Opened"
Closed="ContextMenu_Closed">
<toolkit:MenuItem Header="mark as done" Click="MarkMenuItem_Click"/>
<toolkit:MenuItem Header="edit" Click="EditMenuItem_Click"/>
<toolkit:MenuItem Header="delete" Click="DeleteMenuItem_Click"/>
</toolkit:ContextMenu>
</toolkit:ContextMenuService.ContextMenu>
<!-- The star, with the item-specific color -->
<Rectangle Fill="{Binding Star}" Width="26" Height="25" Margin="0,0,0,10">
<Rectangle.OpacityMask>
<ImageBrush ImageSource="Images/star.png"/>
</Rectangle.OpacityMask>
</Rectangle>
<!-- The title -->
<TextBlock Text="{Binding Title}" Margin="8,0,0,16"
Style="{StaticResource PhoneTextExtraLargeStyle}"/>
</StackPanel>
</DataTemplate>
</phone:PhoneApplicationPage.Resources>
<controls:Pivot x:Name="Pivot" Title="TODO LIST">
<!-- Make the TODO LIST title match built-in apps better -->
<controls:Pivot.TitleTemplate>
<DataTemplate>
<TextBlock Text="{Binding}" Margin="-1,-1,0,-3"
Style="{StaticResource PhoneTextTitle0Style}"/>
</DataTemplate>
</controls:Pivot.TitleTemplate>
<!-- Pivot item #1 -->
<controls:PivotItem Header="all">
<Grid>
<TextBlock x:Name="NoAllTextBlock" Text="No tasks" Visibility="Collapsed"
Margin="22,17,0,0" Style="{StaticResource PhoneTextGroupHeaderStyle}"/>
<ListBox x:Name="AllListBox" ItemsSource="{Binding}"
ItemTemplate="{StaticResource DataTemplate}"
SelectionChanged="ListBox_SelectionChanged"/>
</Grid>
</controls:PivotItem>
<!-- Pivot item #2 -->
<controls:PivotItem x:Name="TodayPivotItem" Header="today">
<Grid>
<TextBlock x:Name="NoTodayTextBlock" Text="Nothing is due today"
Visibility="Collapsed" Margin="22,17,0,0"
Style="{StaticResource PhoneTextGroupHeaderStyle}"/>
<!-- Show today's date underneath the list box -->
<TextBlock x:Name="TodayTextBlock" Opacity=".2" Margin="0,0,0,4"
HorizontalAlignment="Right" VerticalAlignment="Bottom" FontWeight="Bold"
FontSize="{StaticResource PhoneFontSizeExtraExtraLarge}"/>
<ListBox x:Name="TodayListBox"
ItemTemplate="{StaticResource DataTemplate}"
SelectionChanged="ListBox_SelectionChanged"/>
</Grid>
</controls:PivotItem>
<!-- Pivot item #3 -->
<controls:PivotItem x:Name="PastDuePivotItem" Header="past due">
<Grid>
<TextBlock x:Name="NoPastDueTextBlock" Visibility="Collapsed"
Text="Nothing is past due. Good job!" Margin="22,17,0,0"
Style="{StaticResource PhoneTextGroupHeaderStyle}"/>
<!-- Show a clock underneath the list box -->
<Rectangle Opacity=".2" Margin="0,0,0,12" VerticalAlignment="Bottom"
HorizontalAlignment="Right" Width="240" Height="240"
Fill="{StaticResource PhoneForegroundBrush}">
<Rectangle.OpacityMask>
<ImageBrush ImageSource="Images/clock.png"/>
</Rectangle.OpacityMask>
</Rectangle>
<ListBox x:Name="PastDueListBox"
ItemTemplate="{StaticResource DataTemplate}"
SelectionChanged="ListBox_SelectionChanged"/>
</Grid>
</controls:PivotItem>
<!-- Pivot item #4 -->
<controls:PivotItem x:Name="StarredPivotItem" Header="starred">
<Grid>
<TextBlock x:Name="NoStarredTextBlock" Text="No starred tasks"
Visibility="Collapsed" Margin="22,17,0,0"
Style="{StaticResource PhoneTextGroupHeaderStyle}"/>
<!-- Show a star underneath the list box -->
<Rectangle Opacity=".2" Margin="0,0,0,12" VerticalAlignment="Bottom"
HorizontalAlignment="Right" Width="240" Height="240"
Fill="{StaticResource PhoneForegroundBrush}">
<Rectangle.OpacityMask>
<ImageBrush ImageSource="Images/bigStar.png"/>
</Rectangle.OpacityMask>
</Rectangle>
<ListBox x:Name="StarredListBox"
ItemTemplate="{StaticResource DataTemplate}"
SelectionChanged="ListBox_SelectionChanged"/>
</Grid>
</controls:PivotItem>
<!-- Pivot item #5 -->
<controls:PivotItem x:Name="DonePivotItem" Header="done">
<Grid>
<TextBlock x:Name="NoDoneTextBlock" Text="Nothing done. Get to work!"
Visibility="Collapsed" Margin="22,17,0,0"
Style="{StaticResource PhoneTextGroupHeaderStyle}"/>
<!-- Show a checkmark underneath the list box -->
<Rectangle Opacity=".2" Margin="0,0,0,12" VerticalAlignment="Bottom"
HorizontalAlignment="Right" Width="277" Height="240"
Fill="{StaticResource PhoneForegroundBrush}">
<Rectangle.OpacityMask>
<ImageBrush ImageSource="Images/done.png"/>
</Rectangle.OpacityMask>
</Rectangle>
<ListBox x:Name="DoneListBox" ItemsSource="{Binding}"
SelectionChanged="ListBox_SelectionChanged">
<ListBox.ItemTemplate>
<!-- A separate data template specific to the "done" list box -->
<DataTemplate>
<StackPanel Orientation="Horizontal" Background="Transparent"
local:Tilt.IsEnabled="True">
<!-- Add a context menu to the item -->
<toolkit:ContextMenuService.ContextMenu>
<toolkit:ContextMenu Opened="ContextMenu_Opened"
Closed="ContextMenu_Closed">
<toolkit:MenuItem Header="unmark as done"
Click="UnmarkMenuItem_Click"/>
<toolkit:MenuItem Header="edit" Click="EditMenuItem_Click"/>
<toolkit:MenuItem Header="delete"
Click="DeleteMenuItem_Click"/>
</toolkit:ContextMenu>
</toolkit:ContextMenuService.ContextMenu>
<!-- A checkmark-in-a-circle image -->
<Rectangle Width="48" Height="48"
Fill="{StaticResource PhoneForegroundBrush}">
<Rectangle.OpacityMask>
<ImageBrush ImageSource="Shared/Images/normal.done.png"/>
</Rectangle.OpacityMask>
</Rectangle>
<Grid>
<StackPanel Orientation="Horizontal" Margin="8,0,0,0">
<!-- The star, with the item-specific color -->
<Rectangle Fill="{Binding Star}" Width="26" Height="25">
<Rectangle.OpacityMask>
<ImageBrush ImageSource="Images/star.png"/>
</Rectangle.OpacityMask>
</Rectangle>
<!-- The title -->
<TextBlock Text="{Binding Title}" Margin="8,0,0,6"
Style="{StaticResource PhoneTextExtraLargeStyle}"
HorizontalAlignment="Left" />
</StackPanel>
<!-- A horizontal line on top of the title -->
<Line X1="-2" X2="800" Y1="32" Y2="32" StrokeThickness="2"
Stroke="{StaticResource PhoneForegroundBrush}"/>
</Grid>
</StackPanel>
</DataTemplate>
</ListBox.ItemTemplate>
</ListBox>
</Grid>
</controls:PivotItem>
</controls:Pivot>
</phone:PhoneApplicationPage>
Notes:
→ A separate XML namespace is needed for the unique namespace/assembly combination required by the pivot. The conventional prefix for this XML namespace is controls.
→ Because a pivot is meant to be full-screen, the control includes a Title property that you can use for your app title rather than the typical page header. The control does a decent job of mimicking what the app title should look like, but the position and font weight are slightly wrong. Fortunately, you can customize the title’s appearance however you wish. Title is of type object, so you can set it to an arbitrary tree of UI elements rather than a simple string. Or you can use a TitleTemplate property to customize its appearance. This page leverages TitleTemplate to tweak the appearance of the title string, as shown in Figure 26.2. Future releases of Windows Phone might address this issue, if Silverlight will support the same text kerning done natively by Windows Phone OS. Until such time, applying a custom template is a reasonable workaround.
Figure 26.2 The custom title template makes subtle changes to the default appearance of the pivot’s title.

→ Pivot also exposes a HeaderTemplate property for customizing the appearance of each pivot item’s header. However, the default headers are perfect for matching the style of the built-in apps, so most apps have no use for this property. If you’re doing something custom, however, such as putting text and an image in each header, this property enables you to do just that.
→ Each pivot item contains a text block (displayed when that item’s list is empty) and a list box in a grid. All but the first item also have a subtle image or text decoration behind the list box.
→ The first four list boxes share the same item template defined as a resource called DataTemplate. The list box for the “done” pivot item, however, uses its own template that adds a check mark and a strikethrough effect. This is shown in Figure 26.3.
Figure 26.3 The separate item template for the “done” list box adds check marks and a strikethrough effect.
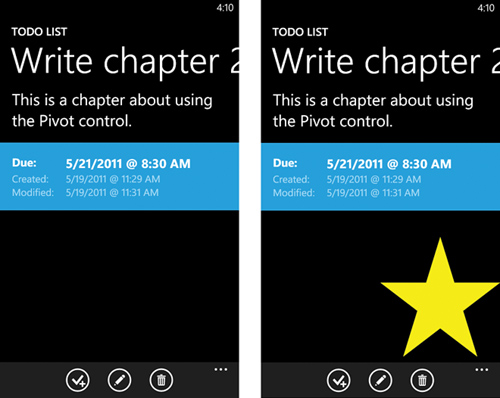
→ Both templates add a context menu to each item, leveraging the ContextMenu element in the Silverlight for Windows Phone Toolkit. To use a context menu, you simply set the ContextMenuService.ContextMenu attachable property on the element that should react to the user’s touch-and-hold gesture. After one second, the menu is shown with the list of menu items you place inside the context menu. This is demonstrated in Figure 26.4.
Figure 26.4 The context menu, shown here for “Do the dishes,” exposes three additional actions for each task.

![]()
→ SelectionChanged—Raised when the pivot item currently occupying the screen has changed
→ LoadingPivotItem—Raised right before a pivot item is displayed for the first time
→ LoadedPivotItem—Raised right after a pivot item is displayed for the first time
→ UnloadingPivotItem—Raised right before a pivot item is removed from the pivot’s Items collection
→ UnloadedPivotItem—Raised right after a pivot item is removed from the pivot’s Items collection
The Code-Behind
Listing 26.2 contains the code-behind for the main page.
Listing 26.2 MainPage.xaml.cs—The Code-Behind for TODO List’s Main Page
using System;
using System.Windows;
using System.Windows.Controls;
using System.Windows.Navigation;
using Microsoft.Phone.Controls;
namespace WindowsPhoneApp
{
public partial class MainPage : PhoneApplicationPage
{
bool isNavigatingAway;
bool isContextMenuOpen;
public MainPage()
{
InitializeComponent();
this.Loaded += MainPage_Loaded;
}
protected override void OnNavigatedFrom(NavigationEventArgs e)
{
this.isNavigatingAway = true;
base.OnNavigatedFrom(e);
// Remember the selected item
Settings.SelectedPivotItemName.Value =
(this.Pivot.SelectedItem as PivotItem).Name;
// Workaround for troubles when pivot items are removed and
// cause SelectedIndex > Count-1
this.Pivot.SelectedIndex = 0;
}
protected override void OnNavigatedTo(NavigationEventArgs e)
{
this.isNavigatingAway = false;
base.OnNavigatedTo(e);
this.TodayTextBlock.Text = DateTime.Now.ToShortDateString();
// If the set of included pivot items were changed
// on the settings page, refresh them
int newPivotItemsCount = 1 + (Settings.IsTodayVisible.Value ? 1 : 0) +
(Settings.IsPastDueVisible.Value ? 1 : 0) +
(Settings.IsStarredVisible.Value ? 1 : 0) +
(Settings.IsDoneVisible.Value ? 1 : 0);
if (this.Pivot.Items.Count != newPivotItemsCount)
{
int insertLocation = 1;
ShowOrHidePivotItem(this.TodayPivotItem,
Settings.IsTodayVisible.Value, ref insertLocation);
ShowOrHidePivotItem(this.PastDuePivotItem,
Settings.IsPastDueVisible.Value, ref insertLocation);
ShowOrHidePivotItem(this.StarredPivotItem,
Settings.IsStarredVisible.Value, ref insertLocation);
ShowOrHidePivotItem(this.DonePivotItem,
Settings.IsDoneVisible.Value, ref insertLocation);
}
}
void ShowOrHidePivotItem(PivotItem item, bool show, ref int insertLocation)
{
// Insert or remove the pivot item, if necessary
if (show && item.Parent == null)
this.Pivot.Items.Insert(insertLocation, item);
else if (!show && item.Parent != null)
this.Pivot.Items.Remove(item);
if (show)
insertLocation++;
}
void MainPage_Loaded(object sender, RoutedEventArgs e)
{
if (!isNavigatingAway) // Workaround for Loaded-raised-too-often bug
{
// Two of the list boxes use data binding
this.AllListBox.DataContext = Settings.TaskList.Value;
this.DoneListBox.DataContext = Settings.DoneList.Value;
// The rest are manually filled by filtering the task list
RefreshLists();
// Restore the selected item
// (done here because OnNavigatedTo is too early)
PivotItem pivotItem =
this.FindName(Settings.SelectedPivotItemName.Value) as PivotItem;
if (pivotItem != null)
this.Pivot.SelectedItem = pivotItem;
}
}
void RefreshLists()
{
DateTime today = DateTime.Now.Date;
// Fill the three filtered lists
this.TodayListBox.Items.Clear();
this.PastDueListBox.Items.Clear();
this.StarredListBox.Items.Clear();
foreach (Task item in Settings.TaskList.Value)
{
// today
if (item.DueDate.Date == today)
this.TodayListBox.Items.Add(item);
// past due
if (item.DueDate < DateTime.Now)
this.PastDueListBox.Items.Add(item);
// starred
if (item.Star != null && item.Star != "none")
this.StarredListBox.Items.Add(item);
}
// Show/hide the "no tasks" labels
this.NoAllTextBlock.Visibility = Settings.TaskList.Value.Count == 0 ?
Visibility.Visible : Visibility.Collapsed;
this.NoTodayTextBlock.Visibility = this.TodayListBox.Items.Count == 0 ?
Visibility.Visible : Visibility.Collapsed;
this.NoPastDueTextBlock.Visibility = this.PastDueListBox.Items.Count == 0 ?
Visibility.Visible : Visibility.Collapsed;
this.NoStarredTextBlock.Visibility = this.StarredListBox.Items.Count == 0 ?
Visibility.Visible : Visibility.Collapsed;
this.NoDoneTextBlock.Visibility = Settings.DoneList.Value.Count == 0 ?
Visibility.Visible : Visibility.Collapsed;
}
void ListBox_SelectionChanged(object sender, SelectionChangedEventArgs e)
{
if (isContextMenuOpen)
{
// Cancel the selection
(sender as ListBox).SelectedIndex = -1;
return;
}
if (e.AddedItems.Count != 1)
return;
// Communicate the selected item to the details page
Settings.CurrentTask.Value = e.AddedItems[0] as Task;
// Navigate to the details page
this.NavigationService.Navigate(new Uri("/DetailsPage.xaml",
UriKind.Relative));
// Undo the selection so the same item can be tapped again upon return
(sender as ListBox).SelectedIndex = -1;
}
// Context menu handlers
void ContextMenu_Opened(object sender, RoutedEventArgs e)
{
this.isContextMenuOpen = true;
}
void ContextMenu_Closed(object sender, RoutedEventArgs e)
{
this.isContextMenuOpen = false;
}
void MarkMenuItem_Click(object sender, RoutedEventArgs e)
{
Task task = (sender as MenuItem).DataContext as Task;
// Move from the task list to the done list
Settings.TaskList.Value.Remove(task);
Settings.DoneList.Value.Add(task);
RefreshLists();
}
void UnmarkMenuItem_Click(object sender, RoutedEventArgs e)
{
Task task = (sender as MenuItem).DataContext as Task;
// Move from the done list to the task list
Settings.DoneList.Value.Remove(task);
Settings.TaskList.Value.Add(task);
RefreshLists();
}
void EditMenuItem_Click(object sender, RoutedEventArgs e)
{
// Communicate the selected item to the add/edit page
Settings.CurrentTask.Value = (sender as MenuItem).DataContext as Task;
// Navigate to the add/edit page
this.NavigationService.Navigate(new Uri("/AddEditPage.xaml",
UriKind.Relative));
}
void DeleteMenuItem_Click(object sender, RoutedEventArgs e)
{
if (MessageBox.Show(
"Are you sure you want to permanently delete this task?", "Delete task",
MessageBoxButton.OKCancel) == MessageBoxResult.OK)
{
// The task is only in one of the two lists, but just try deleting from
// both rather than checking. One call will work, one will be a no-op.
Settings.TaskList.Value.Remove((sender as MenuItem).DataContext as Task);
Settings.DoneList.Value.Remove((sender as MenuItem).DataContext as Task);
RefreshLists();
}
}
// Application bar handlers
void AddButton_Click(object sender, EventArgs e)
{
Settings.CurrentTask.Value = null;
this.NavigationService.Navigate(new Uri("/AddEditPage.xaml",
UriKind.Relative));
}
void InstructionsButton_Click(object sender, EventArgs e)
{
this.NavigationService.Navigate(new Uri("/InstructionsPage.xaml",
UriKind.Relative));
}
void SettingsButton_Click(object sender, EventArgs e)
{
this.NavigationService.Navigate(new Uri("/SettingsPage.xaml",
UriKind.Relative));
}
void AboutMenuItem_Click(object sender, EventArgs e)
{
this.NavigationService.Navigate(new Uri(
"/Shared/About/AboutPage.xaml?appName=TODO List", UriKind.Relative));
}
}
}
→ A pivot exposes a SelectedItem (and SelectedIndex) property that represents which of the pivot items is occupying the screen. TODO List stores the selected item as a persisted setting, but it does so by storing the name of the element rather than its index. This is done because this app’s settings page enables the user to hide any of the pivot items except the first one, and the hiding is done by removing the pivot item(s) from the pivot’s collection.
Setting a pivot’s SelectedItem or SelectedIndex property earlier than the Loaded event fails!
![]()
Setting a pivot’s SelectedItem or SelectedIndex property always animates the change in selection!
![]()
Setting a pivot item’s visibility has no effect!
![]()
![]()
→ In OnNavigatedTo (which is called upon return from adjusting the visible set of pivot items on the settings page), pivot items are either added or removed from the pivot based on the current settings.
→ Pivot does not handle the removal of pivot items very gracefully. If pivot items are removed such that the previously selected index is greater than the new last index, an ArgumentOutOfRangeException is thrown. This happens even if pivot’s SelectedIndex property is set to 0 immediately before removing pivot items, presumably due to its animation from the old item to the new item. This is a bug that might be fixed in a future release of Windows Phone.
Therefore, Listing 26.2 works around this problem by setting SelectedIndex to 0 in OnNavigatedFrom. That way, even if the user visits the settings page, removes pivot items, and returns to the main page extremely quickly, there is still plenty of time for the pivot’s animation to complete beforehand. Also, the pivot will only remain on the 0th item if the previously selected item has been removed thanks to the logic in Loaded that restores the selected item after OnNavigatedTo has executed.
→ The “all” list box databinds to a TaskList setting and the “done” list box databinds to a DoneList setting. The remaining three list boxes all contain a filtered version of TaskList. They are filled manually inside RefreshLists because there’s no automatic data-binding mechanism that filters a collection.
Be careful not to respond to taps in the usual way when the user is simply trying to dismiss a context menu!
![]()
→ The context menu’s Opened and Closed events are handled simply to enable code to check on-demand whether a context menu is currently open. ListBox_SelectionChanged leverages this to ignore a tap on an item when that tap is actually dismissing an open context menu.
→ Because the same context menu handlers are used for both context menus, the code is written in a way to work for either context. The sender passed to these handlers is the MenuItem that was tapped, so its DataContext property is used to retrieve the source item to which the context menu’s item template is applied.
When handling a context menu item click, how do I retrieve the item that was pressed and held?
![]()
Supporting Data Types
As seen in the preceding section, TODO List manipulates two collections of tasks exposed as settings. This involves three classes that are important to understand for appreciating how this app works. Listing 26.3 shows the implementation of the Task class used to represent each item shown in any of main page’s list boxes.
Listing 26.3 Task.cs—The Type of Every Item in Every List Box
using System;
using System.ComponentModel;
namespace WindowsPhoneApp
{
public class Task : INotifyPropertyChanged
{
// The backing fields
string title;
string description;
string star;
DateTimeOffset createdDate;
DateTimeOffset modifiedDate;
DateTimeOffset dueDate;
// The properties, which raise change notifications
public string Title {
get { return this.title; }
set { this.title = value; OnPropertyChanged("Title"); }
}
public string Description {
get { return this.description; }
set { this.description = value; OnPropertyChanged("Description"); }
}
public string Star {
get { return this.star; }
set { this.star = value; OnPropertyChanged("Star"); }
}
public DateTimeOffset CreatedDate {
get { return this.createdDate; }
set { this.createdDate = value; OnPropertyChanged("CreatedDate"); }
}
public DateTimeOffset ModifiedDate {
get { return this.modifiedDate; }
set { this.modifiedDate = value; OnPropertyChanged("ModifiedDate"); }
}
public DateTimeOffset DueDate {
get { return this.dueDate; }
set { this.dueDate = value; OnPropertyChanged("DueDate"); }
}
void OnPropertyChanged(string propertyName)
{
PropertyChangedEventHandler handler = this.PropertyChanged;
if (handler != null)
handler(this, new PropertyChangedEventArgs(propertyName));
}
public event PropertyChangedEventHandler PropertyChanged;
}
}
Notes:
→ The item templates on main page leverage the value of each task’s Title and Star properties. All the properties are displayed on the details and add/edit pages, and the DueDate property is also used for sorting the list of tasks.
→ The CreatedDate and ModifiedDate properties are appropriately of type DateTimeOffset rather than DateTime, and the DueDate property is also a DateTimeOffset to match the others. (One could argue that DueDate should be a DateTime instead, representing a logical point in time that is always expressed in the current time zone, for the same reason that Chapter 20’s Alarm Clock app uses DateTime.)
→ The Star value is a string representing the color (like “red” or “yellow”). This is strange from an API perspective, but it happens to work out nicely because the item templates on the main page and a star on the upcoming details page are able to bind directly to the property without needing a value converter.
→ The property-changed notifications ensure that data-bound user interface elements can remain up-to-date. This is leveraged on the main page and the upcoming details page. On the main page, it turns out that this is only needed for the “done” list due to the way item editing works. This is explained in the upcoming “The Add/Edit Page” section.
Listing 26.4 contains the entire set of persisted settings used by TODO List.
Listing 26.4 Settings.cs—All the Settings Persisted to Isolated Storage
using System.Collections.ObjectModel;
namespace WindowsPhoneApp
{
public static class Settings
{
// The selected pivot item, stored by name
public static readonly Setting<string> SelectedPivotItemName =
new Setting<string>("SelectedPivotItemName", "all");
// Which pivot items are included in the pivot
public static readonly Setting<bool> IsTodayVisible =
new Setting<bool>("IsTodayVisible", true);
public static readonly Setting<bool> IsPastDueVisible =
new Setting<bool>("IsPastDueVisible", true);
public static readonly Setting<bool> IsStarredVisible =
new Setting<bool>("IsStarredVisible", true);
public static readonly Setting<bool> IsDoneVisible =
new Setting<bool>("IsDoneVisible", true);
// The task currently in the details or add/edit page
public static readonly Setting<Task> CurrentTask =
new Setting<Task>("CurrentTask", null);
// Sorted in chronological order
public static readonly Setting<SortedTaskCollection> TaskList =
new Setting<SortedTaskCollection>("TaskList",
new SortedTaskCollection());
// Kept in the order tasks get done
public static readonly Setting<ObservableCollection<Task>> DoneList =
new Setting<ObservableCollection<Task>>("DoneList",
new ObservableCollection<Task>());
}
}
Notes:
→ The first five settings maintain the state of the pivot control on the main page, and the next setting (CurrentTask) tells the details and add/edit pages which item was just selected on the main page.
→ The most important settings are the last two—the list of unfinished tasks and list of done tasks. Notice that these are two different types of collections. DoneList is a basic observable collection of tasks. No sorting is ever done, so the list is always in the order that tasks were finished. (If users want to change the ordering, they would need to “unmark” tasks as done and then mark them again.) TaskList, on the other hand, is an observable collection that automatically sorts its tasks in chronological order based on the value of the DueDate property. This enables every list box on the main page (except the “done” list) to be sorted in this fashion without any sorting code outside of the collection class itself.
→ The fact that both lists are observable collections is important, because the main page relies on the collection-changed notifications for keeping its “all” and “done” lists up-to-date as items are added and removed.
Listing 26.5 shows the implementation of this sorted collection class.
Listing 26.5 SortedTaskCollection.cs—Adds Automatic Sorting to an Observable Collection of Tasks
using System;
using System.Collections.ObjectModel;
using System.Runtime.Serialization;
namespace WindowsPhoneApp
{
[CollectionDataContract]
public class SortedTaskCollection : ObservableCollection<Task>
{
protected override void InsertItem(int index, Task item)
{
// Ignore the index. Instead, keep the list sorted in chronological order
int i = 0;
for (i = 0; i < this.Count; i++)
{
DateTimeOffset d = this[i].DueDate;
if (d > item.DueDate)
break;
}
base.InsertItem(i, item);
}
}
}
Notes:
→ All this class needs to do is override ObservableCollection’s protected InsertItem method that ultimately gets called by both Add and Insert. It ignores the passed-in index and instead chooses an index that maintains the desired sorting of the list. The result is confusing for someone trying to call the collection’s Insert method with a specific index (not done by this app), but calling Add works seamlessly.
→ The most subtle part of this collection’s implementation is the CollectionDataContract attribute. This attribute, defined in the System.Runtime.Serialization namespace in the System.Runtime.Serialization assembly (which is not referenced by Windows Phone projects by default), is necessary for this app’s settings to be serialized successfully. The reason why, however, is obscure. Because SortedTaskCollection derives from ObservableCollection<Task>, the two classes have the same data contract name as far as the built-in serialization process is concerned. However, each type serialized must have a unique data contract name, so the CollectionDataContract attribute assigns one to SortedTaskCollection. (You don’t even need to choose an explicit name for this to work!)
Without this attribute, an exception with the following message is raised when the app is closing or deactivating, due to automatic attempt to serialize this app’s settings:
Type
'System.Collections.ObjectModel.ObservableCollection`1[WindowsPhoneApp.Task]'
cannot be added to list of known types since another type
'WindowsPhoneApp.SortedTaskCollection' with the same data contract name
'http://schemas.datacontract.org/2004/07/WindowsPhoneApp:ArrayOfTask is
already present.
Note that if both lists were of type SortedTaskCollection, the serialization would work just fine without the attribute because there would be no conflict. Of course, it’s a good idea to make classes you intend to serialize with such attributes to avoid subtle bugs in the future.
![]()
![]()
The Details Page
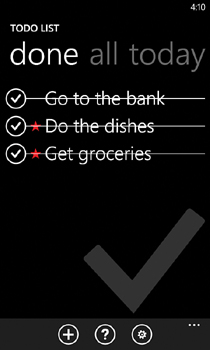
The details page, shown in Figure 26.5, is a straightforward display of each task’s properties. The task’s title is used as the page title, and the description and date properties are shown below it. If the item has been given a star, it is shown as well. For convenience, the page’s application bar exposes buttons for each of the three actions that the main page exposes as context menu items.
Figure 26.5 The details page for an item, before and after it is marked with a yellow star.
Listing 26.6 contains this page’s XAML and Listing 26.7 contains its code-behind.
Listing 26.6 DetailsPage.xaml—The User Interface for TODO List’s Details Page
<phone:PhoneApplicationPage x:Class="WindowsPhoneApp.DetailsPage"
xmlns="http://schemas.microsoft.com/winfx/2006/xaml/presentation"
xmlns:x="http://schemas.microsoft.com/winfx/2006/xaml"
xmlns:phone="clr-namespace:Microsoft.Phone.Controls;assembly=Microsoft.Phone"
xmlns:shell="clr-namespace:Microsoft.Phone.Shell;assembly=Microsoft.Phone"
xmlns:local="clr-namespace:WindowsPhoneApp"
FontFamily="{StaticResource PhoneFontFamilyNormal}"
FontSize="{StaticResource PhoneFontSizeNormal}"
Foreground="{StaticResource PhoneForegroundBrush}"
SupportedOrientations="PortraitOrLandscape" shell:SystemTray.IsVisible="True">
<!-- The application bar, with 3 buttons and a menu item -->
<phone:PhoneApplicationPage.ApplicationBar>
<shell:ApplicationBar>
<shell:ApplicationBarIconButton Text="mark done"
IconUri="/Images/appbar.markDone.png" Click="MarkUnmarkButton_Click"/>
<shell:ApplicationBarIconButton Text="edit"
IconUri="/Shared/Images/appbar.edit.png" Click="EditButton_Click"/>
<shell:ApplicationBarIconButton Text="delete"
IconUri="/Shared/Images/appbar.delete.png" Click="DeleteButton_Click"/>
<shell:ApplicationBar.MenuItems>
<shell:ApplicationBarMenuItem Text="about" Click="AboutMenuItem_Click"/>
</shell:ApplicationBar.MenuItems>
</shell:ApplicationBar>
</phone:PhoneApplicationPage.ApplicationBar>
<phone:PhoneApplicationPage.Resources>
<local:DateConverter x:Key="DateConverter"/>
</phone:PhoneApplicationPage.Resources>
<Grid>
<Grid.RowDefinitions>
<RowDefinition Height="Auto"/>
<RowDefinition Height="*"/>
</Grid.RowDefinitions>
<!-- The standard header -->
<StackPanel Style="{StaticResource PhoneTitlePanelStyle}">
<TextBlock Text="TODO LIST" Style="{StaticResource PhoneTextTitle0Style}"/>
<TextBlock Text="{Binding Title}"
Style="{StaticResource PhoneTextTitle1Style}"/>
</StackPanel>
<!-- The appropriately-colored star -->
<Rectangle Grid.Row="2" Width="240" Height="240" Fill="{Binding Star}"
VerticalAlignment="Bottom" HorizontalAlignment="Right" Margin="0,0,0,12">
<Rectangle.OpacityMask>
<ImageBrush ImageSource="Images/bigStar.png"/>
</Rectangle.OpacityMask>
</Rectangle>
<ScrollViewer Grid.Row="1">
<Grid>
<Grid.ColumnDefinitions>
<ColumnDefinition Width="Auto"/>
<ColumnDefinition/>
</Grid.ColumnDefinitions>
<Grid.RowDefinitions>
<RowDefinition Height="Auto"/>
<RowDefinition Height="Auto"/>
<RowDefinition Height="Auto"/>
<RowDefinition Height="Auto"/>
<RowDefinition Height="24"/>
</Grid.RowDefinitions>
<!-- The description -->
<TextBlock Text="{Binding Description}"
FontSize="{StaticResource PhoneFontSizeLarge}"
Grid.ColumnSpan="2" Margin="24,0,24,24" TextWrapping="Wrap"/>
<!-- The 2-3 dates -->
<Rectangle x:Name="AccentRectangle" Grid.Row="1" Grid.ColumnSpan="2"
Grid.RowSpan="4" Fill="{StaticResource PhoneAccentBrush}"/>
<TextBlock Grid.Row="1" Text="Due:" FontWeight="Bold" Margin="24,24,24,0"
FontSize="{StaticResource PhoneFontSizeMedium}"/>
<TextBlock Grid.Row="2" Text="Created:" Margin="24,0"
Foreground="{StaticResource PhoneSubtleBrush}"/>
<TextBlock x:Name="ModifiedLabelTextBlock" Grid.Row="3" Text="Modified:"
Margin="24,0" Foreground="{StaticResource PhoneSubtleBrush}"/>
<TextBlock Grid.Column="1" Grid.Row="1"
Text="{Binding DueDate, Converter={StaticResource DateConverter}}"
Margin="0,24,0,0" FontWeight="Bold"
FontSize="{StaticResource PhoneFontSizeMediumLarge}"/>
<TextBlock Grid.Column="1" Grid.Row="2"
Text="{Binding CreatedDate, Converter={StaticResource DateConverter}}"
Foreground="{StaticResource PhoneSubtleBrush}"/>
<TextBlock x:Name="ModifiedTextBlock" Grid.Column="1" Grid.Row="3"
Text="{Binding ModifiedDate, Converter={StaticResource DateConverter}}"
Foreground="{StaticResource PhoneSubtleBrush}"/>
</Grid>
</ScrollViewer>
</Grid>
</phone:PhoneApplicationPage>
Listing 26.7 DetailsPage.xaml.cs—The Code-Behind for TODO List’s Details Page
using System;
using System.Windows;
using System.Windows.Navigation;
using Microsoft.Phone.Controls;
using Microsoft.Phone.Shell;
namespace WindowsPhoneApp
{
public partial class DetailsPage : PhoneApplicationPage
{
IApplicationBarIconButton markUnmarkButton;
public DetailsPage()
{
InitializeComponent();
this.markUnmarkButton = this.ApplicationBar.Buttons[0]
as IApplicationBarIconButton;
}
protected override void OnNavigatedTo(NavigationEventArgs e)
{
base.OnNavigatedTo(e);
// Set the context for the data binding done in XAML
this.DataContext = Settings.CurrentTask.Value;
if (Settings.CurrentTask.Value != null)
{
// Only show the modified date if different from the created date
if (Settings.CurrentTask.Value.CreatedDate ==
Settings.CurrentTask.Value.ModifiedDate)
{
this.ModifiedLabelTextBlock.Visibility = Visibility.Collapsed;
this.ModifiedTextBlock.Visibility = Visibility.Collapsed;
}
else
{
this.ModifiedLabelTextBlock.Visibility = Visibility.Visible;
this.ModifiedTextBlock.Visibility = Visibility.Visible;
}
// Ensure that the application bar button correctly represents whether
// this task is done
if (Settings.DoneList.Value.Contains(Settings.CurrentTask.Value))
{
this.markUnmarkButton.IconUri =
new Uri("/Images/appbar.unmarkDone.png", UriKind.Relative);
this.markUnmarkButton.Text = "undo";
}
}
}
// Application bar handlers
void MarkUnmarkButton_Click(object sender, EventArgs e)
{
if (this.markUnmarkButton.Text == "mark done")
{
this.markUnmarkButton.IconUri = new Uri("/Images/appbar.unmarkDone.png",
UriKind.Relative);
this.markUnmarkButton.Text = "undo";
// Move the item from the task list to the done list
Settings.TaskList.Value.Remove(Settings.CurrentTask.Value);
Settings.DoneList.Value.Add(Settings.CurrentTask.Value);
}
else
{
this.markUnmarkButton.IconUri = new Uri("/Images/appbar.markDone.png",
UriKind.Relative);
this.markUnmarkButton.Text = "mark done";
// Move the item from the done list to the task list
Settings.DoneList.Value.Remove(Settings.CurrentTask.Value);
Settings.TaskList.Value.Add(Settings.CurrentTask.Value);
}
}
void EditButton_Click(object sender, EventArgs e)
{
this.NavigationService.Navigate(new Uri("/AddEditPage.xaml",
UriKind.Relative));
}
void DeleteButton_Click(object sender, EventArgs e)
{
if (MessageBox.Show(
"Are you sure you want to permanently delete this task?", "Delete task",
MessageBoxButton.OKCancel) == MessageBoxResult.OK)
{
// The task is only in one of the two lists, but just try deleting from
// both rather than checking. One call will work, one will be a no-op.
Settings.TaskList.Value.Remove(Settings.CurrentTask.Value);
Settings.DoneList.Value.Remove(Settings.CurrentTask.Value);
if (this.NavigationService.CanGoBack)
this.NavigationService.GoBack();
}
}
void AboutMenuItem_Click(object sender, EventArgs e)
{
this.NavigationService.Navigate(new Uri(
"/Shared/About/AboutPage.xaml?appName=TODO List", UriKind.Relative));
}
}
}
→ The information is placed inside a scroll viewer in case the description is really long. The big star serves as a stationary background that does not scroll with the rest of the content.
→ Data binding is used to display the various properties of the current task. A DateConverter value converter similar to the one in Chapter 21, “Passwords & Secrets,” is used to give each DateTimeOffset a nice display. The only difference with this app’s value converter is that it places an @ between the date and time.
→ A few display adjustments are made inside OnNavigatedTo so the page properly updates if the user taps the edit button to navigate to the add/edit page, makes some changes, saves them, and then navigates back. A value converter could have been written and used to avoid toggling the two text blocks’ Visibility property in code-behind, but that seems like overkill.
The Add/Edit Page
The add/edit page acts like two distinct pages—a page for adding a new task and a page for editing an existing task—but due to their enormous similarities, it is implemented as a single page. Figure 26.6 shows this page in both of its roles.
Figure 26.6 The add/edit page in its two different modes.

The User Interface
Listing 26.8 contains the XAML for the add/edit page.
Listing 26.8 AddEditPage.xaml—The User Interface for TODO List’s Add/Edit Page
<phone:PhoneApplicationPage x:Class="WindowsPhoneApp.AddItemPage"
xmlns="http://schemas.microsoft.com/winfx/2006/xaml/presentation"
xmlns:x="http://schemas.microsoft.com/winfx/2006/xaml"
xmlns:phone="clr-namespace:Microsoft.Phone.Controls;assembly=Microsoft.Phone"
xmlns:shell="clr-namespace:Microsoft.Phone.Shell;assembly=Microsoft.Phone"
xmlns:toolkit="clr-namespace:Microsoft.Phone.Controls; assembly=Microsoft.Phone.Controls.Toolkit"
xmlns:sys="clr-namespace:System;assembly=mscorlib"
xmlns:local="clr-namespace:WindowsPhoneApp"
FontFamily="{StaticResource PhoneFontFamilyNormal}"
FontSize="{StaticResource PhoneFontSizeNormal}"
Foreground="{StaticResource PhoneForegroundBrush}"
SupportedOrientations="PortraitOrLandscape" shell:SystemTray.IsVisible="True">
<!-- The single-button, single-menu-item application bar -->
<phone:PhoneApplicationPage.ApplicationBar>
<shell:ApplicationBar>
<shell:ApplicationBarIconButton Text="save"
IconUri="/Shared/Images/appbar.save.png" Click="SaveButton_Click"/>
<shell:ApplicationBar.MenuItems>
<shell:ApplicationBarMenuItem Text="about" Click="AboutMenuItem_Click"/>
</shell:ApplicationBar.MenuItems>
</shell:ApplicationBar>
</phone:PhoneApplicationPage.ApplicationBar>
<Grid>
<Grid.RowDefinitions>
<RowDefinition Height="Auto"/>
<RowDefinition Height="*"/>
</Grid.RowDefinitions>
<!-- The standard header -->
<StackPanel Style="{StaticResource PhoneTitlePanelStyle}">
<TextBlock Text="TODO LIST" Style="{StaticResource PhoneTextTitle0Style}"/>
<TextBlock x:Name="PageTitle"
Style="{StaticResource PhoneTextTitle1Style}"/>
</StackPanel>
<ScrollViewer Grid.Row="1">
<StackPanel Margin="{StaticResource PhoneHorizontalMargin}">
<!-- Title -->
<TextBlock Text="Title" Margin="11,0,0,-5"
Foreground="{StaticResource PhoneSubtleBrush}"/>
<TextBox x:Name="TitleTextBox" InputScope="Text"
TextChanged="TitleTextBox_TextChanged" KeyUp="TitleTextBox_KeyUp"/>
<!-- Description -->
<TextBlock Text="Description" Margin="11,11,0,-5"
Foreground="{StaticResource PhoneSubtleBrush}"/>
<TextBox x:Name="DescriptionTextBox" InputScope="Text" MinHeight="106"
AcceptsReturn="True" TextWrapping="Wrap"/>
<!-- Star -->
<toolkit:ListPicker x:Name="StarListPicker" Header="Star">
<toolkit:ListPicker.ItemTemplate>
<DataTemplate>
<StackPanel Orientation="Horizontal">
<!-- Give each item the colored star next to its text -->
<Rectangle Fill="{Binding}" Width="26" Height="25">
<Rectangle.OpacityMask>
<ImageBrush ImageSource="Images/star.png"/>
</Rectangle.OpacityMask>
</Rectangle>
<TextBlock Text="{Binding}" Margin="12 0 0 0"/>
</StackPanel>
</DataTemplate>
</toolkit:ListPicker.ItemTemplate>
<sys:String>none</sys:String>
<sys:String>red</sys:String>
<sys:String>yellow</sys:String>
<sys:String>green</sys:String>
<sys:String>blue</sys:String>
</toolkit:ListPicker>
<!-- Due Date -->
<TextBlock Text="Due Date" Margin="11,11,0,-5" CacheMode="BitmapCache"
Foreground="{StaticResource PhoneSubtleBrush}"/>
<toolkit:DatePicker x:Name="DueDatePicker" CacheMode="BitmapCache"
ValueChanged="DateTimePicker_ValueChanged"
local:Tilt.IsEnabled="True"/>
<!-- Due Time -->
<TextBlock Text="Due Time" Margin="11,11,0,-5" CacheMode="BitmapCache"
Foreground="{StaticResource PhoneSubtleBrush}"/>
<toolkit:TimePicker x:Name="DueTimePicker" CacheMode="BitmapCache"
ValueChanged="DateTimePicker_ValueChanged"
local:Tilt.IsEnabled="True"/>
</StackPanel>
</ScrollViewer>
</Grid>
</phone:PhoneApplicationPage>
Note:
→ This page exploits three controls from the Silverlight for Windows Phone Toolkit: list picker, date picker, and time picker. The list picker decorates each of its items with an appropriately colored star thanks to data binding that automatically works with the color strings. This is shown in Figure 26.7. For the “none” value, this app leverages the fact that an invalid string causes the binding to fail for that item and leave the rectangle with its default null fill.
Figure 26.7 Each item in the list picker visually shows the star next to each color name, as seen when it is expanded.

The Code-Behind
Listing 26.9 contains the code-behind for the add/edit page.
Listing 26.9 AddEditPage.xaml.cs—The Code-Behind for TODO List’s Add/Edit Page
using System;
using System.Windows.Controls;
using System.Windows.Input;
using System.Windows.Navigation;
using Microsoft.Phone.Controls;
using Microsoft.Phone.Shell;
namespace WindowsPhoneApp
{
public partial class AddItemPage : PhoneApplicationPage
{
IApplicationBarIconButton saveButton;
DateTime? pendingChosenDate;
DateTime? pendingChosenTime;
public AddItemPage()
{
InitializeComponent();
this.saveButton = this.ApplicationBar.Buttons[0]
as IApplicationBarIconButton;
}
protected override void OnNavigatedFrom(NavigationEventArgs e)
{
base.OnNavigatedFrom(e);
// Store the info in page state so it is preserved when temporarily
// navigating away from the page. This is especially important because the
// date picker and time picker navigate to a different page!
this.State["Title"] = this.TitleTextBox.Text;
this.State["Description"] = this.DescriptionTextBox.Text;
this.State["Star"] = this.StarListPicker.SelectedItem;
this.State["DueDate"] = this.DueDatePicker.Value;
this.State["DueTime"] = this.DueTimePicker.Value;
}
protected override void OnNavigatedTo(NavigationEventArgs e)
{
base.OnNavigatedTo(e);
// If we're returning from the date or time picker,
// make sure we apply the chosen value
if (this.pendingChosenDate.HasValue)
this.State["DueDate"] = this.pendingChosenDate;
if (this.pendingChosenTime.HasValue)
this.State["DueTime"] = this.pendingChosenTime;
// Initialize the page for either add mode or edit mode
if (Settings.CurrentTask.Value == null)
{
this.PageTitle.Text = "new";
}
else
{
this.PageTitle.Text = "edit";
this.TitleTextBox.Text = Settings.CurrentTask.Value.Title;
this.DescriptionTextBox.Text = Settings.CurrentTask.Value.Description;
this.StarListPicker.SelectedItem = Settings.CurrentTask.Value.Star;
this.DueDatePicker.Value =
Settings.CurrentTask.Value.DueDate.LocalDateTime;
this.DueTimePicker.Value =
Settings.CurrentTask.Value.DueDate.LocalDateTime;
}
// Apply any temporary values from page state
if (this.State.ContainsKey("Title"))
this.TitleTextBox.Text = (string)this.State["Title"];
if (this.State.ContainsKey("Description"))
this.DescriptionTextBox.Text = (string)this.State["Description"];
if (this.State.ContainsKey("Star"))
this.StarListPicker.SelectedItem = (string)this.State["Star"];
if (this.State.ContainsKey("DueDate"))
this.DueDatePicker.Value = (DateTime?)this.State["DueDate"];
if (this.State.ContainsKey("DueTime"))
this.DueTimePicker.Value = (DateTime?)this.State["DueTime"];
// Only allow saving when there's a title
this.saveButton.IsEnabled = (this.TitleTextBox.Text != null &&
this.TitleTextBox.Text.Trim().Length > 0);
}
void TitleTextBox_TextChanged(object sender, TextChangedEventArgs e)
{
// Only allow saving when there's a title
this.saveButton.IsEnabled = (this.TitleTextBox.Text != null &&
this.TitleTextBox.Text.Trim().Length > 0);
}
void TitleTextBox_KeyUp(object sender, KeyEventArgs e)
{
if (e.Key == Key.Enter)
this.DescriptionTextBox.Focus();
}
void DateTimePicker_ValueChanged(object sender,
DateTimeValueChangedEventArgs e)
{
// Prevent the values from getting clobbered when navigating back
this.pendingChosenDate = this.DueDatePicker.Value;
this.pendingChosenTime = this.DueTimePicker.Value;
}
// Application bar handlers
void SaveButton_Click(object sender, EventArgs e)
{
// Consolidate the due date and due time into a single DateTime.
// First get just the date (no time) from the date picker's value
DateTime dueDate = this.DueDatePicker.Value.Value.Date;
// Now add the time to this date
if (this.DueTimePicker.Value.HasValue)
dueDate = dueDate.AddMinutes(
this.DueTimePicker.Value.Value.TimeOfDay.TotalMinutes);
Task item = new Task
{
Title = this.TitleTextBox.Text.Trim(),
Description = this.DescriptionTextBox.Text.Trim(),
Star = (string)this.StarListPicker.SelectedItem,
ModifiedDate = DateTime.Now,
DueDate = dueDate
};
if (Settings.CurrentTask.Value != null)
{
// This is an edit
// Perform the edit differently for the task list versus done list
if (Settings.TaskList.Value.Remove(Settings.CurrentTask.Value))
{
// We removed the old item, and now let's insert the new item.
// If the due date has changed, this re-sorts the list correctly.
// Be sure to give this new item the original created date
item.CreatedDate = Settings.CurrentTask.Value.CreatedDate;
Settings.TaskList.Value.Add(item);
Settings.CurrentTask.Value = item;
}
else
{
// We don't want to change the ordering in the done list,
// so just update the item in-place
Settings.CurrentTask.Value.Title = item.Title;
Settings.CurrentTask.Value.Description = item.Description;
Settings.CurrentTask.Value.Star = item.Star;
Settings.CurrentTask.Value.ModifiedDate = item.ModifiedDate;
Settings.CurrentTask.Value.DueDate = item.DueDate;
// Don't change CreatedDate!
}
}
else
{
// This is a new task
item.CreatedDate = item.ModifiedDate;
Settings.TaskList.Value.Add(item);
}
if (this.NavigationService.CanGoBack)
this.NavigationService.GoBack();
}
void AboutMenuItem_Click(object sender, EventArgs e)
{
this.NavigationService.Navigate(new Uri(
"/Shared/About/AboutPage.xaml?appName=TODO List", UriKind.Relative));
}
}
}
Notes:
→ This page stores the current value in each control in page state. This is not only a nice touch for when the user gets interrupted while filling out the page, but it is a requirement due to the way that the date and time pickers work. Because these controls navigate away from the current page, failure to save and restore the values would cause the form to get cleared out whenever the date or time picker is used!
→ If an item in the done list is being edited, its values are directly modified. If an item in the task list is being edited, the task is removed and a modified task is added. This is done to keep the task list sorted by due date. If the due date had been changed, editing the existing task in the collection might cause the sorting to be incorrect. This is why Task’s INotifyPropertyChanged implementation is only needed to keep the main page’s “done” list box up-to-date; additions and removals are already reported by observable collections, so the property-changed notifications are only needed for direct edits.
The Settings Page
The settings page, shown in Figure 26.8, enables the user to turn off any of the pivot items except for the “all” item. (The “all” check box is present but always disabled to make it clear that this item can’t be hidden.) Listing 26.10 contains the XAML, and Listing 26.11 contains the code-behind.
Figure 26.8 The settings page enables the user to hide all but the first pivot item.

Listing 26.10 SettingsPage.xaml—The User Interface for TODO List’s Settings Page
<phone:PhoneApplicationPage x:Class="WindowsPhoneApp.SettingsPage"
xmlns="http://schemas.microsoft.com/winfx/2006/xaml/presentation"
xmlns:x="http://schemas.microsoft.com/winfx/2006/xaml"
xmlns:phone="clr-namespace:Microsoft.Phone.Controls;assembly=Microsoft.Phone"
xmlns:shell="clr-namespace:Microsoft.Phone.Shell;assembly=Microsoft.Phone"
xmlns:local="clr-namespace:WindowsPhoneApp"
FontFamily="{StaticResource PhoneFontFamilyNormal}"
FontSize="{StaticResource PhoneFontSizeNormal}"
Foreground="{StaticResource PhoneForegroundBrush}"
SupportedOrientations="PortraitOrLandscape" shell:SystemTray.IsVisible="True">
<Grid>
<Grid.RowDefinitions>
<RowDefinition Height="Auto"/>
<RowDefinition Height="*"/>
</Grid.RowDefinitions>
<!-- The standard header -->
<StackPanel Grid.Row="0" Style="{StaticResource PhoneTitlePanelStyle}">
<TextBlock Text="SETTINGS" Style="{StaticResource PhoneTextTitle0Style}"/>
<TextBlock Text="todo list" Style="{StaticResource PhoneTextTitle1Style}"/>
</StackPanel>
<!-- A check box for each setting -->
<ScrollViewer Grid.Row="1">
<StackPanel Margin="{StaticResource PhoneHorizontalMargin}">
<TextBlock Margin="12,12,0,0" Text="Visible Lists"
Foreground="{StaticResource PhoneSubtleBrush}"/>
<CheckBox Content="all" IsEnabled="False" IsChecked="True"
FontSize="{StaticResource PhoneFontSizeExtraLarge}"
local:Tilt.IsEnabled="True"/>
<CheckBox x:Name="TodayCheckBox" Content="today"
FontSize="{StaticResource PhoneFontSizeExtraLarge}"
local:Tilt.IsEnabled="True"/>
<CheckBox x:Name="PastDueCheckBox" Content="past due"
FontSize="{StaticResource PhoneFontSizeExtraLarge}"
local:Tilt.IsEnabled="True"/>
<CheckBox x:Name="StarredCheckBox" Content="starred"
FontSize="{StaticResource PhoneFontSizeExtraLarge}"
local:Tilt.IsEnabled="True"/>
<CheckBox x:Name="DoneCheckBox" Content="done" local:Tilt.IsEnabled="True"
FontSize="{StaticResource PhoneFontSizeExtraLarge}"/>
</StackPanel>
</ScrollViewer>
</Grid>
</phone:PhoneApplicationPage>
Listing 26.11 SettingsPage.xaml.cs—The Code-Behind for TODO List’s Settings Page
using System.Windows.Navigation;
using Microsoft.Phone.Controls;
namespace WindowsPhoneApp
{
public partial class SettingsPage : PhoneApplicationPage
{
public SettingsPage()
{
InitializeComponent();
}
protected override void OnNavigatedFrom(NavigationEventArgs e)
{
base.OnNavigatedFrom(e);
// Save the settings
Settings.IsTodayVisible.Value = this.TodayCheckBox.IsChecked.Value;
Settings.IsPastDueVisible.Value = this.PastDueCheckBox.IsChecked.Value;
Settings.IsStarredVisible.Value = this.StarredCheckBox.IsChecked.Value;
Settings.IsDoneVisible.Value = this.DoneCheckBox.IsChecked.Value;
}
protected override void OnNavigatedTo(NavigationEventArgs e)
{
base.OnNavigatedTo(e);
// Respect the saved settings
this.TodayCheckBox.IsChecked = Settings.IsTodayVisible.Value;
this.PastDueCheckBox.IsChecked = Settings.IsPastDueVisible.Value;
this.StarredCheckBox.IsChecked = Settings.IsStarredVisible.Value;
this.DoneCheckBox.IsChecked = Settings.IsDoneVisible.Value;
}
}
}
This page is about as simple as a settings page can get. The hard part is supporting the hiding of pivot items that is done in the main page!
The Finished Product
