
10
Intruder Alarm with Email Notifications
In this project, you’ll create an intruder alarm that sends you email notifications. The alarm will detect whether someone has trespassed onto forbidden territory using a passive infrared (PIR) motion sensor. When the PIR motion sensor detects movement, it will send a warning email.
PARTS REQUIRED
Raspberry Pi
Breadboard
PIR mot ion sensor HC-SR501
Two 5 mm LEDs (different colors)
Two 330 Ω resistors
Pushbutton
Jumper wires
INTRODUCING THE PIR MOTION SENSOR
You’ve probably seen motion sensors in a wide variety of applications. They’re used in security lights, in commercial building lights that turn on when you walk by, and in burglar alarms.
A PIR motion sensor (see Figure 10-1) measures infrared light emitted from objects in its field of view. It detects motion based on changes in infrared light, which indicate changes in temperature. This makes it ideal for detecting humans or animals because it will pick up living things that move within its range but not inanimate objects, like a leaf blowing in the wind. You can program the Pi to react to changes in infrared light by triggering an event such as turning on a light, sounding an alarm, or, as we’ll do in this project, sending an email.

FIGURE 10-1: PIR motion sensor
The sensor outputs HIGH if it detects movement or LOW if it doesn’t, and it has only 3 pins: VCC, GND, and data. Data outputs a 3.3 V signal, perfect for your Pi!
SENDING AN EMAIL WITH PYTHON
Python’s email library makes it straightforward to send emails through Python. We’ll write that script now before assembling the parts.
Finding Your SMTP Server Details
To send emails through code, you need to include your Simple Mail Transfer Protocol (SMTP) server details. SMTP is an internet standard for email transmission, and each email provider has a different SMTP server.
These details include your service provider’s server address and port and whether it uses Transport Layer Security (TLS). TLS is a protocol for establishing a secure connection between two email servers. To get this information simply search the internet for SMTP server settings along with the name of your email provider. You’ll plug these details into the script to personalize it.
The Email-Sending Script
NOTE
Don’t name your file email.py because that’s a Python library name, and your script won’t work.
Open Python 3 (IDLE) and go to File ▸ New File to create a new script. Copy the code in Listing 10-1 to the Python Editor and save the script as send_email.py inside the Sensors folder (remember that you can download all the scripts at https://www.nostarch.com/RaspberryPiProject/):
LISTING 10-1: The email notification script
➊ import smtplib
from email.mime.text import MIMEText
#replace the next three lines with your credentials
➋ from_email_addr = '[email protected]'
from_email_password = 'YOUR_EMAIL_PASSWORD'
to_email_addr = '[email protected]'
#set your email message
➌ body = 'Motion was detected in your room.'
msg = MIMEText(body)
#set sender and recipient
msg['From'] = from_email_addr
msg['To'] = to_email_addr
#set your email subject
msg['Subject'] = 'INTRUDER ALERT'
#connecting to server and sending email
#edit the following line with your provider's SMTP server details
➍ server = smtplib.SMTP('smtp.gmail.com', 587)
#comment out the next line if your email provider doesn't use TLS
server.starttls()
➎ server.login(from_email_addr, from_email_password)
server.sendmail(from_email_addr, to_email_addr, msg.as_string())
server.quit()
print('Email sent')
WARNING
If you use the snippet at ➎ inside a while loop without a delay, you will fill your inbox with thousands of emails and your account will probably be blocked, so make sure to include a delay if you use this snippet in any other project!
You start by importing the libraries you need for SMTP and email-related functions: smtplib and MIMEText ➊. Next, you create variables for the email address to send from, that email’s password, and an email address to send to ➋. We suggest you create a second email to send the notifications to your everyday email because you will be giving less secure apps access to the account you send from. Make sure that you input your own information for these strings.
The code block at ➌ writes the email. You start by creating a body variable that stores your email body text. Then you create an object called msg that generates the email itself using msg = MIMEText(body). Feel free to change the email body and subject by changing the string in the body and msg['Subject'] variables, respectively.
At ➍, you establish communication with an SMTP server. Pass the provider’s SMTP server address as a string as the first argument to smtplib.SMTP(), and the port as an int as the second argument. In this script, we’re using a Gmail SMTP server and port. If you use another email provider, make sure to change those values.
The server.starttls() function is necessary for email providers that use TLS to encrypt messages. If your email provider doesn’t use TLS, you can remove or comment out that line.
Next, the script logs into the sending email account ➎, sends the email, and stops communication with the server. Last, the script prints an 'Email sent' message to the Python shell to let the user know an email was sent.
Running the Email-Sending Script
It’s now time to see your script in action! Save your script and press F5 or go to Run ▸ Run Module to run the script. Then check the email inbox you sent the message to. You should have a new email. You can see an email we received using this script in Figure 10-2.

FIGURE 10-2: Email sent with send_email.py
If you haven’t received an email, verify that the email and SMTP information in send_email.py are correct. Also verify that you have given permission to let less secure apps use your account in your email account settings.
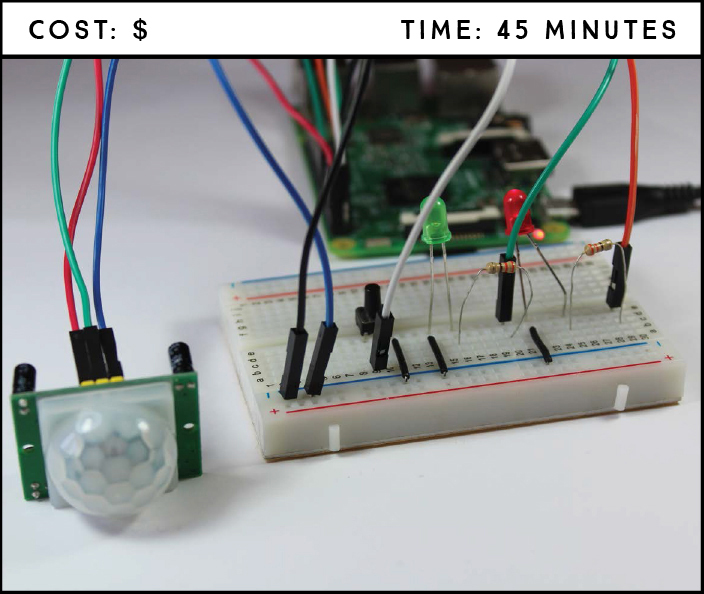
WIRING THE CIRCUIT
Now let’s wire your PIR sensor to your Raspberry Pi so it can send you emails when the sensor detects movement. You’ll also include two LEDs into your system, one to indicate whether the alarm is armed and one to indicate whether it has been triggered, as well as a pushbutton to arm and disarm the sensor.
Follow these steps to build the intruder alarm circuit, using Figure 10-3 as a reference.

FIGURE 10-3: Circuit for the intruder alarm
Connect GND of the Pi to one of the breadboard’s blue rails.
Insert a red LED and a green LED into the breadboard. Connect the green LED’s positive lead to GPIO 18 through a 330 Ω resistor, with the resistor between the LED lead and the GPIO pin, and connect the negative lead to the GND rail. Connect the red LED’s positive lead to GPIO 17 through another 330 Ω resistor and connect the negative lead to the GND rail.
Insert the pushbutton in the middle of the breadboard so that it bridges the center break, as shown in Figure 10-3. Connect the pin at the bottom right to the GND rail and the pin at the bottom left to GPIO 2.
Connect the PIR motion sensor with the connections in the following table.
PIR MOTION SENSOR |
RASPBERRY PI |
GND |
GND |
OUT |
GPIO 4 |
VCC |
5 V |
WRITING THE SCRIPT
Open Python 3 (IDLE) and go to File ▸ New File to create a new script. Enter the code in Listing 10-2 into the new file and save the script as intruder_alarm.py inside the Sensors folder (remember that you can download all the scripts at https://www.nostarch.com/RaspberryPiProject/):
LISTING 10-2: The intruder alarm script
#import necessary libraries
➊ from gpiozero import LED, Button, MotionSensor
import smtplib
from email.mime.text import MIMEText
from signal import pause
#create objects to refer to each LED, the button, and the PIR sensor
➋ led_status = LED(17)
led_triggered = LED(18)
button = Button(2)
pir = MotionSensor(4)
#control variables
➌ motion_sensor_status = False
email_sent = False
#arm or disarm the PIR sensor
➍ def arm_motion_sensor():
global email_sent
global motion_sensor_status
if motion_sensor_status == True:
motion_sensor_status = False
led_status.off()
led_triggered.off()
else:
motion_sensor_status = True
email_sent = False
led_status.on()
#send email when motion is detected and the PIR sensor is armed
➎ def send_email():
global email_sent
global motion_sensor_status
if(motion_sensor_status == True and email_sent == False):
#replace the next three lines with your credentials
from_email_addr = '[email protected]'
from_email_password = 'YOUR_EMAIL_PASSWORD'
to_email_addr = '[email protected]'
#set your email message
body = 'Motion was detected in your room.'
msg = MIMEText(body)
#set sender and recipient
msg['From'] = from_email_addr
msg['To'] = to_email_addr
#set your email subject
msg['Subject'] = 'INTRUDER ALERT'
#connect to server and send email
#edit this line with your provider's SMTP server details
server = smtplib.SMTP('smtp.gmail.com', 587)
#comment out this line if your provider doesn't use TLS
server.starttls()
server.login(from_email_addr, from_email_password)
server.sendmail(from_email_addr, to_email_addr,
msg.as_string())
server.quit()
email_sent = True
led_triggered.on()
print('Email sent')
#assign a function that runs when the button is pressed
➏ button.when_pressed = arm_motion_sensor
#assign a function that runs when motion is detected
➐ pir.when_motion = send_email
➑ pause()
This code is really straightforward and should all be familiar from Listing 10-1. You start by importing the needed libraries ➊ and creating gpiozero objects to refer to the LEDs, button, and motion sensor ➋. At ➌, you create the motion_sensor_status and email_sent control variables to identify whether the motion sensor was triggered and whether an email has been sent. You then create the arm_motion_sensor() function that arms and disarms the motion sensor when you press the pushbutton ➍. The send_email() function at ➎ sends an email when the sensor detects motion, as long as the sensor is armed and the email_sent variable is equal to False.
Last, you assign functions to events: the arm_motion_sensor() function is called when the pushbutton is pressed ➏, and the send_email() function is called when motion is detected ➐. The pause() function at the end of the code keeps the script running for events to be detected ➑.
Notice that the send_email() function has an if statement condition that sets the script to send an email only if motion is detected and if the email_sent variable is equal to False. When an email is sent out, the email_sent variable changes to True and your script sends no more emails. You set the email_sent variable to False again by pressing the pushbutton twice, rearming the alarm.
This condition prevents the script from sending you a lot of unnecessary emails. For example, say you left your dog home when you were out and it triggered the sensor; with this condition, you only receive one email saying that motion was detected. If you didn’t have this condition, you would receive endless emails until your dog moved out of the sensor range.
Press F5 or go to Run ▸ Run Module to run the script. Arm the sensor by pressing the pushbutton; the red status LED should light up. Test the alarm by moving your hand in front of the motion sensor. You should receive a new message in your inbox and the triggered green LED should light up.
Place this circuit in a strategic place and wait to see if someone enters your room while you’re out.
TAKING IT FURTHER
This project showed you how to use the PIR motion sensor with the Raspberry Pi and how to send emails with Python. These are handy skills that you can add to what you’ve learned in other projects to invent your own devices. Here are some simple ideas for projects you can build with the motion sensor:
- Add a piezo buzzer to your alarm circuit so that when motion is detected not only is an email sent but an alarm is also sounded.
- Automate your room’s lights to automatically turn on when you enter. You may need a relay to do this—check Project 16 where we explain how to use a relay.
- Use a relay and a photoresistor to make a security nightlight that turns on only when movement is detected in the dark.