
Primer
In this primer, you will get set up for everything you need in the following projects. We’ll introduce you to the Raspberry Pi board and its most important and interesting parts. Then we’ll walk you through setting up the Pi with all the hardware and software it needs.
This is a simple process that lets you use the Pi for so many things, including as a regular computer! We’ll go over setting up the Pi as a computer and show you how to navigate the desktop and file systems. We’ll show you how to use the terminal, also known as the command line, to give instructions to the Pi. Finally, we’ll introduce you to the Python programming language, which is what we’ll be using to program the projects.
Once you’re done with this primer, you’ll be ready to tackle the projects.
GETTING STARTED WITH THE RASPBERRY PI
We’ll start by exploring uses for the Raspberry Pi board, gathering what we need to get it running, and loading an operating system onto a freshly formatted microSD card to put in the Pi board.
The Raspberry Pi is a credit card–size microcomputer board that you can buy for about $35. It has everything a normal computer has: a processor; RAM; ports to plug in a monitor, mouse, and keyboard; and the ability to connect to the internet. The Raspberry Pi board even has one special feature that normal computers don’t: General Purpose Input Output Pins (GPIOs). These GPIOs let the Pi interact with the real world, allowing you to build smart electronics projects and control them with the Pi.
You can use the Raspberry Pi to do most things you do with a regular computer, such as browsing the web, editing documents, playing games, coding, and much more. Figure 0-1 shows a Raspberry Pi being used as a desktop computer.
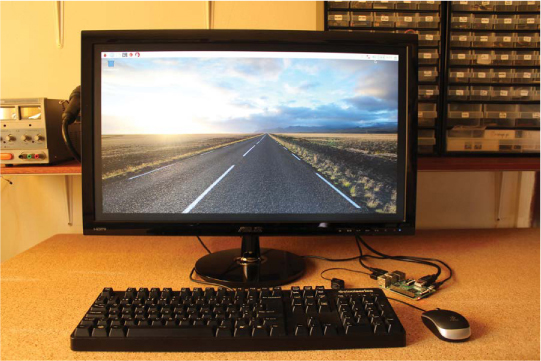
FIGURE 0-1: Using the Raspberry Pi as a desktop computer
However, keep in mind that the Pi isn’t as powerful as more expensive computers, so it has some limitations. First, it can’t keep up with the demands of some modern software, so not all software will work with the Pi. Second, it runs the Linux operating system instead of Windows or macOS, which may be more familiar to you.
Uses for the Raspberry Pi
So what’s the advantage of the Raspberry Pi, if it’s like a normal computer but with some limitations? The Pi gives you freedom to experiment in ways you wouldn’t or couldn’t with your computer. Computers are expensive and much harder to fix, so you wouldn’t want to tinker too much without knowing exactly what you’re doing. However, as Linus Torvalds—the founder of Linux—said in an interview with BBC News, Raspberry Pi makes it possible to “afford failure.” You can play around with hardware and software on the Pi without worrying about breaking something expensive or losing all your important files!
The Pi lets you experiment in two main ways:
Creating your own programs The Pi comes with a set of free tools for writing software. If you make a mistake, you can just wipe your Pi and start over.
Creating your own electronics projects The Pi board has GPIOs that allow you to connect sensors and other electronic devices that can interact with the real world. You can create useful things and have your projects running 24/7 without using much electricity.
There are endless uses for Raspberry Pi. Here are some examples of projects people around the world have been making: a retro gaming console to play old arcade games; a supercomputer, built by linking multiple Pi boards; a cloud server to store and access your data; a media center to organize and play media on your TV; a home automation system to control and monitor devices in the house; a whole host of awesome and useful robots, like farming robots and autonomous robot cars—just to mention a few. For an example of a really cool Pi project, check out the SeeMore sculpture, shown in Figure 0-2, which displays the beauty of parallel algorithms by correlating the movements of a 256-node Raspberry Pi cluster.

FIGURE 0-2: The SeeMore project
Differentiating Between Boards
There are several releases of the Raspberry Pi board, as shown in Figure 0-3.
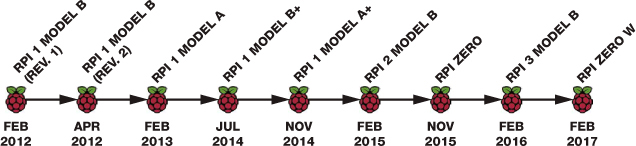
FIGURE 0-3: Chronology of Raspberry Pi boards
Throughout this book we’ll be using the Raspberry Pi 3 Model B, and that’s the board we recommend buying. However, if you already have an older Raspberry Pi model, it should work with most of the projects in this book. (If you are using a model with 26 GPIOs instead of 40, you may need to change some of the project’s circuits, which may require some research. You can also consult the “Raspberry Pi GPIO Pin Guide” on page 261 for a pinout of older boards.)
The Raspberry Pi boards differ in a number of aspects, including the number of GPIOs and the type and number of connectors. Table 0-1 shows the different features of the Model B boards. (Note that the newer boards have better features, such as more RAM and better processors. You can also see that the Pi 3 is the first board to have built-in Bluetooth and Wi-Fi.)
TABLE 0-1: Features of the Model B boards
FEATURE |
PI 1 |
PI 1 |
PI 2 |
PI 3 |
Processor |
700 MHz single-core ARMv6 |
700 MHz single-core ARMv6 |
900 MHz quadcore ARMv7 |
1.2GHz quadcore ARMv8 |
RAM |
512MB |
512MB |
1GB |
1GB |
USB ports |
2 |
4 |
4 |
4 |
GPIOs |
26 |
40 |
40 |
40 |
Ethernet port |
✓ |
✓ |
✓ |
✓ |
HDMI |
✓ |
✓ |
✓ |
✓ |
Storage |
SD |
MicroSD |
MicroSD |
MicroSD |
Wi-Fi |
- |
- |
- |
✓ |
Bluetooth |
- |
- |
- |
✓ |
Price |
$35 |
$25 |
$35 |
$35 |
Power source |
MicroUSB |
MicroUSB |
MicroUSB |
MicroUSB |
Getting to Know the Raspberry Pi and Its Accessories
Let’s take a closer look at a Raspberry Pi board. Figure 0-4 shows an annotated Raspberry Pi 3 Model B board.

FIGURE 0-4: The Raspberry Pi 3 Model B
The Raspberry Pi 3 Model B has the following components:
USB ports Connect peripherals, such as a mouse and keyboard.
Ethernet port Connects the Raspberry Pi to the internet.
Audio jack Connects an audio device.
CSI (Camera Serial Interface) connector Connects a small camera.
HDMI (High-Definition Multimedia Interface) connector Connects a monitor or TV.
MicroUSB power input Powers the Raspberry Pi. (There is no power switch on the Raspberry Pi board.) The microUSB connector is for power input only.
DSI (Display Serial Interface) connector Allows you to easily connect DSI-compatible displays, such as an LCD touchscreen, with a 15-pin ribbon cable.
MicroSD card slot Stores the microSD card, which holds the operating system and everything else the Pi needs to work.
Processor Functions as the brain of your Raspberry Pi. It features a Broadcom BCM2837 system on a chip (SoC) with a 64-bit quad-core CPU operating at a maximum speed of 1.2 GHz.
Antenna Picks up wireless LAN and Bluetooth signals.
GPIO pins Allow you to connect sensors to collect data or send output signals to control an output, such as a motor or LED.
As you can see, the Raspberry Pi is a bare electronic board that can’t do much on its own. You’ll need some accessories to get started (see Figure 0-5).
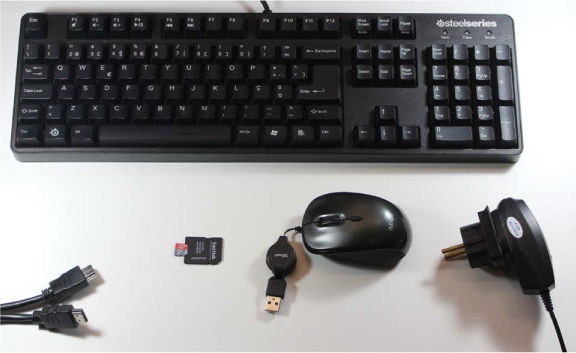
FIGURE 0-5: A keyboard and, from left to right, an HDMI cable, a microSD card, a mouse, and a power adapter
Here’s a list of things you’ll want to purchase for the Pi:
Power adapter
The Raspberry Pi 3 should be powered using a 2.5 A 5 V supply.
MicroSD card
We recommend getting an 8GB (or higher) class 10 microSD card. If you’re using a Raspberry Pi 1 Model B, you need a full-size SD card rather than a microSD.
Monitor and HDMI cable
Your Raspberry Pi works with a monitor or a TV and uses an HDMI connection. Most recent TVs and monitors have an HDMI socket, so you can connect one directly to the Pi board using an HDMI cable. If you have an old monitor or TV, it probably has a VGA or DVI socket. You can still connect the Pi to these screens, but you’ll need a VGA- or DVI-to-HDMI adapter.
Mouse and keyboard
You can use any mouse and keyboard as long as they have an USB plug. You can also use a wireless keyboard and mouse as long as they come with a USB receiver dongle.
MicroSD card adapter and writer for your PC (optional)
Most modern computers have a slot for SD cards. You insert your microSD card into an SD card adapter and connect it to your computer. If your computer doesn’t have an SD card slot, you also need to get an SD card reader/writer that connects via USB.
Ethernet cable or Wi-Fi dongle (optional)
The Raspberry Pi 3 has built-in Wi-Fi, but older versions don’t. This means that older versions need an Ethernet cable or a Wi-Fi dongle to get internet connection. If you get a Wi-Fi dongle, make sure that it is compatible with your Pi board. You can go to https://elinux.org/RPi_USB_Wi-Fi_Adapters to find out if the dongle is compatible.
Protective case (optional)
The Raspberry Pi doesn’t come with an enclosure and is fine to use as is. That said, we recommend purchasing a protective case for your board to make it a bit sturdier. If you don’t want to spend money, you can also create your own case using 3D printing, LEGO, or whatever you like. Just make sure the case allows you to access the GPIOs so you can build your electronics projects.
NOTE
You can also run your Raspberry Pi through your computer without a keyboard, mouse, or monitor. This is known as running headless.
If you’re not sure whether your peripherals are compatible with the Raspberry Pi, you can check https://elinux.org/RPi_VerifiedPeripherals to find a list of compatible and incompatible peripherals.
Project Component List
On top of this equipment, you’ll also need some electronics components to complete the projects in this book. Each project gives you a detailed list of the required parts at the start, and you should be able to easily find the needed components at most online electronics stores or with a quick Google search. We recommend stores like Element14/Farnell, Adafruit, ThePiHut, and SparkFun. Alternatively, you can also buy your parts from Amazon—make sure you get top-reviewed products.
NOTE
For the parts that start with an * we recommend you buy an assorted pack. These components are really cheap and you’ll need plenty of them, so a bulk pack is better value.
Here’s a list of all parts you’ll need for the projects in this book:
Raspberry Pi 3 Model B
Raspberry Pi Zero W (optional)
Breadboard
*5 mm LEDs (at least two LEDs with different colors)
*Jumper wires (male-to-male and male-to-female)
*330 Ω resistors (at least three)
4.7 kΩ resistor
*Pushbuttons (at least eight)
10 kΩ potentiometers (at least two)
MCP3008 chip
Common cathode RGB LED
WS2812B addressable RGB LED strip
Header pins
Logic level converter module BSS 138
16×2 Hitachi HD44780–compatible LCD
0.96-inch OLED display
Sense HAT
PIR motion sensor HC-SR501
Piezo buzzer
MQ-2 gas and smoke sensor
Raspberry Pi Camera Module v2
Relay module HL-52S
Plastic box enclosure
12 V lamp and holder
12 V power adapter
Male DC barrel power jack
DHT22 temperature and humidity sensor
MotoZero add-on board
Smart robot car chassis kit
Four AA batteries
Portable charger
Lighter
Headphones or a monitor with speakers and an HDMI cable
You’ll also need a soldering iron and accessories like solder, solder wick, and a helping hand. Additionally, it can be useful to have needle-nose pliers, mini cutting pliers, and a wire stripper.
UPLOADING THE OPERATING SYSTEM
The Raspberry Pi runs the Linux operating system, open source software built by expert volunteers working together from all over the world. Because Linux is open source, everyone has access to the source code.
NOTE
There are Android and Windows versions for the Pi, but they don’t work as well as the Linux systems. It’s better to stick with Linux, which is the most supported operating system for Raspberry Pi.
There are several Linux distributions available for Raspberry Pi, but the recommended distribution for beginners is Raspbian, which has the most support in the Raspberry Pi community. Raspbian is also free to download.
Because the Raspberry Pi doesn’t have a hard drive, you need to install the operating system on the microSD card, and for that you need another, everyday personal computer.
It’s easiest to install Raspbian with the New Out Of the Box Software (NOOBS), a simple operating system installer that contains Raspbian.
Downloading NOOBS
To download NOOBS, go to https://www.raspberrypi.org/downloads/noobs/. NOOBS comes in two versions: NOOBS and NOOBS LITE. NOOBS LITE doesn’t come with Raspbian, so you need to choose the NOOBS option (see Figure 0-6).
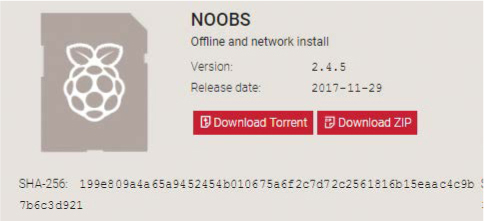
FIGURE 0-6: Downloading NOOBS
Click the Download ZIP button to download NOOBS. (It’s a large file and will take some time to download.) Find the file in your Downloads folder, or wherever your downloads go, but don’t unpack it yet.
You’ll you need to copy the contents of the NOOBS file to a blank microSD card, but first you need to format the card. Your microSD card will need at least 8GB to run well. Follow the instructions for the operating system on your computer.
Formatting a microSD card on Windows or macOS
Connect your microSD card to your computer and then follow these instructions to format your microSD card:
Go to https://www.sdcard.org/downloads/formatter_4/ and download the SD Card Formatter for Windows or Mac (see Figure 0-7).
FIGURE 0-7: SD Card Formatter download
- After you accept the terms, a ZIP file should begin to download.
Run the setup file to install the SD Card Formatter on your computer. Then, with your microSD card connected to your computer, open the SD Card Formatter application.
If you’re using Windows, in the SD Card Formatter dialog, select the drive for your SD card from the drop-down menu and select the Overwrite format option. Click the Format button to format (see Figure 0-8).
FIGURE 0-8: The SD Card Formatter dialog on Windows
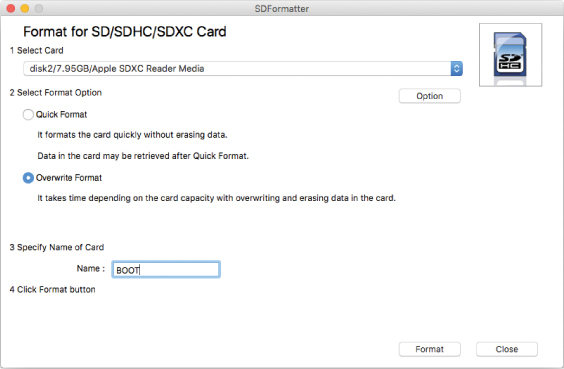
If you’re using macOS, in the SD Card Formatter dialog, select the microSD card drive from the drop-down menu, select Overwrite Format, and name your microSD card BOOT, as shown in Figure 0-9. Then, click Format.
FIGURE 0-9: The SD Card Formatter dialog on macOS


Formatting a microSD card on Linux
Connect your microSD card to your computer and then follow these instructions to format your microSD card on Linux:
Go to http://gparted.org/ and download the GParted software.
Install and open GParted.
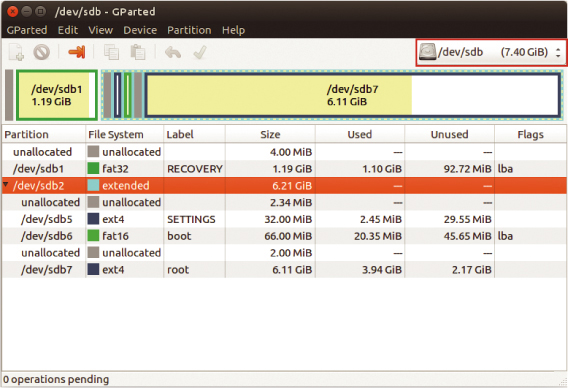
Select your microSD card at the top right, as shown in Figure 0-10.
FIGURE 0-10: GParted on Ubuntu
In the bottom half of the window, you should see a series of partitions listed. Right-click one of the partitions and delete it. Repeat that process to delete all partitions of your microSD card so all the memory is unallocated.
Right-click the unallocated partition and select Create New Partition.
Set the File system to fat32, enter the Label BOOT, and click the Add button, as shown in Figure 0-11. Last, click the green checkmark at the top of the main window to resume operation.
FIGURE 0-11: Creating a new microSD Card partition in GParted

In the end, your microSD card should look like Figure 0-12.
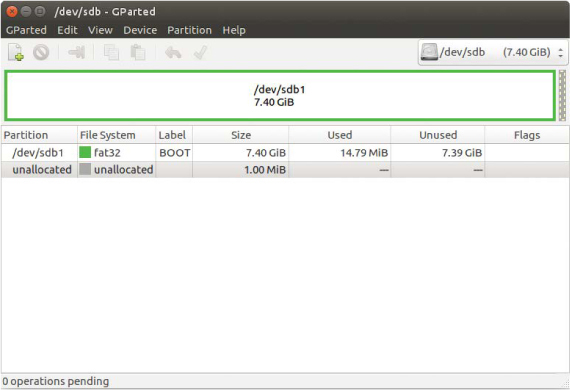
FIGURE 0-12: The microSD card formatted using GParted
Loading Raspbian onto the microSD Card
After the microSD card is properly formatted, plug it into your computer, extract the files from the NOOBS.zip file, and copy the files onto the card. Then safely eject your microSD card from your computer.
Now that your microSD card is ready to boot your Raspberry Pi, you can set up your Pi to act as a fully functioning desktop computer.
SETTING UP YOUR RASPBERRY PI AS A DESKTOP COMPUTER
Using your Raspberry Pi as a desktop computer is like having a learning center that allows you to build your projects and write your own software without worrying about messing up your computer. This is also the easiest way for beginners to interact with the physical world using Raspberry Pi.
Connecting your Raspberry Pi
Here is a list of everything you need to use your Pi as a desktop computer:
- MicroSD card with NOOBS installed
- Monitor or TV
- HDMI cable
- Mouse
- Keyboard
- Power adapter
The power adapter should be the last thing connected, but the other components don’t need to be connected in a specific order. For simplicity, though, we recommend you follow these steps:
NOTE
If you don’t have NOOBS installed on your microSD card, go back to “Downloading NOOBS” on page 10 to see how to install it.
Insert your microSD card into the microSD card slot on the Pi.
Connect the monitor or TV to the Raspberry Pi HDMI socket with an HDMI cable.
Connect the mouse and keyboard to the available USB ports.
Connect the power adapter to the microUSB power input.
Plug the power adapter into a power socket.
Figure 0-13 illustrates these connections.
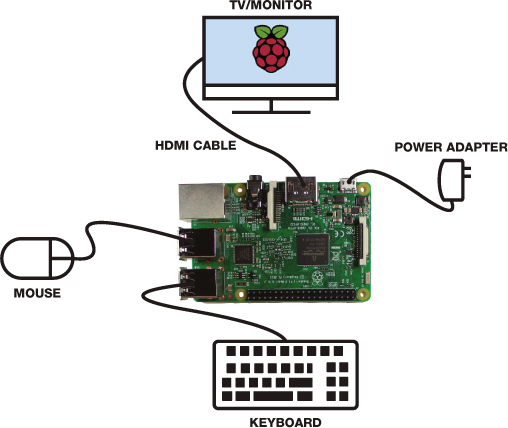
FIGURE 0-13: Connecting the Raspberry Pi to the essential peripherals
When you apply power to your Raspberry Pi, you should see one red LED and one green LED light up, as in Figure 0-14. These are called status LEDs, and they provide you with some useful information.
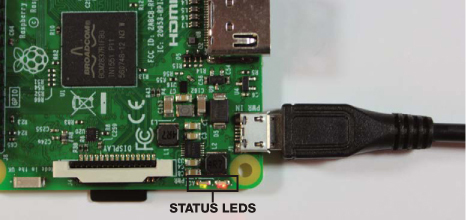
FIGURE 0-14: Raspberry Pi board status LEDs
When the red LED is on, it means the Raspberry Pi is connected to a power source. When the green LED is blinking, there is microSD card activity.
Booting Up Your Pi for the First Time
As soon as you apply power to your Raspberry Pi board, it should boot automatically. If you set up NOOBS correctly, you should see the installation window shown in Figure 0-15 after a few seconds.

FIGURE 0-15: NOOBS installation window
NOTE
It is very important that you correctly select your keyboard layout. Otherwise the wrong characters will come up on the screen when you type.
Raspbian should be selected by default. At the bottom of the screen, outside the NOOBS installation window, you need to select your language and keyboard layout, categorized by region.
After setting your language and keyboard preferences, click Install in the top left of the installation window. Your Pi should then give you a prompt about whether to overwrite the microSD card; select Yes and the installation should begin.
When the installation is complete, click OK and a message should ask you to restart your Pi. After restarting, you should see the Raspbian desktop environment, which will look something like Figure 0-16.
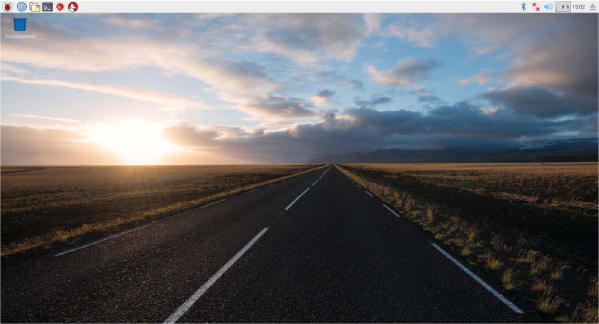
FIGURE 0-16: The Raspbian desktop environment
NOTE
You’ll only see the installation menu on the first boot instance. The next time you boot your Pi, you’ll be taken directly to the desktop environment.
Congratulations! You successfully set up your Raspberry Pi as a desktop computer.
You shouldn’t have been asked to enter a username and password, but you may be asked to do so in future. The default username is pi, and the default password is raspberry. You can change the password by going to the taskbar main menu and selecting Preferences ▸ Raspberry Pi Configuration. In the System tab, click the Change Password button to change your password, as shown in Figure 0-17.

FIGURE 0-17: Changing a password on Raspberry Pi
We recommend using the default user account for following the projects in this book. However, if you need to create a new user account, see the “Adding a New User Account” box.
ADDING A NEW USER ACCOUNT
To add a new user account to your Raspberry Pi, open the terminal and enter the following command, replacing username with the name you want to give to the user:
pi@raspberrypi:~ $ sudo adduser username
You’ll be prompted to enter a password twice (no characters will be displayed on the terminal while you type the password). You’ll then be asked further information about the user, which you can leave blank by pressing ENTER. Last, the terminal will prompt you to verify the information. If it is correct, type Y and press ENTER. You should now have a new user account.
Desktop Tour
As soon as you start exploring the desktop environment, you’ll notice that it’s very similar to a regular computer: it has a taskbar and a desktop area with a wastebasket. You can open, drag, resize, and close windows; create, rename, move, and delete folders; launch apps; and do most of the things you usually do on a normal desktop computer.
Using the Taskbar
The taskbar is at the top of the screen, and on the right side are several useful icons. Figure 0-18 shows what each is.

FIGURE 0-18: Icons on the right side of the taskbar
The left side of the taskbar has the taskbar menu and a few useful quick launch icons for programs (see Figure 0-19).
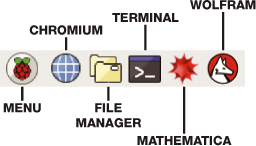
FIGURE 0-19: Taskbar quick launch icons
We encourage you to click the icons and explore the programs.
Exploring the Programs Menu
When you click the taskbar menu (the Raspberry Pi symbol on the taskbar), a drop-down menu with submenus should open (see Figure 0-20).

FIGURE 0-20: The taskbar menu
Explore each menu item to see what’s inside. For example, the Programming submenu contains several tools for writing software in languages like Java and Python. These are worth exploring by yourself at your leisure.
File Manager
On the left side of the taskbar is a folder icon that opens the File Manager window shown on Figure 0-21. The File Manager is a folder with more folders inside for you to organize your stuff. You can create, rename, move, and delete folders.

FIGURE 0-21: The File Manager
Accessing the Terminal
Another important program is the terminal, which you’ll use a lot when you work with the Raspberry Pi. In simple terms, the terminal sends text-based instructions through a command line to interact with your Raspberry Pi. To access the terminal, click the quick launch Terminal icon on the taskbar (labeled in Figure 0-19) or go to the taskbar menu and select Accessories ▸ Terminal. You should see a window that looks like Figure 0-22.

FIGURE 0-22: The Raspberry Pi terminal
In the terminal, you can type specific commands to your Raspberry Pi. For example, you could check what’s inside a folder using the command ls foldername or make a new folder using mkdir foldername. You can do basically everything you do when you use a computer, but instead of, say, clicking an icon, you enter some specific text commands.
Don’t be intimidated by the terminal. It may seem a bit daunting, but throughout this book, each project gives you the commands you need to enter, so it will be easy to follow.
Connecting Your Pi to the Internet
You can connect your Pi to the internet by using Wi-Fi or by connecting it to a modem with an Ethernet cable. Connecting via Wi-Fi is as simple as on a regular computer.
Click the second icon on the right side of the taskbar, as shown in Figure 0-23. Select your network from the available connections, enter your network credentials, and you’re done.
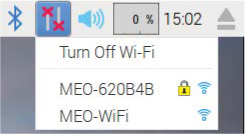
FIGURE 0-23: Connecting to Wi-Fi
If you’re using an Ethernet cable, you just have to plug it into the Pi’s Ethernet port.
Accessing the Internet and Browsing the Web
The Raspberry Pi browser is Chromium. To open Chromium, click the Chromium icon (a blue globe) on the taskbar, or go to the taskbar menu and select Internet ▸ Chromium.
Figure 0-24 shows an open Chromium window.

FIGURE 0-24: The Chromium web browser
As you can see, it’s very similar to Google Chrome. In fact, Chromium is the open source web browser that Google Chrome is based on.
Connecting an External Device
To use an external device like a USB removable disk, you just have to insert the device into one of the available USB ports. A window like the one in Figure 0-25 should open. Select Open in File Manager to check what’s inside or to move files onto the device.

FIGURE 0-25: Removable medium is inserted window
Once you’re done, eject your device safely by clicking the Eject icon on the taskbar and selecting your device.
Shutting Down, Rebooting, and Logging Off
When you turn off your Pi, you need to make sure you shut it down properly. If you just unplug the power, it may damage the Pi. The easiest way to shut down your Pi is to select Shutdown from the taskbar menu and then click Shutdown, shown in Figure 0-26.

FIGURE 0-26: Shutdown menu options
Wait until the green LED stops blinking before you remove the power adapter from the power plug.
You can also reboot or log out of your Pi from the Shutdown menu. If you want to log back into your account, just enter your username and password. The logout option is useful if you need to switch accounts.
Your Pi is now ready to run some programs! But first, let’s learn about some Python programming basics, including user input, variables, math operators, conditional statements, and loops.
GETTING STARTED WITH PYTHON
Python is the programming language you’ll use in most projects in this book. It’s one of the most simple and easy-to-learn programming languages around, so even if you’ve never programmed before, this is a good starting point.
Your Raspberry Pi has two versions of Python installed: Python 2 and Python 3. In this book, we will use Python 3 whenever possible because Python 3 is the most up-to-date version. Python 2 is still used by many programmers with frequent updates, but it is slowly going out of use.
NOTE
We’ll use Python 2 only in Project 12, which uses packages unavailable in Python 3 at the time of writing.
Python 3 Integrated Development Environment
To write code in Python you need the Python 3 IDLE (Integrated DeveLopment Environment), which will be installed automatically when you install Raspbian. With your Pi connected up to a monitor, mouse, and keyboard, start IDLE by going to the taskbar main menu and then select Programming ▸ Python 3 (IDLE). Figure 0-27 shows the Python shell, which is the name for the IDLE window that opens.

FIGURE 0-27: The Python shell
The Python shell is where you type and run Python commands to tell Python what to do. Python runs your instructions with an interpreter, which is what actually understands and runs your code.
When the shell opens you should see the three arrows >>>, as shown in Figure 0-27—this is called the prompt, and it lets you know the shell is ready for you the enter code. Some of the simplest instructions Python can run are math operations. To try it out, type the following:
>>> 2 + 2
Press ENTER and you should get the following result:
4
>>>
You can see that the result doesn’t have the prompt before it. This is to show that it’s an output from Python and not input from you.
Basic Python Instructions
Python can understand many kinds of instructions. You can build programs by putting those instructions, or commands, together. We’ll look at the different kinds of instructions here.
Mathematical Operators
Python is capable of doing most mathematical operations. Table 0-2 lists the mathematical operators used in Python.
TABLE 0-2: Mathematical operators in Python
OPERATOR |
MATHEMATICAL OPERATION |
+ |
Addition |
- |
Subtraction |
* |
Multiplication |
/ |
Division |
// |
Division, discarding the decimal point |
% |
Remainder after division |
Try more of these operations to get a feel for the shell.
Python Relational Operators
Python can make comparisons using relational operators, which compare the values on either sides and show the relation between them. A value, usually a number or letter, is one of the basic components a program works with.
Table 0-3 shows the different relational operators used in Python.
TABLE 0-3: Relational operators in Python
OPERATOR |
DESCRIPTION |
== |
Equal to |
!= |
Not equal to |
> |
Greater than |
< |
Less than |
>= |
Greater than or equal to |
<= |
Less than or equal to |
For example, enter the following in the Python shell:
>>> 2 > 4
You should get:
False
>>>
Python checks whether 2 is greater than 4 and tells you it isn’t. On the other hand, if you enter:
>>> 2 < 4
you’ll get:
True
>>>
Assigning Values to Variables
A variable is like a box that you create to store a value. You give the variable a name, and when you need to use the value you can enter the variable name instead. Figure 0-28 illustrates the concept. To assign a value to a variable you use the equal sign (=), with the name on the left and the value on the right.
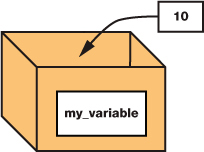
FIGURE 0-28: Assigning a value to a variable
Variables are useful for storing information in a program so that you can refer to or reuse that information later. For example, enter the following:
>>> my_variable = 10
In this line you are creating a variable called my_variable that has the value 10 assigned, as illustrated in Figure 0-28.
Then, if you enter the variable name in the Python shell like so:
>>> my_variable
it should return the value stored inside as output:
10
>>>
The names you give variables can’t have spaces and are case sensitive, so my_variable is different from my_Variable or MyVariable.
Data Types
Variables can store several types of values, not just whole numbers. That’s where data types come in. A data type is a classification of a value that tells the interpreter what operations can be done with the value and how it should be stored. Table 0-4 shows the data types you’ll use most often.
TABLE 0-4: Python data types
DATA TYPE |
DESCRIPTION |
Int |
Integer (whole) number |
Float |
Number with a decimal point |
String |
Set of characters between quotation marks |
Boolean |
True or false |
Let’s look at an example of each data type in the table:
>>> a = 5
>>> b = 7.2
>>> c = 'Hello'
>>> d = True
These are four assignment statements. The first, assigned to a, is an integer, which is a whole number. The b variable contains a float value, which is a number with a decimal. The third value, 'Hello', is a string, which is a series of characters. (Note that a string must be put inside single or double quotation marks.) Last, True is a Boolean, which is a type that can only take either True or False. You saw this data type in use earlier when we used the > operator.
The Python Editor
The Python shell is good for experimenting with simple snippets of code, but it takes only one line at a time. To write a program, known as a script, you need to put together a lot of commands to execute in one go. The right place to write a script is in the Python Editor, which is like a word processor for writing code. In the editor, you can create, edit, and save Python files. You then execute these scripts by running the file. Python files have .py extension.
To open a new file in the Python Editor, go to the Python shell and select File ▸ New File. A window like the one in Figure 0-29 should open.

FIGURE 0-29: The Python Editor and Python shell
The Python Editor doesn’t have a prompt because the commands you enter will not be immediately executed. You save them in a file and run them later. Let’s write a really simple Python script to try out the editor.
Your First Python Program
Traditionally, the first program you write is a simple one that displays a “Hello, world!” message. To do this in Python, enter the following:
#this script prints Hello, world!
print('Hello, world!')
The first line is a comment. Comments must start with a hash mark (#), which indicates that any text after the # should be ignored by the Python interpreter. Comments are useful for reminding you or whoever uses your script what the code is meant to do.
The second line is what actually prints Hello, world! using the print() function. A function tells Python to perform a certain action; in this case, the print() function tells Python to display whatever you enter between the parentheses. The information inside the parentheses is called the argument of the function. The print() function is a built-in Python function, which means it is always available for you to use.
NOTE
All scripts in Python need a .py extension. Don’t forget to add the file extension to the name.
Before you can run the code, you need to save your script. Go to File ▸ Save as and enter a name for your script—for example, hello_world.py—and then choose a folder.
To run your script, press F5 or go to Run ▸ Run Module. The results are shown in the Python shell rather than the editor. You should get a message saying Hello, world! as shown in Figure 0-30.
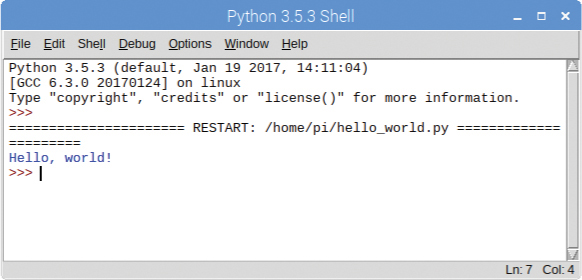
FIGURE 0-30: Running the hello_world.py script
Now, try changing the argument of the print() function and see different messages being displayed on the Python shell.
Asking for User Input
You can level up your program by asking for user input, meaning the user needs to enter some information for the program to continue. In the editor, enter the following snippet of code to ask the user for their name and then print a greeting message using that name:
username = input('What is your name?')
print('Hello ', username)
You use the input() function to ask the user for input. In this example, the user is asked What is your name?. This text is displayed to the user and the program won’t continue until something is entered. Whatever the user enters is then assigned to the username variable so that we can use it later in the program.
Save these two lines of code in a new file called username.py and run the file to see what happens. You should be asked for your name in the shell, and when you enter it, you should see the greeting.
The input() function accepts data as strings only, so if you want to ask for a number you can then use later in your program, you need to convert it into an integer or float. For example, if you wanted to get the user’s age as an integer, you’d need to use the int() function:
age = int(input('How old are you?'))
Similarly, to convert an input to a float, you use the float() function:
height = float(input('How tall are you?'))
Converting strings to numbers is necessary if you want to perform mathematical operations on the input.
Making Decisions with Conditional Statements
To write useful programs, you almost always need to perform different actions depending on whether a certain condition is true or false. In programming, these are called conditional statements, and they have the following structure:
if something is true:
do_something()
elif this is true instead:
do_something_else()
(...)
else:
do_another_something_else()
For example, the following snippet of code tries to guess the fruit you’re thinking of based on the color you choose:
print('Pick a fruit:')
print('strawberry, banana, or kiwi?')
color = input ('Enter the color of the fruit you chose: ')
➊ if (color == 'red'):
➋ print('Your fruit is a strawberry.')
➌ elif (color == 'yellow'):
print('Your fruit is a banana.')
➍ elif (color == 'green'):
print('Your fruit is a kiwi.')
➎ else:
print('Invalid input.')
The first if condition tests whether the user entered red ➊. If so, the program guesses that the fruit is a strawberry and prints the statement Your fruit is a strawberry. at ➋.
The elif statment stands for else if and runs only if the first if condition turns out not to be true. So if the user didn’t input red, the code checks whether the input is yellow ➌. If it is, the program guesses that the fruit is a banana. If not, it will check whether the color is green ➍, and if it is, the program guesses that you’ve chosen a kiwi.
NOTE
Python’s standard indentation is four spaces, not a tab. However, in IDLE, you can press the tab key to automatically insert four spaces.
Notice something very important here. Some lines begin with a few spaces before the code—four spaces to be exact. This is called indentation. Indentation is important to define code blocks. For example, you have an if statement at ➊, and the following line is indented at ➋. The indentation tells Python that the line at ➋ belongs to the preceding if statement, so that line will only be executed if the if condition is true. The line at ➌ is not indented, which means that line doesn’t belong to the same code block and will run separately. Indentation is essential in Python so the interpreter knows what code to run when, so pay attention to the spacing as you work through this book.
Last, if the user misspelled the color or didn’t type the color in lowercase, the else line ➎ runs, and the program alerts the user that the input is invalid.
In summary, the script checks each condition in order. When a condition is false, it proceeds to the next one, and so on. When a condition is true, it runs the corresponding indented code, and the statement ends. Note that there is no limit on the number of elif statements in a program. It’s also not necessary to include an else clause, but if there is one, it must come at the end.
Try creating some if/else statements with your own examples using the print() and input() functions—that’s the best way to learn.
while and for Loops
Loops allow you to execute a block of code multiple times for as long as a condition is met. There are two kinds of loops: while and for loops. For example, you can print all numbers from 1 to 10 with a while loop. Enter the following in the Python Editor:
number = 1
while (number <= 10):
print(number)
number = number + 1
The code that belongs to the while loop, indicated by the indentation, is executed as long as the value in the variable number is less than or equal to (<=) 10. In every loop, the current number is printed and then 1 is added to it.
You can also print numbers from 1 to 10 using a for loop, like this:
number = 1
for number in range(1,11):
print(number)
The for loop is executed as long as the value in the variable number is within the range of 1 and 11. The range() function automatically assigns the next value to the number variable, until 1 below the final number you specify.
You should use a for loop when you want to repeat a block of code a certain number of times. Use a while loop when you want to repeat code until a certain condition is no longer met. In some situations, you can use either one, but as you’ll see as you work through this book, oftentimes one is more efficient than the other.
Making a Simple Calculator
To test your new programming skills, you’re going to build a calculator. The script for this program is very simple and uses all the concepts you’ve just learned. Your calculator will do the following:
- Show a welcome message
- Ask the user what operation to perform
- Ask the user to enter one number
- Ask the user to enter another number
- Perform the calculation
- Print the result
Go to the Python shell and select File ▸ New File. Copy the following code to the Python Editor. (Remember that all scripts are also available to download with the book’s resources at https://www.nostarch.com/RaspberryPiProject/.)
➊ #Python Calculator
➋ running = True
➌ welcome_message = '***Welcome to Python Calculator***'
➍ print(welcome_message)
➎ while running:
print('Operations')
print('1 = Addition')
print('2 = Subtraction')
print('3 = Multiplication')
print('4 = Division')
print('5 = Quit program')
➏ operation = int(input('Enter a number to choose an operation: '))
➐ if operation == 1:
print('Addition')
➑ first = int(input('Enter first number: '))
second = int(input('Enter second number: '))
➒ print('Result = ', first + second)
➐ elif operation == 2:
print('Subtraction')
➑ first = int(input('Enter first number: '))
second = int(input('Enter second number: '))
➒ print('Result = ', first - second)
➐ elif operation == 3:
print('Multiplication')
➑ first = int(input('Enter first number: '))
second = int(input('Enter second number: '))
➒ print('Result = ', first * second)
➐ elif operation == 4:
print('Division')
➑ first = int(input('Enter first number: '))
second = int(input('Enter second number: '))
➒ print('Result = ', first / second)
➐ elif operation == 5:
print('Quitting program... ')
➓ running = False
Let’s break down how the calculator program works. The first line is just a comment that tells anyone who reads the program what the script does ➊. Then, we assign values to variables at ➋ and ➌ and print a welcome message at ➍.
Next we start a while loop ➎ that will run as long as running is set to True; that is, as long as the user hasn’t quit the program. We ask the user to choose a mathematical operation to perform using the numbers 1 to 5, and the program stores the value they choose in the operation variable ➏. We use a series of if/elif statements to select the right operation to run, depending on the input ➐. We then ask the user for the numbers to perform the operation on ➑, and the final line of each if/elif block performs the selected mathematical operation and prints the result ➒.
If the user enters 5, the running variable is set to False, and the while loop stops ➓.
Running the Script
Save your script as calculator.py. Then to run it, press F5 or go to Run ▸ Run Module. Figure 0-31 shows what you should get.

FIGURE 0-31: Running calculator.py
Taking it Further
Congratulations! You’ve built a working calculator program. Now see what you can do to improve it. As on example, you may have noticed that the user input only accepts integers; it’s useful if a calculator can accept floats, so see if you can add that capability. Another improvement you can try is allowing the user to do calculations using more than two numbers.