
13
Burglar Detector with Photo Capture
This project will teach you to use the Raspberry Pi Camera Module v2, which, along with the PIR motion sensor, will detect and photograph trespassers. When the motion sensor detects movement, it triggers an event that takes a photo so you know who was in your house while you were out.

PARTS REQUIRED
Raspberry Pi
Breadboard
Raspberry Pi Camera Module v2
PIR mot ion sensor HC-SR501
Pushbut ton
Jumper wires
INTRODUCING THE RASPBERRY PI CAMERA MODULE V2
The Raspberry Pi Camera Module v2, shown in Figure 13-1, features an 8 MP Sony IMX219 image sensor with a fixed-focus lens. It’s capable of 3280×2464 pixel static images and supports video with resolutions of 1080p at 30 frames, 720p at 60 frames, and 640×480 at 90 frames—all of which means it’s a pretty good camera for its size! You’ll just use the static image capabilities in this project.
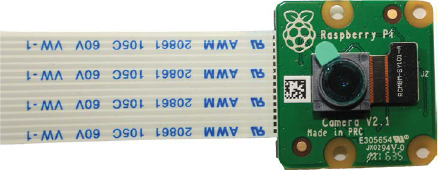
FIGURE 13-1: Raspberry Pi Camera Module v2
This camera is compatible with all Raspberry Pi models—1, 2, 3, and zero—and comes with a 15 cm ribbon cable that makes it easy to connect to the CSI port on the Raspberry Pi, designed to interface with cameras. If you want your camera to reach farther than 15 cm from your Pi, you should be able to find and purchase longer cables.
The Raspberry Pi Camera Module v2 is one of the most popular Raspberry Pi add-ons because it gives users an affordable way to take still photographs and record video in full HD. One interesting example of a Camera Module v2 project comes from the Naturebytes community, which provides kits to remotely capture wildlife photos. Figure 13-2 shows the wildlife camera in action.
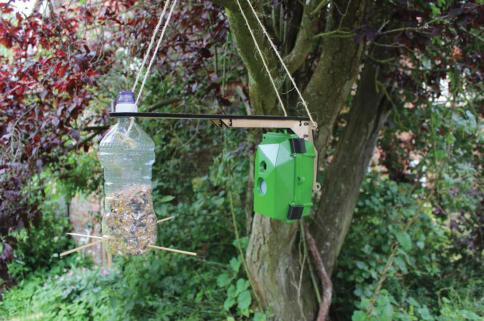
FIGURE 13-2: Raspberry Pi camera with PIR motion sensor pointed at a bird feeder
The Naturebytes kit is also equipped with a PIR motion sensor, so if a bird perches on the feeder in Figure 13-2, it will trigger the camera to take a photo of the bird. You’ll use the same principles for this project’s burglar detector.
BUILDING THE BURGLAR DETECTOR
The burglar detector consists of a PIR motion sensor, a pushbutton, and a camera module you’ll connect to your Pi. You’ll use the built-in picamera library, which makes it simple to control the camera.
Enabling the Camera
You need to enable your Pi’s camera software before you can use the camera module. In the desktop environment, go to the main menu and select Preferences ▸ Raspberry Pi Configuration. You should see a window like the one in Figure 13-3.

FIGURE 13-3: Enabling the camera software
Select Enabled on the Camera row, then click OK, and you’re ready to go.
Connecting the Camera
With the camera software enabled, shut down your Pi and then connect the camera to the CSI port. Make sure the camera is connected with the blue letters facing up and oriented as shown in Figure 13-4. Then start up your Pi again.
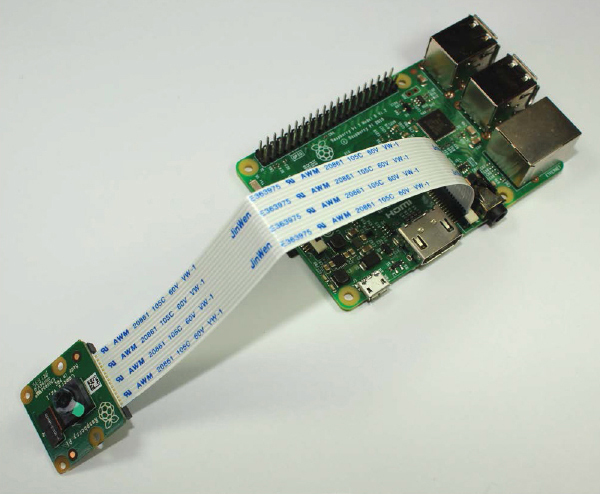
FIGURE 13-4: Connecting the Raspberry Pi camera to the CSI port
WIRING THE CIRCUIT
NOTE
Be careful when moving the camera. The ribbon is very fragile, and if it touches the GPIOs, they may permanently damage your camera. Try using some modeling clay or sticky tack to secure the camera.
With the camera connected, follow these instructions to wire the rest of the circuit, using Figure 13-5 as a reference.
Connect a GND pin to the breadboard GND rails.
Insert a pushbutton into the breadboard so that it straddles the center divide. Connect one lead to GND and the other lead on the same side of the button to GPIO 2.
Wire the PIR motion sensor with the connections shown in the following table.
PIR MOTION SENSOR
RASPBERRY PI
GND
GND
OUT
GPIO 4
VCC
5 V
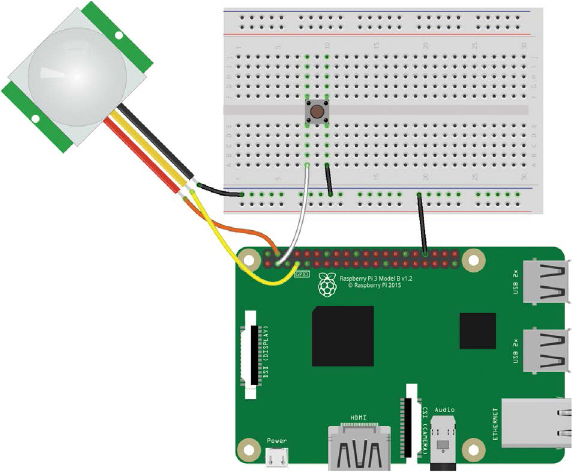
FIGURE 13-5: The burglar detector circuit
WRITING THE SCRIPT
To control the camera, you’ll use the built-in picamera library. It’s a very straightforward library, so this script will be a piece of cake. Here’s an overview of what the code should do:
Initialize the camera.
Take a photo when the PIR motion sensor detects movement.
Save the photos in your Desktop folder.
Name the photos incrementally so you know what order they were taken in—for example, image_1.jpg, image_2.jpg, and so on.
Stop the camera when the pushbutton is pressed. If you don’t include this feature, you won’t be able to exit the camera preview that pops up on your screen.
Entering the Script
Go to your Projects folder and create a new folder called Cameras. Then open Python 3 (IDLE) and go to File ▸ New to create a new script called burglar_detector.py, and copy the following code into it (remember that you can download all the scripts at https://www.nostarch.com/RaspberryPiProject/).
NOTE
You can’t name any of your files picamera.py because picamera is a Python library name and cannot be used.
#import the necessary libraries
➊ from gpiozero import Button, MotionSensor
from picamera import PiCamera
from time import sleep
from signal import pause
#create objects that refer to a button,
#a motion, sensor, and the PiCamera
➋ button = Button(2)
pir = MotionSensor(4)
camera = PiCamera()
#start the camera
camera.rotation = 180
➌ camera.start_preview()
#create image names
➍ i = 0
#stop the camera when the pushbutton is pressed
➎ def stop_camera():
camera.stop_preview()
#exit the program
exit()
#take a photo when motion is detected
➏ def take_photo():
global i
i = i + 1
camera.capture('/home/pi/Desktop/image_%s.jpg' % i)
print('A photo has been taken')
➐ sleep(10)
#assign a function that runs when the button is pressed
➑ button.when_pressed = stop_camera
#assign a function that runs when motion is detected
➒ pir.when_motion = take_photo
pause()
First you import the libraries you need ➊; as we’ve said, the program uses the picamera library to control the camera. You should be familiar with all the other modules used here from previous projects. Then you create objects to refer to the pushbutton, the PIR motion sensor, and the camera ➋, and initialize the camera with camera.start_preview() ➌. Depending on how your camera is oriented, you might also need to rotate it 180 degrees with camera.rotation = 180 so that it doesn’t take the photos upside down. If your image is upside down when you test this code, go back and set the rotation to 0 or comment out this line.
Next, you initialize an i variable that starts at 0 ➍. The take_photo() function, defined at ➏, will use this variable to count and number the images, incrementing the number in the filename by one with each picture taken.
You then define the stop_camera() function that stops the camera with the camera.stop_preview() method ➎. At ➏, you define the take_photo() function we just mentioned, which takes a photo. For this, you use the camera.capture() method, specifying the directory you want to save the image to inside the parentheses. In this case, we’re saving the images in the Desktop folder and naming the images image_%s.jpg, where %s is replaced with the number we incremented earlier in i. If you want to save your files to a different folder, replace this directory with the path to your chosen folder.
You then impose a 10-second delay ➐, meaning the camera takes photos at 10-second intervals for as long as the PIR sensor detects movement. Feel free to increase or decrease the delay time, but be careful to not overload the Pi with tons of images by making the delay time too small.
At ➑, you define the behavior to trigger the stop_camera() function when you press the pushbutton. This function stops the camera preview and exits the program. The exit() function pops up a window asking if you want to close the program; to close it, just click OK. Finally, you tell the camera to take a photo by triggering the take_photo() function when motion is detected ➒.
Running the Script
Press F5 or go to Run ▸ Run Module to run the script. While the script is running, you should see a preview of what the camera sees on your screen. To shut down the camera preview, press the pushbutton and click OK in the window that pops up.
Congratulations! Your burglar detector is ready to catch some burglars. Place the burglar detector in a strategic place and come back later to check any saved photos. Figure 13-6 shows a photo taken by our burglar detector, catching someone stealing a computer from our lab.

FIGURE 13-6: Picture taken with the burglar detector
TAKING IT FURTHER
As you’ve seen, projects with cameras are fun! Here’s an idea on how to improve your security system: redesign your project so that, when the sensor detects motion, the Raspberry Pi takes a photo, sends you an email notification, and sounds an alarm. You should already know how to do all of this using the skills you’ve learned from Projects 9–12.