The sounds of our explosion are all in place and the Artifact is ready for destruction! To finish our explosion, we are going to need some particle effects. We used various particle effects back in Chapter 5, Taking This Level Up a Notch, to enhance our scripted events at the security checkpoint and the elevator. Here we will use an explosion, fire, and smoke to enhance the destruction effect and mask when we delete the different components of the Artifact. Let's take a look:
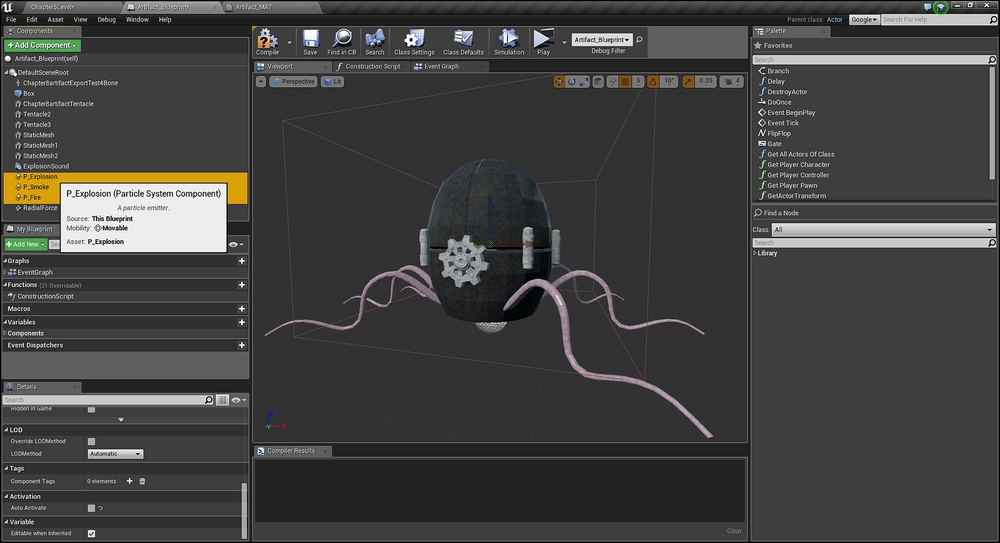
Add an explosion particle, a fire particle, and a smoke particle to the Components list. Be sure to turn off Auto Activate!
To our already extensive list of components, we will add explosion, fire, and smoke particle emitters. Add each emitter, just like we added our sound, and then select each one and disable the Auto Activate option in the Details panel. We will use the Blueprint node Activate to turn those back on later.

Create two separate Class Blueprints for the top and bottom pieces of the Artefact. We will use them as shrapnel in the explosion
The last piece necessary to really make this explosion great is to add flying chunks! When a solid object explodes, parts of it tend to go flying in all directions. We will simulate this by having our Blueprints spawn versions of the bottom and the top of the Artifact, with physics enabled, which will fly around and stay in the level after the rest of the Artifact has been destroyed:
- This will require us to head back to Blender and export versions of our Top and Bottom as separate FBX files. Open our Blender file and select the Top of the Artifact. Head up to the File menu and head to the FBX Export screen. Turn on the Selected Objects option so that only the Top is exported. Also, head to the Geometries tab and change the Smoothing option to Face. Name it something unique and export! Rinse and repeat for our Bottom piece and prepare to import them into Unreal.
- Import both of our new FBX files into Unreal as static meshes, and apply our artifact material to them. You will notice that even though we did not import the whole model, our material still works perfectly. This is because the UV maps for each piece are still the same, whether we use the whole Artifact or only parts.
- Time to create two new class Blueprints. Create a class
Blueprintfor each new static mesh by clicking the Blueprint button, selecting New Empty Blueprint Class, and selecting Actor as the Parent Class. I named mineArtifactTopChunkandArtifactBotChunk. - In each Blueprint, add the appropriate static mesh as a component. Just add it in; there is no need to move it. This way, they will be in the exact position we need them to be when we use our Blueprint to spawn them.
- Now we need to make a couple of changes to their Details.

Apply physics to our flying pieces
- For each of our new Blueprints, click the component and find the Physics section in the Details panel. First, turn on Simulate Physics. This will allow our objects to bounce around and be affected by gravity and outside forces. Next, turn on Mass in Kg. Normally, Unreal will calculate a physics object's mass, based on its size in the level. Both of our pieces come in at around 500 kg, not very good for being flying shrapnel. Turning on Mass in Kg allows us to override Unreal's best guess and fill in whatever value we wish for its weight. I used
50kg, but feel free to use whatever you wish. It can always be adjusted later. Be sure to do this for both the Top and Bottom Artifact chunks.
Time to finish the Artifact's demise. Back in the Artifact class Blueprint, there is one more Component to add to our setup. To make our Top and Bottom chunks fly, we will use a Radial Impulse component to simulate the force of the blast. Add the Radial Impulse through the Add Component menu and find the Radial Force Component section of the Details panel. The radius that the impulse will affect is shown in the viewport as a light blue sphere. Increase the size of the Radius property until it covers the entire Artifact. I used 250. Also in the Details panel, find the Impulse section and increase the Impulse Strength. I used 2000. Lastly, make sure to turn on the Impulse Vel Change option. This option makes sure that the 2000 units of force are applied directly as a velocity change. This will guarantee to throw our chunks a good distance and maybe even the player!
Time for the last bit of programming! Let's take a look:

Activate the explosion, fire, and smoke particles and then destroy the mesh portions. We will then use two Spawn Actor From Class nodes to spawn our Top and Bottom chunks. Finally, fire the Radial Impulse to watch them bounce!
There isn't too much to this final section. We will use a second Activate node off the end of the countdown section to activate all of our particle effects. Then use a Destroy Component node to get rid of the components that would be destroyed in the blast. Next, we will use two Spawn Actor From Class nodes to spawn our two chunks, before finally using a Fire Impulse node to throw them away from the blast. Lastly, we will Delay 4 seconds before using a Destroy Actor to clean up the whole thing. Start by using the search box in the Palette to grab the Activate node. Place it at the end of the countdown sequence and connect it to the Activate node we used to play our sound cue. The Activate node needs one or more Targets to know what to turn on. From the Components panel grab the P_Explosion, P_Smoke, and P_Fire components and drag them into the Blueprint. Connect these to Target node on the Activate node.
Next in line is the Destroy Component node. We will use this node to delete everything that would be destroyed in the explosion. Connect it to our Activate node and set its Targets to be the Artifact, the collision box, and all the tentacles.
Time for Spawn Actor From Class! This great node allows us to use Blueprints to spawn other class Blueprints, but requires a few more parameters than Activate or Destroy Component.

Don't forget to tell the Spawn Actor From Class nodes to use our Top and Bottom chunk class blueprints
Place the Spawn Actor From Class node next to the Destroy Component node and link them. The first thing we need to tell it is what class to spawn. Click the drop-down box and select the bottom Artifact chunk. The second thing it needs to know is where to spawn. This can be done by plugging a Get Actor Transform node (found using the search box in the Palette) into the Spawn Transform option. Now we are set to spawn! Repeat this step to set up a Spawn Actor From Class node for the top Artifact chunk.
Now fire that Radial Impulse and make this a true explosion!

Use these settings for the Fire Impulse node
The node we need to use is Fire Impulse. The only thing this node needs is a Target. Grab our Radial Impulse component from the Components panel and plug it in.
To wrap things up we just need to do a little bit of housekeeping. At the end of this sequence, add a Delay and a Destroy Actor node. The Delay will be set to 4.0 seconds to give our sounds time to play, and the Destroy Actor will have Self as a Target. This will remove all of the class Blueprint from the level. However, it will leave the exploded chunks behind. Even though we used a class Blueprint to spawn them, they are separate Actors and will not be deleted when the rest of the class Blueprint deletes itself.
Make sure the sequence is connected up in order and test it. You should have a satisfying explosion that throws pieces of the Artifact around. If the player is too close, it will even throw them backward!
Explosions are so much fun to make and can be a great way to add a bit of action to any experience, but if you had fun building this sequence, you don't need to stop here. Try adding more explosion particle effects, or adding the tentacles as chunks for added effect.

The final result! I hope you all had as much fun as I did!
How oddly satisfying was that?! There is just something about building something amazing for a video game and then allowing our player to blow it up. With our game asset now properly set up, we can place it in our space station level and use it as a goal to drive our gameplay forward. In this chapter, we went through the process of bringing our fully textured and animated Artifact in to Unreal and setting it up to look great in the level. We used a class Blueprint setup to assemble the pieces and created a way for the player to interact with it, causing it open. We then added some additional components and programming that allowed the player to start a countdown and blow up our game asset in a fine display of fire, smoke, and flying chunks.
And with that, we are done! Congratulations on finishing the book! What you have created is a great skeleton of a game that can be expanded on to create something amazing and uniquely your own. You have two whitebox levels that can be filled with your own custom art created in Blender. You have two game assets that can be further customized to fit your game's specific needs. I would strongly encourage you to properly finish each of these levels and to keep practicing and polishing your skills. Become the game designer or game artist that you want to be and I truly look forward to playing your unique games in the future!
Stick with it and game on!