Now that we have experienced the art pipeline for Unreal, let's kick our level design up a notch. In this chapter and the following chapters, we will be using the same process that we used previously, but we will be incorporating additional elements such as more level scripting, win conditions, animated game assets, and more. We will be further developing the story for our game and communicating to the player through level design and environment choices. The result will be a second level that builds off the survival horror feel we started building on the cargo ship. In this chapter, we will cover the following topics:
- Planning a more complex level
- Whiteboxing a level for better asset creation
- Level design principles
- Advanced scripting techniques
- Win and loss conditions
With the cargo ship level, we introduced the player to a sci-fi world in which a mystery crate becomes a gateway to greater adventure. As we move on to a second level, we need to answer a few questions:
- Where did that cargo ship come from?
- What clue did that crate provide?
- What dangers lurk behind the next corner?
For me, the answers came from my entertainment influences. I am an avid reader of science fiction, as well as cerebral horror by authors like H.P Lovecraft. As a gamer, I enjoy games such as Dead Space, Mass Effect, and FEAR. So to pull from those influences, my thoughts turned to the crate containing some artifact plundered from an ancient race. This artifact somehow caused the disappearance of the crew of our cargo ship. However, an inspection of the crate left us with a clue: the name of an import/export broker based on a mining station not far from where the player found the abandoned freighter. Heading back to the bridge, the player sets a course for the space station.
Like all good things, we will start this level with a sketch on paper:
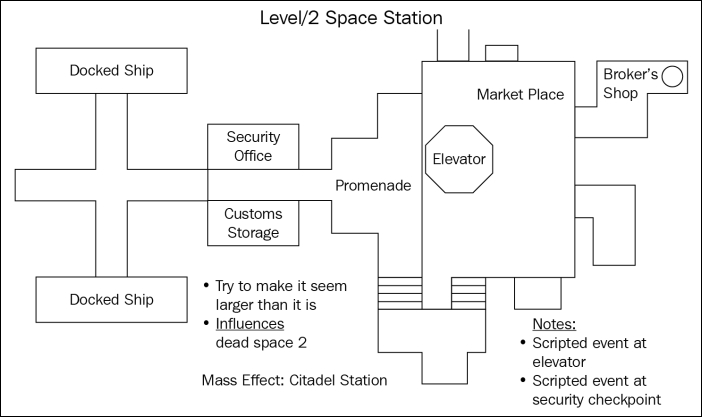
Just like our cargo ship, we start our space station on paper
For the space station, our design is centered on communicating the story to the player and providing a tense and foreboding atmosphere. Like the cargo ship they arrive on, the station is completely empty of any other human life. However, the area provides us as designers with ample opportunity to tell a story through scripted events.
Looking at our map, we can plan ahead and designate different areas as points where we can increase the player's sense of tension and direct the player toward the ultimate goal, the broker's stall in the marketplace. Since we want to avoid obvious clues such as signs and text prompts, we can designate some areas on our map for scripted events. These are areas where we will use Blueprints to communicate to the player and give clues as to the next step of the story. In a space station, these might be automated announcements over the PA system (audio clues), collapsing corridor sections due to damage (using triggered particle events), or creating vistas for the player to marvel at that also highlight the next goal (using level geometry). Let's take a look at the map. The player starts in the landing bay and has to progress through the airlock and security check. Here, we could use light, sounds, and some particle systems to create a malfunction that the player has to escape. Not deadly by any means, but it does communicate that there are no station staff present and that routine maintenance might have not been done in a while. Next, the player walks on to a promenade walkway. This could be an opportunity to present the player with a vista of the larger space station and highlight the location of the broker's shop down below. This communicates to the player that they need to find a way down to the market and makes them think that the level is much larger than the playable area. The player will then move over to the elevator, but this will malfunction as well and crash to the bottom of the shaft and force the player to take the stairs. When they finally enter the broker's stall, they should be on edge and ready for anything. Feel free to create your own interpretations of our scripted events and even add a few more.
Now let's move on to whiteboxing.
Tip
In this chapter, I will talk more about design principles and leave the actual whiteboxing to you, the reader. After working through Chapter 2, Starting Our First Project, I feel you have a strong foundation and can handle laying out the level.