Chapter 7
Troubleshooting
“I don’t think many people are aware of how much time it takes to get accustomed to the finite things that make printing successful. Everybody wants to just plug it in and have it work. You actually need to stop and learn how to use [the machine] for it to be a useful tool.”
David J. Castellano, scenic designer
As a technology still in its toddlerdom, there are still bugs to work out in the 3D printing process. Even if you have created, fixed, and exported what seems like the most perfect 3D model, there can still be some issues that get in your way.
“We look at everything as a solution or a challenge. Even failures are an education.” 34
Jason Lopes, Lead Systems Engineer of 3D Print & Scan Technologies for Legacy Effects
The typical first steps to troubleshooting are updating your firmware and software and resetting all profiles back to factory default. Also consult the user manuals for your printer, slicing software, and your manufacturer for technical concerns.
This chapter outlines some of the most common printing problems that may occur when using FDM and some beginning solutions to address them.
“Keep trying! It’s not an easy-bake oven. There’s going to be frustrations, but those frustrations lead to learning the technologies and how it may impact your design decisions. It’s going to enable something that you might not have thought of.”
Jason Lopes, Lead Systems Engineer of 3D Print & Scan Technologies for Legacy Effects
Extrusion Issues
Under-Extrusion
Sometimes when you begin to print, the printer will act like a pen that has run out of ink – the ghost of a print line is laid down, but it does not actually print sufficient amounts of plastic. Or it may print in spurts like broken or dotted lines or stop extruding altogether in the middle of a print (see Figure 7.1). This action of actively following the print path but not actually printing is referred to as air printing. Air printing happens for many reasons:
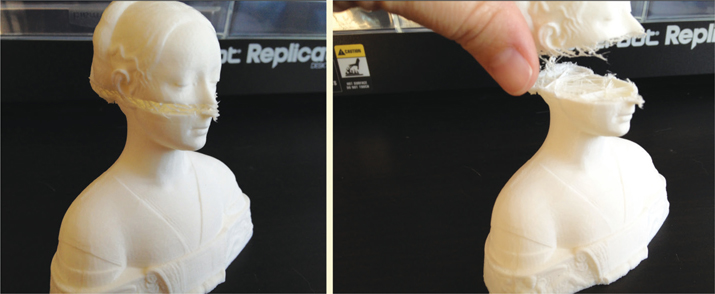
Figure 7.1
Layers skipped due to air printing.
✓ Priming the Extruder
Depending on your printer model, the nozzle may have the bad habit of oozing plastic after a print has finished while the machine is cooling down. When you go to print the next object the nozzle will be empty and may cause delayed extrusion while the filament travels to the opening in the nozzle.
Many manufacturers solve this issue by programming the printing to begin away from your object so that there is a temporary line or blob of filament created first to prime the extruder (see Figure 7.2). This allows the filament to reach a point of flowing smoothly before it reaches your print to begin that all-important first layer. If your printer does not use this technique, choose to print a raft, sidewalk, skirt, or other temporary structure so that flow issues are solved before the actual object begins to print.

✓ Z-Gap Too Low
If the nozzle is too close to the build plate, there is not enough room for the plastic to be properly extruded from the nozzle, which may also be indicated by a clicking or gurgling sound. Observe if the extrusion seems troubled for the first two layers but normal for the third and fourth layers; this can be another indication. Solve this problem by adjusting your z-gap to allow more room between the nozzle and the build plate.
✓ Out of Filament
Verify there is filament leading into the nozzle. This may seem obvious, but depending on your filament delivery system it may be more difficult to see than one might think.
✓ Filament Jam
A simple jam may be fixed by unloading the filament, cutting its end to a blunt tip, heating the printer back up, and reloading the filament into the machine.
✓ Tangled Filament
Extrusion issues may occur if your filament roll has become tangled or temporarily caught. You may hear a clicking sound as the printer tries to pull the filament free. If you suspect your filament is tangled or stuck, gently move the filament roll by hand or remove the roll and check it for snags. To prevent this issue in the future, assure your filament spools stay tightly wound when removed from the machine.
✓ Break in Filament
If the filament has broken within the guide tube or extruder, the printer may not be able to pull the filament into the heating mechanism. Manually feed the filament through the channel and extruder to push out the broken part and restore normal operations.
✓ Inconsistent Filament Diameter
Avoid low-quality filament manufacturers. Poorly made filament may consist of a diameter that varies slightly throughout the spool. When printing, varying diameters can clog the extruder and cause problem prints.
If unsure, digital calipers can be used to verify consistent filament diameter throughout the spool (see Figure 7.3). If you find areas that are largely incorrect, cut off those sections and reload the filament to see if the problem is solved. If the problem persists, contact your manufacturer to request an exchange or consider a new filament manufacturer.

Also, consider where you choose to print. Printing in warm or humid environments may lead to inconsistent filament diameters even if originally stored properly; try to locate your printing area in a cool and dry environment.
✓ Lubrication Concerns
If your print was working fine but suddenly skipped a layer only to continue printing normally again this may be due to lubrication issues on the z-axis rod. If the rod is dirty or not lubricated enough, friction may have caused the build plate to stop or stutter briefly without achieving the correct elevation for the layer to print. A loud squeaking or grinding noise may also indicate a lack of lubrication.
This same problem can occur because the z-axis rod is over-lubricated. This may cause the build plate to misalign, causing the z-gap to be too close. Consult your manufacturer for the proper maintenance regime for your machine.
✓ Feeding Malfunctions
Feeding malfunctions are a common cause for extrusion issues. The feed mechanism that pushes or pulls the filament into the nozzle (which often consists of a small gear with tiny teeth) may strip the filament so that it is no longer being fed properly into the extrusion chamber. Unload the filament and cut off any sections that look shaved off or stripped. Try reloading the filament to see if this fixes the problem.
If the issue persists, try unloading and reloading the filament multiple times in a row to assure that the machine heats up to the proper temperature. When loading the filament give it a good solid push to try to move past any problem areas inside the mechanism. Sometimes simply shutting down and restarting the machine can help reset mechanical problems that do not seem to be responding properly.
If all else fails, you can take apart the extruder and clean it out with a firm bristle brush to remove any rogue plastic shavings stuck in the gear. Consult your manufacturer for help.
✓ Clogged Nozzle or Extruder
The nozzle can become clogged (or partially clogged) with cooled filament or dirt that may have decided to hitch a ride on your filament as it got pulled into the extruder. The hole in the nozzle tip is typically only as big as a single grain of sand, so even dust buildup accumulated on the filament can clog the hole. A clogged nozzle or extruder can also indicate a temperature issue in the hardware; the filament may not be achieving the correct temperature needed to properly extrude.
This first line of defense for a clogged nozzle is typically to unload the filament, cut the stringy, partially melted end of the filament off so it is a clean cut, heat the machine up again, and try reloading. Use force to manually push the filament through. This added pressure may be enough to solve the problem. Once the nozzle begins extruding, let it run for several seconds to assure there are no other impending clogs.
If that does not work, unload the filament again, heat up the machine, and carefully use a thin piano wire or guitar string (the high “E” string works best) to poke through the mechanism to try to release the clog. It may require a strong hand to unearth the clog.
If your nozzle is removable, you can try heating up the machine and removing the nozzle (using pliers to avoid burns) to look for clogs. Use tweezers to remove any clogs that you can reach and a small piano wire, guitar string, or nozzle cleaning bit to clear the hole in the nozzle tip. Before using any of these methods assure that the nozzle is heated enough to allow for malleable filament to be removed.
If all else fails, dissembling the extruder mechanism or exchanging it may be in order. Refer to your manufacturer for major surgeries such as these and be aware that some manufacturers may void your warranty plan if you perform too many invasive measures without their consent.
Over-Extrusion
Sometimes instead of not extruding enough, your printer may extrude too much so that your print appears stringy or hairy (see Figure 7.4).

Figure 7.4
Stringing.
Stringy prints occur when small whiskers of filament are strung between unconnected points in the print. This happens because extraneous plastic oozes from the nozzle while the print head moves to a new location.
✓ Temperature Settings
To counteract stringing, try lowering the temperature settings by 5 to 10 degrees. It may be that your temperature is too hot, which causes the filament to be too molten (almost to the point of melting). Filament that is too hot has less control, which can cause increased oozing.
✓ Retraction Settings
Retraction is a term that refers to the action of the printer sucking the filament back into the nozzle a short distance after each moment of continuous printing before moving to a new location. If the retraction setting is not optimized for your printer, increased stringing may occur.
Retraction speed, or the rate at which the filament is retracted, may also be a part of the problem. Consult your manufacturer’s information for the correct settings by material.
Formation Issues
Print Not Sticking to the Build Plate
The first printed layer of your object is the most important because it lays the foundation for the success of the rest of the object; it must be firmly connected to the build plate. Even if it appears to be stuck on at first, if the adhesion is not solid enough, the print may pull off at a later point in the printing process, which can be very disappointing.
✓ Level Build Plate and Check Z-Gap
One of the most important things you can do before printing is assure that your build plate is level. If the build plate is crooked, even slightly, this may cause the z-gap to be too close on one side and too far on the other, causing first layer adhesion problems.
✓ Clean Build Plate
Clear the build plate of any residual pieces of plastic and clean off any oil, dust, and greasy residue. Even the oils from our hands on the build plate will cause prints to pop off easily or not stick in the first place.
Clean the build plate with a clean, lint-free cloth. If you suspect there may be oil present from your hands, wipe the build plate with a cotton ball soaked in rubbing alcohol and let dry.
✓ Build Plate Surface Material
Different types of filament stick to different types of surfaces better than others. For example, PLA may stick to a plastic build plate better than ABS; while ABS works great on Borosilicate glass when heated.
Some users choose to cover their build plate with supplemental materials to help with adhesion. PLA sticks well to blue painter’s tape while ABS tends to adhere better to warm Kapton tape (or Polymide film). Other popular enhancements include water-soluble glues, hairspray, and any other sticky, but temporary, substances. Others find that covering their build plate completely with alternative materials helps, such as Plexiglass, laminated wood, or Tufnol (a laminated plastic material).
If using tape, use a soft, flat object (like a credit card or plastic squeegee) to smooth out any air bubbles and wrinkles. Irregular features on the build surface will cause print defects or cause the material to embed itself into the object during printing.
After adding supplemental materials (no matter how thin), adjust the z-gap again.
✓ Rafts
If your object continues to resist bonding with the build plate, use a raft, sidewalk, skirt, or any other temporary attachment device. The raft provides a larger surface area and often prints thicker and slower in order to enable the print to stick more easily to the plate. A raft can also help compensate for small inaccuracies in z-gap and/or build plate leveling.
Curling
Edges that curl up and pull away from the build plate are referred to as curling (see Figure 7.5). Curling can be a common occurrence with ABS prints as well as many oversized or large, flat prints in PLA.
✓ Cooling Too Fast
The dance between temperature and cooling rate is a delicate balance – sometimes even a breeze from an open window or a draft underneath a door can be enough to set off the balance.
Curling is often caused by hot filament taking too long to cool and/or shrinking too quickly before fully cooling. The opposite may also be true: the print may be cooling too fast and must be kept warm to avoid curling. If your printer has a heated build plate, heat the build plate slightly during printing; keeping the lower layers warm while the top layers print will allow the overall object to cool more evenly.
Mouse ears, rafts, and other assistive features can also help to decrease curling.

Figure 7.5 Curling – separate pieces of skull glued together that curled during printing.
✓ Z-Gap Too Far Away
If your first layers are not sticking to the build plate, it may cause curling because the foundation of the print is unstable. Try lowering your z-height by 0.05mm increments until the first layer bonds successfully.
✓ Infill Reduction
Reducing the amount of infill in your print may alleviate curling. Although good for the strength of the finished object, infill exerts a force on the external structure of the print. If the infill cools too fast and/or produces too much strain, it may cause the print to curl in on itself.
Surface Imperfections
HOLES, GAPS, AND DEFORMITIES
Sometimes your print may appear to have deformed surfaces and holes or gaps in its outer shell.
✓ Not Enough Shells
When printing with a low infill, the shells may be printing over large, unsupported spans. This can cause the filament to droop or sag into the holes of the infill, which will cause holes or gaps in the top layers.
The simplest way to fix this problem is to increase your number of shells (see Figure 7.6). A good rule of thumb is to assure the top layer of your object is at least 0.5mm thick. Therefore, if you are printing at a 25mm layer height, you need at least two shells; if printing at a 0.1mm layer height you need at least five; and so on.35
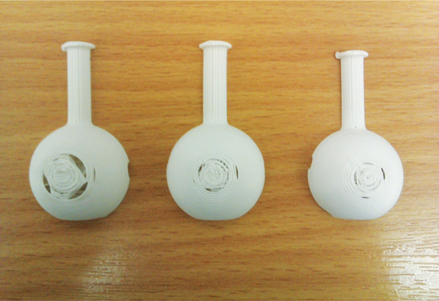
Figure 7.6
Medicine bottle print with collapsing dome. Shell count 1, 2, and 3 from left to right.
Photo courtesy of: Kerry Clements, https://kerrysmakerblog.wordpress.com
✓ Not Enough Infill
If you have tried increasing your shells and you are still experiencing gaps in your print, try increasing the infill percentage. A greater percentage of infill provides a stronger foundation on which your shells can print, thereby decreasing the amount of drooping or sagging that can create gaps in the surface.
✓ Too Coarse a Resolution
Organic objects tend to print better in higher resolutions because the finer layers fill out the subtleties of the object better (see Figure 7.7).
✓ Improper Cooling
Sometimes your print may begin printing fine, but not result in quite the right shape, almost like soft-serve ice cream as it starts to melt (see Figure 7.8).
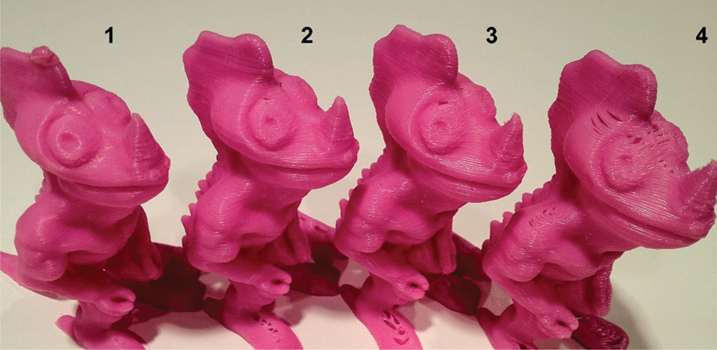
Figure 7.7
Finer to coarser resolutions from left to right: 0.1mm, 0.2mm, 0.3mm, and 0.4mm. The layer lines become more noticeable and more drooping occurs as the layer height increases (right). Dino Dude! by Cerberus333; thing: 23745.
Photo courtesy of: Airwolf 3D
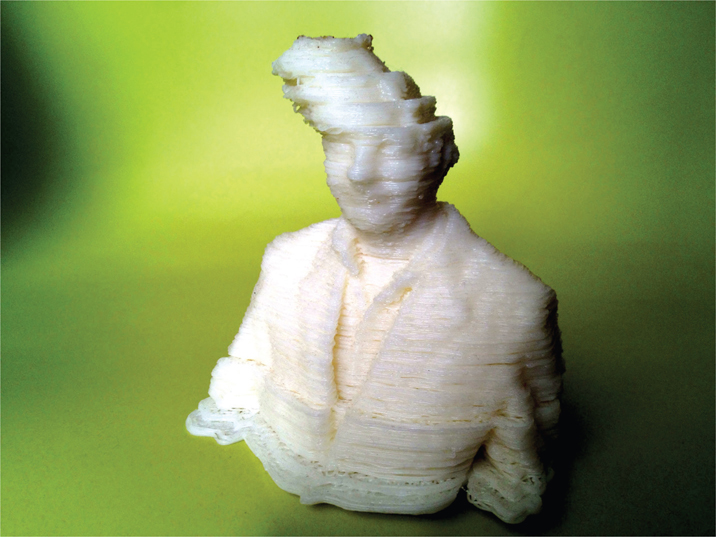
If you find that your print is changing shape as it prints, your object may be overheated, meaning the plastic may not be cooling fast enough to keep its shape. Try placing a small desktop fan nearby the printer to increase the rate of cooling.
Also try printing at a slightly lower temperature (5 to 10 degrees lower). This may enable the plastic to solidify faster in order to retain its shape. The higher temperature may be causing the plastic to be closer to a melted state than a molten one. It may be too liquefied to cool quickly enough to retain its shape.
If all else fails and overheated deformities are still a struggle, try printing multiple objects at once as a workaround – even if the second object is merely a copy of the first. Giving the printer two items to print may allow the object enough relief time to cool properly before the next layer is added.
Delamination
Delamination is the separation or splitting of layers during printing and/or cooling. Layers that delaminate can cause strength and stability issues in the final product (see Figures 7.9–7.10).
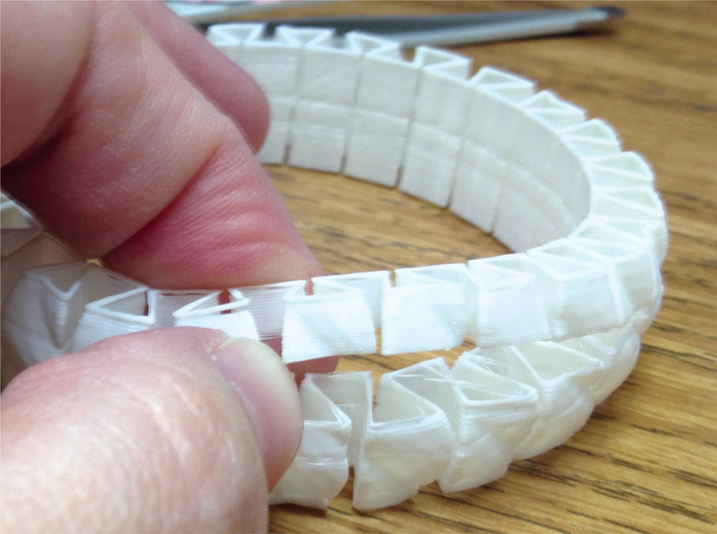
Figure 7.9 Delamination. Layers of bracelet have completely split apart. Stretchy Bracelet by Emmett; thing: 13505.

If your layers are not bonding correctly, check your temperature settings. If the filament is not warm enough or is cooling off too quickly, the layers will not adhere properly to each other. Try increasing your print temperature slightly by 5 or 10 degrees to see if it rectifies the problem.
✓ Layer Height Versus Nozzle Diameter
Most 3D printer models use nozzles that fall between 0.3 and 0.5mm in diameter. Depending on the size of your printer’s nozzle, its diameter may cause some limitations when it comes to layer height. As a general rule, your layer height should be 20% smaller than your nozzle diameter in order for layers to bond correctly. For example, if your nozzle diameter is 0.4mm, stay below a layer height of 0.32mm in order for the layers to adhere properly.