Chapter 9
Costume Applications
3D printing has already become a mainstay in the fashion industry – it is only natural that its influence has started showing in costume design as well. It frees designers from many physical limitations and explodes the artist’s palette.
Costume designers are using 3D printing to add adornment and custom pieces to existing costumes as well as creating the full costumes themselves. 3D printing provides a new richness to materials and possibilities that makes the future of this landscape seemingly unlimited.
Costume Design and Technology
In 2015, costume and fashion designer Wojciech Dziedzic worked with communication design student Tomasz Dabert to re-envision an armored costume for Wolfgang Rihm’s opera The Conquest of Mexico at the Teatro Real de Madrid. Dziedzic wanted the main character, Hernán Cortés, to retain the traditional silhouette of 14th century armor, but with a contemporary reference. He chose to 3D print the armor as if it was built out of pixel-like cubes (see Figure 9.1).
Dabert modeled the cuirass (armor) in Rhino, and worked with printing service i.materialise to complete the project. The biggest challenge was allowing for the singer’s unhindered movement and, most importantly, unobstructed breath support. Ultimately, i.materalise suggested using a rubber-like SLS material for ultimate comfort and flexibility (see Figure 9.2).
Costume Accessories
In addition to full costume pieces, 3D printing has become a favorite among many costume technicians and designers for unique accessories. It can work particularly well with complex organic shapes, items needed in multiples, or accoutrement for those unique touches to the perfect costume.

Figure 9.1 3D printed armor for the opera The Conquest of Mexico, Teatro Real, Madrid, Spain. Design by: Wojciech Dziedzic.
Photo courtesy of: Javier del Real
Mirena Rada is a costume designer whose impressive and versatile credits range from theme park spectaculars at Walt Disney Parks and Resorts and SeaWorld to the Big Apple Circus, DreamWorks stage productions, and Broadway, as well as film, dance, special events, and beyond. Rada is well known for her groundbreaking integration of new technologies into her costume design process – including costume illumination, fabric sublimation, and 3D printing. Visit www.mirenarada.com for more on her work.
Rada first used 3D printing for the Festival of Fantasy parade, which premiered at the Walt Disney World Resort in the summer of 2014. “Ten different costume houses from eight cities and two countries were involved in what was nearly a year-long process.”46 Although she may have been new to the techniques at the time, Rada made a giant splash with her 3D printed
“In the spirit of ‘it’s not the destination, it’s the journey’, my favorite part of any project is the discovery process itself, and there is nothing more delicious than crossbreeding costume design with new or non-traditional technologies.” 47
Mirena Rada, costume designer
designs, which may well change the way costumes and costume accessories are conceptualized from now on.

Figure 9.2 Completed 3D printed armor on dress form. Design by: Wojciech Dziedzic. Technical drawing/design by: Tomasz Dabert.
Photo courtesy of: Wojciech Dziedzic
Rada was introduced to 3D printing by Lisa Hanusiak, Disney’s Materials and Process Engineer, who was hired to explore new materials for Disney’s costuming division. “Before joining Disney [Hanusiak] worked as part of a team that developed, patented, and fabricated components for fighter jets and NASA’s Hubble mission.”48 She was eager for the opportunity to implement 3D printing on a large scale. It was decided that some items would be cast from 3D printed molds, while others could be worn directly in the parade.
The first print the team wanted to try was the raven mask from the Sleeping Beauty section of the parade – a delicate, filigree-like creation (see Figure 9.3). Due to its intricate design Hanusiak explains that “using traditional molding methods would have proven difficult and produced heavier head pieces.”
The mask was modeled in SolidWorks and, after an origami-like paper mockup was created to test the design, it was printed on an industrial SLS machine using carbon fiber filled nylon material for strength. Hanusiak felt it “would be durable enough for a daily parade application, which is one of the most brutal environments for costuming.”49
After printing, the mask was treated with several thin layers of epoxy as a sealant. It was then sanded, primed, painted with a Modern Masters Shimmer brassy metallic paint and patina, and completed with Swarovski heat-set crystals. The finished product is surprisingly durable – especially for the harsh environment of a parade application. “After a year in the parade, not one of the raven masks has been broken,” says Hanusiak. “This has paved the way for the use of these additively manufactured materials in additional costuming applications at Disney.”50
“The benefits [of 3D printing] are outstanding. Each subsequent raven mask is easily and consistently produced – while being incredibly lightweight and durable compared to a metal version – and can be easily adjusted in 3D for differently shaped heads (if needed).” 51
Mirena Rada, costume designer
Rada’s second costume opus in the parade was a seashell headdress on the aptly named Seashell Girl who was part of the parade’s The Little Mermaid sequence (see Figure 9.4). The shell prototype was made of SLA. Originally it was planned that the printed version would be parade-worthy. However, after further investigation, it was decided that the prototype would be used to mold the final object using UV-stabilized, water-clear urethane resin to maintain color stability under ultraviolet exposure from the sun. “Our initial research and testing indicated that the UV cure clear resins currently used in SLA rapid prototyping are highly affected by UV exposure and discolor quite drastically when exposed to sunlight,” explains Hanusiak.52
Overall, the intention for the shell headdress was to retain a translucent and magical look. Therefore, luminescent Angelina fibers and sheer dress fabric were laminated on the inside of the shell structure before finally adding fiberglass. The crown – which was printed using opaque nylon impact-resistant material – was primed and painted gold. This material is not sensitive to UV exposure, “which is quite fortunate since that would have been a very complicated shape to mold traditionally,” says Hanusiak. Once fully assembled, the final touches included airbrushing, adding a clear coat, and securing pearls and crystals to the tips of the crown.
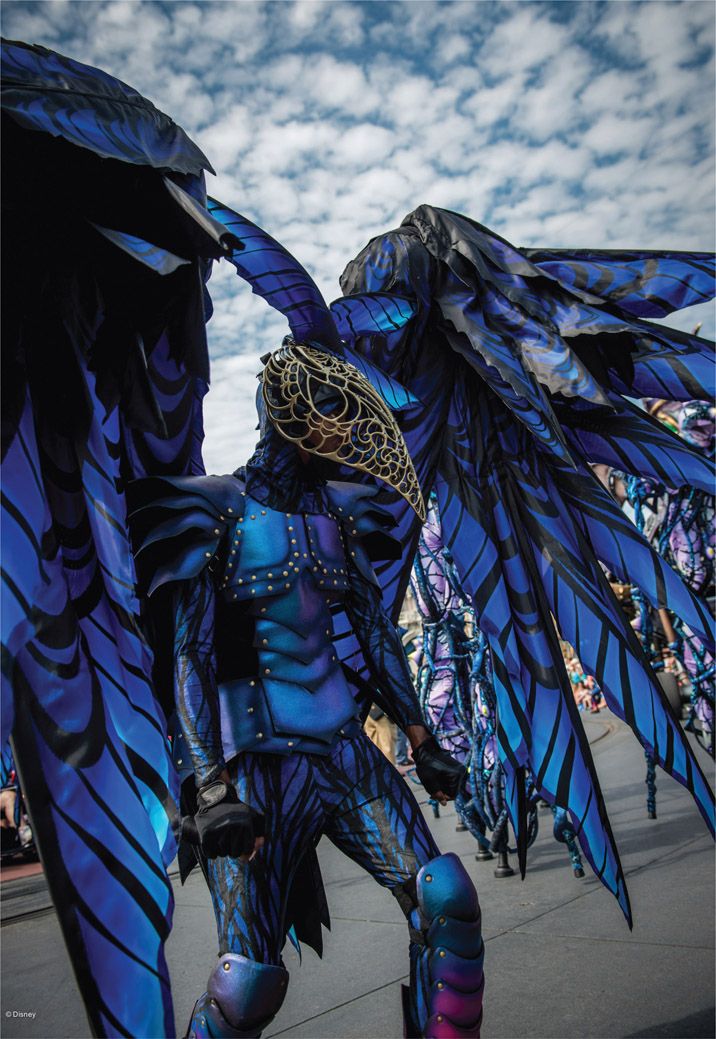
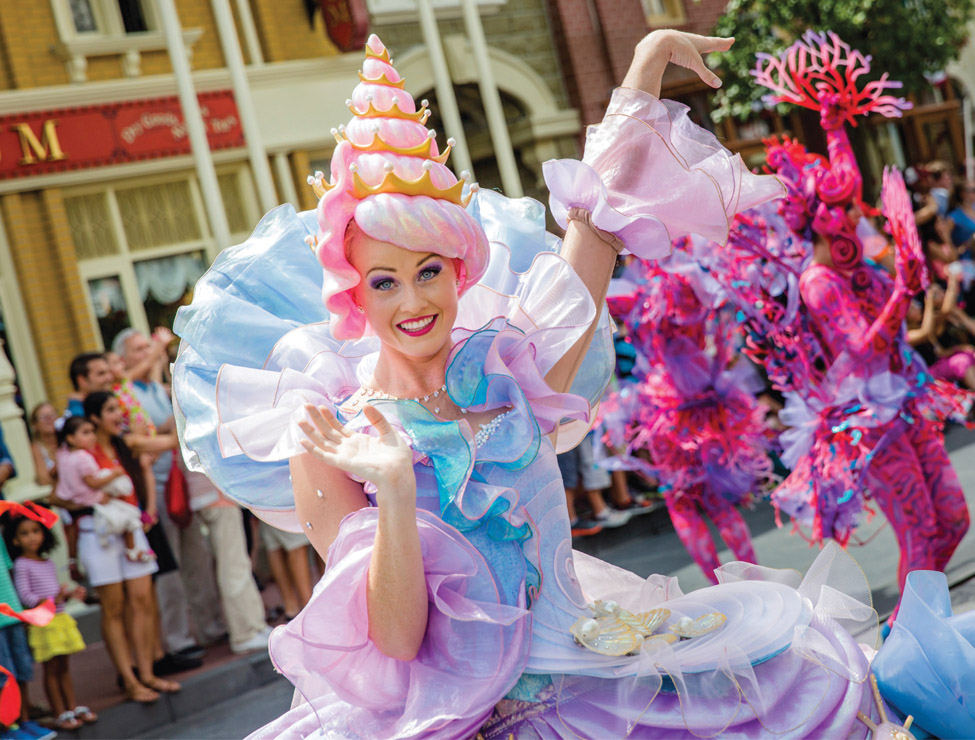
Figure 9.4 Seashell Girl’s headdress. Festival of Fantasy Parade. Walt Disney World Resort.
© Disney
Tips and Tricks!
According to Hanusiak, 3D printed “prototypes are a great way to try out concepts before building molds:
- ✓ Scale – Is the size correct for the overall costume?
- ✓ Fit – How does it fit the performer, and how is it adapted to the costume?
- ✓ Finishing – Do the aesthetics and finishes look as intended?
- ✓ Functionality – Is the costume element functional for its intended use?”53
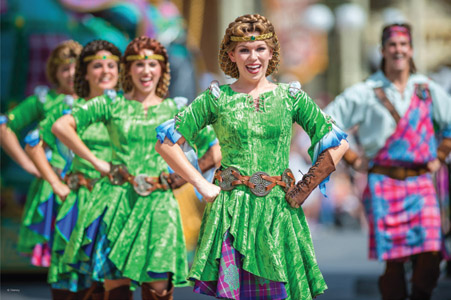
In addition to the shell and the raven mask, other accessories were printed for the parade too. High-resolution accents like the Brave highland dancers’ male pin, female headband, and belt disks were created on an industrial Objet Polyjet printer using VeroWhite material to create the silicone molds for the accessories. The final pieces were cast out of urethane (see Figure 9.5). Also, the mold for the Tangled mime inflatable’s face was created using an industrial 3D Systems SLA machine – a material and technology that works very well when used for molding soft materials that require fine detail (see Figure 9.6).
“The characteristics of each piece can dictate a different technology path for a given costume element,” explains Rada.
The surface detail, the desired finish, the quantity being fabricated, how the piece is going to be used and whether the application requires strength, stiffness, heat resistance, or lightweight properties can influence the technology and material choices. 54
When considering what materials may be right for your project, Hanusiak suggests discussing the following questions with your team:
- What is its intended use, i.e. prototype tooling, mold model, or an end-use item?
- What is the use environment, i.e. heat, stress, shop production, etc?
- Is high resolution required, i.e. for high detail jewelry, accessories, etc?
- What material properties are important, i.e. strength, stiffness, impact, wear, flexibility, heat tolerance, UV resistant, etc?
- Is the color important?
- Is weight important?55
Similarly, she advises experimenting with different materials to find what the right one is for your project. “There are hundreds of RP materials coming on the market and, while sometimes overwhelming, it can also be a wonderland of possibilities” (see Figure 9.7).56

Figure 9.6 Tangled mime inflatable. Festival of Fantasy Parade. Walt Disney World Resort. © Disney
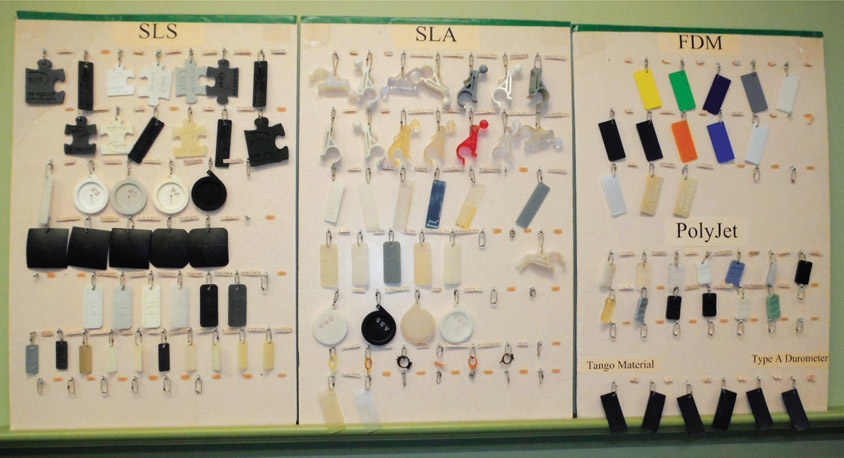
“A huge variety of the RP technologies and materials can be very useful to the costume development process. Using only one technology and one material would be analogous to telling a mechanic they could only use one tool from their toolbox, or an artist that they could only use one color from their color palette.” 57
Lisa Hanusiak, Materials and Process Engineer, Disney
“It’s a dream to work with [this technology] and incredibly useful on so many levels; from pre-visualization, to customization on a performer, to working out maquettes,” says Rada.
Because this technology is rapidly evolving, improving, and becoming more cost effective and because there is an ever-increasing variety of new materials to choose from, this is a technology that is well suited to costuming applications. Additionally, if one is only creating a few of a given piece, rapid prototyping can make the difference between an economically feasible production cost and the creation of molds that could be cost prohibitive for small quantities. 58
Since the success of the Festival of Fantasy parade, Rada has continued to expand her repertoire of 3D printing for costume design. In 2016, while working on an electric parade for Chimelong Ocean Kingdom theme park in China, she used 3D printing for large accents on the parade’s mascot characters. Printed items include features such as internally lit Penguin beaks, millinery items like clown hats, sculptural costume elements like internally lit candy shapes for the candy dancers, as well as bases and enclosures for the costume lighting elements (see Figures 9.8a–b). Rada adds,
3D printing has fundamentally changed the costume design field, in particular the microcosm of fantasy, special effects, and theme park costume design. The customization and flexibility allowed by this versatile technology has stepped up our game, unleashing a new system of visualization and manufacturing to create wearable sculpture that is highly customized, aesthetically beautiful, light-weight, well-engineered, and ergonomically sound.
She continues,
Of course, this new exciting technology requires new skill sets, such as 3D digital sculpting, which will add additional jobs to the design fields. It is also important to acknowledge that 3D design and printing will not replace traditional design/construction techniques, but will undoubtedly enhance and streamline the creative process.
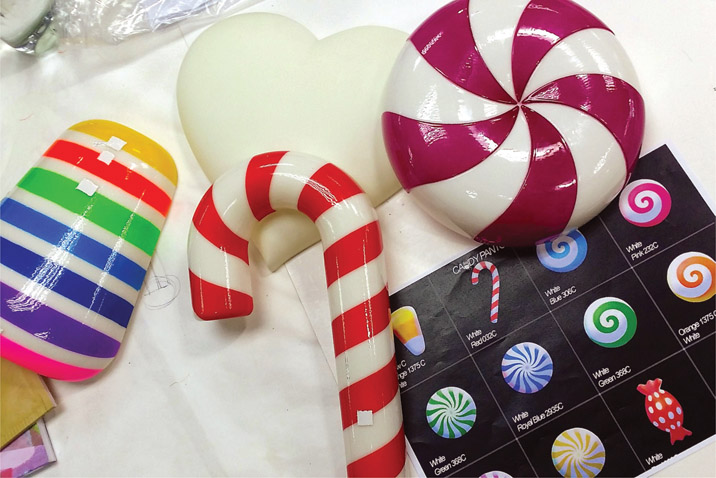
Figure 9.8a
3D printed internally lit candy shapes for electric parade at Chimelong Ocean Kingdom theme park, designed by Mirena Rada. Surface painted with glossy clear color paint.
Photo courtesy of: Mirena Rada
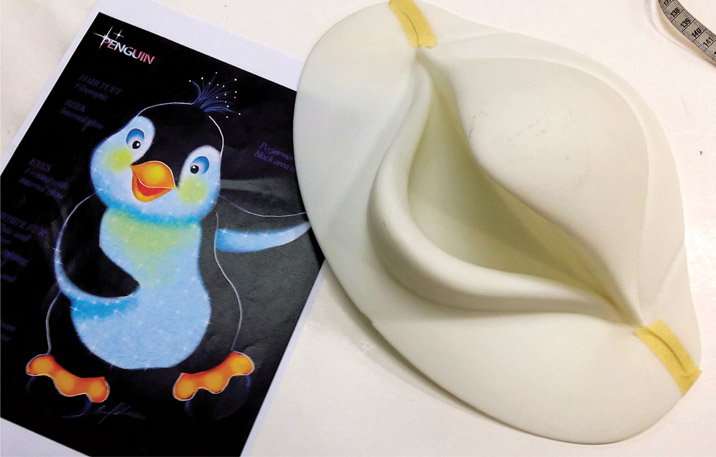
Figure 9.8b 3D printed internally lit penguin beak in process for electric parade at Chimelong Ocean Kingdom theme park, designed by Mirena Rada.
Photo courtesy of: Mirena Rada
“[3D printing] has revolutionized the way I personally approach costume design. There is a freedom, flexibility, and R&D efficiency allowed by the 3D printing process that was not always financially or structurally feasible before. We are no longer combing the nooks and crannies of the world for hard to find oneof-a-kind items to utilize in a show, but can now easily sculpt, design, sample, and consistently reproduce lightweight theatrically useful pieces that can be easily maintained and/or replaced. There is no longer a limit to our imagination.”
Mirena Rada, costume designer
Costume crafts artisan Rachel E. Pollock has an extensive resume spanning theatre, opera, ballet, television, and film. She has worked for such internationally acclaimed institutions as the American Repertory Theatre at Harvard University in Cambridge and the Los Angeles Opera. In addition, she has served as a crafts artisan, dyer, and milliner for such designers as Catherine Zuber, Ann Hould-Ward, Gregg Barnes, William Ivey Long, Constance Hoffman, and Julie Taymor and worked for Parsons-Meares, Ltd. on Paul Tazewell’s Tony Award-winning costume designs for Hamilton. At this time of print, she is currently in residence at the PlayMakers Repertory Company.
“One of the things we keep trying to learn through experimentation with 3D printing is how this technology can be applied specifically to theatre. Is it durable enough to last for the week? A month? Or we may want it to last for the run of a play. Or if it’s Broadway, we may want it to last until the casting changes!”
Rachel E. Pollock, costume crafts artisan
Pollock first began working with 3D printing when the need came up for a very specific item. In 2015, while working with the Museum of Science Fiction in Washington D.C., Pollock and her team were asked to recreate the costume of the iconic flight attendant from the film 2001: A Space Odyssey. The costume was planned for display at the Ronald Reagan Washington National Airport before being installed in the permanent museum exhibition. The flight attendant’s costume included a medallion of the classic Pan American World Airways (Pan Am) logo embossed in gold on the center of the headpiece. It could not be easily shopped, and sculpting and casting would be time-consuming and expensive. 3D printing seemed like a logical choice. “It wasn’t a pin that you could just buy on Ebay or something. Because of its dimensions it was not a locatable item,” says Pollock. “3D printing works great for specific and rigid three-dimensional objects like this medallion.”

The Pan Am logo was digitized to the right proportions for the hat and printed on a MakerBot Replicator. “It was a 20-minute turnaround that would have been one person all day [if made with traditional techniques],” says Pollock.59 Then it was sprayed with Krylon flat plastic Fusion primer, painted with Valspar metallic gold spray paint, and foiled in gold for reflectivity (see Figures 9.9a–b). After the exhibition moved to its permanent space in the Museum of Science Fiction, this medallion was used as a model for a metal replacement.
“Within a few years you’re not going to have a high-end costume production facility that’s not using this technology. If you aspire to work at that level, you better learn it. Employers are going to expect you to have this skill in the same way they expect you to know how to turn on a sewing machine and sew something together.”
Rachel E. Pollock, costume crafts artisan
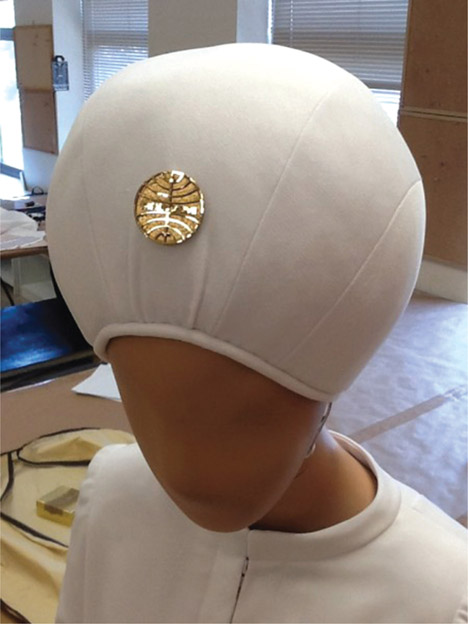
Figure 9.9b Finished flight attendant headpiece with 3D printed Pan Am medallion.
Photo courtesy of: Rachel E. Pollock
Costume designer and Imagineer Joe Kucharski began researching 3D printing for costume while teaching at Baylor University. “3D printing started as a way of rapid prototyping, [but] has recently transitioned to rapid manufacturing where we’re creating end-pieces,” says Kucharski. “There’s a lot of advantages of 3D printing – first and foremost is the ability to customize pieces that would just be too time-consuming or complicated to make by hand.”60
In 2014 Kucharski began by designing small costume accessories for the Witch’s costume in Into the Woods using Sculptris, like mushroom growths on her costume and bean-shaped buttons (see Figures 9.10a–c). These small touches were quick to print and finished the overall look with an original flair.
Kucharski’s next project was a bit more ambitious. Costume designer Sally Askins wanted to reproduce a piece of Elizabethan lace to create a 16th century whisk for Twelfth Night (see Figure 9.11a). Askins found a digital scan of a piece of lace surviving from 1588. Kucharski used that scan to develop a 3D model for the lace pattern and the underpropper structure.
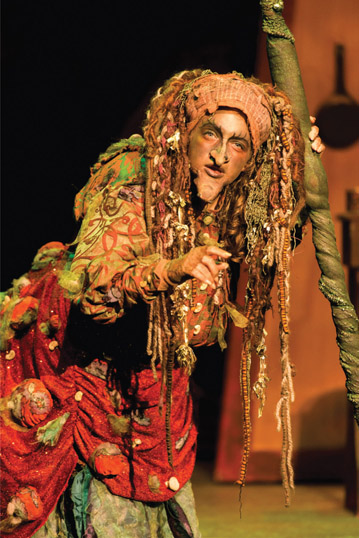
Figure 9.10a Witch with 3D printed accents from Into the Woods, designed by Joe Kucharski. Actor: Mackenzie Dobbs.
Photo courtesy of: Jared Tseng
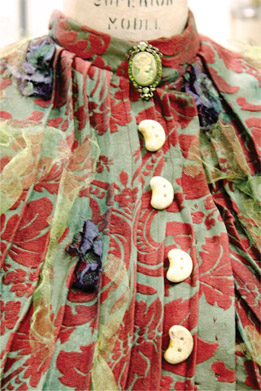
Figure 9.10b
Bean button details from Into the Woods.
Photo courtesy of: Blythe Tierney Dever
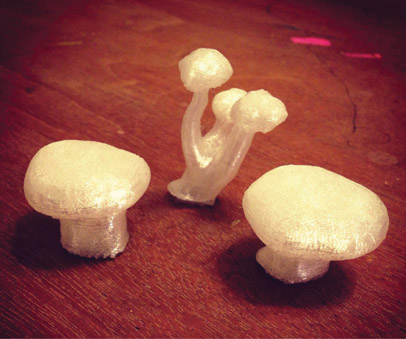
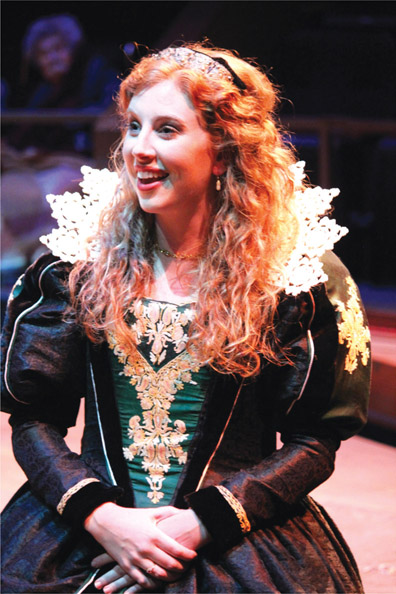
Figure 9.11a
3D printed 16th century Elizabethan lace whisk for Twelfth Night, designed by Sally Askins. Actor: Christina Ward. Print by: Joe Kucharski.
Photo courtesy of: Blythe Tierney Dever
He split the model in half to print in PLA on his MakerBot Z18. As Kucharski explains,
MakerBot print software allows you to layer two files on the print bed so that they intersect. This would have allowed me to print the whisk in one piece, but would have required us to print the collar vertically instead of horizontally, as the printable space is taller than it is wide,”. “Because of the complexity of the lace, I opted to print it flat in two sections as to avoid the need for intricate supports. 61
After printing, the pieces were glued together and curved gently with a heat gun to match the bodice neckline. Then it was sealed with Plasti Dip rubber coating spray and finished with ivory-colored spray paint (see Figure 9.11b). Finally, it was attached to the costume using lingerie loops so that it could be easily removed for maintenance and storage.
Kucharski concludes,
We were pleasantly surprised by the durability of the whisk during dress rehearsals and production requiring no repairs. We found a successful balance in thickness that allowed the 3D printed object to read as real lace, while remaining lightweight, and serving as its own support. 62
Tutorial: Making simple geometric glasses in Vectorworks
- Drawing the frames: Draw a 2D line 2.48” long (in 1:1 scale). This is the average interocular distance for adults (see Figure 9.12a).
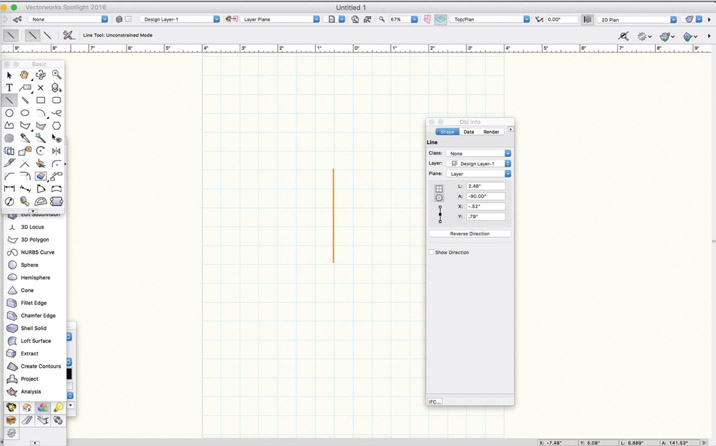
Figure 9.12a Step 1: Draw Line.
- Draw a regular six-sided polygon with a 1” radius that is centered on an endpoint of the line.
- On the center of one of the sides of the polygon, draw a square 1/8” by 1/8”.
- Select the square and the polygon. From the drop-down menu, choose Model >Extrude Along Path and select the polygon as the path of extrusion (see Figure 9.12b).
- Choose the Mirror and Duplicate tool and, using the midpoint of the line as the line of symmetry, duplicate the extruded polygon.
- Drawing the Bridge: Select the Double Line tool. In the Double Line tool preferences, make the separation 1/8” and select the “Create Polygons” option. Draw a double line that connects both polygons. It should create a rectangle. Select rectangle and choose Model >Extrude. Make the extrusion 1/8”.
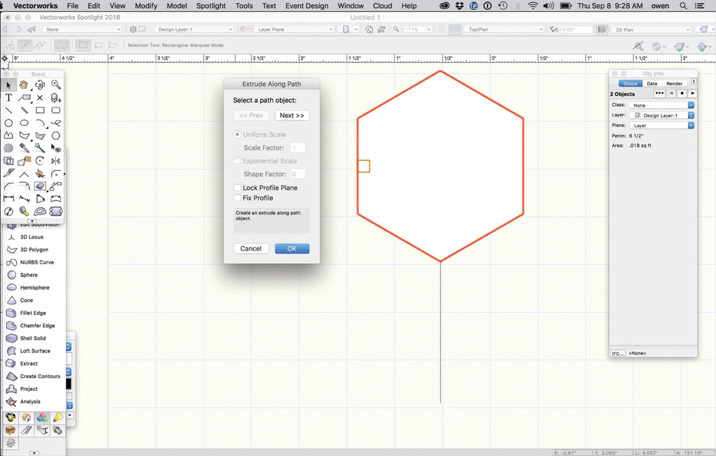
Figure 9.12b Step 4: Extrude Along Path.
- Select all objects (except the original line) and choose Model >Add Solids (see Figure 9.12c).
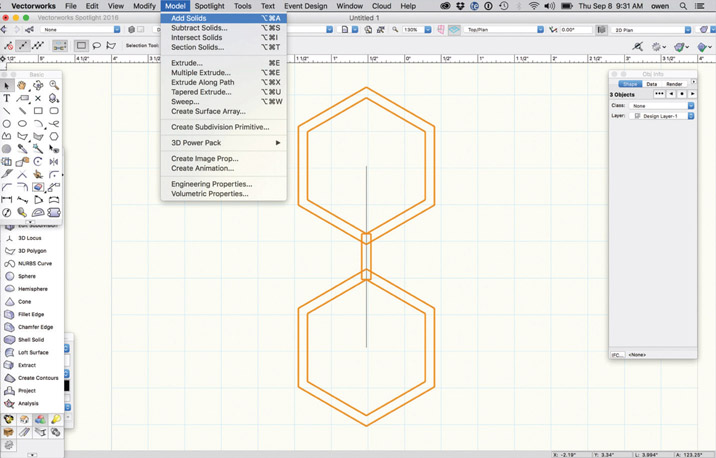
Figure 9.12c Step 7: Add Solids.
- Drawing the Temple Supports: Select the 2d Polyline Tool. In an area separate from the frames, draw a line that is 4.25” long and a connected line at a 45 degree angle that is 1.5” long.
- On the center of one of the ends of the polyline, draw a square 1/8” by 1/8”.
- Select the square and the polygon. From the drop-down menu, choose Model >Extrude Along Path and select the polyline as the path of extrusion (see Figure 9.12d).

Figure 9.12d Step 10: Extrude Along Path.
- Choose the Mirror and Duplicate tool and, using the original as the line of symmetry, duplicate the extruded polygon.
- Delete the line created in Step 1 and choose File >Export >Export STL (3D only) [or Export Stereo Lithography for earlier versions] (see Figure 9.12e).
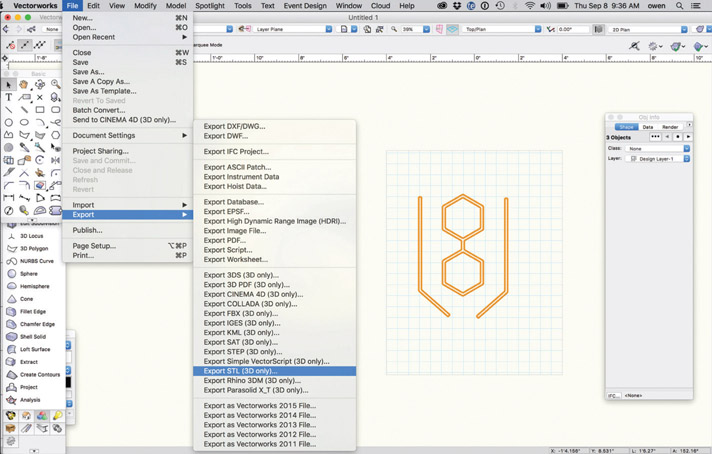
Figure 9.12e Step 12: Export.
- Print each part and glue together with an appropriate glue for your material.
Notes: No supports or rafts required. At a low-quality resolution and low amount of infill (perhaps 3%) this model will take approximately 30 to 45 minutes to print on most FDM machines.
Understructures
3D printing is a versatile tool for creating understructures for costume pieces, masks, and other accessories. Traditional foundations may be made with time-consuming methods – such as carving, molding, and casting – or be created with troublesome materials that can be rough on the creator’s hands. 3D printing can be a way to ease these processes and create rigid formations that require less labor.
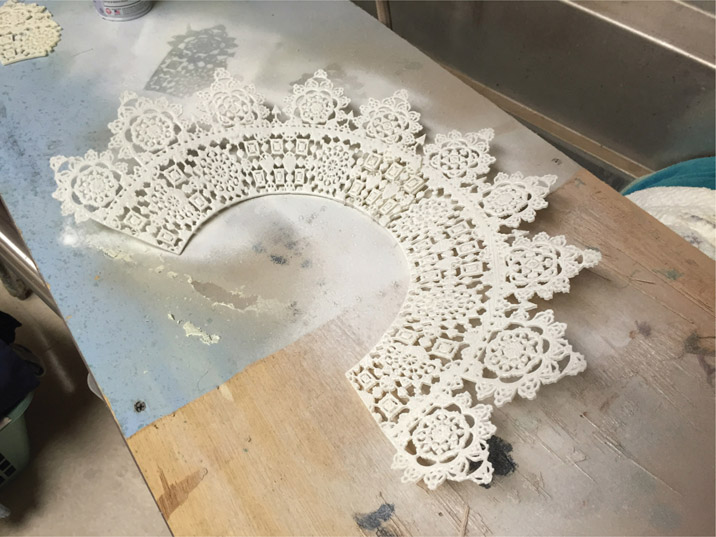
Inspired by Kucharski’s work with the 3D printed Elizabethan lace whisk, costume crafts artisan Rachel E. Pollock decided to try a different direction. Instead of the end-product itself, Pollock decided to create an underpropper for a 17th century ruff. Usually the most difficult part to build, Pollock felt this understructure might be the perfect candidate for a 3D printed form:
The lace itself is not nearly the most time-consuming and difficult thing about a standup lace collar or ruff – it’s the wire underpropper that holds it up. What if you could 3D print that, and then just lay the lace on top of it?
Normally these structures are painstakingly created through bending wire intricately into an arcing topography of complex curves and supporting struts then soldering the connections into place or wrapping the joints with tie-wire. Not only is this process extremely time-consuming, but is also very rough on the artisan’s hands. 3D printing seemed like a good way to address this traditional problem with modern technology.
Pollock worked directly from a detailed image of a surviving Elizabethan ruff collar stand from a digital museum in the Netherlands, complete with deformations and blemishes that have occurred from centuries of existence (see Figure 9.13). She even created it as a customizable thing on Thingiverse so that others may use it as a basis for other lace formations. She chose ABS for the final product due to its strength, although she suggests that printing in metal or metal composite filament might further complete the look of the item as well as provide strength.
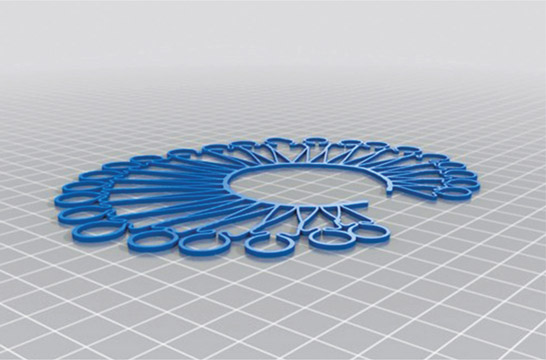
Figure 9.13
Elizabethan ruff underpropper (screenshot); thing: 1298467.
Image courtesy of: Rachel E. Pollock
Pollock suggests that using 3D technologies for a project like this
is not superseding the level of aesthetics and historical accuracy or the use of antique textiles. You don’t have to just throw all that away, but it doesn’t mean that there can’t still be an element that this technology can help you with. For example, if a designer wants me to use the antique lace that she bought at a flea market in Paris I can use that and still make the piece faster by 3D printing the wire structure.
Pollock has also used 3D printing to create understructures for masks. When the Kenan Theatre Company needed a bear-head mask in a short amount of time and with little skilled labor assistance, Pollock turned immediately to Thingiverse. It seemed like a perfect solution to the problem.
Traditionally, we might carve or sculpt the rigid foundation support for such a mask, but in this case, we had limited time, money, and labor. I knew that if we could print the base structure, we would save an enormous amount of time in terms of available labor to work on the piece.
She adds, “I love how the file (Figure 9.14a) already has openwork designed into the topography to minimize weight and to give anchor areas for stitching if need be.”63
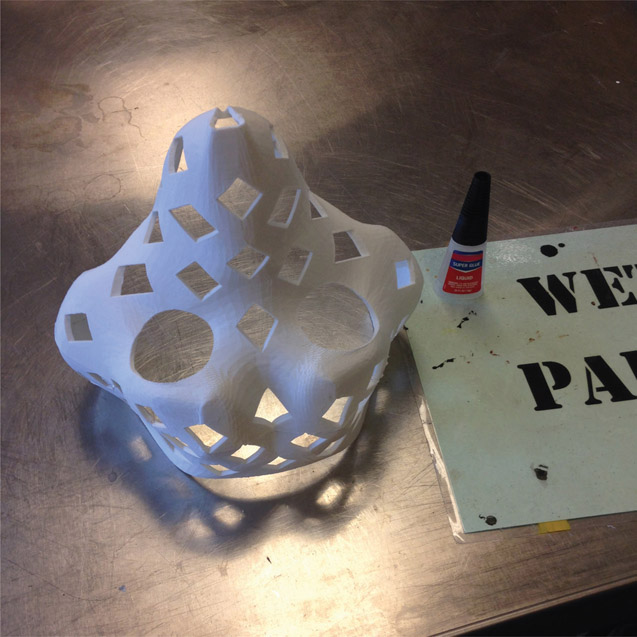
Figure 9.14a
Fur suit head structure by Tioh; thing: 650760. (Snout facing upwards in this image.)
Photo courtesy of: Rachel E. Pollock
The understructure was printed in multiple pieces, glued together with Super Glue, and painted using a Valspar plastic primer and brown enamel. Then faux fur was attached (see Figure 9.14b), and the ears and nose were created with traditional materials. The project was a success and, thanks to 3D printing, completed in the required time frame.
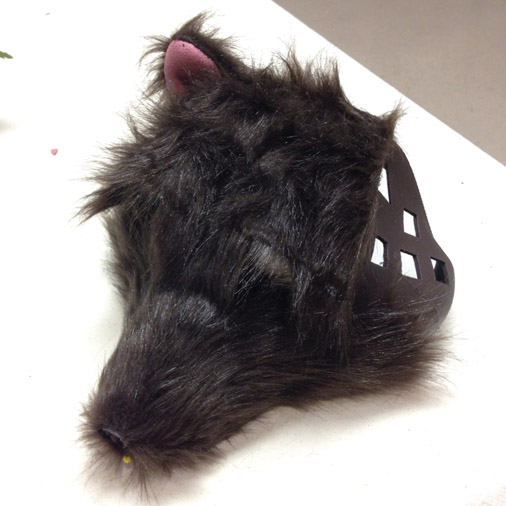
Figure 9.14b Bear head materials being attached to 3D printed and painted understructure.
Photo courtesy of: Rachel E. Pollock
Fabric Block Printing
3D printing can also be useful for fabric decoration – from stenciling to block printing. (Note in this section that the word “printing” is being used to mean stenciling or stamping – not to be confused with 3D printed fabrics discussed in Chapter 1.)
Costume technician Katherine Keener used 3D printing to rejuvenate an antique hand-carved wooden textile-printing block that had been damaged over time. Due to the damage, the full pattern was not able to register when stamped on fabric (see Figure 9.15).
Keener began by stamping the pattern on paper using ink. She then scanned it (two-dimensionally) and digitally extrapolated the missing pieces from the repeated pattern. After extruding it, she reproduced the block using both a 3D printer with ABS and a ShopBot CNC router. The CNC router took 19 minutes of build time; the 3D printer took 13 hours.
Aside from the difference in build time, both methods were successful (see Figures 9.16a–b). One advantage to the 3D printed block is that the use of infill allowed the block to be lighter in weight – although this may not matter for a few small tests, it will lessen strain on the craftsperson working on large expanses of fabric. Alternatively, the weight of the CNC wood
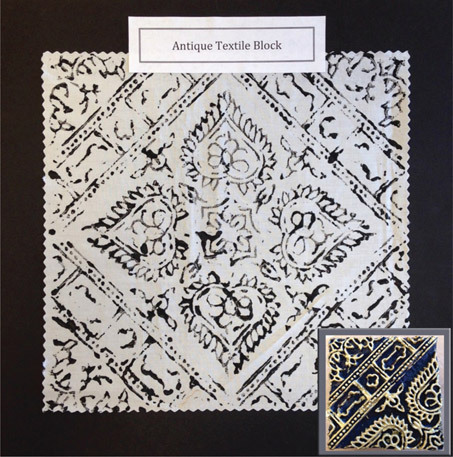
Figure 9.15 Pattern created using authentic antique textile printing block (inset lower right). Note the pattern loss in the stamped image due to the damaged block.
Photo courtesy of: Katherine Keener
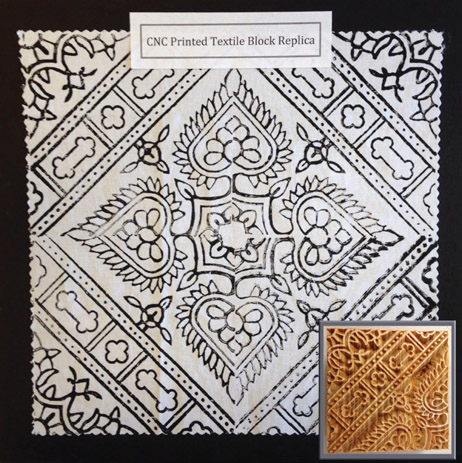
Figure 9.16a
Pattern created by replica of antique printing block. Block created by CNC (inset lower right).
Photo courtesy of: Katherine Keener
block enabled the pattern to transfer more easily to the fabric without the need for as much downward pressure.
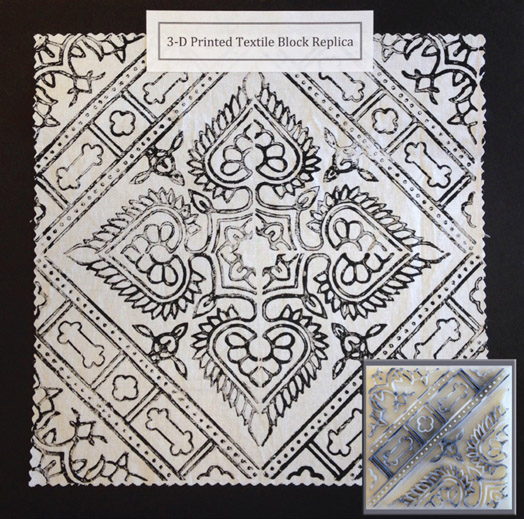
Figure 9.16b Pattern created by replica of antique printing block. Block created by 3D printing (inset lower right).
Photo courtesy of: Katherine Keener
Mask Making
3D printing can be another option for mask making too – as costume crafts artisan Rachel E. Pollock and costume technologist Candyce McClernan discovered while comparing it to traditional methods. McClernan started with a skull mask sculpture and replicated it in several different materials, including papier maché, Vacuform styrene, Wonderflex, Fosshape, Worbla/TerraFlex, Celastic, hardened leather, and cast neoprene (see Figure 9.17a). Then Pollock had the original structure scanned and printed in PLA (see Figure 9.17b). At 2mm thick, it took approximately ten hours to print on a Fusion3 FDM machine.
Pollock concludes,
[3D printing] produces a mask that feels much sturdier than a Vacuformed plastic mask… and with a higher melting point than Wonderflex. It’s not as lightweight as papier maché or Fosshape, but not as heavy as cast neoprene. It’s not flexible at all.
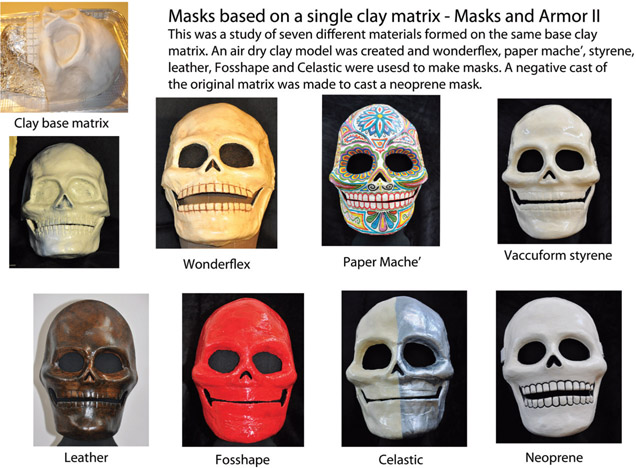
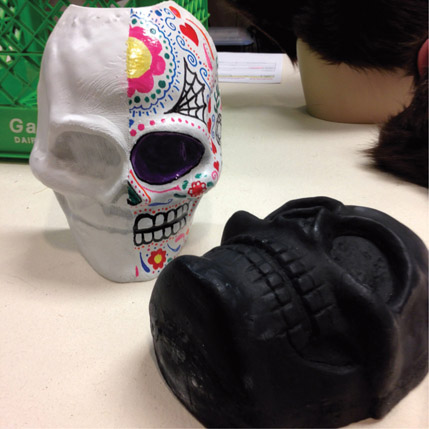
Figure 9.17b
Printed mask in PLA (left); original mask sculpture (right).
Photo courtesy of: Rachel E. Pollock
[It] doesn’t work for every application, but if you need a rigid mask to be worn, say, in direct Florida sun for an hour-long parade this would be great. If you need a flexible mask that can bend in half and pop back into shape, this is not it. Regardless, it’s exciting to have one more option for mask making. 64
Another advantage to using 3D technologies for mask making is its customizable properties. During a large-scale production, many, many actors may move in and out of roles. Using 3D modeling allows the craftsperson to more easily replicate the mask and scale it precisely to the actor’s face shape.
Printing the mask was one of the least expensive options tried in this experiment. The finished mask used 370 grams of filament (just over one-third of a 1kg spool). This equated to approximately $6.00 USD in materials.
“Puppeteers and mask maskers, especially [ones] starting out, find it’s easy to build and build and build, and then weight becomes an issue. [3D printing allows me to] focus on the design and end up with a lightweight object that’s more comfortable for the performer.”
Laurie Berenhaus, digital fabrication specialist and puppeteer
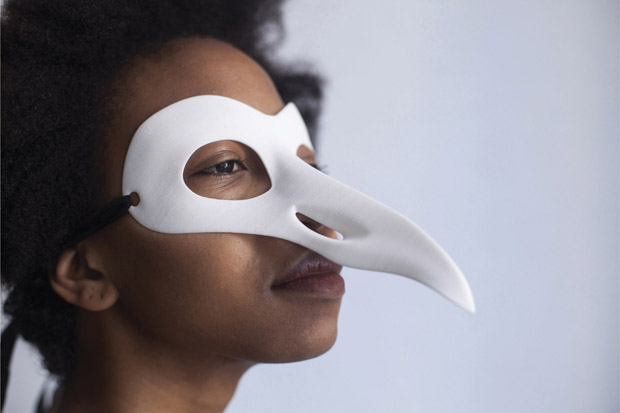
Figure 9.18
Lightweight 3D printed mask, designed by Laurie Berenhaus. Model: Janelle E. Smith.
Photo courtesy of: Jason Chen
Headpieces
In addition to masks, headpieces can be customized to each individual actor through the use of 3D scanning. No longer must we subject our actors to panic-inducing, messy face/life casts where an actor’s entire head and torso are slathered in alginate or silicone. Instead you can simply take some photos or a scan of his or her head. The file can be used virtually or you can print a life-size replica. From there, any close-fitting pieces can be created straight from the virtual 3D model or 3D print, instead of a fragile and heavy plaster cast.
Costume designer Ivan Ingermann and costume technician Dustin Bell used this technique at the University of Georgia to create a ram’s head costume for Judge Turpin’s ritualistic masked ball in Sweeney Todd (see Figure 9.19a).
They began by 3D scanning both the actor’s head and a decorative ram’s skull with a Structure Sensor Pro 3D Scanner. They virtually adjusted the skull to fit to the actor’s head, and to assure the fit before printing, Bell imported the model into Pepakura Designer, a software program which mocks up the item in origami-like paper form (see Figure 9.19b).

Figure 9.19a
Judge Turpin ram’s head costume (right), designed by Ivan Ingermann.
Photo courtesy of: Mirabel Lee
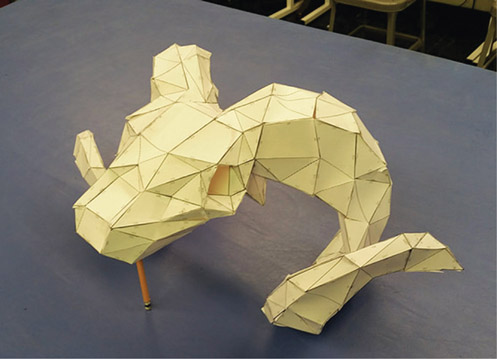
The skull was large enough (25 inches between the tips of the horns) that they needed to split it into four different pieces in order to print on their LulzBot TAZ machine. Once printed, it was assembled, primed with gesso, and painted with acrylic paint (see Figure 9.19c). The piece was attached to the fabric and a Fosshape skullcap with bolts.

Overall the piece would have taken a total of 70 hours print time, but they were able to use multiple printers simultaneously, reducing the print time to 48 hours. They began by printing it in ABS, but the ABS was delaminating on the large pieces. Eventually they switched to PLA for the rest of the piece. “For theatre, you can patch it up and put it onstage. No one can see the small problems,” laughs costume designer Ivan Ingermann. They chose to print the skull with 5% infill to keep the headpiece light enough for the actor.
“It will always be important to learn the classic methods – learning about color and form and all of the elements of art are always going to be essential. But if you have students that are coming out of programs with all of the traditional skills… plus 3D printing, it certainly does give them an edge in the marketplace.” 65
Joe Kucharski, costume designer and Imagineer
Cirque du Soleil, the world’s largest theatrical producer (with productions on every continent except Antarctica), creates 18,000 costume-related items every year in its workshops in Montreal, Canada. In 2014 alone, the Cirque costume workshop used more than 40 miles of fabric solely for hats and other headwear. In the past, to assure the proper fit, life casting has been used to create busts of the performers. Since 2009 Cirque has switched to 3D scanning instead.
Rino Côté, Advisor of Research and Development at Cirque du Soleil, explains,
Before 2009 we would use traditional mold-making techniques to capture the artist’s head. It took three people an hour and a half to make the mold, plus the artist and often a translator – a total of five people. This technique used a lot of the company’s resources. Now we use the [Handyscan handheld 3D scanner] so we only need the technician and the artist. It lasts for maybe 20 to 25 minutes. Also, the technician can fly to another country and scan a dozen people at once, allowing artists to be scanned from all over the world.
All of Cirque’s performers are scanned and kept in a digital archive. Only the scans that require specific headpieces are reproduced as physical busts. These designated models are sent to CNC fabrication service USIMM (also in Montreal) who machines the life-size busts out of a rigid, wood-like resin called RenShape (see Figures 9.20a–b). The costume shop uses these busts for precise fittings of wigs, hats, and other headpieces (see Figures 9.20c–d).
Although the headpieces are made specifically for each performer, a certain amount of planning exists in the event of an understudy. For this, Côté says they often build the headpiece around a standard hardhat’s ratchet suspension rig so that it can be adjusted for understudies.
Cirque du Soleil uses a variety of modeling software packages to build its pieces: AutoCAD, Maya, ZBrush, and Solidworks, among them. For printing, they have six 3D printers: one Stratasys Objet Eden 260v PolyJet machine and five consumer model FDM printers: two MakerBot Z18s, a LulzBot TAZ 5 and TAZ 6, and an Ultimaker 2 Extended+.
Research and development play a big role in Cirque du Soleil’s costume design. The Workshop’s teams of specialists (patternmakers, textile designers, dyers, costume makers, etc.) are constantly on the lookout for new materials and products that are likely to stimulate the imagination of their costume designers.
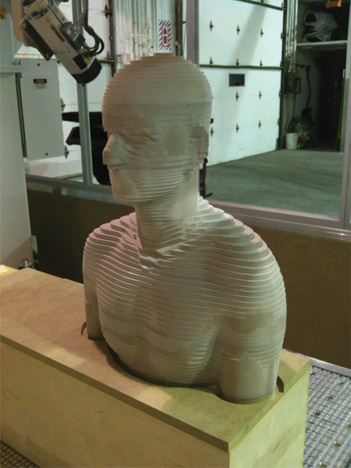
Figure 9.20a Bust composited of RenShape. Performer: Rino Côté.
Photo courtesy of: USIMM, Inc., www.usimm.ca

Figure 9.20b
Finished life-size bust. Performer: Rino Côté.
Photo courtesy of: USIMM, Inc., www.usimm.ca
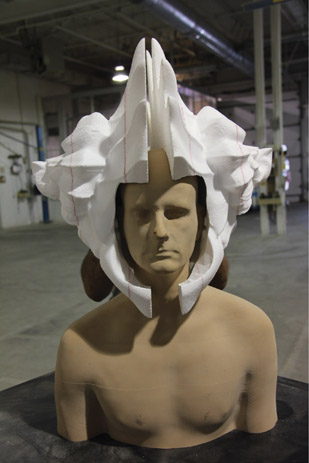
Figure 9.20c Hat mockup on bust made with polystyrene. Performer: Rino Côté.
Photo courtesy of: USIMM, Inc., www.usimm.ca
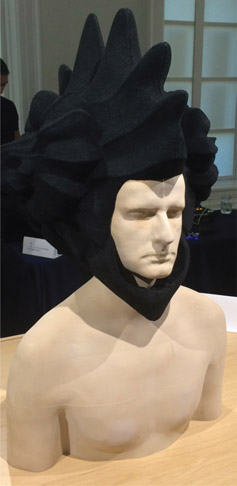
Figure 9.20d
Finished hat structure on bust. Performer: Rino Côté.
Photo courtesy of: USIMM, Inc., www.usimm.ca
Specialty Suits
3D fabrication technologies have quickly become a mainstay in the film and television industry. In particular, fantasy, sci-fi, and superhero movies have begun to rely heavily on them to create otherworldly or highly advanced characters.
“Traditionally we shrink [our full body] scans… which is a lot easier to do digitally than practically. We shrink [them] so the suits fit tighter. The last thing you want is a baggy creature-suit or, worse, a baggy super-suit!”
Andrew Clement, Owner, Creative Character Engineering
Legacy Effects, an Oscar®-nominated effects studio located in San Fernando, California, creates practical, live-action special effects for hundreds of commercials and movies each year and easily stands out as a leader in the industry for 3D printed film and television effects. They specialize in anything from creature design to animatronics to prosthetic special effects makeup to specialty character suits and costumes. Legacy’s resume stretches far and wide: feature films like Avatar, Iron Man, The Avengers, RoboCop, Pacific Rim, Jurassic World, and Terminator Genisys, as well as over 900 commercials including characters such as the Aflac duck, the Geico gecko, and the KIA hamsters, among countless others.
The team at Legacy Effects has been exploring 3D fabrication in their workflow since The Lost World: Jurassic Park (1997), while they were still a part of Stan Winston Studio. In 2006 they used it for their first large-scale project: The Halo® Diorama Campaign for the video game Halo 3®.
The ad campaign consisted of a large expanse of Halo 3® miniatures depicting a massive battle scene. Legacy was asked to create over 700 figurines that were each about 7-inches tall in hundreds of different poses. The battlefield itself was filmed on a large sound stage that was 70-feet long by 30-feet wide.
A variety of pained facial expressions were needed for close-up shots of the battle vignettes. Legacy used a 3D scanner to capture actors’ faces for the figurines. Jason Lopes, Lead Systems Engineer of 3D Print & Scan Technologies, feels “it was a perfect testing platform [for 3D fabrication] because in the delivery and the amount of characters that needed to be done, traditional sculpting would never have worked – just within the deadline.”66
The timeline was not the only challenge for such an iconographic game. “The concern was that everything we needed to express in a physical world needed to come across with the exact designs and detail that all their clients were used to [from] playing video games,” says Lopes.
We [sent a character to a printing bureau] just to get one back to see what could come out of it, and we were instantly, instantly blown away…. We knew instantly this was the way to go, and this was how we were going to be doing all of our business from this day forward. 67
In 2008, the Iron Man franchise began. The Legacy Effects team (then still part of Stan Winston Studio) began experimenting with a series of maquettes (a scale model of a character – approximately 18-inches tall) for the look of Iron Man’s suit (see Figure 9.21). 3D printing was an efficient answer – a printed maquette is an exact replica of the final product and takes (a relatively short) 11 hours to print. Presenting a printed maquette to a client became a quick and effective way to get approval on a design.
“Things that we didn’t even think of are coming out of this technology. We prepare for meetings, for pitches.… We’re putting characters in people’s hands within 24 hours. Things that we never even thought of! Rather than just popping out a character for a final piece, it’s now in our brainstorming sessions. We’re building ideas off of it…. None of our artists have to hold back anymore and worry about detail that’s not going to be translated…. I’ll have four artists sitting down at a machine coming up with four different concepts, and within four hours I’ll have four different concepts physically in my hand.” 68
Jason Lopes, Lead Systems Engineer of 3D Print & Scan Technologies for Legacy Effects
The maquettes were so successful that Legacy decided to give 3D printing a try in creating the final product for the live-action scenes in Iron Man 2 (2010) – this time printed in-house instead of using a service bureau. “At that time we were the first people to do that kind of work,”says Dave Merritt, Model Shop Supervisor of Legacy Effects.69
The suit was broken into pieces and printed on a Stratasys Objet Eden260V PolyJet. It was printed at a 16-micron layer height – one-third the width of a human hair – so layer lines were virtually invisible. Some pieces went straight from machine to screen (after being painted by hand), while others were molded and cast into their final materials.
“We still use [our Stratasys Objet Eden260V] to this day almost 24-7. In the morning I could print you a rigid part; after lunch I could maybe switch and print you a small, clear part; and then back by five o’clock I could print you a rubber part all by pushing a button and changing out materials. That’s killer for this studio!” 70
Jason Lopes, Lead Systems Engineer of 3D Print & Scan Technologies for Legacy Effects

Figure 9.21 Iron Man maquette.
Photo courtesy of: Legacy Effects. The Iron Man suit appears courtesy of Marvel Studios
Industrial printers, like the ones used by Legacy Effects, are reliable and fast. “I print more and have less problems than I do with my traditional Epson printer,” said Lopes.71 A new prototype can be created overnight – or sometimes over lunch – saving time in ever-decreasing production schedules.
“We complete a whole movie now with multiple, say, Iron Man suits or RoboCop suits or 26 robots from Real Steel in the same time that we spent hand-sculpting the first Terminator.” 72
John Rosengrant, co-owner, Legacy Effects
As the years have progressed, Legacy Effects’ treasure trove of printers has grown to include FDM, SLA, PolyJet and CLIP machines – over a dozen different machines at this time of print. Models range from the Stratasys Objet Eden260V, Objet500 Connex3, Fortus 250mc, the Envisiontec Perfactory 4, the MakerBot Replicator Z18, and the first-ever Carbon M1 CLIP printer. They even own desktop models – the MakerBot Replicator 2 and the Ultimaker 2. In addition to producing parts for the studio, Lopes uses the desktop machines for experimentation with new materials and ideas.
Having a diverse toolbox allows Legacy to choose the best tool for each job. Conceptual models and master patterns are typically printed with PolyJet for its high level of detail and accuracy. However, its material that they typically use is not “real world property” – the material will break if dropped, for instance. Therefore, machines using engineering grade materials – such as FDM using ABS or CLIP using rigid polyurethane – print items that need to be sturdy. These may be parts that end up on a final product or internal structures used to attach mechanical parts. Some engineering materials, like rigid polyurethane, require the part to be baked in an oven for two hours after printing in order to activate its mechanical properties, like added strength.
Cost may also be a factor in choosing the right printer for the job. Lopes calls the PolyJet materials “liquid gold”; to fully load and run the machine for 72 hours of continuous printing it can cost up to $3,800 USD in materials alone.
“For high-end detail you need to step into the PolyJet world to get that level of accuracy and every bit of detail that you put into it. FDM is great for strong parts, but you lose detail. For us, FDM is good for under-the-hood; things that don’t need to be seen on the outside.”
Jason Lopes, Lead Systems Engineer of 3D Print & Scan Technologies for Legacy Effects
In addition to 3D printing, Legacy also uses 3D scanning as an integral part of their workflow. Instead of life casting, actors’ heads and bodies are 3D scanned so suits, helmets, and specialty makeup can be built around their exact sizing. Lopes most often uses a handheld Artec Eva structured light scanner. He uses the scanner for form only – not for capturing color textures. That information is recorded using high-end photo references.
For efficiency, Legacy automates their scan-to-print process for heads using their MakerBot Z18s; scan data fed directly to the machines is cut into four pieces and printed. According to Lopes, this is far more cost-effective than sending the scan out-of-house (as was previous practice) – especially for “something that is basically just a placeholder.”
Some items are still printed out-of-house – particularly full body scans, which are cut into pieces and keyed together. The hands and head may be printed in-house with FDM, while the rest of the body is printed out-of-house with SLA. “If we send out data, we don’t send out all the pieces of the puzzle,” says Lopes. Not only does this help with cost, but security is of the utmost importance when working with A-list celebrities. For added assurance, the files are even hand-delivered between Legacy and their vendors. Once assembled, the prints are used for “pre-fittings” for the initial stages of a suit. “This allows us to go into the first fitting knowing that we’re pretty much spot-on right out of the gate,” says Lopes.
Generally, Legacy’s printers are run all night, every night, and all weekend long. Lopes added cameras to each room for remote monitoring and even had a proprietary notification system created that alerts him when a print has ten minutes left or if the building has lost power; in which case the machines can print for 45 minutes on battery backup. If the power is out indeterminately, Lopes can shut the machine down remotely.
Legacy Effects continues to position itself as one of the rare entertainment companies driving engineering innovation. “Thanks to 3D printing we don’t stop,” adds Lopes. “On the creative process there is no roadblock. It allows us to keep going.”73 In fact, Legacy Effects has partnered with printer manufacturers to develop their own proprietary printing materials.
Lopes has even been working with Carbon to develop elastomer materials that can be used in the prosthetic makeup world – even printing in silicone (and perhaps latex in the future). He is working on flexible makeup appliances that can be embedded in traditional ones, like ripped skin exposing cyborg-like mechanics underneath with the look of rigid metal, but flexible enough to conform to an actor’s face.
Lopes advises home users to keep trying and keep experimenting. “The best thing about being a home user is any idea has a chance to make it. Before this, an idea had to go through a process to get a prototype done by hand – that’s one thing,” he says.
Then, to go from that prototype to a tool is a whole other thing. So right away the process is a potential roadblock for any idea. But when you have access to 3D printing and you’re kicking around designs, there’s access to show that idea very quickly and cost-effectively. It gives every idea a chance.
I get asked all the time what it takes to work for our company in my department. The one thing I can’t stress enough is … understand coming up through the ranks and … learning from people that have been doing a craft for so many years – and the knowledge [you] will get out of it…. What I look for is attention to detail. When I’m explaining a process to a person and I see them writing it down, that’s big points for me…. [Also] willing to give 110 percent.… If someone hires you to do something, you give them better. And I think in an artistic, creative world when someone asks you to do something artistically or creatively it’s nice to give that extra 10 percent of “wow” that they never even thought [possible]. 74