Chapter 8
Scenic Applications
3D printing is useful for many aspects of scenic design and its related techniques. Its applications range from scenic models to full scenic pieces and even construction.
Scenic Design
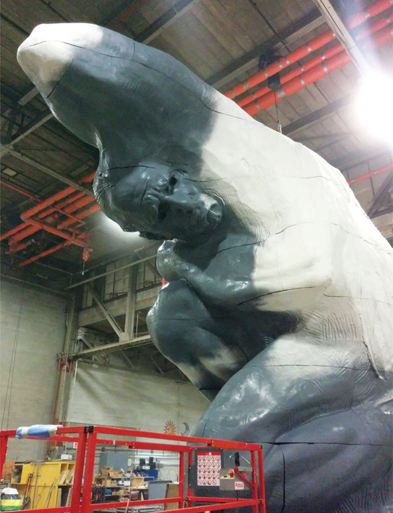
In 2015, Richard Strauss’ operatic tragedy Elektra was performed at the Opéra de Montréal in Canada, directed by Alain Gauthier. The set consisted of one 25-foot (over 7 meter) tall, rotatable statue of Agamemnon – the replica of a piece by sculptor Victor Ochoa, commissioned by the opera’s artistic director Michel Beaulac (see Figure 8.1). Unprecedented, the piece was 3D printed. Ochoa felt that 3D printing brought a certain meaning to the work.
The process was led by an industrial printing service in Spain called AsorCAD in collaboration with a service in Spain named Undo Prototipos. The original sculpture was scanned and divided into more than 2,900 virtual segments (see Figure 8.2). It took seven BCN3D+ FDM printers printing non-stop for four months straight. In the end, the statue weighed in at a staggering two and a half tons (2,400kg) and used over 800 lbs (400kg) of filament. The printed pieces formed the skin of the statue, which were attached to an aluminum frame inside the structure, allowing for stability and mobility (see Figure 8.3). When the piece was rotated, the base was even walked-upon by the performers, further demonstrating the strength of this enormous 3D printed masterpiece (see Figure 8.4).
The statue took over seven months and 100 artisans in total to complete. It was primed and preassembled in Madrid then shipped to Montreal for final assembly (see Figure 8.5). Final painting and preparations for stage were completed there.
Unfortunately, some of the larger parts of this history-making scenic piece had warped during printing, which was not discovered until the statue was first put together. The seams no longer fit together smoothly (see Figure 8.6). When the printing team called to tell Gauthier (the director) about the mishap, they said the finished structure would look more like welded metal than a stone sculpture. Gauthier embraced the change with open arms, he said, “‘Great! That’s even better!’ It changed the whole way of putting the show on stage.” The happy accident conveniently anchored the opera in a time period – “the dawn of sculptural metal, the period of the Eiffel Tower.” In fact, one of the pieces even got lost in transit. Gauthier decided that Elektra – now a metal sculptress – had decided not to finish the sculpture of her father until after her mother’s death. No matter the form, the sculpture made sense to Gauthier: “Agamemnon is the only character who is never onstage, yet it’s all about him.”36
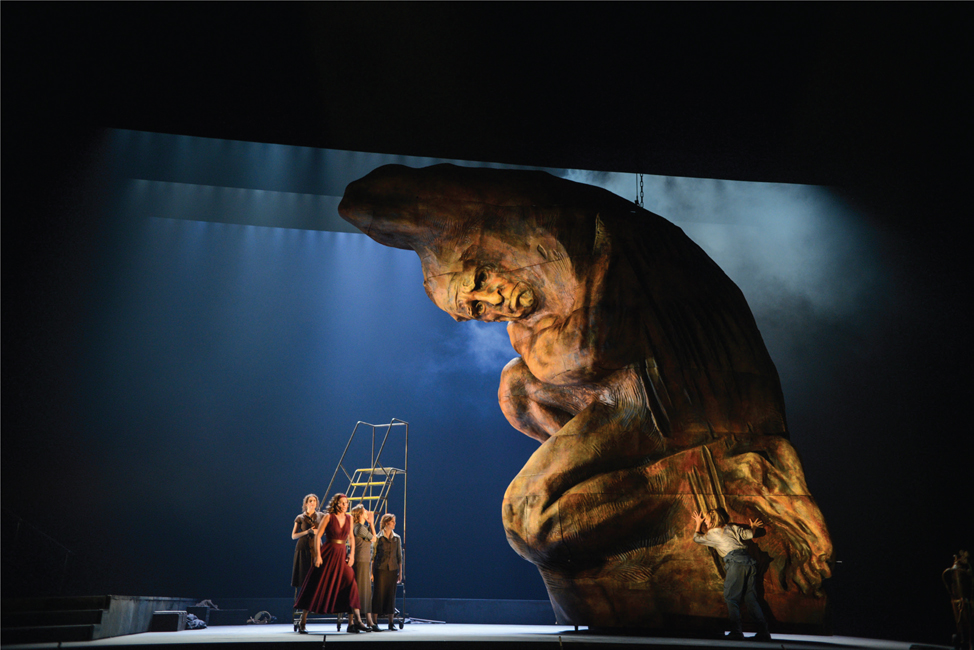
Figure 8.1 Elektra at Opéra de Montréal – 3D printed replica of a sculpture of Agamemnon by Victor Ochoa.
Photo courtesy of: Yves Renaud


Figure 8.3 Elektra statue 3D printed foot assembled with aluminum frame exposed above.
Photo courtesy of: Undo Prototipos
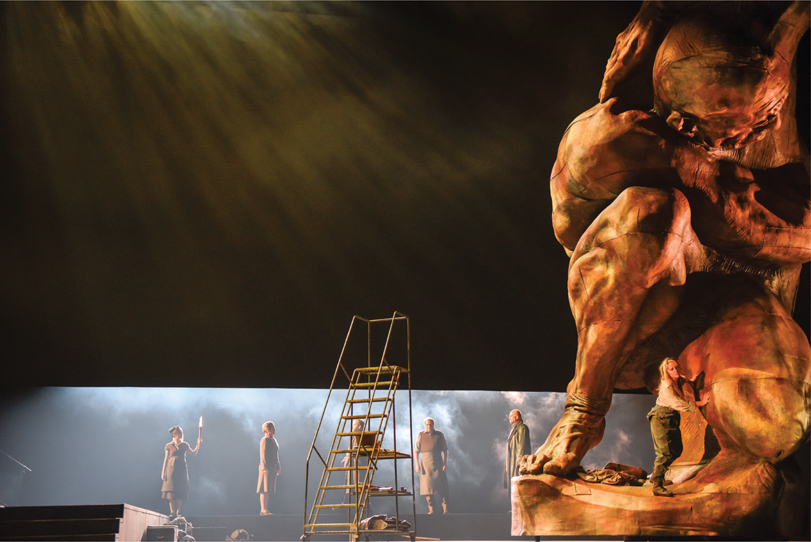
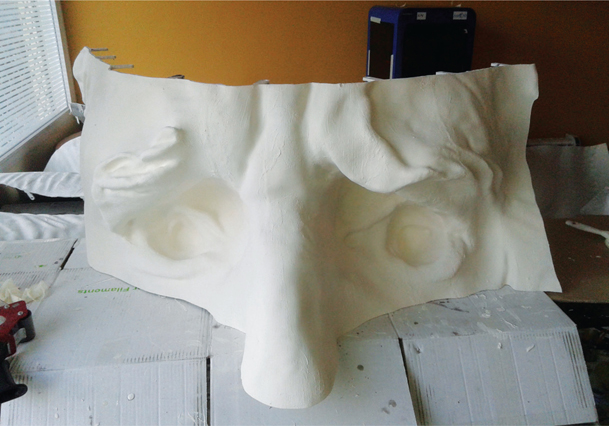
Figure 8.5 Elektra statue 3D printed eye piece ready for assembly.
Photo courtesy of: Undo Prototipos
Scenic Models
3D printing can be an ideal tool for creating tiny, detailed items such as model furniture and other architectural details found in a theatrical scenic model.
“Our printer saves us time on a lot of things – especially for models and small things that we build a lot of or are very time consuming. The machine is slow, but it’s a bit like a crockpot – you set it and forget it. Tomorrow morning – if something didn’t go wrong – you have some nice columns or a bunch of chairs.”
Alexander Dodge, Broadway scenic designer
“With Gigi we were doing this ironwork that was elaborate and delicate, and also had different layers to it (see Figure 8.7). The 3D printer was really great at creating those layers [in the model]. If we had made that model traditionally it would have been made with brass and solder. It probably wouldn’t have come out quite as well because there just isn’t the same variety of thicknesses in the brass available, so it would have been a little bit more of a compromise.”
Derek McLane, Broadway scenic designer
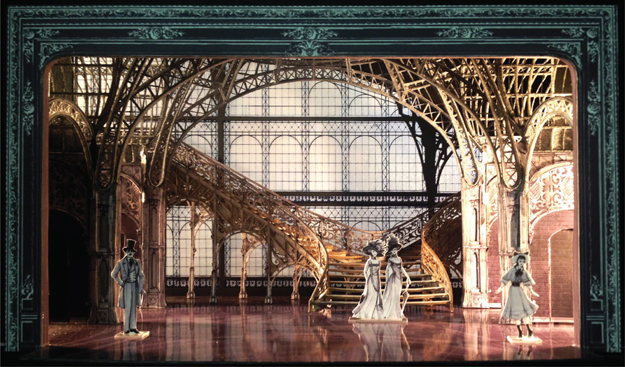
Figure 8.7 Gigi model with 3D printed ironwork. Broadway production, designed by Derek McLane.
Photo courtesy of: Derek McLane
“At first, we only 3D printed small pieces, like furniture and window frames, incorporated with traditional modeling materials like matte board and balsa wood. Now, the desktop printers we use are larger, and we can print entire scenic units in scale.” 37
John Lee Beatty, Broadway scenic designer
As scenic designer and one of John Lee Beatty’s main Broadway associates, Kacie Hultgren models beautiful, printable items for the productions in which she is involved (see Figure 8.8). Hultgren has been using 3D printing in her scenic models since MakerBot first developed the Cupcake consumer 3D printer in 2009. Since then Hultgren’s reputation for precise, accurate, elegant, and exquisite items has become well known in the field.

Figure 8.8 Don’t Dress for Dinner model. Broadway production, designed by John Lee Beatty. Built by Kacie Hultgren.
Photo courtesy of: Kacie Hultgren
Throughout the years, Hultgren’s portfolio has grown to include a wide range of period model furniture that she sells on her Shapeways marketplace: www.shapeways.com/shops/prettysmallthings. There you can find period furniture in 1/4” and 1/2” scale, among others, available in a variety of materials. Hultgren uses AutoCAD to create her models and began by printing each piece at home on her MakerBot for herself and her clients. She soon found that the demand was so great that she partnered with Shapeways in 2014 to outsource her product. In addition to Shapeways, many of Hultgren’s STL files can be downloaded for free from www.thingiverse.com/prettysmallthings/designs for those that have a printer at home.
As her reputation has grown through the years, Hultgren has become a tour de force in the 3D printing world – well representing the field of theatrical design. She has spoken professionally at conferences, maker faires, and has a series of online tutorials on lynda.com.
Hultgren prefers to use 3D printing for detailed items such as model furniture, molding, and other complex architectural details like fireplaces, staircases, and windows (see Figure 8.9). When first building a model, she takes stock of what items could benefit from 3D printing, and what items would be more successful using traditional methods. Most often she makes flat pieces such as walls, legs, borders, floors, and the model box itself out of traditional paper stock items; anything dimensional or finely detailed is usually made with a 3D printer (see Figure 8.10).

Figure 8.9 Long Day’s Journey into Night model (close-up). Guthrie Theater, designed by John Lee Beatty. Built by Kacie Hultgren.
Photo courtesy of: Kacie Hultgren
In general, when working with scale models, there are two ways to look at 3D printing: 1) 3D printing can be combined with traditional techniques in the same model (as Hultgren does), or 2) models can be 3D printed as one piece. Many designers prefer method number one because flat items are more easily and more quickly made from traditional materials – foam core, card stock, illustration board, and the like.

Figure 8.10 Model wall built with both traditional and 3D printed pieces.
Photo courtesy of: Kacie Hultgren
Scenic and lighting designer Owen M. Collins agrees that 3D printing is not the answer to every modeling possibility. It all comes down to manufacturing time. “Many simple model pieces, like basic platforms and flats, can be made just as quickly by hand. Printing model furniture, which is more complex and usually requires multiple copies, is more easily justified.”38
Models printed as one piece may also be difficult to paint. Painting in the crevices is often easier when painting a model in pieces. However, as 3D printing becomes faster and in full color, perhaps one-piece models may become more common. In fact, Hultgren admits that she is printing more and more in large pieces. For Beatty’s production of Outside Mullingar, “I printed the complete sets and walls in one chunk,” she says.39
However, model furniture should always be left loose so that the director can move the pieces around in discussion as desired.
“3D printing is clearly where things are going. Models are outrageously expensive – going into the thousands of dollars usually. This is a great way to offset that cost a little bit. Although we spend a lot of time getting the file prepared for the printer, we’re already saving time, materials, and labor with printing things we use over and over. Sometimes we don’t even have to draw up the objects, like columns; you can pick them up online and rescale them. Otherwise those details [built by hand] can be so time consuming and cause labor costs to shoot up.”
Alexander Dodge, Broadway scenic designer
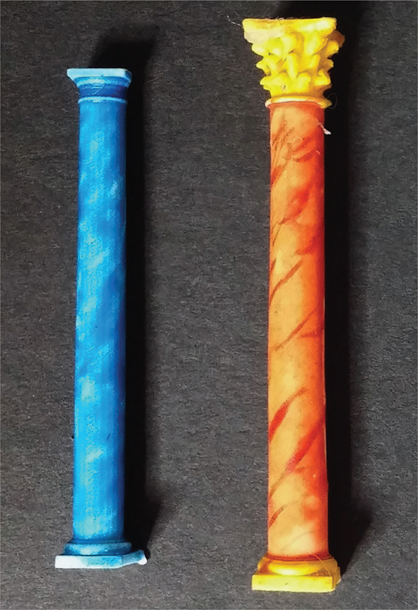
Figure 8.11 A Funny Thing Happened on the Way to the Forum 3D printed columns. Williamstown Theatre Festival, designed by Alexander Dodge.
Photo courtesy of: Alexander Dodge
“3D printing is fantastic for model building. When we did the model for A Bronx Tale the set is a bunch of multi-story towers that are fire escapes. There’s a lot of ironwork and repeated details over and over and over again. We decided to 3D print the details in the model – it took my assistant about a day to draw it, but it would have taken a week to produce a traditional handmade model (see Figures 8.12a–b). Something like that is a huge time savings.
I did another show earlier this year where I had 35 Corinthian columns. I did the drawing in an hour and sent it off to [Shapeways] and two days later had 35 columns. If I had tried to hand-carve all of those it would have taken a week.”
Beowulf Boritt, Broadway scenic designer
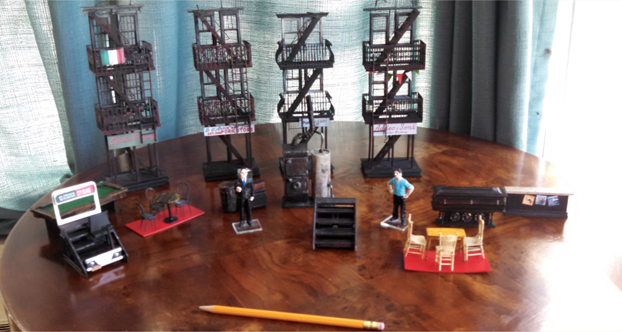
Figure 8.12a
3D printed model pieces for A Bronx Tale, designed by Beowulf Boritt.
Photo courtesy of: Beowulf Boritt
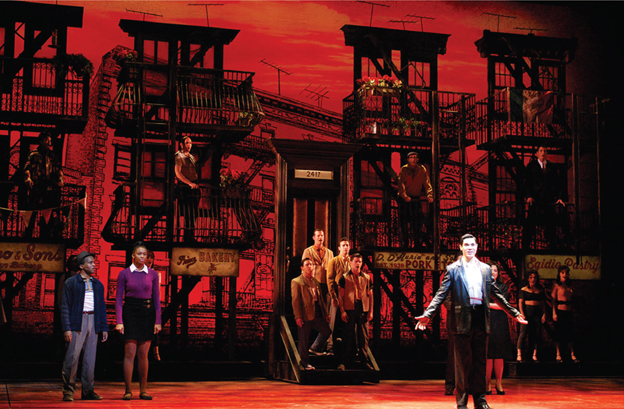
Figure 8.12b A Bronx Tale realized production. Paper Mill Playhouse, designed by Beowulf Boritt.
Photo courtesy of: Beowulf Boritt
Colin Winslow, a set and costume designer, is another designer known for his 3D printing in the field of entertainment. Winslow has been the Head of Design for theatres around the world including the Royal Lyceum Theatre in Edinburgh, The Manitoba Theatre Centre in Winnipeg, Ensemble in Amsterdam, and several theatres in England. Currently, he teaches stage design in the Department of Drama at the University of Alberta in Edmonton, Canada.
Winslow was the first to begin writing about 3D printing for the entertainment arts. His books, The Handbook of Set Design (2006), The Handbook of Model-making for Set Designers (2008), and The Handbook of Techniques for Theatre Designers (2010) all discuss his work with 3D printing. His 3D models can be found at www.thingiverse.com/winslow/designs
Winslow began experimenting with 3D printing for theatrical design in 2004. For his first print, he used an industrial style powder binder printer (a Zcorp Z400), which used plaster as the medium. It belonged to the I.T. department at the university at which he worked. He chose to print an entire set all as one piece, but later decided that he might have done things differently if he tried again.
Although this was an interesting exercise, I realized at the time that it was probably not the best use of the technology, for parts such as the base and any thin, flat elements would have been far better made from wood or card, and in any case, a model made in one piece is virtually impossible to paint. 40
However, he notes that the industrial printing process only took eight hours (perhaps less than the hours of making a scenic model by hand) and cost considerably less than the materials would have cost for a traditional model (see Figure 8.13). The final print was covered with a wax coating and primed with gesso before painting.
“Although 3D printers [can be] cumbersome and extremely costly machines, it is not so many years ago that color printers were far too expensive for personal use, yet now they often cost less than the replacement ink-cartridges, so it [seems] inevitable that 3D printers too [will] soon become cheaper and more accessible. I [used to] suggest that ‘we should all start clearing a space beside our drawing boards for the 3D printer.’ Ten years later, this prediction has become reality, for several makes of desktop 3D printers are now available at a fairly reasonable cost. However, mine does not sit ‘beside my drawing board’ for my studio no longer contains a drawing board as all my plans and working drawings are now produced digitally.” 41
Colin Winslow, set and costume designer
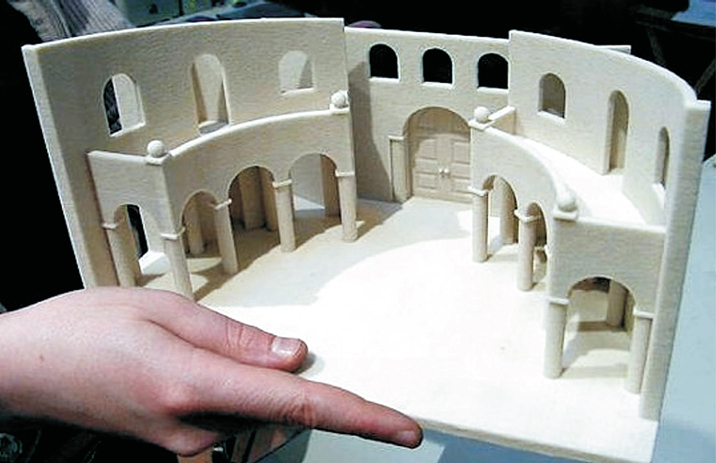
Figure 8.13 Model for Don Giovanni printed as all one piece, designed by Colin Winslow.
Photo courtesy of: Colin Winslow
Winslow now chooses to print mostly items that have a lot of detail or pieces that take a long time to produce by hand, such as model furniture. He uses AutoCAD to produce his models and prints on a MakerBot Replicator at home or uses service bureaus, such as Shapeways or i.materialise.
“One advantage 3D printing has over laser cutting is that with laser cutting you still have to put the object together. For 3D printing, once you’ve done the drafting correctly you can make a gazillion 3D printed chairs, and they pop out finished.”
Chris Barreca, Broadway scenic designer
“3D printing solves things that I either can’t build fast enough or can’t build accurately enough … or things I don’t have the patience to build.”
Christopher Scott Murillo, scenic designer

Scenic designer Steven C. Kemp uses 3D printing for models and model furniture. He works in AutoCAD and Vectorworks for modeling, but will occasionally pull already built items from SketchUp’s 3D Warehouse.
Instead of using an in-house printer, he prefers using the service bureau Shapeways. He finds that the service works for his budget if he uses their least expensive material – typically the “strong & flexible,” which is a white nylon powder printed with SLS. He also prefers this material because it takes gesso well as a primer before painting (see Figures 8.15a–b).
He also likes Shapeways’ “frosted detail plastic” for translucent items, which is an acrylic resin printed with SLA. Before choosing a material, Kemp recommends reading the provided information on each material’s tolerances (overhangs, wall thicknesses, etc.). Not only does this enable you to produce a good print, but it may also rule out some material options. He explains, “I love the idea of the colored sandstone, but the problem is the tolerances are not good for 1/4” models and are barely successful for 1/2” ones.”
According to Kemp, one big advantage to Shapeways is that it works with a freelancer’s busy travel schedule. “With as much traveling as we inherently do, not being tied to a physical model building space and being able to continue my design work wherever I am really unlocks possibilities,” explains Kemp. “I can be sitting in tech or sitting in a hotel room on my laptop and still be continuing to work on the model just as if I were in my studio.”
Furthermore, he believes that printing a model may actually be more cost effective than making one by hand. Depending on the complexity of the design, “it can be really economical,” says Kemp.
If a complex unit costs $40.00 [USD] to print at Shapeways, an assistant at $20.00 an hour is going to spend way more than two hours building something like complex curves out of Bristol. Printing allows you to weigh those cost options.

Figure 8.15a 1/4” printed model for Dead Man Walking, designed by Steven C. Kemp.
Photo courtesy of: Steven C. Kemp
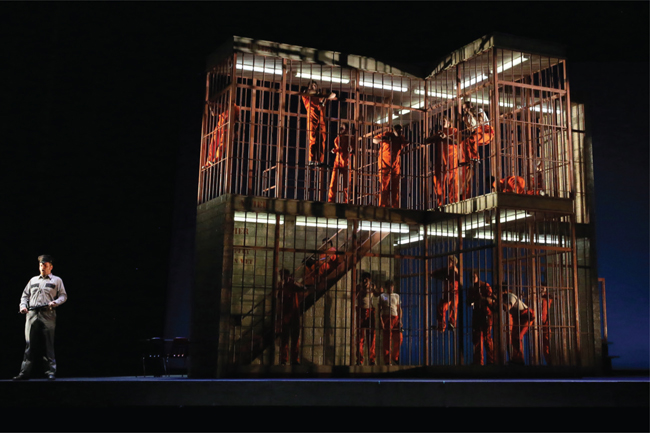
Figure 8.15b Dead Man Walking realized production, designed by Steven C. Kemp.
Photo courtesy of: Steven C. Kemp
When choosing what items to print, scenic designer Steven C. Kemp considers the following:
- ✓ What are the most efficient items to print?
- ✓ How finished does the model need to be?
- ✓ How much is the fee and reimbursement budget for this project?
Sometimes simply the fee scale of a project may reduce the cost efficiency of a 3D printing option. In these cases, Kemp may decide to simplify the model, especially if a fully produced model is not needed.
Moreover, 3D printing speeds up his design process overall. “It makes my workflow really self-contained,” he says.
When I build an object to render-out to show the director, it can immediately go into the drafting package. Then by scaling it down quickly and maybe doing one or two adjustments to it, I can send it right away to Shapeways so it can arrive in a week and a half – that’s a really quick workflow to get everything through the pipeline. And I can do it out of town! I can send it to Shapeways knowing that I’ll be back in my studio in a week and a half to assemble the model. This efficiency allows me to focus more on the design than the model building process.
Kemp’s 3D models can be found at: www.shapeways.com/shops/kempscalefurniture.
“We see the most benefit [to 3D printing] when we’ve got many of one thing. The modeling time is the most time consuming. However, we’re almost through with having every Greek order of column modeled and ready to print. As soon as we have all of those finished it will be a huge time saver – we’ll never have to do that modeling time again.”
Colin McGurk, scenic designer
“3D printing has changed the whole spectrum of things – and it continues to do so. I feel like we’re on a basic Atari device right now. In a few years there’ll be something that will do color and texture and probably all sorts of things we haven’t even thought about yet, but it’s a great start certainly.”
Alexander Dodge, Broadway scenic designer
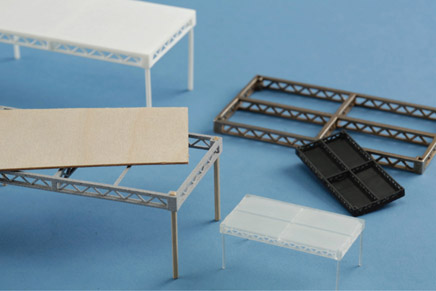
Figure 8.16 Model steel deck, www.shapeways.com/shops/tmp.
Photo courtesy of: Rory McAlister, Middlesex University
Model Furniture
“3D printing is great for model pieces. It’s perfect because the scale is so minute.”
David Gallo, Broadway scenic designer
Set designers and their assistants spend hours crafting scale furniture. Conventionally they are made lovingly out of balsa wood, polystyrene, Bristol, or card stock using an X-ACTO knife. This can mean a lot of late nights, sliced up fingers, paper cuts, and abundant frustrations over tiny broken cabriole legs or rows of dentils that took hours to create; and once one dining room chair is carved, there are often five or seven more to go to complete the set! This is an excellent reason why chairs and other intricate objects are great items to consider when thinking about 3D printing – nearly every interior has at least one chair!
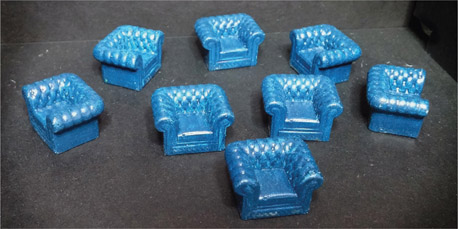
Figure 8.17
3D printed Chesterfield chairs for The Second Mrs. Wilson. Long Wharf Theatre, designed by Alexander Dodge.
Photo courtesy of: Alexander Dodge
“The time put into the 3D modeling process really pays off when you will print multiples of an object over time.” 42
Kacie Hultgren, scenic designer
“One issue with 3D printing is that we tend to do most of our models in 1/4” scale, and [the printer] has a little bit of a hard time printing detail that’s small enough for some things. However, we still use it for a lot of furniture because [a piece of furniture] is much sturdier when it comes out of the 3D printer than if it’s made out of paper, so it lasts longer and doesn’t break as easily.”
Derek McLane, Broadway scenic designer

Figure 8.18
3D printed 1/4” scale Eames chair. Designed by Anshuman Bhatia, www.shapeways.com/shops/ab.
Photo courtesy of: Anshuman Bhatia
These small items with such tiny features can be somewhat fragile during printing or in transit. One trick scenic designer Steven C. Kemp uses for hard-to-print items, such as small model chairs, is that he will create a temporary sprue that links items together (see Figure 8.20a). Kemp adopted this idea from model car or airplane kits that often have small pieces tied together with tiny snap-off points (see Figure 8.20b). The sprue provides structural support for fragile pieces, enabling small items to be printed more easily.


“When you think about the labor of building multiple chairs by hand, printing is a no-brainer. If in reality you’re just going to pull a chair from stock, why should you (as the designer) be spending an hour or two hours building a chair from scratch for the model when, just like in real life, the director might say, ‘I hate that chair. Let’s pick another chair.’ Then all of a sudden all of that work is down the drain.”
Steven C. Kemp, scenic designer
“It’s common that we often need to build multiple identical pieces for models. I was so glad we could make pieces all the same with less suffering. The wonderful thing about a 3D printer is that an object like a bentwood chair or staircase can be reproduced in miniature, be absolutely regular, and can be duplicated ad infinitum. I don’t feel guilty asking for 24 lampposts, and then asking for two more. Often if design elements are repeated, it is the completely identical quality of the objects that is meaningful.” 43
John Lee Beatty, Broadway scenic designer
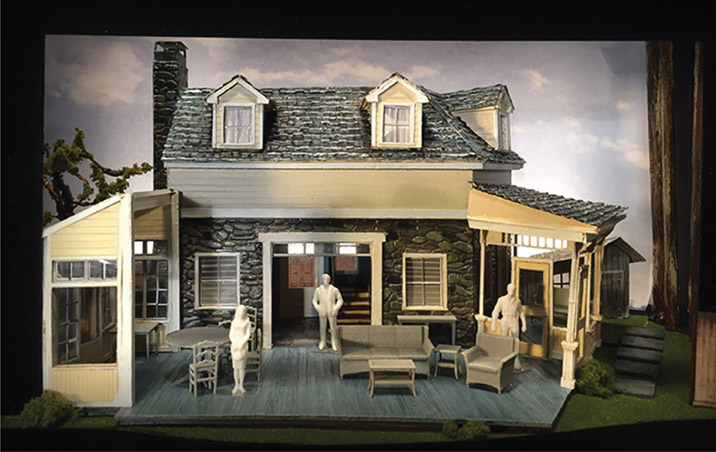
Figure 8.21 Model for Vanya and Sonia and Masha and Spike with 3D printed furniture. Goodman Theatre, designed by Charlie Corcoran.
Photo courtesy of: Charlie Corcoran

Figure 8.22
3D printed scale furniture from PrettySmallThings.
Photo courtesy of: Kacie Hultgren, www.shapeways.com/shops/prettysmallthings
Tutorial: Making a 1/2” scale rehearsal chair in Vectorworks
- Create a rectangle 1’-6” square.
- Use the Model >Extrude… tool to make it 1” tall (see Figure 8.23a).

Figure 8.23a Step 2: Extrusion.
- Duplicate it and move it next to the original.
- At the top left corner of the first rectangle, make a 1’-6” by 2” rectangle.
- Use the Model >Extrude… tool to make it 1’-6” tall.
- At the top left corner of the second rectangle, make a 2” square.
- Using the Mirror and Copy Tool, copy this to each corner of the rectangle (see Figure 8.23b).
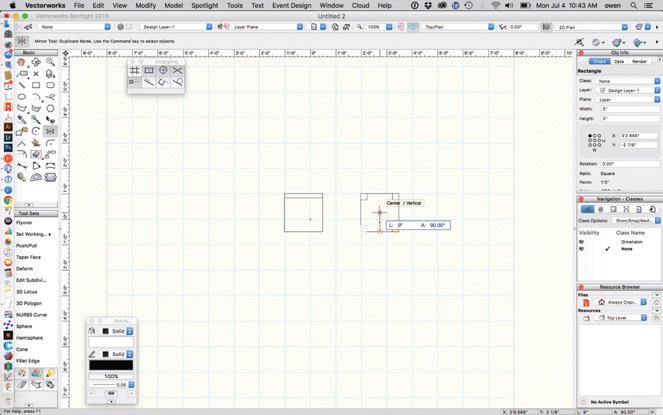
Figure 8.23b Step 7: Mirror and Copy Tool.
- Select these new objects and make them 1’-6”tall using the Extrude tool.
- Select all objects and Choose Model >Add Solids. This eliminates intersecting internal geometry (see Figure 8.23c).
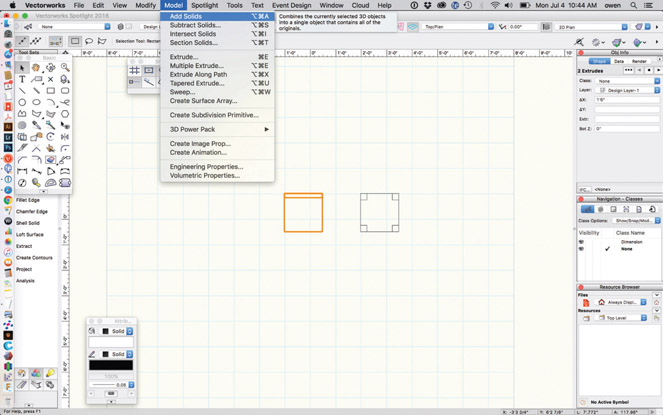
Figure 8.23c Step 9: Add Solids.
- Choose Modify >Scale Objects… Under Symmetric type 0.042. This scales the object to 1/2”=1’-0” scale (see Figure 8.23d).
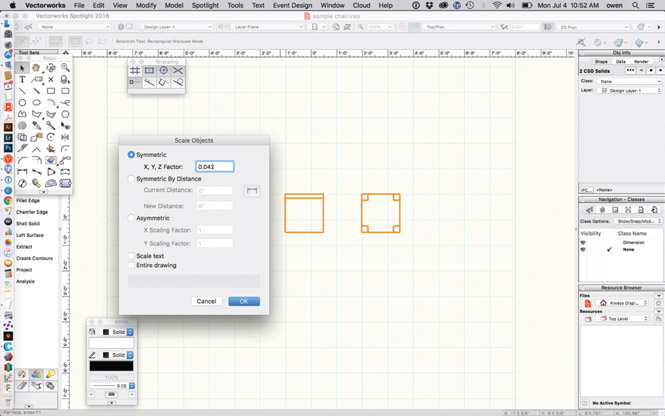
Figure 8.23d Step 10: Symmetric Scaling.
- Choose File >Export >Export STL (3D only) [or Export Stereo Lithography for earlier versions] (see Figure 8.23e).

Figure 8.23e Step 11: Export to STL.
- Now there is an STL of two objects that can be printed without supports (see Figure 8.23f).
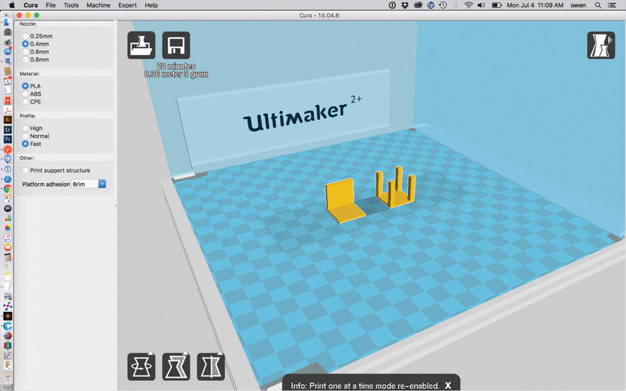
Figure 8.23f Step 12: STL loaded in slicing software.
- Print each part and then glue together with an appropriate glue for your material.
Notes: No supports or rafts required. At a low-quality resolution and low amount of infill (perhaps 3%) this model will take approximately 20 to 25 minutes to print on most FDM machines.
Drawing Adaptation
As more and more designers adopt three-dimensional drafting techniques much of the modeling work is already complete by the time the drawings are ready to print. Perhaps you drafted a fancy fireplace for your elevations. Even if it is drawn in 2D, it is halfway to the status of a 3D model.
Or perhaps your set is more organic. If your drawings are already complete and created in 3D, simply print the organic set pieces to escape all that measuring, guesstimating, and approximating required for carving a model.
Real-World Integration
Photogrammetry and 3D scanning in combination with 3D printing gives scenic designers the shorthand to incorporate real-world objects into their models. Perhaps if your drawing room set mantel has two busts placed on top, 3D technology can help make your process faster. Instead of trying to draw and carve two tiny faces, heads, and shoulders, you can catch or scan two statues, actors, neighbors, or friends and print them out to scale.

The possibilities seem endless … candelabras you saw in a museum, the perfect chair from the thrift store, the door you loved from the Cotswolds, the statue on the cathedral downtown, the perfect beach house décor from your vacation … capture them all and start your own library of useful and interesting items. As a matter of fact, Kacie Hultgren’s well-known “oversized armchair” was created from a scan of a recliner in her mother’s basement that she captured while visiting for the holidays (see Figure 8.24).
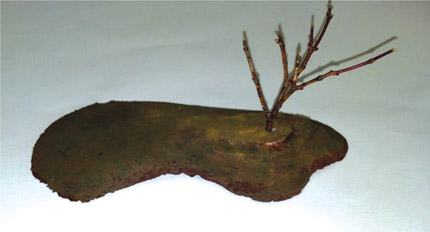
Scenic and lighting designer Michael Harvey used a similar technique when creating a drawing package for an in-the-round production of Waiting for Godot at Salem State University. He began by creating a 1/4” model by hand using pink foam – sculpting an abandoned island complete with a single tree (see Figure 8.25). “It was exactly what I wanted … and then I had to figure out how to draft it. You can’t just hand that to the T.D. and say, ‘Here! Build this!’” laughs Harvey.
Instead of attempting to draft the organic item, Harvey decided to make technology work for him. He used photogrammetry to capture the model, and Blender to clean it up. Then he was able to import it into Vectorworks as a full 3D model (see Figure 8.26). From there he produced a full drawing set as well as a printed final model on his Solidoodle 2.
Using this technology allowed the drawings and final model to have exact matching dimensions to the organic shape – no guesstimating required. It also enabled a successful build in the shop – the project was reproduced exactly from page to stage.
“There may soon come a day when we’re printing our entire set. What it’ll mean is that my assistants will draft the file that will get printed. We’d be creating one file you print a model out of and then, presumably, print the scenery out of the same file.”
Beowulf Boritt, Broadway scenic designer
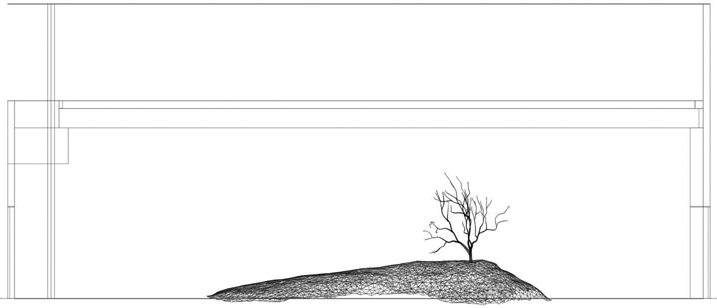
Figure 8.26 3D model in Vectorworks made from catch. Waiting for Godot.
Image courtesy of: Michael Harvey
Gentle Giant Studios located in Burbank, California provides digital sculpting, props, and mobile 3D scanning for the film industry. The Vice President of Entertainment, Karl Meyer, began exploring 3D technologies in the early 1990s. “I realized that the ability to capture and control organic geometry would be a solution to a problem,” he explains.
A character artist is often working from a maquette [a scale model of a character]. I thought if I could capture that geometry and control the size, it would avoid the back-and-forth of the approval process. Because when you tell a traditional sculptor to make something a different size, it really is saying to redo it completely. Whereas using 3D printing, I can print out an entire tray of that same character in multiple different sizes.
Gentle Giant Studios travels on location and to sound stages around the world in order to digitize the environments. They have worked on hundreds of films including the Star Wars, Lord of the Rings, and Harry Potter franchises. They have even built custom vehicles as mobile scanning units, which use a mixture of photogrammetry and LIDAR scanning (Light Imaging, Detection, and Ranging) – an industrial cousin to SLS 3D scanning which measures distance by evaluating the properties of scattered light on distant objects.
The geometry that they capture creates a database that can be used for visual effects, game design, set design, and consumer products, as well as pre-production needs like planning camera shots, action sequences, and lighting rigs. In the case of the Harry Potter franchise, the scan data of the scenery created for the films was even translated directly to the design of The Wizarding World of Harry Potter theme parks. “It’s the same data from the original designs by the art department at [Warner Bros.] Leavesden Studios all the way through to the ride that you might go on today,” says Meyer. “That real geometry becomes the foundation for making anything that’s based off of it. It takes away interpretation and makes the approval process almost mute.”
Gentle Giant (who was acquired by 3D Systems in 2013 as their entertainment sector) has a full suite of nearly 20 3D printers in-house – no molding or casting in sight. Their workflow is 100% digital, except for some handwork in post-processing. Meyer adds, “If we need to build ten sculptures of a character, instead of molding and casting, we just print them.”
Model Replication
“Depending on its size, you no longer need to ship a model if the company has a 3D printer on site.”
David J. Castellano, scenic designer
Consider, as the technology progresses, the advantage of having the ability to print multiple, complete models – no longer will the director, stage manager, and scene shop need to fight over the model during the build and rehearsal processes. Perhaps with the future of 3D printing, you can more easily produce several identical copies of your model so that everyone gets his or her own.
In fact, as the technology matures and moves towards full-color mixing, we may see the equivalent of “faxing” your model to others. Instead of flying in with the model for an out-of-town production meeting, you can send the file to the production team. They can print out the model at their location so it can be discussed at the meeting while you telecommute!
“It’s a great way to share something. Someone can design something on one side of the world, and someone on the other side of the world can print one out and look at it. You never would have been able to do that before.”
Richard North, Robot CNC and Digital Supervisor for Artem
Set Decoration
3D printing can be useful for set decoration/set propping as well. Use 3D printing to fill in the gaps and help provide hard-to-find or cost-prohibitive items. Instead of shopping all over town for that one perfect detail piece, you can design it and print it. Design, print, paint, done! (see Figure 8.27).

Figure 8.27
3D printed statuettes used as set decoration in the Public Theater’s Comedy of Errors, 2013. Based on Fountain Statue by Jlbeeftrout; thing: 26476.
Photo courtesy of: Kacie Hultgren
“We may eventually be building the full scale scenery with a 3D printer. In fact, in a pinch, we’ve been able to manufacture small pieces of the finished scenery with a 3D printer now. The stove hardware in [the Broadway production of] Outside Mullingar was 3D printed. And when we worked on the Public’s Shakespeare in the Park production of Comedy of Errors, we 3D printed oversized finials when the supplier failed to deliver in time.” 44
John Lee Beatty, Broadway scenic designer
Michael Driggers, Assistant Technical Director at the University of Maryland, uses 3D printing for set construction and decoration. In fact, he used 3D printing to augment the construction of a large 6’-0” tall statue for the school’s production of Tartuffe (see Figure 8.29). The statue, a replica of Bernini’s Apollo and Daphne, formed the focal point of the room and was able to roll throughout the stage, light up, and emit fog. The file for the statue was purchased from the repository TurboSquid.
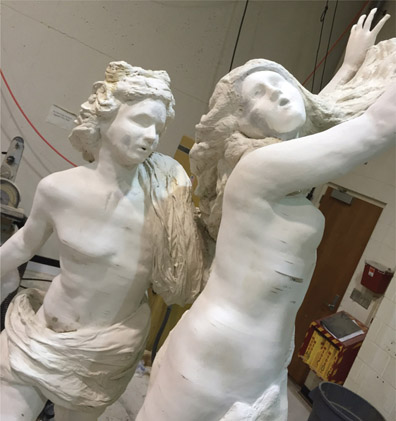
Figure 8.29
Bernini statue for Tartuffe with 3D printed faces and hands.
Photo courtesy of: Tim Jones
Driggers began constructing the piece using a CNC router to create 1/4” stacked pieces of MDF, but soon realized that the faces and hands needed further detail. “The faces, especially – they would stack but they just didn’t look right. It’s a figure you’re so familiar with,” he explains. “And the hands, because of their position, almost didn’t look like anything at that resolution.” Therefore, the decision was made to cut the faces and hands off and use 3D printed elements in their place (see Figures 8.30a–b).
Driggers frequently combines the use of 3D printing with CNC fabrication. “I often use the same files to go between both worlds,” he explains.
It can be a little difficult to navigate, but the same STL file can be turned into a sliced, carved thing for the CNC or a printed thing for additive manufacturing. It’s all from the same source. I really enjoy that type of efficiency.

Figure 8.30a
Statue with face removed in preparation of adding 3D printed face.
Photo courtesy of: Tim Jones
Scenic Painting
3D printing can be used to assist with scenic painting techniques too. Printing out an ornate wallpaper stencil or stamp may be easier than cutting one out by hand, for instance. A plastic stencil may be sturdier than one created by other means too and may withstand a lengthy painting session better.
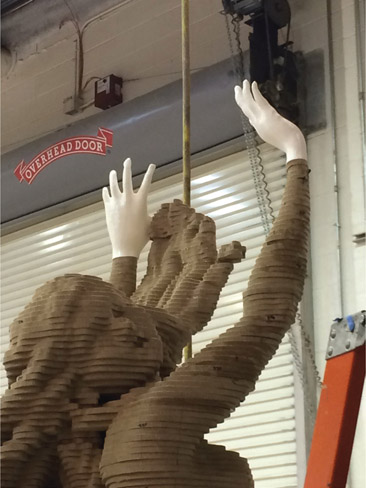
Figure 8.30b Statue made of stacked MDF with 3D printed hands attached.
Photo courtesy of: Michael Driggers
Paint rollers can also be created with custom printed patterns (see Figures 8.31a–b). The Painted House (although not 3D printed) has a good tutorial on how to use specialty rollers like these, found here: https://youtu.be/bpQ4kfJNkgg. Their patterned rollers are also good for inspiration (see Figure 8.32).

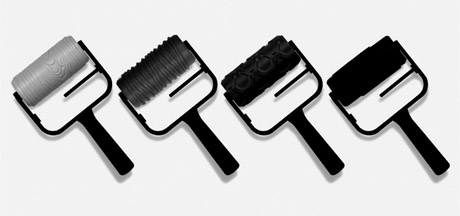
Figure 8.31b 3D printed patterned paint roller with wood grain effect (far left).
Photo courtesy of: Matthijs Kok, www.matthijskok.nl

Figure 8.32
Beautiful Victorian-inspired wallpaper roller by The Painted House, www.the-painted-house.co.uk
Photo courtesy of: Clare Bosanquet
Scenic Construction
Occasionally 3D printing can even be helpful for set construction. Custom jigs can be printed to make a cutting job easier, and custom tools can be made if proper safety testing is strictly considered. When working with structural or functional items use 100% infill and multiple shells for the most strength possible and perform abundant safety checks before utilizing. Do not print anything functional or weight-bearing unless you are sure the force and load can be handled by the print.
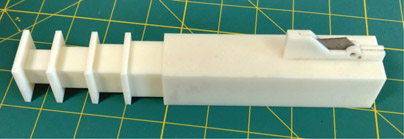
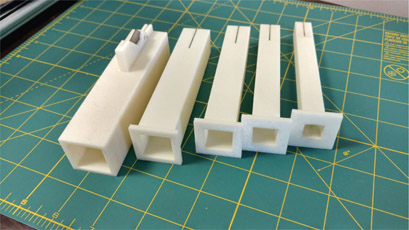
Figure 8.33b
3D printed Ethafoam rod splitter – multiple sizes.
Photo courtesy of: Christopher Morris
Christopher Morris, faculty Technical Director at Salem State University, created an Ethafoam rod cutting tool to help make the repetitive splitting of foam easier (see Figures 8.33a–b). He felt that the traditional ways of splitting Ethafoam were dangerous and unreliable. Using a 3D printed structure with an incorporated razor blade produced a simple tool to accomplish a previously troublesome task.
For safety in regards to weight-bearing objects, Morris prints with 100% infill and strongly suggests destructive testing (making a test item to load with weight until it breaks), then building in a 7:1 safety factor. (For reference, a 10:1 safety factor can hold ten times the weight the item needs – if the item breaks while holding 1,000 Lbs., only use 100 Lbs. to allow for the proper safety factor).

Figure 8.34
3D printed Kabuki drop solenoid rig.
Photo courtesy of: Christopher Morris
Morris believes that the only real way to know what a printed item can hold is through destructive testing. “The problem is because you’re printing [the filament] and layering it and melting it onto itself, you can’t really trust a material’s listed tolerances,” Morris explains. “[Also destructive testing] can be used to determine where on the unit it breaks… can you add more plastic [at the breakpoint] or a gusset to make it stronger?”
Destructive testing can also alleviate the contrast between different machines, different printing temperatures, and even different weather conditions that may affect the resulting print. Morris warns, “One machine may melt [the layers] better together and one may fuse it less.” Destructive testing is the most reliable method for assessing these variances.
Michael Darling, Head of Technical Direction at California Institute of the Arts (CalArts), uses 3D printing for small scenic construction needs. “[We print] a lot of brackets – if we need a spring-loaded switch or a bracket to mount something to something else, it’s easier to just start the machine up and let it run while you’re doing other work,” Darling explains. “It’s kind of like growing a third or fourth hand.”
Darling and his students print with FDM using PLA and HIPS; CalArts’ collection consists of two LulzBots, a MakerGear M2, and five Solidoodles. Darling feels the 3D workflow is ideal for students: “They can just think [an item] up and play with shapes in some free software to create any kinds of forms they want to,” he says. “They don’t get so intimidated by all the processes, because there is only one – the computer.”
For the play Hamletmachine, Darling and his team created a 56-foot wide Rube Goldberg machine that used 4 miles of red rope. They used 3D printing to create gears and triggers, such as a finger-like device that pulled a trigger on a prop gun for a mechanical firing squad effect. 3D printing allowed the students to create this invention without knowledge of complex machining. “[3D printing] opens their eyes because these things are non-issues. I love to hear [the students say], ‘I’m just going to 3D print that.’ They don’t say, ‘I’m just going to mill that,’” laughs Darling. “[3D printing] really opens up what they can do, and takes the stress out of [the process].”
Props
Next to scenic applications, props seems like the next most likely function for desktop 3D printing. Its versatile design capabilities and seemingly limitless creation potential make it a natural fit in the ever-flexible props artisan’s toolbox.
There are many advantages to using 3D printing for props. Not only can it replace fragile and breakable items, but it is good for breakaway items as well (see Figures 8.36a–b). Translucent filament can be used as an alternative to sugar glass too.
Breakaway items can be made either with breakable seams tacked together or simply in multiples that can be destroyed every night – especially if it is something that is supposed to look precious. For strength consider infill over 15% for pieces that intend to stay intact, and 1 to 3% for parts that want to break or be crushed.
Safe versions of prop weapons can be printed as well with blunt ends and/or plastic parts. If used for stage combat, test for safety first. It may help to print with 100% infill and additional shells for strength. Multiple copies can be made too in case one breaks during performance.

Figure 8.35 Milky White prop from Into the Woods at San Diego State University with 3D printed eyes that rotate from pupils (when alive) to x’s (when dead). Designed by Loren Schreiber. Eyes modeled, printed, and assembled by: Travis Barrett and Tim McCalister.
Photo courtesy of: Tim McCalister

Figure 8.36a Breakaway 3D printed horse for Legends at the Gordon Frost Organisation, designed by Justin Nardella; thing: 835187 by Sam Choy. Based on scan from terracotta horse in the Metropolitan Museum of Art; thing: 271266.
Photo courtesy of: Sam Choy

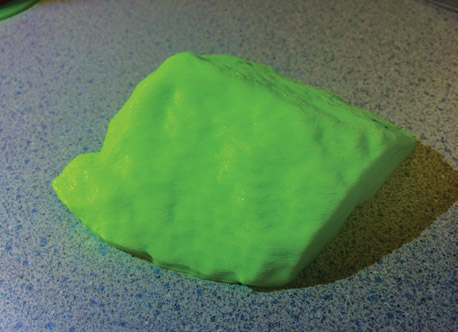
Figure 8.37a
3D printed “radioactive uranium” rock.

Figure 8.37b
Cricket (after a speech about Marie Curie) shows glowing “uranium” to her teacher, Ms. Bennett. Flashlight was used to make rock glow. Performers: Danielle Soibelman (left) and Aspen Ford (right). Bless Cricket, Crest Toothpaste, and Tommy Tune
Scenic designer Michelle D. Harvey tends to gather props for her own productions. When items are hard to find or out of the budget’s reach, 3D printing can be a great solution. “We go through the props list and look at what can be pulled from stock or be easily purchased within budget,” she explains.
After that we get to the antique items, the breakable things, or ones not feasible to own or borrow. If all of our other resources are exhausted then we look at what we can build; can we make it out of materials we already have, or is it going to be easier to create a 3D model in Vectorworks and print it on our MakerBot?

Figure 8.38
3D printed teacart wheels.
Photo courtesy of: Michelle D. Harvey
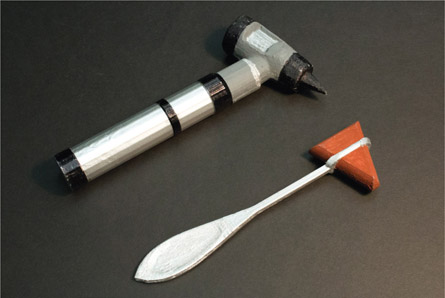
Figure 8.39
3D printed medical equipment.
Photo courtesy of: Michelle D. Harvey
Harvey finds she generally chooses printing as an option for the following reasons: 1) items the budget cannot afford, 2) anything antique or vintage, 3) useful connectors like a collar that connects a spear head to a large dowel rod (see Figure 8.40), and 4) safety issues, like breakable items or hazards, such as a prop hacksaw for which Harvey printed a fake blade.
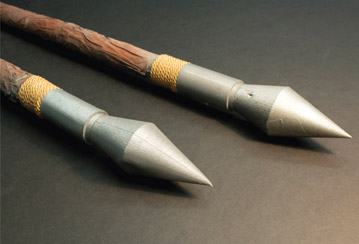
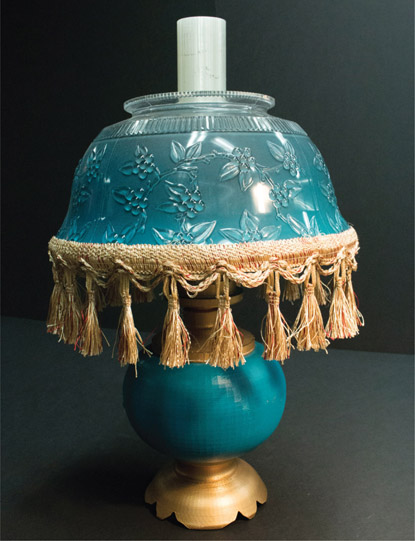
Figure 8.41
3D printed Victorian hurricane lamp with punch bowl shade; thing: 166210.
Photo courtesy of: Michelle D. Harvey
One disadvantage, she says, is not being able to print food-safe items.
With all the ridges on the prints we don’t risk [using it for practical food or drink onstage]. We don’t want to do anything that could potentially harbor any bacteria that cannot be cleaned out. We have our actors fake [the action of drinking from a cup, etc.]. In a proscenium space it works fine.
Regardless, Harvey enjoys the challenge of using 3D printing creatively. She does not allow size limitations or time constraints to stop her when making elaborate items. “The lamp [in Figure 8.41] was printed in six or seven different parts,” she says. “But, the radio [in Figure 8.42] was one full print – I made it as big as I could to fit onto the printer bed. It took about 24 hours to complete.”
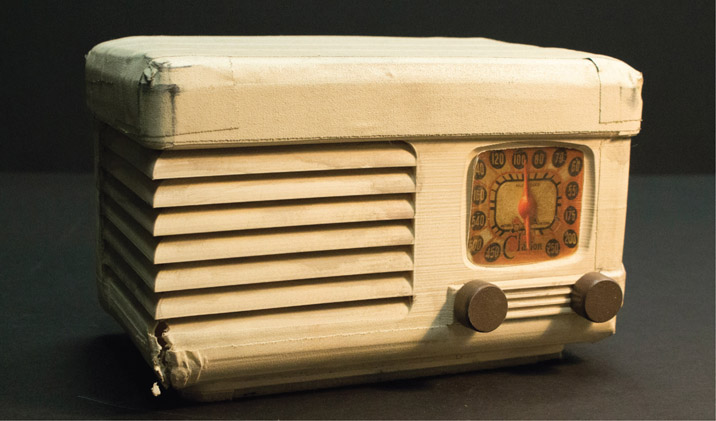
Figure 8.42 3D printed 1940s Bakelite tube radio (repaired after being thrown from a stage window each night of the performance); thing: 544241.
Photo courtesy of: Michelle D. Harvey
Artem Ltd., a creative practical effects and innovative solutions studio, has been developing special effects, props, and sets for television, film, live events, exhibitions, and visitor attractions for almost 30 years. Artem’s portfolio covers nearly anything a client can dream up, including high-end model making and pyrotechnics to prosthetics, animatronics, mechanical rigs, puppets, and specialty costumes. Based in West London and Glasgow, they began using 3D printing in their workflow over ten years ago, making them a forerunner in the industry.
Artem finds 3D printing useful when creating props for advertisements – food commercials being a good example. Richard North, Robot CNC and Digital Supervisor for Artem explains,
It’s quite usual when you’re shooting food to [use] large scale models. It allows people to have much more control over the lighting and the environment; and the camera can get closer to the object if it’s ten times bigger.
“Almost every job that we do that involves prop making we print parts for – just because it allows you to prototype things so much quicker.”
Richard North, Robot CNC and Digital Supervisor for Artem
In the past, a food model would have been sculpted from clay by hand then molded and cast. Then, in the case of a broken-in-half candy bar prop, if caramel is oozing out that part might have gone through further processing – sanded down to be smoother, lacquered, remolded, and cast out again in a translucent material to capture the shiny finish.
Today this multi-step process has been simplified by 3D fabrication technologies. Now Artem’s team begins by breaking an actual candy bar in half and 3D scanning it. “Once it’s digital it doesn’t have a scale,” explains North. “It can be as big as you want it to be.”
Once a clean scan is achieved, the model can be printed – perhaps the chocolate, the caramel, and the nougat are printed in separate pieces that fit together like a three-dimensional jigsaw puzzle. Then they can be molded and cast separately into the materials needed to achieve the proper look (see Figure 8.43). “In the space of 48 hours we can have a large-scale chocolate model to start testing with. Whereas before that would have taken a week,” says North.
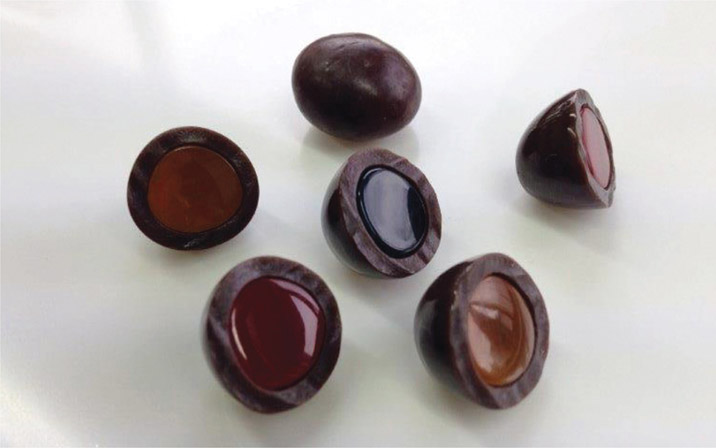
Figure 8.43
Prop chocolate-covered candy with fruit-filled insides – resin casting made using 3D printed molds.
Photo courtesy of: Artem, Ltd
Artem has two in-house machines: an FDM machine (Stratasys Dimension 1200es SST) and a PolyJet (Objet 30 Prime). The FDM printer is somewhat limited by layer height – the finest at 254 microns – too coarse for small, delicate props like the chocolate bar, but works great for larger items such as the costumes they create for the Halo® franchise. North explains that, in Artem’s case, the PolyJet seems to be the most versatile.
It’s running 24 hours most days. The engineer that came to visit us recently to give us an annual service said that we had put the most hours on it in our first year than almost any other machine that he’s visited – and this company installs machines for large car manufacturers like Bentley and Formula One teams.
For the most part Artem uses 3D printing as a step in the process; most of the items printed do not actually make it to camera. According to North the major stumbling block is the printing materials themselves; most often the materials available for 3D printing are either not durable enough for their needs or versatile enough to create the right look for a finished product. For example, the VeroGray material they regularly use in their PolyJet machine can be stiff, which may chip and break almost like glass, or a finished item may need to be translucent or glossy (like the caramel in the candy bar example). And the ABSplus used in their FDM machine can delaminate easily if any torque is applied to the item. This can be helped by using an acetone bath to bond the layers together, but it simply adds one more step to an already lengthy process.
Although there are other materials available, North explains, “We have to balance the cost of the material. We tend to use the cheaper materials because we know there are post-processes involved, and we’ll probably just mold it [anyway].”
Theatre provides a distance from the audience that a camera often does not. This enabled Artem to print several end-use props for the West End production of Harry Potter and the Cursed Child: Parts One and Two. Although some were a hybrid of traditional and printed materials, many of the props were able to be printed, painted, and used directly on stage.
“Cars onstage are always a scale problem. When you make a car onstage that’s just a car seat on wheels, and you stick a steering wheel on it, the steering wheel is invariably too big to keep that proportion.
When I was doing Little Miss Sunshine we priced printing a 1968 VW steering wheel at 75 percent scale. Sadly, we couldn’t afford it on that show, but I’ve looked into it a couple of times for things like that. I’m sure as it becomes more affordable we’ll start doing that more often.”
Beowulf Boritt, Broadway scenic designer
Creative Character Engineering (CCE) in Van Nuys, California uses 3D printing to create animatronics, prosthetics, props, specialty suits, and creature effects for film, television, and themed entertainment. Known for their work on E.R., Grey’s Anatomy, and Nightmare on Elm Street among countless others, Andrew Clement, owner, says 3D technologies have changed the way CCE does business; “It’s an extremely fast way of sculpting and of doing concepts.”45 In the past each mock-up would have been built by hand, but virtual models or quick 3D prints allow the creative process to progress more quickly.
For example, in the film Repo Men (2010) several futuristic internal organs were required – heart, lungs, etc. Clement determined that the fine details in the concept art (like small mechanical fins and tiny printed text and barcodes) required 3D printing to make possible (see Figures 8.44a–b). “We had done 3D printing before, but this was one of the first shows where we had to make things in 3D print that were too small to see – either on screen or too small to survive the molding process,” says Clement. “We were getting down to almost fingerprint resolution.”
The organs were modeled and sent to a service bureau to be printed by PolyJet in VeroBlue. Then the printed parts were molded and cast and, finally, metal plated in nickel – the metal plating provided the durability needed on set. The success of this project paved the way for 3D technologies to become a permanent part of CCE’s creative pipeline.

Figure 8.44a Repo Men 3D printed heart.
©2010 Universal Pictures
Courtesy of: Universal Studios Licensing LLC
Photo courtesy of: Creative Character Engineering
As the years passed and the demand for 3D printing grew, CCE decided to bring printing in-house; finding that desktop models work well for their needs. They use a LulzBot TAZ 5 (FDM) and a Formlabs Form 1+ (SLA) printer. They use the TAZ for functional, durable parts, and the Form 1 for highly detailed, fine resolution prints. Clement says, “the smaller machines are great, but there is still a big difference in performance and support between [desktop models] and some of the larger pro machines.” He adds, “Eventually the gap will shrink.”
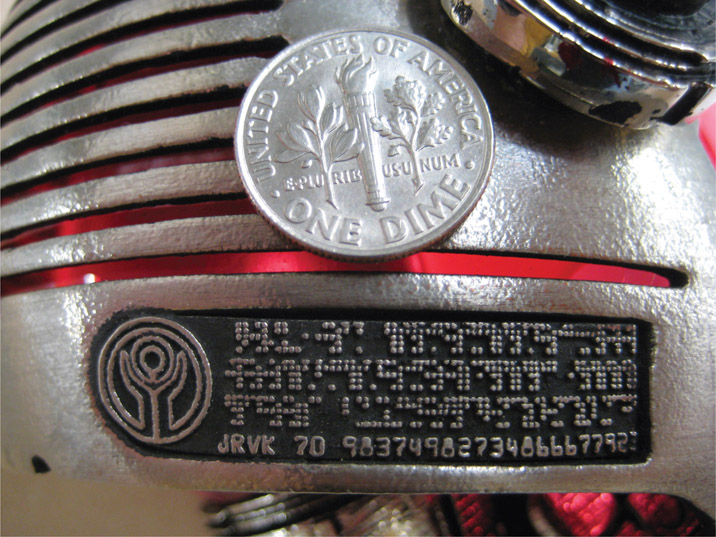
Figure 8.44b Repo Men 3D printed heart (close-up of detail). Dime used for scale reference.
©2010 Universal Pictures
Courtesy of: Universal Studios Licensing LLC
Photo courtesy of: Creative Character Engineering
CCE also uses a 3D scanner for reverse engineering – scanning traditional maquettes into a digital file for easy reproduction as well as preserving handmade maquettes made prior to the 3D era that were never molded or digitized in any other way.
Clement suggests that new users do a lot of research before investing in a 3D printer. Find what works for the intended use. Also invest time in learning multiple software programs, as different programs offer different advantages to modeling. For example, one program might help you create really detailed models, but another might help with exact dimensioning. Clement uses ZBrush and Lightwave respectively, although he also likes using SketchUp and Inventor for real on-screen dimensioning and their library of parts.
In addition, Clement suggests learning traditional sculpture and anatomy. He adds, “Just get a feeling for how things really feel in the real world. I see a lot of work that looks very digital, that doesn’t have a real cohesion to it.” Finally, Clement, who holds a degree in theatrical design, suggests learning traditional drafting; “Chamfers, radiuses, clearances, tolerances … [having learned] all of those things really helps me to make things actually functional.”
Augmenting Traditional Prop Techniques
3D printing is not an all-or-nothing tool. It can be used to augment the traditional prop-making process. Like instead of creating a traditional mold, the mold can be 3D printed and then items can still be traditionally cast. Or an existing prop can be painted using 3D printed tools (see Figure 8.45).

Figure 8.45
3D printed paint roller used to create holiday wrapping paper.
Photo courtesy of: Matthijs Kok, www.matthijskok.nl
“The applications [for 3D printing] in costume crafts, props building, and scenic decoration are inconceivably vast! For example, instead of being limited to the wood medallion-shaped handle that you can buy at Home Depot when you’re trying to make a Rococo dresser drawer, you can 3D print it. Then just paint it, age it, seal it, and be done.”
Rachel E. Pollock, costume crafts artisan
Furthermore, 3D printed parts can be added to an existing prop to enhance its features, like 3D printed accents added to a plain chair. These accents can be painted and treated so that the chair is seemingly transformed into a specific time period.
Appliqués can also be printed to make a chair-like structure appear like a chair – for example, a steel frame can be altered into a decorative piece of furniture with the addition of a 3D printed decorative shell.
Tutorial: Making a prop statue in Vectorworks: (such as the Arthur Award for Spamalot)
- Importing the Statue: Begin by downloading the “Knight with Shield and Sword” STL made by Avioza from Thingiverse at www.thingiverse.com/thing:635886.
- In Vectorworks, choose File >Import >Import STL (3D Only) to import the downloaded model.
- Select the model and choose Modify >Scale Objects from the pull-down menu. Select Symmetric and 7 for the scale factor. This will make the model larger for a proper statuette size.
- Creating the base: Use the circle tool to create a circle with a 2.75” diameter and place at the bottom center of the statue model. (You may need to use a 3D view – like front view – to align correctly).
- Select the circle and choose Model >Extrude. Extrude the base to −3” tall so that the base extrudes in the negative direction (see Figure 8.46a).
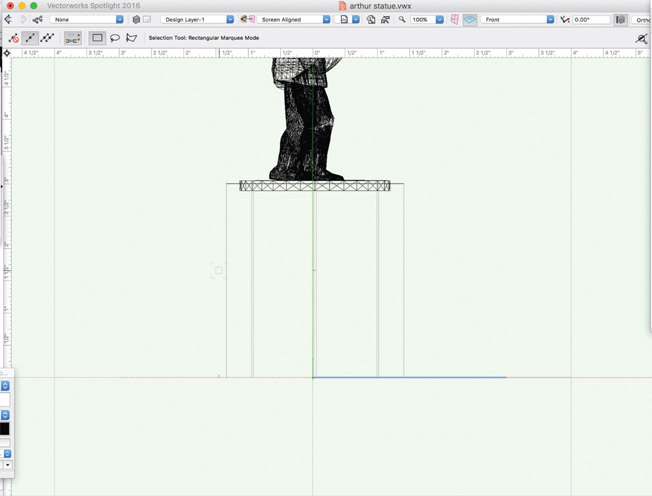
Figure 8.46a Step 5: Negative extrusion of base.
- Select both objects and choose Modify >Align >Align/Distribute from the pull-down menu. Select “align” and “center” on the bottom set of choices (see Figure 8.46b).

Figure 8.46b Step 6: Align tool.
- Choose File >Export >Export STL (3D only) [or Export Stereo Lithography for earlier versions]. This complex model may take several minutes to export.
Notes: No supports or rafts required. At a low-quality resolution and low amount of infill (perhaps 3%) this model will take over two hours to print on most FDM machines.