Chapter 10
Character Design and Fabrication
3D printing provides a sense of freedom and creativity for those involved in character design. From puppets and marionettes to animatronics and stop-motion animation, designers and fabricators find that 3D technologies provide the tools and flexibility needed to help birth unique creations.
Puppets and Marionettes
Puppets and marionettes are well suited for 3D printing, due to their size. Internal structures, mechanisms, and joints can be customized and uniquely built for the puppeteer’s needs (see Figures 10.1–10.2).
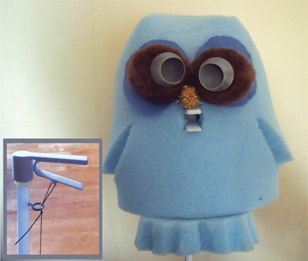
Figure 10.1
Owl stick puppet with 3D printed mouth mechanism (inset).
Photo courtesy of: Kirsty Rowley of Weegie Puppets
Owen M. Collins is a scenic and lighting designer with a strong interest in integrating emerging technologies into theatre. Collins is the Chair of the Department of Theater and Dance at Washington and Lee University in Lexington, Virginia.
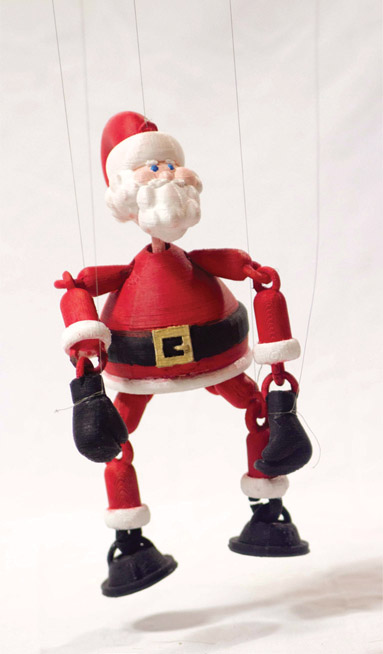
Figure 10.2
3D printed Santa Claus marionette with custom O-ring joints.
Photo courtesy of: J Wall of Print That Thing
Collins’ first experience with 3D printing was in 1999. The engineering department at the university he was attending at the time purchased an industrial LOM machine. LOM, which stands for Layered (or Laminated) Object Manufacturing, was first developed in 1991 by Michael Feygin, founder of Helysis, Inc. LOM is the forefather to the SDL technique used by Mcor Technologies today. This method employed special adhesive-coated paper that was cut out with a laser and then laminated together. Extraction of the print from LOM printers was extremely difficult and could damage the object. In addition, the laser-and-paper combination was a fire hazard.
What Collins remembers from that experience is that the objects that resulted from that machine were rough and blocky, but it provided an exciting glimpse into the world of 3D manufacture. Although anxious to get into the 3D printing world, the machines – which cost hundreds of thousands of dollars at the time – fell out of his price range.
Ten years later, in 2009, MakerBot Industries announced that they were selling their Cupcake CNC 3D printing kit for less than $1,000. Collins was one of the first to snatch one up. “It took twenty-five hours of setup, assembly, and calibration spread out over a month before I was ready to print.”75 Today, Collins uses an Afinia H-Series 3D printer and creates most of his models using Vectorworks.
Collins’ work spans from scenic models to props to puppets and marionettes. He has published articles regarding the 3D printing and scanning process for the entertainment arts and speaks frequently at conferences.
Among the many areas where Collins’ shines is his work with 3D printed puppetry and marionettes (see Figure 10.3). He was among one of the first to write about working with puppetry and 3D printing and has developed a selection of Bunraku joints freely available to the public: www.thingiverse.com/owenscenic/designs (see Figure 10.4).

Figure 10.3 3D printed animal marionette. Designed by: Owen M. Collins; thing: 10808.

Laurie Berenhaus is a digital fabrication specialist and puppeteer with a background in traditional sculpture and digital animation. Berenhaus runs a service called BYOpuppet on GitHub (https://github.com/BYOPuppet/BYOPuppet), an a la carte catalog of open-source 3D printed puppet joints and parts (see Figures 10.5a–b). “The true power of BYOPuppet lies

Figure 10.5b
Completed puppet frame using BYOpuppet 3D printed parts. Puppet inspired by renowned puppeteer Hansj✓rgen Fettig.
Photo courtesy of: Laurie Berenhaus
in the ability to create whole, infinitely customizable ‘actors’, who can transform easily from role to role with simple pops and clicks,” she says.76
Berenhaus originally began building puppets from traditional materials but has discovered that 3D printing opens up new possibilities in her workflow. “I found that, due to the manufacturing process that 3D printing allows, I could explore design that would otherwise have been either impossible or very difficult to produce,” says Berenhaus. “For me that was getting precise measurements, a lot of the molding and casting time was cut, and learning new materials – like the nylon plastic through SLS has a nice flexible feel to it, and it was lightweight.”
Berenhaus feels that 3D printing is best used in the later stages in the puppetry process. When developing a puppet initially she usually chooses to work with traditional materials. “You don’t get that immediate ‘thing’ as you would if you construct something quickly with cardboard and just play with it. That creative play is not where 3D printing stands – it’s later in the process when producing the physical item,” she says.
3D printing has solved a lot of practical problems in her creations too. For one, it can produce interlocking joints using exact measurements. She explains,
I was able to create forms that otherwise I would really struggle with. When I sculpt by hand I have a looser, rough flow that’s nice for puppet hands, heads, and feet, but I was always ‘off’ with my measurements for intricate joints.
Furthermore, using only one material helps to distribute a puppet’s weight more evenly onto its frame; some traditional methods may produce weak points in the structure that can be cause for concern during performances. She tends to like FDM for internal parts.
Lastly, it helps this artist with her city lifestyle.
From a practical standpoint I’m saving space – I don’t have as many molds in storage – especially with moving to [New York City] and having less space. I now have files versus boxes and boxes of molds. I’m also able to construct a piece without being dependent on other tools – like a bandsaw to cut wood or plastic. I can [make the piece] the exact size I want using a machine that takes up less space.
Michael Schupbach, co-founder of Puppet Kitchen Productions, says he is always finding new ways to use 3D printing in his puppetry work. “What’s nice about it is that it’s a burgeoning technology, which means there aren’t too many preconceived notions about what is right and what is wrong. You get to determine your own workflow.”
Puppet Kitchen is one of New York’s premier puppetry houses. Since 2008 they have been producing puppets and marionettes for some of the country’s highest caliber clients – from Broadway to opera to television, theme parks, exhibitions, and more.
Puppet Kitchen first began exploring 3D printing while working on a marionette named The Gunstringer for Twisted Pixel Games (see Figure 10.6). In order to get the exact likeness of the well-loved character, Puppet Kitchen used the original digital file from the game company to print the marionette pieces. After painting and rigging it to move, all that was left was to create some gloves and a hat out of real leather. 3D printing allowed this project to be created accurately and efficiently.

Schupbach finds that working digitally (in ZBrush) also allows for more detail in the final product.
One of the most time-consuming parts of our job is adding detail. It’s one of the things that really distinguishes quality – the more detail you can put into anything, usually the better it is, depending on the artistic needs of the project.
For example, when producing puppets that are realistic in nature, he can add pores, details on the nose, a gum line around the teeth, and other touches that help to customize the puppet and elevate the realism of the item (see Figure 10.7). Printing pieces on his Ultimaker also saves time (avoiding the steps of molding and casting) as well as allowing worry-free rescaling without having to rebuild the entire creature.
Even puppets made of felt or fleece may have a 3D printed nose or teeth. The puppeteers may choose to cover the 3D printed part with the same fabric as the puppet so that the piece feels more integral; a 3D printed nose may be covered in felt for a felt-covered puppet, for instance.

Figure 10.7 Fox puppet with 3D printed nose and teeth. Fox character is featured in the YouTube and Twitch shows Way of the Fox.
Photo courtesy of: Puppet Kitchen Productions
Puppet Kitchen has also been exploring creating kinetic puppets as print-in-place objects (see Figure 10.8) and experimenting with flexible filaments for elastic joints, jaws, and other moving parts.
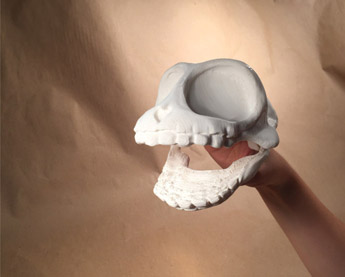
Figure 10.8
Print-in-place Jim Henson-style puppet skull.
Photo courtesy of: Puppet Kitchen Productions
In addition to producing printed parts, Schupbach finds that 3D modeling helps in many aspects of puppet creation. For example, organically shaped soft puppets made from flat patterns can take some trial and error to get right when building from scratch. With 3D modeling, instead of repeatedly experimenting with shapes cut from foam, Schupbach simply models the form virtually and peels apart the digital shapes into a flat pattern. It helps achieve a near-perfect fit every time (see Figure 10.9).
For aspiring puppeteers, Schupbach recommends gaining as much experience on a 3D printer as you can. “Getting to a 3D printer is now easier than ever. There are inexpensive models to buy and services like Shapeways or even some local libraries that provide printing services,” encourages Schupbach. “Try it out. Model some simple shapes and start printing. Once you get past the initial threshold of learning the equipment, the principles are simple. The whole world just opens up!”

Figure 10.9 Foam octopus puppet form and creator Michael Schupbach; made from pattern created with 3D modeling.
Photo courtesy of: Puppet Kitchen Productions
Emmy®-award winning Kamela Portuges, co-owner of Images In Motion Media, Inc. and Images in 3D (I-3D), a full-service production studio in Sonoma, California, uses 3D printing as another tool in her toolbox. Her team works with a wide variety of clients on a wide variety of projects – from Broadway to feature films to Pixar, a relationship lasting over 15 years (see Figures 10.10a–b). Thanks to 3D printing, “what would have taken me two weeks to sculpt, mold, cast, etc., I’m able to do now in three days,” says Portuges. “It’s definitely enhanced what I can do with my arsenal of tools.”
Portuges uses a LulzBot TAZ 6 for FDM and a 3D Systems ZPrinter 650 full color for GMB. For modeling, she uses Maya to block in a simple geometric form that she imports into ZBrush for final detailing.
Portuges likes to experiment with materials in the LulzBot (see Figures 10.11a–b). However, although exciting and innovative, she recognizes the materials have some limitations. For example, she explains, “the wood-based materials plug up the machine, and the metal-based ones shred the [nozzle] tips.”
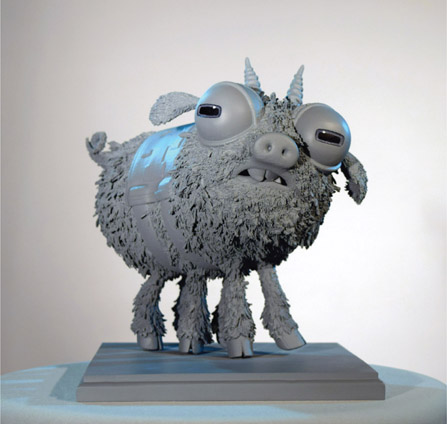
Figure 10.10a 3D printed maquette of Archie the Scare Pig from Disney•Pixar’s Monster’s, Inc.
Printed by: Images In Motion Inc.
Photo by: Lee Armstrong © Disney•Pixar

Figure 10.10b
Fully 3D printed puppet for Pushing Dead (2016).
Printed by: Images In Motion Inc.
Photo courtesy of: Tom E. Brown
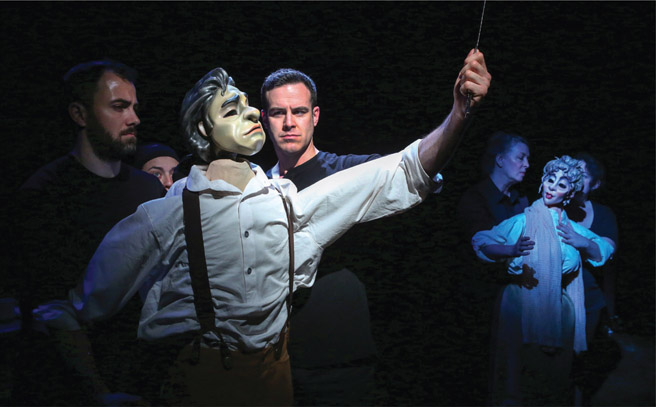
Figure 10.11a Sweeney Todd and Mrs. Lovett 3D printed puppet heads in wood composite filament for a workshop production of Sweeney Todd at the Eugene O’Neill Theater Center by the Puppet Art Theater Co. Each head took 30 hours to print at low resolution.
Printed by: Images In Motion Inc.
Photo courtesy of: Richard Termine

Figure 10.11b
Toby & Pirelli 3D printed puppet heads in wood composite filament (Toby has detachable printed hair).
Printed by: Images In Motion Inc.
Photo courtesy of: Richard Termine
She also admits that the GMB machines can be an expensive add to one’s budget: a 30lbs box of gypsum powder costs $1,100 (USD), each print head (CMYK + white) is $42, and the binder (or “infiltrant”) cartridges are $80 each for CMY, and clear and black are $250 each. Add that all together and it ends up being close to $1,000 (not including the powder) each time materials need to be replaced – which is often. In response Portuges advises, “Hollowing an object is really important. You don’t want to print solid with the powders, otherwise it will cost an arm and a leg.”
Animatronics
Just as marionettes and puppets benefit from 3D printing, so does the field of animatronics for themed entertainment. Themed characters are made from a variety of materials and consist of complex organic shapes. Using 3D printing as a step in the process can save time and money.
Garner Holt Productions, Inc. (GHP) is the world’s leading designer and manufacturer of animatronics, show action systems, dark rides, special effects for theme parks, museums, parade floats, themed retail environments, casinos, haunt attractions, and other interactive exhibits. Located in San Bernadino, California, Garner Holt founded the company when he was just 16 years old in the corner of his parent’s garage. Now his award-winning company owns and operates a 60,000-square foot design and production facility and handles the world’s most elite clients including Walt Disney Parks and Resorts, Universal Studios, Cedar Fair Entertainment, Chuck E. Cheese Restaurants, and even the United States military and NASA. 3D printing and scanning technologies have quickly become an integral part of the company’s daily workflow.
“We’ve had relatively good success with 3D printing. We’re very pleased with the results and the efficiencies that it has given us in so many different ways. It’s a tool that we can use to be better, faster, more accurate, and have less mistakes.”
Garner Holt, President and Founder of Garner Holt Productions, Inc.
GHP’s design process often begins with creating the character, creature, or animatronic figure as a 3D model (see Figure 10.12) or from a 3D scan of a signature object provided by the client.
After a figure’s on-screen creation, it is sent to the 3D printing lab and printed as a maquette to present to the clients at design meetings (see Figure 10.13). “Our clients can be sent a physical object that they can hold in their hands and double check,” says Holt. “Even though more and more people are used to it, it’s still hard to see everything on a computer screen. It’s not like having a real object that you can hold and put lighting on.”
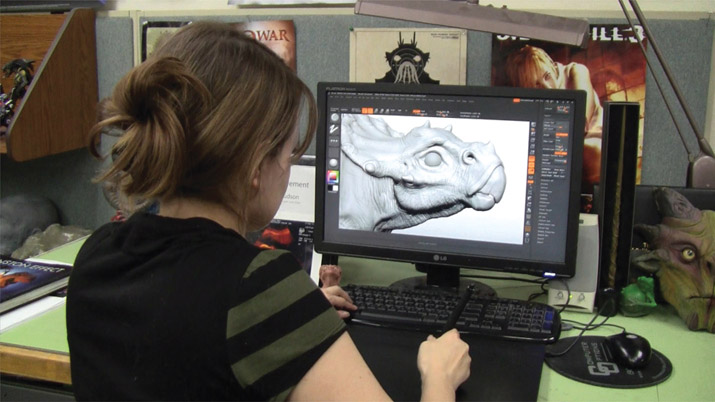
Figure 10.12 3D modeling of an animatronic character.
Photo courtesy of: Garner Holt Productions, Inc.
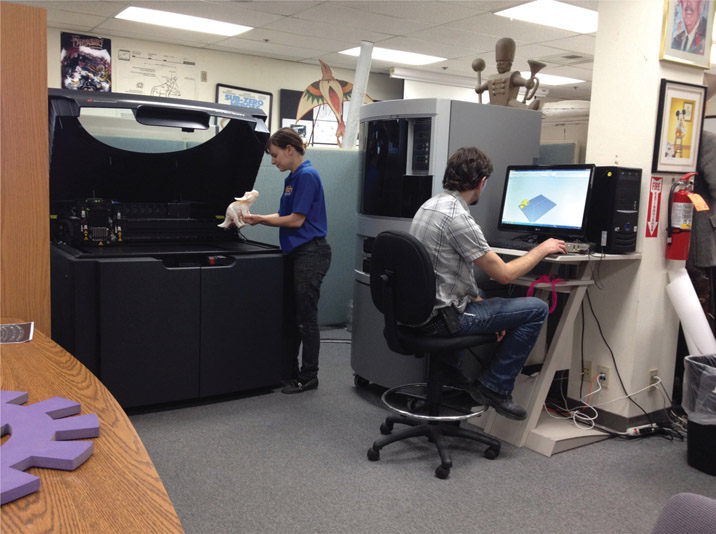
Figure 10.13
Maquette being removed from the 3D printer.
Photo courtesy of: Garner Holt Productions, Inc.
GHP works from two in-house printers: an FDM machine using ABS (Stratasys Dimension Elite) and a polyjet machine capable of printing from 17 different materials (Stratasys Objet Eden 500V). Typically the polyjet machine is chosen for its higher resolution (up to 16 microns, which allows build lines to virtually disappear) as well as its large build chamber (big enough to print a human-sized head). The FDM machine has a smaller build volume, but is chosen when sturdier parts are required. A full-size human head (a common print for this animatronic fabricator) at its finest resolution takes approximately 40 to 60 hours to grow (GHP’s word lovingly used instead of “print”).
Once the printed maquette is approved by the client, the file gets sent to an on-site KUKA robotic arm which subtractively carves the exact same item from a piece of foam in full scale (see Figure 10.14). Holt says,
If we show our client this elephant [maquette] printed here, and we take that same file to the KUKA, it’s going to be literally the same piece – within millimeters! – just instead of 18 inches long, it will be 18 feet long. Our clients appreciate getting a maquette from us that they know will be the exact same piece when enlarged.
Depending on the figure, the KUKA arm may have some slight limitations on very fine detail. At this stage the GHP sculptors may decide to make some touchups to the foam item, such as refining tiny wrinkles and other fine features (see Figure 10.15). Lastly, a mold is created from this foam model in order to build the skin for the final figure.
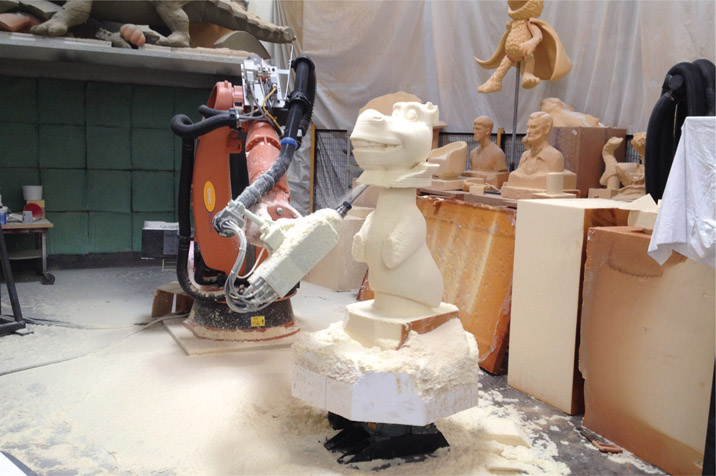
Figure 10.14
KUKA robotic arm in process, carving figure out of foam.
Photo courtesy of: Garner Holt Productions, Inc.

Figure 10.15 Sculptor refining details on elephant foam sculpture.
Photo courtesy of: Garner Holt Productions, Inc.
“In the old days they used to build a maquette of a parade float that was 24 inches long. Then they would put the actual float out in the middle of the shop and stand there and try to build the real thing. It just wasn’t possible to build it exactly the same. This process fixed that. Now we can go from a screen to a physical object that’s small for a test. Then we can carve it in pieces to enlarge it, and it will be exactly the same as the object we had in the computer.”
Garner Holt, President and Founder of Garner Holt Productions, Inc.
Not only does this overall process save hours in an increasingly crunched time frame, but it also helps the sculptors skip some of the laborious parts of their jobs. Holt asks,
Do you really want to take a bunch of blocks of foam the size of a car and put on a mask and whittle on those all day just to get the basic shape of an elephant? Wouldn’t it be great if I had this machine that just gave you the basic shape of an elephant so you can go in and do all of your sculpting and detailing and fine art?
Occasionally other steps get added to the process. For example, to test an object’s range of motion, before a final maquette is produced (which will be made of hard, stiff materials) an even smaller version of the figure is printed that will be molded and poured with the final intended skin materials – like a flexible material. This allows the team to see how the figure will look while moving – mouth opening, eyes moving, etc. Working on the smaller item allows mistakes to be caught and changes to be made before moving onto the full-blown maquette stage.
The reverse is also true. Some items may be hand sculpted in clay and then 3D scanned into the computer (instead of created from scratch in a modeling program). Living people may also be scanned using GHP’s large 3D scanning rig.
GHP also chooses to send some items out to be printed by service bureaus – metal items, in particular. Custom framing pieces and mechanisms used directly in the figures for internal animatronic skeletons are some examples. According to Holt, “It’s good for parts that are very complex to machine.”
Although GHP has a lot of success with 3D technologies, there are a few instances where they stray away from 3D fabrication. For example, a figure’s hands are traditionally still created through the life casting process. “When you scan somebody’s hands you lose resolution,” Holt explains.
And then you print the hands … and you lose resolution. So, you’re always losing resolution. There are a lot of things that make a hand, a hand. If you cast somebody’s hand in alginate and you pour it in wax and pull it out, it will literally have the fingerprints on it. It’s that detailed.
Artem, Ltd. also uses 3D printing for animatronics. They also find it useful for complicated mechanical parts – “especially if we’re making a complex animatronic creature or something that needs specific mechanisms in very tight spaces,” adds Richard North, Robot CNC and Digital Supervisor for Artem. “Some things are really difficult to make with a mill. It’s much easier to print a solid plastic part.”
One of the remarkable things about this technology, according to North, is that a full animatronic creature can now be designed using various CAD software and checked virtually for mechanical functionality before its physical creation, which was not possible with previous processes. For example, a creature head sculpted in ZBrush or Freeform can be exported to Solidworks (or similar) and all of the mechanical design informed and constrained by the form of the sculpt. Servo motors, mechanisms, and the chassis can be virtually assembled and even animated. Then all of the pieces can be sent to the printer or CNC machine simultaneously. Hours later everything is ready to assemble. “It cuts out multiple days of someone in a machine shop, and the design can be changed at almost any stage before fabrication,” he adds.
Depending on the project, Artem may also use 3D printing to create maquettes for client presentations. It enables the client greater understanding of the object; they can turn it, move around it, and look at it in the daylight – instead of on a two-dimensional computer screen. “It really helps the design process and the collaborative process,” North explains. “And goes a long way to encourage trust from the client.”
Reverse engineering for maquettes is also a technique used by Artem. A traditional sculptor may begin by creating a small 12-inch maquette out of clay. The maquette is then 3D scanned and further tweaked in the computer in order to produce renderings for the client.
This method can ease a myriad of problems. For example, symmetry is an extremely time-consuming issue in traditional sculpting – it can take days to perfect. By using this technique, the sculptor can sculpt the maquette as a whole and pick which side he or she thinks is the best. Once the maquette is scanned into the computer, the designated side can be easily mirrored to produce a symmetrical object. Then the finished item can be printed as a finalized maquette to show the client; it will still have a hand-made quality – complete with the fingerprint marks in the clay, but be exactly the end-product the client will receive. After final approval, the file is sent directly to their in-house KUKA robotic arm, which can sculpt the exact replica out of foam at any size.
Reverse engineering also saves time in fine detail work. For instance, a sculptor can begin by creating a clay maquette for an animatronic figure. Once it is scanned into the computer, digital sculptors can add small details that might take a traditional sculptor a lot of time to produce well, such as hair, pores, and fine wrinkles. Minute details such as these can essentially be potato-stamped on the virtual model, making it a much faster technique.
Other times, a traditional sculptor may create a small, basic character maquette to develop a good silhouette or pose. Once approved, this maquette can be 3D scanned and sent to Freeform for cleanup and scaling. Instead of full scale, Artem will make the object slightly smaller – a negative surface offset of about 10mm (less than half an inch). It can then be cut on the KUKA robotic arm in a dense foam. Once this larger object is carved, its surface is then covered with clay so the sculptor finishes the detail of the model by hand before it goes to mold. This technique allows the sculptor to focus on the final look of the piece, rather than spending days carving the object’s basic shape.
Artem uses several types of 3D scanners. In addition to a small desktop model, they also use a ZCorp ZScanner 700 laser line scanner that requires reflective dots placed on the target and is suitable for items between the size of a basketball and the size of a car. They also have a structured light scanner (a David 3D Scanner), which scans an amazing level of detail. It even detects the fingerprints on a hand scanned from 18 inches away. It can scan anything as large as the side of a car to as small as a penny.
“It’s useful that this kind of technology is becoming so accessible. [For a young designer] it’s much easier to get your head around simply printing something out rather than how you would manufacture a complex part traditionally.”
Richard North, Robot CNC and Digital Supervisor for Artem
Although Artem uses 3D printing a lot, for designers new to the 3D printing process North cautions, “It can be a bit of an overused tool. There’s definitely still a place for practical skills.” For example, he adds, if you need to make a box, it is overkill to model and print a box when it can be quickly and easily built from traditional materials.
“[Design] needs to be a blend. And it needs to remain a blend,” he says.
If you get too complacent and you rely on one technology too much then something is lost. You may end up with inferior results because you’re not able to blend a more traditional way of working with this new technology. There’s a risk that everything you make will look “printed.” Always think, “is it possible to manufacture this in any other way?” There’s a danger to restricting yourself to just one tool.
“Avoid thinking that 3D printing is your get-out-of-jail-free card. You still need to understand materials, strengths and weaknesses, where you need to make things more traditionally, etc. If you have a passion for making things it would be remiss of you to focus on just one element. Diversify and broaden your skillset.”
Richard North, Robot CNC and Digital Supervisor for Artem
Stop-Motion Animation
3D printing has also made its mark on stop-motion animation. The repeatability needs, sturdiness requirements, and painstakingly subtle altered faces make stop-motion a logical choice for 3D modeling and printing.
Interesting Fact!
Star Wars: The Force Awakens (2015) used 3D technologies to recreate the famous “Holochess” (hologram chess) game (known as Dejarik) from the original 1977 film Star Wars: A New Hope.
“In The Force Awakens, new character Finn leans on a familiar table in the Millennium Falcon and unintentionally activates a game of Dejarik,” writes 3Dprint.com author Scott J. Grunewald.
“The new Holochess scene picks up right where it left off almost forty years ago, and as it turns out it was even created by the original animators using the same stop-motion techniques used on the original production. Recreating a stop-motion scene from forty years ago turned out to be quite an undertaking, and it required the use of several modern technologies including 3D printing, 3D scanning, and photogrammetry to accomplish. While the original bit of animation took a little over a week to complete, thanks to the need to find and recreate the original models, as well as special effects legends Phil Tippett and Jon Berg’s packed schedules, the new scene took Tippett Studio a full year to produce.
With [director J.J. Abrams’] commitment to using as many practical special effects as possible, and trying to recreate the retro-future feel of the original films, he approached Tippett with the idea of recreating the Holochess gag. He wanted the game to match the original, even down to the look and feel of the stop-motion process used to animate the game. In order to recreate the past, the first step was to see if they could locate the original puppets from the 1977 production. Thankfully Lucasfilm Ltd. LLC has a pretty massive prop archive and the Tippett staff was able to find four of the original figures that had been mounted on a game board as a gift to [George Lucas, franchise creator] after production wrapped. Two of the figures had been purchased by Peter Jackson [of The Lord of the Rings fame] at an auction, and the Weta Workshop facility was happy to provide highly detailed 3D scans of them. Sadly, the remaining two pieces were nowhere to be found, having been purchased by non-disclosed buyers years earlier.
In the 1970s most props, much less stop-motion puppets made from foam and Sculpey clay, weren’t really built to last very long, so unfortunately the team at Tippett had a lot of work ahead of them. The four figures found in the Lucasfilm Ltd. LLC archive were turned into highly detailed 3D models using photogrammetry.… The remaining two figures that were unaccounted for needed to be reconstructed digitally using original production photos. All of the newly created digital assets were then brought into ZBrush where they were repaired and had any lost or damaged details recreated…
After being given the go-ahead by production, the maquettes were then 3D printed in resin by San Francisco-based 3D printing company Moddler. The team, including head puppet fabricator Frank Ippolito and armaturist Brett Foxwell, took the 3D printed statues and went about fabricating the recreations of the original puppets. First the resin statues were turned into a mold, and once the new articulated armatures that would allow the puppets to move were carefully placed inside of the molds they were filled with a soft and flexible silicone material. After all eight of the game pieces were cast in silicone they were painted to match the original figures and sent off to be filmed.”77 (See Figure 10.16.)

Figure 10.16 The completed recreations of the original Holochess pieces. ™ & © Lucasfilm Ltd. LLC.
Courtesy of: Lucasfilm Ltd. LCC
In stop-motion animation, often hundreds of thousands of different replacement faces – each with different mouth and eye positions – are produced in order to achieve creative facial expressions that smoothly transition throughout a film. This is called replacement animation, where a new face with a different expression is used for every moment of film. “For just one second of a facial expression or word, for example, upwards from twelve to twenty-four different changeable faceplates could be required.”78 Up until now an artisan had to create each one of those different faces and other body parts, typically by sculpting them out of clay. Each face had to be carefully handled as they were switched out every few minutes for each shot. Any time one got ruined or damaged, a new one would need to be sculpted again; many spares were needed.
The ease of 3D printing now allows the creation of an even larger array of varying facial expressions that are easily replaceable and not nearly as fragile. LAIKA Digital in Portland, Oregon has become a leader in the field – creating innovative 3D printed characters for multiple Oscar®-nominated full-length features. The president and CEO of LAIKA, Travis Knight, describes 3D printing as “the tip of the innovation spear.”79
“We struggled with it at the beginning. It’s counter-intuitive for an animator – they’re having to separate out facial animation from the body animation. They have to make decisions on what the face performance is going to be days if not weeks before they’re out there shooting.” 80
Brian McLean, Director of Rapid Prototyping, LAIKA
LAIKA’s Department of Rapid Prototyping’s first foray into 3D printed characters was in 2009 for Coraline, considered the first-ever 3D printed stop-motion feature film. An industrial PolyJet printer from Objet, capable of printing resin layers as thin as 15 microns, was used to create the characters’ many facial expressions in the movie (see Figure 10.17).
Interesting Fact!
Thanks to the advancing technology of 3D printing, the main character in Coraline had the potential of over 207,336 different facial expressions. By comparison, Jack Skellington from 1993’s popular stop-motion film, The Nightmare Before Christmas, which used traditional sculpting techniques, had the ability to have only 800 possible expressions – which was considered a breakthrough at that time.
LAIKA estimates that without the use of 3D modeling and printing that Coraline would have taken ten sculptors four years to complete with the same accuracy.
The printer used for Coraline did not print in color. Therefore, each one of the faces and its features were hand-painted. In fact, the number of freckles on Coraline’s face was negotiated with the director because an artist had to paint each one on every face. The freckles were designated by physical indicators on the print in order to keep their placements consistent.

Interesting Fact!
LAIKA’s use of the 3D printer for stop-motion animation is groundbreaking work. It is considered the first time ever that any industry has used 3D printing for mass production.
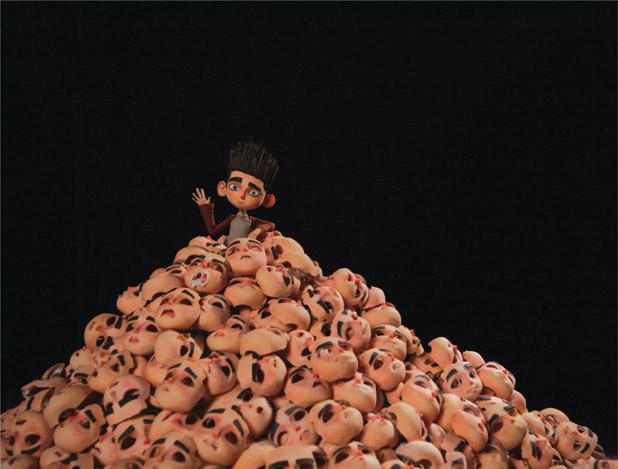
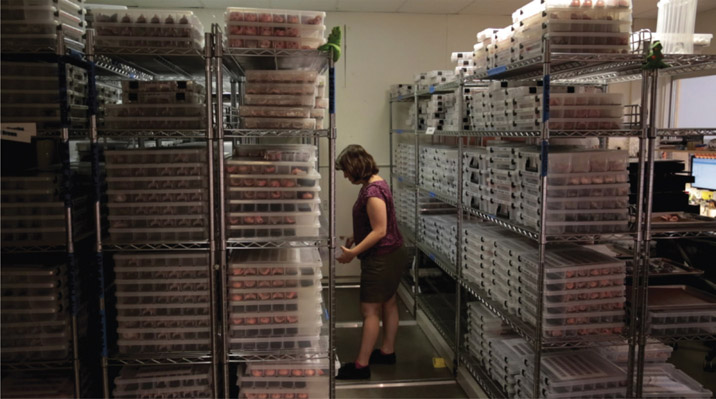
Figure 10.18
Pile of faces with ParaNorman’s protagonist, Norman.
Photo courtesy of: LAIKA
In 2012, LAIKA continued its success for the stop-motion film, ParaNorman (see Figure 10.19). This time they used a full-color, industrial powder binder printer (see Figure 10.20) using a plaster-like media (the ZPrinter 650 from Z-Corp, now sold as the 3D Systems ProJet 660). Each layer of resolution is between 0.89mm (0.035”) and 0.102mm (0.004”) thick, producing incredibly fine detail.
Color printing allowed for ParaNorman’s freckles to be much less problematic than Coraline’s. Painting the thousands of freckles for ParaNorman by hand would have been unfathomable and impractical (see Figure 10.21). Brian McLean, LAIKA’s Director of Rapid Prototyping, says
By using a color 3D printer we were not only able to push facial performance to new levels, but we were also able to achieve a level of detail and subtlety in characters’ faces that a few short years ago would have seemed impossible. 81


Figure 10.21 Freckles being developed for the character Neil Downe from ParaNorman.
Photo courtesy of: LAIKA
“Here’s a recipe we used for the film, ParaNorman. We started out with 8,000 lbs. of printing powder, 77 gallons of Super Glue, 300 puppets, 40,000 faces, 50 stages, 5,000 X-ACTO blades, 66,400 rare earth magnets, 729 sheets of sandpaper, 2 gallons of white resin, 25,000 purple Nitrile gloves (for safety reasons), [and one] massive warehouse. Put those altogether and bake for 127 human years. You got yourself a stop-motion feature.” 82
Kingman Gallagher and Morgan Hay, Rapid Prototyping Leads at LAIKA
For ParaNorman, LAIKA developed an even more creative way to achieve more expressions than with their previous film – the faces could be segmented into pieces. The animators can choose which kit they require – mouth, eyes, face, eyebrows, etc. in order to achieve the desired look.
The kits are stored by a “face librarian” (see Figure 10.22) and grouped into expressions called things like “up surprised eyebrows” or “frown mouths.” These pieces can all be mixed and matched to create a myriad of expressions. “It’s sort of like a very fancy Mr. Potato Head,” laughs McLean (see Figure 10.23).83
Each piece of the face attaches to the characters’ heads with magnets (see Figure 10.24). Seams created by where the pieces fit together are removed in post-processing by LAIKA’s “seam team.” The result is that the hero, Norman, is able to express himself in over 1.5 million ways! In fact, for Norman’s face alone, 9,121 individual parts were printed producing over 8,000 unique expressions.


The animators even created unique prints, such as two faces on one head or a blurred “animation smear” (see Figures 10.25–10.26), to simulate an innovative fast-motion blur effect. ParaNorman was the first stop-motion animation movie to use these kinds of out-of-the-box techniques.
The use of full-color technology vaulted ParaNorman into a whole new class. Although the technology was still slightly limited in color range, no longer was an artisan required to paint each expression individually. Thanks to full-color 3D printing, the stop-motion animation process became much quicker.
However, LAIKA found that during mass production the color was not always consistent from piece to piece – especially in regards to skin tone. To circumvent this problem, LAIKA used a book of Pantone colors and printed each color one by one to discover which colors could be created most consistently by the printer. The most successful colors were the ones used as the film’s color palette. After each print, the faces were compared to a color chart to assure accuracy and, most importantly, consistency (see Figure 10.27). In addition, dipping the powdered faces in Super Glue (cyanoacrylate resin) helped to not only strengthen the piece, but also made the colors more vibrant. This depth of color gave the characters’ skin a soft, humanlike glow when backlit.


Figure 10.27 Printed faces being compared to color charts by Brian McLean, LAIKA’s Director of Rapid Prototyping.
Photo courtesy of: LAIKA
As for texture, powder binder printers produce objects with a less crisp surface finish, unlike the smoothly surfaced resin printers used in Coraline. In order to embrace this quality, LAIKA applied that same slightly “fluffy” texture to the rest of the film’s environment. The result was a cohesive soft, hand-rendered look shared between the characters and the scenery.
“Jack Skellington from Nightmare Before Christmas has replacement heads [from] when they were hand made. You can see them. They can only get a certain amount of consistency when they’re hand made. So, you can see them jerk around and stuff. That’s why it really helped in the design of those characters in that world that there was a certain simplicity to the head shapes. Our characters have a more caricatured or more realistic look to them and much more complex shapes to them. Only by doing it by computer, printing it out, could we have kept the performance consistent… having the ability to print more faces just allowed us to add more subtlety to the character’s performance.” 84
Anthony Stacchi, Director The Boxtrolls
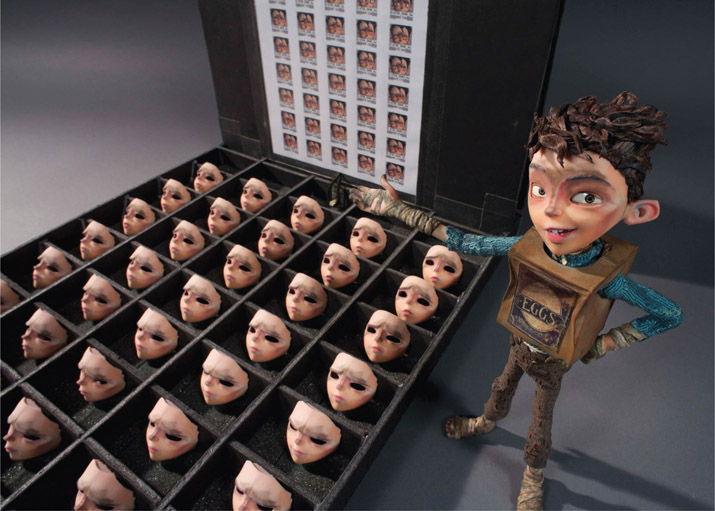
In 2014, LAIKA released The Boxtrolls, which used the same advanced facial techniques as ParaNorman (see Figure 10.28). The magnetized 3D printed facial kits that produced such success in the previous film were once again created and refined. For The Boxtrolls, 52,000 face pieces were created – far more than Coraline’s 20,000 pieces or even ParaNorman’s 33,000. The Boxtrolls took animation even further by animating Eggs’ face (the protagonist) in an even more advanced fashion (see Figure 10.29). “We’re getting so much more tension and musculature and volume change,” McLean explains. “We’re animating almost every square millimeter of Eggs’ face, whereas with Norman we essentially had the mouth moving and some cheek movement.”85
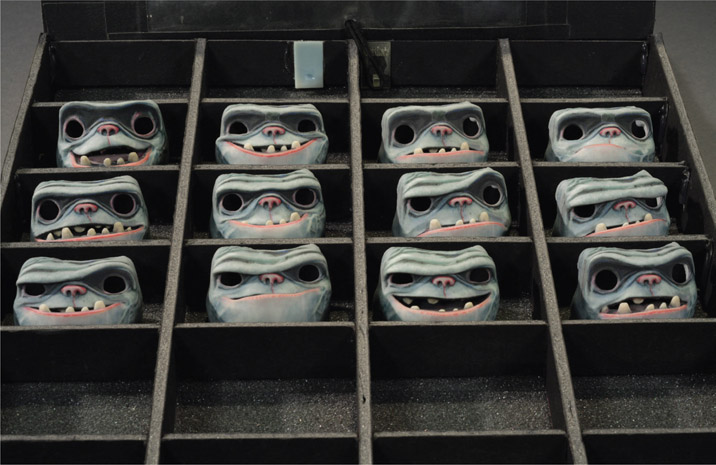
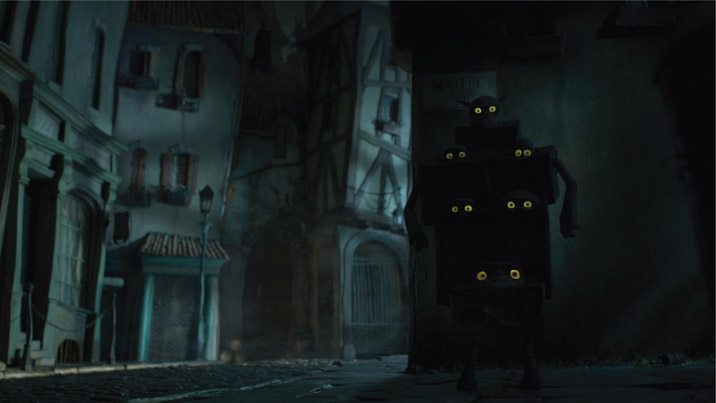
Additionally, miniature mechanics were mounted inside the puppets’ heads to allow for even more precise control of the character’s eyeballs and eyelids. The boxtrolls themselves also had small LED lights mounted inside their eyes so that their eyes could glow during nighttime scenes (see Figure 10.30).
Occasionally, one-off expressions, called “specialty faces,” were created for very specific moments in order to heighten the theatricality. For example, animating the scene in The Boxtrolls where Archibald Snatcher’s face swells drastically from his cheese allergy created many unique prints that would only be used for that particular scene. The design team wanted his face to have a real “fleshiness” with a feeling of weight and bounce about it that would not be used in other moments of the film. Unique half-head faces were also created for the boxtrolls for any scene where the creatures hid inside their boxes.
The faces were printed with the same industrial powder binder printer using gypsum powder as ParaNorman (see Figure 10.31). Post-print the faces were finished by using the following process: sanding the rough edges and inconsistencies, a dip in Super Glue for added strength, a gloss coating called Crystal Clear (which protects the item without yellowing), and, finally, a quick bake in the oven for final setting.

Although the printer used allows for five-color mixing, as with ParaNorman, some color inconsistencies still existed. “It’s like printing the same photograph on a hundred different pieces of paper and using that as a flipbook – you’re going to see crazy color differentiation too,” says McLean.86 Each new face was compared with the other faces to inspect for color variance between camera shots. “The testing process is very much an analogue one,” says McLean, “with a head on a stick and locked off camera to capture each frame and toggle back and forth to see if colors match.”87 For quick fixes on set, pastels were crushed into powder form and used to brush over inconsistently colored skin tones.
Humidity can also play a role in inconsistent color printing – a problem in rainy Portland, Oregon where LAIKA is located. Therefore, information on humidity, daytime temperature, and printer maintenance status were tracked and cataloged with each printed piece so that identical parts could be replicated at a later date.
Although color problems existed, the technology was still advancing with each new LAIKA film. The colors in The Boxtrolls are more vibrant and accurate than ever before. This was a step above even the achievement of simple rosy cheeks on ParaNorman, which was unachievable with Coraline’s technology. Furthermore, a subtle cross-hatching and layered color texture was used on the faces in The Boxtrolls which resulted in an ever-so-slightly translucent quality that more accurately emulated human skin. In fact, the advancement of 3D color technology had come such a long way that LAIKA was even able to print a set of special faces for Eggs, which filled Eggs’ face with a progression of pinks and reds when he blushed.
“We are taking advantage of computer animation in that we can choose unbelievable subtlety. We can choose to just move a tiny amount of the lips, and when you print that out that can show up. One thing that replacement animation has been used for is broad expressions, but the subtlety was always near difficult to capture because these things were hand-sculpted. But because we’re harnessing the power of the computer, we have the benefit of getting the subtle expressions combined with the broad expressions.” 88
Brian McLean, Director of Rapid Prototyping, LAIKA
Another challenge to The Boxtrolls was that the scale of the faces was much smaller than that of ParaNorman because the characters’ heads were much more proportional to the body. Eggs’ head is about the size of a ping-pong ball, while Norman’s head is about the size of a small apple or orange. This made the demand to maintain detail that much more difficult. This also affected production. Depending on the size of the face, for small characters such as Eggs, LAIKA could print 100 to 150 mouths a day on their five printers. Some larger characters only allowed for the printing of 12 pieces a day! (see Figure 10.32).

190 puppet bodies with 200 different costumes were created for the film, although some characters were replicated. Twenty-eight Eggs puppets were created, and 15 to 20 of each main boxtroll character, like Fish and Shoe. Some puppets were duplicated because they were needed on different sets at the same time, while others were created with different ranges of motion. For example, the Eggs puppets in the action scenes needed more articulation than others.
The Boxtrolls was a conceptual idea for over a decade, but actual production took approximately two years to complete. Once a puppet is on set and a new face is snapped on, animators make an adjustment for every 24th of a second of film. For every eight-hour workday in the studio, 2 seconds of screen-time is completed. One week averaged about 3.7 seconds of actual footage. The goal was typically shooting four scenes per week.
During production, LAIKA experimented with ways to create printed items that withstand the test of time (shooting can take up to 18 months or more – the hot lights and constant handling can be brutal on the faces). In fact, since the time of ParaNorman, LAIKA switched from halogen to an entirely LED lighting rig to help save on heat, energy, and keep the sets, props, and animators from melting under the hot lights. The design team enjoys the programmable color control available from LED fixtures too.
3D scanning also plays a role in LAIKA’s process. During the start of production, hand-sculpted puppets are the very first items that are made. These are then scanned and imported into the modeling software (Maya and ZBrush) for additional detailing. “We actually exaggerate a lot of the details in there,” explains McLean, “the scan data and 3D printer softens things so the model needs to overdrive a lot of the detail.”89 Once that process is complete, the models are ready for printing.
Interesting Fact!
In 2016, LAIKA’s Director of Rapid Prototyping, Brian McLean, and former Facial Animation Designer, Martin Meunier, were honored with a special technical award from the Academy Awards® for “pioneering the use of rapid prototyping for character animation in stop-motion film production”.90
In 2016, LAIKA released its next masterpiece, Kubo and the Two Strings. However, this film’s design posed some initial limitations. “We had worked through limitations on the past three films,” says McLean, “but when we saw some of the character designs on Kubo and the Two Strings, and we looked at particularly Monkey, Beetle, and this Moonbeast character, we realized the existing technology that we had been building over the last several years was not going to work.”91 The hard-edged nature of these characters would have required alterations in the design with their previous methods of printing. It was either that or choose to work with a new fabrication method.
Always continuing to innovate, LAIKA reached out to Stratasys and their R&D facility located in Israel to collaborate on new technology that would work for the film. In the end, they decided to use the multi-color Stratasys Connex3 PolyJet machine. According to McLean, “the hardware ‘is amazing. But the software that they had developed to run the hardware was not going to work for us.’”92 With approval from Stratasys they created their own software to run the machine.
The results were characters that feature the subtlety of a combination of over 22 million different facial expressions – far exceeding the previous 1.5 million possibilities. “The Kubo character alone had 11,007 unique mouth expressions and 4,429 brow expressions, allowing for over 48 million possible facial expressions.”93 With the help of Stratasys, “we found a new way to print with plastic … and reached a [greater] level of color and sophistication in a plastic-printed 3D part,” says McLean (see Figure 10.33).94

However, there are still some limitations to the technology; the Connex3 can only print three colors at once, which limited the color palettes per character. However, by using clear plastic, translucency became an option – which acted as almost an additional color. Along with varying the color temperature of the lighting fixtures on set, a wide array of hues was achieved.
The use of this new technology enabled LAIKA to create their first ever 100% 3D printed puppet – a creature called the Moon Beast, made up of 130 3D printed parts. If the Moon Beast was scaled to human-size, it would be 73-feet long. McLean states
One of the down sides to doing Moon Beast is that he’s so large that you need to animate him very slowly, so there’s a lot of subtlety in its body movement and its facial movement, so [it’s] a lot of … shots, we needed to produce 24 faces for every second of film, but we could only print 20 faces in 40 hours. So, every second of film – we were almost spending 60 hours printing time for one second. [That’s] something like a year and a half of straight printing time. 95
LAIKA also experimented with scale on this production – one scene required a 200% scale of Kubo’s head to capture an extreme close-up of a tear trickling down his face. “It’s one thing to zoom into an object and make one face look good,” says McLean, “[but when replacing a different face part every frame] any inconsistency with the geometry, or color, or even the surface texture would translate into some chatter and noise.”96