2. Basic Principles of 3D Printing
All 3D printing works on the same basic principle, but there are several variants and sub-variants. In this chapter we’ll explain the basic principle and then go on to discuss the variants.
How 3D Printing Works
Before you can 3D print an object, you need a 3D computer model of the object. Many programs are available that can produce suitable models. For example, you can use engineering and design software such as AutoCAD or Inventor from Autodesk, SolidWorks from Dassault Systemes, or Solid Edge from Siemens PLM Systemes.
Okay, so you can’t afford several thousand dollars’ worth of engineering software. No problem; Autodesk has free software that you use online at www.123dapp.com. This even includes a killer app called 123D Catch that will produce a 3D model using 20–30 digital photos from an ordinary camera, tablet, cell phone, and so on.
Note
You can also download thousands of existing models from a number of websites. This is probably the easiest approach if you just want to see your new printer working right away. The flip side is that you don’t even need a 3D printer. There are a number of online service bureaus. You upload your model—often as easily as clicking a “3D Print” button in your design app—and they ship you the part (for a nominal fee, of course). We cover both the engineering software and the 123D products in later chapters.
Layered Approach to 3D Printing
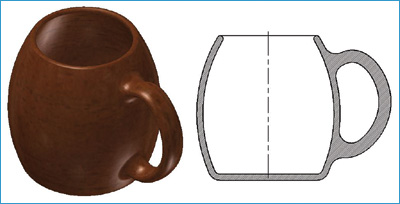
One feature of the 3D modelling software is that it can generate flat 2D drawings of 3D models, such as the cross-section views shown in Figure 2.1.
In a nutshell, that is the essence of 3D printing because all 3D printers work basically the same way. Their software takes in the 3D model from your design software, creates a cross-section view just a hair’s width up from the bottom of the part, and then prints it as a paper-thin layer of solid material onto a flat platen. The print head lays down a very narrow stripe of material as it traverses back and forth, advancing sideways a tiny amount between each traverse.
Note
The only difference between all the brands and models lies in the type of material they use and how they print it. We’ll have more on this later in this chapter.
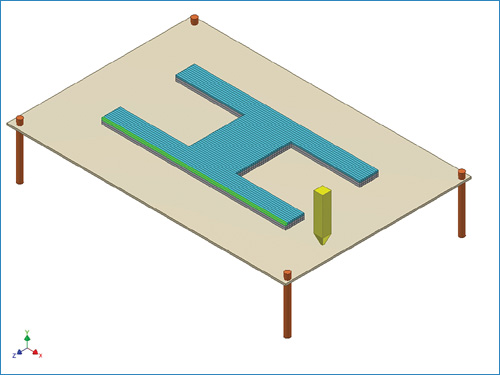
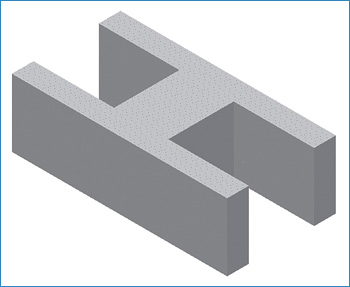
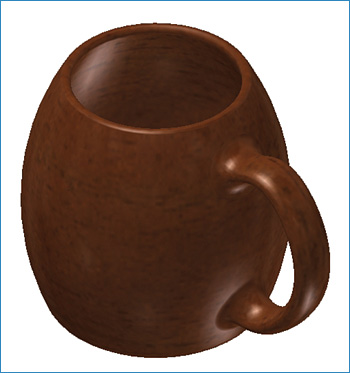
Because the printing sequence for the mug shown in Figure 2.1 is more complex, let’s begin by examining a simpler model of the letter H.
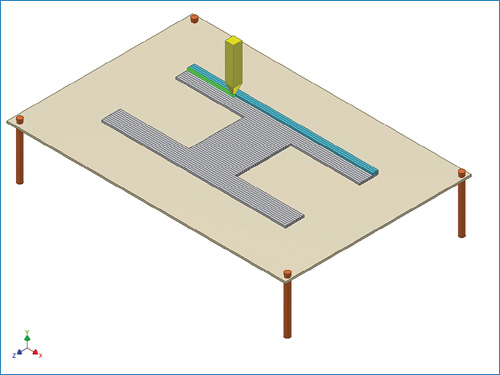
Figure 2.2 shows the first three stripes in blue while the yellow print head is working on the fourth stripe, shown in green. In the real world all stripes would normally be the same color and would not have dark edges. I added the edges and the green to make the stripes more obvious.

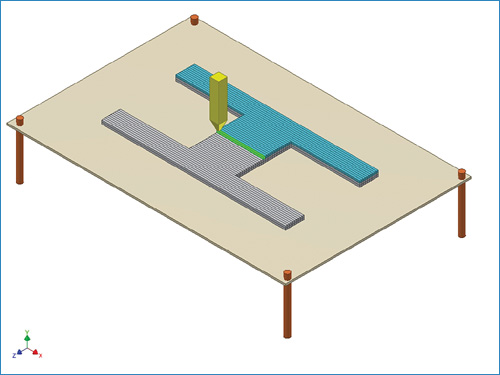
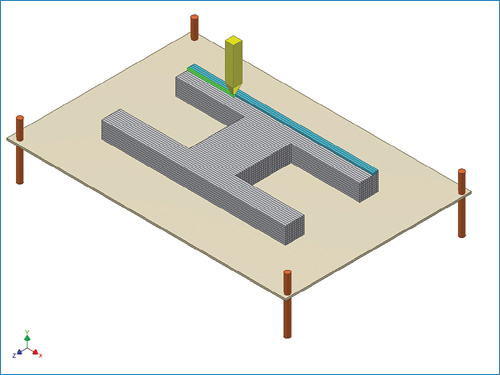
Figure 2.3 shows the half-finished first layer. The print head is working from right to left on the green stripe.

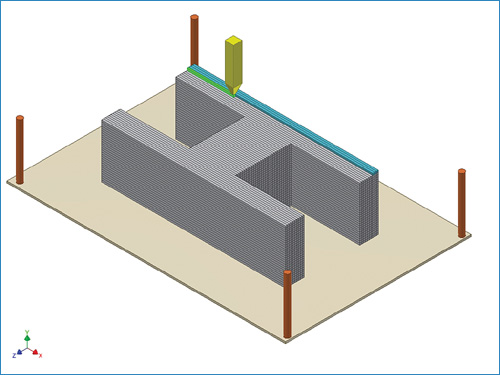
Moving right along, Figure 2.4 shows the completed first layer.

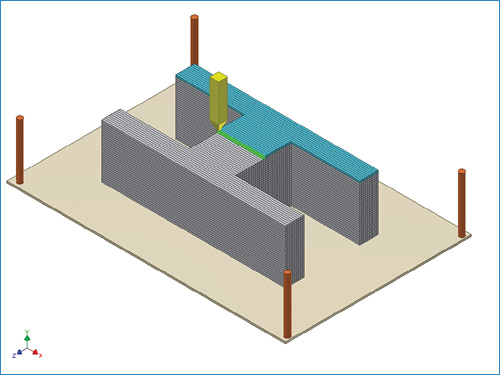
The printer lowers the plate with the first layer on it by an amount equal to the thickness of the layer and moves the cutting plane in the 3D model up by the same amount. It then prints the new cross-section on top of the previous one, as shown in Figure 2.5.
Tip
Once again, for clarity, I’ve changed a color. The edges of the stripes remain dark, the current stripe remains green, and the current layer remains blue, but previous layers are light gray.
The process continues. Figure 2.6 shows the half-finished second layer, and Figure 2.7 shows how the first two layers look when finished.


The process repeats, layer after layer, as shown in Figures 2.8–2.19, as the part seems to grow downward from the print head.


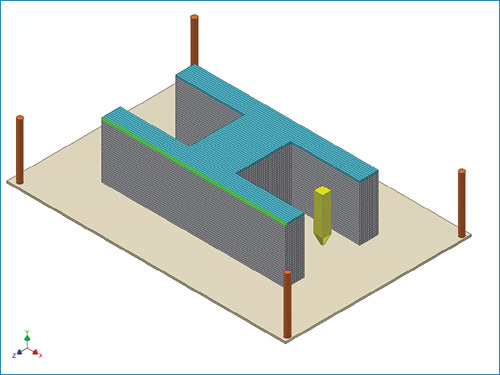
I won’t bore you with figures of every layer being created, so we’ll jump ahead a bit to the tenth layer being started in Figure 2.11.
If you want to get a better feel for how the 3D printing process operates, all you need to do is to tear the preceding pages out of the book, cut out the figures, and staple them together to make an animation flipbook. When you’re finished, go buy another copy of the book because you just ruined the first one.
The next morning we can remove the finished part from the 3D printer, as shown in Figure 2.20.
Printing Time for Layers
“Did you say ‘the next morning’?” That’s right; the average 3D printer operates somewhat slower than your average laser printer, and they are often left running overnight. A significant point here is that printing time is not usually a function of the complexity of the part or of its width and length (within the machine’s capabilities).
Instead, printing time depends mostly on the thickness of the part. Your car speedometer shows miles and/or kilometres per hour, but 3D printer speeds are typically in the range of an inch per hour in the vertical direction. Realigning the part before printing so that its shortest dimension is in the vertical direction can often significantly reduce the printing time.
Tip
For simplicity and ease of creating the figures, I made each layer identical. However, in the real world most 3D printers lay down succeeding layers in alternating alignments to minimize the possibility of “grain” effects in the final part.
Figure 2.21 shows this process in the first two layers of our previous example. The third layer would then be applied in the same direction as the first one, and this would repeat all the way through the part. If this was not done, then the part could easily be much weaker in one direction than another, much like the grain in a piece of wood.
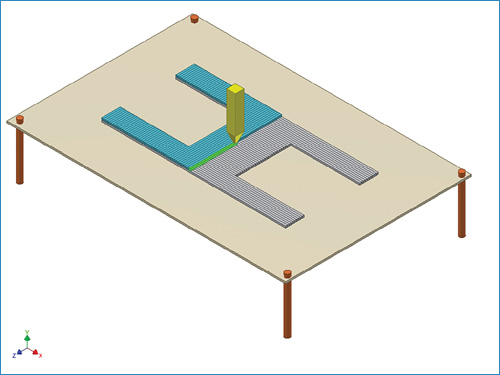
FIGURE 2.21 Layers are usually printed with alternating alignments to prevent possible “grain” effects.
A More Realistic 3D Printing Example
The previous 3D printing example was pretty trivial. So, let’s look at Figure 2.22 that uses the mug shown in Figure 2.1 to illustrate a more realistic example.

Figure 2.23 shows the contents of the next layer in isolation.
In the real world, Figure 2.23 would look almost exactly like Figure 2.22 except that the part would be thicker by the thickness of the layer shown in Figure 2.22. I figure it’s about time for a coffee break, and so Figure 2.24 shows the finished product.
As you have seen, 3D printing is effectively the opposite of sliced bread, but that doesn’t make it the worst invention of all time. Far from it.
Two Basic Types of Printers
There are two kinds of 3D printer in the world. No, this isn’t the lead-in to a bad joke. There really are two basic types of 3D printer: deposition and fusion.
Deposition—Deposit This...
In of the deposition printer, material is deposited a stripe at a time, layer upon layer, as implied by the previous sections. The material is usually one of the many types of thermoplastic (that is, “meltable” plastic) and is supplied in the form of a spool of plastic filament, much like weed trimmer string. It is fed through a heated print head where it melts and is extruded onto the part much like glue coming from a hot-melt gun. The popular MakerBot machine is an example of this type.
Note
The extreme example of deposition printing is a truck-mounted unit that can 3D print a full-size concrete house.
Fusion—Take This Material And Stick It...
The other type of printer uses fusion. These printers start with a thin layer of material, either as a liquid or fine powder, that covers the entire plate. The print head traverses over the layer fusing the material into solid as appropriate. The layer is lowered, fresh material applied over the entire printable area, and the process repeats.
How do you carve a statue of an elephant? You get a big block of marble and cut off anything that doesn’t look like an elephant. How do you 3D fusion print a statue of an elephant? You get a big pile of loose raw material and then stick together everything that does look like an elephant.
When you’ve finished printing, the part is fished out of the unused material; the unused material can be reused for the next part.
Fusion printers come in two basic variants. One variant uses a liquid plastic that solidifies where the ultraviolet laser in the print head shines on it. The first commercially successful 3D printers were the StereoLithography machines from 3D Systems, which use the fusion system.
The other variant of fusion machines uses powdered materials. This can range from corn starch, which is glued together using sugar water from the print head, up to steel powder that is fused together using a high-powered laser. A number of brands and models are available.
Stacking Up: The Third Type of 3D Printing Process
Okay, I lied. There is a third type of 3D printing process, but it’s quite rare. It cuts the individual layers out of a sheet material; then the layers are stacked and glued together into the final part. The good news is that you don’t even need a special 3D printing machine. You can simply print the individual layers one at a time onto ordinary paper or thin cardboard and cut them out with scissors. The bad news is that it takes a lot of time and patience to stack and glue together the individual sheets for even a small, simple model.
Pros and Cons of 3D Printing Processes
In this section, you learn about some of the advantages and disadvantages of each process type.
Pros and Cons of Deposition Printers
First, the good news:
![]() Relatively inexpensive home-hobbyist machines such as the MakerBot are readily available.
Relatively inexpensive home-hobbyist machines such as the MakerBot are readily available.
![]() They can use a wide range of thermoplastic (meltable plastic) materials within the same machine.
They can use a wide range of thermoplastic (meltable plastic) materials within the same machine.
![]() Parts usually come out ready to use with little or no cleanup required.
Parts usually come out ready to use with little or no cleanup required.
![]() Hollow, sealed cavities can be made, such as a basketball.
Hollow, sealed cavities can be made, such as a basketball.
Now the bad news:
![]() Parts might require temporary support structures that need to be removed later.
Parts might require temporary support structures that need to be removed later.
Consider the coffee mug shown earlier. What if we want the handle to be open at the bottom, as shown in Figure 2.25, instead of curving back into and joining the body of the mug?

Figure 2.26 shows everything starting out much as we expect it would.
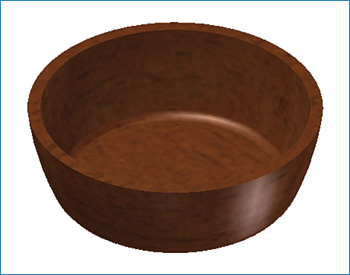
Figure 2.27 shows everything looking good so far...until we reach the bottom of the handle.

As shown in Figure 2.28, there’s nothing to support the first bit of the end of the handle. Figure 2.28 shows how the first layer of the lower end of the handle would simply fall down because we are trying to print on thin air.
This portion of all subsequent layers will do likewise until we reach the point where the upper end of the handle curves back and joins the main body.
Looking back at Figure 2.23, it seems like it would have the same problem. However, there is a difference. Figure 2.23 shows that the next slice being printed is supported by the lower portion of the handle. Now look at Figure 2.27, which doesn’t have the lower handle portion.
There are three possible solutions:
![]() Redesign the part to eliminate the overhangs.
Redesign the part to eliminate the overhangs.
![]() Add temporary support webs that are removed when the part is finished.
Add temporary support webs that are removed when the part is finished.
Tip
The good news is that the support software for most 3D printers is able to automatically add the kind of temporary supports needed in cases like Figure 2.27. The supports then must be removed manually when the 3D print is complete.
![]() Reorient the part for printing. In the case of the coffee mug, you could simply rotate the computer model 90° on its Y axis so it’s lying on its side or 180° on its Z axis so it’s upside-down.
Reorient the part for printing. In the case of the coffee mug, you could simply rotate the computer model 90° on its Y axis so it’s lying on its side or 180° on its Z axis so it’s upside-down.
Pros and Cons of Fusion Printers
First the good news:
![]() You can usually ignore the overhang problem because the unfused material will support things until the print operation is finished. This makes it easier to design and print complex shapes.
You can usually ignore the overhang problem because the unfused material will support things until the print operation is finished. This makes it easier to design and print complex shapes.
![]() A wide range of materials can be used from liquid plastic to corn starch to powdered metal.
A wide range of materials can be used from liquid plastic to corn starch to powdered metal.
Now the bad news:
![]() You can’t build empty sealed cavities such as a basketball because they will be full of unfused material. If you need such an item, then you’ll have to leave a drain hole that is plugged later.
You can’t build empty sealed cavities such as a basketball because they will be full of unfused material. If you need such an item, then you’ll have to leave a drain hole that is plugged later.
![]() Any given machine can use only a specific material or narrow range of materials. You can’t run powdered aluminum through a starch machine, for example.
Any given machine can use only a specific material or narrow range of materials. You can’t run powdered aluminum through a starch machine, for example.
![]() Parts need to be cleaned after printing. Machines that use a fine powder—starch in particular—tend to produce a lot of dust.
Parts need to be cleaned after printing. Machines that use a fine powder—starch in particular—tend to produce a lot of dust.
![]() Fusion printers tend to be more expensive than deposition ones.
Fusion printers tend to be more expensive than deposition ones.
Later chapters in this book provide more specific information on the pros and cons of the various 3D printers, but this gets you off to a good start.
Summary
As indicated in the opening paragraphs, 3D printers work from 3D computer models. How do you get the model? You can download existing models from websites, or you can create your own. This chapter described the basic operating principle used by all 3D printers and then went on to cover the two main types of 3D printers.
The following chapters explain how to create 3D models with the iPad, a Mac, or a PC.