3. 123D Creature for iPad
A great starting point on the path to 3D modeling is the free iPad application called 123D Creature. It allows anyone with an iPad to use their fingers to create creatures of all shapes and sizes on the tablet’s touchscreen.
![]() A free copy of 123D Creature for iPad can be downloaded from http://www.123dapp.com/creature, or it can be found on the Apple App Store on your iPad.
A free copy of 123D Creature for iPad can be downloaded from http://www.123dapp.com/creature, or it can be found on the Apple App Store on your iPad.
This is a fun and easy way to create a 3D model of the monster out of your wildest imagination. When you’ve finished your masterpiece with Creature, you can export it from the iPad to print on your own 3D printer or send it to a service that will 3D print it for you.
Don’t worry if you don’t think you have any artistic ability because a large catalog of creatures is available online that you can use as a starting point and make them your own.
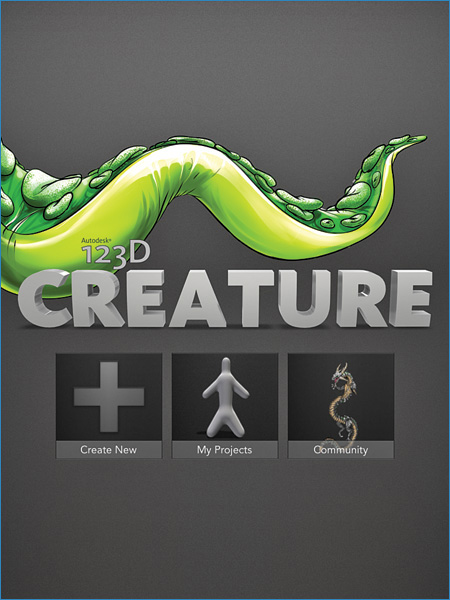
Let’s begin by launching the application on the iPad (see Figure 3.1).
Creating a Creature
When you first launch the Creature application, you are presented with three boxes: Create New, My Projects, and Community:
![]() Create New—This lets you start from a basic skeleton model that you will embellish with your own ideas using a number of steps along the way.
Create New—This lets you start from a basic skeleton model that you will embellish with your own ideas using a number of steps along the way.
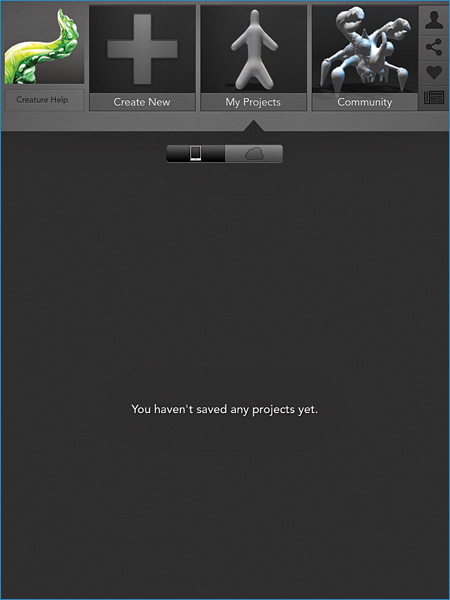
![]() My Projects—Shown in Figure 3.2, this is where you can view previously created works. You can store your creatures on the iPad or on the Autodesk servers, represented by the cloud icon on the right.
My Projects—Shown in Figure 3.2, this is where you can view previously created works. You can store your creatures on the iPad or on the Autodesk servers, represented by the cloud icon on the right.
Tip
If you save your projects to the cloud, you can then access them from other Autodesk applications and further manipulate them.
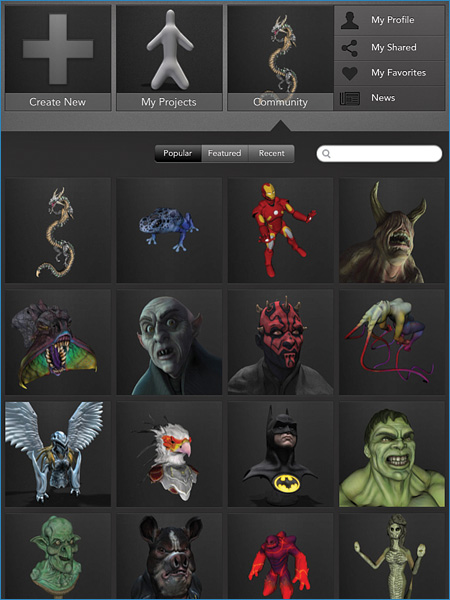
![]() Community—Shown in Figure 3.3, this is a collection of all the publically shared Creature models that others have designed on their iPads and made freely available. Search has a number of options including popularity. Entering a keyword will filter the Community creatures by their tags.
Community—Shown in Figure 3.3, this is a collection of all the publically shared Creature models that others have designed on their iPads and made freely available. Search has a number of options including popularity. Entering a keyword will filter the Community creatures by their tags.
Note
While browsing the models, you can flag your favorites and copy them to your My Projects section to work on yourself or share them with friends on various social networking sites. A My Profile section shows your Autodesk profile and any shared Creatures you’ve made and shared.
![]() The last option in the Community section is for news about the application and featured designs from Autodesk (see Figure 3.4).
The last option in the Community section is for news about the application and featured designs from Autodesk (see Figure 3.4).

When you click the Create New box for the first time, you might be presented with a set of introduction screens (see Figure 3.5). These screens give you a basic overview for using the software and the steps your creature design will go through.

Adding Bones and Joints
All creatures created with this program start with a basic skeleton. By adding joints, bones, and limbs (see Figure 3.6), you build up your creature’s internal structure and general body shape. This structure allows you to create a creature and then pose it in various positions, just like an action figure, without having to redraw it each time.
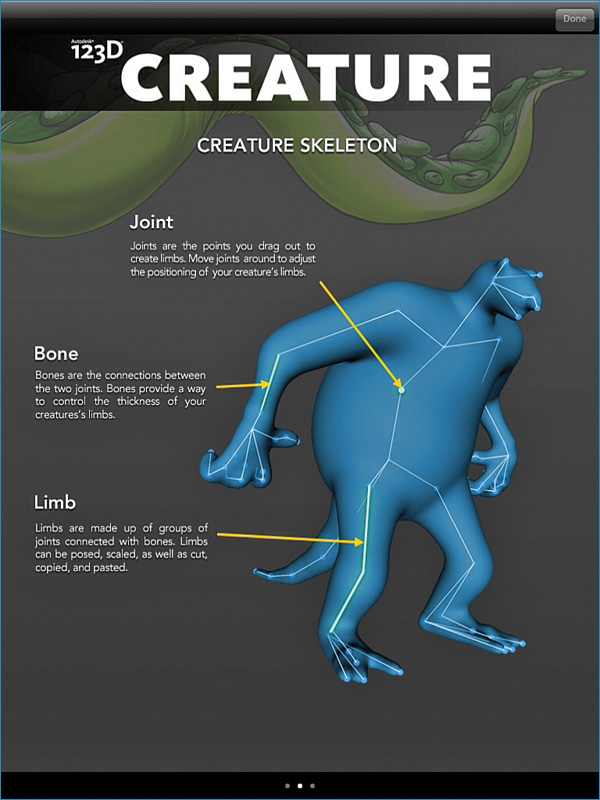
The 123D Creature understands the relationship between bones and joints and will allow you to bend a leg. However, it will only bend as far as the joints and bones will allow, just like a person. Limbs are a grouping of the bones and joints to make it easier to move a larger segment of your creature.
Moving the Model
During creation, you’ll need to regularly move your model around. To do this, Creature enables you to move the model in a number of ways (see Figure 3.7):
![]() Tumble—The way to rotate the model in any direction by using one finger that is not touching the model anywhere. Be sure you press down on to any area in the background, as long as it’s not your model. Doing this rotates the model in the direction you drag your finger along the touch screen.
Tumble—The way to rotate the model in any direction by using one finger that is not touching the model anywhere. Be sure you press down on to any area in the background, as long as it’s not your model. Doing this rotates the model in the direction you drag your finger along the touch screen.
![]() Zoom—Allows you to zoom in or out on your model using two fingers in an expanding or a contracting action.
Zoom—Allows you to zoom in or out on your model using two fingers in an expanding or a contracting action.
![]() Pan—Requires two fingers and allows you to move the model around 3D space without rotating it.
Pan—Requires two fingers and allows you to move the model around 3D space without rotating it.

Sculpting Your Creature
After you’ve finished designing the skeleton, you’ll then go to the sculpting area to further enhance your model with various tools (see Figure 3.8). Think of this part of the process as if you’re working with a clay model, allowing you to push and pull various parts of the virtual clay to shape your creature.
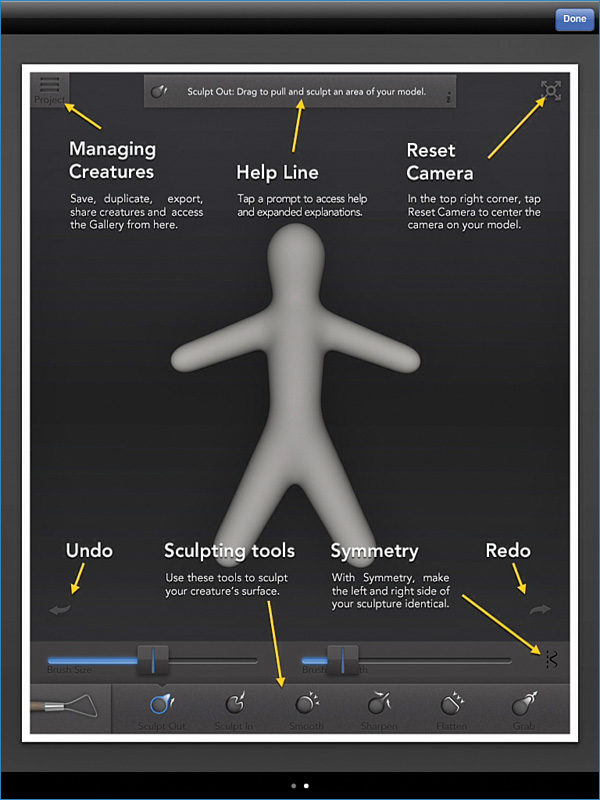
To simplify the design process, each creature is essentially made as a mirrored model. This means you can modify the left side and the right side will do the same thing. You can turn off this feature called Symmetry in the sculpting section on the lower-right corner (see Figure 3.9).

Let’s start making something scary...or possibly just weird and creepy.
Working with Control Options
After creating a new skeleton, you are presented with a basic skeleton shape that kind of looks like a simple gingerbread man (see Figure 3.10). Try some of the previously mentioned camera controls to get a feel of how the interface works before you start creating your creature. Fortunately, there is an Undo button on the lower left of the screen in case you make a mistake while learning to navigate.

If you wind up with a view that doesn’t work for you, you can press the Reset Camera button in the upper-right corner of the screen (see Figure 3.11).
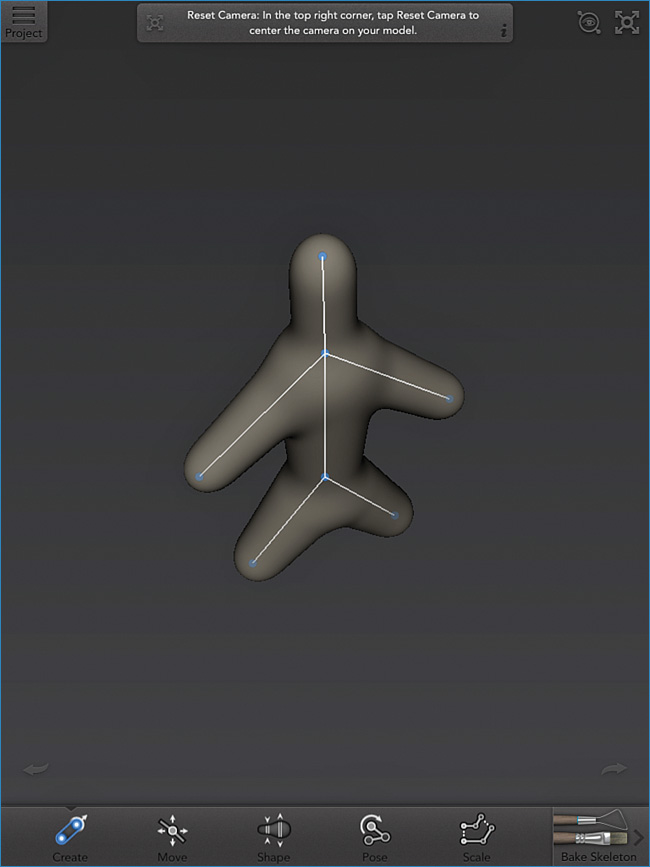
A number of controls listed in Table 3.1 can be used while manipulating your skeleton (see Figure 3.12).
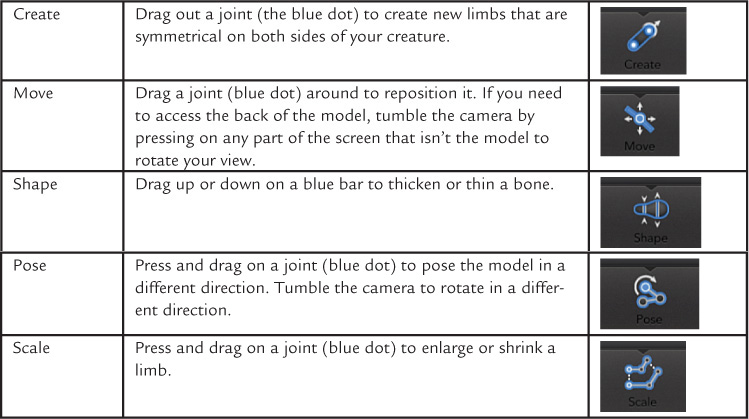
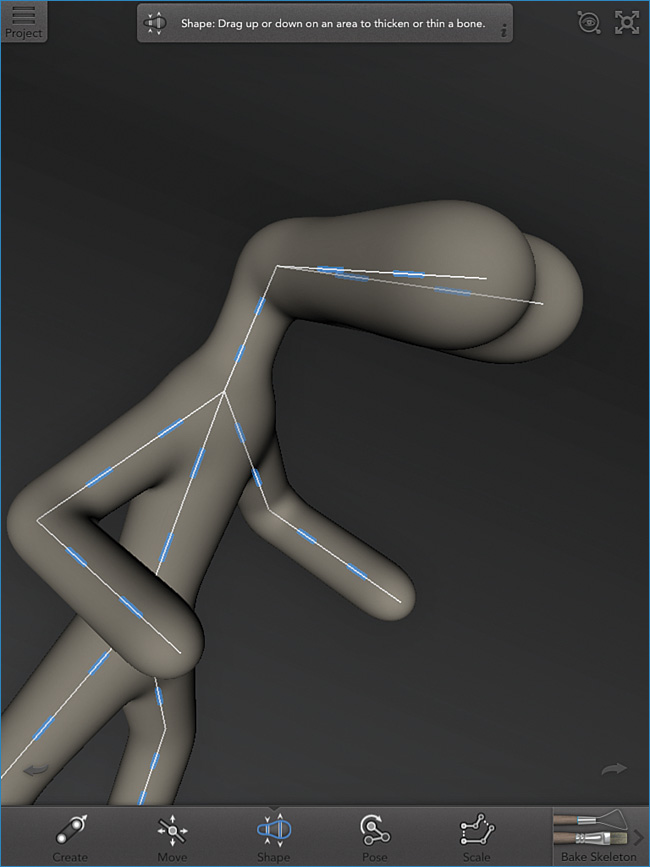
The last icon, Bake Skeleton, will take you to the next step in the process. For now, however, use the options in Table 3.1 and let your imagination run wild (see Figure 3.13).

As you activate various control options, the parts you can manipulate are highlighted in blue within your model. If that action has multiple axes that can be manipulated, you’ll see colored circles with directional arrows, as in Figure 3.14. These indicate which axis (X, Y, or Z) you are manipulating. You might want to tumble the camera to better see the movement angles.

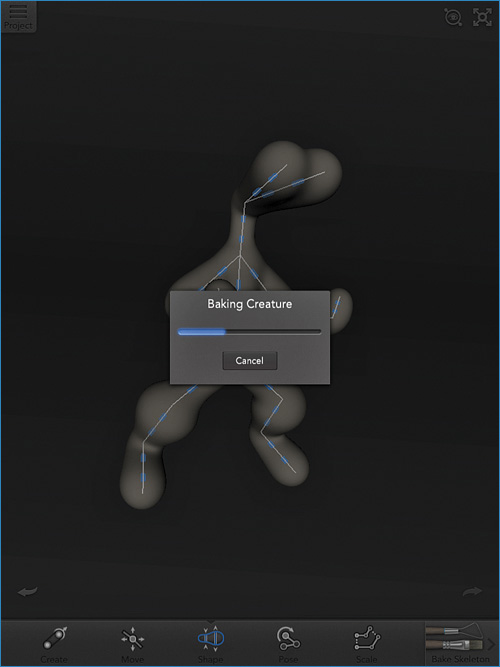
When you’re happy with the skeleton you’ve created, press the Bake Skeleton button on the bottom right to go to the Sculpt section after the baking process (see Figure 3.15).
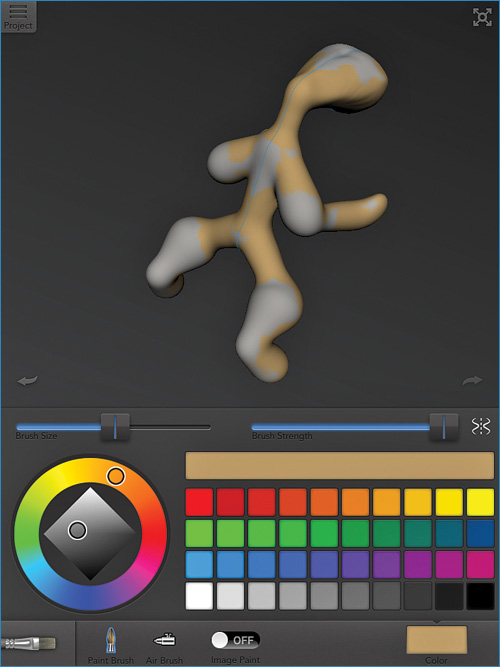
As shown in Figure 3.16, you’re ready to start detailing your creature.

Tip
The Sculpt section contains a number of options that affect the physical appearance of your creature, while others are superficial image effects that just present the creature in a dramatic way.
Note
If you’re planning on 3D printing your model, you might want to skip a few of the image effects options (like lighting and backdrops) because they may not be printed on in your final 3D model, which is a physical object. This can vary depending on the type of 3D printer you have access to or if you’re sending your creature to a third-party printing service that can 3D print in full color.
While sculpting, you can vary the size and strength of the various tools’ brushes using the blue sliders on the bottom of the screen.
Note the blue line in the middle of the creature in Figure 3.17, which is the dividing line when Symmetry is turned on. Anything done on one side of the model will be reflected on the other side as long as this is turned on.

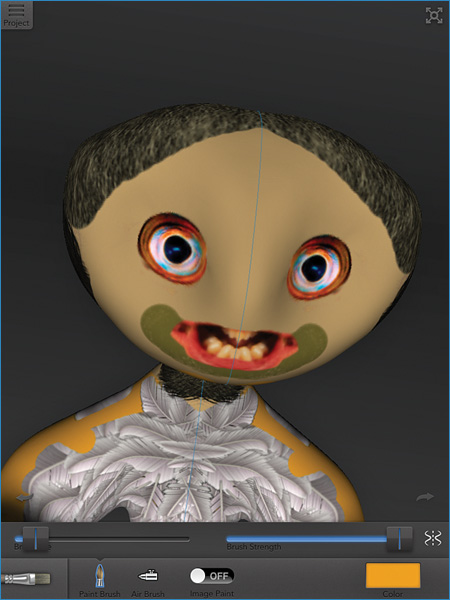
Don’t forget to look at the back of your model as well while you’re sculpting (Figure 3.18)! This also applies to painting, which as mentioned earlier, can have little effect on your model if you’re 3D printing it in most cases.
Notice in Figure 3.19 that adding backgrounds and lighting to your model has little effect on the actual 3D model. However, it can be fun to play with these options.

There are a lot of image options to play with that can really add lots of great, if not creepy, detail to your model (see Figure 3.20). It’s easy to spend a lot of time trying the various options.
Sharing Your Creature
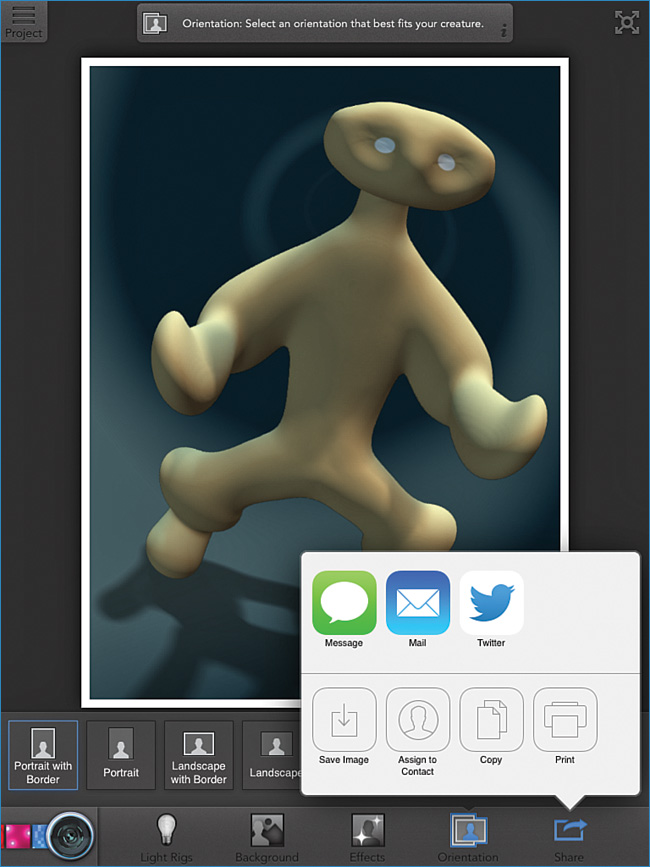
When you’re happy with your creature, press the share button on the bottom right (see Figure 3.21). From here, you can send a photo to various social networks or save it on your device.
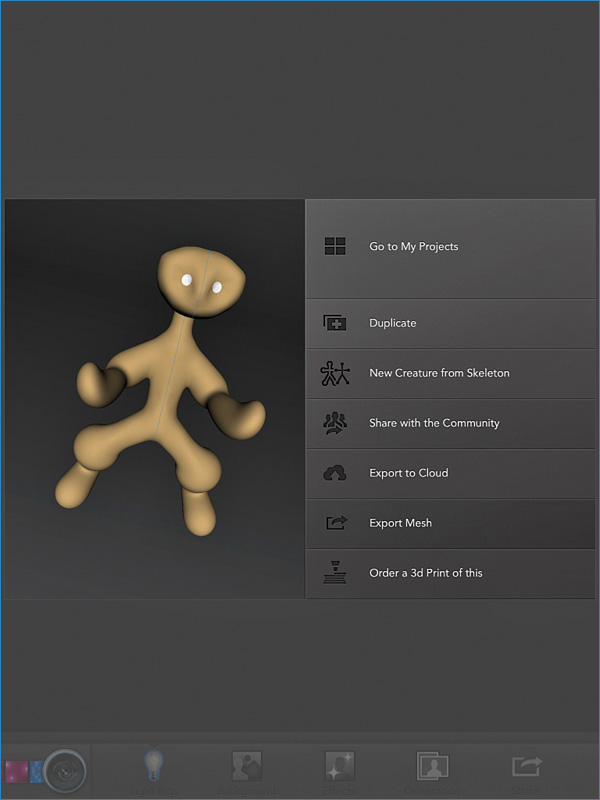
You can save your creature by selecting the drop-down on the upper left of the screen (see Figure 3.22).

After you save, you’ll get another menu of options to make a duplicate, export your creature as a 3D mesh, order a 3D print, or share your creature with the community (see Figure 3.23).
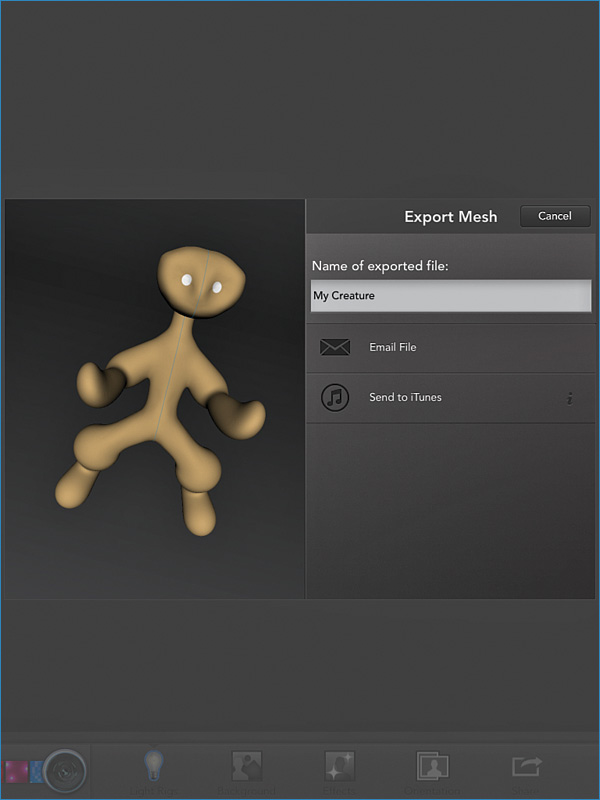
You can either send your exported mesh file via email or send it to iTunes so you can retrieve the file from within iTunes (see Figure 3.24). If you choose email, it will create a compressed Zip file and launch your email program with the file as an attachment.
If you choose to order a 3D print of your creature, you’ll be taken through the steps to order from Sculpteo right within the Creatures app (see Figure 3.25).

![]() To learn more about working with a 3D printing service like Sculpteo, go to Chapter 16, “Using a Third-Party 3D Printing Service Bureau.”
To learn more about working with a 3D printing service like Sculpteo, go to Chapter 16, “Using a Third-Party 3D Printing Service Bureau.”
Summary
In this chapter we covered using 123D Creature for Apple devices to create monsters that can be as wild as you can imagine. Some features of the application such as lighting and textures can also be skipped if you’re planning on only 3D printing your creature because they are purely for displaying your creation on your device.
Happy creature making!