
Modifiers can be used to deform and otherwise alter the geometry of objects, but they also can be used to affect other aspects of an object, including animated changes. Once such important animation modifier is the Point Cache modifier. This modifier lets the movement of each vertex in the scene be saved to a cached file for immediate recall and for animating multiple objects simultaneously.
The Modifiers menu also includes an Animation submenu that contains many such modifiers. These modifiers are unique in that each of them changes with time. They can be useful as an alternate to controllers, but their resulting effects are very specific. Included with this submenu are modifiers such as Morpher, which allows an object to move through several different preset shapes, and Flex, which is used to add soft-body dynamics to your scene. Other animation modifiers include Melt and PathDeform.
When you add keys to an object to control its animation using modifiers, the modifiers remain with the object and can be revisited and altered as needed. However, if you have multiple objects that follow the same set of keys, such as for a crowd scene, then including a set of modifiers for each object can increase the overhead many times over. A simple solution is to bake all the keys into the object, allowing all the keys to be pulled from an external file. This frees the resources required to animate multiple objects and makes the animated keys portable. The Point Cache modifier makes this possible.
You also can use the Point Cache modifier when playback in the viewport is too slow because Max needs to compute the vertex positions of a huge number of vertices. Reading their position from a separate file increases the playback speed. You also can use the file on a cloned object to control its motion at a different speed.
The Point Cache modifier records the movement of every vertex of an object to a file. Point Cache files have the .xml extension, but they can also be saved using the older .pc2 extension. To create a Point Cache file, click the New button and name a new file on the hard drive. Then set the range of the animation to capture and click the Record button. Once recorded, the total number of points along with the sample rate and range are displayed for the active cache.
Warning
Point Cache files can be loaded and used only on objects with the same number of vertices as the original used to record the file.
If you select the Disable Modifiers Below option, then all modifiers below the Point Cache in the Modifier Stack are disabled. You can enable the Relative Offset option and set the Strength value to cause the cached animation to be exaggerated or even reversed. In the Playback Type section, you can control the range of the animation.
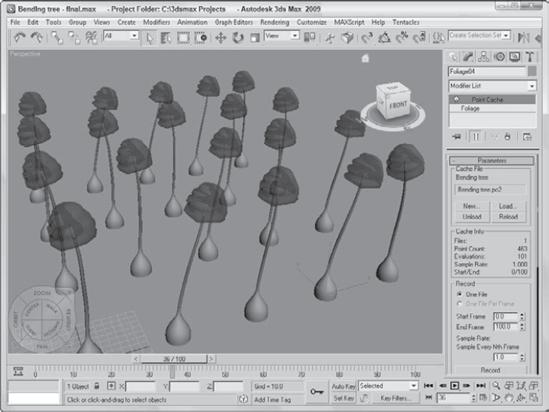
As an example of using the Point Cache modifier, you'll use a tree that is bending under violent forces such as a hurricane and duplicate it many times.
To create a forest of trees in a hurricane, follow these steps:
Open the Bending tree.max file from the Chap 32 directory on the DVD.
This file includes an animated tree swaying back and forth using the Bend modifier.
Select the tree and choose the Modifiers

In the Parameters rollout, click the New button and create a file named "Bending tree.pc2." Then click the Record button to save all the animation data to the file.
Select the tree and delete its Bend modifier. Then use the Tools
Select several random trees and change the Playback Type to Custom Start in the Parameters rollout and change the Start Frame to −2 to cause some random motion.
Press the Play Animation button to see the results.
Figure 32.1 shows several of the trees being moved about by the storm.
Animation is more than just moving an object from here to there. All objects move not only with major transformations, but with lots of secondary motions also. When a human character walks, the motions of his arms and legs are major, but the secondary motions of his swinging hips and bobbing shoulders make the walk realistic. Many of the animation modifiers enable these key secondary motions.
All the animation modifiers presented in this chapter are located in the Modifiers
Note
Also included among the Animation modifiers are several Skin modifiers, which are used to make an object move by attaching it to an underlying skeleton. The Skin modifiers are covered in Chapter 43, "Skinning Characters."
The Morpher modifier lets you change a shape from one form into another. You can apply this modifier only to objects with the same number of vertices.
Note
In many ways, the Morpher modifier is similar to the Morph compound object, which is covered in Chapter 26, "Working with Compound Objects."
The Morpher modifier can be very useful for creating facial expressions and character lip-synching. You can also use it to morph materials. Max makes 100 separate channels available for morph targets, and channels can be mixed. You can use the Morpher modifier in conjunction with the Morph material. For example, you could use the Morph material to blush a character for an embarrassed expression.
Tip
When it comes to making facial expressions, a mirror and your own face can be the biggest help. Coworkers may look at you funny, but your facial expressions will benefit from the exercise.
The first task before using this modifier is to create all the different morph targets. Because the morph targets need to contain the same number of vertices as the base object, make a copy of the base object for each morph target that you are going to create. As you create these targets, be careful not to add or delete any vertices from the object.
Note
Because morph targets deal with each vertex independently, you cannot mirror morph targets, so if you want a morph target for raising the left eyebrow and a morph target for raising the right eyebrow, you need to create each morph target by hand.
After all your morph targets are created, select a channel in the Channel Parameters rollout, shown in Figure 32.2, and use the Pick Object from Scene button to select the morph target for that channel. Another option for picking is to use Capture Current State. After a morph target has been added to a channel, you can view it in the Channel List rollout.
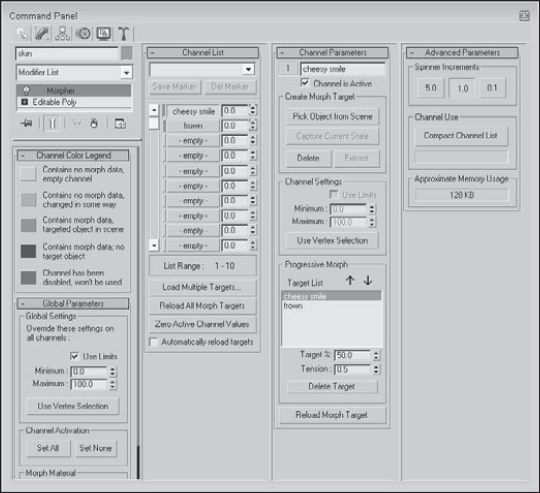
As you animate, you can specify the amount of each morph target to include in the frame using the value to the right of the channel name in the Channel List rollout. The slim color bar to the left of the channel name designates the status of the channel. You can find information on what each color represents in the Channel Color Legend rollout.
The Channel Parameters rollout also includes a Progressive Morph section. This feature lets you define an intermediate step for how the morph is to progress, with the final step being the morph target. Using these intermediate steps, you can control how the object morphs.
The Morpher modifier is very helpful when you're trying to morph facial expressions, such as those to make a character talk. With the various sounds added to the different channels, you can quickly morph between them. In this example, you use the Morpher modifier to change the facial expressions of the general character.
Tip
When creating facial expressions, be sure to enable the Soft Selection features, which make modifying the face meshes much easier.
To change facial expressions using the Morpher modifier, follow these steps:
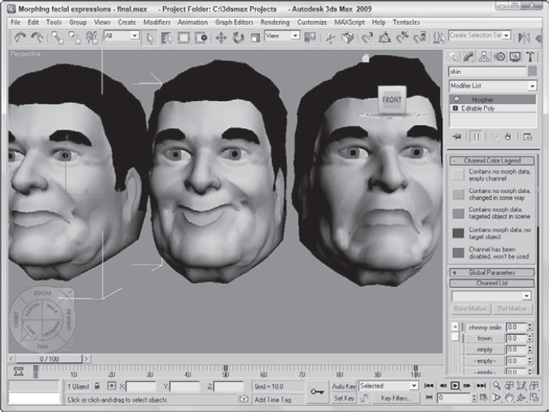
Open the Morphing facial expressions.max file from the Chap 32 directory on the DVD.
This file includes a head model created by Viewpoint Datalabs. The model has been copied twice, and the morph targets have already been created by modifying the subobjects around the mouth.
Select the face on the left, and select the Modifiers
In the Channel List rollout, select channel 1, click the Pick Object from Scene button, and select the middle face object. Then select the second empty channel from the Channel List rollout; in the Channel Parameters rollout, again click the Pick Object from Scene button and select the face on the right.
If you look in the Channel List rollout, you'll see "cheesy smile" in Channel 1 and "frown" in Channel 2.
Click the Auto Key button (or press the N key), drag the Time Slider to frame 50, and then increase the "cheesy smile" channel in the Channel List rollout to 50. Drag the Time Slider to frame 100, and increase the "frown" channel to 100 and the "cheesy smile" channel to 0. Then return the Time Slider to 50, and set the "frown" channel to 0.
Click the Play Animation button in the Time Controls to see the resulting animation.
Figure 32.3 shows the three facial expressions. The Morpher modifier is applied to the left face.
Tip
Be sure to keep the morph target objects around. You can hide them in the scene or select them and save them to a separate file with the File
The Flex modifier can add soft body dynamic characteristics to an object. The characteristic of a soft body is one that moves freely under a force. Examples of soft body objects are clothes, hair, and balloons. The opposite of soft body dynamics is rigid body dynamics. Think of a statue in the park. When the wind blows, it doesn't move. The statue is an example of a rigid body. On the other hand, the flag flying over the library moves all over when the wind blows. The flag is an example of a soft body.
Note
Soft body objects can also be defined and simulated using reactor, which is covered in Chapter 38, "Simulating Physics-Based Motion with reactor."
Another way to think of soft bodies is to think of things that can flex. Objects such as a clothesline flex under very little stress, but other objects like a CD flex only a little when you apply a significant force. The settings of the Flex modifier make it possible to represent all kinds of soft body objects.
Figure 32.4 shows many of the rollouts available for the Flex modifier.
In the Modifier Stack, the Flex modifier has three subobjects that you can access: Center, Edge Vertices, and Weights and Springs. The Center subobject is a simple box gizmo that marks the center of the flex effect. Portions of the object that are farther from the center move a greater distance. The Edge Vertices subobject can be selected to control the direction and falloff of the flex effect. The Weights and Springs rollout controls the Weights and Springs subobject.

The Parameters rollout includes a Flex value, which controls the amount of bending the object does; a Strength value, which controls the rigidity of the object; and a Sway value, which controls how long the flexing object moves back and forth before coming to a stop. An antenna on a car is an example of an object that has fairly high Flex and Sway values and a low Strength value.
Chase Springs cause an object to return to its original position when the force is removed. A twig on a tree is an example of an object with Chase Springs. The Use Chase Springs option lets you disable these springs. A piece of cloth is an example of when you would want Chase Springs disabled.
Selecting the Weights and Springs subobject lets you apply weights to certain selected springs. You can disable these weights using the Use Weights option. If you disable these weights, the entire object acts together.
The Flex modifier offers three solution methods to compute the motions of objects. These are presented in a drop-down list. The Euler solution is the simplest method, but it typically requires five samples to complete an accurate solution. The Midpoint and Runge-Kutta4 solutions are more accurate and require fewer samples, but they require more computational time. Setting the Samples value higher produces a more accurate solution.
In the Simple Soft Bodies rollout, use the Create Simple Soft Body button to automatically set the springs for the selected object to act like a soft body. You can also set the amount of Stretch and Stiffness the object has. For cloth, you want to use a high Stretch value and a low Stiffness value, but a racquetball would have both high Stretch and Stiffness values.
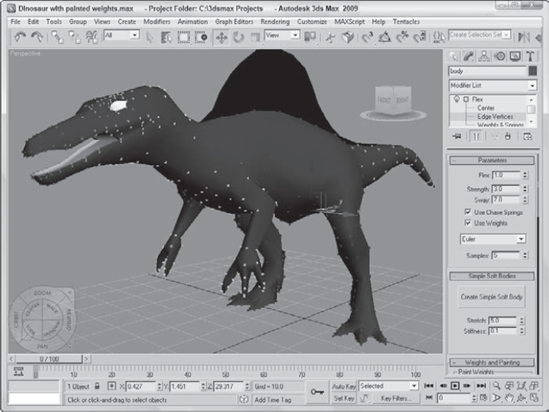
When you select the Weights and Springs subobject mode, the spring vertices are displayed on the object. The vertices are colored to reflect their weight. By default, the vertices that are farthest from the object's pivot point have the lowest weight value. Vertices with the greatest weight value (closest to 1) are colored red, and spring vertices with the lowest weight value (closest to −1) are blue. Vertices in between these two values are orange and yellow. The lower-weighted vertices move the greatest distance, and the higher-weighted vertices move the least.
Selecting the Weights and Springs subobject also enables the Paint button in the Weights and Springs rollout. Clicking this button puts you in Paint mode, where you can change the weight of the spring vertices by dragging a paint gizmo over the top of the object in the viewports. As you paint the spring vertices, they change color to reflect their new weights.
The Strength value sets the amount of weight applied to the vertices. This value can be negative. The Radius and Feather settings change the size and softness of the Paint brush. Figure 32.5 shows a dinosaur model with the Flex modifier applied. The dinosaur has had some weights painted so its tail, arms, and neck move under the influence of the Flex modifier. The blue vertices are the weights that don't move as much.
The weights applied using the Paint button are relative to the existing vertex weight. If you select the Absolute Weight option, then the Vertex Weight value is applied to the selected vertices.
To see the effect of the Flex modifier, you need to add some motion to the scene. The flex object flexes only when it is moving. One of the easiest ways to add motion to the scene is with Space Warps.
The Forces and Deflectors rollout includes two lists: one for Forces and one for Deflectors. Below each are Add and Remove buttons. Using these buttons, you can add and remove Space Warps from the list. The Forces list can use any of the Space Warps in the Forces subcategory (except for Path Follow). The Deflector list can include any of the Space Warps in the Defectors subcategory.
Tip
When you add Space Warps to the Forces and Deflectors list for the Flex modifier, they do not need to be bound to the object.
The final two rollouts for the Flex modifier are Advanced Parameters and Advanced Springs. The Advanced Parameters rollout includes settings for controlling the Start and End frames where the Flex modifier has an effect. The Affect All Points option ignores any subobject selections and applies the modifier to the entire object. The Set Reference button updates all viewports, and the Reset button resets all the vertices' weights to their default values.
You can use the Advanced Springs rollout to manually add and configure springs to the object. Clicking the Options button opens a dialog box where you can select the type of spring to add to the selected vertices, including Edge and Shape springs. Edge springs are applied to vertices at the edges of an object, and Shape springs are applied between vertices. For these advanced springs, you can set the Stretch Strength, Stretch Sway, Shape Strength, and Shape Sway.
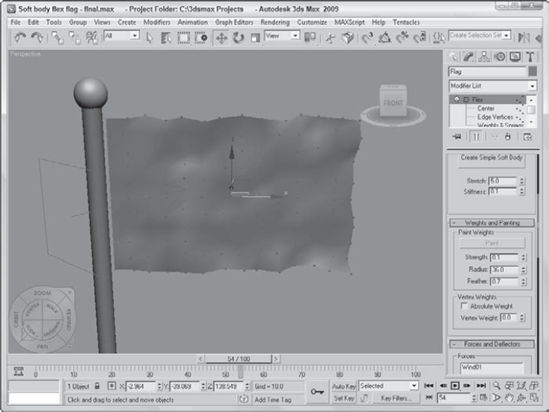
A good example of a soft body object is a flag. By making a flag wave in the wind, you can practice using the Flex modifier. In this example, you also apply the Flex modifier to subobjects.
To make a flag wave in the wind using the Flex modifier, follow these steps:
Open the Soft body flex flag.max file from the Chap 32 directory on the DVD.
This file includes a simple plane object that has been converted to an Editable Mesh.
With the Flag object selected, open the Modify panel and select the Vertex subobject mode in the Selection rollout. In the Front viewport, drag over all the vertices, except the left column where the flag touches the flagpole.
With all the vertices on the right selected, click the Modifier List and select the Flex modifier (or you can choose the Modifiers
In the Parameters rollout, set the Flex value to 3.0, set the Sway value to 50, and disable the Use Weights option. In the Simple Soft Bodies rollout, click the Create Simple Soft Body button. Finally, click the Add button for the Forces list in the Forces and Deflectors rollout, and select the Wind Space Warp in the Top viewport.
To see the final results, click the Play Animation button to see the flag wave in the viewport.
Figure 32.6 shows the flag waving.
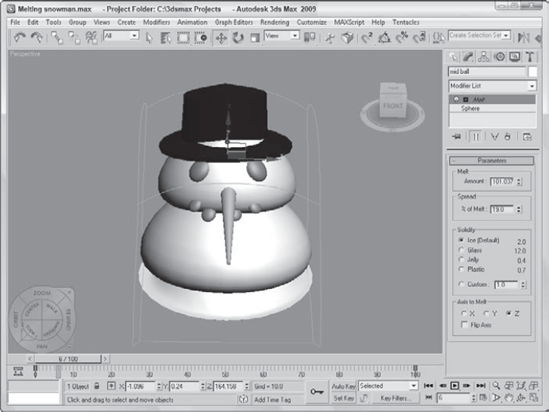
The Melt modifier simulates an object melting by sagging and spreading edges over time. Melt parameters include Amount and Spread values, Solidity (which can be Ice, Glass, Jelly, or Plastic), and a Melt Axis.
Figure 32.7 shows the Melt modifier applied to the snowman model (it was inevitable).
Among the animation modifiers are several that are similar in function but that work on different types of objects. The PatchDeform modifier uses patches, and the SurfDeform modifier deforms an object according to a NURBS surface.
In the Parameters rollout for each of these modifiers is a Pick Patch (or Surface) button that lets you select an object to use in the deformation process. After the object is selected, you can enter the Percent and Stretch values for the U and V directions, along with a Rotation value.
Note
The PatchDeform modifier is also available as a World Space Modifier (WSM). WSMs are similar to the normal Object Space Modifiers (OSM), except that they use World Space coordinates instead of Object Space coordinates. The most noticeable differences are that WSMs don't use gizmos and that the OSM moves the patch to the object, while the WSM causes the object to move to the patch.
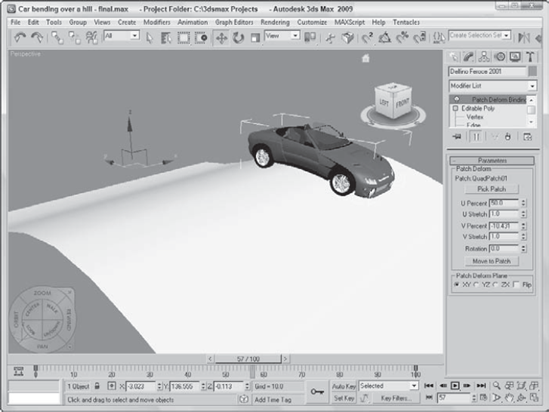
Have you seen those commercials that use rubber cars to follow the curvature of the road as they drive? In this tutorial, you use the PatchDeform modifier to bend a car over a hill made from a patch.
To deform a car according to a patch surface, follow these steps:
Open the Car bending over a hill.max file from the Chap 32 directory on the DVD.
This file contains a simple hill made from patch objects and a car model created by Viewpoint Datalabs.
Select the car model, and choose Modifiers
This applies the World Space PatchDeform modifier (WSM) to the car object and moves the car to align with the hill.
Set the V Percent value to 0 in the Parameters rollout. Then, click the Auto Key button (or press the N key) to enable key mode, and drag the Time Slider to frame 100. Then set the V Percent value to −50, and click the Auto Key button again to disable key mode.
Click the Play button (or press the / key) to see the car deform over the hill.
Figure 32.8 shows the results of this tutorial.
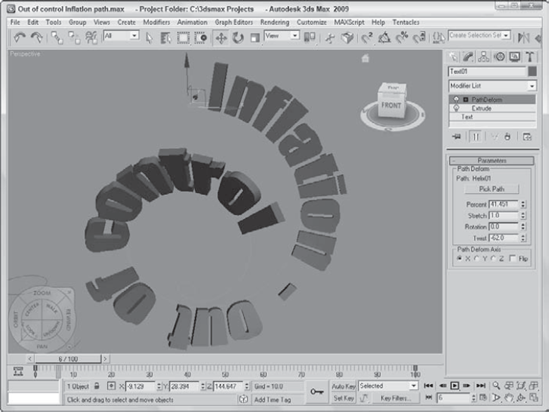
The PathDeform modifier uses a spline path to deform an object. The Pick Path button lets you select a spline to use in the deformation process. You can select either an open or closed spline. The Parameters rollout also includes spinners for controlling the Percent, Stretch, Rotation, and Twist of the object. The Percent value is the distance the object moves along the path.
Note
If you use the PathDeform modifier, you can benefit from using the Follow/Bank utility, which gives you control over how the object follows and banks along the path.
Figure 32.9 shows some text wrapped around a spline path.
The Linked XForm modifier passes all transformations of one object onto another, but not vice versa. The object that controls the transformation is designated as the Control Object and is selected via the Pick Control Object button (which is the only control in the Parameters rollout for this modifier). After the Control object is selected, the Control Object controls the selected object's transforms, but the object that is being controlled can move independently of the control object without affecting the control object.
The SplineIK Control modifier can be applied only to spline objects. In the Spline IK Control Parameters rollout, you can click the Create Helpers button, which adds a dummy object to every vertex on the spline. These dummy objects make it much easier to control the spline without having to enter vertex subobject mode. You can also specify how the dummy objects are linked and how they are displayed.
The Attribute Holder modifier displays all custom defined attributes in their own rollout. Creating custom attributes and wiring attributes is discussed in Chapter 33, "Animating with the Expression Controller and Wiring Parameters."
This chapter introduced all the available animation modifiers and showed you how to use several of them. Through custom attributes and wiring parameters, the animator's job can be accomplished by tweaking some controls. In this chapter, you accomplished the following:
Used the Point Cache modifier
Used the Morpher modifier to deform a face
Learned about the Flex modifier and the other deformation modifiers
Used the various miscellaneous animation modifiers
The next chapter takes a close look at the Expression Controller that gives you the ability to script the controller's behavior. It also covers wiring parameters so that one parameter can control another and creating custom parameters.