Max can help you create some incredible images and animations, but that power comes at a significant price—time. Modeling scenes and animation sequences takes enough time on its own, but after you're finished, you still have to wait for the rendering to take place, which for a final rendering at the highest detail settings can literally take days. Because the time rendering takes is directly proportional to the amount of processing power you have access to, Max lets you use network rendering to add more hardware to the equation and speed up those painfully slow jobs.
This chapter shows you how to set up Max to distribute the rendering workload across an entire network of computers, helping you finish big rendering jobs in record time.
If you work all day modeling, texturing, and animating sequences only to find that most of your day is shot waiting for a sequence to be rendered, then happily you have several solutions. You can get a second system and use it for rendering while you work on the first system, or you can use the network rendering feature to render over the network, or you have a third possibility: you can use the Batch Render tool.
Unless you are working around the clock (which is common for many game productions), you can set up a batch rendering queue before you leave for the evening using the Batch Render tool. This queue runs through the night, giving you a set of takes to review in the morning.
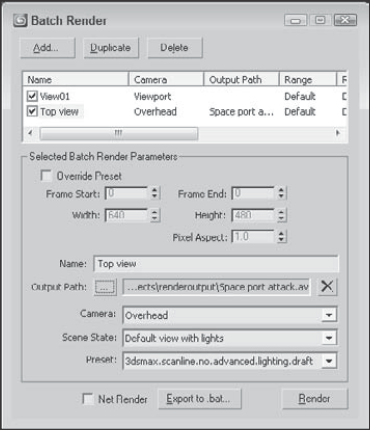
The Batch Render window, shown in Figure 47.1, is accessed from the Rendering menu. Render tasks can be added to the list by clicking the Add button. Render tasks can be disabled by selecting the check box to the left of the task name.
For each task, you can set the task's Name, Output Path, Camera, and render Preset. The Scene State drop-down list lets you select any scene states that are defined using the Tools
Each new task added to the Batch Render window uses the default render parameters for its frame range, dimensions, and pixel aspect, but if you enable the Override Preset option, then you can customize each of these parameters for the selected task.
The Batch Render queue can be rendered over the network by enabling the Net Render option at the bottom of the Batch Render window.
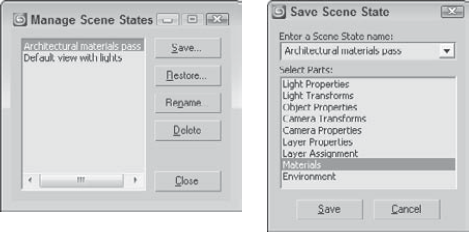
A single scene file may have many different settings that you'd like to try as different renderings. For example, you can set up a scene with different light settings, with different camera properties, or with unique materials. Scene states let you define different sets of properties that can be recalled prior to a batch rendering. Each of these scene states can be part of a single Max file.
When the Tools
When you use network rendering to render your animation, Max divides the work among several machines connected via a network, with each machine rendering some of the frames. The increase in speed depends on how many machines you can devote to rendering frames: Add just one computer, and you double the rate at which you can render. Add seven or eight machines, and instead of missing that important deadline by a week, you can get done early and take an extra day off.
Machines connected to handle network rendering are often referred to collectively as a rendering farm. The basic process during a network rendering goes like this: One machine manages the entire process and distributes the work among all the computers in the farm. Each machine signals the managing computer when it is ready to work on another frame. The manager then sends or "farms out" a new frame, which gets worked on by a computer in the rendering farm, and the finished frame gets saved in whatever format you've chosen.
The software in Max that makes network rendering possible is called Backburner. You may have noticed that it was installed when Max was installed. Max has several features to make the network rendering process easier. If one of the computers in your rendering farm crashes or loses its connection with the manager, the manager reclaims the frame that was assigned to the down computer and farms it out to a different machine. You can monitor the status of any rendering job you have running, and you can even have Max e-mail you when a job is complete.
Note
One additional caveat to using network rendering is that you have no guarantee that the frames of your animation will be rendered in order. Each participating computer renders frames as quickly as possible and saves them as separate files, so you cannot use network rendering to create .avi or .mov files. Instead, you have to render the scene with each frame saved as a separate bitmap file, and then use the RAM Player, Video Post, or a third-party program (such as Adobe Premiere) to combine them into an animation file format such as .avi.
Note
A licensed version of Max is required to do network rendering, but the good news is that only one machine in your farm needs to have an authorized copy of Max installed. No authorization whatsoever is needed on machines used for network rendering only. Simply install Max, and each network rendering machine gets its authorization from the computer that launched the render job.
Before getting into the details of setting up Max for network rendering, it's important to understand the different parts of the network rendering system. This list shows the major players involved:
Manager: The manager is a program (manager.exe) that acts as the network manager. It's the network manager's job to coordinate the efforts of all the other computers in your rendering farm. Only one machine on your network needs to be running the manager, and that same machine can also be used to render.
Server: A rendering server is any computer on your network used to render frames of your animation. When you run the server program (server.exe), it contacts the network manager and informs it that this particular computer is available to render. The server starts up Max when the manager sends a frame to be rendered.
3ds Max: At least one computer in your rendering farm must have an authorized copy of Max running, although it does not need to be the same computer that is running the manager. It is from this machine that you initiate a rendering job.
Monitor: The Monitor (monitor.exe) is a special program that lets you monitor your rendering farm. You can use it to check the current state of jobs that are running or that have been queued. You can also use it to schedule network rendering times. The Monitor is completely independent from the actual rendering process, so you can use it on one of the machines in your rendering farm, or you can use it to remotely check the status of things by connecting over the network.
Now that you know all the pieces involved, you'll need to setup your network and install a copy of Max on all the network machines that you plan on using. When installing Max on a network machine, you can use the Compact option so that Max installs only the minimum number of files it needs to be able to render. You also need to choose a destination directory where you want Max to be installed. If possible, just accept the displayed default destination and click Next.
Tip
Installing 3ds Max in the same directory on every computer can save you some maintenance headaches later on. Managing bitmap and plug-in directories is much easier if each machine has the same directory layout.
You also need to setup several shared directories on the network where the scenes and materials can be accessed from and where the rendered scenes can be saved. Once you have these shared folders in place, you are ready to start up your network rendering system.
The very first time you start your rendering farm, you need to help Max do a little initialization.
To initialize the network rendering system, follow these steps:
Start the network manager on one machine in your rendering farm. This program, Manager.exe, is in the Backburner directory. You can start the manager by selecting it and pressing Enter in Windows Explorer. After it starts up, you first see the Backburner Manager General Properties dialog box. This dialog box appears only the first time you run the Manager.exe program or if you choose Edit

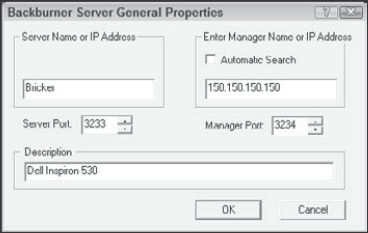
Now start a network server on each computer that you plan to use for rendering. To do this, find and start the Server.exe program just like you did with Manager.exe. When you start this program for the first time, the Backburner Server General Properties dialog box appears. This dialog box is covered later in the chapter. Click OK, and the Network Server window appears, as shown in Figure 47.4.
When the server finds the manager, it displays a message that the registration is accepted. The Network Manager window also shows a similar message.
If the server had trouble connecting to the manager, you need to follow these two additional steps:
If automatic detection of the manager fails, the server keeps trying until it times out. If it times out, or if you just get tired of waiting, choose Edit

Click OK to close the Backburner Server General Properties dialog box, and then click Close to shut down the server (doing so forces the server to save the changes you've made). Restart the server the same way you did before, and now the server and manager are able to find each other.
Note
The network manager does not need to have a computer all to itself, so you can also run a network server on the same computer and use it to participate in the rendering.
Your rendering farm is up and running and just dying to render something, so let's put those machines to work.
To start a network rendering job, follow these steps:
Start Max, and create a simple animation scene.
This should be as simple as possible because all you're doing here is verifying that the rendering farm is functional.
In Max, choose Rendering

In the Render Output section of the Render Scene dialog box, click Files to open the Render Output File dialog box. In the Save In section, choose the output drive that can be accessed over the network and directory that you created in the "Configuring shared directories" section.
In the File name section of the Render Output File dialog box, type the name of the first frame. Max automatically numbers each frame for you. Choose a bitmap format from the Save as type list (remember, an animation format will not work).
Click Save to close the Render Output File dialog box. (Some file formats might ask you for additional information for your files; if so, just click OK to accept the default options.) Back in the Render Scene dialog box, Max displays the full path to the output directory.
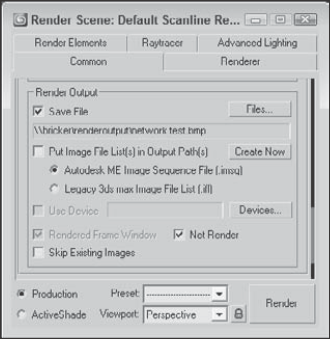
In the Render Output section of the Render Scene dialog box, check the Net Render option, as shown in Figure 47.6. Change any other settings you want, such as selecting a viewport, and then click Render.
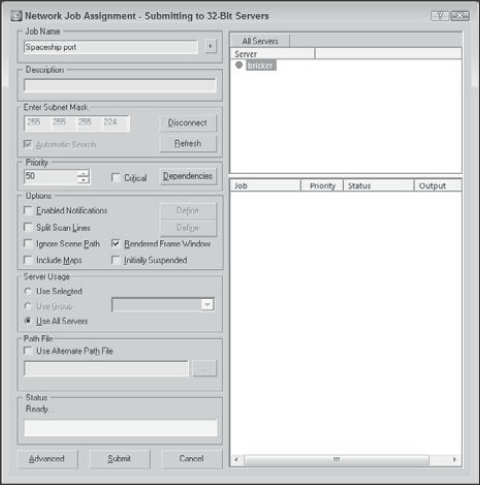
A Network Job Assignment dialog box opens, like the one shown in Figure 47.7.
In the Enter Subnet section of the Network Job Assignment dialog box, click Connect if the Automatic Search box is checked. If it isn't checked, or if your servers had trouble finding the manager in the "Initializing the network rendering system" tutorial earlier in this chapter, type the IP address of the machine running the manager and then click Connect.
Max then searches for any available rendering servers, connects with it, and adds its name to the list of available servers. Click the server name once, and click Submit.
Tip
If you try to submit the same job again (after either a failed or a successful attempt at rendering), Max complains because that job already exists in the job queue. You can remove the job using the Monitor, or you can click the + button on the Network Job Assignment dialog box, and Max adds a number to the job name to make it unique.
After you've submitted your job, notices appear on the manager and the servers (like the ones shown in Figures 47.8 and 47.9) that the job has been received. Soon Max starts up on each server, and you see a Rendering dialog box showing the progress of the rendering task. As you can see, this displays useful information such as what frame is being rendered and how long the job is taking. When the entire animation has been rendered, you can go to your output directory to get the bitmap files that Max generated. The render servers and the render manager keep running, ready for the next job request to come in.
The Network Job Assignment dialog box, shown previously in Figure 47.7, has an important section that you didn't use for your first simple render job; it's called Options.
The Options section has the following settings:
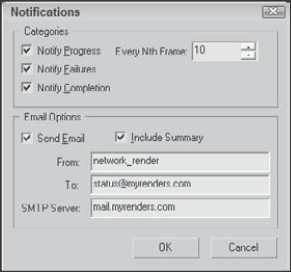
Enabled Notifications: Lets you tell Max when to notify you that certain events have occurred. If you check the Enable Notifications option, the Define button becomes active. The Define button opens a Notifications dialog box, shown in Figure 47.10.
Split Scan Lines: This option breaks a rendered image into strips that can be rendered separately. The Define button lets you specify the Strip Height, Number of Strips, and any Overlap.
Ignore Scene Path: Use this option to force the servers to retrieve the scene file via TCP/IP. If disabled, the manager copies the scene file to the server.
Rendered Frame Window: Use this option if you want to be able to see the image on the server as it gets rendered.
Include Maps: Checking this box makes Max compress everything that it needs to render the scene (including the maps) into a single file and send it to each server. This option is useful if you're setting up a rendering farm over the Internet, although it takes more time and network bandwidth to send all that extra information.
Initially Suspended: This option pauses the rendering before it starts so that you can manually start it when the network is ready.
Use Selected/Use Group/Use All Servers: The Server Usage option makes the selected server, a group of servers, or all servers listed in the Server panel fair game for rendering.
Use Alternate Path File: This option lets you specify an alternate path for map and other files, which is entered in the text field below the check box.
You can configure both the manager and servers using their respective General Properties dialog boxes. You open these dialog boxes by choosing Edit
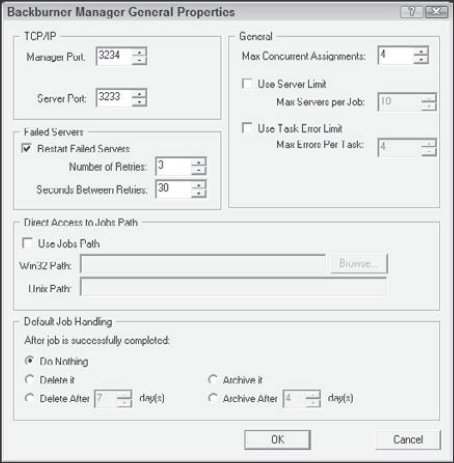
The rendering manager has some options that let you modify how it behaves. You specify these options in the Network Manager General Properties dialog box, shown in Figure 47.11. To open this dialog box, select Edit
This dialog box includes the following sections:
TCP/IP: Here you can change the communications ports used by the manager and the servers. In general, leaving these alone is a good idea. If some other program is using one of these ports, however, Max won't be able to render via the network, so you need to change them. If you change the Server Port number, be sure to change it to the same number on all your rendering servers. If you change the Manager Port number, you also need to change two files on your hard drive to match: queueman.ini (in your 3dsmax directory) and client.ini (in your 3dsmax etwork directory). Both have lines for the Manager Port, and you can edit these files with any text editor or word processor.
General: The Max Concurrent Assignments field is used to specify how many jobs the rendering manager sends out at a time. If you make this number too high, the manager might send out jobs faster than the servers can handle them. The default value here is fine for most cases.
Note
The network manager can automatically attempt to restart servers that failed, giving your rendering farm much more stability.
Failed Servers: Usually, Max doesn't send more frames to a server that previously failed. If you check the Restarts Failed Servers box, Max tries to give the server another chance. The Number of Retries field tells Max how many times it should try to restart a server before giving up on the particular server for good, and the Minutes Between Retries field tells Max the number of minutes it should wait before trying to give the failing server another job.
Note
The rendering manager writes the configuration settings to a file on the disk that gets read when the manager loads. If you make changes to any of the settings, shutting down the manager and starting it up again to guarantee that the changes take effect is best.
Direct Access to Jobs Path: This setting lets you specify a different path that exists anywhere on the network, regardless of where the manager is running. Separate fields are available for Win32 paths and Unix paths. If the Use Jobs Path option is selected, then the specified path is used.
Default Job Handling: This section lets you tell the Manager what to do after the rendering job is finished. The options include Do Nothing, Delete or Archive, and Delete or Archive after a specified number of days. This option gives you a way to clean out your queue.
As you may have guessed, the Properties button on the Network Server window serves a similar purpose as the one on the Network Manager window: It enables you to specify the behavior of the network server. Clicking this button displays the Backburner Server General Properties dialog box.
This dialog box has the following section:
TCP/IP: The port numbers serve the same function as they do for the rendering manager, described in the previous section. If you change them in the manager properties, change them here. If you change them here, change them in the manager properties.
Note
The Manager Name or IP Address setting lets you override automatic detection of the rendering manager and specify its exact location on the network. Generally, letting Max attempt to find the manager itself is best; if it fails, override the automatic detection by clearing the Automatic check box. If you happen to be running multiple managers on the same network, the servers connect to the first one they find. In this case, you have to manually choose the correct server.
Keep in mind that the server properties aren't shared among your servers, so if you want something to change on all your servers, you have to make that change on each machine.
Note
As with the rendering manager settings, if you change anything in the Network Servers Properties dialog box, be sure to shut down the server and restart it.
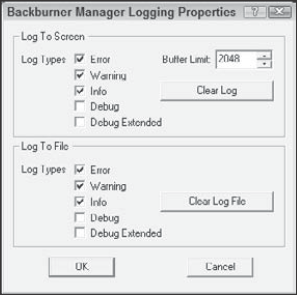
Both the Network Manager and Network Server windows have a Logging button that you can click to access the Logging Properties dialog box, where you can configure how log information gets handled. This dialog box, shown in Figure 47.12, looks the same for managers and servers. You can access this dialog box with the Edit
Max generates the following types of messages:
Error: Anything that goes wrong and is serious enough to halt the rendering of a frame.
Warning: A problem that Max can still work around. If a server fails, for example, a warning is generated, but Max continues the rendering job by using other servers.
Info: A general information message, such as notification that a job has arrived or that a frame is complete.
Debug: A lower-level message that provides information to help debug problems with the rendering farm.
Debug Extended: The same as the Debug option with more details.
Max displays the type of message and the message itself in two locations: in the list window and in a log file (in your 3dsmax etwork directory). The Logging Properties dialog box lets you choose whether each type of message gets reported to the screen, the log file, both places, or neither place. You can also use the Clear buttons to get rid of old messages.
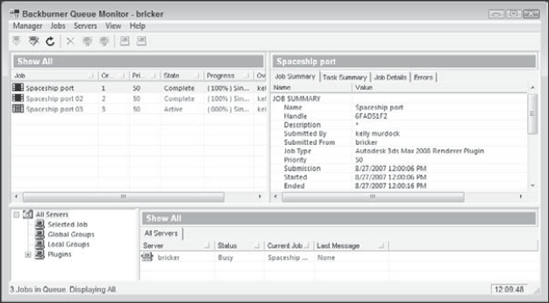
The Monitor is a powerful utility that helps you manage your rendering farm and all the jobs in it. If you use network rendering frequently, then the Monitor quickly becomes your best friend. You start it the same way that you start a rendering server or manager: Go to the 3dsmax directory, find QueueManager.exe, and double-click it. Every computer that has Max installed on it also has a copy of the Monitor, so you can use it from any machine on your network. The main screen is shown in Figure 47.13.
When the Monitor starts up, it automatically searches for the rendering manager and connects to it. (If you have more than one manager running, you have to choose which one to connect to.)
The main screen is divided into three panes. The top-left pane shows the job queue, and their Priority and Status, and the top-right pane shows information about whatever you have selected in the left pane. You can use the tabs at the top of this pane to select the information that you want to view. The information tabs include Job Summary, Frames Summary, Advanced (which shows the rendering parameters), Render Elements, and Log.
The bottom pane lists all the available servers. Next to each server in the left pane is an icon that reflects its current status. Green icons mean that the job or server is active and hard at work. Yellow means the server is idle. Red means that something has gone wrong, and gray means that a job has been inactivated or that a server is assigned to a job but is absent. When a job is complete, it can be deleted from the queue.
If you choose a job in the top-left pane, the top-right pane displays information about the selected job. The panels in the top-right pane are as follows:
Job Summary: Lists some of the rendering options you chose before you submitted the job. Among other things, the example in the figure shows that the job was rendered to 640 × 480 pixels.
Frames Summary: Lists the details of rendering each frame in the animation, including the time required to render and the server used.
Advanced: Lists advanced settings from the Render Scene dialog box and gives limited information about the scene itself.
Render Elements: Lists the details of each render element included as part of the job.
Log: Displays important messages from the job log. Whereas the log file on each server lists events for a particular server, this pane lets you see all the messages relating to a particular job.
When you point at a job in the top-left pane and right-click, a small pop-up menu appears. On this menu, you can delete a job from the queue or you can choose to activate or deactivate it. If you deactivate a job, all the servers working on that job save their work in progress to disk and then move on to the next job in the queue. This feature is very useful when you have a lower-priority job that you run when no other jobs are waiting; when something more important comes along, you deactivate the job so that you can later activate it when the servers are free again.
One last useful feature for jobs is that you can reorder them by dragging a job above or below other jobs. Jobs higher on the screen are rendered before lower ones, which enables you to "bump up" the priority of a particular job without having to deactivate other ones.
Note
A file with a Critical priority is rendered immediately.
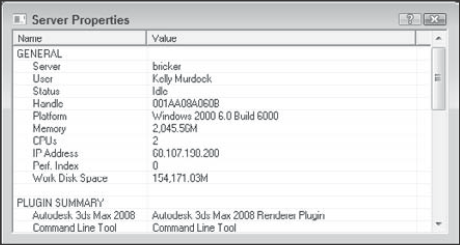
If you right-click a server and select Properties from the pop-up menu, the Server Properties dialog box, shown in Figure 47.14, opens. This dialog box contains information about the selected server.
Many other features are available in the right-click pop-up menu. Using this pop-up menu, you can assign the server to a selected job, remove the server from its selected job, display specific server information, create a server group, or view the Week Schedule, as shown in Figure 47.15. Using the Week Schedule dialog box, you can set the active rendering period for a server.
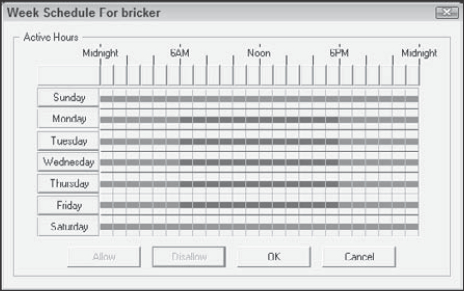
Figure 47.15. The Week Schedule dialog box can set the time during the week when a server is available for rendering.
The Week Schedule dialog box lets you decide when a particular machine is available for rendering. (For example, you can have your coworker's computer automatically become available for rendering after he or she goes home for the night.)
Click and drag with your mouse over different hours to select a group of times. Alternatively, you can click a day of the week to select the entire day or click a time to select that time for every day. In the example shown in Figure 47.15, the server is scheduled to render in the evenings and on the weekends.
After you've selected a group of times, click Allow to make the server available for rendering during that time or click Disallow to prevent rendering. When you're finished, click OK to close the Server Properties dialog box and return to the Monitor dialog box.
If you have several jobs going at once but suddenly need to get one finished quickly, you can take servers off one job and put them on another. To remove a server, right-click its name in the left pane of the Monitor dialog box and choose Delete Server (Ctrl+Enter) from the pop-up menu. The icon next to the server turns black, indicating that it has been unassigned. To assign this server to another job, right-click the server name in the list of servers for the job you want to assign it to, and choose Assign to Selected Jobs.
If your goal is to spend more time modeling and less time waiting for rendering jobs to complete, then the network rendering services provided by 3ds Max can help you take a step in the right direction. After the initial complexities of setting up a rendering farm are out of the way, network rendering can be a great asset in helping you reach important deadlines, and it lets you enjoy your finished work sooner. Even if you can afford to add only one or two computers to your current setup, you'll see a tremendous increase in productivity—an increase that you can't truly appreciate until you've completed a job in a fraction of the time it used to take!
In this chapter, you accomplished the following:
Used the Batch Render window to create a batch render queue
Used the rendering manager and servers to carry out rendering jobs
Used the Monitor to control job priority
Made Max notify you when problems occur or when jobs finish
Performed batch rendering even if you don't have a network
In the next chapter, you'll look at the compositing options including Video Post and the various render elements that are available in Max.

