7
PROGRAMMING EXAMPLES-I
CHAPTER OBJECTIVES
In the last three chapters, the reader was introduced to a few MCS-51 instructions like data moving and loading, arithmetic operations and program branching. In this chapter, we will discuss applications of these instructions through a few example cases of programming. After completion of the chapter, the reader should be able to understand how these instructions may be properly utilized to
- Manipulate data in different ways using pointers.
- Use counters for iterations.
- Plan any program flow and necessary branching.
- Perform some basic arithmetic operations.
7.1 | Introduction
So far, we have made ourselves familiar with some, though not all, instructions of MCS-51 in the previous three chapters. Using these instructions, we will now develop a few programs in this chapter to solve some simple problems. Although these programming examples are very elementary, the reader will gain some insight into software development and will also be familiar with the applications of the knowledge gained so far.
In every example, after presenting the problem, basic solution techniques are discussed followed by the algorithm or flowchart. Complete program listing is placed after that, with adequate comment statements for easier understanding of the programming logic.
7.2 | Copy Block
Example 7.1
Purpose: How to handle pointers during indirect addressing mode.
Problem
Copy a block of 20 bytes of data available from address 60H to 73H to the location starting from 40H.
Solution
Schematically, the problem is explained through Fig. 7.1(a). The data available between 60H and 73H of the internal RAM area, shown at left, is to be copied in the same sequence to RAM location 40H onwards.
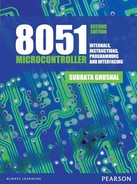
As the addresses are sequential in this case, it is preferable to use pointers, which can be manipulated easily. Therefore, R0 and R1 may be initialized by the starting addresses of source and destination area. Another register, say R7, may be used as a counter to keep a track of number of copy operation and indicate when to terminate. As the MOV instruction does not allow both source and destination to be indirectly addressed, therefore, the accumulator may be used for in-between storage of the data. This is schematically explained through Fig. 7.1(b). Following are the algorithm and program listing.

Figure 7.1 Schematics of (a) problem and (b) solution technique
Algorithm
Step 1: Initialize R0 as source and R1 as destination pointers and load R7 by 20d to serve as the counter.
Step 2: Copy a byte from source to destination, using R0 and R1 through accumulator (as a temporary storage). Update pointers after copying.
Step 3: Decrement counter by one. Continue at Step 2 if the counter is not zero.
Step 4: Terminate the process.
Program
; Program to copy 20 bytes starting from 60H to location 40H onwards.
; First three instructions initialize both source and destination pointers and the counter.
; Iterative procedure to copy data from source to destination starts from here.

; R7 = 0 indicates data copy over. Following instruction terminates the program.
OVER: SJMP OVER ; terminate here
Generally, this type of routine is terminated by the RET (return to the calling program) instruction. However, as we are yet to become familiar with RET instruction, an infinite loop is used to terminate the program. A system reset is to be used to come out from this infinite loop.
A common mistake by beginners is to write the third instruction of this type of program as:
MOV R7, #20H
Generally they overlook that H stands for hexadecimal numbers and 20H indicates 32 in decimal. A safer practice is to write it as:
MOV R7, #20d
so that the assembler takes it as a decimal number and converts it correctly.
C-version
#include <regx51.h>
void main(void)
{
register unsigned *src, *dest;
src = 0x60;
dest = 0x40;
do
{
*dest = *src;
dest++;
src++;
}while (src!= 0x74);
}
7.3 | Shift Block
Example 7.2
Purpose: To understand the restrictions related with data shifting.
Problem
Shift a block of 8 bytes of data, presently located from 50H to 57H, 1 byte up, so that the data is available from 51H to 58H.
Solution
The difference between copy block and shift block is that there is no overlapping in former, which exists in the latter. Moreover, shift-up and shift-down are to be treated in a slightly different manner. Otherwise, the usage of pointers and the counter is identical (refer to Fig. 7.2) in both cases. Here also R0 and R1 are used as pointers and R7 is used as the counter. Following are the algorithm and program listing.
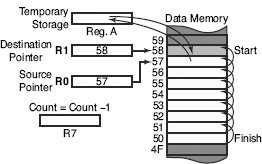
Figure 7.2 Schematic of solution for shift-block operation
Algorithm
Step 1: Initialize R0 as source and R1 as destination pointers for the highest addresses and load R7 by 08 to serve as the counter.
Step 2: Copy a byte via accumulator from source to destination, using R0 and R1, through accumulator. Decrement both pointers by one after copying.
Step 3: Decrement counter by one. Continue at Step 2 if the counter is not zero.
Step 4: Terminate the process.
Program
; Program to shift 8 bytes by 1 byte up.
; Following three instructions initialize both pointers and the counter.
; Shifting operation of 8 bytes starts from here.
; R7 indicates that the operation is over.
; Next instruction is used to terminate the program.
OVER: SJMP OVER ; terminate here.
Please note that had it been a case of shifting down, pointers would have been loaded for the other end (50H and 4FH) and would have been incremented after every iteration.
C-version
#include <regx51.h>
void main(void)
{
unsigned char *src, *dst;
signed char ptr; // note we take signed data type here
src = 0x50; // point first location of source
dst = 0x51; // point first location of destination
for (ptr = 7; ptr >= 0; ptr --)
{
dst[ptr] = src[ptr];
}
while(1);
}
7.4 | Count No. of Nulls
Example 7.3
Purpose: Application of CJNE instruction in its indirect addressing mode.
Problem
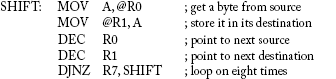
Twenty bytes of data are stored in location from 7FH to 6CH of internal RAM. Count the number of those bytes, which contain 00H, and store this number of null bytes in RAM location 6BH.
Solution
It is assumed that the null bytes might be present anywhere and be of any number. All 20 locations might contain null [Fig.7.3(a)] or, in opposite case, not even a single location might be having it [Fig.7.3(b)]. Anygeneral case might be in between these two as shown in Fig. 7.3(c). Therefore, the solution technique assumes that the number of null bytes is zero and checks every byte. Using register indirect addressing mode of CJNE instruction, the procedure checks every byte and stores the final outcome of this checking from the accumulator to location 6BH [Fig. 7.3(d)]. Note that whenever any null byte is detected, accumulator content is incremented by one. Following are the algorithm and listing of the program.
Figure 7.3 Possibilities of location of null bytes (a-c) and schematic solution technique (d)
Algorithm
Step 1: Initialize R0 as source pointer for the highest address and load R7 by 14H to serve as the counter for 20 numbers. Clear accumulator.
Step 2: Compare a byte with zero through pointer. If it is zero then increment accumulator by 1.
Step 3: Decrement both pointer and counter by one. Continue at Step 2 if the counter is not zero.
Step 4: Save accumulator content through the pointer. Terminate the process.
Program
; Program to count number of null bytes within 20 bytes starting from 6CH.
; Following three instructions initialize the pointer and the counters.
; Scanning of 20 bytes starts from here.

; R7 indicates that the scanning is over.
; Following two instructions store the number of null bytes and terminate the program.
An alternate method would be to use JZ or JNZ instruction after assigning another register as the counter. However, as we are interested in application of CJNE instruction, therefore we follow the present method.
C-version
#include <regx51.h>
void main(void)
{
unsigned char *pRamLoc, *pLoc6BH;
unsigned char nullByteCnt=0;
pLoc6BH = 0x6B;
for (pRamLoc=0x6C, nullByteCnt=0; pRamLoc<=0x7F; pRamLoc++)
{
if (0==*pRamLoc)
{
nullByteCnt += 1;
}
}
*pLoc6BH = nullByteCnt;
while(1);
}
7.5 | Find Checksum
Example 7.4
Purpose: Multiple additions through indirect addressing mode.
Problem
Sixteen consecutive bytes starting from 50H have unsigned integers. Develop a program to add all these 16 integers and store the 8-bit sum in memory location 60H.
Solution
Checksum is generally used to ensure the correctness of a dataset after some communication. It is generally taken as 8 bits, neglecting the carry. Therefore, ADD instruction is adequate here to find the sum. Indirect addressing using R0 as the pointer helps to minimize number of instructions of the program. R7 was used as the counter for 16 locations and the checksum is initially stored in the accumulator. Following are the algorithm and program listing.
Algorithm
Step 1: Initialize R0 as source pointer and load R7 by 16d to serve as the counter. Also clear the accumulator to calculate the sum.
Step 2: Add 1 byte with accumulator as pointed by R0. Then increment pointer by one.
Step 3: Decrement counter by one. Continue at Step 2 if the counter is not zero.
Step 4: Store accumulator as pointed by R0. Terminate the process.
Program
; Program to calculate checksum for 16 bytes from location 50H.
; Following three instructions complete the initialization process.
; Iterative procedure, for addition of 16 numbers, starts from here.
; Addition is complete. Store the result or checksum.
C-version
#include <regx51.h>
void main(void)
{
register unsigned char *src, *dest;
unsigned short int sum = 0, i;
src = 0x50, dest = 0x60;
for (i = 16; i > 0; I --)
{
sum += *src;
src++;
}
*dest = sum;
}
7.6 | Sum of Natural Numbers
Example 7.5
Purpose: How to accomplish multiple duties within a single loop.
Problem
Write a program to generate and store natural numbers starting from 1 to ‘N’ terms and also find the sum of these numbers. Assume that the value of ‘N’ is stored in location 30H. Store generated natural numbers from 40H. Leave the sum in the accumulator.
Solution
We select bank #0 and use R6 for generating the natural numbers. These generated numbers are stored at target locations from R6 using R0 as the pointer. Bank #0 is selected through PSW as direct addressing for source to be used for saving the generated number through indirect addressing. R7 counts down from N, which was loaded from location 30H. It is assumed that N is not zero. The accumulator is used to calculate the sum after each cycle of iteration. Fig. 7.4 explains the scheme of register allotment. Following are the adopted algorithm and the program listing.

Figure 7.4 Schematic for natural number generation
Algorithm
Step 1: Select bank #0. Initialize R0 as destination pointer for storage of generated natural numbers and load R7 from 30H by N to serve as the counter. Also clear R6 and the accumulator to generate the numbers and calculate the sum.
Step 2: Increment R6 by one to generate the next natural number. Save it through R0 and add it with accumulator. Then increment R0 to point the next storage location.
Step 3: Decrement counter R7 by one. Continue at Step 2 if the counter is not zero.
Step 4: Terminate the process.
Program
; Program to generate and add N natural numbers. Value of N is in location 30H.
; Following five instructions complete the initialization procedure.

; Main loop for natural number generation, storing and addition starts from here.

; R7 indicates that the process is over. Following instruction terminates the program.
OVER: SJMP OVER ; terminate here
If we are interested in 16-bit sum, then instead of accumulator, two registers to be initialized as zero and ADD followed by ADDC instructions to be used.
C-version
#include <reg51.h>
void main(void)
{
unsigned char *pLocN;
unsigned char sum, ntrlNum;
// initialize
pLocN = 0x30;
sum = 0x00;
if (*pLocN > 0)
{
for (ntrlNum=1; ntrlNum<=(*pLocN); ntrlNum++)
{
sum += ntrlNum;
}
}
// store result in the accumulator
ACC = sum;
while(1);
}
7.7 | Sum of a Series
Example 7.6
Purpose: To illustrate conditional application of ADD and SUBB instruction and taking care of carry flag before using SUBB instruction.
Problem
Write a program to find the sum of the series 1 − 2 + 3 − 4 + … up to N terms. Assume the non-zero value of N is available in location 30H. Store the sum in the accumulator.
Solution
Every series follows a particular sequence. The present series is of natural numbers starting from 1. Sign of all odd terms are positive and all even terms are negative. Therefore, we may use the same technique for natural number generation as we have followed in the previous example. However, the addition is to be performed only for odd terms and subtraction must be carried out for even terms. Moreover, as N might be either even or odd which is unknown to the program, the decrement of iteration counter must be carried out in two steps.
Another point must be noted that before execution of every SUBB instruction, the carry flag of PSW should be cleared. As a matter of fact, CLR C is the standard instruction for it. However, as we are yet to discuss about this instruction, therefore, we should find an alternative for it. In this case we can do it by loading PSW with 00H. Therefore, it is preferable to use bank #0 so that this PSW clearing for carry does not alter the selected bank. Following are the algorithm and the program listing.
Algorithm
Step 1: Select bank #0. Load R7 by N from location 30H to serve as the counter. Also clear R6 and the accumulator to generate the numbers and calculate the sum.
Step 2: Increment R6 by one to generate the next (odd) natural number. Add it with accumulator.
Step 3: Decrement counter R7 by one. Continue at Step 4 if the counter is not zero. Otherwise continue at step 6.
Step 4: Increment R6 by one to generate the next (even) term. Clear carry flag by loading 00 in PSW.
Then subtract the generated number from the accumulator.
Step 5: Decrement counter R7 by one. Continue at Step 2 if it is not zero.
Step 6: Terminate the program.
Program
; Program to calculate the sum of the given series up to N terms. N is in location 30H.
; First four instructions perform the initialization.

; Start generating numbers and keep on adding for odd terms.

; Now generate an even term and subtract from the sum.

; R7 indicates that all terms were generated. Following instruction terminates the program.
OVER: SJMP OVER ; terminate here, sum in register A
In the present problem, the sign is toggling, that is alternately changing between positive and negative states. A better way to tackle this type of toggling problems is to use a one-bit flag, which may be complemented after every iteration. This we shall discuss after being familiar with Boolean variable manipulation instructions.
C-version
#include <regx51.h>
#define ODD 1
#define EVEN 0
void main(void)
{
unsigned char *pLocN;
unsigned char ntrlNum, evenOddState;
signed char sum;
// initialize
pLocN = 0x30;
sum = 0x00;
evenOddState = ODD;
if (*pLocN > 0)
{
for (ntrlNum=1; ntrlNum<=(*pLocN); ntrlNum++)
{
if (ODD==evenOddState)
{
sum += ntrlNum;
}
evenOddState Λ= 1;
}
}
// store result in the accumulator
ACC = sum;
while(1);
}
7.8 | Fibonacci Series
Example 7.7
Purpose: How to use multiple data pointers in synchronization with the program flow.
Problem
Generate Fibonacci series up to N terms and save from location 50H onwards. Assume N being available in location 4FH. Also assume the value of N to be greater than 3.
Solution
Fibonacci series generates any term by adding its two previous terms. The first and second terms of this series are always 0 and 1, respectively, and the series starts as follows:
Fibonacci series 0, 1, 1, 2, 3, 5, 8, 13d, ….
To count the number of terms to be generated, we may use R7 as the counter, which should be loaded from location 4FH. R1 may be used as the pointer for storing a freshly generated term while R0 may be used to point previous two terms one after another as shown in Fig. 7.5.

Figure 7.5 Schematic for Fibonacci series term generation
The program loop should take over from the generation of the third term of the series while first two terms may simply be loaded in the storage area during initialization. Following are the algorithm and the program listing.
Algorithm
Step 1: Load R7 by number of terms to be generated.
Step 2: Load R0 by second term’s location and store 01 there.
Step 3: Decrement R0 by 1 to point the location of the first term and store 00 there as the first term.
Step 4: Initialize R1 by the location of the third term. Decrement R7 by two as two terms are generated and stored.
Step 5: Load the term pointed by R0 in the accumulator. Increment R0 by one.
Step 6: Add to the accumulator the term pointed by R0. Store this new term from accumulator to its storage location pointed by R1. Then increment R1 by one to point the next storage location.
Step 7: Decrement R7 by one and continue at Step 5 if it is not zero.
Step 8: Terminate the program.
Program
; Program to generate and store N terms of Fibonacci series.
; First two instructions initialize the counter (R7) and storage pointer (R1).
; Store first two terms of the series. This is done by following three instructions.
| MOV | @R0, #01H | ; save second term |
| DEC | R0 | ; location for first term |
| MOV | @R0, #00H | ; save first term |
; Initialize the storage pointer (R1) and adjust the counter (R7) for two terms, already stored.
| MOV | R1, #52H | ; R1 pointing location for third term |
| DEC | R7 | ; reduce counter value by 2 as |
| DEC | R7 | ; two terms already generated |
; Now, R0 pointing to the first of the two generated terms and R1 pointing to the storage area of the
; third term, which is yet to be generated.
; Iterations for generating and storing terms start from here.
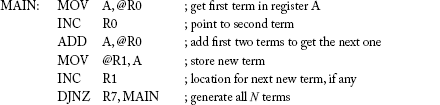
; R7 indicates all N terms that are generated and stored. Terminate the program.
OVER: SJMP OVER ; terminate here
C-version
#include <regx51.h>
void main(void)
{
register unsigned char *n, *dest;
unsigned char count;
n = 0x4F;
dest = 0x50;
*dest = 1;
dest++;
*dest = 1;
dest++;
for (count = (*n); count > 2; count --)
{
*(dest) = (*(dest − 1) ) + (*(dest − 2));
dest++;
}
}
7.9 | Generate a Series
Example 7.8
Purpose: Application of nested loops.
Problem
Generate and store the following series up to N terms. Value of N is available in location 30H. The series is presented using decimal number system.
1, 2, 3, 11, 12, 13, 21, 22, 23, 31, … up to Nterms.
Solution
A careful study reveals that the series contains only natural numbers with some regular gaps. After first three terms, there is a gap of seven numbers and the pattern repeats. Therefore, two consecutive loops may be planned whose first one to be repeated three times and the second one for seven times. Moreover, there must be a counter for keeping track of N terms of the series. Following are the flowchart (Fig. 7.6) and program listing.

Figure 7.6 Flowchart for Example 7.8 (series generation)
Program
; Program to generate a series starts.
; First three instructions complete initialization process.
; Iteration to generate and store the terms of the series starts from here.

; Following part generates, but not stores, the unwanted numbers.

Another way to solve this problem is to add 7 with every third generated number, However, in that case only one loop would be sufficient.
SUMMARY
This chapter deals with the application of the instructions, which have been discussed so far in previous three chapters. Using instructions related to data moving, arithmetic operations and conditional branching, eight different examples have been discussed. First two examples deal with copying and shifting data bytes. Next two examples show how to calculate number of null bytes and checksum of an array. Last four examples deal with different types of series. These examples highlight the use of pointers (R0 and R1) and counters. To maintain uniformity, R7 was used as counter in all examples. However, any other available register would equally serve that purpose.
In general, DJNZ instruction is used to process the counter values and terminate the iteration process. CJNE instruction is used for comparing two numbers and taking some decision as per its result. CJNE instruction offers various forms and the most applicable one to be selected by the programmer. Instead of direct addressing, indirect addressing through pointers makes the algorithm simpler, especially when sequential addresses are to be dealt with.
POINTS TO REMEMBER
- There is no overlapping for data-copy operation while overlapping exists for data-shift operations.
- D epending upon shift-up or shift-down requirement, the start address of shifting must be initialized by the programmer.
REVIEW QUESTIONS
Evaluate Yourself
- What would be the value of R0 and R1 at termination of the copy-block program of Example 7.1?
- 73H and 53H
- 74H and 54H
- 00H and 00H
- None of these
- In Example 7.3, what would have been the content of location 6BH at termination of the program, if all bytes from 6CH to 7FH contained 00H?
- 00H
- 20H
- 14H
- None of these
- In Example 7.5, what might be the maximum value of N if the program remains unchanged?
- FFH
- 7FH
- 16H
- None of these
- In Example 7.5, what would happen if the first instruction of the program (MOV PSW, #00H) is removed?
- No change
- Incorrect result
- Depends upon current bank
- None of these
- The program in Example 7.6 would work properly only if the value of N is
- odd
- even
- any value
- none of these
- If all other parameters remain unchanged, what might be the maximum value of N in Example 7.7?
- 10d
- 14d
- 255d
- None of these
- An alternate method to calculate the sum of N natural numbers is
- 0.5*N*(N+1)
- 0.5*N*2
- N*(N-1)
- None of these
- If the value of N is 8 then the sum of the series in Example 7.6 would be
- positive
- zero
- negative
- none of these
- In Example 7.8, what would be the value of R6 at the termination of the program?
- Undefined
- 03H
- 07H
- None of these
- In Example 7.8, what would be the value of R7 at the termination of the program?
- Undefined
- 03H
- 07H
- None of these
Search for Answers
- What is the difference between copy block and shift block?
- What is the purpose of calculating checksum of an array?
- What was the purpose of selecting bank #0 in Example 7.6?
- What should be the initialization value of R7 in Example7.2, if 16 bytes are to be shifted 2 bytes down?
- Apart from CLR C instruction, what is the alternative way to clear the carry flag?
- How is the Nth term of Fibonacci series generated?
- What is the difference between an algorithm and a flowchart?
- Find an alternative method to calculate the sum of the series in Example 7.6 if N is always an even number.
- What would happen if the ADD instruction, in Example 7.4, is replaced by ADDC instruction?
- What is the maximum size of an array that might be pointed by R0 or R1?
Think and Solve
- Draw the flowchart of Fibonacci series generation problem.
- Instead of using two pointers, R0 and R1, can the copy-block operation (Example 7.1) be completed using a single pointer?
- Apart from using the SJMP instruction to jump at the same place, is there any other way to terminate any general-purpose program?
- Why are there two pointers (R0 and R1) in MCS-51?
- What is the limitation of DJNZ instruction?
- Eight random numbers are stored in locations from 40H to 47H. Write a program to reverse their order in the same place from 40H to 47H. Do not use any other memory area except current register bank and accumulator.
- Two arrays, each of 16 bytes, are stored from 40H to 4FH and 50H to 5FH. Write a program to compare these two arrays and store 00H in location 30H if they are identical (same number and in same sequence). Otherwise, store a non-zero value in location 30H.
- Sixteen random numbers are stored in location 40H to 4FH. Write a program to take out alternate numbers, starting from the first number, and create a second array of eight numbers from 50H to 57H.
- Extend the previous program so that the first array is compacted within 8 bytes from 40H to 47H after shifting eight of its entries.
- Sixteen random numbers are stored in an array, starting from location 40H. Write a program to count the number of non-zero elements in this array and store it in location 30H.