
1
THE STEADY-HAND GAME
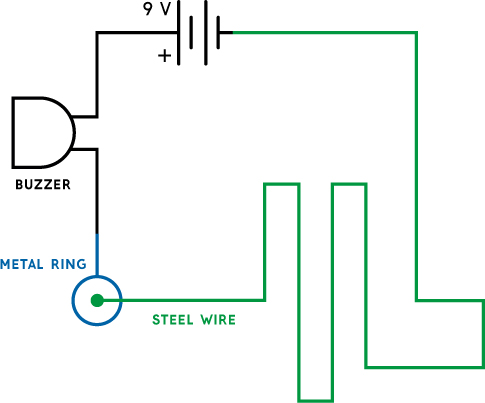
THIS CIRCUIT WILL SOUND A BUZZER IF YOU LET THE RING TOUCH THE WIRE.

THE CIRCUIT DIAGRAM
THE PARTS LIST
PART |
DESCRIPTION |
Buzzer |
Buzzer that works with 9 V battery |
Steel wire |
Bare and stiff wire, like a clothes hanger |
Metal ring |
Bare metal ring, like a soda can ring |
An old pen |
Old pen for mounting the metal ring |
Tape |
Electrical tape is best, but any tape should work |
ABOUT THE CIRCUIT
You might have grown up playing a game called Operation, in which you play a surgeon who uses tweezers to remove silly ailments (like brain freeze and charlie horse) from a patient. If you aren’t careful and touch the wrong place, a terrifying buzzer sounds and the patient’s nose lights up.
In this chapter, you’ll build a steady-hand game that works a lot like Operation, but the goal is to move a ring along a track of steel wire without letting them touch. If you get the ring all the way to the other side without touching the wire, you win. If the ring touches the wire, the buzzer sounds and you lose.
The circuit works on the basic principle that for anything to happen in electronics, there must be a closed loop—a continuous path from the positive to the negative side of the battery where the current can flow. When the metal ring doesn’t touch the steel wire, you don’t have a closed loop, so nothing happens. When the ring touches the steel wire, you get a closed loop and the buzzer sounds.
Connecting the Battery to the Buzzer
The circuit itself is pretty simple. You just need to connect the buzzer and the battery, in the black part of the circuit diagram, to the breadboard. Make sure you place the plus sign (+) on the buzzer toward the positive terminal of the battery. Remember, the red lead of the battery clip connects to the positive terminal on the battery.
Add two loose jumper wires—one from the negative (–) side of the buzzer and one from the negative battery terminal (the two yellow wires in Figure 1-1).
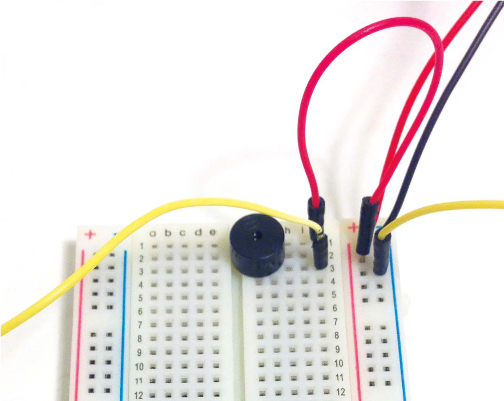
FIGURE 1-1 Connecting the battery to the buzzer
Now you just need to create a game track and integrate it into the circuit.
Creating the Game Track
To create the game track, use a steel wire from a clothes hanger and bend it into the shape you want. Connect the steel wire to the breadboard using the loose jumper wire from the negative connection of the battery and some tape, as in Figure 1-2. Make sure the metal at the end of the jumper wire is touching the steel wire so there’s a good electrical connection between them.

FIGURE 1-2 Taping a jumper wire to the game track
Any kind of tape should work, but I recommend electrical tape as it sticks well to metal.
Connecting the Metal Ring to the Breadboard
For the metal ring, you can use the tab from a can, like the one shown in Figure 1-3.

FIGURE 1-3 Use the metal ring from a can to loop around the track.
Tape the ring and the loose end of the jumper wire from the negative side of the buzzer to the end of an old pen, making sure the jumper wire has a good connection with the metal (see Figure 1-4). The pen offers players something to easily grasp as they navigate the turns in the track.

FIGURE 1-4 Taping the metal ring to a pen
That’s it! The circuit is complete, so now you can test how steady your hands are!
COMMON MISTAKES
If the circuit is not working properly, double-check that you haven’t made any of these common mistakes:
- Not creating a good connection between the jumper wire and the track
- Not creating a good connection between the jumper wire and the ring
- Connecting the buzzer wrong way (remember that it has a positive and a negative side)
If you are still struggling with this circuit, find more resources through the book’s website at https://nostarch.com/circuits/.
A QUIET ALTERNATIVE
If you prefer a noiseless game—so you can play without disturbing other people—you can modify the game so it uses an LED instead of a buzzer. Just replace the buzzer in the circuit with an LED. Don’t forget to put the LED in series with a resistor (just like your first breadboard circuit); otherwise, you risk breaking the LED.