
Chapter 13. Using TensorFlow Lite in Android Apps
Chapter 12 introduced you to TensorFlow Lite, a set of tools that help you convert your models into a format that can be consumed by mobile or embedded systems. Over the next few chapters you’ll look into how to use those models on a variety of runtimes. Here, you’ll see how to create Android apps that use TensorFlow Lite models. We’ll start with a quick exploration of the main tool used to create Android apps: Android Studio.
What Is Android Studio?
Android Studio is an integrated development environment (IDE) for developing Android apps for a variety of devices, from phones and tablets to TVs, cars, watches, and more. In this chapter we’ll focus on using it for phone apps. It’s available to download for free, and there are versions for all major operating systems.
One of the nice things that Android Studio gives you is an Android emulator, so you can try out apps without needing to own a physical device. You’ll be using that extensively in this chapter! Traditionally Android applications were built using the Java programming language, but recently Google introduced Kotlin to Android Studio, and you’ll use that language in this chapter.
Creating Your First TensorFlow Lite Android App
If you don’t already have Android Studio, install it now. It can take a little while to get everything set up, updated, and ready to go. Over the next few pages, I’ll step you through creating a new app, designing its user interface, adding TensorFlow Lite dependencies, and then coding it for inference. It will be a really simple app—one where you type in a value, and it performs inference and calculates Y = 2X – 1, where X is the value you entered. It’s massive overkill for such simple functionality, but the scaffolding of an app like this is almost identical to that of a far more complex one.
Step 1. Create a New Android Project
Once you have Android Studio up and running, you can create a new app with File → New → New Project, which will open the Create New Project dialog (Figure 13-1).

Figure 13-1. Creating a new project in Android Studio
Select the Empty Activity, as shown in Figure 13-1. This is the simplest Android app, with very little preexisting code. Press Next and you’ll be taken to the Configure Your Project dialog (Figure 13-2).

Figure 13-2. Configuring your project
In this dialog, set the name to be FirstTFLite as shown, and ensure that the language is Kotlin. The Minimum SDK level will probably default to API 23, and you can leave it at that if you like.
When you’re done, press Finish. Android Studio will now create all the code for your app. Lots of files are needed for an Android application. The single activity you created has a layout file (in XML) that defines what it looks like, as well as a .kt (Kotlin) file for the associated source. There are also several configuration files defining how the app should be built, what dependencies it should use, and its resources, assets, and more. It can be quite overwhelming at first, even for a very simple app like this one.
Step 2. Edit Your Layout File
On the left side of your screen you’ll see the project explorer. Make sure Android is selected at the top and find the res folder. Within it there’s a layout folder, and within that you’ll find activity_main.xml (see Figure 13-3).
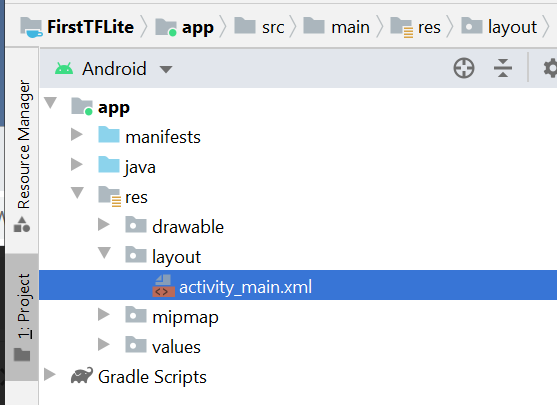
Figure 13-3. Finding your activity design file
Double-click this to open it, and you’ll see the Android Studio Layout Editor. This gives you access to a visual representation of the user interface for your activity, as well as an XML editor that shows the definition. You may see just one or the other, but if you want to see both (which I recommend!) you can use the three buttons highlighted at the top right of Figure 13-4. These give you (from left to right) the XML editor alone, a split screen with both the XML editor and the visual designer, and the visual designer by itself. Also note the Attributes tab directly underneath these. It allows you to edit the attributes of any of the individual user interface elements. As you build more Android apps you’ll probably find it easier to use the visual layout tool to drag and drop items from the control palette onto the design surface and the Attributes window to set things like the layout width.

Figure 13-4. Using the Layout Editor in Android Studio
As you can see in Figure 13-4, you’ll have a very basic Android activity containing a single TextView control that says “Hello World.” Replace all of the code for the activity with this:
<?xmlversion="1.0"encoding="utf-8"?><LinearLayoutxmlns:tools="http://schemas.android.com/tools"android:orientation="vertical"xmlns:android="http://schemas.android.com/apk/res/android"android:layout_height="match_parent"android:layout_width="match_parent"><LinearLayoutandroid:layout_width="match_parent"android:layout_height="wrap_content"><TextViewandroid:id="@+id/lblEnter"android:layout_width="wrap_content"android:layout_height="wrap_content"android:text="Enter X:"android:textSize="18sp"></TextView><EditTextandroid:id="@+id/txtValue"android:layout_width="180dp"android:layout_height="wrap_content"android:inputType="number"android:text="1"></EditText><Buttonandroid:id="@+id/convertButton"android:layout_width="wrap_content"android:layout_height="wrap_content"android:text="Convert"></Button></LinearLayout></LinearLayout>
An important thing to note in this code is the android:id fields, particularly for the EditText and the Button. It’s okay to change these, but if you do, you’ll need to use the same values when you write your code a little later. I’ve called them txtValue and convertButton respectively, so watch out for those values in the code!
Step 3. Add the TensorFlow Lite Dependencies
TensorFlow Lite isn’t natively part of the Android APIs, so when you use it in an Android app, you need to let the environment know that you’ll be importing external libraries. In Android Studio this is achieved using the Gradle build tool. This tool lets you configure your environment by describing it with a JSON file called build.gradle. This can be a little confusing at first, particularly for new Android developers, because Android Studio actually gives you two Gradle files. Typically these are described as the “project-level” build.gradle and the “app-level” build.gradle. The first one is found within the project folder and the latter in the app folder (hence their names), as you can see in Figure 13-5.

Figure 13-5. Selecting your build.gradle file
You are going to want to edit the app-level file, highlighted in Figure 13-5. This has the dependency details for your app. Open it up, and make two edits. The first is to add an implementation to the dependencies section. This is to include the TensorFlow Lite libraries:
implementation'org.tensorflow:tensorflow-lite:0.0.0-nightly'
Note
You can get the latest version number for this dependency at https://bintray.com/google/tensorflow/tensorflow-lite.
The second edit requires you to create a new setting within the android{} section, as follows:
android{...aaptOptions{noCompress"tflite"}...}
This step prevents the compiler from compressing your .tflite file. The Android Studio compiler compiles assets to make them smaller so that the download time from the Google Play Store will be reduced. However, if the .tflite file is compressed, the TensorFlow Lite interpreter won’t recognize it. To ensure that it doesn’t get compressed, you need to set aaptOptions to noCompress for .tflite files. If you used a different extension (some people just use .lite), make sure you have that here.
You can now try building your project. The TensorFlow Lite libraries will be downloaded and linked.
Step 4. Add Your TensorFlow Lite Model
In Chapter 12 you created a very simple model that inferred Y = 2X – 1 from a set of X and Y values that it was trained on, converted it to TensorFlow Lite, and saved it as a .tflite file. You’ll need that file for this step.
The first thing to do is create an assets folder in your project. To do this, navigate to the app/src/main folder in the project explorer, right-click on the main folder and select New Directory. Call it assets. Drag the .tflite file that you downloaded after training the model into that directory. If you didn’t create this file earlier, you can find it in the book’s GitHub repository.
When you’re done, the project explorer should look something like Figure 13-6. Don’t worry if the assets folder doesn’t yet have the special assets icon; this will be updated by Android Studio eventually, typically after the next build.

Figure 13-6. Adding your model as an asset
Now that all the plumbing is done, it’s time to start coding!
Step 5. Write the Activity Code to Use TensorFlow Lite for Inference
Despite the fact that you’re using Kotlin, your source files are in the java directory that you can see in Figure 13-6. Open this, and you’ll see a folder with your package name. Within that you should see your MainActivity.kt file. Double-click this file to open it in the code editor.
First, you’ll need a helper function that loads the TensorFlow Lite model from the assets directory:
privatefunloadModelFile(assetManager:AssetManager,modelPath:String):ByteBuffer{valfileDescriptor=assetManager.openFd(modelPath)valinputStream=FileInputStream(fileDescriptor.fileDescriptor)valfileChannel=inputStream.channelvalstartOffset=fileDescriptor.startOffsetvaldeclaredLength=fileDescriptor.declaredLengthreturnfileChannel.map(FileChannel.MapMode.READ_ONLY,startOffset,declaredLength)}
Because the .tflite file is effectively a compressed binary blob of weights and biases that the interpreter will use to build an internal neural network model, it’s a ByteBuffer in Android terms. This code will load the file at modelPath and return it as a ByteBuffer.
Then, within your activity, at the class level (i.e., just below the class declaration, not within any class functions), you can add the declarations for the model and interpreter:
privatelateinitvartflite:Interpreterprivatelateinitvartflitemodel:ByteBuffer
So, in this case, the interpreter object that does all the work will be called tflite and the model that you’ll load into the interpreter as a ByteBuffer is called tflitemodel.
Next, in the onCreate method, which gets called when the activity is created, add some code to instantiate the interpreter and load model.tflite into it:
try{tflitemodel=loadModelFile(this.assets,"model.tflite")tflite=Interpreter(tflitemodel)}catch(ex:Exception){ex.printStackTrace()}
Also, while you’re in onCreate, add the code for the two controls that you’ll interact with—the EditText where you’ll type a value, and the Button that you’ll press to get an inference:
varconvertButton:Button=findViewById<Button>(R.id.convertButton)convertButton.setOnClickListener{doInference()}txtValue=findViewById<EditText>(R.id.txtValue)
You’ll also need to declare the EditText at the class level alongside tflite and tflitemodel, as it will be referred to within the next function. You can do that with the following:
privatelateinitvartxtValue:EditText
Finally, it’s time to do the inference. You can do this with a new function called doInference:
privatefundoInference(){}
Within this function you can gather the data from the input, pass it to TensorFlow Lite to get an inference, and then display the returned value.
The EditText control, where you’ll enter the number, will provide you with a string, which you’ll need to convert to a float:
varuserVal:Float=txtValue.text.toString().toFloat()
As you’ll recall from Chapter 12, when feeding data into the model you need to format it as a Numpy array. Being a Python construct, Numpy isn’t available in Android, but you can just use a FloatArray in this context. Even though you’re only feeding in one value, it still needs to be in an array, roughly approximating a tensor:
varinputVal:FloatArray=floatArrayOf(userVal)
The model will return a stream of bytes to you that will need to be interpreted. As you know, you’re getting a float value out of the model, and given that a float is 4 bytes, you can set up a ByteBuffer of 4 bytes to receive the output. There are several ways that bytes can be ordered, but you just need the default, native order:
varoutputVal:ByteBuffer=ByteBuffer.allocateDirect(4)outputVal.order(ByteOrder.nativeOrder())
To perform the inference, you call the run method on the interpreter, passing it the input and output values. It will then read from the input value and write to the output value:
tflite.run(inputVal,outputVal)
The output is written to the ByteBuffer, whose pointer is now at the end of the buffer. To read it, you have to reset it to the beginning of the buffer:
outputVal.rewind()
And now you can read the contents of the ByteBuffer as a float:
varf:Float=outputVal.getFloat()
If you want to display this to the user, you can then use an AlertDialog:
valbuilder=AlertDialog.Builder(this)with(builder){setTitle("TFLite Interpreter")setMessage("Your Value is:$f")setNeutralButton("OK",DialogInterface.OnClickListener{dialog,id->dialog.cancel()})show()}
You can now run the app and try it for yourself! You can see the results in Figure 13-7.
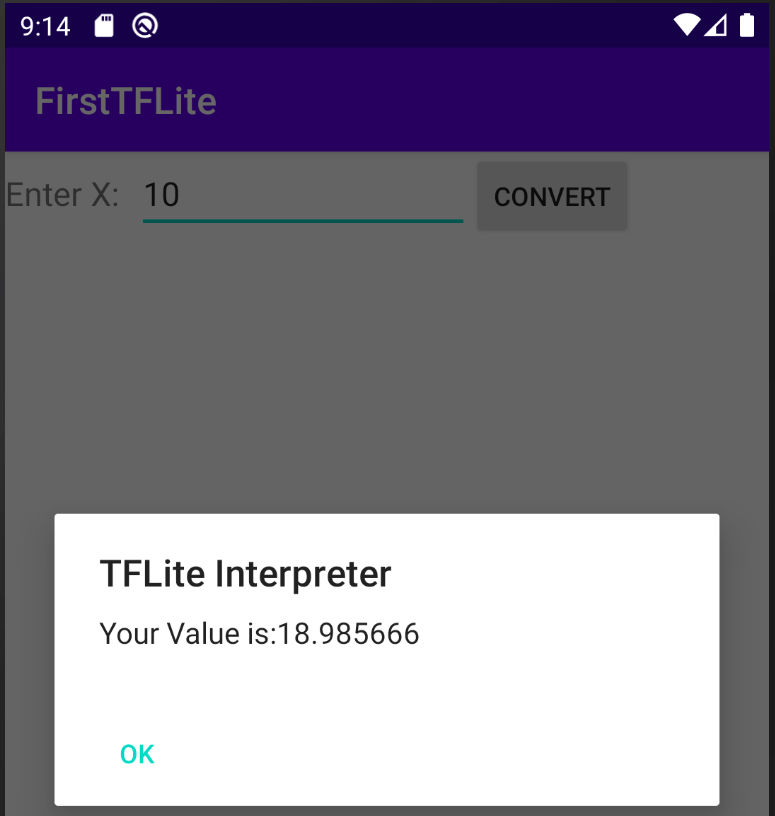
Figure 13-7. Running the interpreter in an emulator
Moving Beyond “Hello World”—Processing Images
As you saw over the last few pages, there’s a lot of scaffolding involved in building an Android app, and the TensorFlow Lite interpreter needs code and configuration in order to be properly initialized. Now that you have that out of the way, if you want to create other Android apps that use TensorFlow Lite, you’ll go through pretty much the same process. The only major difference you’ll encounter is in formatting your input data in a way that the model understands, and parsing output data in the same way. So, for example, in Chapter 12 you built a Dogs vs. Cats model that allows you to feed in an image of a cat or a dog, and get an inference out. The model expects as input an image that is 224 × 224 pixels, in three color channels, and normalized—this requires figuring out how on earth to get an image from an Android image control and format it so that the neural network can understand it!
For example, let’s start with an image like that in Figure 13-8, which is a simple image of a dog that happens to be 395 × 500 pixels.
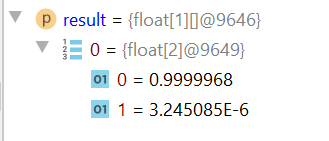
Figure 13-8. Image of a dog to interpret
The first thing you need to do is resize it to 224 × 224 pixels, the image dimensions that the model was trained on. This can be done in Android using the Bitmap libraries. For example, you can create a new 224 × 224 bitmap with:
valscaledBitmap=Bitmap.createScaledBitmap(bitmap,224,224,false)
(In this case bitmap contains the raw image loaded as a resource by the app. The full app is available in the book’s GitHub repo.)
Now that it’s the right size, you have to reconcile how the image is structured in Android with how the model expects it to be structured. If you recall, when training models earlier in the book you fed in images as normalized tensors of values. For example, an image like this would be (224, 224, 3): 224 × 224 is the image size, and 3 is the color depth. The values were also all normalized to between 0 and 1.
So, in summary, you need 224 × 224 × 3 float values between 0 and 1 to represent the image. To store that in a ByteArray, where 4 bytes make a float, you can use this code:
valbyteBuffer=ByteBuffer.allocateDirect(4*224*224*3)byteBuffer.order(ByteOrder.nativeOrder())
Our Android image, on the other hand, has each pixel stored as a 32-bit integer in an ARGB value. This might look something like 0x0010FF10 for a particular pixel. The first two values are the transparency, which you can ignore, and the rest are for RGB; i.e., 0x10 for red, 0xFF for green, and 0x10 for blue. The simple normalization you’ve been doing to this point is just to divide the R, G, B channel values by 255, which would give you .06275 for red, 1 for green, and .06275 for blue.
So, to do this conversion, let’s first turn our bitmap into an array of 224 × 224 integers, and copy the pixels in. You can do this using the getPixels API:
valintValues=IntArray(224*224)scaledbitmap.getPixels(intValues,0,224,0,0,224,224)
Now you’ll need to iterate through this array, reading the pixels one by one and converting them into normalized floats. You’ll use bit shifting to get the particular channels. For example, consider the value 0x0010FF10 from earlier. If you shift that by 16 bits to the right, you’ll get 0x0010 (with the FF10 being “lost”). If you then “and” that by 0xFF you’ll get 0x10, keeping just the bottom two numbers. Similarly, if you had shifted by 8 bits to the right you’d have 0x0010FF, and performing an “and” on that would give you 0xFF. It’s a technique that allows you to quickly and easily strip out the relevant bits that make up the pixels. You can use the shr operation on an integer for this, with input.shr(16) reading “shift input 16 pixels to the right”:
varpixel=0for(iin0untilINPUT_SIZE){for(jin0untilINPUT_SIZE){valinput=intValues[pixel++]byteBuffer.putFloat(((input.shr(16)and0xFF)/255))byteBuffer.putFloat(((input.shr(8)and0xFF)/255))byteBuffer.putFloat(((inputand0xFF))/255))}}
As before, when it comes to the output, you need to define an array to hold the result. It doesn’t have to be a ByteArray; indeed, you can define something like a FloatArray if you know the results are going to be floats, as they usually are. In this case, with the Dogs vs. Cats model, you have two labels, and the model architecture was defined with two neurons in the output layer, containing the respective properties for the classes cat and dog. So, to read back the results you can define a structure to contain the output tensor like this:
valresult=Array(1){FloatArray(2)}
Note that it’s a single array that contains an array of two items. Remember back when using Python you might see a value like [[1.0 0.0]]—it’s the same here. The Array(1) is defining the containing array [], while the FloatArray(2) is the [1.0 0.0]. It can be a little confusing, for sure, but it’s something that I hope you’ll get used to as you write more TensorFlow apps!
As before, you interpret using interpreter.run:
interpreter.run(byteBuffer,result)
And now your result will be an array, containing an array of two values. You can see what it looks like in the Android debugger in Figure 13-8.

Figure 13-9. Parsing the output value
As you create mobile apps with Android, this is the most complex part—other than creating the model, of course—that you’ll have to take into account. How Python represents values, particularly with Numpy, can be very different from how Android does. You’ll have to create convertors to reformat your data for how neural networks expect the data to be input, and you’ll have to understand the output schema that the neural network uses so that you can parse the results.
TensorFlow Lite Sample Apps
The TensorFlow team provides many open source sample apps that you can dissect to learn how they work from the foundations you’ve built up in this chapter. They include (but are not limited to) the following:
- Image classification
- Read input from the device’s camera and classify up to a thousand different items.
- Object detection
- Read input from the device’s camera and give bounding boxes to objects that are detected.
- Pose estimation
- Take a look at the figures in the camera and infer their poses.
- Speech recognition
- Recognize common verbal commands.
- Gesture recognition
- Train a model for hand gestures and recognize them in the camera.
- Smart reply
- Take input messages and generate replies to them.
- Image segmentation
- Similar to object detection, but predict which class each pixel in an image belongs to.
- Style transfer
- Apply new art styles to any image.
- Digit classifier
- Recognize handwritten digits.
- Text classification
- Using a model trained on the IMDb dataset, recognize sentiment in text.
- Question answering
- Using BERT, answer user queries automatically!
You can find another curated list of apps on GitHub in the Awesome TFLite repo.
Summary
In this chapter you got a taste of using TensorFlow Lite on Android. You were introduced to the anatomy of an Android application and how you can weave TensorFlow Lite into it. You learned how to implement a model as an Android asset, and how to load and use that in an interpreter. Most importantly, you saw the need for converting your Android-based data (such as images or numbers) into input arrays that emulate the tensors used in the model and how to parse output data, realizing that it too is effectively memory-mapped tensors in ByteBuffers. You stepped in detail through a couple of examples that showed how to do this, which hopefully has equipped you to be able to handle other scenarios. In the next chapter you’ll do this all over again, but this time on iOS with Swift!